一、什么是UnoCss?
UnoCSS 是一个即时的原子CSS引擎,而非一款框架,因为它并未提供核心工具类,所有功能可以通过预设和内联配置提供。它可以让你用简短的类名来控制元素的样式
原子样式也有很多选择,最著名的就是 Tailwind
二、noCss优点
- 增加开发维护效率:少打很多字符,也解决了来回跳转 style 写 CSS
- 复用性强,缩小项目体积
- 降低命名负担,不需要定义很多class
- 更易于维护,因为它避免了样式冲突和重复代码。只是更改了某个东西的class名,而不是更改class里的属性
三、使用 unocss
参考官方文档Vite配置
3.1 安装
npm install -D unocss
3.2 打包配置
在vite.config.js 中
// vite.config.js
import UnoCSS from 'unocss/vite'
import { defineConfig } from 'vite'export default defineConfig({UnoCSS({configFile: './uno.config.ts'}),
})
3.3 创建一个uno.config.ts 配置文件
import { defineConfig, presetUno, presetAttributify } from 'unocss';
// presetAttributify 属性化模式,属性冲突时,可以通过默认un-前缀来解决:<div m-2 rounded text-teal-400 >代替class</div>
import presetRemToPx from '@unocss/preset-rem-to-px';
// 此处我用了rem to px的预设,所以后面不加单位的数字的话会直接被转化为px(如果不用这个预设,就需要用m-100px之类的)export default defineConfig({presets: [presetUno(), presetAttributify(), presetRemToPx({ baseFontSize: 4 })],rules: [[/^fs-(\d+)$/, ([, num]) => ({ 'font-size': `${num}px` })],[/^lh-(\d+)$/, ([, num]) => ({ 'line-height': `${num}px` })]],variants: [matcher => {if (!matcher.startsWith('hover:')) {return matcher;}return {matcher: matcher.slice(6),selector: s => `${s}:hover`};}],shortcuts: {'center': 'flex items-center justify-center'}
});
或者我们可以新建一个 自定义方案的文件:
// css-preset.ts
import type { Preset } from 'unocss'export const myPreset: Preset = {name: 'my-preset',rules: [],variants: [],shortcuts: {}
}
然后再uno配置文件中只需要
// uno.config.ts
import { defineConfig, presetUno, presetAttributify } from 'unocss'
import { myPreset } from './css-preset'
import presetRemToPx from '@unocss/preset-rem-to-px'export default defineConfig({presets: [myPreset,presetUno(),presetAttributify(),presetRemToPx({ baseFontSize: 4 })],// ...其他配置项
})
3.4全局引入
// main.js
import 'uno.css';
其他介绍
我们需要在vscode安转UnoCss插件,这样当你移入样式回自动提示;
在初期使用的时候我们会不太熟练,不用担心,官方提供了:互动性文档(查询默认预设中的东西)
配置vscode输入的时候自动提示
ctrl + shift + p => 输入 open Setting => 选择 首选项:打开用户设置
"editor.quickSuggestions": {"strings": true,"other": true,"comments": true,},其他配置项
配置项
Rules 写自定义规则
Variants 可以设置:hover这样的样式(hover已经在默认预设里了)
Shortcuts 用来设置需要重复利用,并且有多种样式的class 将多个规则合并为一个简写
Theme 可用于定义主题相关的配置,如颜色、字体、间距。相当于在theme里存储一套方案,然后在rules里面可以匹配到theme,再进行判定(看官网文档例子)
Layer 设置优先级,并排序
SafeList/ BlockList 预加载/不加载某些class
下面是一些常见的在 theme 下自定义的属性:
- colors:用于定义颜色变量,可以是命名颜色或自定义的颜色值。
- fontSize:用于定义字体大小变量,可以是像素值、百分比或 rem 单位。
- fontWeight:用于定义字体粗细变量,如正常、粗体、细体等。
- spacing:用于定义间距变量,如边距、内边距等。
- borderRadius:用于定义边框圆角变量,可以是像素值或百分比。
- boxShadow:用于定义阴影效果变量,可以是单个阴影或多个阴影组成的数组。
- fontFamily:用于定义字体系列变量,可以是字体名称或字体栈。
- lineHeight:用于定义行高变量,可以是数字、百分比或单位值。
- zIndex:用于定义层级变量,控制元素在层叠上下文中的显示顺序。
- opacity:用于定义透明度变量,控制元素的不透明度。
margin和padding不支持;所以需要借助rules
定义全局变量
定义我们系统中的主题颜色
theme: {colors: {// 这种方式可以使用element中的颜色 但是在代码中看不到颜色// primary: 'var(--el-color-primary)',// primary: 'rgb(var(--el-color-primary-rgb))','primary': '#427cff',},fontSize: {'small': '12px','base': '14px','medium': '16px'},margin: {'small': '20px','base': '24px','large': '32px','extra-large': '46px'},
}
使用
<div class="c-primary font-size-large font-size-18 mr-small">算法平台</div>
如果是想在css中使用,我们需要安装
npm i @unocss/transformer-directives -D
在uno.config.ts中
import transformerDirectives from '@unocss/transformer-directives';
// 转换器插件,用于在编译时处理样式中的指令  style中可以使用theme()export default defineConfig({presets: [...],transformers: [transformerDirectives()],...
})
当时在处理margin的时候 ,像处理颜色一样。但是一直有问题;后来发现是margin不支持使用theme的自定义属性,所以我借助rules解决
[// [mp] 将会被捕获为第一个分组,(\d+) 仍然捕获后续的数字作为第二个分组。/^([mp])r-(.+)$/,([, prefix, value], { theme }: any) => ({[`${prefix === 'm' ? 'margin' : 'padding'}`]: `${theme.margin[value]}`})],
同时我们在自定义rules的时候 想使用br-primary-2 代表border的宽度和颜色
但是我们大多数的时候默认是1
[/^br-(.*?)(?:-(.*))?$/,([, color, width = 1], { theme }: any) => ({ 'border': `${width}px solid ${theme.colors[color]}` })
],
自定义规则rules分为两类: 静态规则 和 动态规则
静态规则
export default defineConfig({rules: [['m-1', { margin: '1px' }] // 一个配置为一个数组]
}).m-1
动态规则
export default defineConfig({rules: [/** match[1]代表获取到的值 */[/^m-(\d+)$/, match => ({ margin: `${match[1]}px` })],]
})
Shortcuts配置快捷方式(样式集合)
假如你有个盒子,里面的内容需要垂直居中,那么就可以定义为:
export default defineConfig({shortcuts: [{'flex-row': 'flex items-center justify-center',},// ['flex-row', 'flex items-center justify-center']]
})
也支持动态
export default defineConfig({shortcuts: [[/^br-(.*?)(?:-(.*))?$/,([, color, width = 1], { theme }: any) => `border-${width} border-solid border-${theme.colors[color]}`]]
})
优秀参考文章👍
在使用过程中: 我遇到了一下问题
- Element-Plus自定义主题(scss变量覆盖)
创建了一个文件夹diy-element, index.scss中
Element-Plus自定义主题
@forward 'element-plus/theme-chalk/src/common/var.scss' with ($colors: ('primary': ('base': #427cff),'success': ('base': #009817),'warning': ('base': #e27d02),'danger': ('base': #fb4a32),'error': ('base': #ff5f5f),'info': ('base': #65676f)),$text-color: ('primary': #646a74,'regular': #edf3fc,'secondary': #333333,'placeholder': #9598a3,'disabled': #dcdee4)
);@use 'element-plus/theme-chalk/src/index.scss' as *;
这样覆盖的话 会导致f12的时候 有很多样式被覆盖
最后换了一种方式,写一个hooks
import { onMounted } from 'vue';export const setElementTheme = () => {onMounted(() => {setStyle('--el-color-primary', '#14C2C2');setStyle('--el-text-color-regular', '#000000d9');setStyle('--el-text-color-placeholder', '#00000040');});const setStyle = (key: string, value: string) => {document.documentElement.style.setProperty(key, value);};
};
在app.vue中
import { setElementTheme } from '@/hooks/setElementTheme';setElementTheme();
详细看文章
- theme.color使用覆盖后的变量
防止我们以后更改系统的主题颜色 我们需要更改element文件。也需要更改这里,所以想直接使用ele的变量
theme: {colors: {// 这种方式可以使用element中的颜色 但是在代码中看不到颜色// primary: 'var(--el-color-primary)',// primary: 'rgb(var(--el-color-primary-rgb))','primary': '#427cff',}}
虽然最后没有使用, 因为代码中颜色不提示 考虑到也不经常改变主题颜色
- 调研elementplus组件样式修改
rules: [['el-button',{color: 'red',background: 'green'}]
上面这种样式是可以实现,可以我想设置hover的时候 却不行,说是Unocss 不支持直接在配置文件中使用伪类选择器。最后还是在组件中直接修改了
- 在uno.config.ts中配置,怎么在scss片段中使用
使用 @apply 关键字来应用定义的快捷方式
shortcuts: [['flex-row', 'flex items-center justify-center']],
@apply flex-row;
- 自动格式化
//格式化后的代码:当我们保存后,会自动进行eslint格式化,它会按照默认的配置(可以自定义)进行排列,所有写的原子类按照同一个风格,我们看起来就比较方便了,
首先我们需要安装插件
npm install -D @unocss/eslint-config
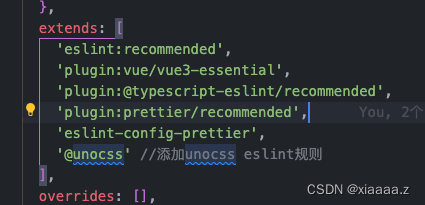
.eslintrc.cjs中添加"@unocss",//添加unocss eslint规则

在setting.json中
"eslint.enable": true,//eslint开启"editor.codeActionsOnSave": {"source.fixAll.eslint": true, // 开启eslint保存自动格式化},eslint插件是怎么知道保存的时候怎么格式化的呢 ? 就是利用unocss/eslint-config插件 所以这两个插件缺一不可
- 生成class
我们有些时候 同一个页面 有很多耦合的设置 我们就会给他生成一个class 其他地方使用这个class即可
插件:transformer-compile-class
这里需要注意是,这里必须要加一个前缀,默认的是:uno:,这个前缀可以通过配置修改。
安装
npm install -D @unocss/transformer-compile-class
//unocss.config.ts
import transformerCompileClass from '@unocss/transformer-compile-class'transformers: [// 指令:@apply等transformerDirectives(),//非必须transformerCompileClass(),//必须,这个是编译class的,要放在这之前transformerVariantGroup(),//非必须
],
官方文档
使用:
<div class=":uno-title: text-center c-primary">算法平台</div><div class="uno-title">hahahah</div>
- 自定义类名
想写一个滚动条隐藏的代码
在rules中
[/^scrollbar-none$/,() => {return `&::-webkit-scrollbar  {display: none;}
`;}]
使用
@apply scrollbar-none;


)


)


