采购单管理模块
文章目录
- 采购单管理模块
- 一、添加采购单(核心)
- 1.1 采购流程
- 1.2 采购单实体类
- 1.3 添加采购单
- 1.3.1 Mapper
- 1.3.2 Service
- 1.3.3 Controller
- 1.3.4 效果图
- 二、采购单管理模块
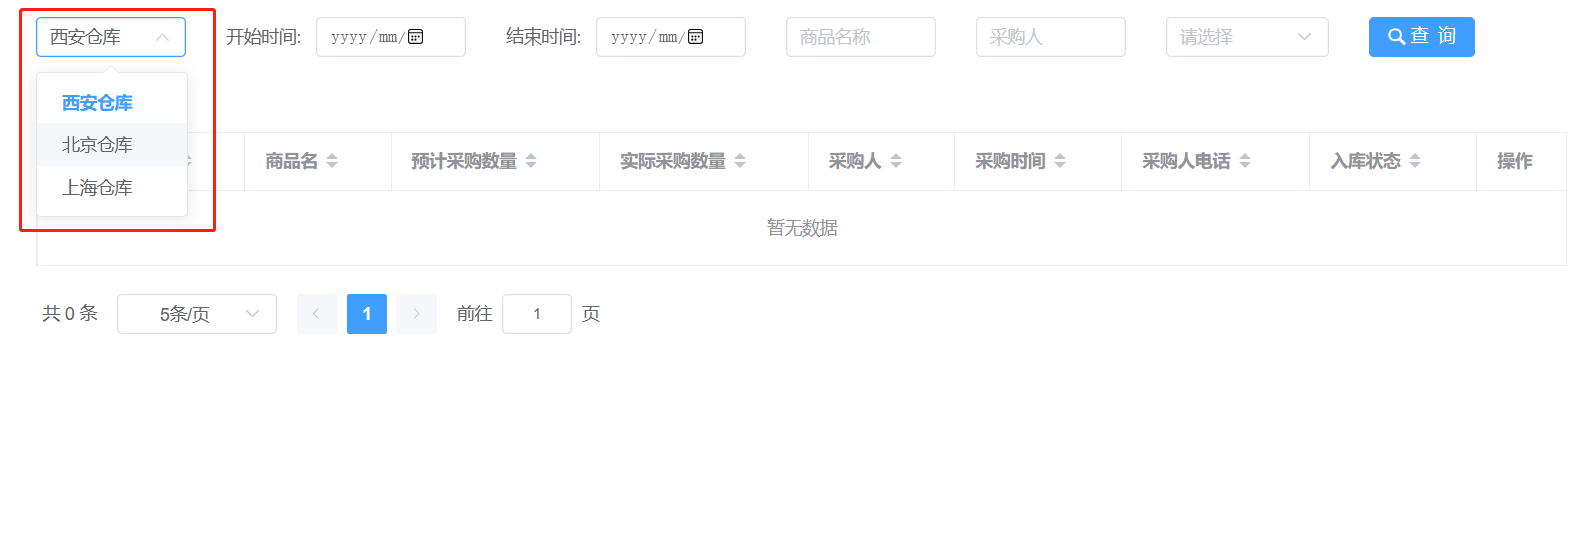
- 2.1 仓库数据回显
- 2.1.1 Mapper
- 2.1.2 Service
- 2.1.3 Controller
- 2.1.4 效果图
- 2.2 采购单列表
- 2.1.1 Mapper
- 2.1.2 Service
- 2.1.3 Controller
- 2.1.4 效果图
- 2.3 删除采购单
- 2.3.1 Mapper
- 2.3.2 Service
- 2.3.3 Controller
- 2.4 修改采购单
- 2.4.1 Mapper
- 2.4.2 Service
- 2.4.3 Controller
- 2.5 生成入库单
- 2.5.1 入库单表实体类
- 2.5.2 Mapper
- 2.5.3 Service
- 2.5.4 Controller
- 2.5.5 效果图
- 三、入库单管理
- 3.1 分页查询入库单
- 3.1.1 Mapper
- 3.1.2 Service
- 3.1.3 Controller
- 3.1.4 效果图
- 3.2 确认入库单
- 3.1.1 Mapper
- 3.1.2 Service
- 3.1.3 Controller
- 四、出库单管理
- 4.1 确认出库单
- 4.1.1 Mapper
- 4.1.2 Service
- 4.1.3 Controller
一、添加采购单(核心)
1.1 采购流程
类似进货
采购流程
-
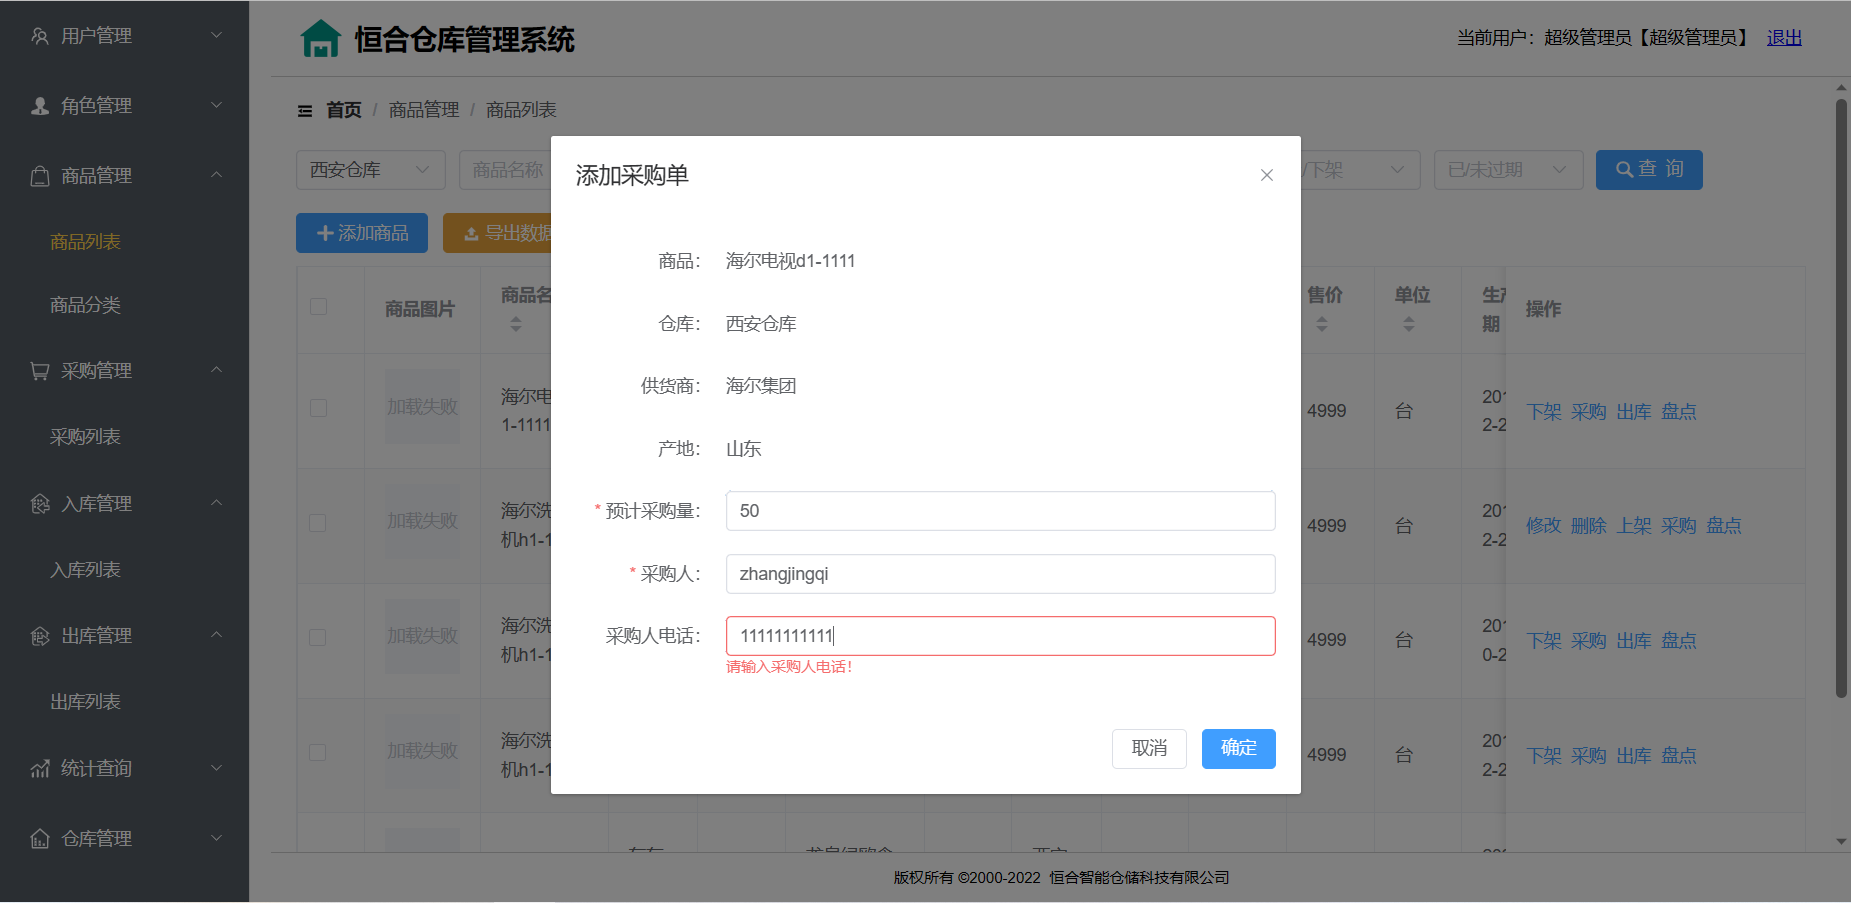
在商品列表针对具体的商品添加采购单
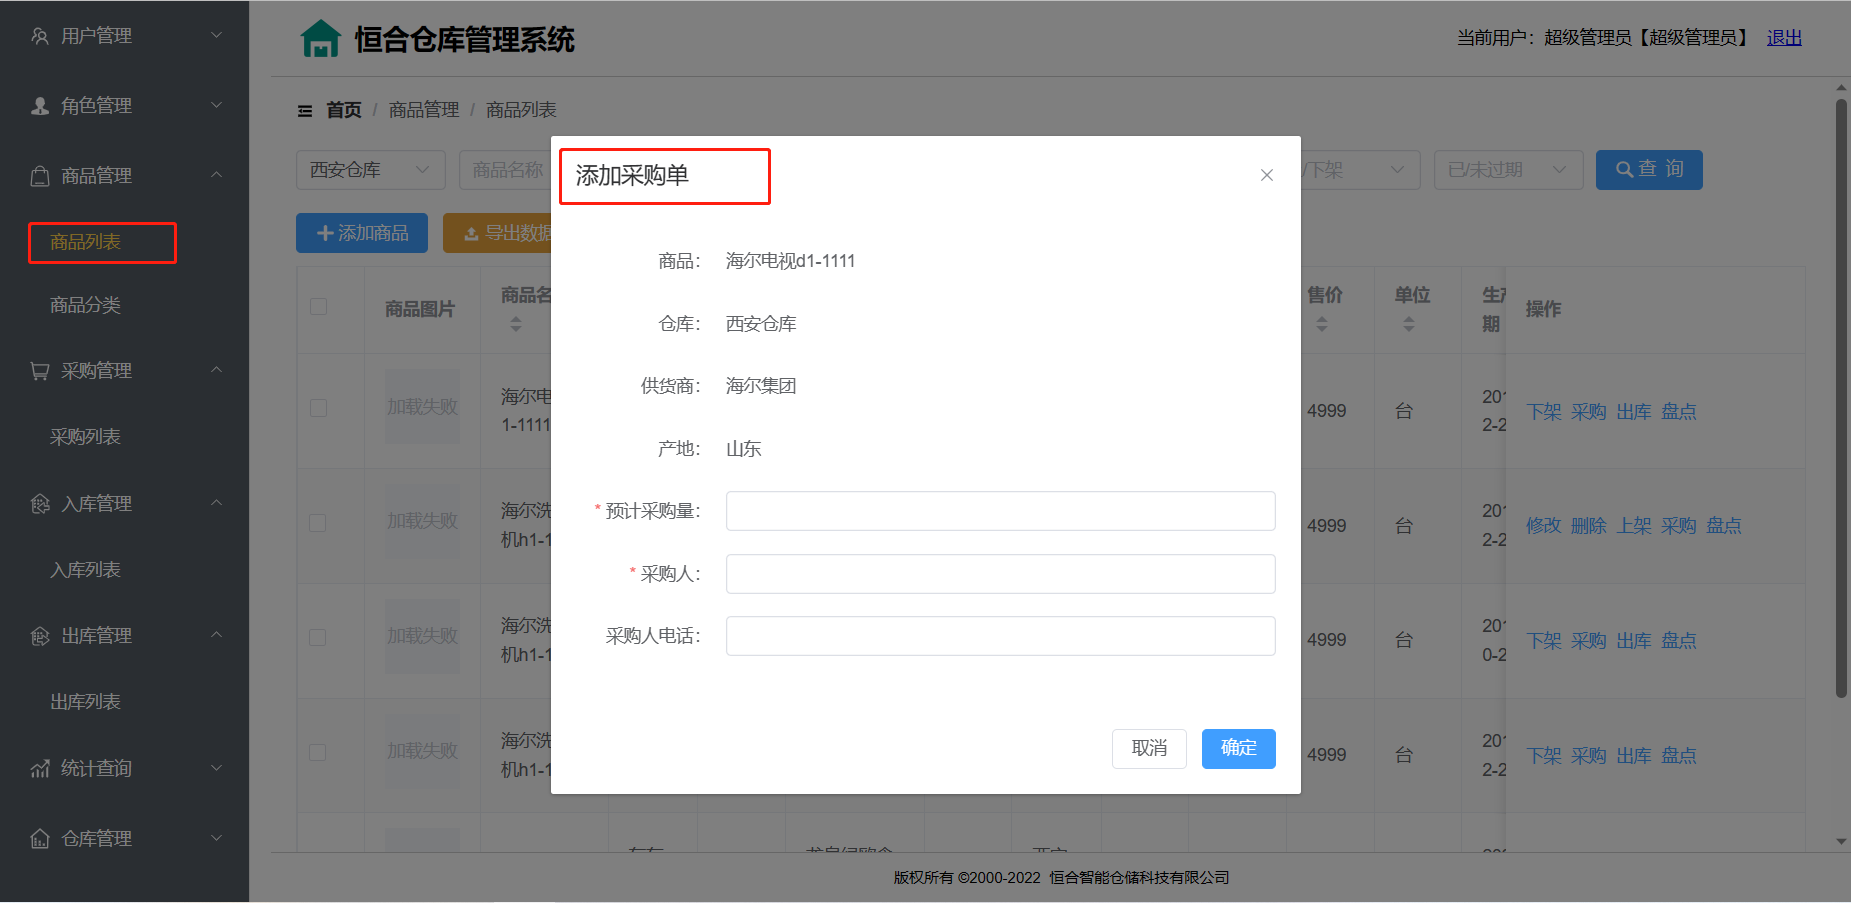
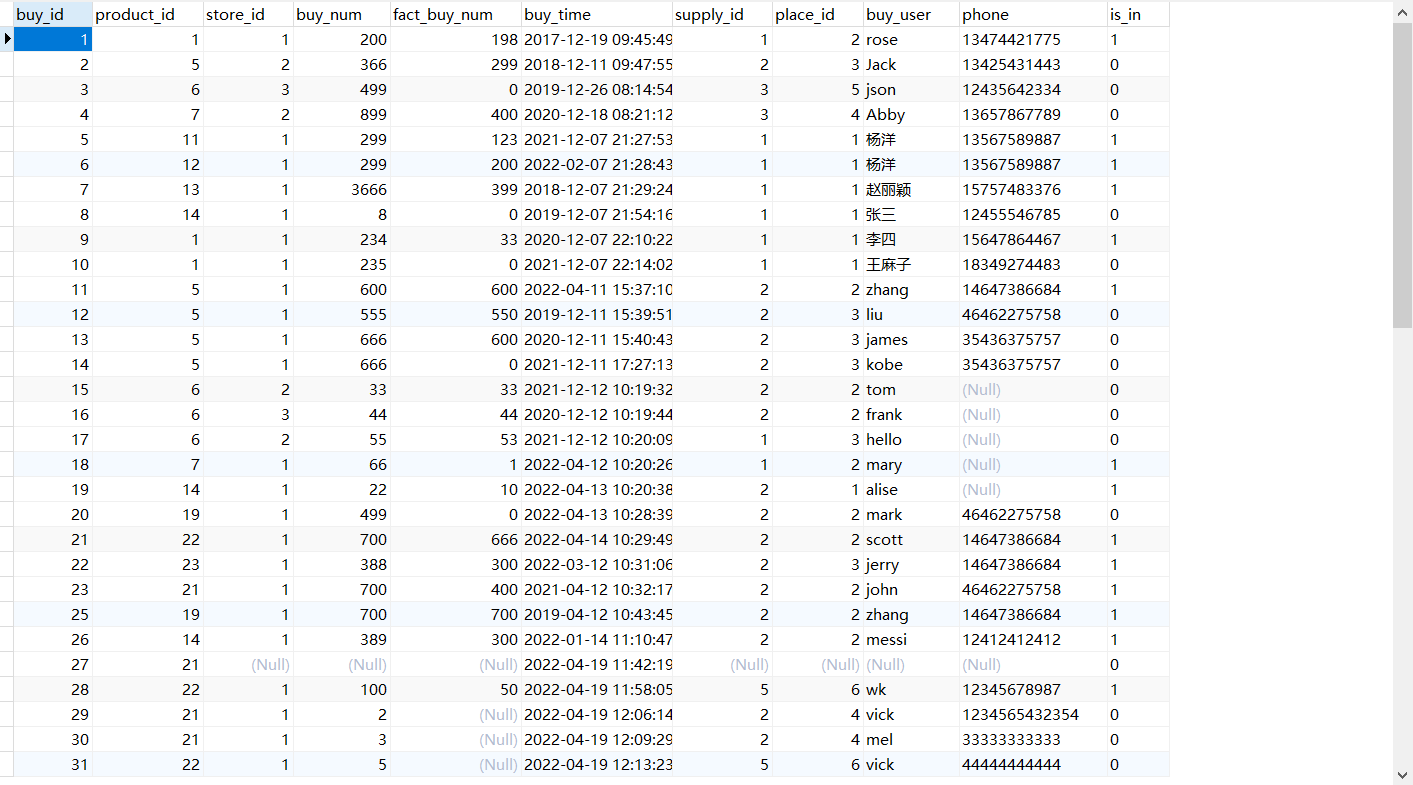
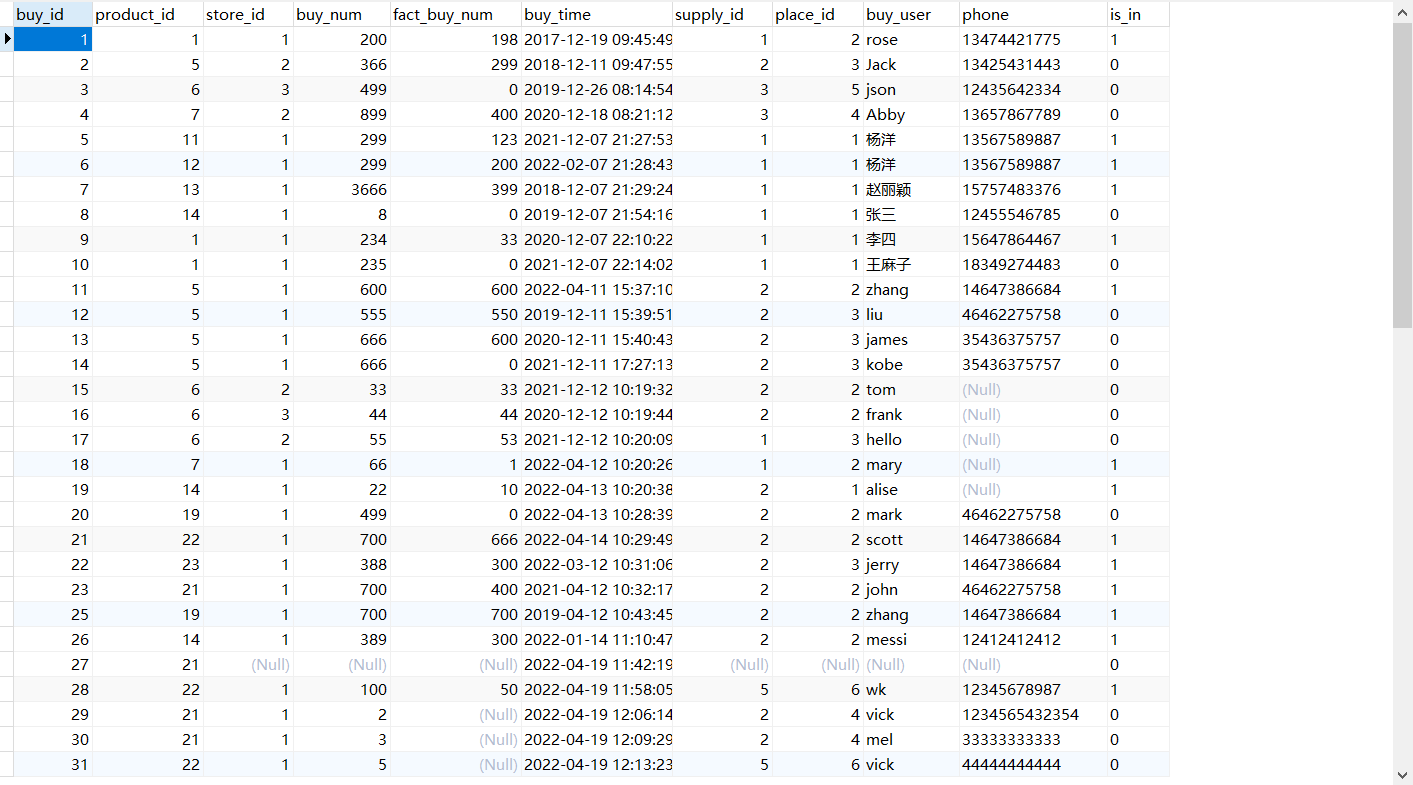
向buy_list表中添加一条记录。添加的采购单表示预买的商品(还没有买,is_in字段的值是0)
-
当商品采购到之后进行入库
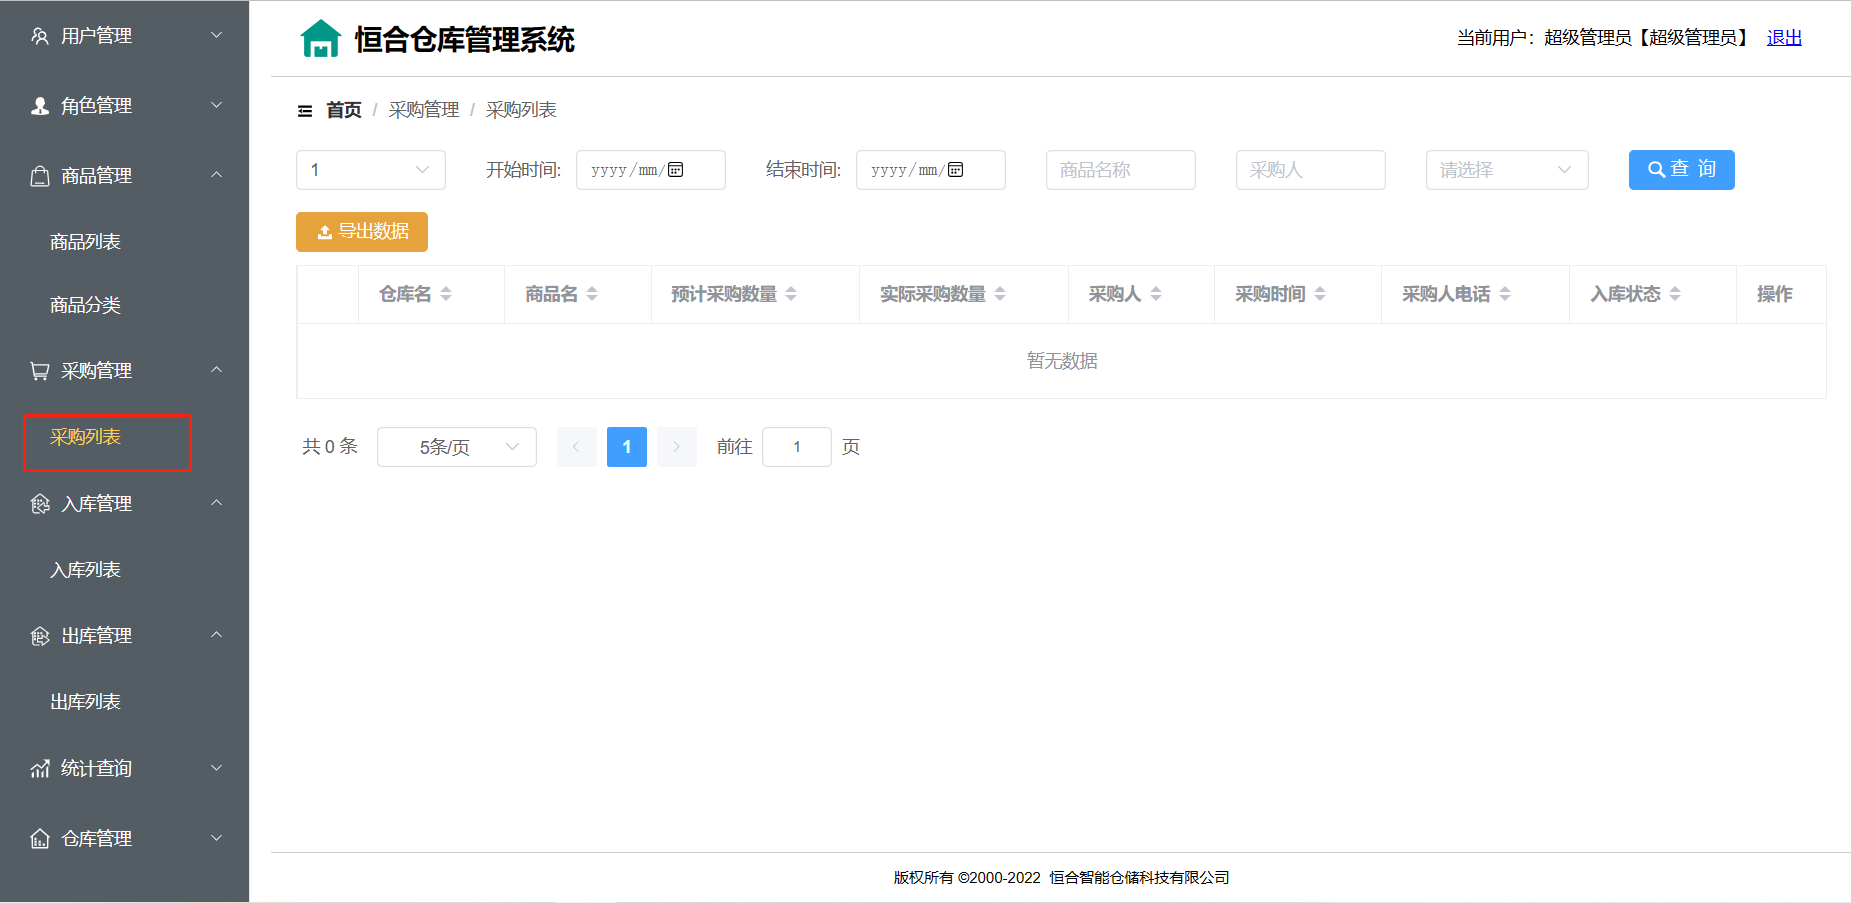
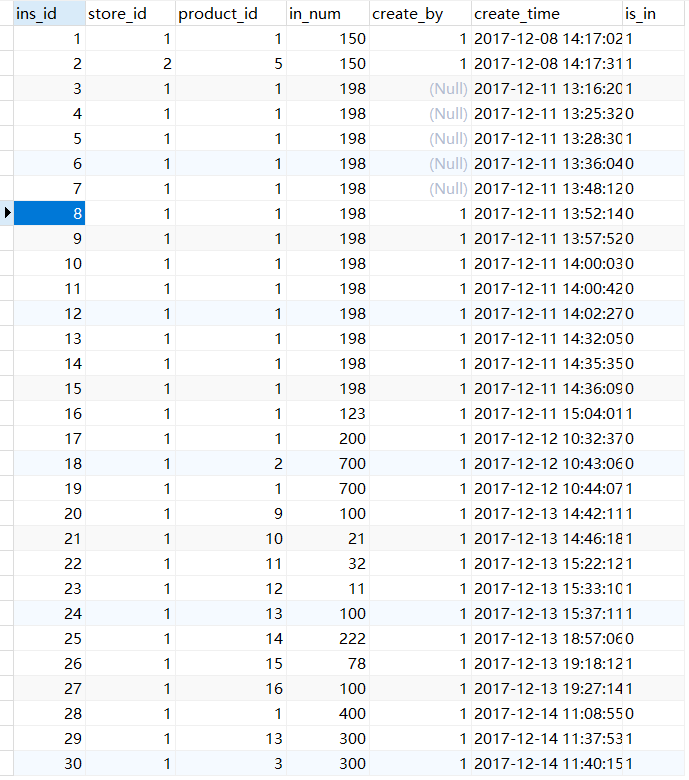
在采购单列表做入库操作,向in_store表添加记录(状态是0未入库),同时修改采购单表buy_list表由0改为1入库(这个入库是表示准备入库)
下面是in_store表
-
商品真正的入库
在入库单列表做确认入库操作
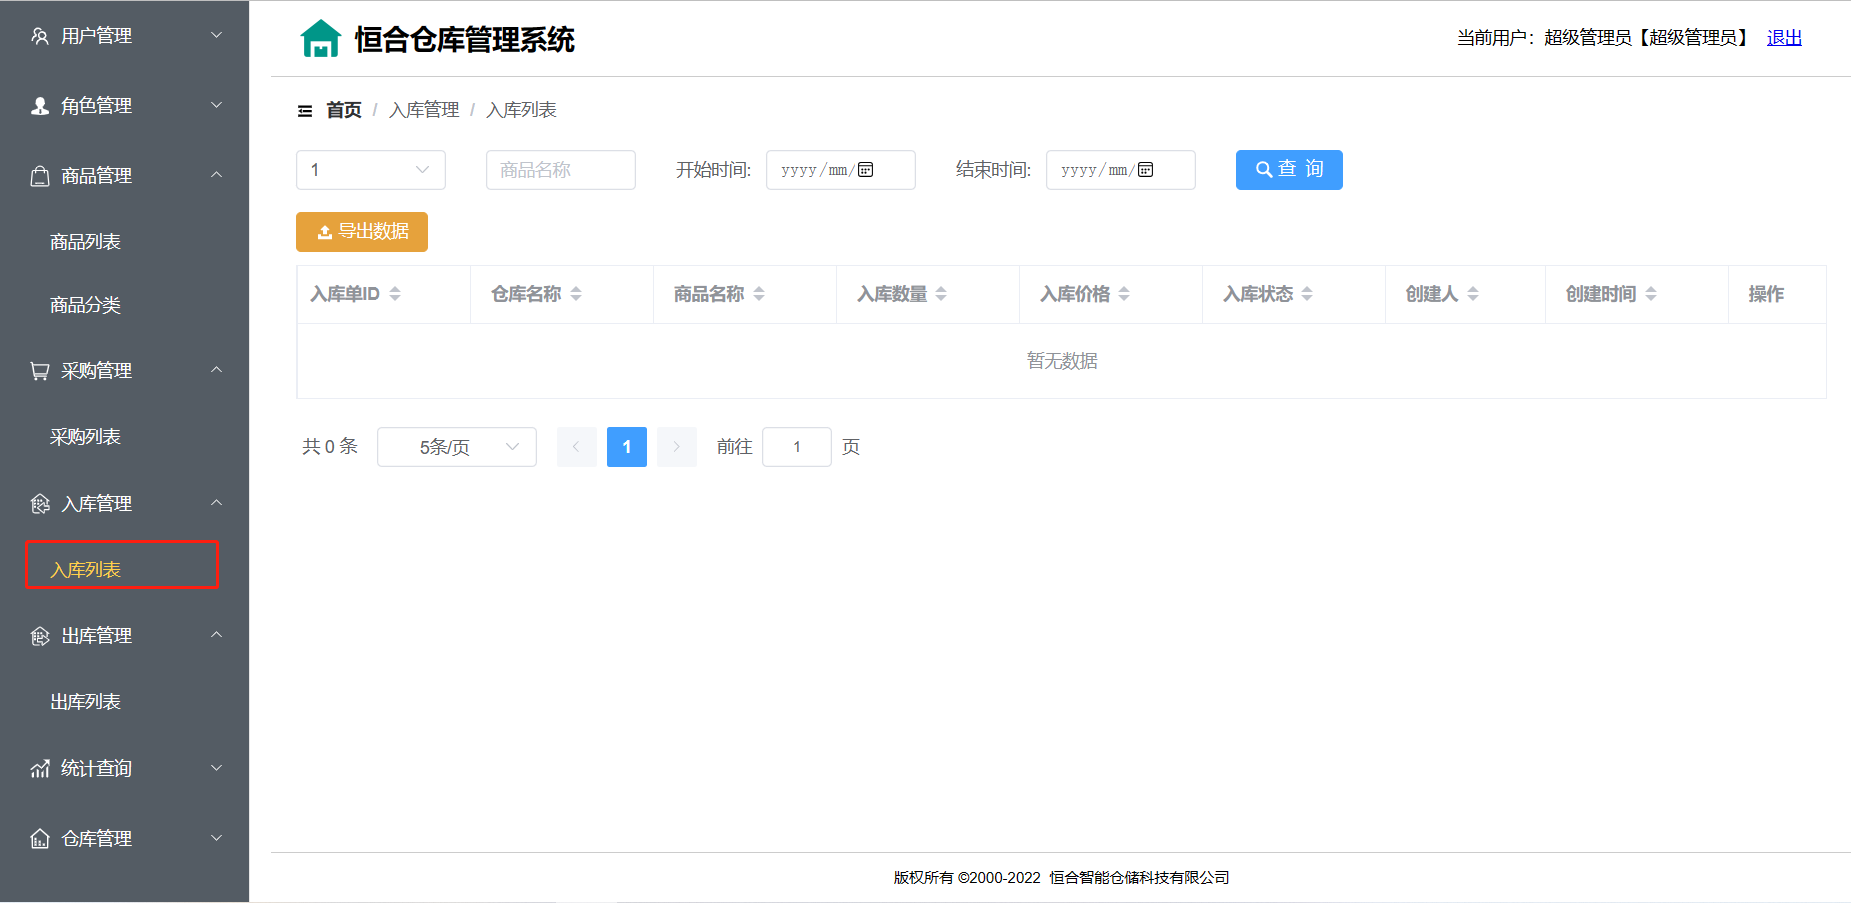
将入库单表in_store表的入库单状态由0改为1入库
1.2 采购单实体类
/*** 采购单表buy_list表的实体类:*/
@Data
@NoArgsConstructor
@AllArgsConstructor
@ToString
public class Purchase {private Integer buyId;//采购单idprivate Integer productId;//采购单采购的商品idprivate Integer storeId;//采购单采购的商品所在仓库idprivate Integer buyNum;//预计采购的商品数量private Integer factBuyNum;//实际采购的商品数量@JsonFormat(pattern = "yyyy-MM-dd")private Date buyTime;//采购时间private Integer supplyId;//采购单采购的商品的供应商idprivate Integer placeId;//采购单采购的商品的产地idprivate String buyUser;//采购人private String phone;//采购人联系电话private String isIn;//是否生成入库单,1.是,0.否//---------------追加属性---------------------------private String productName;//商品名称private String storeName;//仓库名称private String startTime;//搜索起始时间private String endTime;//搜索结束时间
}
1.3 添加采购单
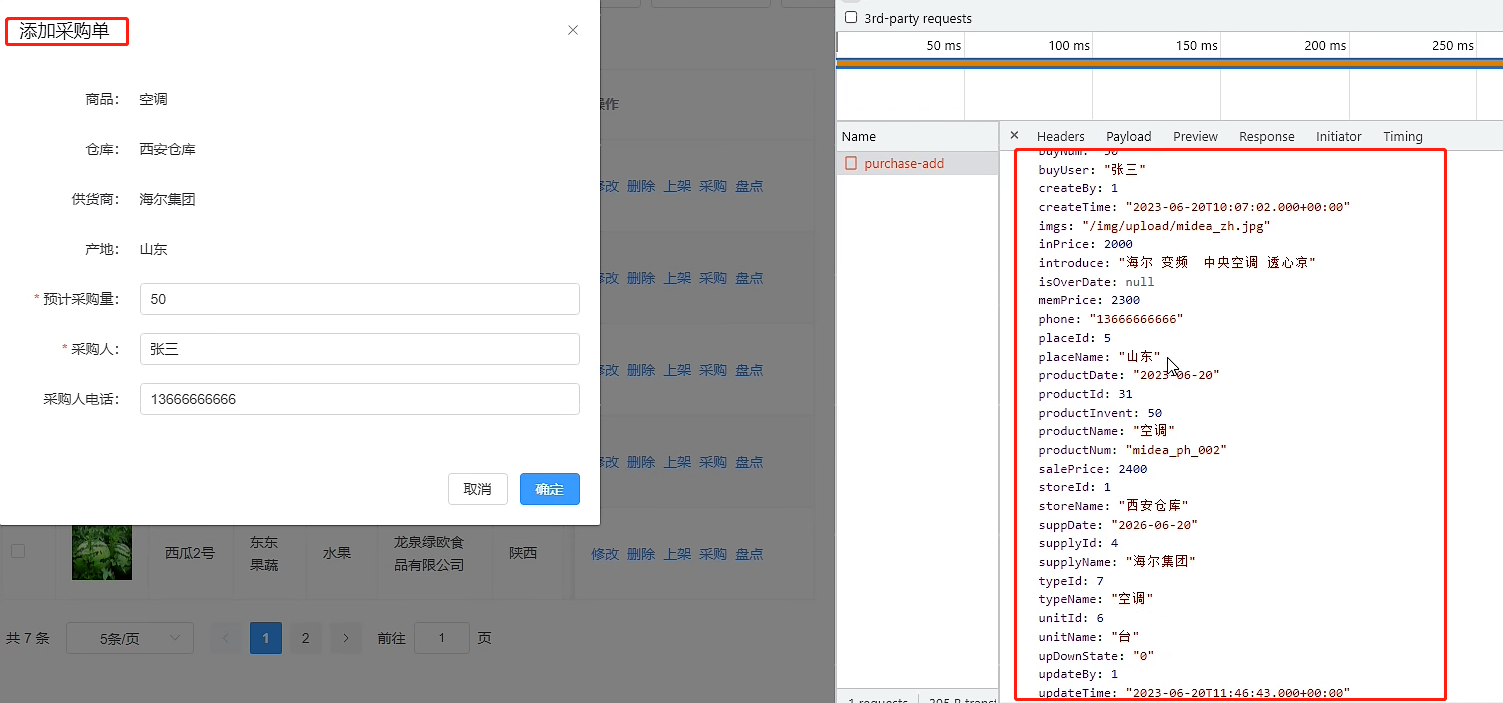
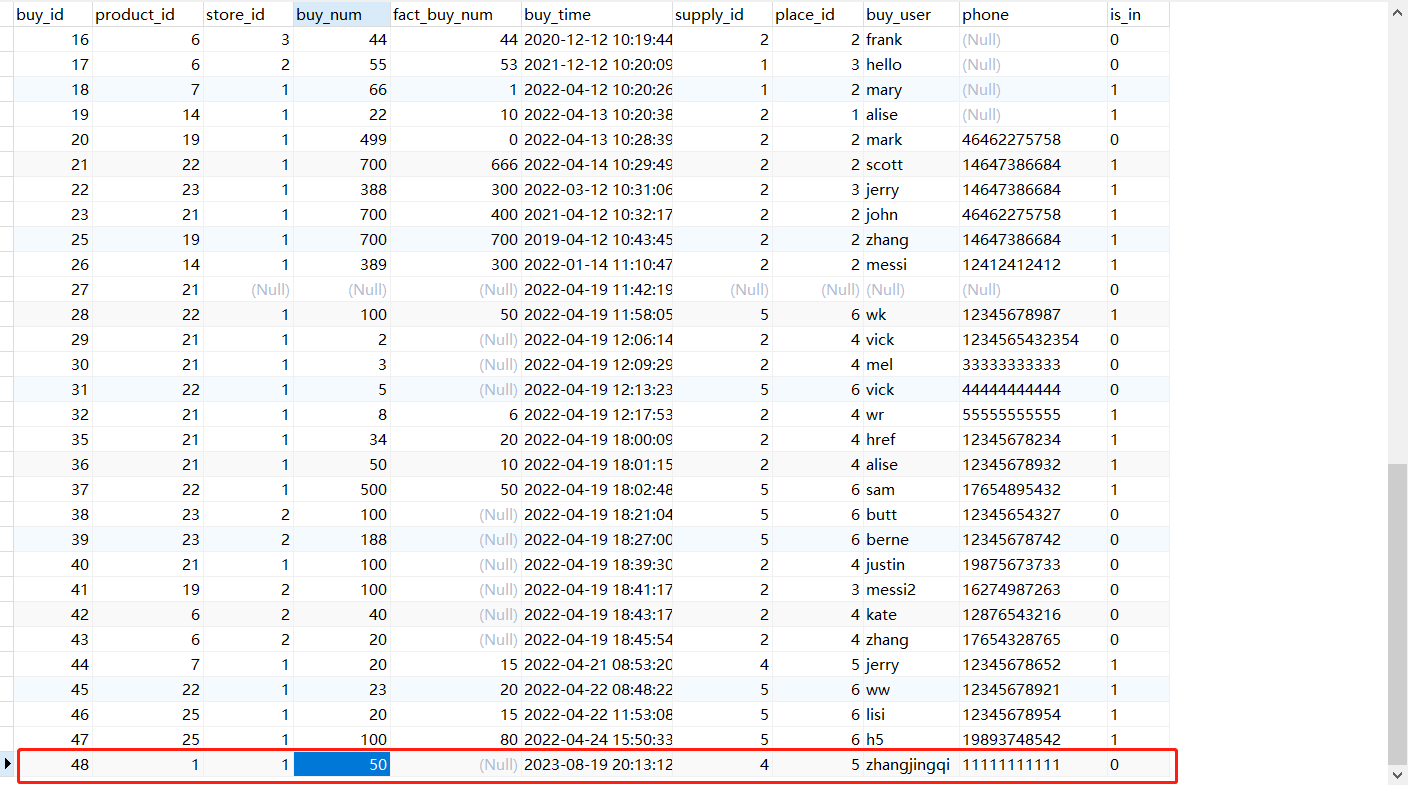
采购单数据库表buy_list如下所示

1.3.1 Mapper
@Mapper
public interface PurchaseMapper {
//   添加采购单public int insertPurchase(Purchase purchase);}
<insert id="insertPurchase">insert into buy_listvalues (null, #{productId}, #{storeId}, #{buyNum}, null, now(),#{supplyId}, #{placeId}, #{buyUser}, #{phone}, 0)
</insert>
1.3.2 Service
@Service
public class PurchaseServiceImpl implements PurchaseService {@Autowiredprivate PurchaseMapper purchaseMapper;@Overridepublic Result savePurchase(Purchase purchase) {
//      初始化时,实际采购数量要和预计采购数量一致purchase.setFactBuyNum(purchase.getBuyNum());int success = purchaseMapper.insertPurchase(purchase);return success>0 ? Result.ok("添加采购单成功") : Result.err(501,"添加采购单失败");}}
1.3.3 Controller
@RestController
@RequestMapping("/purchase")
public class PurchaseController {@Autowiredprivate PurchaseService purchaseService;@RequestMapping("/purchase-add")public Result addPurchase(@RequestBody Purchase purchase){return purchaseService.savePurchase(purchase);}}
1.3.4 效果图
二、采购单管理模块
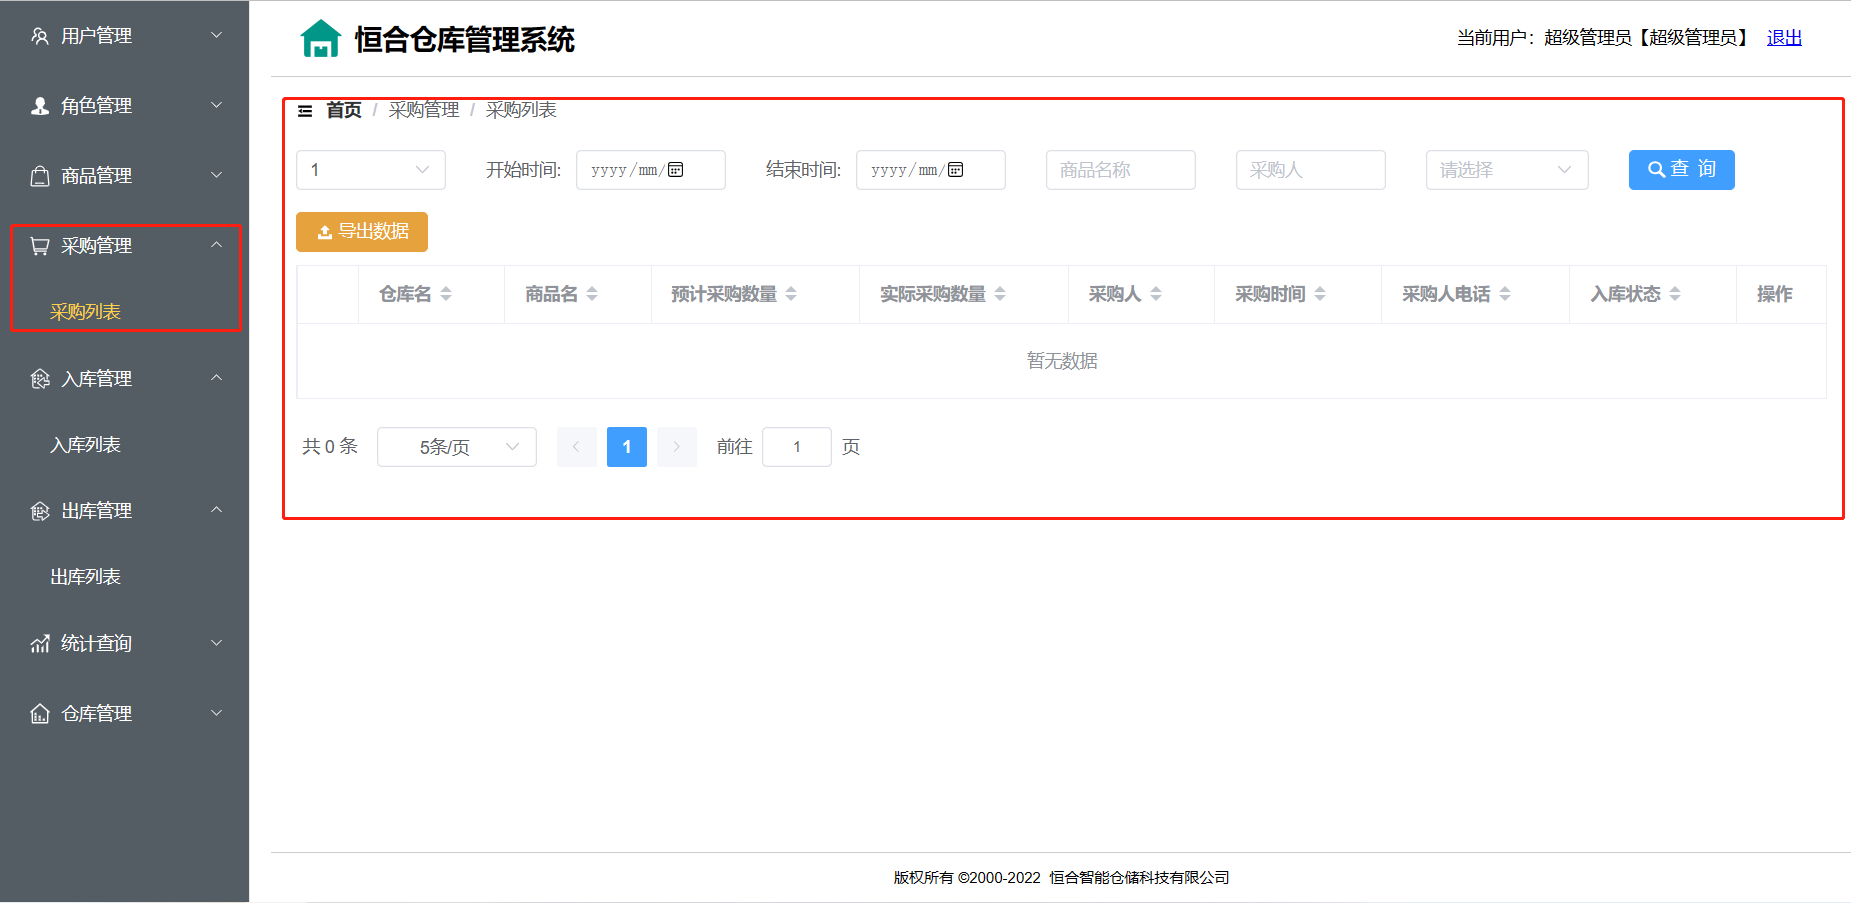
1.采购列表
2.删除采购单
3.修改采购单
4.生成入库单
2.1 仓库数据回显
2.1.1 Mapper
// 查询所有仓库的方法public List<Store> findAllStore();
<mapper namespace="com.pn.mapper.StoreMapper"><select id="findAllStore" resultType="com.pn.entity.Store">select *from store</select></mapper>
2.1.2 Service
@CacheConfig(cacheNames = "com.pn.service.impl.StoreServiceImpl")
@Service
public class StoreServiceImpl implements StoreService {@Autowiredprivate StoreMapper storeMapper;@Cacheable(key = "'all:store'")@Overridepublic List<Store> queryAllStore() {return storeMapper.findAllStore();}
}
2.1.3 Controller
// 仓库数据回显 - 查询所有仓库@RequestMapping("/store-list")public Result storeList(){return Result.ok(storeService.queryAllStore());}
2.1.4 效果图
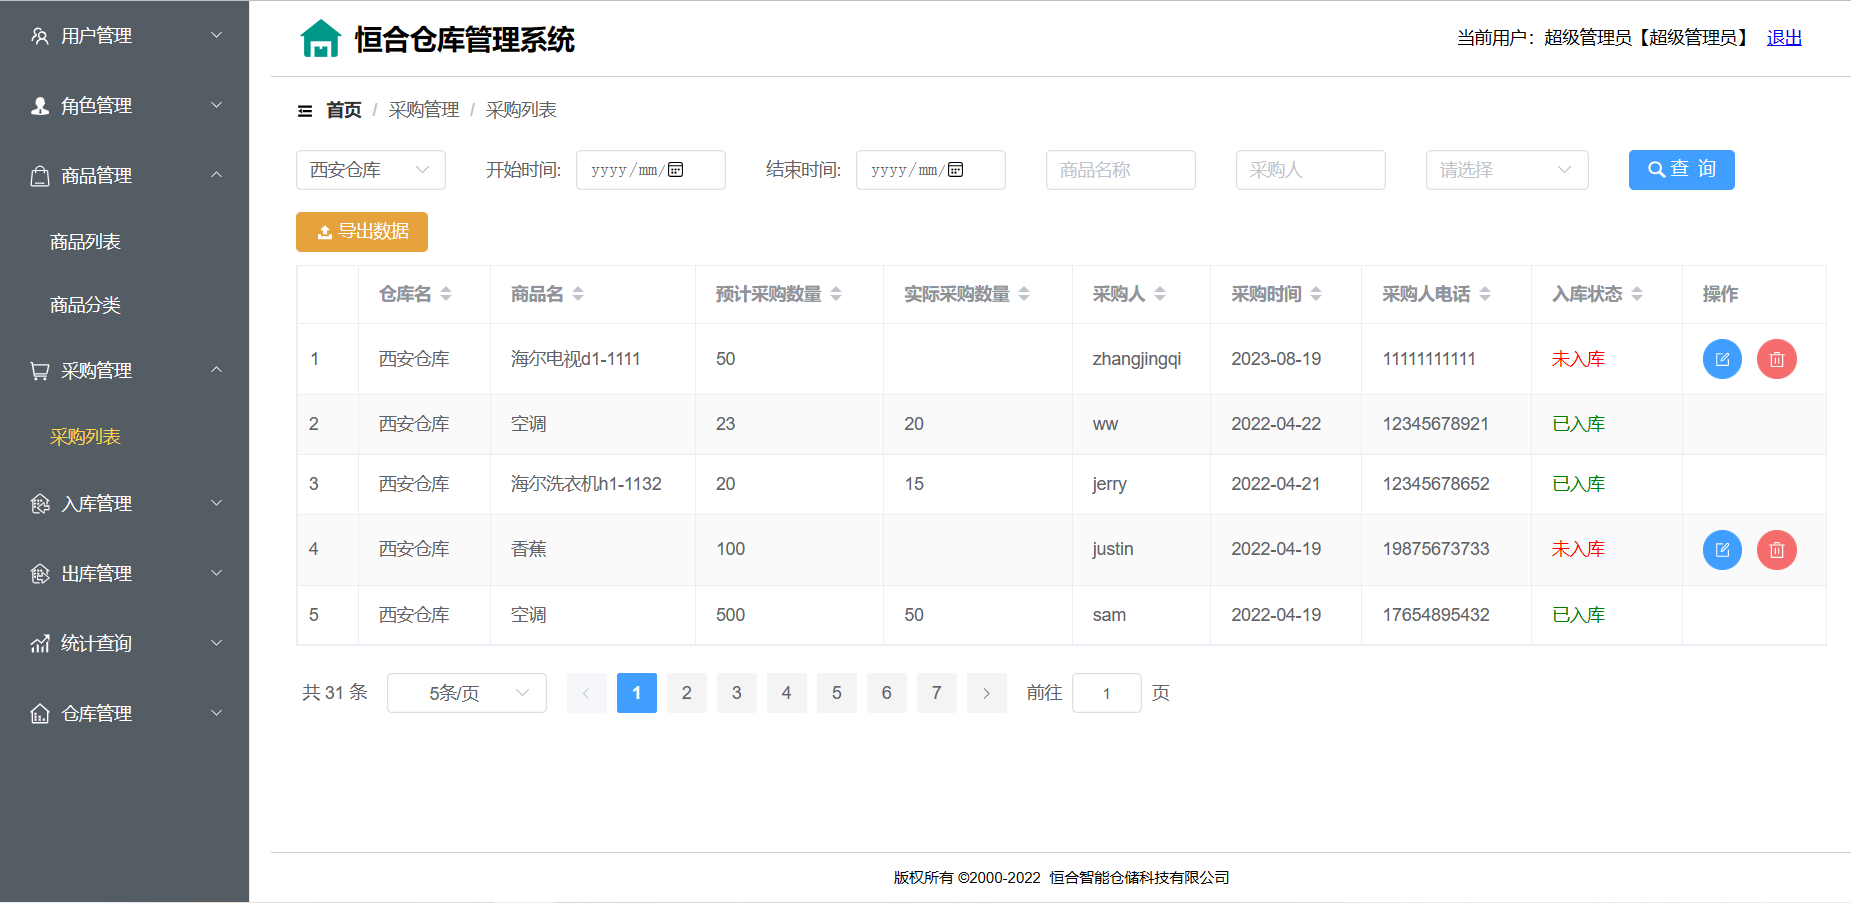
2.2 采购单列表
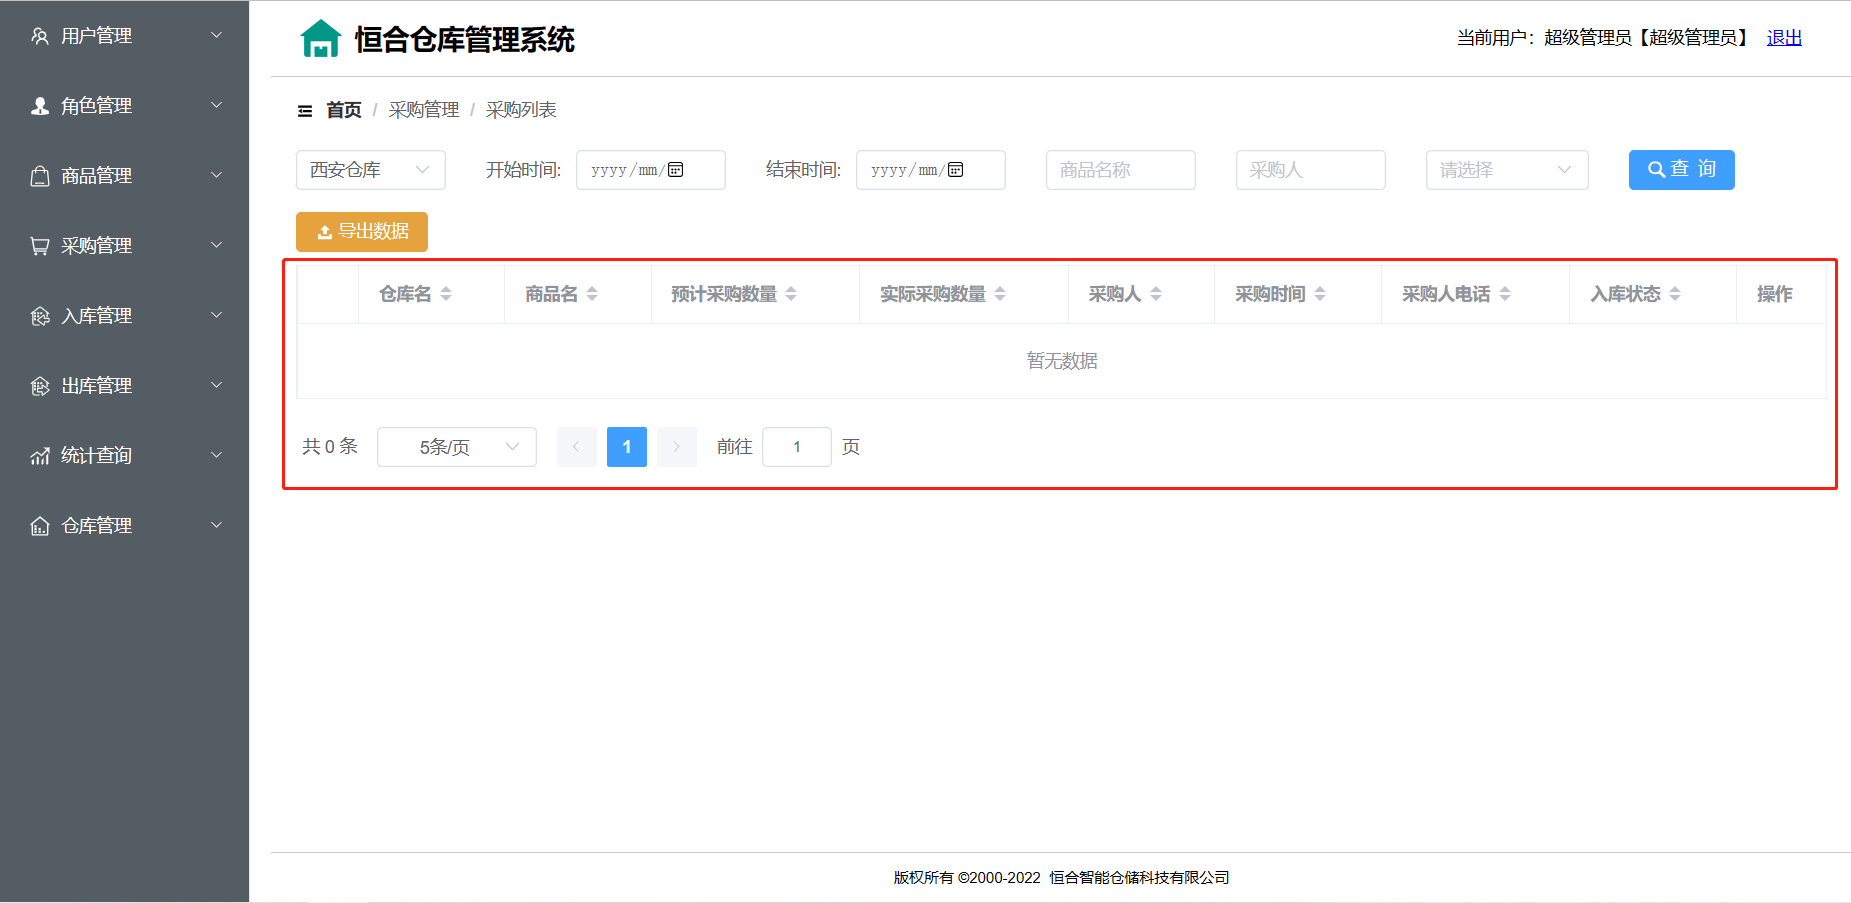
我们需要将下面的数据显示出来。
查询所有采购单并分页或者是根据仓库id、起止时间、商品名称、采购员、是否入库查询采购单并分页
2.1.1 Mapper
// 查询采购单行数的方法public Integer findPurchaseCount(Purchase purchase);// 分页查询采购单的方法public List<Purchase> findPurchasePage(@Param("page") Page page,@Param("purchase") Purchase purchase);
<select id="findPurchaseCount" resultType="java.lang.Integer">select count(*) from buy_list t1, product t2, store t3where t1.product_id = t2.product_id and t1.store_id = t3.store_id<if test="storeId != null">and t1.store_id = #{storeId}</if><if test="productName != null and productName != ''">and t2.product_name like concat('%', #{productName}, '%')</if><if test="buyUser != null and buyUser != ''">and t1.buy_user like concat('%', #{buyUser}, '%')</if><if test="isIn != null and isIn != ''">and t1.is_in = #{isIn}</if><if test="startTime != null and startTime != ''">and t1.buy_time >= #{startTime}</if><if test="endTime != null and endTime != ''">and t1.buy_time <= #{endTime}</if>
</select><select id="findPurchasePage" resultType="com.pn.entity.Purchase">select t1.*, t2.product_name, t3.store_namefrom buy_list t1, product t2, store t3where t1.product_id = t2.product_id and t1.store_id = t3.store_id<if test="purchase.storeId != null">and t1.store_id = #{purchase.storeId}</if><if test="purchase.productName != null and purchase.productName != ''">and t2.product_name like concat('%', #{purchase.productName}, '%')</if><if test="purchase.buyUser != null and purchase.buyUser != ''">and t1.buy_user like concat('%', #{purchase.buyUser}, '%')</if><if test="purchase.isIn != null and purchase.isIn != ''">and t1.is_in = #{purchase.isIn}</if><if test="purchase.startTime != null and purchase.startTime != ''">and t1.buy_time >= #{purchase.startTime}</if><if test="purchase.endTime != null and purchase.endTime != ''">and t1.buy_time <= #{purchase.endTime}</if>order by t1.buy_time desclimit #{page.limitIndex}, #{page.pageSize}
</select>
2.1.2 Service
@Overridepublic Page queryPurchasePage(Page page, Purchase purchase) {// 查询采购单行数Integer count = purchaseMapper.findPurchaseCount(purchase);// 分页查询采购单List<Purchase> purchasePage = purchaseMapper.findPurchasePage(page, purchase);// 组装分页信息page.setTotalNum(count);page.setResultList(purchasePage);return page;}
2.1.3 Controller
//分页查询采购单的url
@RequestMapping("/purchase-page-list")
public Result purchaseListPage(Page page, Purchase purchase) {return Result.ok(purchaseService.queryPurchasePage(page,purchase));
}
2.1.4 效果图
2.3 删除采购单
已经入库的采购单不能被删除
2.3.1 Mapper
// 根据id删除采购单的方法public int removerPurchaseById(@Param("buyId") Integer buyId);
<delete id="removerPurchaseById">delete from buy_list where buy_id =#{buyId}
</delete>
2.3.2 Service
@Overridepublic Result deletePurchaseById(Integer buyId) {int success = purchaseMapper.removerPurchaseById(buyId);return success>0 ? Result.ok("删除采购单成功") : Result.err(501,"删除采购单失败");}
2.3.3 Controller
// 删除采购单@RequestMapping("/purchase-delete/{buyId}")public Result deletePurchase(@PathVariable Integer buyId){return Result.ok(purchaseService.deletePurchaseById(buyId));}
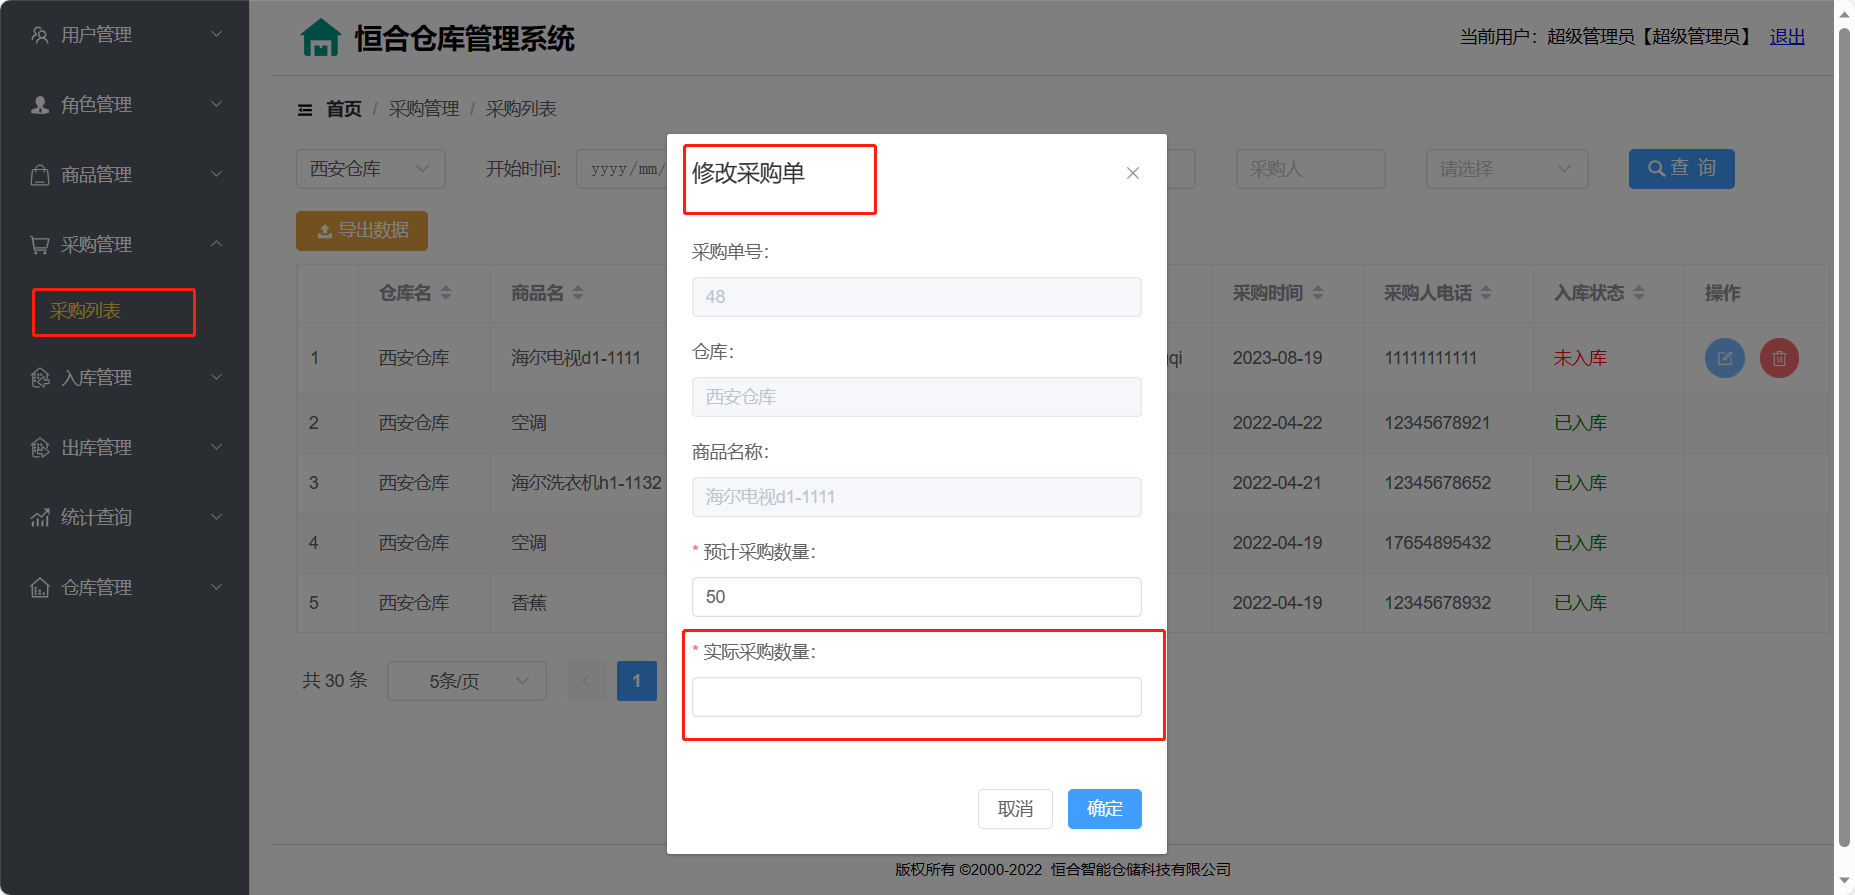
2.4 修改采购单
只能修改采购单的“预计采购数量”和“实际采购数量”
2.4.1 Mapper
// 根据id修改预计采购数量和实际采购数量的方法public int setNumberById(Purchase purchase);
<update id="setNumberById">update buy_listset buy_num = #{buyNum} ,fact_buy_num = #{factBuyNum}where buy_id = #{buyId}
</update>
2.4.2 Service
@Override
public Result updatePurchaseById(Purchase purchase) {int success = purchaseMapper.setNumberById(purchase);return success>0 ? Result.ok("删除采购单成功") : Result.err(501,"删除采购单失败");
}
2.4.3 Controller
// 修改采购单的业务方法@RequestMapping("/purchase-update")public Result updatePurchase(@RequestBody Purchase purchase){return Result.ok(purchaseService.updatePurchaseById(purchase));}
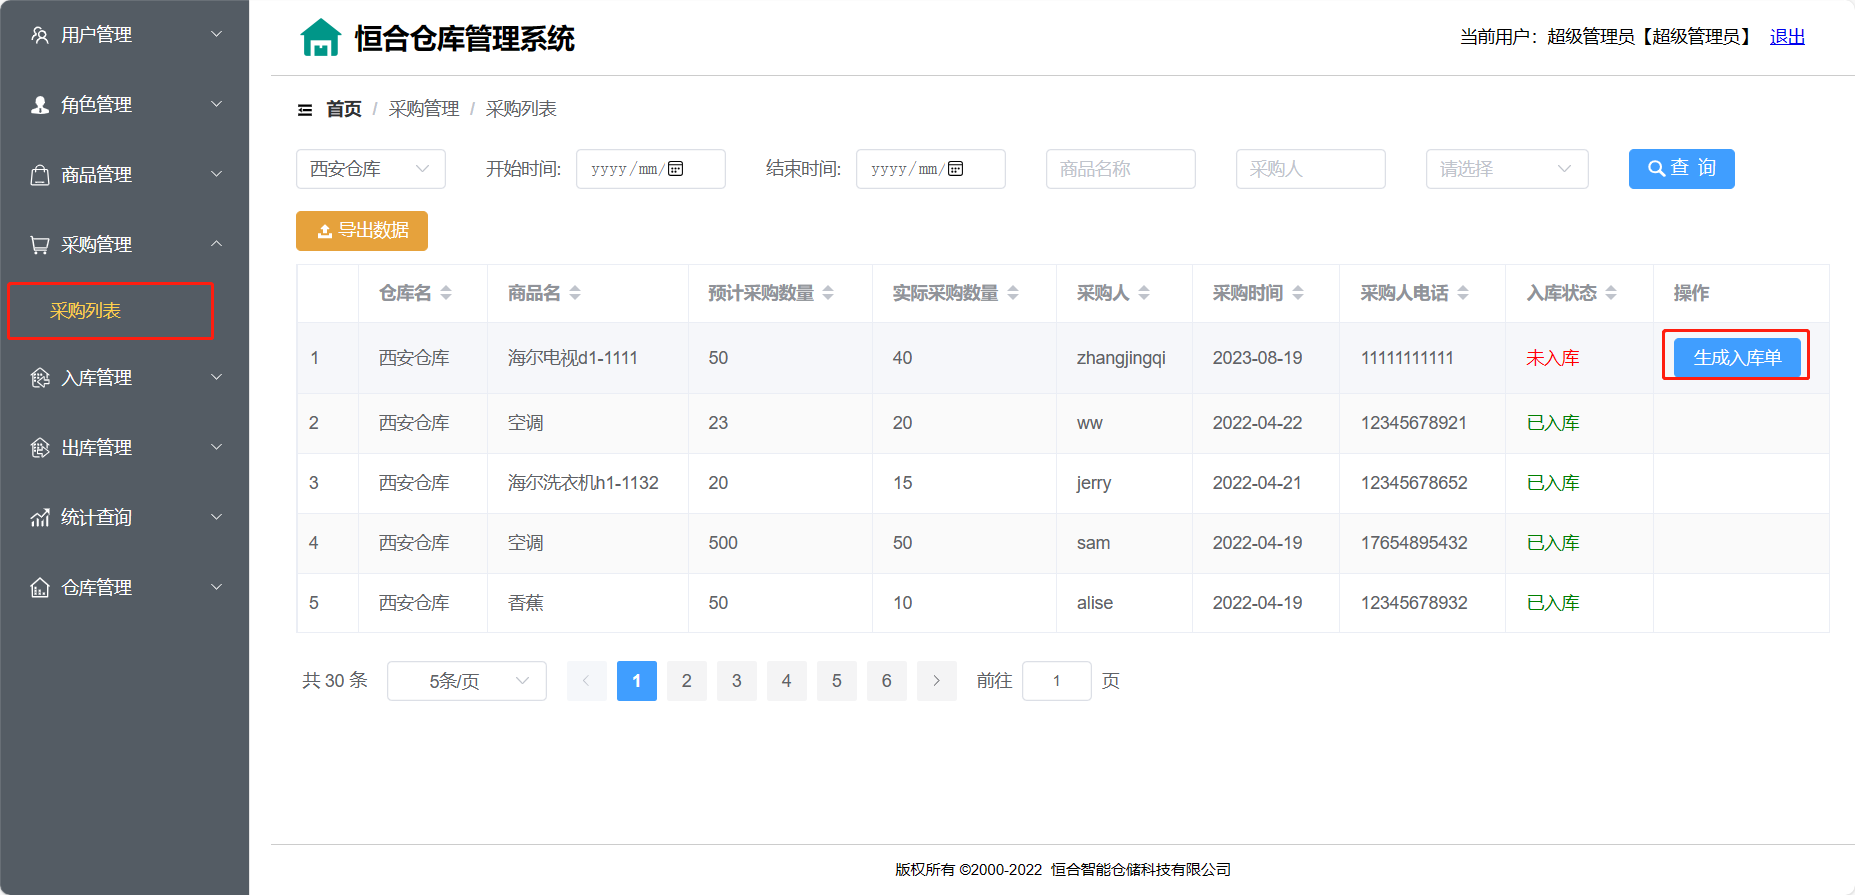
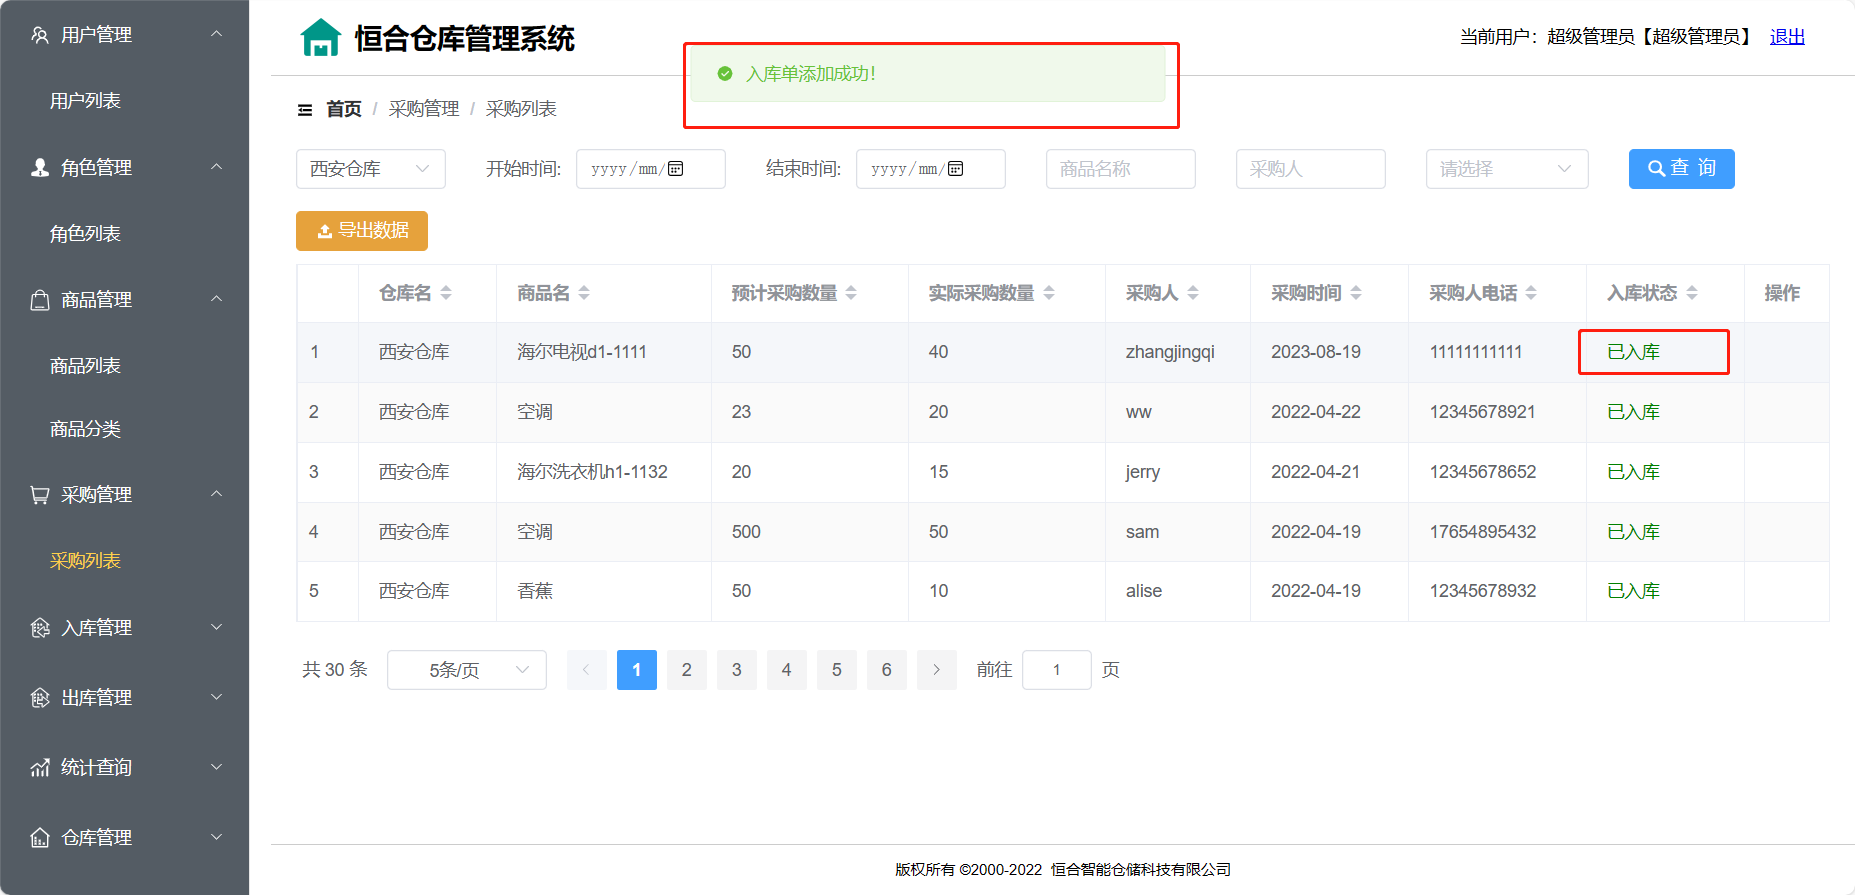
2.5 生成入库单

当我们商品采购到后,我们要进行入库操作
2.5.1 入库单表实体类
/*** 入库单表in_store表的实体类:*/
@Data
@NoArgsConstructor
@AllArgsConstructor
public class InStore {private Integer insId;//入库单idprivate Integer storeId;//仓库idprivate Integer productId;//商品idprivate Integer inNum;//入库数量private Integer createBy;//创建入库单的用户id@JsonFormat(pattern="yyyy-MM-dd HH:mm:ss")private Date createTime;//创建时间private Integer isIn;//是否入库,1.是,0.否//-----------------追加的属性--------------------private String productName;//商品名称private String startTime;//起始时间private String endTime;//结束时间private String storeName;//仓库名称private String userCode;//创建入库单的用户的名称private BigDecimal inPrice;//商品入库价格
}
2.5.2 Mapper
// 根据id修改采购单状态为已入库 (采购表buy_list)public int setIsInById(Integer buyId);
<update id="setIsInById">update buy_listset is_in =1where buy_id = #{buyId}
</update>
//添加入库单的方法
public int insertInStore(InStore inStore);
2.5.3 Service
@Service
public class InStoreServiceImpl implements InStoreService {//注入InStoreMapper@Autowiredprivate InStoreMapper inStoreMapper;//注入PurchaseMapper@Autowiredprivate PurchaseMapper purchaseMapper;//    //添加入库单的业务方法@Transactional//事务处理@Overridepublic Result saveInStore(InStore inStore, Integer buyId) {//添加入库单int i = inStoreMapper.insertInStore(inStore);if(i>0){//根据id将采购单状态改为已入库int j = purchaseMapper.setIsInById(buyId);if(j>0){return Result.ok("入库单添加成功!");}return Result.err(Result.CODE_ERR_BUSINESS, "入库单添加失败!");}return Result.err(Result.CODE_ERR_BUSINESS, "入库单添加失败!");}}
2.5.4 Controller
//  生成入库单的url接口
@RequestMapping("/in-warehouse-record-add")
public Result addInStore(@RequestBody Purchase purchase, @RequestHeader("Token") String token) {//获取当前登录的用户CurrentUser currentUser = tokenUtils.getCurrentUser(token);//获取当前登录的用户id 创建入库单的用户idint createBy = currentUser.getUserId();//创建InStore对象封装添加的入库单的信息InStore inStore = new InStore();inStore.setStoreId(purchase.getStoreId());inStore.setProductId(purchase.getProductId());inStore.setInNum(purchase.getFactBuyNum());inStore.setCreateBy(createBy);return inStoreService.saveInStore(inStore,purchase.getBuyId());
}
2.5.5 效果图
三、入库单管理
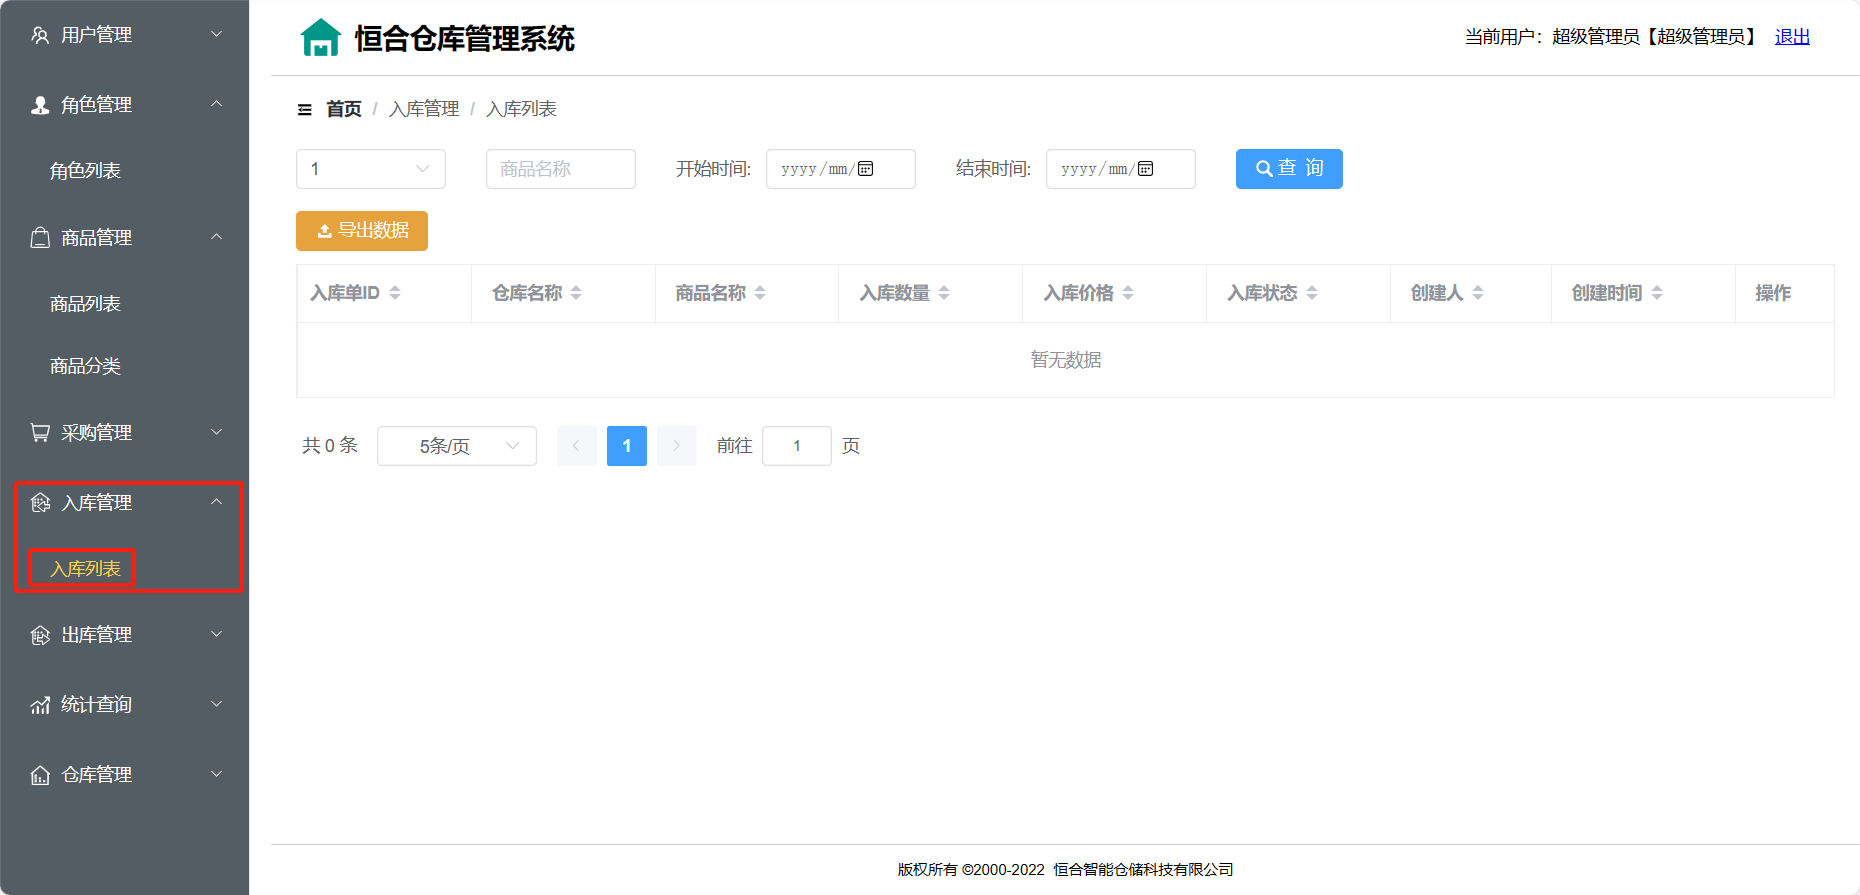
3.1 分页查询入库单
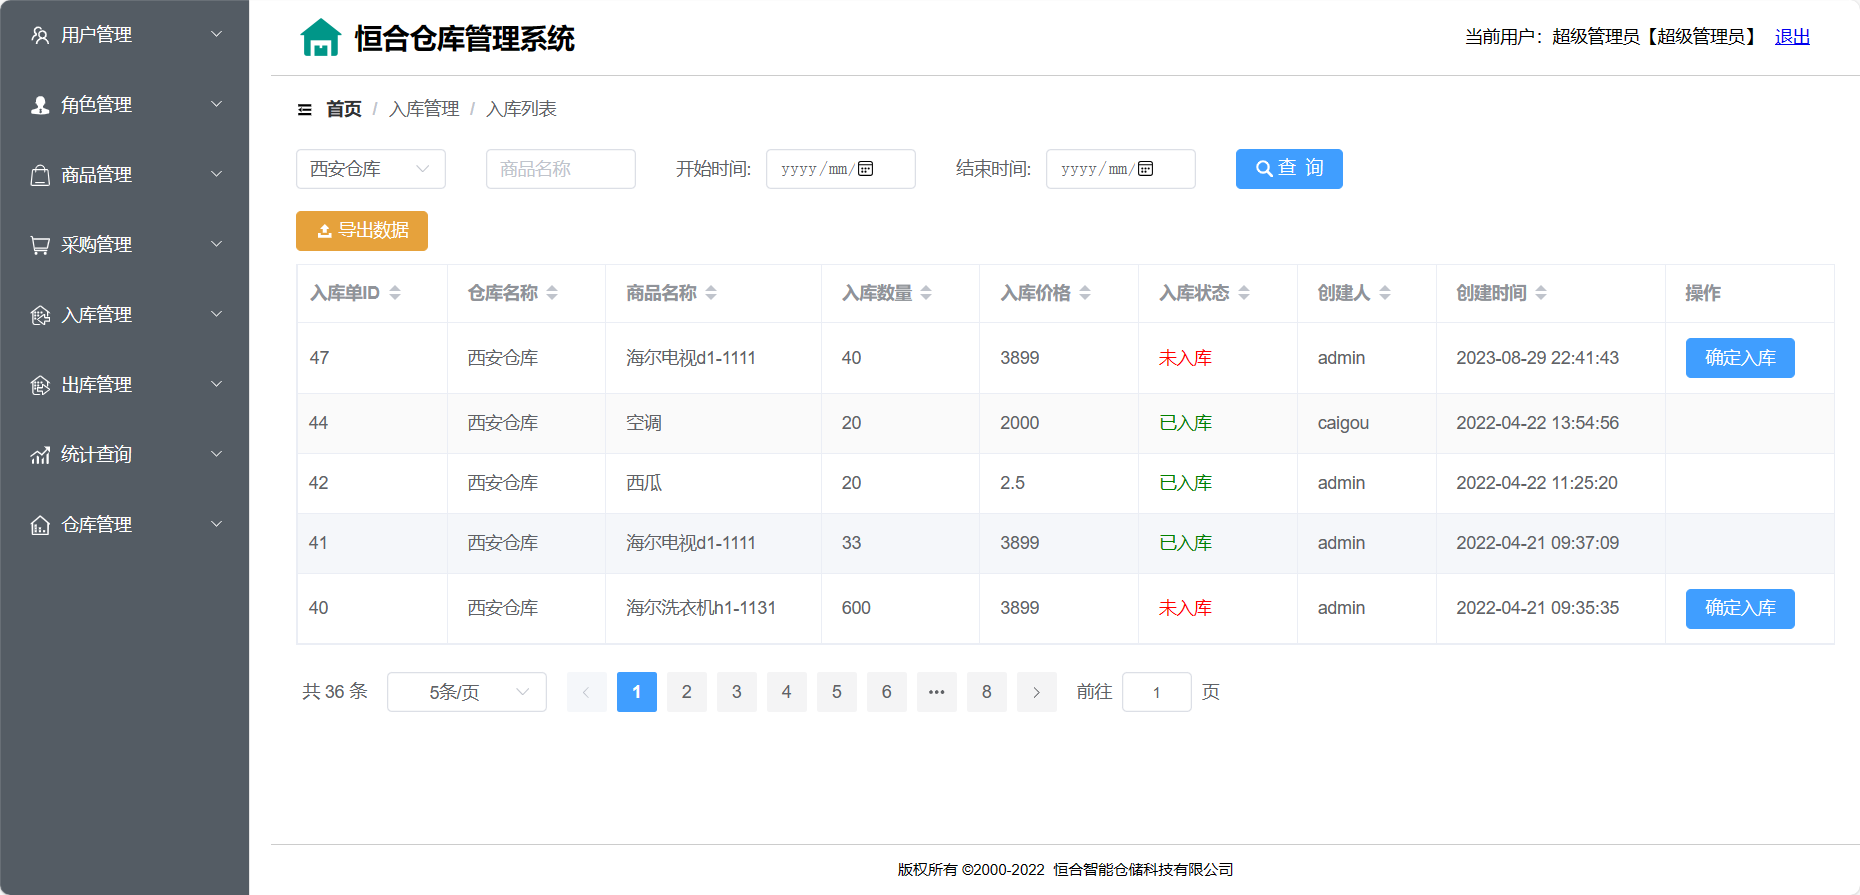
我们要完成的就是下面这个功能
3.1.1 Mapper
//  分页查询的方法
//  查询入库单行数的方法public Integer findInStoreCount(@Param("inStore")InStore inStore);//  分页查询入库单的方法public List<InStore> findInStorePage(@Param("page") Page page,@Param("inStore") InStore inStore);
具体实现
<!--查询入库单行数的方法-->
<select id="findInStoreCount" resultType="java.lang.Integer">select count(*)from in_store t1,product t2where t1.product_id = t2.product_id<if test="inStore.storeId !=null">and t1.store_id = #{inStore.storeId}</if><if test="inStore.productName !=null and inStore.productName !='' ">and t2.product_name like concat('%',#{inStore.productName},'%')</if><if test="inStore.startTime !=null and inStore.startTime!='' ">and t1.create_time > = #{inStore.startTime}</if><if test="inStore.endTime !=null and inStore.endTime!='' ">and t1.create_time < = #{inStore.endTime}</if>
</select>
<!--分页查询入库单的方法-->
<select id="findInStorePage" resultType="com.pn.entity.InStore">select t1.*,t2.product_name,t2.in_price,t3.store_name,t4.user_codefrom in_store t1,product t2,store t3,user_info t4where t1.product_id = t2.product_idand t1.store_id = t3.store_idand t1.create_by = t4.user_id<if test="inStore.storeId !=null">and t1.store_id = #{inStore.storeId}</if><if test="inStore.productName !=null and inStore.productName !='' ">and t2.product_name like concat('%',#{inStore.productName},'%')</if><if test="inStore.startTime !=null and inStore.startTime!='' ">and t1.create_time > = #{inStore.startTime}</if><if test="inStore.endTime !=null and inStore.endTime!='' ">and t1.create_time < = #{inStore.endTime}</if>order by t1.create_time desclimit #{page.limitIndex},#{page.pageSize}
</select>
3.1.2 Service
    @Overridepublic Page queryInStore(Page page, InStore inStore) {
//      查询入库单行数Integer count = inStoreMapper.findInStoreCount(inStore);//      分页查询入库单List<InStore> inStorePageList = inStoreMapper.findInStorePage(page, inStore);page.setResultList(inStorePageList);page.setTotalNum(count);return page;}
3.1.3 Controller
@RequestMapping("/instore-page-list")
public Result inStoreListPage(Page page, InStore inStore) {return Result.ok(inStoreService.queryInStore(page, inStore));
}
3.1.4 效果图
3.2 确认入库单

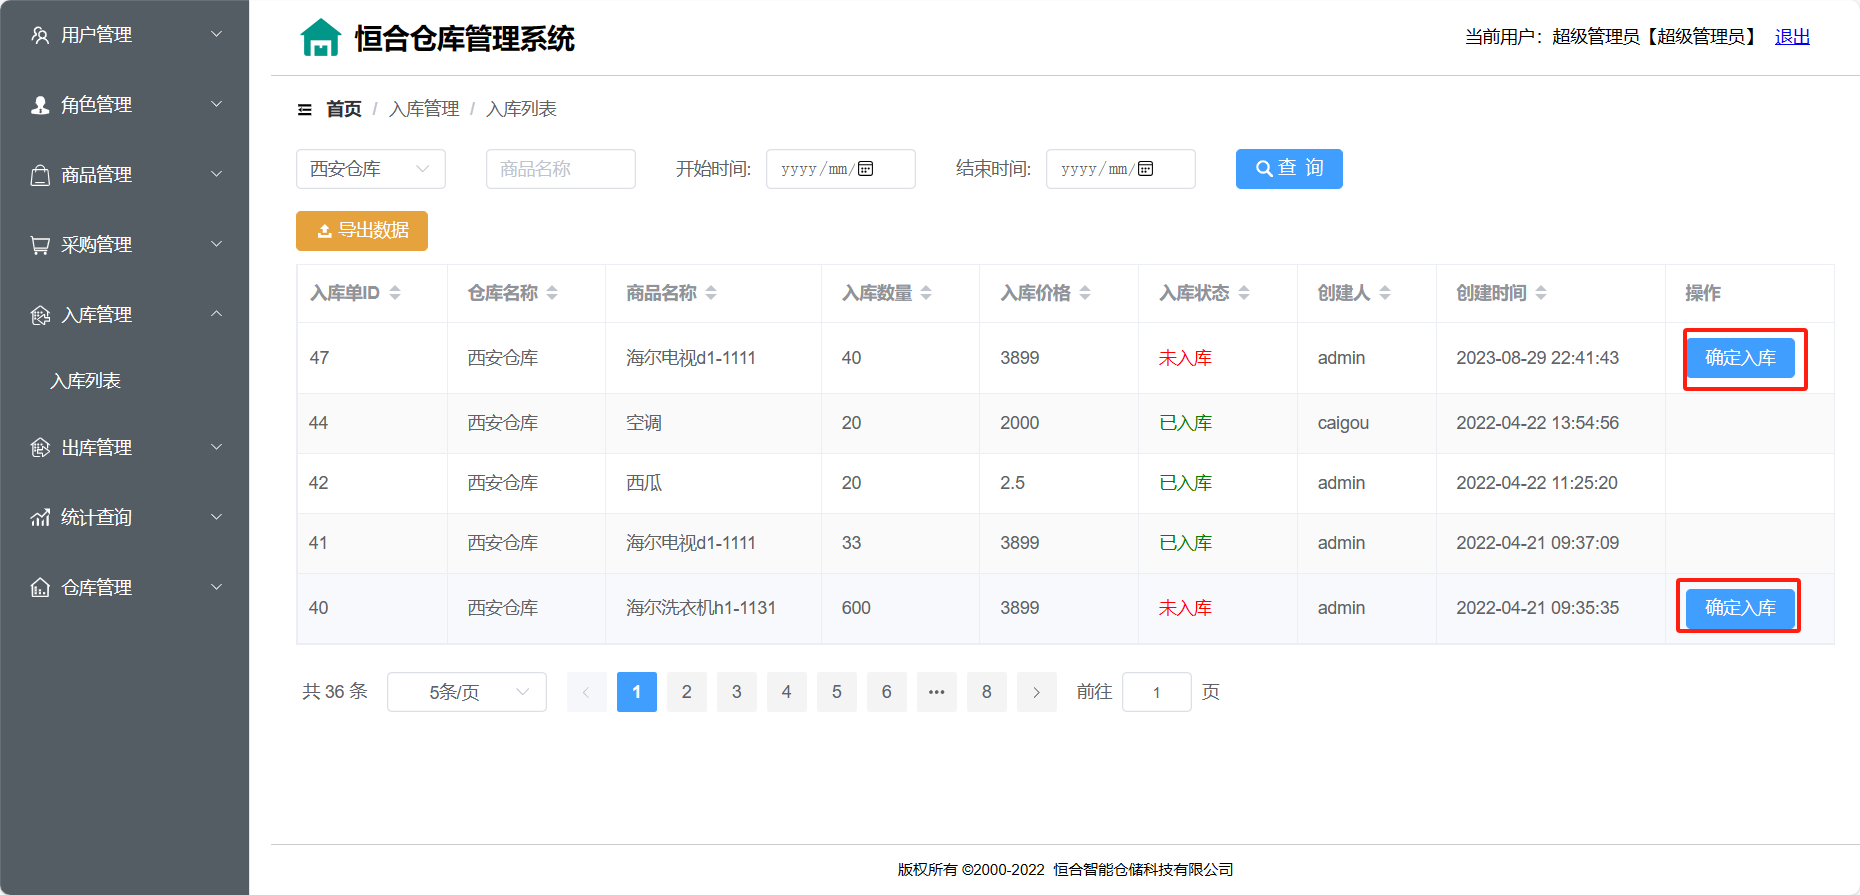
入库流程
- 将入库单状态改为已入库
- 增加商品的库存
3.1.1 Mapper
将入库单的状态修改为已入库
// 根据id修改入库单状态为已入库的方法public int setIsInById(@Param("isStoreId") Integer isStoreId);
<update id="setIsInById">update in_store set is_in = 1 where  ins_id = #{isStoreId}
</update>
修改product表中的库存数量
// 根据id修改商品库存的方法public int setInventById(@Param("productId")Integer productId,@Param("invent")Integer invent);
<!--根据id修改商品库存的方法-->
<update id="setInventById">update product set product_invent = product_invent+#{invent} where product_id = #{productId}
</update>
3.1.2 Service
    @Override@Transactionalpublic Result inStoreConfirm(InStore inStore) {
//      修改入库单状态int success = inStoreMapper.setIsInById(inStore.getInsId());if (success>0){
//          修改商品库存
//          商品入库数量增加int successCount = productMapper.setInventById(inStore.getProductId(), inStore.getInNum());if (successCount>0){return Result.ok("入库单确认成功!");}}return Result.err(Result.CODE_ERR_BUSINESS,"入库单确认失败!");}
3.1.3 Controller
//  确认入库的url
@RequestMapping("/instore-confirm")
public Result confirmInStore(@RequestBody InStore inStore) {return inStoreService.inStoreConfirm(inStore);
}
四、出库单管理

4.1 确认出库单
- 将出库单状态修改为1,表示已出库
- 修改商品的库存 – 减库存
4.1.1 Mapper
修改出库单状态
// 根据id修改出库单状态为已出库的方法public int setIsOutById(@Param("outStoreId") Integer outStoreId);
<update id="setIsOutById">update out_storeset is_out =1where outs_id = #{outStoreId}
</update>
根据商品id查询商品库存的方法
// 根据商品id查询商品库存的方法public int findInventById(@Param("productId")Integer productId);
<select id="findInventById" resultType="java.lang.Integer">select product_invent from product where product_id  =#{productId}
</select>
修改商品库存数量
依然是3.2.1中的Mapper
4.1.2 Service
    @Override@Transactionalpublic Result outStoreConfirm(OutStore outStore) {
//      判断商品库存是否充足int productInvent = productMapper.findInventById(outStore.getProductId());if (productInvent < outStore.getOutNum()) {return  Result.err(Result.CODE_ERR_BUSINESS,"商品库存不足!");}
//      修改出库单状态outStoreMapper.setIsOutById(outStore.getStoreId());
//      修改商品库存productMapper.setInventById(outStore.getProductId(),-outStore.getOutNum());return Result.ok("确认出库成功");}
4.1.3 Controller
//  确认出库单url接口
@RequestMapping("/outstore-confirm")
public Result confirmOutStore(@RequestBody OutStore outStore) {return outStoreService.outStoreConfirm(outStore);
}


)


