【日常业务开发】Java实现异步编程
- Java实现异步编程
- 什么是异步
- 异步的八种实现方式
- 异步编程
- 线程异步
- Future异步
- CompletableFuture实现异步
- Spring的@Async异步
- Spring ApplicationEvent事件实现异步
- 消息队列
- ThreadUtil异步工具类
- Guava异步
- CompletableFuture异步编排工具类
- 创建异步对象
- runAsync和 supplyAsync
- 计算完成时回调方法
- handle 方法
- 线程串行化方法
- thenApply
- thenAccept
- thenRun
- thenCompose 方法
- 两任务组合 - 都要完成
- thenCombine 合并任务
- thenAcceptBoth
- runAfterBoth
- 两任务组合 - 一个完成
- applyToEither 方法
- acceptEither 方法
- runAfterEither 方法
- 多任务组合
- 实际业务场景
Java实现异步编程
异步执行对于开发者来说并不陌生,在实际的开发过程中,很多场景多会使用到异步,相比同步执行,异步可以大大缩短请求链路耗时时间,比如:发送短信、邮件、异步更新等,这些都是典型的可以通过异步实现的场景。
什么是异步
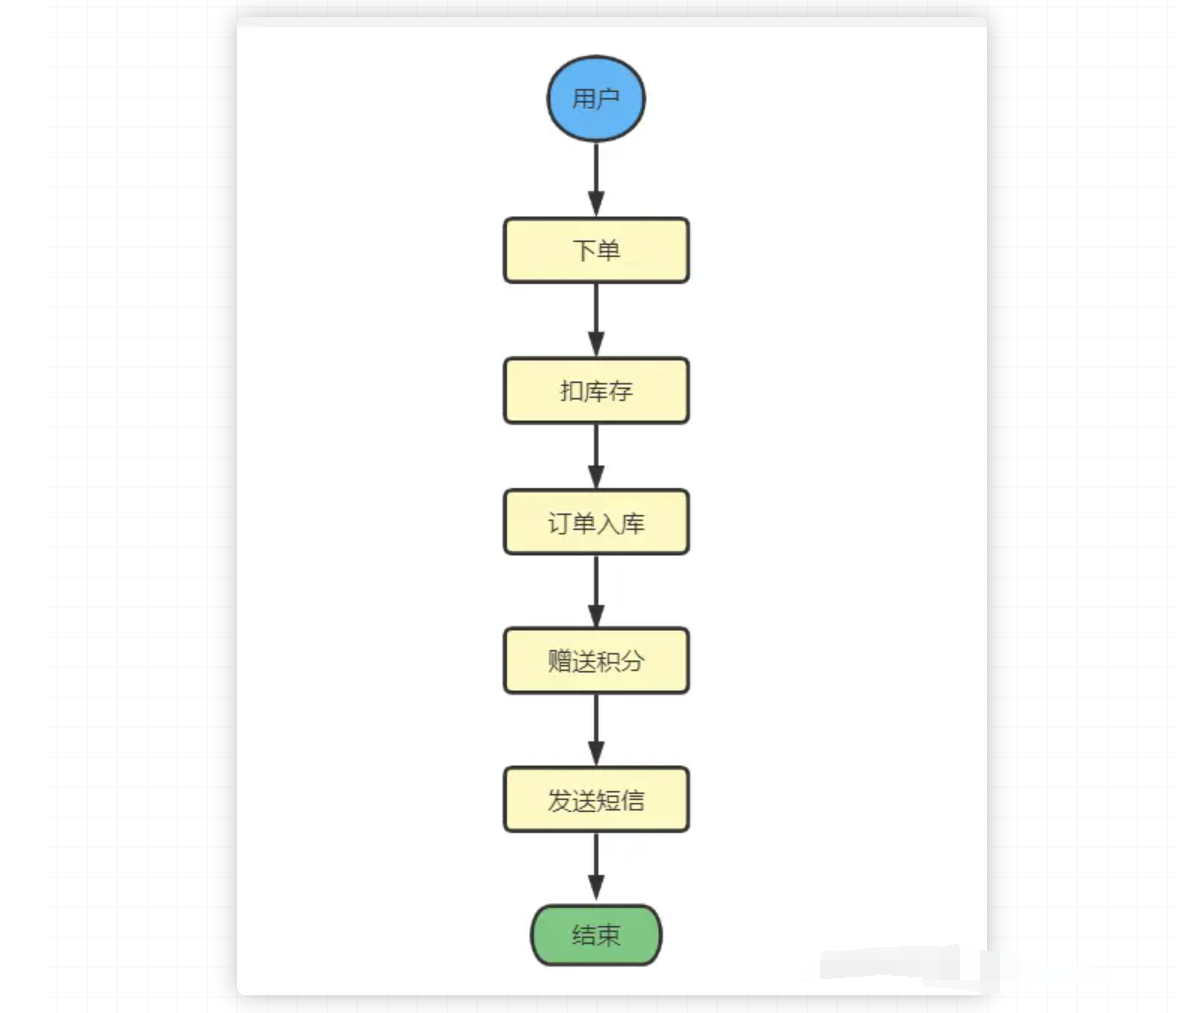
首先我们先看一个常见的用户下单的场景:

在同步操作中,我们执行到 发送短信 的时候,我们必须等待这个方法彻底执行完才能执行 赠送积分 这个操作,如果 赠送积分 这个动作执行时间较长,发送短信需要等待,这就是典型的同步场景。
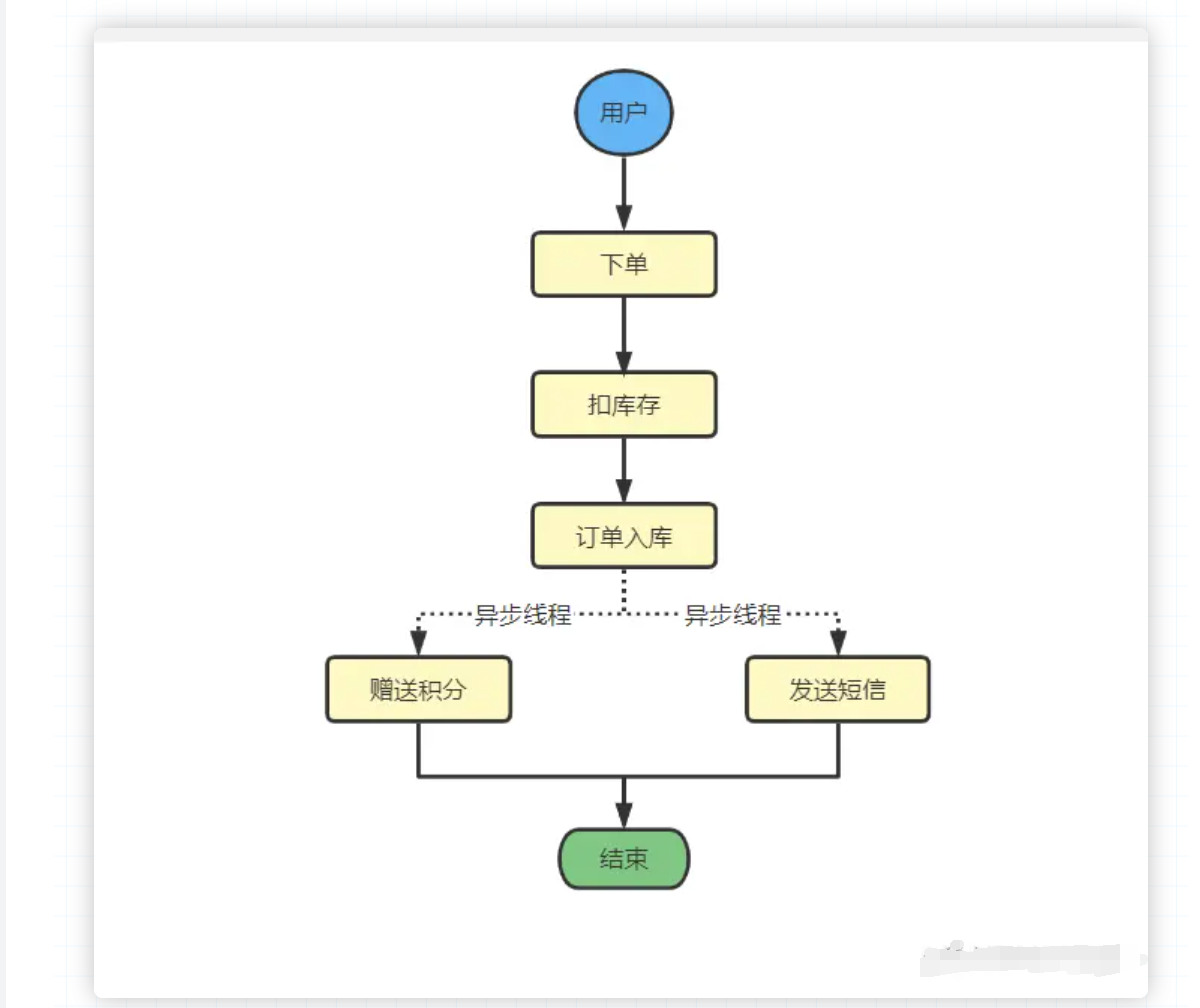
实际上,发送短信和赠送积分没有任何的依赖关系,通过异步,我们可以实现赠送积分和发送短信这两个操作能够同时进行,比如:

异步的八种实现方式
- 线程Thread
- Future
- 异步框架CompletableFuture
- Spring注解@Async
- Spring ApplicationEvent事件
- 消息队列
- 第三方异步框架,比如Hutool的ThreadUtil
- Guava异步
异步编程
线程异步
public class AsyncThread extends Thread {@Overridepublic void run() {System.out.println("Current thread name:" + Thread.currentThread().getName() + " Send email success!");}public static void main(String[] args) {AsyncThread asyncThread = new AsyncThread();asyncThread.run();}
}
当然如果每次都创建一个Thread线程,频繁的创建、销毁,浪费系统资源,我们可以采用线程池:
private ExecutorService executorService = Executors.newCachedThreadPool();public void fun() {executorService.submit(new Runnable() {@Overridepublic void run() {log.info("执行业务逻辑...");}});
}
可以将业务逻辑封装到Runnable或Callable中,交由线程池来执行。
Future异步
@Slf4j
public class FutureManager {public String execute() throws Exception {ExecutorService executor = Executors.newFixedThreadPool(1);Future<String> future = executor.submit(new Callable<String>() {@Overridepublic String call() throws Exception {System.out.println(" --- task start --- ");Thread.sleep(3000);System.out.println(" --- task finish ---");return "this is future execute final result!!!";}});//这里需要返回值时会阻塞主线程String result = future.get();log.info("Future get result: {}", result);return result;}@SneakyThrowspublic static void main(String[] args) {FutureManager manager = new FutureManager();manager.execute();}
}
Future的不足之处的包括以下几点:
- 无法被动接收异步任务的计算结果:虽然我们可以主动将异步任务提交给线程池中的线程来执行,但是待异步任务执行结束之后,主线程无法得到任务完成与否的通知,它需要通过get方法主动获取任务执行的结果。
- Future件彼此孤立:有时某一个耗时很长的异步任务执行结束之后,你想利用它返回的结果再做进一步的运算,该运算也会是一个异步任务,两者之间的关系需要程序开发人员手动进行绑定赋予,Future并不能将其形成一个任务流(pipeline),每一个Future都是彼此之间都是孤立的,所以才有了后面的CompletableFuture,CompletableFuture就可以将多个Future串联起来形成任务流。
- Futrue没有很好的错误处理机制:截止目前,如果某个异步任务在执行发的过程中发生了异常,调用者无法被动感知,必须通过捕获get方法的异常才知晓异步任务执行是否出现了错误,从而在做进一步的判断处理。
CompletableFuture实现异步
public class CompletableFutureCompose {/*** thenAccept子任务和父任务公用同一个线程*/@SneakyThrowspublic static void thenRunAsync() {CompletableFuture<Integer> cf1 = CompletableFuture.supplyAsync(() -> {System.out.println(Thread.currentThread() + " cf1 do something....");return 1;});CompletableFuture<Void> cf2 = cf1.thenRunAsync(() -> {System.out.println(Thread.currentThread() + " cf2 do something...");});//等待任务1执行完成System.out.println("cf1结果->" + cf1.get());//等待任务2执行完成System.out.println("cf2结果->" + cf2.get());}public static void main(String[] args) {thenRunAsync();}
}
我们不需要显式使用ExecutorService,CompletableFuture 内部使用了ForkJoinPool来处理异步任务,如果在某些业务场景我们想自定义自己的异步线程池也是可以的。
Spring的@Async异步
自定义异步线程池
/*** 线程池参数配置,多个线程池实现线程池隔离,@Async注解,默认使用系统自定义线程池,可在项目中设置多个线程池,在异步调用的时候,指明需要调用的线程池名称,比如:@Async("taskName")***/
@EnableAsync
@Configuration
public class TaskPoolConfig {/*** 自定义线程池** @author: jacklin* @since: 2021/11/16 17:41**/@Bean("taskExecutor")public Executor taskExecutor() {//返回可用处理器的Java虚拟机的数量 12int i = Runtime.getRuntime().availableProcessors();System.out.println("系统最大线程数  : " + i);ThreadPoolTaskExecutor executor = new ThreadPoolTaskExecutor();//核心线程池大小executor.setCorePoolSize(16);//最大线程数executor.setMaxPoolSize(20);//配置队列容量,默认值为Integer.MAX_VALUEexecutor.setQueueCapacity(99999);//活跃时间executor.setKeepAliveSeconds(60);//线程名字前缀executor.setThreadNamePrefix("asyncServiceExecutor -");//设置此执行程序应该在关闭时阻止的最大秒数,以便在容器的其余部分继续关闭之前等待剩余的任务完成他们的执行executor.setAwaitTerminationSeconds(60);//等待所有的任务结束后再关闭线程池executor.setWaitForTasksToCompleteOnShutdown(true);return executor;}
}
public interface AsyncService {MessageResult sendSms(String callPrefix, String mobile, String actionType, String content);MessageResult sendEmail(String email, String subject, String content);
}@Slf4j
@Service
public class AsyncServiceImpl implements AsyncService {@Autowiredprivate IMessageHandler mesageHandler;@Override@Async("taskExecutor")public MessageResult sendSms(String callPrefix, String mobile, String actionType, String content) {try {Thread.sleep(1000);mesageHandler.sendSms(callPrefix, mobile, actionType, content);} catch (Exception e) {log.error("发送短信异常 -> ", e)}}@Override@Async("taskExecutor")public sendEmail(String email, String subject, String content) {try {Thread.sleep(1000);mesageHandler.sendsendEmail(email, subject, content);} catch (Exception e) {log.error("发送email异常 -> ", e)}}
}
在实际项目中, 使用@Async调用线程池,推荐等方式是是使用自定义线程池的模式,不推荐直接使用@Async直接实现异步。
Spring ApplicationEvent事件实现异步
定义事件
public class AsyncSendEmailEvent extends ApplicationEvent {/*** 邮箱**/private String email;/*** 主题**/private String subject;/*** 内容**/private String content;/*** 接收者**/private String targetUserId;}
定义事件处理器
@Slf4j
@Component
public class AsyncSendEmailEventHandler implements ApplicationListener<AsyncSendEmailEvent> {@Autowiredprivate IMessageHandler mesageHandler;@Async("taskExecutor")@Overridepublic void onApplicationEvent(AsyncSendEmailEvent event) {if (event == null) {return;}String email = event.getEmail();String subject = event.getSubject();String content = event.getContent();String targetUserId = event.getTargetUserId();mesageHandler.sendsendEmailSms(email, subject, content, targerUserId);}
}
另外,可能有些时候采用ApplicationEvent实现异步的使用,当程序出现异常错误的时候,需要考虑补偿机制,那么这时候可以结合Spring Retry重试来帮助我们避免这种异常造成数据不一致问题。
消息队列
生产者
@Slf4j
@SpringBootTest
public class ProducerRocketMqBootApiTest {@Autowiredprivate RocketMQTemplate rocketMQTemplate;/*** 发送的是同步消息* rocketMQTemplate.syncSend()* rocketMQTemplate.send()* rocketMQTemplate.convertAndSend()* 这三种发送消息的方法,底层都是调用syncSend*//*** 测试发送简单的消息** @throws Exception*/@Testpublic void testSimpleMsg() {SendResult sendResult = rocketMQTemplate.syncSend(MqConstant.TOPIC_TAG, "我是一个同步简单消息");System.out.println(sendResult.getSendStatus());System.out.println(sendResult.getMsgId());System.out.println(sendResult.getMessageQueue());}
}
消费者
@Slf4j
@Component
@RocketMQMessageListener(topic = "${rocketmq.topic}", consumerGroup = "${rocketmq.consumer.group}")
public class BaseConsumerListener implements RocketMQListener<MessageExt>, RocketMQPushConsumerLifecycleListener {@Autowiredprivate MessageMapper messageMapper;//    @Autowired
//    private BitMapBloomFilter bitMapBloomFilter;@Autowiredprivate ApplicationContext applicationContext;@Overridepublic void onMessage(MessageExt message) {String topic = message.getTopic();String tag = message.getTags();byte[] body = message.getBody();String keys = message.getKeys();String msgId = message.getMsgId();String realTopic = message.getProperty("REAL_TOPIC");String originMessageId = message.getProperty("ORIGIN_MESSAGE_ID");// 获取重试的次数 失败一次消息中的失败次数会累加一次int reconsumeTimes = message.getReconsumeTimes();String jsonBody = JackJsonUtil.toJSONString((new String(body)));log.info("消息监听类: msgId:{},topic:{}, tag:{}, body:{},keys:{},realTopic:{},originMessageId:{},reconsumeTimes:{}", msgId, topic, tag, jsonBody, keys, realTopic, originMessageId, reconsumeTimes);// 布隆过滤器进行去重
//        if (bitMapBloomFilter.contains(keys)) {
//            return;
//        }
//        bitMapBloomFilter.add(keys);// 消费者幂等处理: 设计去重表,防止重复消费messageMapper.insert(buildMessage(message));applicationContext.publishEvent(new BaseEvent(tag, jsonBody));}private Message buildMessage(MessageExt messageExt) {Message message = new Message();message.setMsgId(messageExt.getMsgId());message.setMsgTopic(messageExt.getTopic());message.setMsgTag(messageExt.getTags());message.setMsgBody(JackJsonUtil.toJSONString((new String(messageExt.getBody()))));// 判断是否是重试消息String realTopic = messageExt.getProperty("REAL_TOPIC");String originMessageId = messageExt.getProperty("ORIGIN_MESSAGE_ID");if (StrUtil.isNotBlank(realTopic) && StrUtil.isNotBlank(originMessageId) ) {message.setMsgType("2");message.setMsgKeys(messageExt.getKeys()+":"+originMessageId+":"+IdUtil.fastUUID());} else {message.setMsgType("1");message.setMsgKeys(messageExt.getKeys());}message.setMsgRetryId(originMessageId);message.setMsgRetryTopic(realTopic);message.setCreateTime(new Date());return message;}@Overridepublic void prepareStart(DefaultMQPushConsumer consumer) {// 设置最大重试次数consumer.setMaxReconsumeTimes(3);// 如下,设置其它consumer相关属性consumer.setPullBatchSize(16);}
}
ThreadUtil异步工具类
@Slf4j
public class ThreadUtils {public static void main(String[] args) {for (int i = 0; i < 3; i++) {ThreadUtil.execAsync(() -> {ThreadLocalRandom threadLocalRandom = ThreadLocalRandom.current();int number = threadLocalRandom.nextInt(20) + 1;System.out.println(number);});log.info("当前第:" + i + "个线程");}log.info("task finish!");}
}
Guava异步
Guava的ListenableFuture顾名思义就是可以监听的Future,是对java原生Future的扩展增强。我们知道Future表示一个异步计算任务,当任务完成时可以得到计算结果。如果我们希望一旦计算完成就拿到结果展示给用户或者做另外的计算,就必须使用另一个线程不断的查询计算状态。这样做,代码复杂,而且效率低下。使用Guava ListenableFuture可以帮我们检测Future是否完成了,不需要再通过get()方法苦苦等待异步的计算结果,如果完成就自动调用回调函数,这样可以减少并发程序的复杂度。
ListenableFuture是一个接口,它从jdk的Future接口继承,添加了void addListener(Runnable listener, Executor executor)方法。
我们看下如何使用ListenableFuture。首先需要定义ListenableFuture的实例:
ListeningExecutorService executorService = MoreExecutors.listeningDecorator(Executors.newCachedThreadPool());final ListenableFuture<Integer> listenableFuture = executorService.submit(new Callable<Integer>() {@Overridepublic Integer call() throws Exception {log.info("callable execute...")TimeUnit.SECONDS.sleep(1);return 1;}});
首先通过MoreExecutors类的静态方法listeningDecorator方法初始化一个ListeningExecutorService的方法,然后使用此实例的submit方法即可初始化ListenableFuture对象。
ListenableFuture要做的工作,在Callable接口的实现类中定义,这里只是休眠了1秒钟然后返回一个数字1,有了ListenableFuture实例,可以执行此Future并执行Future完成之后的回调函数。
 Futures.addCallback(listenableFuture, new FutureCallback<Integer>() {@Overridepublic void onSuccess(Integer result) {//成功执行...System.out.println("Get listenable future's result with callback " + result);}@Overridepublic void onFailure(Throwable t) {//异常情况处理...t.printStackTrace();}
});
CompletableFuture异步编排工具类
在Java8中,CompletableFuture提供了非常强大的Future的扩展功能,可以帮助我们简化异步编程的复杂性,并且提供了函数式编程的能力,可以通过回调的方式处理计算结果,也提供了转换和组合 CompletableFuture 的方法。
它可能代表一个明确完成的Future,也有可能代表一个完成阶段( CompletionStage ),它支持在计算完成以后触发一些函数或执行某些动作。
创建异步对象
runAsync和 supplyAsync
CompletableFuture 提供了四个静态方法来创建一个异步操作。
public static CompletableFuture<Void> runAsync(Runnable runnable)
public static CompletableFuture<Void> runAsync(Runnable runnable, Executor executor)
public static <U> CompletableFuture<U> supplyAsync(Supplier<U> supplier)
public static <U> CompletableFuture<U> supplyAsync(Supplier<U> supplier, Executor executor)
没有指定Executor的方法会使用ForkJoinPool.commonPool() 作为它的线程池执行异步代码。如果指定线程池,则使用指定的线程池运行。以下所有的方法都类同。
- runAsync方法不支持返回值。
- supplyAsync可以支持返回值。
计算完成时回调方法
当CompletableFuture的计算结果完成,或者抛出异常的时候,可以执行特定的Action。主要是下面的方法:
public CompletableFuture<T> whenComplete(BiConsumer<? super T,? super Throwable> action)
public CompletableFuture<T> whenCompleteAsync(BiConsumer<? super T,? super Throwable> action)
public CompletableFuture<T> whenCompleteAsync(BiConsumer<? super T,? super Throwable> action, Executor executor)
public CompletableFuture<T> exceptionally(Function<Throwable,? extends T> fn)
whenComplete 可以处理正常和异常的计算结果,exceptionally 处理异常情
whenComplete 和 whenCompleteAsync 的区别:
- whenComplete:是执行当前任务的线程执行继续执行 whenComplete 的任务。
- whenCompleteAsync:是执行把 whenCompleteAsync 这个任务继续提交给线程池来进行执行。
方法不以 Async 结尾,意味着 Action 使用相同的线程执行,而 Async 可能会使用其他线程执行(如果是使用相同的线程池,也可能会被同一个线程选中执行)
public static void whenComplete() throws Exception {CompletableFuture<Void> future = CompletableFuture.runAsync(() -> {try {TimeUnit.SECONDS.sleep(1);} catch (InterruptedException e) {}if(new Random().nextInt()%2>=0) {int i = 12/0;}System.out.println("run end ...");});future.whenComplete(new BiConsumer<Void, Throwable>() {@Overridepublic void accept(Void t, Throwable action) {System.out.println("执行完成!");}});future.exceptionally(new Function<Throwable, Void>() {@Overridepublic Void apply(Throwable t) {System.out.println("执行失败!"+t.getMessage());return null;}});TimeUnit.SECONDS.sleep(2);
}
handle 方法
handle 是执行任务完成时对结果的处理。
handle 方法和 thenApply 方法处理方式基本一样。不同的是 handle 是在任务完成后再执行,还可以处理异常的任务。thenApply 只可以执行正常的任务,任务出现异常则不执行 thenApply 方法。
public <U> CompletionStage<U> handle(BiFunction<? super T, Throwable, ? extends U> fn);
public <U> CompletionStage<U> handleAsync(BiFunction<? super T, Throwable, ? extends U> fn);
public <U> CompletionStage<U> handleAsync(BiFunction<? super T, Throwable, ? extends U> fn,Executor executor);
public static void handle() throws Exception{CompletableFuture<Integer> future = CompletableFuture.supplyAsync(new Supplier<Integer>() {@Overridepublic Integer get() {int i= 10/0;return new Random().nextInt(10);}}).handle(new BiFunction<Integer, Throwable, Integer>() {@Overridepublic Integer apply(Integer param, Throwable throwable) {int result = -1;if(throwable==null){result = param * 2;}else{System.out.println(throwable.getMessage());}return result;}});System.out.println(future.get());
}
线程串行化方法
thenApply
当一个线程依赖另一个线程时,获取上一个任务返回的结果,并返回当前任务的返回值
public <U> CompletableFuture<U> thenApply(Function<? super T,? extends U> fn)
public <U> CompletableFuture<U> thenApplyAsync(Function<? super T,? extends U> fn)
public <U> CompletableFuture<U> thenApplyAsync(Function<? super T,? extends U> fn, Executor executor)
Function
- T:上一个任务返回结果的类型
- U:当前任务的返回值类型
private static void thenApply() throws Exception {CompletableFuture<Long> future = CompletableFuture.supplyAsync(new Supplier<Long>() {@Overridepublic Long get() {long result = new Random().nextInt(100);System.out.println("result1="+result);return result;}}).thenApply(new Function<Long, Long>() {@Overridepublic Long apply(Long t) {long result = t*5;System.out.println("result2="+result);return result;}});long result = future.get();System.out.println(result);
}
thenAccept
消费处理结果。接收任务的处理结果,并消费处理,无返回结果。
public CompletionStage<Void> thenAccept(Consumer<? super T> action);
public CompletionStage<Void> thenAcceptAsync(Consumer<? super T> action);
public CompletionStage<Void> thenAcceptAsync(Consumer<? super T> action,Executor executor);
public static void thenAccept() throws Exception{CompletableFuture<Void> future = CompletableFuture.supplyAsync(new Supplier<Integer>() {@Overridepublic Integer get() {return new Random().nextInt(10);}}).thenAccept(integer -> {System.out.println(integer);});future.get();
}
thenRun
只要上面的任务执行完成,就开始执行 thenRun,只是处理完任务后,执行thenRun 的后续操作
public static void thenRun() throws Exception{CompletableFuture<Void> future = CompletableFuture.supplyAsync(new Supplier<Integer>() {@Overridepublic Integer get() {return new Random().nextInt(10);}}).thenRun(() -> {System.out.println("thenRun ...");});future.get();
}
thenCompose 方法
thenCompose 方法允许你对两个 CompletionStage 进行流水线操作,第一个操作完成时,将其结果作为参数传递给第二个操作。
private static void thenCompose() throws Exception {CompletableFuture<Integer> f = CompletableFuture.supplyAsync(new Supplier<Integer>() {@Overridepublic Integer get() {int t = new Random().nextInt(3);System.out.println("t1="+t);return t;}}).thenCompose(new Function<Integer, CompletionStage<Integer>>() {@Overridepublic CompletionStage<Integer> apply(Integer param) {return CompletableFuture.supplyAsync(new Supplier<Integer>() {@Overridepublic Integer get() {int t = param *2;System.out.println("t2="+t);return t;}});}});System.out.println("thenCompose result : "+f.get());
}
两任务组合 - 都要完成
thenCombine 合并任务
组合两个 future,获取两个 future 的返回结果,并返回当前任务的返回值
private static void thenCombine() throws Exception {CompletableFuture<String> future1 = CompletableFuture.supplyAsync(new Supplier<String>() {@Overridepublic String get() {return "hello";}});CompletableFuture<String> future2 = CompletableFuture.supplyAsync(new Supplier<String>() {@Overridepublic String get() {return "hello";}});CompletableFuture<String> result = future1.thenCombine(future2, new BiFunction<String, String, String>() {@Overridepublic String apply(String t, String u) {return t+" "+u;}});System.out.println(result.get());
}
thenAcceptBoth
组合两个 future,获取两个 future 任务的返回结果,然后处理任务,没有返回值
private static void thenAcceptBoth() throws Exception {CompletableFuture<Integer> f1 = CompletableFuture.supplyAsync(new Supplier<Integer>() {@Overridepublic Integer get() {int t = new Random().nextInt(3);try {TimeUnit.SECONDS.sleep(t);} catch (InterruptedException e) {e.printStackTrace();}System.out.println("f1="+t);return t;}});CompletableFuture<Integer> f2 = CompletableFuture.supplyAsync(new Supplier<Integer>() {@Overridepublic Integer get() {int t = new Random().nextInt(3);try {TimeUnit.SECONDS.sleep(t);} catch (InterruptedException e) {e.printStackTrace();}System.out.println("f2="+t);return t;}});f1.thenAcceptBoth(f2, new BiConsumer<Integer, Integer>() {@Overridepublic void accept(Integer t, Integer u) {System.out.println("f1="+t+";f2="+u+";");}});
}
runAfterBoth
组合两个 future,不需要获取 future 的结果,只需两个 future 处理完任务后,处理该任务
private static void runAfterBoth() throws Exception {CompletableFuture<Integer> f1 = CompletableFuture.supplyAsync(new Supplier<Integer>() {@Overridepublic Integer get() {int t = new Random().nextInt(3);try {TimeUnit.SECONDS.sleep(t);} catch (InterruptedException e) {e.printStackTrace();}System.out.println("f1="+t);return t;}});CompletableFuture<Integer> f2 = CompletableFuture.supplyAsync(new Supplier<Integer>() {@Overridepublic Integer get() {int t = new Random().nextInt(3);try {TimeUnit.SECONDS.sleep(t);} catch (InterruptedException e) {e.printStackTrace();}System.out.println("f2="+t);return t;}});f1.runAfterBoth(f2, new Runnable() {@Overridepublic void run() {System.out.println("上面两个任务都执行完成了。");}});
}
两任务组合 - 一个完成
applyToEither 方法
两个任务有一个执行完成,获取它的返回值,处理任务并有新的返回值。
private static void applyToEither() throws Exception {CompletableFuture<Integer> f1 = CompletableFuture.supplyAsync(new Supplier<Integer>() {@Overridepublic Integer get() {int t = new Random().nextInt(3);try {TimeUnit.SECONDS.sleep(t);} catch (InterruptedException e) {e.printStackTrace();}System.out.println("f1="+t);return t;}});CompletableFuture<Integer> f2 = CompletableFuture.supplyAsync(new Supplier<Integer>() {@Overridepublic Integer get() {int t = new Random().nextInt(3);try {TimeUnit.SECONDS.sleep(t);} catch (InterruptedException e) {e.printStackTrace();}System.out.println("f2="+t);return t;}});CompletableFuture<Integer> result = f1.applyToEither(f2, new Function<Integer, Integer>() {@Overridepublic Integer apply(Integer t) {System.out.println(t);return t * 2;}});System.out.println(result.get());
}
acceptEither 方法
两个任务有一个执行完成,获取它的返回值,处理任务,没有新的返回值。
private static void acceptEither() throws Exception {CompletableFuture<Integer> f1 = CompletableFuture.supplyAsync(new Supplier<Integer>() {@Overridepublic Integer get() {int t = new Random().nextInt(3);try {TimeUnit.SECONDS.sleep(t);} catch (InterruptedException e) {e.printStackTrace();}System.out.println("f1="+t);return t;}});CompletableFuture<Integer> f2 = CompletableFuture.supplyAsync(new Supplier<Integer>() {@Overridepublic Integer get() {int t = new Random().nextInt(3);try {TimeUnit.SECONDS.sleep(t);} catch (InterruptedException e) {e.printStackTrace();}System.out.println("f2="+t);return t;}});f1.acceptEither(f2, new Consumer<Integer>() {@Overridepublic void accept(Integer t) {System.out.println(t);}});
}
runAfterEither 方法
两个任务有一个执行完成,不需要获取 future 的结果,处理任务,也没有返回值
private static void runAfterEither() throws Exception {CompletableFuture<Integer> f1 = CompletableFuture.supplyAsync(new Supplier<Integer>() {@Overridepublic Integer get() {int t = new Random().nextInt(3);try {TimeUnit.SECONDS.sleep(t);} catch (InterruptedException e) {e.printStackTrace();}System.out.println("f1="+t);return t;}});CompletableFuture<Integer> f2 = CompletableFuture.supplyAsync(new Supplier<Integer>() {@Overridepublic Integer get() {int t = new Random().nextInt(3);try {TimeUnit.SECONDS.sleep(t);} catch (InterruptedException e) {e.printStackTrace();}System.out.println("f2="+t);return t;}});f1.runAfterEither(f2, new Runnable() {@Overridepublic void run() {System.out.println("上面有一个已经完成了。");}});
}
多任务组合
public static CompletableFuture<Void> allOf(CompletableFuture<?>... cfs);
public static CompletableFuture<Object> anyOf(CompletableFuture<?>... cfs);
allOf:等待所有任务完成
anyOf:只要有一个任务完成
实际业务场景

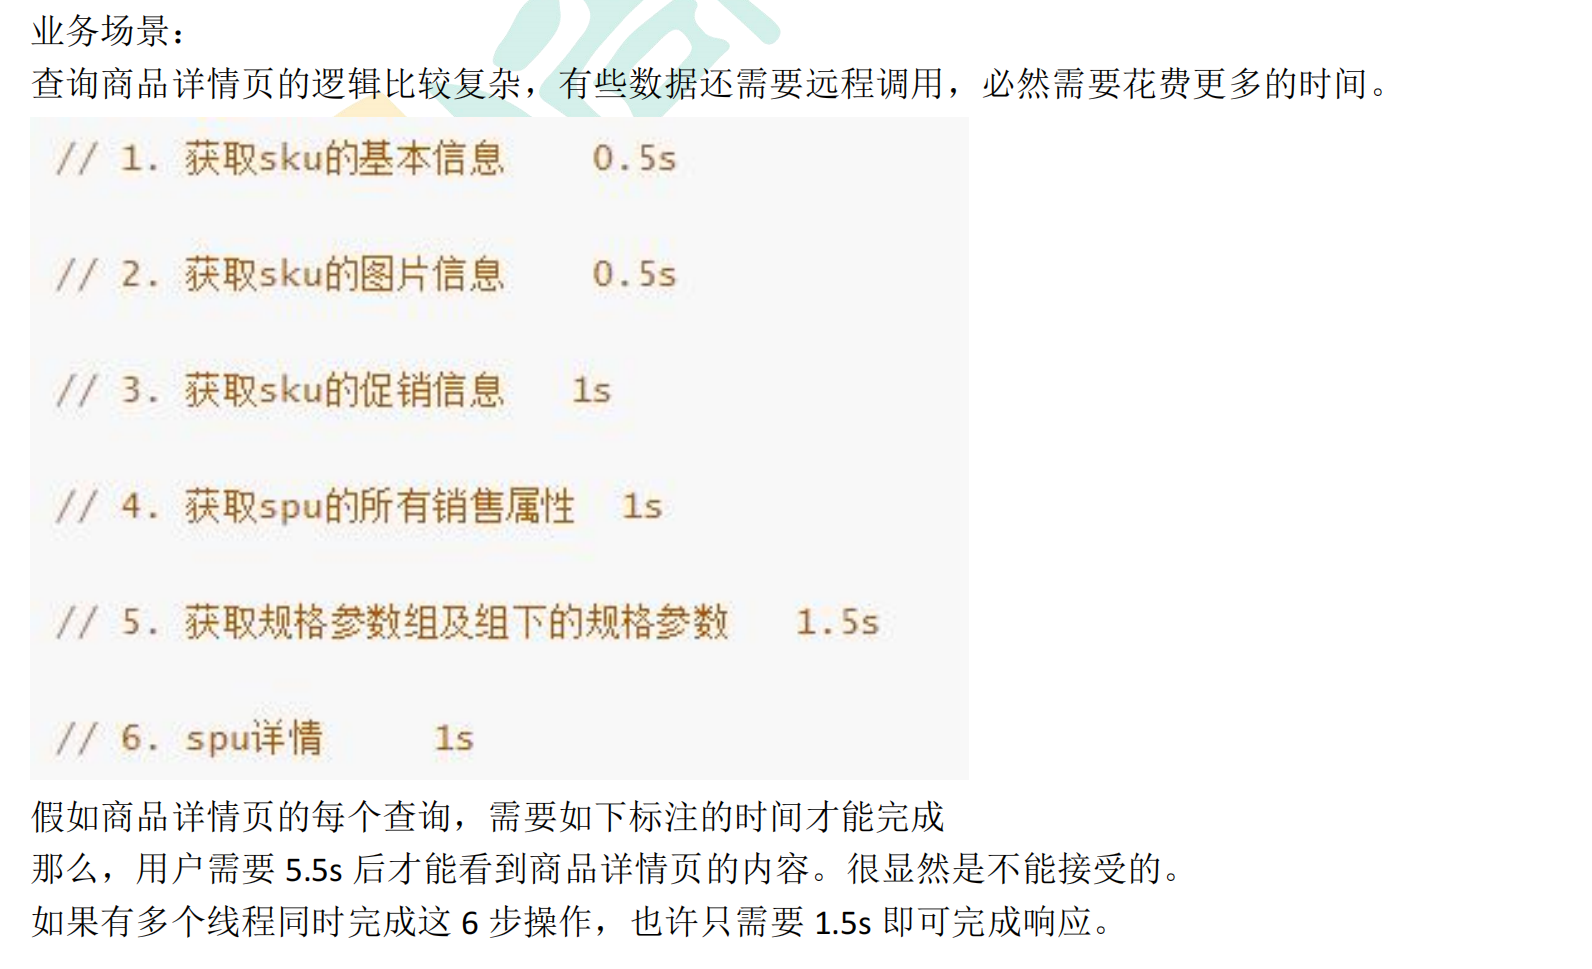
假设要求:
第一,要先拿到商品的基本信息 基本信息里面有 销售id 和 销售规格id
第二,拿到商品基本信息后 可以 根据商品基本信息 异步去获取 促销、销售属性、规格参数等信息
第三,图片信息和商品基本没有上下关联关系 可以同时异步获取
第四,所以信息全部查询完成后一起返回
@Test
public void test16() throws ExecutionException, InterruptedException {//所有信息的汇总SkuiVo skuiVo = new SkuiVo();//查询基本信息(带返回值的异步)CompletableFuture<Skuinfo> infoFuture = CompletableFuture.supplyAsync(() -> {//假设查询到了商品基本信息Skuinfo skuinfo = new Skuinfo();skuinfo.setSpuId("1");skuinfo.setSpuId("2");skuinfo.setGuiId("3");skuiVo.setSkuinfo(skuinfo);return skuinfo;},executor);//查到基本信息后 异步同时去查 促销信息 规格信息 销售属性信息//拿到查基本信息任务的返回值 任务本身无需返回值CompletableFuture<Void> saleCxFuture = infoFuture.thenAcceptAsync((res) -> {String spuId = res.getSpuId();//拿到商品的销售id后查促销信息skuiVo.setSaleCx("促销信息");}, executor);CompletableFuture<Void> saleSxFuture = infoFuture.thenAcceptAsync((res) -> {String spuId = res.getSpuId();//拿到商品的销售id后查销售属性skuiVo.setSaleSx("销售属性信息");}, executor);CompletableFuture<Void> saleGgFuture = infoFuture.thenAcceptAsync((res) -> {String spuId = res.getSpuId();String guiId = res.getGuiId();//拿到商品的销售id和规格id 查商品规格信息skuiVo.setSaleGg("商品规格信息");}, executor);//查基本信息的时候 同时异步 也根据商品id 查商品图片信息//这个任务不需要返回值CompletableFuture<Void> imageFuture= CompletableFuture.runAsync(() -> {//查商品图片信息skuiVo.setImages("商品图片信息");}, executor);//等待所有任务都完成CompletableFuture.allOf(saleCxFuture,saleSxFuture,saleGgFuture,imageFuture).get();System.out.println(skuiVo);
}


)


——常见网络学习)


