目录
- 路由
- 作用
- Vue Router路由
- Vue Router路由的组成
- VueRouter常用的函数
- Vue Router的使用
- 安装Vue Router
- 创建router
- 引入router
- 使用
- 备注
- Vue多级路由(嵌套路由)
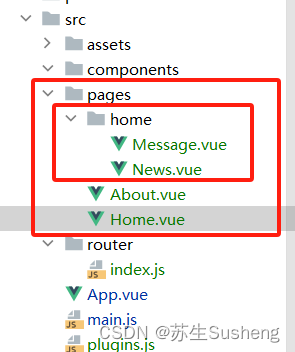
- 编写组件
- 配置嵌套路由
- Vue中的动态路由
- 代码示例
- 父组件Home.vue
- 子组件
- 路由配置
- 路由的 query 参数
- 父组件Home.vue
- 改变news.vue组件取参方式
- 改变路由配置
- 命名路由
- 组件配置
- 父组件传对象参数/Home.vue
- 路由的 props 配置
- 代码示例(动态)
- 路由配置
- 父组件Home.vue
- 子组件message.vue
- <router-link>的 replace 属性
- 编程式路由导航
- 缓存路由组件
- 新的生命周期钩子activated 和 deactivated
- Vue2中的路由守卫
- 全局守卫
- 组件级守卫
- 路由守卫的使用方法
- Vue2中路由器的两种工作模式
- 哈希模式(hash mode)
- 特点
- 历史模式(history mode)
- 特点
路由
在Vue中,路由是指用来管理应用程序中不同页面之间切换和导航的机制。它允许我们根据不同的URL路径,动态地加载和显示不同的组件内容。
Vue中的路由可以通过Vue Router来实现。Vue Router是Vue官方提供的一个插件,它提供了一种声明式的方式来定义路由和导航。
作用
通过路由,我们可以在Vue应用中实现以下功能:
-
跳转到不同的页面:通过定义路由配置,我们可以指定不同URL路径对应的组件,当用户访问这些路径时,路由会自动加载并显示对应的组件。
-
传递参数:我们可以在路由路径中定义动态参数,例如
/user/:id,然后在组件中可以通过$route对象来获取URL中的参数。 -
嵌套路由:可以定义嵌套的路由配置,实现页面的层级结构。
-
导航守卫:可以在路由切换前后执行一些操作,例如验证用户登录状态、获取数据等。
总之,通过路由,我们可以实现在Vue应用中的页面导航和切换,并能够动态加载不同的组件内容。这样可以实现更好的用户体验,使得应用程序更加灵活和可扩展。
Vue Router路由
- 路由就是根据一个请求路径选中一个组件进行渲染的决策过程。
- Vue Router是Vue.js官方提供的路由管理插件,用于实现前端路由。
- Vue Router通过使用路由插件,将不同的组件映射到不同的URL路径上,使得我们可以更方便地在Vue应用中进行页面导航和切换。
route:表示单个路由。routes:表示多个路由的集合。是一个数组,在这个数组中包含了多个route。router:译为路由器,是route、routes的管理者。
路由的查找过程是: router --> routes --> route(当用户在页面上点击按钮的时候,这个时候router就会去routes中去查找route,就是说路由器会去路由集合中找对应的路由)
Vue Router路由的组成
Vue Router路由由以下几个重要的组成部分组成:
-
路由实例(Router Instance):创建一个Vue Router实例,用于管理应用程序的路由。
-
路由映射表(Route Mapping):在路由实例中设置路由映射表,即定义URL路径与对应的组件之间的关系。路由映射表是一个包含路由对象的数组,每个路由对象由以下几个属性组成:
path:定义URL路径,可以是字符串或者正则表达式。name:路由名称,用于标识路由。component:对应的组件,当路径匹配时,将渲染该组件。redirect:重定向路径,在访问某个路径时,自动重定向到其他路径。children:定义嵌套路由。
-
路由出口(Router View):使用
<router-view>标签作为路由的出口,用于渲染匹配到的组件。 -
路由链接(Router Link):使用
<router-link>标签作为路由的链接,用于生成可点击的链接,通过点击链接切换路由。 -
导航守卫(Navigation Guards):Vue Router提供了多个导航守卫钩子,用于在路由导航过程中拦截或者影响导航行为。例如,
beforeEach、beforeResolve、afterEach等。
通过以上组成部分,我们可以在Vue应用中实现前端路由的功能,通过定义路由映射表来控制页面的切换和加载不同的组件。同时,导航守卫可以让我们在路由切换前后执行一些逻辑,例如检查用户权限、验证用户登录状态等。
VueRouter常用的函数
Vue Router常用的函数包括:
-
VueRouter构造函数:用于创建一个Vue Router实例,可以在创建实例时传入一些配置选项。例如:
const router = new VueRouter({routes: [// 路由映射表],mode: 'history' // 路由模式,默认为hash模式 }) -
router.push():用于在代码中进行路由的跳转,将会导航到一个新的URL。可以传入一个字符串路径或者一个描述地址的对象。例如:
// 字符串路径 router.push('/home')// 对象 router.push({ path: '/home' }) -
router.replace():与
router.push()类似,不同的是使用router.replace()进行路由跳转时,不会留下浏览历史记录。例如:router.replace('/home') -
router.go():用于在浏览器历史记录中前进或后退指定的步数。接受一个整数作为参数,正数为前进,负数为后退。例如:
// 前进一页 router.go(1)// 后退一页 router.go(-1) -
router.beforeEach():导航守卫钩子函数,在路由切换前执行,可以用于进行一些逻辑判断或者权限验证。例如:
router.beforeEach((to, from, next) => {// 在此处进行权限验证等操作next() }) -
router.afterEach():导航守卫钩子函数,在路由切换后执行,一般用于处理一些页面切换后的操作。例如:
router.afterEach((to, from) => {// 在此处执行一些操作
})
这些是Vue Router中常用的函数,通过使用这些函数可以实现路由的跳转、导航守卫和浏览历史记录等功能。
Vue Router的使用
Vue2的路由是通过Vue Router实现的,它可以帮助我们在Vue应用中实现页面之间的切换和导航。
安装Vue Router
首先,我们需要在项目中安装Vue Router:
npm install vue-router@3
创建router

import Vue  from "vue";
//引入VueRouter
import VueRouter from 'vue-router'
//引入路由组件
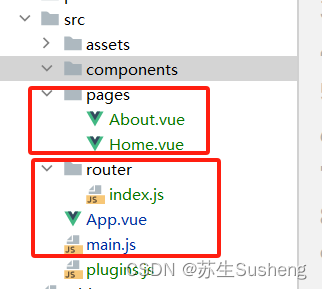
import About from '../pages/About.vue'
import Home from '../pages/Home.vue'
Vue.use(VueRouter)
//创建router实例对象,去管理一组一组的路由规则
const router = new VueRouter({routes: [{path: '/about',component: About,},{path: '/home',component: Home,},],
})//暴露router
export default router
引入router
然后,在Vue的入口文件(main.js)中,我们需要引入Vue Router并使用它:
//该文件是整个项目的入口文件
//引入vue,相当于以前在html中引入了vue.js
import Vue from 'vue'
//引入app组件,它是所有组件的父组件,App组件的父组件是vm,即:一人之下万人之上
import App from './App.vue'
//关闭Vue的生产提示
Vue.config.productionTip = false
import router from "@/router";//引入router//创建Vue实例对象————vm
new Vue({router,//引入router//render函数:用于把App组件中的template模板结构,渲染到页面中,即将App组件放入到容器中render: h => h(App),
}).$mount('#app')//该行代码一样可以写在new Vue({el:'#app'}})
在上面的代码中,我们首先引入Vue Router,并使用Vue.use()将其安装到Vue中。
然后,我们创建一个路由实例,其中包含了我们的路由配置。在配置中,我们可以通过mode属性指定路由模式,可以是hash模式或history模式;通过routes属性指定路由的详细配置。每个路由都包含了一个path属性表示路由路径,一个name属性表示路由名称,以及一个component属性表示对应的组件。
接下来,我们在Vue实例中将路由实例注入,这样就可以在整个应用中使用路由了。
使用
在我们的组件中,我们可以使用Vue Router提供的<router-link>组件来生成路由链接,使用<router-view>组件来显示当前路由对应的组件。
App.vue内容
<template><div><router-link to="/">Home</router-link><router-link to="/about">About</router-link><!--指定展示位置--><router-view></router-view></div>
</template>
在上面的代码中,<router-link>组件可以通过to属性指定要跳转的路由路径。<router-view>组件则会根据当前路由显示对应的组件。
通过以上配置,我们就可以实现基本的页面路由导航了。当我们点击<router-link>组件时,路由会自动切换到指定的路由,并将对应的组件渲染到<router-view>组件中。
备注
-
路由组件通常存放在
pages文件夹,一般组件通常存放在components文件夹。 -
通过切换,“隐藏”了的路由组件,默认 是被 销毁 掉的,需要的时候再去挂载。
-
每个组件都有自己的
$route属性,里面存储着自己的路由信息。 -
整个应用只有一个 router,可以通过组件的
$router属性获取到。
Vue多级路由(嵌套路由)
编写组件

message.vue
<template>
<div>本台最新消息...
</div>
</template><script>
export default {// eslint-disable-next-line vue/multi-word-component-namesname: "Message"
}
</script><style scoped></style>
news.vue
<template>
<div>新华社....
</div>
</template><script>
export default {// eslint-disable-next-line vue/multi-word-component-namesname: "news"
}
</script><style scoped></style>
home.vue
<template>
<div style="border: 1px dashed green;margin: 10px"><span>主页</span><br><router-link to="/home/news">新闻</router-link> <router-link to="/home/message">消息</router-link><router-view></router-view>
</div>
</template><script>
export default {// eslint-disable-next-line vue/multi-word-component-namesname: "Home"
}
</script><style scoped></style>
配置嵌套路由
router/index.js
import Vue  from "vue";
//引入VueRouter
import VueRouter from 'vue-router'
//引入路由组件
import About from '../pages/About.vue'
import Home from '../pages/Home.vue'
import News from '../pages/home/News.vue'
import Message from '../pages/home/Message.vue'
Vue.use(VueRouter)
//创建router实例对象,去管理一组一组的路由规则
const router = new VueRouter({routes: [{path: '/about',component: About,},{path: '/home',component: Home,children: [//通过children配置子级路由{path: 'news', //此处一定不要写:'/news'component: News,},{path: 'message', //此处一定不要写:'/message'component: Message,},],},]
})//暴露router
export default router
Vue中的动态路由
- 在Vue2中,动态路由是指根据用户的输入或操作,动态地生成和处理路由。
- Vue Router是Vue.js官方提供的路由管理插件,在Vue Router中可以通过配置动态路由来实现根据用户需要加载不同的组件或页面。
代码示例
父组件Home.vue
<template>
<div style="border: 1px dashed green;margin: 10px"><span>主页</span><br><router-link to="/home/news/666/反犹太意识法案">新闻</router-link> <router-link to="/home/message/秘密消息">消息</router-link><router-view></router-view>
</div>
</template><script>
export default {// eslint-disable-next-line vue/multi-word-component-namesname: "Home"
}
</script><style scoped></style>
子组件
news.vue:两个参数
<template>
<div>新华社....<p>id:{{id}}</p><p>title:{{title}}</p>
</div>
</template><script>
export default {// eslint-disable-next-line vue/multi-word-component-namesname: "news",data() {return {id:this.$route.params.id,title:this.$route.params.title}}
}
</script><style scoped></style>
message.vue:一个参数
<template>
<div>本台最新消息...<p>msg:{{msg}}</p>
</div>
</template><script>
export default {// eslint-disable-next-line vue/multi-word-component-namesname: "Message",data(){return{msg:""}},created() {this.msg = this.$route.params.msg;}
}
</script><style scoped></style>
路由配置
import Vue  from "vue";
//引入VueRouter
import VueRouter from 'vue-router'
//引入路由组件
import About from '../pages/About.vue'
import Home from '../pages/Home.vue'
import News from '../pages/home/News.vue'
import Message from '../pages/home/Message.vue'
Vue.use(VueRouter)
//创建router实例对象,去管理一组一组的路由规则
const router = new VueRouter({routes: [{path: '/about',component: About,},{path: '/home',component: Home,children: [//通过children配置子级路由{path: 'news/:id/:title', //此处一定不要写:'/news'component: News,},{path: 'message/:msg', //此处一定不要写:'/message'component: Message,},],},]
})//暴露router
export default router
路由的 query 参数
- 跳转的路径中添加要传递的参数信息,类似于get方式
- 使用{{this.$route.query.id}}获取对应的参数值
父组件Home.vue
改变news组件的传值方式
<template>
<div style="border: 1px dashed green;margin: 10px"><span>主页</span><br><router-link to="/home/news?id=666&title=反犹太意识法案">新闻</router-link> <router-link to="/home/message/秘密消息">消息</router-link><router-view></router-view>
</div>
</template><script>
export default {// eslint-disable-next-line vue/multi-word-component-namesname: "Home"
}
</script><style scoped></style>
改变news.vue组件取参方式
<template>
<div>新华社....<p>id:{{id}}</p><p>title:{{title}}</p>
</div>
</template><script>
export default {// eslint-disable-next-line vue/multi-word-component-namesname: "news",data() {return {id:this.$route.query.id,title:this.$route.query.title}}
}
</script><style scoped></style>
改变路由配置
import Vue  from "vue";
//引入VueRouter
import VueRouter from 'vue-router'
//引入路由组件
import About from '../pages/About.vue'
import Home from '../pages/Home.vue'
import News from '../pages/home/News.vue'
import Message from '../pages/home/Message.vue'
Vue.use(VueRouter)
//创建router实例对象,去管理一组一组的路由规则
const router = new VueRouter({routes: [{path: '/about',component: About,},{path: '/home',component: Home,children: [//通过children配置子级路由{path: 'news', //此处一定不要写:'/news'component: News,},{path: 'message/:msg', //此处一定不要写:'/message'component: Message,},],},]
})//暴露router
export default router
命名路由
- 防止路由路径的路径较长编写起来不方便,为路由配置设置name属性
- 跳转的时候使用:to=“{name:’配置的name的值’}”
- 另外:在Vue2中,可以使用路由对象的params属性来传递对象参数。
组件配置
给组件赋予name属性
import Vue  from "vue";
//引入VueRouter
import VueRouter from 'vue-router'
//引入路由组件
import About from '../pages/About.vue'
import Home from '../pages/Home.vue'
import News from '../pages/home/News.vue'
import Message from '../pages/home/Message.vue'
Vue.use(VueRouter)
const originalPush = VueRouter.prototype.push
VueRouter.prototype.push = function push(location) {return originalPush.call(this, location).catch(err => err)
}
//创建router实例对象,去管理一组一组的路由规则
const router = new VueRouter({routes: [{path: '/about',component: About,},{path: '/home',component: Home,children: [//通过children配置子级路由{path: 'news', //此处一定不要写:'/news'name: 'homeNews',//name属性component: News,},{path: 'message/:msg', //此处一定不要写:'/message'component: Message,},],},]
})//暴露router
export default router
父组件传对象参数/Home.vue
<template>
<div style="border: 1px dashed green;margin: 10px"><span>主页</span><br><router-link to="/home/message/秘密消息">消息</router-link> <router-link :to="{name:'homeNews',params: {id:666,title:'王祖贤法案'}}">新闻</router-link>
<!-- <button @click="toNews">新闻</button>--><router-view></router-view>
</div>
</template><script>
export default {// eslint-disable-next-line vue/multi-word-component-namesname: "Home",data(){return {news:{id:'666',title:'王祖贤法案'}}},methods:{toNews(){const push = {name:'homeNews',params:this.news}this.$router.push(push)}}
}
</script><style scoped></style>
路由的 props 配置
在路由的 props 配置中,我们可以使用以下方式来设置和使用:
-
静态配置:
const routes = [{path: '/',component: Home,props: { foo: 'bar' } // 设置静态的 props} ]; -
动态配置:
const routes = [{path: '/',component: Home,props: (route) => ({ id: route.query.id }) // 使用函数返回动态的 props}
];
在组件中,我们可以通过 props 属性来获取路由传递的参数:
props: ['foo'], // 声明需要接受的参数mounted() {console.log(this.foo); // 使用 props 中的参数
}
代码示例(动态)
路由配置
import Vue  from "vue";
//引入VueRouter
import VueRouter from 'vue-router'
//引入路由组件
import About from '../pages/About.vue'
import Home from '../pages/Home.vue'
import News from '../pages/home/News.vue'
import Message from '../pages/home/Message.vue'
Vue.use(VueRouter)
const originalPush = VueRouter.prototype.push
VueRouter.prototype.push = function push(location) {return originalPush.call(this, location).catch(err => err)
}
//创建router实例对象,去管理一组一组的路由规则
const router = new VueRouter({routes: [{path: '/about',component: About,},{path: '/home',component: Home,children: [//通过children配置子级路由{path: 'news', //此处一定不要写:'/news'name: 'homeNews',component: News,},{path: 'message', //此处一定不要写:'/message'component: Message,//props: { author: '记者张三' } // 设置静态的 propsprops: (route) => ({msg: route.query.msg,authorNo: route.query.authorNo,authorName: route.query.authorName}) // 使用函数返回动态的 props},],},]
})//暴露router
export default router
父组件Home.vue
<template>
<div style="border: 1px dashed green;margin: 10px"><span>主页</span><br><router-link to="/home/message?msg=本台最新消息&authorNo=101&authorName=张三">消息</router-link> <router-link :to="{name:'homeNews',params: {id:666,title:'王祖贤法案'}}">新闻</router-link>
<!-- <button @click="toNews">新闻</button>--><router-view></router-view>
</div>
</template><script>
export default {// eslint-disable-next-line vue/multi-word-component-namesname: "Home",data(){return {news:{id:'666',title:'王祖贤法案'}}},methods:{toNews(){const push = {name:'homeNews',params:this.news}this.$router.push(push)}}
}
</script><style scoped></style>
子组件message.vue
<template>
<div>本台最新消息...<p>msg:{{msg}}</p><p>author:{{authorName}}</p>
</div>
</template><script>
export default {// eslint-disable-next-line vue/multi-word-component-namesname: "Message",props: ['msg','authorNo','authorName'], // 声明需要接受的参数
}
</script><style scoped></style>
的 replace 属性
<router-link> 组件是 Vue Router 提供的用于创建导航链接的组件。replace 属性是 <router-link> 组件的一个配置选项,用于设置导航时是否使用 replace 模式。
默认情况下,点击 <router-link> 组件会使用 push 模式进行导航,即会向 history 栈中添加一个新的记录。如果设置了 replace 属性为 true,则会使用 replace 模式进行导航,即替换当前的 history 记录,而不会添加新的记录。
下面是一个使用 replace 属性的示例:
<template><div><router-link to="/page1">Page 1</router-link><router-link to="/page2" replace>Page 2</router-link></div>
</template>
在上述代码中,第一个 <router-link> 使用默认的 push 模式进行导航,点击后会向 history 栈中添加一个新的记录。第二个 <router-link> 添加了 replace 属性,表示使用 replace 模式进行导航,点击后会替换当前的 history 记录。
replace 模式可以在某些场景中很有用,例如在实现页面重定向时。
编程式路由导航
编程式路由导航是通过代码来进行路由跳转的方式,而不是通过用户的交互操作来触发导航。
在 Vue Router 中,你可以使用 $router 对象来进行编程式路由导航。$router 对象是 Vue Router 实例的一个属性,可以通过 this.$router 来访问。
下面是一些常见的编程式路由导航的示例:
- 使用
push方法进行导航:
// 跳转到指定的路由路径
this.$router.push('/page1');// 跳转到指定的命名路由
this.$router.push({ name: 'page1' });// 在导航时传递参数
this.$router.push({ path: '/page1', query: { id: 1 } });
- 使用
replace方法进行导航:
// 替换当前的路由记录
this.$router.replace('/page2');// 替换当前的命名路由记录
this.$router.replace({ name: 'page2' });// 在导航时传递参数
this.$router.replace({ path: '/page2', query: { id: 2 } });
- 使用
go方法进行前进或后退导航:
// 前进一步
this.$router.go(1);// 后退一步
this.$router.go(-1);// 前进或后退多步
this.$router.go(2);
通过使用 $router 对象的方法,你可以在组件中进行编程式导航,实现页面跳转和导航控制的逻辑。
缓存路由组件
在 Vue Router 中,你可以通过 keep-alive 组件来缓存路由组件。keep-alive 组件是 Vue 内置的组件,可以将其包裹在需要缓存的路由组件的外层。
下面是一个示例,展示如何使用 keep-alive 来缓存路由组件:
<template><div><router-view v-slot="{ Component }"><keep-alive><component :is="Component" /></keep-alive></router-view></div>
</template><script>
export default {// ...
}
</script>
在上面的示例中,<keep-alive> 组件包裹了 <component> 组件,:is 属性根据当前路由的组件动态地渲染对应的组件。
这样,当切换到其他路由后再返回到被缓存的路由,该路由组件将会被从缓存中取出并重新渲染,而不是重新创建一个新的组件实例。
需要注意的是,keep-alive 组件默认会缓存所有被包裹的组件,如果你希望只缓存特定的组件,可以在路由配置中使用 meta 字段来标记需要缓存的组件,然后在 keep-alive 组件上使用 include 或 exclude 属性来指定要缓存的组件。
例如,将只缓存具有 meta 字段为 keepAlive: true 的组件:
<template><div><router-view v-slot="{ Component }"><keep-alive :include="includedComponents"><component :is="Component" /></keep-alive></router-view></div>
</template><script>
export default {computed: {includedComponents() {return this.$route.matched.filter(route => route.meta.keepAlive).map(route => route.components.default);}}
}
</script>
在上面的示例中,includedComponents 计算属性根据当前路由的 matched 属性来过滤出具有 keepAlive: true 的组件,并返回这些组件的 default 组件。然后,将 includedComponents 数组传递给 keep-alive 组件的 include 属性。这样,只有被标记为 keepAlive: true 的组件才会被缓存起来。
新的生命周期钩子activated 和 deactivated
-
作用:路由组件所独有 的两个钩子,用于捕获路由组件的激活状态。
-
具体名字:
activated路由组件被激活时触发。deactivated路由组件失活时触发。
Vue2中的路由守卫
在Vue2中,路由守卫是一种机制,用于在导航到特定路由之前或之后执行一些逻辑。它们可以用于控制访问权限,检查用户登录状态,执行一些初始化操作等。
路由守卫分为全局守卫和组件级守卫。
全局守卫
全局守卫包括三种:
-
前置守卫(beforeEach):在导航之前被调用,可以用来进行身份验证等操作。可以通过
router.beforeEach()来注册全局前置守卫。 -
后置钩子(afterEach):在导航完成之后被调用,无法改变导航本身。可以通过
router.afterEach()来注册全局后置钩子。 -
重用组件钩子(beforeRouteUpdate):在组件被重用时调用,例如从
/users/1导航到/users/2。
组件级守卫
组件级守卫包括四种:
-
路由独享的守卫(beforeEnter):在路由配置中定义的守卫,只在该路由中生效。
-
组件内的守卫:可以在组件中定义
beforeRouteEnter、beforeRouteUpdate和beforeRouteLeave三个生命周期函数作为守卫。
路由守卫的使用方法
-
在创建Vue Router实例之前,要先引入Vue Router模块。
import Vue from 'vue' import VueRouter from 'vue-router'Vue.use(VueRouter) -
创建路由实例,并配置路由规则。
const router = new VueRouter({routes: [{ path: '/home', component: Home },{ path: '/about', component: About }] }) -
注册全局前置守卫。
router.beforeEach((to, from, next) => {// 在进入路由之前执行的逻辑next() }) -
注册全局后置钩子。
router.afterEach((to, from) => {// 在路由完成之后执行的逻辑 }) -
在组件中定义组件内守卫。
export default {beforeRouteEnter(to, from, next) {// 在进入路由之前执行的逻辑next()},beforeRouteUpdate(to, from, next) {// 在组件被重用时执行的逻辑next()},beforeRouteLeave(to, from, next) {// 在离开路由之前执行的逻辑next()}
}
通过使用路由守卫,可以对路由的导航进行控制和管理,实现更好的用户体验和安全防护。
Vue2中路由器的两种工作模式
在Vue2中,路由器(Vue Router)有两种工作模式,分别是哈希模式(hash mode)和历史模式(history mode)。
哈希模式(hash mode)
默认使用的是哈希模式,即URL中会带有一个以#开头的哈希值。在这种模式下,路由器会监听浏览器URL中哈希值的变化,并根据哈希值来匹配对应的路由。哈希模式的URL在改变时不会触发页面的刷新,因此可以实现单页面应用(SPA)的效果。
const router = new VueRouter({mode: 'hash',routes: [{ path: '/home', component: Home },{ path: '/about', component: About }]
})
在哈希模式下,访问http://example.com/#/home会加载Home组件,访问http://example.com/#/about会加载About组件。
特点
-
地址中永远带着#号,不美观 。
-
若以后将地址通过第三方手机 app 分享,若 app 校验严格,则地址会被标记为不合法。
-
兼容性较好。
历史模式(history mode)
历史模式使用HTML5 History API来管理URL,可以去掉URL中的哈希值,使URL更加友好和美观。在这种模式下,路由器会监听浏览器历史记录的变化,并根据路径来匹配对应的路由。需要注意的是,在使用历史模式时,需要服务器的支持,以便正确地响应URL,避免404错误。
const router = new VueRouter({mode: 'history',routes: [{ path: '/home', component: Home },{ path: '/about', component: About }]
})
在历史模式下,访问http://example.com/home会加载Home组件,访问http://example.com/about会加载About组件。
特点
- 地址干净,美观 。
- 兼容性和 hash 模式相比略差。
- 应用部署上线时需要后端人员支持,解决刷新页面服务端 404 的问题。
connect-history-api-fallback ,用来解决 history 之后 404 NOT FOUND 的问题npm i connect-history-api-fallback
通过选择合适的工作模式,可以根据项目需求来决定路由器的工作方式,提供更好的用户体验和URL美观性。


