SqlSession以及Spring与MyBatis整合
准备所需要的JAR包
要实现MyBatis与Spring的整合,很明显需要这两个框架的JAR包,但是只是使用这两个框架中所提供的JAR包是不够的,还需要配合其他包使用:
- Spring的JAR包
- MyBatis的JAR包
- Spring与MyBatis整合中间包
mybatis-spring-x.x.x.jar - 数据库驱动JAR(以MYSQL为例)
mysql-connector-java-x.x.x-bin.jar - 数据源所需的JAR(DBCP)
commons-dbcp2-x.x.x.jar和commons-pool2-x.x.x.jar
配置文件介绍
关于resources文件夹
我们在之前的项目中,几乎每次都会创建这个文件夹,然后Use as a source folder,那么这个文件夹到底是用来干啥的,凭什么使用它里面的文件是直接写文件名?
实际上这个文件夹是专门存放你的应用所需资源的,如XML等配置文件。这个文件夹被标记为source folder后,在编译后,里面的文件会放到与编译好的文件相同目录里,所以你读取的直接使用文件名实际上是相对路径。
pom.xml
如果我们创建的是一个Maven项目,就可以在pom.xml里添加<properties></properties>标签来定义库版本,然后在下方的<dependencies></dependencies>中的<dependency></dependency>的<version></version>以${...}形式引用它。
下面的XML文件省略了很多,仅为了演示。
<properties><project.build.sourceEncoding>UTF-8</project.build.sourceEncoding><junit.version>4.12</junit.version><!-- 此处表示省略 -->[...]
</properties><dependencies><!-- JUINT --><dependency><groupId>junit</groupId><artifactId>junit</artifactId><!-- 引用上方标签的版本号 --><version>${junit.version}</version><scope>test</scope></dependency><!-- 此处表示省略 -->[...]
</dependencies>
db.properties
db.properties主要包含一些数据库连接信息,比如JDBC连接驱动、数据库账户名和密码等。
我们在之前的项目中就已经使用过这个文件了,但我们一直没有详细介绍过其每条内容的含义(实际上语义很明显)
jdbc.driver=com.mysql.jdbc.Driver
jdbc.url=jdbc:mysql://localhost:3306/db_mybatis?useUnicode=true&characterEncoding=utf8
jdbc.username=db_mybatis
jdbc.password=db_mybatis
首先第一行jdbc.driver是指定数据库连接驱动。JDBC即Java数据库连接,它定义了一套关系型数据库的规则,没错实际上就是接口,然后实现并不是由Java官方进行的,而是交给各个数据库厂商来做,它们打包的库也就是JAR包,就被叫做数据库驱动,同时也意味着不同数据库就有不同的驱动实现。
程序设计者无需去关心每个数据库驱动是怎么实现的,而是像你把手机充电器插到墙上的插座一样,把驱动按照接口给“插”进去。这就是面向接口编程的好处。
你的程序只是一个调用者,数据库驱动就像一个代理人,你要先告诉这个代理人怎么操作,然后让这个代理人去真正操纵数据库(怎么操纵你是不关心的,只要满足你的操作需求即可)。你与这个代理人约定的通用交流方式就是刚才的接口,而代理人具体的操纵方式就是驱动的实现。
我们所给的代码中很显然是MySQL的数据库驱动,后面的mysql.jdbc.Driver实际上是随你pom.xml添加的包一块引入的。
第二行的是数据库连接URL,它实际上是数据库JDBC连接字符串的一部分。它的书写形式应该参考数据库驱动提供方的文档!
jdbc说明这是一个JDBC的连接字符串mysql说明连接的数据库为MYSQLlocalhost所在部分,一般是数据库的网络地址或域名,localhost实际上是一个域名,它在你系统的HOST文件中被解析到了127.0.0.1(通常是这样,不绝对,你完全可以修改它),这个地址是一个回环地址,它实际上表示你机器本身。同理,我的MySQL如果在远程服务器192.168.10.2上面,这里就不再是localhost,而是192.168.10.2或者对应的域名。db_mybatis部分对应数据库名称,这个我们在之前创建过。useUnicode这里的值为true表示使用Unicode编码,它是国际标准字符集,将世界上每一种自然语言每个字符都定义为一个唯一编码,满足跨语言需要,尤其是包含中文的时候。characterEncoding部分是指定Unicode编码的存储方式。Unicode只是一个符号集,但并没有规定怎么存放。这里的存放方式为utf8,被定义为将码点编码为1到4个字节byte,具体取决于有效二进制位的数量。
类似于useUnicode的参数还有很多,比如设置SSL等,这里不过多介绍,碰到了请参考文档或搜索引擎。
jdbc.username和jdbc.password就很简单了,一般是具有权限的数据库用户的用户名和密码。分配一个或多个具有部分权限的用户是好习惯,而不是一直用root(它权限太大了,不安全)。
app.xml
app.xml为Spring配置文件,名称同样不固定,根据你自己来。对于内容的解释请看下方代码的注释:
<!-- 指定XML版本和编码方式为Unicode UTF-8 -->
<?xml version="1.0" encoding="UTF-8"?>
<beans xmlns="http://www.springframework.org/schema/beans"xmlns:xsi="http://www.w3.org/2001/XMLSchema-instance" xmlns:context="http://www.springframework.org/schema/context"xmlns:tx="http://www.springframework.org/schema/tx"xsi:schemaLocation="http://www.springframework.org/schema/beans http://www.springframework.org/schema/beans/spring-beans.xsdhttp://www.springframework.org/schema/txhttp://www.springframework.org/schema/tx/spring-tx.xsdhttp://www.springframework.org/schema/context http://www.springframework.org/schema/context/spring-context.xsd"><!-- 指定需要扫描的包,使注解生效 --><context:component-scanbase-package="xxx.xxxx.xxx" /><!--读取db.properties --><context:property-placeholder location="classpath:db.properties"/><!-- 配置数据源 --><bean id="dataSource" class="org.springframework.jdbc.datasource.DriverManagerDataSource"><!--数据库驱动 --><property name="driverClassName" value="${jdbc.driver}" /><!--连接数据库的url --><property name="url" value="${jdbc.url}" /><!--连接数据库的用户名 --><property name="username" value="${jdbc.username}" /><!--连接数据库的密码 --><property name="password" value="${jdbc.password}" /></bean><!-- 事务管理器,依赖于数据源 --><bean id="transactionManager" class="org.springframework.jdbc.datasource.DataSourceTransactionManager"><property name="dataSource" ref="dataSource" /></bean>	<!-- 注册事务管理器驱动,开启事务注解 --><tx:annotation-driven transaction-manager="transactionManager"/><!-- 配置MyBatis工厂 --><bean id="sqlSessionFactory" class="org.mybatis.spring.SqlSessionFactoryBean"><property name="dataSource" ref="dataSource" /><!-- 这里指定了MyBatis配置文件为mybatis-config.xml --><property name="configLocation" value="classpath:mybatis-config.xml"/></bean><bean class="org.mybatis.spring.mapper.MapperScannerConfigurer"><property name="basePackage" value="xx.xxx.xx.mapper" /><property name="sqlSessionFactoryBeanName" value="sqlSessionFactory" /></bean></beans>
mybatis-config.xml
mybatis-config.xml为MyBatis配置文件,当然你可以不写它,将它的配置写在Spring配置文件中(写法不太一样),但不建议这么做,当文件内容特别多时不利于维护。
<?xml version="1.0" encoding="UTF-8" ?>
<!DOCTYPE configuration PUBLIC "-//mybatis.org//DTD Config 3.0//EN""http://mybatis.org/dtd/mybatis-3-config.dtd">
<configuration><properties resource="db.properties" /><settings><!-- 延迟加载的开关 --><setting name="lazyLoadingEnabled" value="false" /><!-- 设置积极加载(true)或按需加载(false) --><setting name="aggressiveLazyLoading" value="true" /><setting name="mapUnderscoreToCamelCase" value="true" /><setting name="logImpl" value="STDOUT_LOGGING" /></settings><typeAliases><!-- 对应的dao实体对象 --><package name="xx.xxx.xx.dao" /></typeAliases><!--2.配置Mapper的位置 --><mappers><mapper resource="xx/xxx/xx/mapper/CustomerMapper.xml" /></mappers>
</configuration>
log4j.properties
日志的配置文件
# Global logging configuration
log4j.rootLogger=ERROR, stdout
# MyBatis logging configuration...
log4j.logger.top.cairbin.test5=DEBUG
# Console output...
log4j.appender.stdout=org.apache.log4j.ConsoleAppender
log4j.appender.stdout.layout=org.apache.log4j.PatternLayout
log4j.appender.stdout.layout.ConversionPattern=%5p [%t] - %m%n
进程、线程与CPU调度
在开始Spring与MyBatis的整合之前,为了了解一些概念,我们来讲下进程与线程。
什么是进程?进程是对程序过程的抽象。它是OS的动态执行单元,在传统OS上既是基本分配单元又是基本执行单元。
举个不太严谨的例子,你在Windows下打开一个音乐播放器,随之你能在任务管理器中看到这一项,而这个正在运行的音乐播放器就是一个进程。
线程实际上算是轻量级的进程,但二者还是不太相同,不过它们的相同点要多余不同点。它是看起来就像是对计算机创建进程的模拟,只不过这个模拟是在进程之中的。
进程内存资源相对来讲较独立,而多个线程共享进程的内存资源。
另外我们的CPU调度一般是抢占式的,我们在使用计算机的时候看起来没啥感觉,但实际上CPU一直在“抽疯”——在多个线程之间进行高速切换,这就带来一些问题。
有些操作它不是原子的,即可分割为更小的操作,当一个活没有干完的时候,CPU便去干另一个活。
同时,多个线程尝试对同一个变量进行修改的时候,顺序可能是乱的。
这些都有可能导致线程不安全。什么是线程不安全?指多线程并发执行某个代码的时候,产生了逻辑上的错误,结果与预期值不同。
当然,内存可变性以及Java编译器对指令优化也有可能导致这种情况。
SqlSession
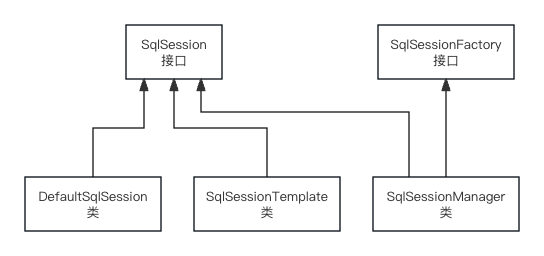
对于MyBatis来讲实际上有三种SqlSession,我们来分别讲讲它们的区别和使用场景。
首先看一张图片,描述再来描述它们的关系:

DefaultSqlSession
DefaultSqlSession类是SqlSession接口的默认实现,它通常被使用于执行SQL操作数据库。
//读取配置文件
InputStream inputStream = Resources.getResourceAsStream("mybatis-config.xml");// 构建SqlSessionFactory
SqlSessionFactory sqlSessionFactory = new SqlSessionFactoryBuilder().build(inputStream);// 获取SqlSession
SqlSession sqlSession = sqlSessionFactory.openSession();try {MyDao myDao = sqlSession.selectOne("MyMapper.selectDao", 1);System.out.println(myDao);
} finally {sqlSession.close();
}
DefaultSqlSession是一个线程不安全的,也就是说它不能是单例。
啥是单例?某些组件在整个程序运行时只要一个实例对象,多个实例化可能会报错。
DefaultSqlSession即然不能是单例,那每次从工厂中获取一个不就行了,实际上这会带来额外开销和资源重用。
另外,DefaultSqlSession还需要手动调用close()方法,这很容易忘记(虽然对于C++程序员是家常便饭),但是聪明的你肯定能用我们所学过的东西来解决这一问题吧——没错就是AOP。
我们既想要单例,又要线程安全,还想要自动关闭怎么办?这就有了SqlSessionManager。
SqlSessionManager
SqlSessionManager使用了JDK动态代理技术(我们之前讲过),动态生成代理对象sqlSessionProxy,并通过SqlSessionInterceptor来对DefaultSqlSession进行增强。
虽然对于SqlSessionManager实际上还是创建非单例的DefaultSqlSession来执行方法,但SqlSessionManager可以是单例!
那你可能会怼我,说多个DefaultSqlSession这不还是会造成额外开销和资源重用吗?SqlSessionManager还有另外一种形态,它会复用线程本地的DefaultSqlSession!
线程不安全是由于多个线程之间共享DefaultSqlSession导致的,那我在同线程内“共享”(复用)我自己的DefaultSqlSession那不就解决线程安全问题了吗。这就大大提高了效率。
治不了洋人还治不了你吗(雾)!
SqlSessionTemplate
SqlSessionTemplate是MyBatis与Spring整合时的线程安全SqlSession。
SqlSessionTemplate实现线程安全的思路与SqlSessionManager相反,我既然自己管不了,我就让别人管——它交给SqlSessionUtils去获取SqlSession。
但从本质上讲SqlSessionTemplate与SqlSessionManager还是一样的。
SqlSessionUtils会先尝试从事务同步器中获取,获取不到再从工厂里要。而事务同步器本身就是一个线程本地变量管理器。
所以SqlSessionTemplate与SqlSessionManager在实现线程安全这一点上殊途同归。
但是二者在自动关闭,即自动执行close()方法的时候就有区别了。
SqlSessionTemplate分两种情况:
- 当获取的对象由事务同步管理器返回的时候,那关闭是交给Spring的。
- 如果是从工厂里拿的,直接调用
close()方法。
Spring与MyBatis整合
Spring与MyBatis整合方式分为两种:
- 传统Dao方式
- Mapper接口方式
传统Dao方式整合
采用传统的Dao方式整合Spring和MyBatis框架,可采用mybatis-spring中所提供的SqlSessionTemplate类或者SqlSessionDaoSupport类来实现。
由于这种方式在现在的开发中已经不常用了,所以这里仅做演示。
@Repository
public class CustomerDaoImpl extends SqlSessionDaoSupport implements ICustomerDao{@Autowiredpublic void setSqlSessionFactory(SqlSessionFactory sqlSessionFactory){super.sqlSessionFactory = sqlSessionFactory;}public void add(Customer customer){[...]}
}
更细化的讲解可参考Spring | 整合MyBatis中SqlSessionTemplate和MapperScannerConfigurer类的使用
Mapper接口方式
传统Dao方式会产生大量重复代码,而且需要正确指定映射文件中的id。
为了解决上述问题,我们采用Mapper的方式整合开发。
基于MapperFactoryBean的整合
MapperFactoryBean是MyBatis-Spring团队提供的一个用来根据Mapper接口生成Mapper对象的类,该类在配置文件中使用时可以配置一下参数
mapperInterface用于指定接口SqlSessionFactory用于指定SqlSessionFactorySqlSessionTemplate用于指定SqlSessionTemplate,如果与SqlSessionFactory同时设定,则一般情况下只会启用SqlSessionTemplate。
虽然使用Mapper接口编程的方式很简单,但是在具体使用的时候还是需要遵循一些规范:
- Mapper接口的名称和对应的XML映射文件名称必须一致
- XML映射文件中的
namespace与Mapper接口的类路径相同 - Mapper接口方法名要和XML映射文件中定义的每个执行语句的id相同
- Mapper接口中的方法的输入参数类型和XML映射文件中的
parameterType类型相同 - Mapper接口方法的输出类型要和XML映射文件的
resultType类型相同
基于MapperScannerConfigurer的方式
使用上面的方式会使得配置文件臃肿,所以我们在做项目开发的时候一般是使用MapperScannerCongigurer的方式进行扫描。
<bean class="org.mybatis.spring.mapper.MapperScannerConfigurer"><property name="basePackage" value="top.cairbin.test6.mapper" /><property name="sqlSessionFactoryBeanName" value="sqlSessionFactory" />
</bean>
我们新建一个项目top.cairbin.test6,至于哪些细节该注意你应当非常清楚了,这里就不多说了,如果不会请回去看之前的教程。
对于配置文件我们也说的很清楚了,接下来直接给文件:
pom.xml文件
<project xmlns="http://maven.apache.org/POM/4.0.0" xmlns:xsi="http://www.w3.org/2001/XMLSchema-instance"xsi:schemaLocation="http://maven.apache.org/POM/4.0.0 http://maven.apache.org/xsd/maven-4.0.0.xsd"><modelVersion>4.0.0</modelVersion><groupId>top.cairbin</groupId><artifactId>test6</artifactId><version>0.0.1-SNAPSHOT</version><packaging>jar</packaging><name>test6</name><url>http://maven.apache.org</url><properties><project.build.sourceEncoding>UTF-8</project.build.sourceEncoding><maven.compiler.source>1.7</maven.compiler.source><maven.compiler.target>1.7</maven.compiler.target><junit.version>4.12</junit.version><spring.version>5.2.5.RELEASE</spring.version><mybatis.version>3.5.4</mybatis.version><mybatis.spring.version>2.0.4</mybatis.spring.version><mysql.version>8.0.33</mysql.version><commons-dbcp.version>2.7.0</commons-dbcp.version></properties><dependencies><dependency><groupId>junit</groupId><artifactId>junit</artifactId><version>${junit.version}</version><scope>test</scope></dependency><dependency><groupId>org.springframework</groupId><artifactId>spring-context</artifactId><version>${spring.version}</version></dependency><dependency><groupId>org.springframework</groupId><artifactId>spring-test</artifactId><version>${spring.version}</version></dependency>		<dependency><groupId>org.springframework</groupId><artifactId>spring-jdbc</artifactId><version>${spring.version}</version></dependency><dependency><groupId>org.mybatis</groupId><artifactId>mybatis</artifactId><version>${mybatis.version}</version></dependency><dependency><groupId>org.mybatis</groupId><artifactId>mybatis-spring</artifactId><version>${mybatis.spring.version}</version></dependency><dependency><groupId>mysql</groupId><artifactId>mysql-connector-java</artifactId><version>${mysql.version}</version></dependency><dependency><groupId>org.apache.commons</groupId><artifactId>commons-dbcp2</artifactId><version>${commons-dbcp.version}</version></dependency><dependency><groupId>org.mybatis.generator</groupId><artifactId>mybatis-generator-core</artifactId><version>1.4.0</version></dependency>		</dependencies>
</project>
db.properties文件
jdbc.driver=com.mysql.jdbc.Driver
jdbc.url=jdbc:mysql://localhost:3306/db_mybatis?useUnicode=true&characterEncoding=utf8
jdbc.username=db_mybatis
jdbc.password=db_mybatis
Spring配置文件app.xml
<?xml version="1.0" encoding="UTF-8"?>
<beans xmlns="http://www.springframework.org/schema/beans"xmlns:xsi="http://www.w3.org/2001/XMLSchema-instance" xmlns:context="http://www.springframework.org/schema/context"xmlns:tx="http://www.springframework.org/schema/tx"xsi:schemaLocation="http://www.springframework.org/schema/beans http://www.springframework.org/schema/beans/spring-beans.xsdhttp://www.springframework.org/schema/txhttp://www.springframework.org/schema/tx/spring-tx.xsdhttp://www.springframework.org/schema/context http://www.springframework.org/schema/context/spring-context.xsd"><!-- 指定需要扫描的包,使注解生效 --><context:component-scanbase-package="top.cairbin.test6" /><!--读取db.properties --><context:property-placeholder location="db.properties"/><!-- 配置数据源 --><bean id="dataSource" class="org.springframework.jdbc.datasource.DriverManagerDataSource"><!--数据库驱动 --><property name="driverClassName" value="${jdbc.driver}" /><!--连接数据库的url --><property name="url" value="${jdbc.url}" /><!--连接数据库的用户名 --><property name="username" value="${jdbc.username}" /><!--连接数据库的密码 --><property name="password" value="${jdbc.password}" /></bean><!-- 事务管理器,依赖于数据源 --><bean id="transactionManager" class="org.springframework.jdbc.datasource.DataSourceTransactionManager"><property name="dataSource" ref="dataSource" /></bean>	<!-- 注册事务管理器驱动 --><tx:annotation-driven transaction-manager="transactionManager"/><bean id="sqlSessionFactory" class="org.mybatis.spring.SqlSessionFactoryBean"><property name="dataSource" ref="dataSource" /><property name="configLocation" value="mybatis-config.xml"/></bean><bean class="org.mybatis.spring.mapper.MapperScannerConfigurer"><property name="basePackage" value="top.cairbin.test6.mapper" /><property name="sqlSessionFactoryBeanName" value="sqlSessionFactory" /></bean>
</beans>
mybatis-config.xml文件
<?xml version="1.0" encoding="UTF-8" ?>
<!DOCTYPE configuration PUBLIC "-//mybatis.org//DTD Config 3.0//EN""http://mybatis.org/dtd/mybatis-3-config.dtd">
<configuration><properties resource="db.properties" /><settings><!-- 延迟加载的开关 --><setting name="lazyLoadingEnabled" value="false" /><!-- 设置积极加载(true)或按需加载(false) --><setting name="aggressiveLazyLoading" value="true" /><setting name="mapUnderscoreToCamelCase" value="true" /><setting name="logImpl" value="STDOUT_LOGGING" /></settings><typeAliases><package name="top.cairbin.test6.dao" /></typeAliases><!--2.配置Mapper的位置 --><mappers><mapper resource="top/cairbin/test6/mapper/CustomerMapper.xml" /></mappers>
</configuration>
top.cairbin.test6.dao.Customer类
package top.cairbin.test6.dao;public class Customer {private Integer id;			// 主键idprivate String username;	// 客户名称private String jobs;		// 职业private String phone;		// 电话public Integer getId() {return this.id;}public void setId(Integer id) {this.id = id;}public String getUsername() {return this.username;}public void setUsername(String username) {this.username = username;}public String getJobs() {return this.jobs;}public void setJobs(String jobs) {this.jobs = jobs;}public String getPhone() {return this.phone;}public void setPhone(String phone) {this.phone = phone;}@Overridepublic String toString() {return "Customer [id=" + id + ", username=" + username + ", jobs=" + jobs + ", phone=" + phone + "]";}
}top.cairbin.test6.mapper下的CustomerMapper.xml
<?xml version="1.0" encoding="UTF-8"?>
<!DOCTYPE mapper PUBLIC "-//mybatis.org//DTD Mapper 3.0//EN""http://mybatis.org/dtd/mybatis-3-mapper.dtd">
<mapper namespace="top.cairbin.test6.mapper.CustomerMapper"><resultMap id="BaseResultMap" type="top.cairbin.test6.dao.Customer"><id column="id" jdbcType="INTEGER" property="id" /><result column="username" jdbcType="VARCHAR" property="username" /><result column="jobs" jdbcType="VARCHAR" property="jobs" /><result column="phone" jdbcType="VARCHAR" property="phone" /></resultMap><sql id="Base_Column_List">id, username, jobs, phone</sql><select id="selectByPrimaryKey" parameterType="java.lang.Integer" resultMap="BaseResultMap">select <include refid="Base_Column_List" />from customerwhere id = #{id,jdbcType=INTEGER}</select>
</mapper>
对应接口top.cairbin.test6.mapper.CustomerMapper
package top.cairbin.test6.mapper;import top.cairbin.test6.dao.Customer;public interface CustomerMapper{// 通过id查询客户Customer selectByPrimaryKey(Integer id);
}
我们接下来实现Service层
创建src/main/java下的包top.cairbin.test6.service
然后在包中创建接口ICustomerService
package top.cairbin.test6.service;import top.cairbin.test6.dao.Customer;public interface ICustomerService {	public Customer getCustomerByID(int id);
}
创建实现这个接口的类CustomerServiceImpl
package top.cairbin.test6.service;import org.springframework.beans.factory.annotation.Autowired;
import org.springframework.stereotype.Service;
import top.cairbin.test6.dao.Customer;
import top.cairbin.test6.mapper.CustomerMapper;@Service
public class CustomerServiceImpl implements ICustomerService{@Autowiredprivate CustomerMapper customerMapper;public Customer getCustomerByID(int id) {Customer customer = customerMapper.selectByPrimaryKey(id);return customer;}
}
在测试目录src/test/java下的top.cairbin.test6包创建测试类CustomerTest
package top.cairbin.test6;import org.junit.Test;
import org.junit.runner.RunWith;
import org.springframework.beans.factory.annotation.Autowired;
import org.springframework.test.context.ContextConfiguration;
import org.springframework.test.context.junit4.SpringJUnit4ClassRunner;
import top.cairbin.test6.dao.Customer;
import top.cairbin.test6.service.ICustomerService;@RunWith(SpringJUnit4ClassRunner.class)
@ContextConfiguration(locations = { "classpath:app.xml" })
public class CustomerTest {@Autowiredprivate ICustomerService customerService;	@Testpublic void findTest() {Customer customer = customerService.getCustomerByID(1);System.out.println(customer);}
}
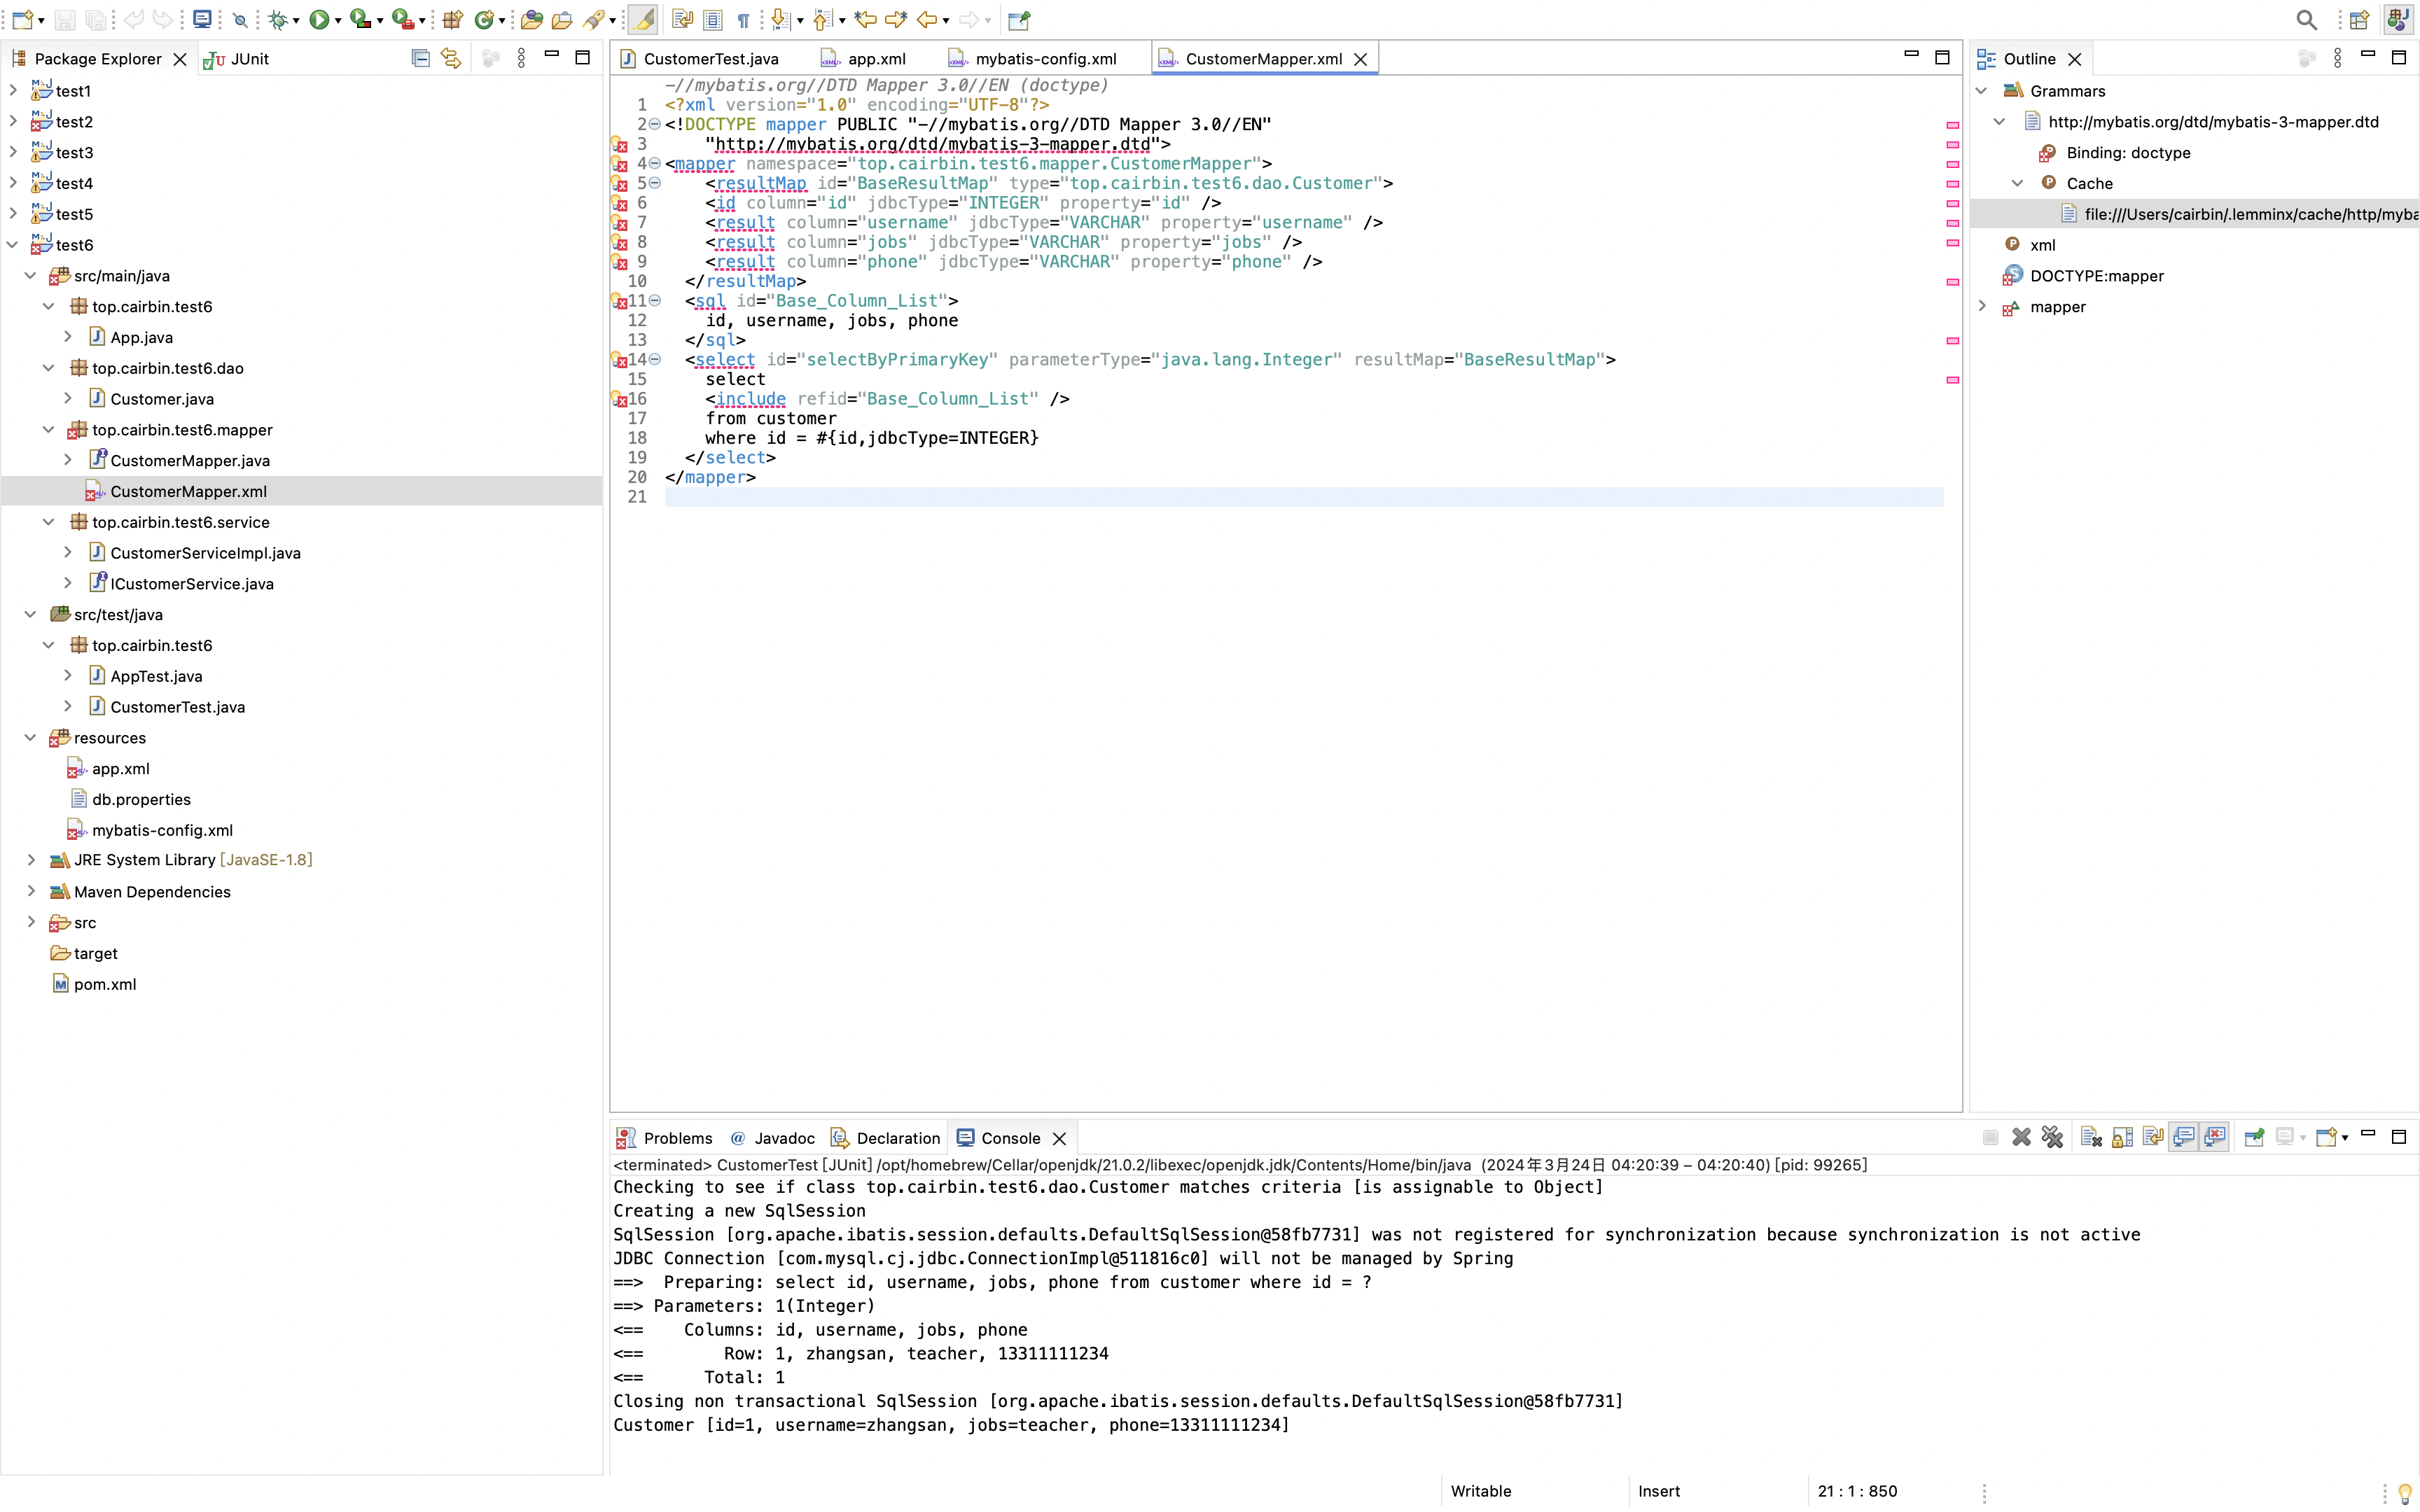
运行测试,得到结果

】)


中国及分省人口预估数据库_v2)


(八))
)


安装vue调试插件)


)
