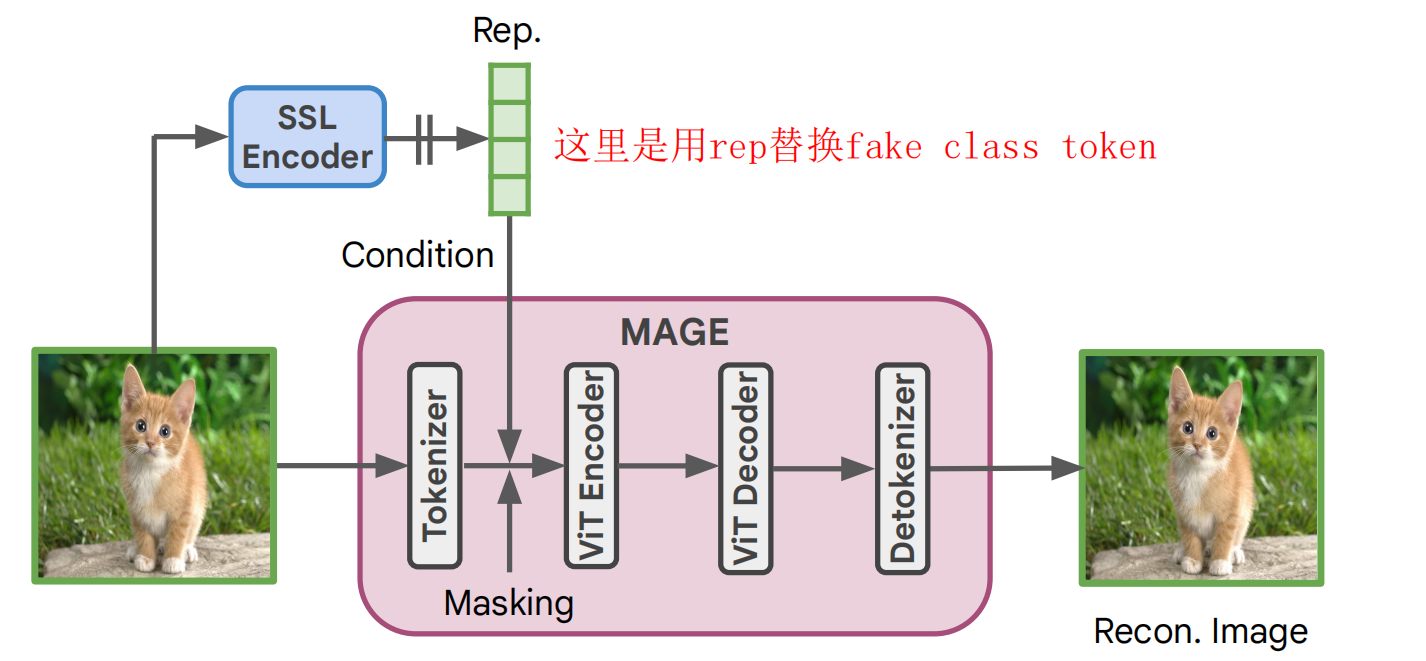
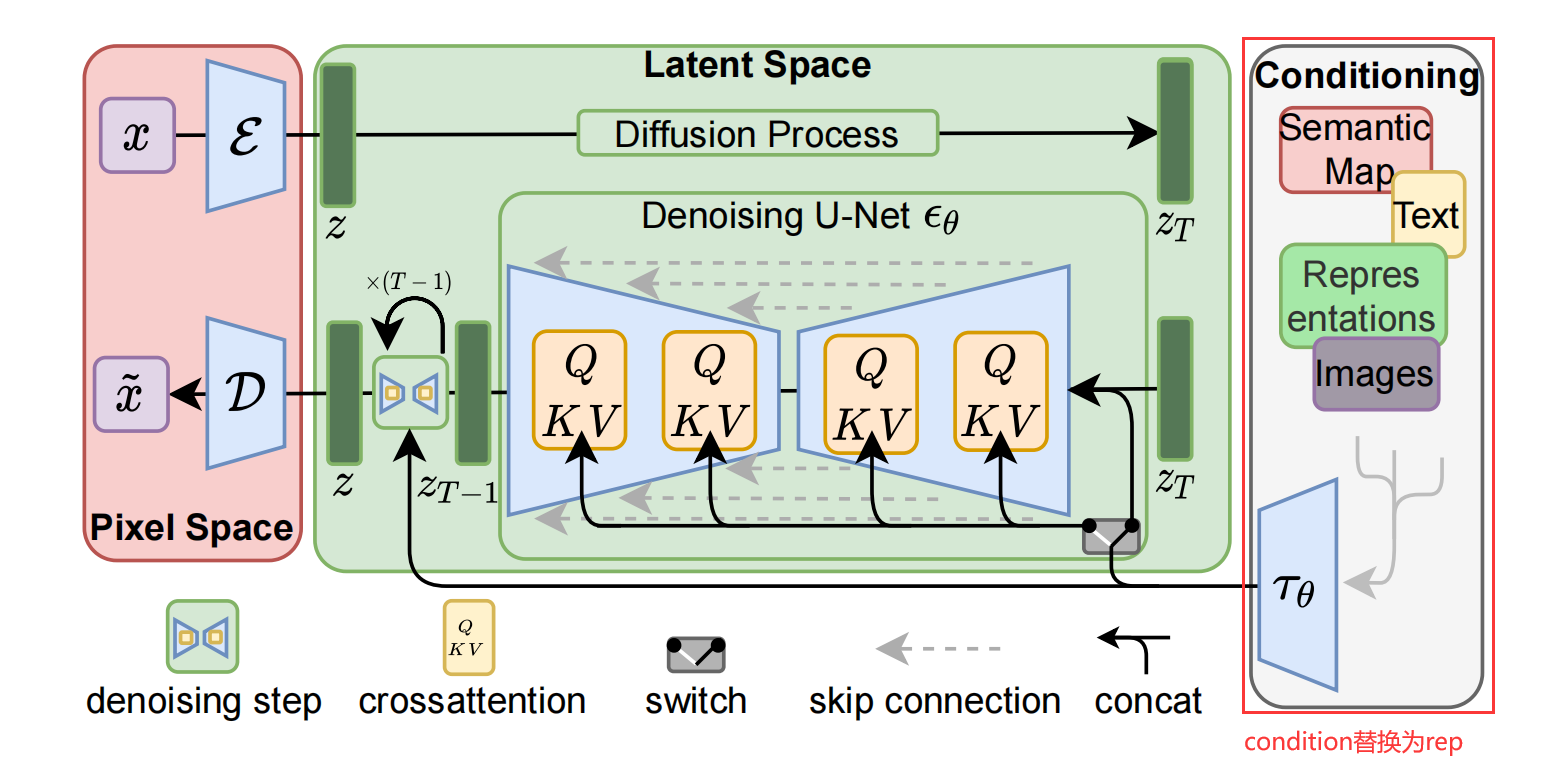
在自条件的训练过程中,需要将图像经过Pretrained encoder的表征Rep输入进已有的Pixel Generator上,目前RCG是向四种Pixel Generator上加入了自条件,关于它是如何将rep加到Pixel Generator上的,我来总结一下:
一、Pixel Generator: MAGE

在MAGE中,是使用rep替换embedding的 fake class token做的:
- 得到CFG的混合表征
- 将混合表征替换embedding的 fake class token
- 输入进ViT block
# replace fake class token with repif self.use_rep:# cfg(class free guidance) by masking representationdrop_rep_mask = torch.rand(bsz) < self.rep_drop_probdrop_rep_mask = drop_rep_mask.unsqueeze(-1).cuda().float()# 这里相当于cfg, O = αU + (1-a)C, 最终输出是由条件生成C(rep)和无条件生成U(fake_latent)的线性外推获得rep = drop_rep_mask * self.fake_latent + (1 - drop_rep_mask) * reprep = self.latent_prior_proj(rep)# 将rep赋值给embedding的(将图像的rep替换seq的第0维度,相当于替换了seq的fake class token),其实并没有对原始的MAGE做什么改变,只是将原来可学习的fake token换为了rep,从而输入进encoder# input_embeddings_after_drop:(64,129,768) <-- rep:(64,768)input_embeddings_after_drop[:, 0] = rep# class-conditional MAGEif self.use_class_label:class_emb = self.class_emb(class_label)input_embeddings_after_drop[:, 0] = class_emb# apply Transformer blocksx = input_embeddings_after_dropfor blk in self.blocks:x = blk(x)x = self.norm(x)# print("Encoder representation shape:", x.shape)return x, gt_indices, token_drop_mask, token_all_mask二、Pixel Generator: DiT
从forward函数中,可以看到,
- 先使用CFG得到rep的混合表征rep
- 将rep加到timestep中 (16,1024) + (16,1024) =(16,1024)维度得到c。
- 然后将这个c作为融合条件输入进去噪block(transformer block)中。
def forward(self, x, t, y, rep=None):"""Forward pass of DiT.x: (N, C, H, W) tensor of spatial inputs (images or latent representations of images)t: (N,) tensor of diffusion timestepsy: (N,) tensor of class labels"""x = self.x_embedder(x) + self.pos_embed # (N, T, D), where T = H * W / patch_size ** 2t = self.t_embedder(t) # (N, D)y = self.y_embedder(y, self.training) # (N, D)# rep condif rep is not None:# 1、get the CFG mixture repif self.training:drop_rep_mask = torch.rand(x.size(0)) < self.rep_dropout_probdrop_rep_mask = drop_rep_mask.unsqueeze(-1).cuda().float()rep = drop_rep_mask * self.fake_latent + (1 - drop_rep_mask) * reprep = self.rep_embedder(rep)# 2】直接将rep加到timestep t上从而作为下一步的输入 -->(16,1024)c = t + repelse:c = t + y # (N, D)# 3、进一步处理for block in self.blocks:x = block(x, c) # (N, T, D)x = self.final_layer(x, c) # (N, T, patch_size ** 2 * out_channels)x = self.unpatchify(x) # (N, out_channels, H, W)return x三、Pixel Generator: ADM
这里和DiT的处理方式是一样的,直接将rep与timestep相加,然后输入进U-Net进行去噪
U-Net的forward():
model_output = model(x_t, self._scale_timesteps(t), rep=rep, **model_kwargs) def forward(self, x, timesteps, y=None, rep=None):"""Apply the model to an input batch.:param x: an [N x C x ...] Tensor of inputs.:param timesteps: a 1-D batch of timesteps.:param y: an [N] Tensor of labels, if class-conditional.:return: an [N x C x ...] Tensor of outputs."""assert (y is not None) == (self.num_classes is not None), "must specify y if and only if the model is class-conditional"assert (rep is not None) == self.rep_cond# 将timestep embeddinghs = []emb = self.time_embed(timestep_embedding(timesteps, self.model_channels))if self.num_classes is not None:assert y.shape == (x.shape[0],)emb = emb + self.label_emb(y)# 将timestep的embedding和rep相加,然后输入进U-Netif self.rep_cond:emb = emb + self.rep_proj(rep)h = x.type(self.dtype)for module in self.input_blocks:h = module(h, emb)hs.append(h)h = self.middle_block(h, emb)for module in self.output_blocks:h = th.cat([h, hs.pop()], dim=1)h = module(h, emb)h = h.type(x.dtype)return self.out(h)四、Pixel Generator: LDM

整体来说没有什么太多的问题,就是将LDM中的condition换成了包含了/未包含condition信息的 rep:
- 得到encoder后的图像x(4,4,32,32),表征rep c(4,1,256)
- 将带有condition信息的rep替换DDPM的原始condition
- 将encoder后的图像x(4,4,32,32),表征rep c(4,1,256), timestep t(4)输入进DDPM的后向过程求loss
def forward(self, x, c, batch=None, gen_img=False, *args, **kwargs):if gen_img:return self.gen_imgs()# 1、得到encoder后的图像x(4,4,32,32),表征rep c(4,1,256)if batch is not None:x, c = self.get_input(batch, self.first_stage_key)if self.rep_cond:rep = c['rep']c = {'class_label': c['class_label']}t = torch.randint(0, self.num_timesteps, (x.shape[0],)).cuda().long()if self.model.conditioning_key is not None:assert c is not None# 将图像的label变为可学习的if self.cond_stage_trainable:c = self.get_learned_conditioning(c)if self.shorten_cond_schedule: # TODO: drop this optiontc = self.cond_ids[t].cuda()c = self.q_sample(x_start=c, t=tc, noise=torch.randn_like(c.float()))# 2、将带有condition信息的rep替换DDPM的原始conditionif self.rep_cond:c = repc = c.unsqueeze(1)# 3、将encoder后的图像x(4,4,32,32),表征rep c(4,1,256), timestep t(4)输入进DDPM的后向过程求lossloss, loss_dict = self.p_losses(x, c, t, *args, **kwargs)if self.use_ema and batch is not None:self.model_ema(self.model)return loss, loss_dict【附代码文档】)
——SBP的Bundle组装)


)


)
)


