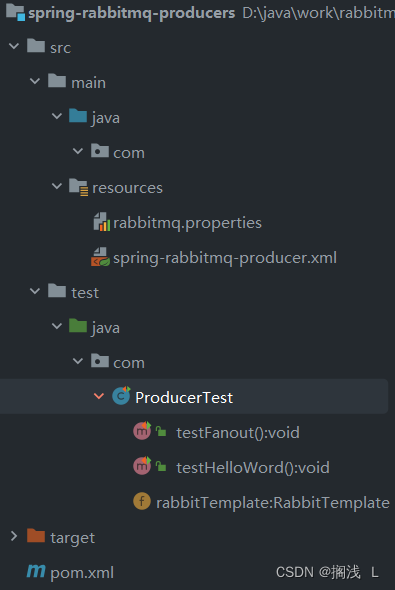
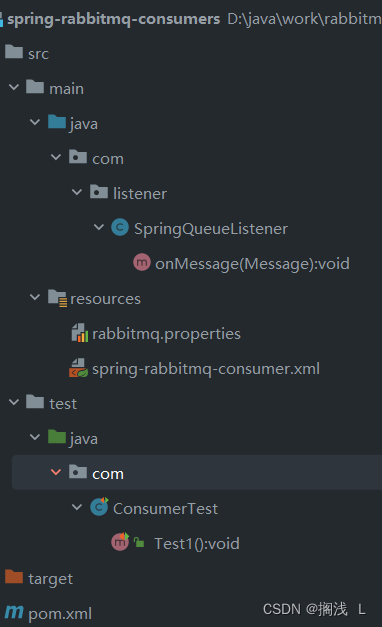
需求:使用Spring整合RabbitMQ
步骤:
生产者
1.创建生产者工程
2.添加依赖
3.配置整合
4.编写代码发送消息
消费者步骤相同
生产者

导入依赖
<?xml version="1.0" encoding="UTF-8"?>
<project xmlns="http://maven.apache.org/POM/4.0.0"xmlns:xsi="http://www.w3.org/2001/XMLSchema-instance"xsi:schemaLocation="http://maven.apache.org/POM/4.0.0 http://maven.apache.org/xsd/maven-4.0.0.xsd"><modelVersion>4.0.0</modelVersion><groupId>com</groupId><artifactId>spring-rabbitmq-producers</artifactId><version>1.0-SNAPSHOT</version><dependencies><dependency><groupId>org.springframework.amqp</groupId><artifactId>spring-rabbit</artifactId><version>2.1.8.RELEASE</version></dependency><dependency><groupId>junit</groupId><artifactId>junit</artifactId><version>4.12</version></dependency><dependency><groupId>org.springframework</groupId><artifactId>spring-test</artifactId><version>5.1.7.RELEASE</version></dependency></dependencies><build><plugins><plugin><groupId>org.apache.maven.plugins</groupId><artifactId>maven-compiler-plugin</artifactId><version>3.8.0</version><configuration><source>1.8</source><target>1.8</target></configuration></plugin></plugins></build><properties><maven.compiler.source>8</maven.compiler.source><maven.compiler.target>8</maven.compiler.target><project.build.sourceEncoding>UTF-8</project.build.sourceEncoding></properties></project>
配置文件
rabbitmq.host=192.168.235.129
rabbitmq.port=5672
rabbitmq.username=ljb
rabbitmq.password=ljb
rabbitmq.virtual-host=/ljb
<?xml version="1.0" encoding="UTF-8"?>
<beans xmlns="http://www.springframework.org/schema/beans"xmlns:xsi="http://www.w3.org/2001/XMLSchema-instance"xmlns:context="http://www.springframework.org/schema/context"xmlns:rabbit="http://www.springframework.org/schema/rabbit"xsi:schemaLocation="http://www.springframework.org/schema/beanshttp://www.springframework.org/schema/beans/spring-beans.xsdhttp://www.springframework.org/schema/contexthttps://www.springframework.org/schema/context/spring-context.xsdhttp://www.springframework.org/schema/rabbithttp://www.springframework.org/schema/rabbit/spring-rabbit.xsd"><!--加载配置文件--><context:property-placeholder location="classpath:rabbitmq.properties"/><!-- 定义rabbitmq connectionFactory --><rabbit:connection-factory id="connectionFactory" host="${rabbitmq.host}"port="${rabbitmq.port}"username="${rabbitmq.username}"password="${rabbitmq.password}"virtual-host="${rabbitmq.virtual-host}"/><!--定义管理交换机、队列--><rabbit:admin connection-factory="connectionFactory"/><!--定义持久化队列,不存在则自动创建;不绑定到交换机则绑定到默认交换机默认交换机类型为direct,名字为:"",路由键为队列的名称--><rabbit:queue id="spring_queue" name="spring_queue" auto-declare="true"/><!-- ~~~~~~~~~~~~~~~~~~~~~~~~~~~~广播;所有队列都能收到消息~~~~~~~~~~~~~~~~~~~~~~~~~~~~ --><!--定义广播交换机中的持久化队列,不存在则自动创建--><rabbit:queue id="spring_fanout_queue_1" name="spring_fanout_queue_1" auto-declare="true"/><!--定义广播交换机中的持久化队列,不存在则自动创建--><rabbit:queue id="spring_fanout_queue_2" name="spring_fanout_queue_2" auto-declare="true"/><!--定义广播类型交换机;并绑定上述两个队列--><rabbit:fanout-exchange id="spring_fanout_exchange" name="spring_fanout_exchange" auto-declare="true"><rabbit:bindings><rabbit:binding queue="spring_fanout_queue_1"/><rabbit:binding queue="spring_fanout_queue_2"/></rabbit:bindings></rabbit:fanout-exchange><!-- ~~~~~~~~~~~~~~~~~~~~~~~~~~~~通配符;*匹配一个单词,#匹配多个单词 ~~~~~~~~~~~~~~~~~~~~~~~~~~~~ --><!--定义广播交换机中的持久化队列,不存在则自动创建--><rabbit:queue id="spring_topic_queue_star" name="spring_topic_queue_star" auto-declare="true"/><!--定义广播交换机中的持久化队列,不存在则自动创建--><rabbit:queue id="spring_topic_queue_well" name="spring_topic_queue_well" auto-declare="true"/><!--定义广播交换机中的持久化队列,不存在则自动创建--><rabbit:queue id="spring_topic_queue_well2" name="spring_topic_queue_well2" auto-declare="true"/><rabbit:topic-exchange id="spring_topic_exchange" name="spring_topic_exchange" auto-declare="true"><rabbit:bindings><rabbit:binding pattern="ljb.*" queue="spring_topic_queue_star"/><rabbit:binding pattern="ljb.#" queue="spring_topic_queue_well"/><rabbit:binding pattern="lu.#" queue="spring_topic_queue_well2"/></rabbit:bindings></rabbit:topic-exchange><!--定义rabbitTemplate对象操作可以在代码中方便发送消息--><rabbit:template id="rabbitTemplate" connection-factory="connectionFactory"/>
</beans>
生产者代码
package com;import org.junit.Test;
import org.junit.runner.RunWith;
import org.springframework.amqp.rabbit.core.RabbitTemplate;
import org.springframework.beans.factory.annotation.Autowired;
import org.springframework.test.context.ContextConfiguration;
import org.springframework.test.context.junit4.SpringJUnit4ClassRunner;@RunWith(SpringJUnit4ClassRunner.class)
@ContextConfiguration(locations = "classpath:spring-rabbitmq-producer.xml")
public class ProducerTest {//1.注入 RabbitTempLate@Autowiredprivate RabbitTemplate rabbitTemplate;@Testpublic void testHelloWord(){//2.发送消息//参数说明——1:队列名称(因为没有指定Routing Key,但是要发送到队列,所以可以直接指定队列名替代Routing Key)//          2:自定义队列消息rabbitTemplate.convertAndSend("spring_queue","hello world spring----");}@Testpublic void testFanout(){//参数说明——1:交换机       2:Routing Key      3:自定义队列消息rabbitTemplate.convertAndSend("spring_fanout_exchange","ljb.haha","spring fanout....");}}
消费者

导入依赖于生产者相同
配置文件
properties与生产者相同
<?xml version="1.0" encoding="UTF-8"?>
<beans xmlns="http://www.springframework.org/schema/beans"xmlns:xsi="http://www.w3.org/2001/XMLSchema-instance"xmlns:context="http://www.springframework.org/schema/context"xmlns:rabbit="http://www.springframework.org/schema/rabbit"xsi:schemaLocation="http://www.springframework.org/schema/beanshttp://www.springframework.org/schema/beans/spring-beans.xsdhttp://www.springframework.org/schema/contexthttps://www.springframework.org/schema/context/spring-context.xsdhttp://www.springframework.org/schema/rabbithttp://www.springframework.org/schema/rabbit/spring-rabbit.xsd"><!--加载配置文件--><context:property-placeholder location="classpath:rabbitmq.properties"/><!-- 定义rabbitmq connectionFactory --><rabbit:connection-factory id="connectionFactory" host="${rabbitmq.host}"port="${rabbitmq.port}"username="${rabbitmq.username}"password="${rabbitmq.password}"virtual-host="${rabbitmq.virtual-host}"/><!--    注册监听器bean:监听队列消息--><bean id="springQueueListener" class="com.listener.SpringQueueListener"/><!--    监听器bean关联队列名,也就是使监听器生效--><rabbit:listener-container connection-factory="connectionFactory" auto-declare="true"><rabbit:listener ref="springQueueListener" queue-names="spring_queue"/></rabbit:listener-container>
</beans>
消费者代码
监听器
package com.listener;import org.springframework.amqp.core.Message;
import org.springframework.amqp.core.MessageListener;public class SpringQueueListener implements MessageListener {@Overridepublic void onMessage(Message message) {//监听到之后直接打印System.out.println(new String(message.getBody()));}
}
package com;import org.junit.Test;
import org.junit.runner.RunWith;
import org.springframework.test.context.ContextConfiguration;
import org.springframework.test.context.junit4.SpringJUnit4ClassRunner;@ContextConfiguration(locations = "classpath:spring-rabbitmq-consumer.xml")
@RunWith(SpringJUnit4ClassRunner.class)
public class ConsumerTest {@Testpublic void Test1() {//使消费者一致在监听队列while (true) {}}
}
//效果是监听器一直处于监听队列消息的状态,只要队列区有消息就获取

)


)

数据可视化之 Grafana安装、页面介绍、图表配置】)
)
)


