TOC
- 1 前言
- 2 方法和代码
1 前言
该论文发表之前,市面上几乎都是用卷积网络作为实际意义上的(de-facto)backbone。于是一个想法就来了:为啥不用transformer作为backbone呢?
文章说本论文的意义就在于揭示模型选择对于扩散模型的重要性,并为生成模型研究提供一个可借鉴的基准(baseline)。
本文还揭示出卷积网络的inductive bias对生成性能并没有多大的影响,所以可以使用transformer网络去替代卷积网络。文章使用Gflops和FID去分别评估模型复杂度和生成图像质量。
刚刚又去学了一下FLOPs,真是破破烂烂,缝缝补补啊……
总的来说,DiT有如下优点:
- 高质量:achieve a state-of-the-art result of 2.27 FID on the classconditional 256 × 256 ImageNet generation benchmark.
- 发现了FID和GFLOPs之间存在强相关关系,通过增加depth of transformer或者amount of patches可以增加GFLOPs
- 灵活性:可以挑战模型大小、patches大小和序列长度
- 跨领域研究:DiT架构和ViT类似,为跨领域研究提供可能
2 方法和代码

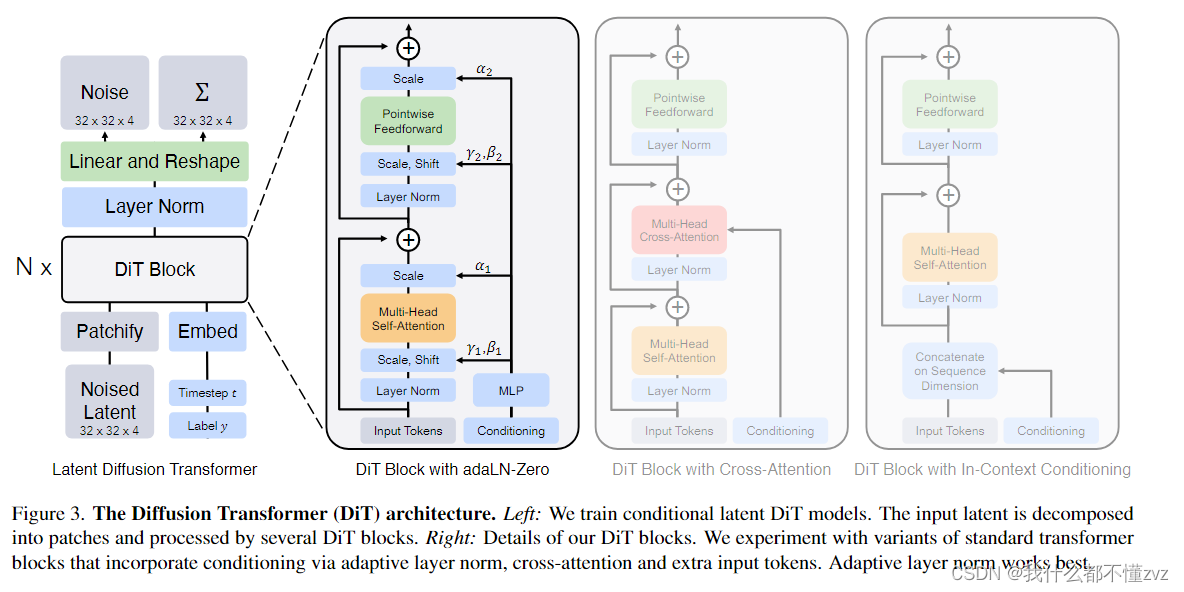
整体来看:
- 使用transformer作为其主干网络,代替了原先的UNet
- 在latent space进行训练,通过transformer处理潜在的patch
- 输入的条件(timestep 和 text/label )的四种处理方法:
- In-context conditioning: 将condition和input embedding合并成一个tokens(concat),不增加额外计算量
- Cross-attention block:在transformer中插入cross attention,将condition当作是K、V,input当作是Q
- Adaptive layer norm (adaLN) block:将timestep和 text/label相加,通过MLP去回归参数scale和shift,也不增加计算量。并且在每一次残差相加时,回归一个gate系数。
- adaLN-Zero block:参数初始化为0,那么在训练开始时,残差模块当于identical function。
- 整体流程:patchify -> Transfomer Block -> Linear -> Unpatchify。 注意最后输出的维度是原来维度的2倍,分别输出noise和方差。
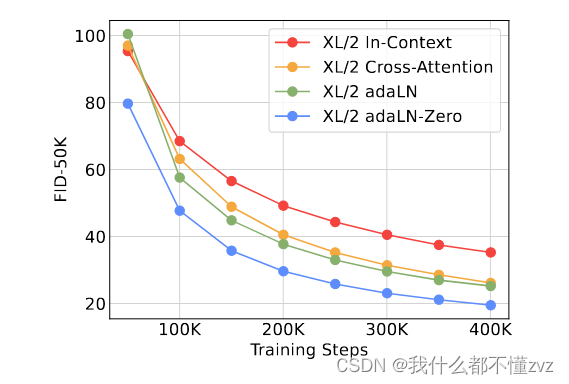
由下图可见,adaLN-Zero最好。然后就是探索各种调参效果,此处略。

代码以及注释:
DiTBlock
# DIT的核心子模块
class DiTBlock(nn.Module):"""A DiT block with adaptive layer norm zero (adaLN-Zero) conditioning."""def __init__(self, hidden_size, num_heads, mlp_ratio=4.0, **block_kwargs):super().__init__()self.norm1 = nn.LayerNorm(hidden_size, elementwise_affine=False, eps=1e-6)self.attn = Attention(hidden_size, num_heads=num_heads, qkv_bias=True, **block_kwargs)# 此处为miltihead-self-Attentionself.norm2 = nn.LayerNorm(hidden_size, elementwise_affine=False, eps=1e-6)mlp_hidden_dim = int(hidden_size * mlp_ratio)approx_gelu = lambda: nn.GELU(approximate="tanh")self.mlp = Mlp(in_features=hidden_size, hidden_features=mlp_hidden_dim, act_layer=approx_gelu, drop=0)#使用自适应归一化替换标准归一化层self.adaLN_modulation = nn.Sequential(nn.SiLU(),nn.Linear(hidden_size, 6 * hidden_size, bias=True))def forward(self, x, c):shift_msa, scale_msa, gate_msa, shift_mlp, scale_mlp, gate_mlp = self.adaLN_modulation(c).chunk(6, dim=1)x = x + gate_msa.unsqueeze(1) * self.attn(modulate(self.norm1(x), shift_msa, scale_msa))x = x + gate_mlp.unsqueeze(1) * self.mlp(modulate(self.norm2(x), shift_mlp, scale_mlp))return x
- addLN_zero: 先通过SiLU,然后再通过线性层输出6个值
forward
def forward(self, x, t, y):x = self.x_embedder(x) + self.pos_embed # (N, T, D), where T = H * W / patch_size ** 2t = self.t_embedder(t) # (N, D)# time step embeddingy = self.y_embedder(y, self.training) # (N, D)c = t + y # (N, D)# 送入上述的DIT-Block中for block in self.blocks:x = block(x, c) # (N, T, D)x = self.final_layer(x, c) # (N, T, patch_size ** 2 * out_channels)x = self.unpatchify(x) # (N, out_channels, H, W)return x
- x通过embedding,与position embedding相加(固定的sin-cos位置编码)
- t通过embedding
- y通过embedding, t和y相加得到c
- 遍历每一个block,传入x和c
- 最后传入最后一层线性层,然后通过unpatchify恢复图像
class FinalLayer(nn.Module):"""The final layer of DiT."""def __init__(self, hidden_size, patch_size, out_channels):super().__init__()self.norm_final = nn.LayerNorm(hidden_size, elementwise_affine=False, eps=1e-6)self.linear = nn.Linear(hidden_size, patch_size * patch_size * out_channels, bias=True)self.adaLN_modulation = nn.Sequential(nn.SiLU(),nn.Linear(hidden_size, 2 * hidden_size, bias=True))nn.init.constant_(self.adaLN_modulation[-1].weight, 0)nn.init.constant_(self.adaLN_modulation[-1].bias, 0)nn.init.constant_(self.linear.weight, 0)nn.init.constant_(self.linear.bias, 0)def forward(self, x, c):shift, scale = self.adaLN_modulation(c).chunk(2, dim=1)x = modulate(self.norm_final(x), shift, scale)x = self.linear(x)return x
- 同样引入adpLN_zero,并且让输出维度为p*p*2c,是特征维度原来大小的2倍,分别预测noise和方差
最后unpatchify
def unpatchify(self, x):x: (N, T, patch_size**2 * C)imgs: (N, H, W, C)"""c = self.out_channelsp = self.x_embedder.patch_size[0]h = w = int(x.shape[1] ** 0.5)assert h * w == x.shape[1]x = x.reshape(shape=(x.shape[0], h, w, p, p, c))x = torch.einsum('nhwpqc->nchpwq', x)imgs = x.reshape(shape=(x.shape[0], c, h * p, h * p))return imgs


和super(props)有什么区别)

)


![[C++] C++函数的进化: 函数->函数指针->函数模板->仿函数(函数对象)->Lambda表达式](http://pic.xiahunao.cn/[C++] C++函数的进化: 函数->函数指针->函数模板->仿函数(函数对象)->Lambda表达式)


