摘要
利用Vue3及其配套的Vue Router实现后台管理系统中的页面过渡动画。文章首先简要介绍了Vue3的特性和Vue Router的基本用法,利用Vue3提供的组件以及Vue Router的路由钩子函数来实现页面过渡效果。
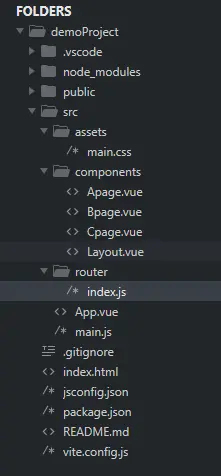
代码结构
在 components 里有4个组件,其中 Layout.vue 是左右分栏垂直布局组件,Apage.vue、Bpage.vue、Cpage.vue 分别是三个单独的页面,用于渲染在左右分栏布局的右侧,对应的是左侧导航的点击。

App.vue
<template><Layout />
</template><script>import './assets/main.css'; // 全局样式import Layout from './components/Layout.vue'; // 引入Layout组件export default {// 注册组件components: {Layout}};
</script>
Layout.vue
一般 Vue 路由设置如下所示:
<template><router-view />
</template>
在旧版本的 Vue 路由中,我们可以简单地用 <transition> 组件包装 <router-view>
但是,在较新版本的 Vue 路由中则必须用 v-slot 来解构 props 并将它们传递到我们的内部 slot 中。 这将包含一个动态组件,该组件被过渡组件包围。
<router-view v-slot="{ Component }"><transition><component :is="Component" /></transition>
</router-view>
完整代码:
<template><div class="container"><div class="left-pane"><!-- 左侧导航链接 --><div class="router-link"><router-link to="/" class="link">首页</router-link><router-link to="/Bpage" class="link">Bpage</router-link><router-link to="/Cpage" class="link">Cpage</router-link></div></div><div class="right-pane"><!-- 右侧内容 --><router-view v-slot="{ Component }"><transition name="fade" mode="out-in"><component :is="Component" /></transition></router-view></div></div>
</template><style>
.container {display: flex;flex-direction: row;height: 100vh; /* 100%视窗高度 */
}.left-pane {width: 250px;height: 100%; /* 100%父容器的高度 */box-sizing: border-box; /* 让边框不会撑大容器 */
}.right-pane {flex: 1; /* 平分父容器的宽度 */height: 100%; /* 100%父容器的高度 */box-sizing: border-box; /* 让边框不会撑大容器 */
}.left-pane {background-color: #eee; /* 左侧面板的背景色 */
}.router-link {width: 80%;margin: 22px auto 0;
}.link {width: 100;display: block;padding: 10px 0;text-align:center;text-decoration: none;color: #666;border-radius: 10px
}.right-pane {background-color: #ffffff; /* 右侧面板的背景色 */
}.fade-enter-active,
.fade-leave-active {transition: opacity 0.3s ease;
}.fade-enter-from,
.fade-leave-to {opacity: 0;
}.link.router-link-active {background-color: #ddd;color: #333;
}
</style>
Apage.vue
<template><div class="card"><h1>Index</h1></div>
</template><style scoped>
.card {width: 90%;height: 500px;background: #eee;margin: 20px auto;text-align: center;line-height: 500px;border-radius: 10px;
}
</style>
Bpage.vue
<template><div class="card"><h1>Bpage</h1></div>
</template><style scoped>
.card {width: 90%;height: 500px;background: #eee;margin: 20px auto;text-align: center;line-height: 500px;border-radius: 10px;
}
</style>
Cpage.vue
<template><div class="card"><h1>Cpage</h1></div>
</template><style scoped>
.card {width: 90%;height: 500px;background: #eee;margin: 20px auto;text-align: center;line-height: 500px;border-radius: 10px;
}
</style>
router/index.js
import { createRouter, createWebHashHistory  } from 'vue-router';const routes = [{path: '/',name: 'Apage',component: () => import('../components/Apage.vue'),},{path: '/Bpage',name: 'Bpage',component: () => import('../components/Bpage.vue'),},{path: '/Cpage',name: 'Cpage',component: () => import('../components/Cpage.vue'),},
];const router = createRouter({history: createWebHashHistory(),routes,linkActiveClass: 'router-link-active'
});export default router;
打包演示
https://demo.likeyunba.com/vue3-router-transition/
本文作者
TANKING


)

)


)


