传统的布局,基于盒状模型,依赖 display 属性 + position属性 + float属性。它对于那些特殊布局实现起来比较麻烦,就比如垂直居中,伸缩等。实现起来就不是很容易。
弹性布局是CSS3一种新的布局模式,是一种当页面需要适应不同的屏幕大小以及设备类型时确保元素拥有恰当的行为的布局方式。引入弹性盒布局模型的目的是提供一种更加有效的方式来对一个容器中的子元素进行排列、对齐,伸缩和分配空白空间。
1,开启弹性布局flex
<!DOCTYPE html>
<html lang="en">
<head><meta charset="UTF-8"><title>弹性布局1</title><style>.father{width: 1000px;height: 600px;background-color: #0e90d2;/*开启了弹性布局*/display: flex;}.child{width: 200px;height: 200px;background-color: rebeccapurple;border: 1px solid red;}</style>
</head>
<body><div class="father"><div class="child">1</div><div class="child">2</div><div class="child">3</div></div>
</body>
</html>
打开页面可以看到元素从左往右进行的正常排列,顺序为1,2,3
总结
1,开启了flex的元素,就是弹性布局;
2,给元素设置: display:flex或 display:inline-flex,该元素就变为了弹性布局;
3,无论原来是哪种元素(块、行内块、行内),一旦开启了flex布局,全都会“块状化”";
4,弹性布局只能对一级子元素有效,如果是孙子元素或者是孙子的孙子元素不起任何作用;
5,display:inline-flex很少使用,因为可以给多个父容器设置;
2,主轴和侧轴
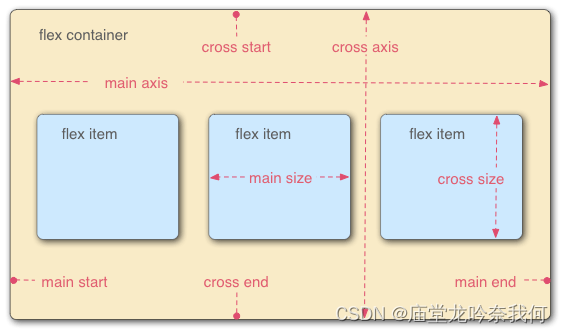
容器默认存在两根轴:水平的主轴和垂直的交叉轴,项目默认沿主轴排列。

<!DOCTYPE html>
<html lang="en">
<head><meta charset="UTF-8"><title>主轴和侧轴</title><style>.father{width: 1000px;background-color: #0e90d2;margin: 0 auto;/*开启了弹性布局*/display: flex;/* 1, 设置主轴的方向,水平从左到右 默认 *//*flex-direction: row;*//* 2, 调整主轴方向使用 row-reverse 从右往左 *//*flex-direction: row-reverse;*//* 3,调整主轴方向从上往下   *//*flex-direction: column;*//* 4,调整主轴方向从下往上   */flex-direction: column-reverse;}.child{width: 200px;height: 200px;background-color: rebeccapurple;border: 1px solid red;}</style>
</head>
<body>
<div class="father"><div class="child">1</div><div class="child">2</div><div class="child">3</div>
</div>
</body>
</html>
放开注释可以看到元素不同的排列方式
总结:
1.主轴与侧轴
·主轴:弹性布局沿着主轴排列,主轴默认是水平的从左到右(左边是起点,右边是终点,可以称之为x轴)。
.侧轴:与主轴垂直的就是侧轴,侧轴默认是垂直的,默认方向是:从上到下(上边是起点,下边是终点.可以称之为y轴)。
2.主轴方向
·修改主轴的属性(默认值):flex-direction常用值如下:
1. row :主轴方向水平从左到右-―默认值
2. row-reverse:主轴方向水平从右到左。
3. column :主轴方向垂直从上到下。
4. column-reverse :主轴方向垂直从下到上。
注意:改变了主轴的方向,侧轴方向也随之改变。
3,主轴换行flex-wrap
<!DOCTYPE html>
<html lang="en">
<head><meta charset="UTF-8"><title>换行</title><style>.father{width: 1100px;background-color: #0e90d2;margin: 0 auto;height: 610px;/*开启了弹性布局*/display: flex;/* 1, 设置主轴的方向,水平从左到右 默认 */flex-direction: row;/*  主轴换行  不换行默认值*//*flex-wrap: wrap;*//*  反向换行  */flex-wrap: wrap-reverse;}.child{width: 200px;height: 200px;background-color: rebeccapurple;border: 1px solid red;}</style>
</head>
<body>
<div class="father"><div class="child">1</div><div class="child">2</div><div class="child">3</div><div class="child">4</div><div class="child">5</div><div class="child">6</div><div class="child">7</div><div class="child">8</div><div class="child">8</div><div class="child">10</div><div class="child">11</div>
</div>
</body>
</html>
总结:主轴换行主要使用属性flex-wrap
1,wrap作用:让元素正常排列,多出的自动换行;
1,wrap-reverse作用:让元素从下往上,从左往右进行排列;
4,flex-flow
<!DOCTYPE html>
<html lang="en">
<head><meta charset="UTF-8"><title>flex-flow</title><style>.father{width: 1100px;background-color: #0e90d2;margin: 0 auto;height: 610px;/*开启了弹性布局*/display: flex;flex-flow: row wrap;}.child{width: 200px;height: 200px;background-color: rebeccapurple;border: 1px solid red;}</style>
</head>
<body>
<div class="father"><div class="child">1</div><div class="child">2</div><div class="child">3</div><div class="child">4</div><div class="child">5</div><div class="child">6</div><div class="child">7</div><div class="child">8</div><div class="child">8</div><div class="child">10</div><div class="child">11</div>
</div>
</body>
</html>
flex-flow是一个复合属性,结合了 flex-direction和flex-wrap两个属性 用的比较少。
5,主轴的对齐方式justify-content
<!DOCTYPE html>
<html lang="en">
<head><meta charset="UTF-8"><title>主轴的对齐方式justify-content</title><style>.father{width: 1100px;background-color: #0e90d2;margin: 0 auto;height: 610px;/*开启了弹性布局*/display: flex;/* 设置主轴的方向,水平从左到右 默认 */flex-direction: row;/* 1, 起点对齐*//*justify-content: flex-start;*//* 2, 中间对齐  *//*justify-content: center;*//* 3,终点*//*justify-content: flex-end;*//* 4,均匀分布,两端距离是中间距离的一半*//*justify-content: space-around;*//* 5,均匀分布,两端对齐*//*justify-content: space-between;*//* 6,均匀分布,两端距离与中间距离一致  */justify-content: space-evenly;}.child{width: 200px;height: 200px;background-color: rebeccapurple;border: 1px solid red;}</style>
</head>
<body>
<div class="father"><div class="child">1</div><div class="child">2</div><div class="child">3</div>
</div>
</body>
</html>
justify-content·常用值如下:
1. flex-strt:主轴起点对齐。—―默认值
2. flex-end:主轴终点对齐。
3. center :居中对齐
4. space-between:均匀分布,两端对齐(最常用)。
5. space-around :均匀分布,两端距离是中间距离的一半。
6. space-evenly :均匀分布,两端距离与中间距离一致。
6,侧轴的对齐方式一行align-items
<!DOCTYPE html>
<html lang="en">
<head><meta charset="UTF-8"><title>侧轴对齐方式一行的情况</title><style>.father{width: 1100px;background-color: #0e90d2;margin: 0 auto;height: 610px;/*开启了弹性布局*/display: flex;/* 设置主轴的方向,水平从左到右 默认 */flex-direction: row;/* 1, 主轴上的对齐方式  起点对齐*/justify-content: flex-start;/*1,  起始位置 *//*align-items: flex-start;*//* 2, 中间位置 *//*align-items: center;*//* 3, 终点位置 *//*align-items: flex-end;*//* 4, 侧轴中间位置对齐 *//*align-items: baseline;*//* 4, 没有高度的时候有效 拉伸到父容器的高度 */align-items: stretch;}.child{width: 200px;height: 200px;background-color: rebeccapurple;border: 1px solid red;}.child:nth-child(2){height: 400px;}</style>
</head>
<body>
<div class="father"><div class="child">1</div><div class="child">2</div><div class="child">3</div>
</div>
</body>
</html>
所需属性: align-items。只适用于只有一行的情况
常用值如下:
1. flex-start 起点对齐。
2. flex-end :终点对齐。
3. center :中点对齐。
4. baseline:基线对齐。
5. stretch: 没有高度的时候有效 拉伸到父容器的高度
7,侧轴的对齐方式多行align-content
<!DOCTYPE html>
<html lang="en">
<head><meta charset="UTF-8"><title>侧轴对齐方式多行的情况</title><style>.father{width: 1100px;background-color: #0e90d2;margin: 0 auto;height: 910px;/*开启了弹性布局*/display: flex;/* 设置主轴的方向,水平从左到右 默认 */flex-direction: row;/* 1, 主轴上的对齐方式  起点对齐*/justify-content: flex-start;flex-wrap: wrap;/*1,  侧轴的对齐方式  起始位置 *//*align-content: flex-start;*//* 2, 侧轴的对齐方式  中间位置 *//*align-content: center;*//* 3, 侧轴的对齐方式  终点位置 *//*align-content: flex-end;*//* 4, 侧轴的对齐方式  伸缩项目间的距离相等,比距边缘大一倍 *//*align-content: space-around;*//* 5, 侧轴的对齐方式  与侧轴两端对齐,中间平均分布 *//*align-content: space-between;*//* 6, 侧轴的对齐方式  在侧轴上完全平分 *//*align-content: space-evenly;*//* 7, 侧轴的对齐方式  占满整个侧轴 */align-content: stretch;}.child{width: 200px;height: 200px;background-color: rebeccapurple;border: 1px solid red;}.child:nth-child(2){height: 400px;}</style>
</head>
<body>
<div class="father"><div class="child">1</div><div class="child">2</div><div class="child">3</div><div class="child">4</div><div class="child">5</div><div class="child">6</div><div class="child">7</div><div class="child">8</div><div class="child">9</div><div class="child">10</div><div class="child">11</div>
</div>
</body>
</html>
所需属性: align-content常用值如下:
1.flex-stat :与侧轴的起点对齐。
2. flex-end :与侧轴的终点对齐。
3. center :与侧轴的中点对齐。
4. space-between :与侧轴两端对齐,中间平均分布。
5. space-around :伸缩项目间的距离相等,比距边缘大一倍。
6. space-evenly :在侧轴上完全平分。
7. stretch :占满整个侧轴。—―默认值
8,元素水平垂直居中-两种方式
<!DOCTYPE html>
<html lang="en">
<head><meta charset="UTF-8"><title>元素的水平垂直居中</title><style>.father{width: 1100px;background-color: #0e90d2;margin: 0 auto;height: 910px;/*开启了弹性布局*/display: flex;/* 设置主轴的方向,水平从左到右 默认 */flex-direction: row;/*方式一 x和y轴水平居中*/justify-content: center;align-items: center;}.child{width: 200px;height: 200px;background-color: rebeccapurple;border: 1px solid red;/*  方式二,直接给子元素margin:0 auto  *//*margin: 0 auto;*/}</style>
</head>
<body>
<div class="father"><div class="child">1</div>
</div>
</body>
</html>
9,基准长度flex-basic
<!DOCTYPE html>
<html lang="en">
<head><meta charset="UTF-8"><title>基准长度</title><style>.father{width: 1100px;background-color: #0e90d2;margin: 0 auto;height: 910px;/*开启了弹性布局*/display: flex;/* 设置主轴的方向,水平从左到右 默认 */flex-direction: row;/* 1, 主轴上的对齐方式  起点对齐*/justify-content: flex-start;/*进行换行*/flex-wrap: wrap;}.child{width: 200px;height: 200px;background-color: rebeccapurple;border: 1px solid red;}.child:nth-child(2){/*设置伸缩元素在主轴上的基准长度,主轴是横向的,宽失效,纵向高失效 它的默认值为auto*/flex-basis: 300px;}</style>
</head>
<body>
<div class="father"><div class="child">1</div><div class="child">2</div><div class="child">3</div>
</div>
</body>
</html>
概念: flex-basis设置的主轴方向的基准长度会让宽度或高度失效。
备注:主轴横向:宽度失效;主轴纵向:高度失效
作用:浏览器根据这个属性设置的值,计算主轴上是否有多余空间,默认值auto,即:伸缩项目的宽或高。
10,弹性布局之拉伸flex-grow
父元素的宽度增加,子元素的宽度也会随之增加,并进行一定比较的分配。
<!DOCTYPE html>
<html lang="en">
<head><meta charset="UTF-8"><title>弹性布局-拉伸</title><style>.father{width: 1100px;background-color: #0e90d2;margin: 0 auto;height: 910px;/*开启了弹性布局*/display: flex;/* 设置主轴的方向,水平从左到右 默认 */flex-direction: row;/* 1, 主轴上的对齐方式  起点对齐*/justify-content: flex-start;/*进行换行*/flex-wrap: wrap;}.child{width: 200px;height: 200px;background-color: rebeccapurple;border: 1px solid red;flex-grow: 1;}.child:nth-child(2){width: 300px;}</style>
</head>
<body>
<div class="father"><div class="child">1</div><div class="child">2</div><div class="child">3</div>
</div>
</body>
</html>
概念:
flex-grow 定义伸缩项目的放大比例,默认为1,即:纵使主轴存在剩余空间,也不拉伸(放大)
规则:
1,若所有伸缩项目的 flex-grow值都为1,如果它们有空间的话,按等分进行空间的分配。
2,如果单独设置flex-grow,则根据计算规则进行分配。
11,弹性布局之压缩flex-shrink
父元素的宽度减小,子元素的宽度也会随之减小,并进行一定比较的分配。
<!DOCTYPE html>
<html lang="en">
<head><meta charset="UTF-8"><title>弹性布局-压缩</title><style>.father{width: 1100px;background-color: #0e90d2;margin: 0 auto;height: 910px;/*开启了弹性布局*/display: flex;/* 设置主轴的方向,水平从左到右 默认 */flex-direction: row;/* 1, 主轴上的对齐方式  起点对齐*/justify-content: flex-start;/*进行换行*//*flex-wrap: wrap;*/}.child{width: 200px;height: 200px;background-color: rebeccapurple;border: 1px solid red;flex-shrink: 1;}.child:nth-child(2){width: 300px;flex-shrink: 2;}</style>
</head>
<body>
<div class="father"><div class="child">1</div><div class="child">2</div><div class="child">3</div>
</div>
</body>
</html>
概念: flex-shrink定义了项目的压缩比例,默认为1。如果空间不足,该项目将会缩小。
注意:如果压缩到一定的程度,则以里面的子元素作为最小的单位进行展示,例如子元素里面有一个div的元素宽和高分别为50,则它压缩的最低宽度不会小于50
12,复合属性的使用-flex
<!DOCTYPE html>
<html lang="en">
<head><meta charset="UTF-8"><title>flex复合属性的使用</title><style>.father{width: 600px;background-color: #0e90d2;margin: 0 auto;height: 910px;/*开启了弹性布局*/display: flex;/* 设置主轴的方向,水平从左到右 默认 */flex-direction: row;/* 1, 主轴上的对齐方式  起点对齐*/justify-content: flex-start;}.child{width: 200px;height: 200px;background-color: rebeccapurple;border: 1px solid red;/*  可以拉伸  *//*flex-grow: 1;*//*  可以压缩  *//*flex-shrink: 1;*//*基准长度*//*flex-basis: 100px;*//* 这一个属性相当于上面的3个属性  拉伸,压缩,不设置基准长度  简写flex:auto;   */flex: 1 1 100px;}</style>
</head>
<body>
<div class="father"><div class="child">1</div><div class="child">2</div><div class="child">3</div>
</div>
</body>
</html>
flex复合属性的用法
flex是复合属性,复合了: flex-grow , flex-shrink . flex-basis三个属性,默认值为0 1 auto
1,如荣写flex:1 1 auto ,则可简马为:flex:auto
2,如果写flex:1 1 0,则可简写为:flex : 1
3,如果写flex:0 0 auto ,则可简写为:flex : none
4,如果写flex:0 1 auto ,则可简写为: flex:0 auto ——即flex初始值。
13,项目排序和对齐align-self
<!DOCTYPE html>
<html lang="en">
<head><meta charset="UTF-8"><title>项目排序和单独对齐</title><style>.father{width: 600px;background-color: #0e90d2;margin: 0 auto;height: 610px;/*开启了弹性布局*/display: flex;/* 设置主轴的方向,水平从左到右 默认 */flex-direction: row;/* 1, 主轴上的对齐方式  起点对齐*/justify-content: flex-start;}.child{width: 200px;height: 200px;background-color: rebeccapurple;border: 1px solid red;flex: 1 1 100px;}.child:nth-child(2){order: -1;align-self: center;}</style>
</head>
<body>
<div class="father"><div class="child">1</div><div class="child">2</div><div class="child">3</div>
</div>
</body>
</html>
align-self属性常用的有3个
1,flex-start 起点对齐
2,center 居中对齐
3,flex-start:终点对齐
14,综合练习

<!DOCTYPE html>
<html lang="en">
<head><meta charset="UTF-8"><title>练习</title><style>body{background-color: slateblue;}ul{background-color: whitesmoke;list-style: none;padding: 0;width: 90px;height: 90px;border: 1px solid gray;float: left;margin: 10px;border-radius: 5px;/* 开启弹性布局 */display: flex;}li{width: 20px;height: 20px;margin: 5px;background-color: gray;border-radius: 50%;}ul:nth-child(2){justify-content: center;}ul:nth-child(3){justify-content: flex-end;}ul:nth-child(4){justify-content: flex-end;align-items: center;}ul:nth-child(5){justify-content: center;align-items: center;}ul:nth-child(6){justify-content: space-between;}ul:nth-child(7){justify-content: space-between;}ul:nth-child(7) li:nth-child(2){align-self: flex-end;}ul:nth-child(8){justify-content: space-between;}ul:nth-child(8) li:nth-child(2){align-self: center;}ul:nth-child(8) li:nth-child(3){align-self: flex-end;}ul:nth-child(9){justify-content: space-between;flex-direction: column;}ul:nth-child(10){flex-wrap: wrap;justify-content: space-between;align-content: space-between;}ul:nth-child(10) li{margin: 10px;}ul:nth-child(11){flex-wrap: wrap;justify-content: space-between;align-content: space-between;}ul:nth-child(11) li{margin: 5px 10px;}ul:nth-child(11) li:nth-child(3){margin: 5px 35px;}ul:nth-child(12){flex-wrap: wrap;justify-content: space-between;align-content: space-between;}ul:nth-child(13){flex-wrap: wrap;justify-content: flex-start;align-content: flex-start;}ul:nth-child(14){flex-wrap: wrap;justify-content: center;align-content: center;}ul:nth-child(15){flex-wrap: wrap;justify-content: flex-end;align-content: flex-end;}ul:nth-child(16){flex-wrap: wrap;justify-content: space-evenly;align-content: center;}ul:nth-child(17){flex-direction: column;flex-wrap: wrap;justify-content: space-evenly;align-content: center;}ul:nth-child(18){flex-direction: column;flex-wrap: wrap-reverse;justify-content: center;align-content: center;}ul:nth-child(19){flex-direction: row;flex-wrap: wrap-reverse;justify-content: center;align-content: center;}ul:nth-child(20){flex-direction: row;flex-wrap: wrap-reverse;justify-content: center;align-content: center;}ul:nth-child(21){flex-direction: column;flex-wrap: wrap-reverse;justify-content: center;align-content: center;}ul:nth-child(22){flex-direction: column-reverse;flex-wrap: wrap;justify-content: center;align-content: center;}ul:nth-child(23){flex-direction: column-reverse;flex-wrap: wrap-reverse;justify-content: flex-start;align-content: flex-start;}ul:nth-child(24){flex-direction: column;flex-wrap: wrap-reverse;justify-content: flex-start;align-content: flex-start;}ul:nth-child(25){flex-wrap: wrap;justify-content: center;align-content: center;}ul:nth-child(26){flex-direction: row;flex-wrap: wrap;}</style>
</head>
<body><ul><li></li></ul><ul><li></li></ul><ul><li></li></ul><ul><li></li></ul><ul><li></li></ul><ul><li></li><li></li></ul><ul><li></li><li></li></ul><ul><li></li><li></li><li></li></ul><ul><li></li><li></li><li></li></ul><ul><li></li><li></li><li></li><li></li></ul><ul><li></li><li></li><li></li><li></li><li></li></ul><ul><li></li><li></li><li></li><li></li><li></li><li></li></ul><ul><li></li><li></li><li></li><li></li><li></li><li></li></ul><ul><li></li><li></li><li></li><li></li><li></li><li></li></ul><ul><li></li><li></li><li></li><li></li><li></li><li></li></ul><ul><li></li><li></li><li></li><li></li><li></li><li></li><li></li></ul><ul><li></li><li></li><li></li><li></li><li></li><li></li><li></li></ul><ul><li></li><li></li><li></li><li></li><li></li><li></li><li></li></ul><ul><li></li><li></li><li></li><li></li><li></li><li></li><li></li></ul><ul><li></li><li></li><li></li><li></li><li></li><li></li><li></li><li></li></ul><ul><li></li><li></li><li></li><li></li><li></li><li></li><li></li><li></li></ul><ul><li></li><li></li><li></li><li></li><li></li><li></li><li></li><li></li></ul><ul><li></li><li></li><li></li><li></li><li></li><li></li><li></li><li></li></ul><ul><li></li><li></li><li></li><li></li><li></li><li></li><li></li><li></li></ul><ul><li></li><li></li><li></li><li></li><li></li><li></li><li></li><li></li></ul><ul><li></li><li></li><li></li><li></li><li></li><li></li><li></li><li></li><li></li></ul>
</body>
</html>
完结。

![网课:[NOIP2017]奶酪——牛客(疑问)](http://pic.xiahunao.cn/网课:[NOIP2017]奶酪——牛客(疑问))

![[论文总结] 深度学习在农业领域应用论文笔记12](http://pic.xiahunao.cn/[论文总结] 深度学习在农业领域应用论文笔记12)


![[office] 图文演示excel怎样给单元格添加下拉列表 #知识分享#经验分享](http://pic.xiahunao.cn/[office] 图文演示excel怎样给单元格添加下拉列表 #知识分享#经验分享)

)


![P1044 [NOIP2003 普及组] 栈题解](http://pic.xiahunao.cn/P1044 [NOIP2003 普及组] 栈题解)


)
)