依旧是带着问题再去学习
首先,Android是怎么启动的?
Android服务是怎么启动的?
Android线程是怎么切换的?
Android ApplicationThread是怎么创建的?
那么接下来开始分析Android的启动流程 还是一步一图
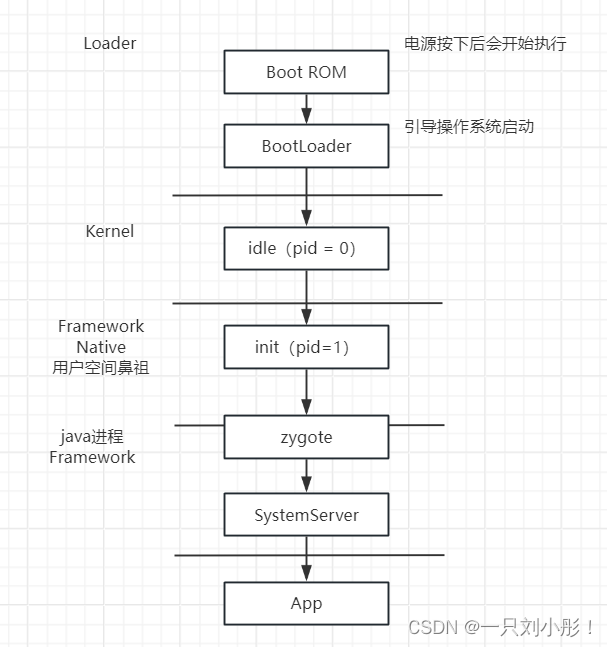
先画一张流程图描述个大概
这里有个小知识点,线程和进程在Linux内核空间是一样的,只是因为共享内存,所以才有线程和进程区分,连调用方法都一样,只是传进去的参数线程会传入的是父进程的用户空间
言归正传,继续看Android的启动流程
首先 init进程如何启动的?
init 是在 system/bin/init 这个文件来启动的,那么这个文件是在哪执行的呢?

是这一层进行执行的 是一个叫 kenel_init 的方法,启动init进程
1497static int __ref kernel_init(void *unused)
1498{
1499        int ret;
1500
1501        /*
1502         * Wait until kthreadd is all set-up.
1503         */
1504        wait_for_completion(&kthreadd_done);
1505
1506        kernel_init_freeable();
1507        /* need to finish all async __init code before freeing the memory */
1508        async_synchronize_full();
1509        kprobe_free_init_mem();
1510        ftrace_free_init_mem();
1511        kgdb_free_init_mem();
1512        exit_boot_config();
1513        free_initmem();
1514        mark_readonly();
1515
1516        /*
1517         * Kernel mappings are now finalized - update the userspace page-table
1518         * to finalize PTI.
1519         */
1520        pti_finalize();
1521
1522        system_state = SYSTEM_RUNNING;
1523        numa_default_policy();
1524
1525        rcu_end_inkernel_boot();
1526
1527        do_sysctl_args();
1528
1529        if (ramdisk_execute_command) {
1530                ret = run_init_process(ramdisk_execute_command);
1531                if (!ret)
1532                        return 0;
1533                pr_err("Failed to execute %s (error %d)\n",
1534                       ramdisk_execute_command, ret);
1535        }
1536
1537        /*
1538         * We try each of these until one succeeds.
1539         *
1540         * The Bourne shell can be used instead of init if we are
1541         * trying to recover a really broken machine.
1542         */
1543        if (execute_command) {
1544                ret = run_init_process(execute_command);
1545                if (!ret)
1546                        return 0;
1547                panic("Requested init %s failed (error %d).",
1548                      execute_command, ret);
1549        }
1550
1551        if (CONFIG_DEFAULT_INIT[0] != '\0') {
1552                ret = run_init_process(CONFIG_DEFAULT_INIT);
1553                if (ret)
1554                        pr_err("Default init %s failed (error %d)\n",
1555                               CONFIG_DEFAULT_INIT, ret);
1556                else
1557                        return 0;
1558        }
1559
1560        if (!try_to_run_init_process("/sbin/init") ||
1561            !try_to_run_init_process("/etc/init") ||这个地方会启动Android的,init进程
1562            !try_to_run_init_process("/bin/init") ||
1563            !try_to_run_init_process("/bin/sh"))
1564                return 0;
1565
1566        panic("No working init found.  Try passing init= option to kernel. "
1567              "See Linux Documentation/admin-guide/init.rst for guidance.");
1568}
那么这个 try to run init process 是什么呢?
1424static int run_init_process(const char *init_filename)
1425{
1426        const char *const *p;
1427
1428        argv_init[0] = init_filename;
1429        pr_info("Run %s as init process\n", init_filename);
1430        pr_debug("  with arguments:\n");
1431        for (p = argv_init; *p; p++)
1432                pr_debug("    %s\n", *p);
1433        pr_debug("  with environment:\n");
1434        for (p = envp_init; *p; p++)
1435                pr_debug("    %s\n", *p);
1436        return kernel_execve(init_filename, argv_init, envp_init);
1437}
1438
1439static int try_to_run_init_process(const char *init_filename)
1440{
1441        int ret;
1442
1443        ret = run_init_process(init_filename);
1444
1445        if (ret && ret != -ENOENT) {
1446                pr_err("Starting init: %s exists but couldn't execute it (error %d)\n",
1447                       init_filename, ret);
1448        }
1449
1450        return ret;
1451}
最终调用到 kernel_execve
那么这个init文件是谁生成的?调用init会调用到哪里?
实际上init文件是 Android.bp生成,最终调用到 main.cpp上
cc_binary {
//省略srcs: ["main.cpp"]}
时序图如下

main.cpp是Android系统的头文件,那么接下来我们接着看main.cpp

51  int main(int argc, char** argv) {
52  #if __has_feature(address_sanitizer)
53      __asan_set_error_report_callback(AsanReportCallback);
54  #endif
55
56      if (!strcmp(basename(argv[0]), "ueventd")) {
57          return ueventd_main(argc, argv);
58      }
59
60      if (argc > 1) {
61          if (!strcmp(argv[1], "subcontext")) {
62              android::base::InitLogging(argv, &android::base::KernelLogger);
63              const BuiltinFunctionMap& function_map = GetBuiltinFunctionMap();
64
65              return SubcontextMain(argc, argv, &function_map);
66          }
67
68          if (!strcmp(argv[1], "selinux_setup")) {
69              return SetupSelinux(argv);
70          }
71
72          if (!strcmp(argv[1], "second_stage")) {
73              return SecondStageMain(argc, argv);
74          }
75      }
76
77      return FirstStageMain(argc, argv);
78  }
这是main.cpp的main函数,这个main方法会执行多次,Android系统最初的函数 先看 First
int FirstStageMain(int argc, char** argv) {
175      if (REBOOT_BOOTLOADER_ON_PANIC) {检查,如果init挂掉了会重新启动
176          InstallRebootSignalHandlers();
177      }
178
179      boot_clock::time_point start_time = boot_clock::now();
180
181      std::vector<std::pair<std::string, int>> errors;
182  #define CHECKCALL(x) \
183      if ((x) != 0) errors.emplace_back(#x " failed", errno);
184
185      // Clear the umask.
186      umask(0);
187
188      CHECKCALL(clearenv());
189      CHECKCALL(setenv("PATH", _PATH_DEFPATH, 1));
190      // Get the basic filesystem setup we need put together in the initramdisk
191      // on / and then we'll let the rc file figure out the rest.挂载 创建一些文件
192      CHECKCALL(mount("tmpfs", "/dev", "tmpfs", MS_NOSUID, "mode=0755"));
193      CHECKCALL(mkdir("/dev/pts", 0755));
194      CHECKCALL(mkdir("/dev/socket", 0755));
195      省略
332      CHECKCALL(mknod("/dev/null", S_IFCHR | 0666, makedev(1, 3)));输入输出SetStdioToDevNull(argv);以及启动 selinuxupconst char* args[] = {path, "selinux_setup", nullptr};execv(path, const_cast<char**>(args));
333      return 1;
334  }
First 主要作用是挂载,初始化重要文件,重定向输入输出,log,以及启动 selinux_setup
execv函数会再走一次这个main函数
然后再次进入,启动 Second

SetupSelinux 是一个最小权限原则
672  int SetupSelinux(char** argv) {
673      SetStdioToDevNull(argv);
674      InitKernelLogging(argv);697      省略
698      const char* path = "/system/bin/init";打开 second_stage
699      const char* args[] = {path, "second_stage", nullptr};
700      execv(path, const_cast<char**>(args));
701
702      // execv() only returns if an error happened, in which case we
703      // panic and never return from this function.
704      PLOG(FATAL) << "execv(\"" << path << "\") failed";
705
706      return 1;
707  }
selinux_setup 是一个安全策略 然后进入SecondStageMain
if (!strcmp(argv[1], "second_stage")) {
73              return SecondStageMain(argc, argv);
74          }
int SecondStageMain(int argc, char** argv) {省略初始化一些属性域PropertyInit();处理子进程终止信号,僵尸进程InstallSignalFdHandler(&epoll);InstallInitNotifier(&epoll);StartPropertyService(&property_fd);匹配命令和函数之间的关系const BuiltinFunctionMap& function_map = GetBuiltinFunctionMap();解析init.rcLoadBootScripts(am, sm);}然后看下如何解析init.rc这个工作吧
272  static void LoadBootScripts(ActionManager& action_manager, ServiceList& service_list) {        创建解析器
273     std::string bootscript = GetProperty("ro.boot.init_rc", "");
276      if (bootscript.empty()) {解析init.rc
277          parser.ParseConfig("/system/etc/init/hw/init.rc");
278          if (!parser.ParseConfig("/system/etc/init")) {
279              late_import_paths.emplace_back("/system/etc/init");
280          }
281          // late_import is available only in Q and earlier release. As we don't
282          // have system_ext in those versions, skip late_import for system_ext.
283          parser.ParseConfig("/system_ext/etc/init");
284          if (!parser.ParseConfig("/product/etc/init")) {
285              late_import_paths.emplace_back("/product/etc/init");
286          }
287          if (!parser.ParseConfig("/odm/etc/init")) {
288              late_import_paths.emplace_back("/odm/etc/init");
289          }
290          if (!parser.ParseConfig("/vendor/etc/init")) {
291              late_import_paths.emplace_back("/vendor/etc/init");
292          }
293      } else {
294          parser.ParseConfig(bootscript);
296  }
297
先看下这个CreateParser方法 创建三种解析器,对rc语法进行解析
251  Parser CreateParser(ActionManager& action_manager, ServiceList& service_list) {
252      Parser parser;
253
254      parser.AddSectionParser("service", std::make_unique<ServiceParser>(
255                                                 &service_list, GetSubcontext(), std::nullopt));
256      parser.AddSectionParser("on", std::make_unique<ActionParser>(&action_manager, GetSubcontext()));
257      parser.AddSectionParser("import", std::make_unique<ImportParser>(&parser));
258
259      return parser;
260  }
解析出二进制文件这个地方省略,有兴趣可以后面研究
解析出init.rc后会进入一个while循环 还是这个 SecondStageMain 方法,接下来进入while循环当中
操作系统到最终还是一个死循环
int SecondStageMain(int argc, char** argv) {842      进入while
843      while (true) {
844          // By default, sleep until something happens.
845          auto epoll_timeout = std::optional<std::chrono::milliseconds>{};
846
847          auto shutdown_command = shutdown_state.CheckShutdown();
848          if (shutdown_command) {
849              HandlePowerctlMessage(*shutdown_command);
850          }
851
852          if (!(prop_waiter_state.MightBeWaiting() || Service::is_exec_service_running())) {
853              am.ExecuteOneCommand();
854          }
855          if (!IsShuttingDown()) {
856              auto next_process_action_time = HandleProcessActions();
857
858              // If there's a process that needs restarting, wake up in time for that.
859              if (next_process_action_time) {
860                  epoll_timeout = std::chrono::ceil<std::chrono::milliseconds>(
861                          *next_process_action_time - boot_clock::now());
862                  if (*epoll_timeout < 0ms) epoll_timeout = 0ms;
863              }
864          }
865
866          if (!(prop_waiter_state.MightBeWaiting() || Service::is_exec_service_running())) {
867              // If there's more work to do, wake up again immediately.
868              if (am.HasMoreCommands()) epoll_timeout = 0ms;
869          }
870          这里有个Wait 会在这里循环等待
871          auto pending_functions = epoll.Wait(epoll_timeout);
872          if (!pending_functions.ok()) {
873              LOG(ERROR) << pending_functions.error();
874          } else if (!pending_functions->empty()) {
875              // We always reap children before responding to the other pending functions. This is to
876              // prevent a race where other daemons see that a service has exited and ask init to
877              // start it again via ctl.start before init has reaped it.
878              ReapAnyOutstandingChildren();
879              for (const auto& function : *pending_functions) {
880                  (*function)();
881              }
882          }
883          if (!IsShuttingDown()) {
884              HandleControlMessages();
885              SetUsbController();
886          }
887      }
888
889      return 0;
890  }
一张时序图,接下来会进入init.rc当中
init处理几个重要事情
1.挂载文件
2.设置selinux 安全策略
3.设置属性服务 注册到epoll中
4.解析init.rc
5.循环处理脚本
6.循环等待
画张时序图

接下来继续分析,init.rc 就会启动zygote zygto 是第一个进入到java层,从zygto 开始才会开启java层
import /init.environ.rc
8 import /system/etc/init/hw/init.usb.rc
9 import /init.${ro.hardware}.rc
10 import /vendor/etc/init/hw/init.${ro.hardware}.rc
11 import /system/etc/init/hw/init.usb.configfs.rc
12 import /system/etc/init/hw/init.${ro.zygote}.rc
13
14 # Cgroups are mounted right before early-init using list from /etc/cgroups.json
15 on early-init
16     # Disable sysrq from keyboard
17     write /proc/sys/kernel/sysrq 0
18
19     # Android doesn't need kernel module autoloading, and it causes SELinux
20     # denials.  So disable it by setting modprobe to the empty string.  Note: to
21     # explicitly set a sysctl to an empty string, a trailing newline is needed.
22     write /proc/sys/kernel/modprobe \n省略# Now we can start zygote for devices with file based encryption
443     trigger zygote-start当执行到这的时候就会启动 zygote
812 on zygote-start && property:ro.crypto.state=unencrypted
813     # A/B update verifier that marks a successful boot.
814     exec_start update_verifier_nonencrypted
815     start statsd
816     start netd
817     start zygote
818     start zygote_secondary
可以看到init.rc导入了这个 zygote的文件
然后实际上启动的是 init.zygote.32.rc / init.zygote.64.rc 文件
具体启动哪个,是要分系统32/64 位系统
主要作用是启动 zygote的main方法,还有 如果被关闭会重启
接下来启动app_main.cpp 的main方法,现在仍然是main方法
Android的运行环境就是zygto启动的
172
173  int main(int argc, char* const argv[])
174  {
175      if (!LOG_NDEBUG) {
176        String8 argv_String;
177        for (int i = 0; i < argc; ++i) {
178          argv_String.append("\"");
179          argv_String.append(argv[i]);
180          argv_String.append("\" ");
181        }
182        ALOGV("app_process main with argv: %s", argv_String.string());
183      }
184      Android 时运行环境
185      AppRuntime runtime(argv[0], computeArgBlockSize(argc, argv));
186      // Process command line arguments
187      // ignore argv[0]
188      argc--;
189      argv++;
190
216      const char* spaced_commands[] = { "-cp", "-classpath" };
218      bool known_command = false;
219
220      int i;解析一堆东西,不详细看了
221      for (i = 0; i < argc; i++) {
222          if (known_command == true) {
223            runtime.addOption(strdup(argv[i]));
227            ALOGV("app_process main add known option '%s'", argv[i]);
228            known_command = false;
229            continue;
230          }
231
232          for (int j = 0;
233               j < static_cast<int>(sizeof(spaced_commands) / sizeof(spaced_commands[0]));
234               ++j) {
235            if (strcmp(argv[i], spaced_commands[j]) == 0) {
236              known_command = true;
237              ALOGV("app_process main found known command '%s'", argv[i]);
238            }
239          }
240
241          if (argv[i][0] != '-') {
242              break;
243          }
244          if (argv[i][1] == '-' && argv[i][2] == 0) {
245              ++i; // Skip --.
246              break;
247          }
248
249          runtime.addOption(strdup(argv[i]));
250          // The static analyzer gets upset that we don't ever free the above
251          // string. Since the allocation is from main, leaking it doesn't seem
252          // problematic. NOLINTNEXTLINE
253          ALOGV("app_process main add option '%s'", argv[i]);
254      }
255
256      // Parse runtime arguments.  Stop at first unrecognized option.
257      bool zygote = false;
258      bool startSystemServer = false;
259      bool application = false;
260      String8 niceName;
261      String8 className;
262
263      ++i;  // Skip unused "parent dir" argument.
264      while (i < argc) {
265          const char* arg = argv[i++];如果是 zygote
266          if (strcmp(arg, "--zygote") == 0) {
267              zygote = true;
268              niceName = ZYGOTE_NICE_NAME;如果是 system-server
269          } else if (strcmp(arg, "--start-system-server") == 0) {
270              startSystemServer = true;
271          } else if (strcmp(arg, "--application") == 0) {
272              application = true;
273          } else if (strncmp(arg, "--nice-name=", 12) == 0) {
274              niceName.setTo(arg + 12);
275          } else if (strncmp(arg, "--", 2) != 0) {
276              className.setTo(arg);
277              break;
278          } else {
279              --i;
280              break;
281          }
282      }
283
284      Vector<String8> args;
285      if (!className.isEmpty()) {
292          runtime.setClassNameAndArgs(className, argc - i, argv + i);
293
294          if (!LOG_NDEBUG) {
295            String8 restOfArgs;
296            char* const* argv_new = argv + i;
297            int argc_new = argc - i;
298            for (int k = 0; k < argc_new; ++k) {
299              restOfArgs.append("\"");
300              restOfArgs.append(argv_new[k]);
301              restOfArgs.append("\" ");
302            }
303            ALOGV("Class name = %s, args = %s", className.string(), restOfArgs.string());
304          }
305      } else {
306          // We're in zygote mode.
307          maybeCreateDalvikCache();
308
309          if (startSystemServer) {
310              args.add(String8("start-system-server"));
311          }
312
313          char prop[PROP_VALUE_MAX];
314          if (property_get(ABI_LIST_PROPERTY, prop, NULL) == 0) {
315              LOG_ALWAYS_FATAL("app_process: Unable to determine ABI list from property %s.",
316                  ABI_LIST_PROPERTY);
317              return 11;
318          }
319
320          String8 abiFlag("--abi-list=");
321          abiFlag.append(prop);
322          args.add(abiFlag);
323
324          // In zygote mode, pass all remaining arguments to the zygote
325          // main() method.
326          for (; i < argc; ++i) {
327              args.add(String8(argv[i]));
328          }
329      }
330
331      if (!niceName.isEmpty()) {
332          runtime.setArgv0(niceName.string(), true /* setProcName */);
333      }
334
335      if (zygote) {现在是zygote 走这里
336          runtime.start("com.android.internal.os.ZygoteInit", args, zygote);
337      } else if (className) {App走这
338          runtime.start("com.android.internal.os.RuntimeInit", args, zygote);
339      } else {
340          fprintf(stderr, "Error: no class name or --zygote supplied.\n");
341          app_usage();
342          LOG_ALWAYS_FATAL("app_process: no class name or --zygote supplied.");
343      }
344  }
最终会走到 AndroidRuntime 的start 这里有三件事
启动虚拟机
注册jni
启动ZygtoInit.java的main方法
1136  void AndroidRuntime::start(const char* className, const Vector<String8>& options, bool zygote)
1137  {
1138      ALOGD(">>>>>> START %s uid %d <<<<<<\n",
1139              className != NULL ? className : "(unknown)", getuid());
1140
1141      static const String8 startSystemServer("start-system-server");
1142      // Whether this is the primary zygote, meaning the zygote which will fork system server.
1143      bool primary_zygote = false;
1144
1145      /*
1146       * 'startSystemServer == true' means runtime is obsolete and not run from
1147       * init.rc anymore, so we print out the boot start event here.
1148       */
1149      for (size_t i = 0; i < options.size(); ++i) {
1150          if (options[i] == startSystemServer) {
1151              primary_zygote = true;
1152             /* track our progress through the boot sequence */
1153             const int LOG_BOOT_PROGRESS_START = 3000;
1154             LOG_EVENT_LONG(LOG_BOOT_PROGRESS_START,  ns2ms(systemTime(SYSTEM_TIME_MONOTONIC)));
1155          }
1156      }
1157
1158      const char* rootDir = getenv("ANDROID_ROOT");
1159      if (rootDir == NULL) {
1160          rootDir = "/system";
1161          if (!hasDir("/system")) {
1162              LOG_FATAL("No root directory specified, and /system does not exist.");
1163              return;
1164          }
1165          setenv("ANDROID_ROOT", rootDir, 1);
1166      }
1167
1168      const char* artRootDir = getenv("ANDROID_ART_ROOT");
1169      if (artRootDir == NULL) {
1170          LOG_FATAL("No ART directory specified with ANDROID_ART_ROOT environment variable.");
1171          return;
1172      }
1173
1174      const char* i18nRootDir = getenv("ANDROID_I18N_ROOT");
1175      if (i18nRootDir == NULL) {
1176          LOG_FATAL("No runtime directory specified with ANDROID_I18N_ROOT environment variable.");
1177          return;
1178      }
1179
1180      const char* tzdataRootDir = getenv("ANDROID_TZDATA_ROOT");
1181      if (tzdataRootDir == NULL) {
1182          LOG_FATAL("No tz data directory specified with ANDROID_TZDATA_ROOT environment variable.");
1183          return;
1184      }
1185
1186      //const char* kernelHack = getenv("LD_ASSUME_KERNEL");
1187      //ALOGD("Found LD_ASSUME_KERNEL='%s'\n", kernelHack);
1188
1189      /* start the virtual machine */
1190      JniInvocation jni_invocation;
1191      jni_invocation.Init(NULL);
1192      JNIEnv* env;启动虚拟机
1193      if (startVm(&mJavaVM, &env, zygote, primary_zygote) != 0) {
1194          return;
1195      }
1196      onVmCreated(env);
1197
1198      /*
1199       * Register android functions.
1200       */启动注册JNI (与java层通信的方法)只加载一部分
1201      if (startReg(env) < 0) {
1202          ALOGE("Unable to register all android natives\n");
1203          return;
1204      }
1205
1206      /*
1207       * We want to call main() with a String array with arguments in it.
1208       * At present we have two arguments, the class name and an option string.
1209       * Create an array to hold them.
1210       */
1211      jclass stringClass;
1212      jobjectArray strArray;
1213      jstring classNameStr;
1214
1215      stringClass = env->FindClass("java/lang/String");
1216      assert(stringClass != NULL);
1217      strArray = env->NewObjectArray(options.size() + 1, stringClass, NULL);
1218      assert(strArray != NULL);
1219      classNameStr = env->NewStringUTF(className);
1220      assert(classNameStr != NULL);这里启动ZygoteInit.java文件
1221      env->SetObjectArrayElement(strArray, 0, classNameStr);
1222
1223      for (size_t i = 0; i < options.size(); ++i) {
1224          jstring optionsStr = env->NewStringUTF(options.itemAt(i).string());
1225          assert(optionsStr != NULL);
1226          env->SetObjectArrayElement(strArray, i + 1, optionsStr);
1227      }
1228
1229      /*
1230       * Start VM.  This thread becomes the main thread of the VM, and will
1231       * not return until the VM exits.
1232       */
1233      char* slashClassName = toSlashClassName(className != NULL ? className : "");
1234      jclass startClass = env->FindClass(slashClassName);
1235      if (startClass == NULL) {
1236          ALOGE("JavaVM unable to locate class '%s'\n", slashClassName);
1237          /* keep going */
1238      } else {
1239          jmethodID startMeth = env->GetStaticMethodID(startClass, "main",
1240              "([Ljava/lang/String;)V");
1241          if (startMeth == NULL) {
1242              ALOGE("JavaVM unable to find main() in '%s'\n", className);
1243              /* keep going */
1244          } else {
1245              env->CallStaticVoidMethod(startClass, startMeth, strArray);
1246
1247  #if 0
1248              if (env->ExceptionCheck())
1249                  threadExitUncaughtException(env);
1250  #endif
1251          }
1252      }
1253      free(slashClassName);
1254
1255      ALOGD("Shutting down VM\n");
1256      if (mJavaVM->DetachCurrentThread() != JNI_OK)
1257          ALOGW("Warning: unable to detach main thread\n");
1258      if (mJavaVM->DestroyJavaVM() != 0)
1259          ALOGW("Warning: VM did not shut down cleanly\n");
1260  }
简单看下 setVM 一些大小的初始化
虚拟机到底是什么?其实就是一个内存管理
int AndroidRuntime::startVm(JavaVM** pJavaVM, JNIEnv** pEnv, bool zygote, bool primary_zygote)
610  {
611      JavaVMInitArgs initArgs;
612      char propBuf[PROPERTY_VALUE_MAX];
613      char jniOptsBuf[sizeof("-Xjniopts:")-1 + PROPERTY_VALUE_MAX];
614      char heapstartsizeOptsBuf[sizeof("-Xms")-1 + PROPERTY_VALUE_MAX];
615      char heapsizeOptsBuf[sizeof("-Xmx")-1 + PROPERTY_VALUE_MAX];省略,但是都是对虚拟机进行的初始化
670      char jdwpProviderBuf[sizeof("-XjdwpProvider:") - 1 + PROPERTY_VALUE_MAX];
671      char opaqueJniIds[sizeof("-Xopaque-jni-ids:") - 1 + PROPERTY_VALUE_MAX];
672      char bootImageBuf[sizeof("-Ximage:") - 1 + PROPERTY_VALUE_MAX];
在看下注册jni这块
1592  /*static*/ int AndroidRuntime::startReg(JNIEnv* env)
1593  {
1594      ATRACE_NAME("RegisterAndroidNatives");1600      androidSetCreateThreadFunc((android_create_thread_fn) javaCreateThreadEtc);
1601
1602      ALOGV("--- registering native functions ---\n");1610      env->PushLocalFrame(200);
1611
1612      if (register_jni_procs(gRegJNI, NELEM(gRegJNI), env) < 0) {
1613          env->PopLocalFrame(NULL);
1614          return -1;
1615      }
1616      env->PopLocalFrame(NULL);
1617
1620      return 0;
1621  }
static const RegJNIRec gRegJNI[] = {
1449 REG_JNI(register_com_android_internal_os_RuntimeInit),
1450 REG_JNI(register_com_android_internal_os_ZygoteInit_nativeZygoteInit),
1451 REG_JNI(register_android_os_SystemClock),
1452 REG_JNI(register_android_util_EventLog),
1453 REG_JNI(register_android_util_Log),
1454 REG_JNI(register_android_util_MemoryIntArray),
1455 REG_JNI(register_android_app_admin_SecurityLog),
1456 REG_JNI(register_android_content_AssetManager),
1457 REG_JNI(register_android_content_StringBlock),
1458 REG_JNI(register_android_content_XmlBlock),
1459 REG_JNI(register_android_content_res_ApkAssets),
1460 REG_JNI(register_android_text_AndroidCharacter),
1461 REG_JNI(register_android_text_Hyphenator),jni其实是一个函数指针,函数指针对应了java里的方法
这个是静态注册,我们搞个例子看下 jni 既可以native -> java 也可以 java-> native
250  int register_com_android_internal_os_RuntimeInit(JNIEnv* env)
251  {
252      const JNINativeMethod methods[] = {
253              {"nativeFinishInit", "()V",
254               (void*)com_android_internal_os_RuntimeInit_nativeFinishInit},
255              {"nativeSetExitWithoutCleanup", "(Z)V",
256               (void*)com_android_internal_os_RuntimeInit_nativeSetExitWithoutCleanup},
257      };
258      return jniRegisterNativeMethods(env, "com/android/internal/os/RuntimeInit",
259          methods, NELEM(methods));
260  }
画一张时序图

接下来看下zygoteInit.java的main方法
public static void main(String[] argv) {ZygoteServer zygoteServer = null;// Mark zygote start. This ensures that thread creation will throw// an error.ZygoteHooks.startZygoteNoThreadCreation();// Zygote goes into its own process group.try {Os.setpgid(0, 0);} catch (ErrnoException ex) {throw new RuntimeException("Failed to setpgid(0,0)", ex);}Runnable caller;try {// Store now for StatsLogging later.final long startTime = SystemClock.elapsedRealtime();final boolean isRuntimeRestarted = "1".equals(SystemProperties.get("sys.boot_completed"));String bootTimeTag = Process.is64Bit() ? "Zygote64Timing" : "Zygote32Timing";TimingsTraceLog bootTimingsTraceLog = new TimingsTraceLog(bootTimeTag,Trace.TRACE_TAG_DALVIK);bootTimingsTraceLog.traceBegin("ZygoteInit");RuntimeInit.preForkInit();boolean startSystemServer = false;String zygoteSocketName = "zygote";String abiList = null;boolean enableLazyPreload = false;for (int i = 1; i < argv.length; i++) {if ("start-system-server".equals(argv[i])) {startSystemServer = true;} else if ("--enable-lazy-preload".equals(argv[i])) {enableLazyPreload = true;} else if (argv[i].startsWith(ABI_LIST_ARG)) {abiList = argv[i].substring(ABI_LIST_ARG.length());} else if (argv[i].startsWith(SOCKET_NAME_ARG)) {zygoteSocketName = argv[i].substring(SOCKET_NAME_ARG.length());} else {throw new RuntimeException("Unknown command line argument: " + argv[i]);}}final boolean isPrimaryZygote = zygoteSocketName.equals(Zygote.PRIMARY_SOCKET_NAME);if (!isRuntimeRestarted) {if (isPrimaryZygote) {FrameworkStatsLog.write(FrameworkStatsLog.BOOT_TIME_EVENT_ELAPSED_TIME_REPORTED,BOOT_TIME_EVENT_ELAPSED_TIME__EVENT__ZYGOTE_INIT_START,startTime);} else if (zygoteSocketName.equals(Zygote.SECONDARY_SOCKET_NAME)) {FrameworkStatsLog.write(FrameworkStatsLog.BOOT_TIME_EVENT_ELAPSED_TIME_REPORTED,BOOT_TIME_EVENT_ELAPSED_TIME__EVENT__SECONDARY_ZYGOTE_INIT_START,startTime);}}if (abiList == null) {throw new RuntimeException("No ABI list supplied.");}// In some configurations, we avoid preloading resources and classes eagerly.// In such cases, we will preload things prior to our first fork.if (!enableLazyPreload) {bootTimingsTraceLog.traceBegin("ZygotePreload");EventLog.writeEvent(LOG_BOOT_PROGRESS_PRELOAD_START,SystemClock.uptimeMillis());预加载资源,加速启动进程有一个preload_class preload(bootTimingsTraceLog);EventLog.writeEvent(LOG_BOOT_PROGRESS_PRELOAD_END,SystemClock.uptimeMillis());bootTimingsTraceLog.traceEnd(); // ZygotePreload}// Do an initial gc to clean up after startupbootTimingsTraceLog.traceBegin("PostZygoteInitGC");gcAndFinalize();bootTimingsTraceLog.traceEnd(); // PostZygoteInitGCbootTimingsTraceLog.traceEnd(); // ZygoteInitZygote.initNativeState(isPrimaryZygote);ZygoteHooks.stopZygoteNoThreadCreation();这个实际上就是socket如果AMS需要zygote 创建一个进程,就在这通信zygoteServer = new ZygoteServer(isPrimaryZygote);if (startSystemServer) {启动systemServerRunnable r = forkSystemServer(abiList, zygoteSocketName, zygoteServer);// {@code r == null} in the parent (zygote) process, and {@code r != null} in the// child (system_server) process.if (r != null) {r.run();return;}}Log.i(TAG, "Accepting command socket connections");// The select loop returns early in the child process after a fork and// loops forever in the zygote.启动一个循环,接收AMS的消息caller = zygoteServer.runSelectLoop(abiList);} catch (Throwable ex) {Log.e(TAG, "System zygote died with fatal exception", ex);throw ex;} finally {if (zygoteServer != null) {zygoteServer.closeServerSocket();}}// We're in the child process and have exited the select loop. Proceed to execute the// command.if (caller != null) {caller.run();}}现在知道AMS和zygote是靠socket通信,可是问题是为什么使用socket?
因为socket更安全,binder会有一个线程池,有死锁的风险,为什么有死锁风险?
这里有个题外话,为什么回调里不能加锁?当你在回调里加锁,如果回调里切了线程有锁,并且访问这把锁,下面代码又需要上一把锁就会死锁
binder这个死锁是另一个场景,如果你切换了进程,当前线程拿了一把锁,你在这里切进程,锁没人通知它解开就会一直锁住,也会死锁
AMS属于SystemServer里面,服务代码
还有一个小知识点,Loop之所以是主线程是因为main方法所在的线程被称为主线程
pid = Zygote.forkSystemServer(parsedArgs.mUid, parsedArgs.mGid,parsedArgs.mGids,parsedArgs.mRuntimeFlags,null,parsedArgs.mPermittedCapabilities,parsedArgs.mEffectiveCapabilities);} catch (IllegalArgumentException ex) {throw new RuntimeException(ex);}/* For child process */if (pid == 0) {if (hasSecondZygote(abiList)) {waitForSecondaryZygote(socketName);}zygoteServer.closeServerSocket();sytemServer在这里通过反射执行return handleSystemServerProcess(parsedArgs);}还是刚才的main方法,pid == 0 时候代表这段代码已经是SystemServer,所以这是一段 SystemServer专属方法
那么SystemServer fork是怎么执行的呢?
static jint com_android_internal_os_Zygote_nativeForkSystemServer(
2075          JNIEnv* env, jclass, uid_t uid, gid_t gid, jintArray gids,
2076          jint runtime_flags, jobjectArray rlimits, jlong permitted_capabilities,
2077          jlong effective_capabilities) {
2078    std::vector<int> fds_to_close(MakeUsapPipeReadFDVector()),
2079                     fds_to_ignore(fds_to_close);
2080
2081    fds_to_close.push_back(gUsapPoolSocketFD);
2082
2083    if (gUsapPoolEventFD != -1) {
2084      fds_to_close.push_back(gUsapPoolEventFD);
2085      fds_to_ignore.push_back(gUsapPoolEventFD);
2086    }
2087
2088    if (gSystemServerSocketFd != -1) {
2089        fds_to_close.push_back(gSystemServerSocketFd);
2090        fds_to_ignore.push_back(gSystemServerSocketFd);
2091    }
2092
2093    pid_t pid = ForkCommon(env, true,
2094                           fds_to_close,
2095                           fds_to_ignore,
2096                           true);static pid_t ForkCommon(JNIEnv* env, bool is_system_server,
1076                          const std::vector<int>& fds_to_close,
1077                          const std::vector<int>& fds_to_ignore,
1078                          bool is_priority_fork) {
1091
1114
1115    pid_t pid = fork();
关于fork函数需要结合linux的知识,这个后面专门做一期了解,把它和android系统关联起来


