Redis学习——入门篇③
- 1. Redis事务
- 1.1 事务实际操作
- 1.2 watch
- 2. Redis管道(pipelining)
- 2.1 管道简介
- 2.2 管道实际操作
- 2.3 管道小总结
- 3. Redis(pub、sub)发布订阅(不重要)
- 3.1 简介
- 3.2 发布订阅实际操作
- = = = = = = = = = 这是一个分水岭,之前是单机版本 = = = = = = = = = = =
- = = = = = = = 复制 哨兵 集群 三位一体! 面试的重点 = = = = = = = = = = =
- 4. Redis复制(replica)
- 4.1 简介
- 4.2.1 基本操作命令
- 4.2 案例演示
- 4.2.1 架构说明
- 4.2.2 配置文件准备
- 4.2.3 Diskless replication(无盘复制)(知识点补充)
- 4.3 主从复制之一主二仆
- 4.3.1 从机额外配置
- 4.3.2 主从关系查看的两种方式
- 4.3.3 通过日志
- 4.3.4 通过命令
- 4.3.5 从机可以执行写命令吗?
- 4.3.6 从机切入点问题?
- 4.3.7 主机shutdown后,从机会上位吗?
- 4.3.8 主机shutdown后,重启后主从关系还在吗?从机还能否顺利复制?
- 4.3.9 某台从机down后,master继续,从机重启后它能跟上大部队吗?
- 4.3.10 手动主从
- 4.4 薪火相传(SLAVEOF)
- 4.5 反客为主(SLAVEOF no one)
- 4.6 总结
- 4.7 主从复制痛点和改进需求
- 5. Redis哨兵(Sentinel)
- 5.1 哨兵简介
- 5.1.1 Redis Sentinel架构
- 5.1.2 Fundamental things to know about Sentinel before deploying
- 5.2 实际操作
- 5.3 异常情况
- 5.3.1 关闭主节点,会不会发挥哨兵的作用!
- 5.3.2 之前down机的master机器重启回来,谁将会是新老大?会不会双master冲突?
- 5.3.3 哨兵的配置文件写入
- 5.3.4 主观下线
- 5.3.4 客观下线
- 5.3.4 选举出领导者哨兵Leader
- 5.4 哨兵运行流程
- 5.5 选举算法
- 5.5.1 新主登基
- 5.5.2 群臣俯首
- 5.5.3 旧主俯首
- 5.6 哨兵使用建议


1. Redis事务
https://redis.io/docs/manual/transactions/
一次性执行一组命令。一定程度的原子性,不能保证同时成功或者失败。
可以一次执行多个命令,本质是一组命令的集合。一个事务中的所有命令都会序列化,按顺序地串行化执行而不会被其它命令插入,不许加塞

1.1 事务实际操作
正常执行
127.0.0.1:6379> multi
OK
127.0.0.1:6379(TX)> set k1 v1
QUEUED
127.0.0.1:6379(TX)> keys *
QUEUED
127.0.0.1:6379(TX)> set k2 v2
QUEUED
127.0.0.1:6379(TX)> set k3 v3
QUEUED
127.0.0.1:6379(TX)> exec
1) OK
2) 1) "k1"
3) OK
4) OK
127.0.0.1:6379> keys *
1) "k3"
2) "k1"
3) "k2"
事务放弃(DISCARD)
127.0.0.1:6379> multi
OK
127.0.0.1:6379(TX)> set k1 v11
QUEUED
127.0.0.1:6379(TX)> set k2 v22
QUEUED
127.0.0.1:6379(TX)> discard
OK
127.0.0.1:6379> keys *
1) "k3"
2) "k1"
3) "k2"
127.0.0.1:6379> get k1
"v1"
全体连坐(故意写错k3,事务整体被打回)
127.0.0.1:6379> multi
OK
127.0.0.1:6379(TX)> set k1 v111
QUEUED
127.0.0.1:6379(TX)> set k3
(error) ERR wrong number of arguments for 'set' command
127.0.0.1:6379(TX)> exec
(error) EXECABORT Transaction discarded because of previous errors.
127.0.0.1:6379> get k1
"v1"
冤头债主(未检测的错误),对 email 进行自增
127.0.0.1:6379> multi
OK
127.0.0.1:6379(TX)> set k1 v1111
QUEUED
127.0.0.1:6379(TX)> set k3 @1
QUEUED
127.0.0.1:6379(TX)> incr k3
QUEUED
127.0.0.1:6379(TX)> exec
1) OK
2) OK
3) (error) ERR value is not an integer or out of range
127.0.0.1:6379> get k1
"v1111"
127.0.0.1:6379> get k3
"@1"

1.2 watch
初始化数据
127.0.0.1:6379> flushall
OK
127.0.0.1:6379> set k1 abc
OK
127.0.0.1:6379> set balence 100
OK
127.0.0.1:6379> watch balance
OK
127.0.0.1:6379> multi
OK
127.0.0.1:6379(TX)> set k1 abc2
QUEUED
127.0.0.1:6379(TX)> set balance 110
QUEUED
127.0.0.1:6379(TX)> exec
1) OK
2) OK
127.0.0.1:6379> get k1
"abc2"
127.0.0.1:6379> get balance
"110"
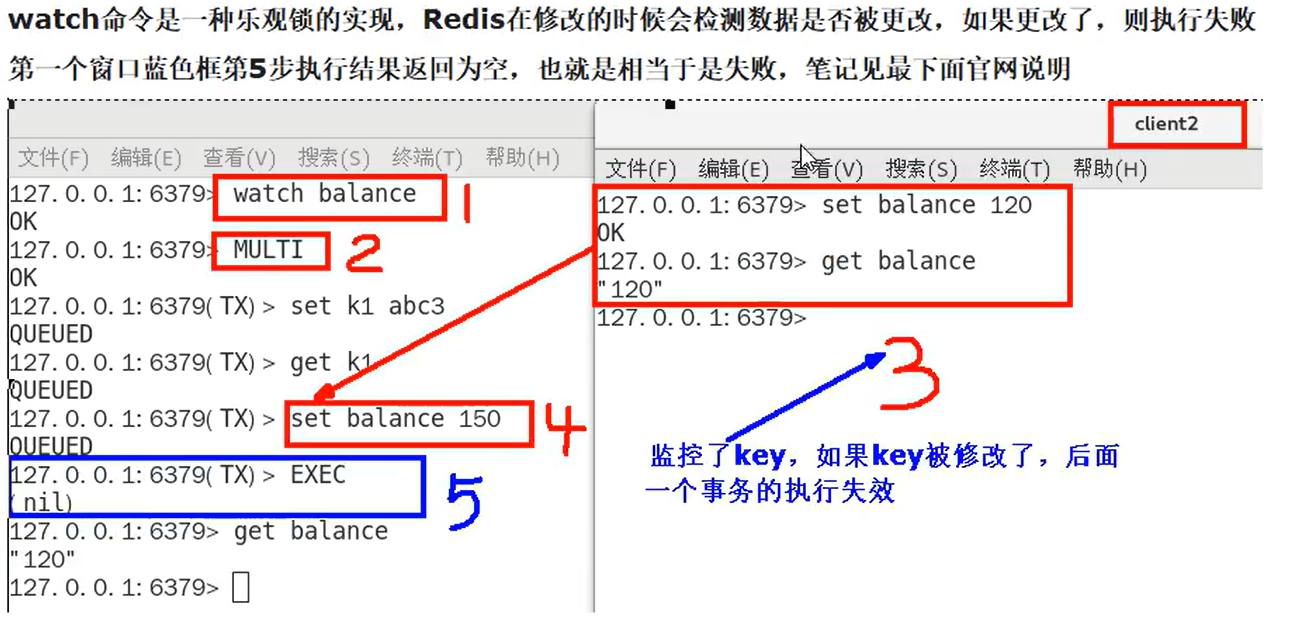
如果监控的key已经被修改,整个事务被取消。
unwatch 取消监控
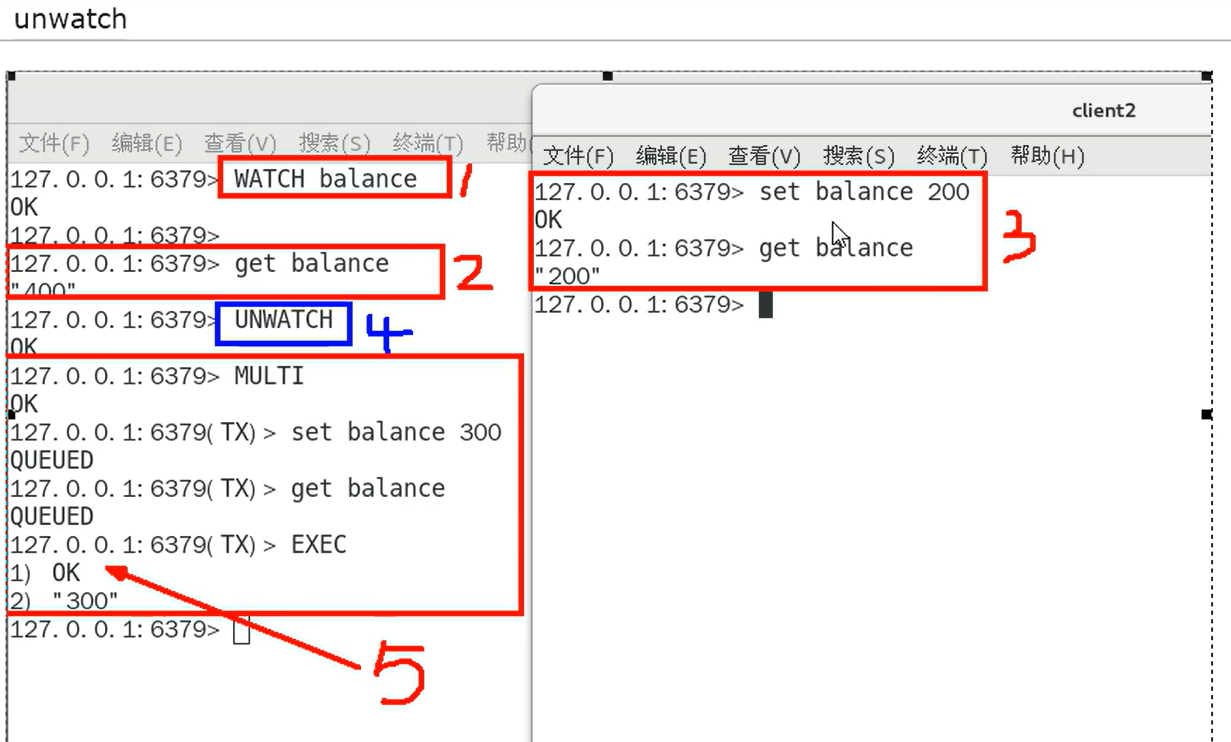

2. Redis管道(pipelining)


2.1 管道简介

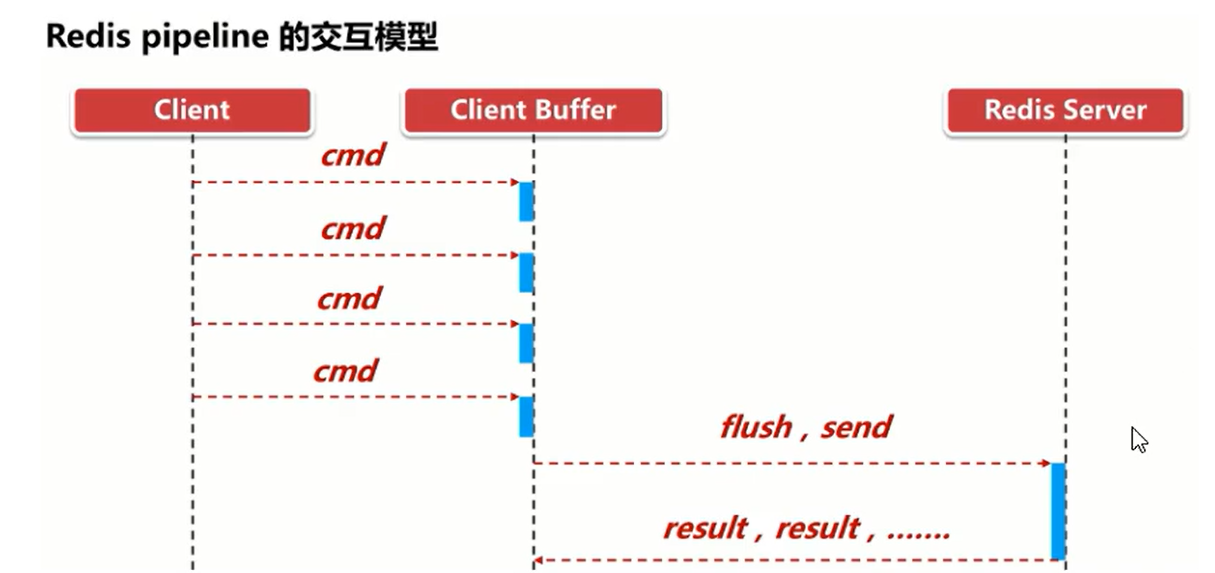
Pipeline是为了解决RTT往返回时,仅仅是将命令打包一次性发送,对整个Redis的执行不造成其它任何影响
https://redis.io/docs/manual/pipelining/
面试题:如何优化频繁命令往返造成的性能瓶颈?
mset 有点类似于 管道,将三条set变为一条mset
如何理解:三次搬家路程合并为一次路程。

2.2 管道实际操作
mset 局限性:跨数据类型命令。

root@matthew-virtual-machine:/myredis# vim cmd.txt
root@matthew-virtual-machine:/myredis# ll
总用量 112
drwxr-xr-x  3 root root      8 1月  25 11:34 ./
drwxr-xr-x 20 root root     26 1月  16 09:40 ../
drwxr-xr-x  3 root root      6 1月  24 19:39 appendonlydir/
-rw-r--r--  1 root root     63 1月  25 11:34 cmd.txt
-rw-r--r--  1 root root    124 1月  25 10:50 dump6379.rdb
-rw-r--r--  1 root root    353 1月  24 16:35 dump.rdb
-rw-r--r--  1 root root 107561 1月  24 19:25 redis7.conf
-rw-r--r--  1 root root  24576 1月  16 09:46 .redis7.conf.swp
root@matthew-virtual-machine:/myredis# cat cmd.txt
set k1 v1
set k2 v2
hset k3 a abc
hset k3 b bcd
hset k3 age 30
root@matthew-virtual-machine:/myredis# root@matthew-virtual-machine:/myredis# ll
总用量 112
drwxr-xr-x 3 root root 8 1月 25 11:34 ./
drwxr-xr-x 20 root root 26 1月 16 09:40 ../
drwxr-xr-x 3 root root 6 1月 24 19:39 appendonlydir/
-rw-r--r-- 1 root root 63 1月 25 11:34 cmd.txt
-rw-r--r-- 1 root root 124 1月 25 10:50 dump6379.rdb
-rw-r--r-- 1 root root 353 1月 24 16:35 dump.rdb
-rw-r--r-- 1 root root 107561 1月 24 19:25 redis7.conf
-rw-r--r-- 1 root root 24576 1月 16 09:46 .redis7.conf.swp
root@matthew-virtual-machine:/myredis# cat cmd.txt
set k1 v1
set k2 v2
hset k3 a abc
hset k3 b bcd
hset k3 age 30
root@matthew-virtual-machine:/myredis# cat cmd.txt |redis-cli -a 111111 --pipe
Warning: Using a password with '-a' or '-u' option on the command line interface may not be safe.
All data transferred. Waiting for the last reply...
Last reply received from server.
errors: 0, replies: 5
root@matthew-virtual-machine:/myredis# 127.0.0.1:6379> keys *
1) "k1"
2) "balence"
3) "balance"
4) "k3"
5) "k2"
127.0.0.1:6379> hgetall k3
1) "a"
2) "abc"
3) "b"
4) "bcd"
5) "age"
6) "30"

2.3 管道小总结
与原生批量命令对比(mset、mget):
- 原生批量命令是原子性(例如:
msetsmget),pipeline是非原子性 - 原生批量命令一次只能执行一种命令,pipeline支持批量执行不同命令
- 原生批命令是服务端实现,而pipeline需要服务端与客户端共同完成
与事务对比:
- 事务具有原子性,管道不具有原子性
- 管道一次性将多条命令发送到服务器,事务是一条一条的发,事务只有在接收到
exec命令后才会执行 - 执行事务时会阻塞其他命令的执行,而执行管道中的命令时不会
注意事项:
- pipeline缓冲的指令只是会依次执行,不保证原子性,如果执行中指令发生异常,将会继续执行后续的指令
- 使用pipeline组装的命令个数不能太多,不然数据量过大客户端阻塞的时间可能过久,同时服务端此时也被迫回复一个队列答复

3. Redis(pub、sub)发布订阅(不重要)
3.1 简介
是一种消息通信模式:发送者(PUBLISH)发送消息,订阅者(SUBSCRIBE)接收消息,可以实现进程间的消息传递
Redis可以实现消息中间件MQ的功能,通过发布订阅实现消息的引导和分流。
仅代表我个人,不推荐使用该功能,专业的事情交给专业的中间件处理,redis就做好分布式缓存功能


https://redis.io/docs/manual/pubsub/
pub sub 命令https://redis.io/commands/?group=pubsub
3.2 发布订阅实际操作

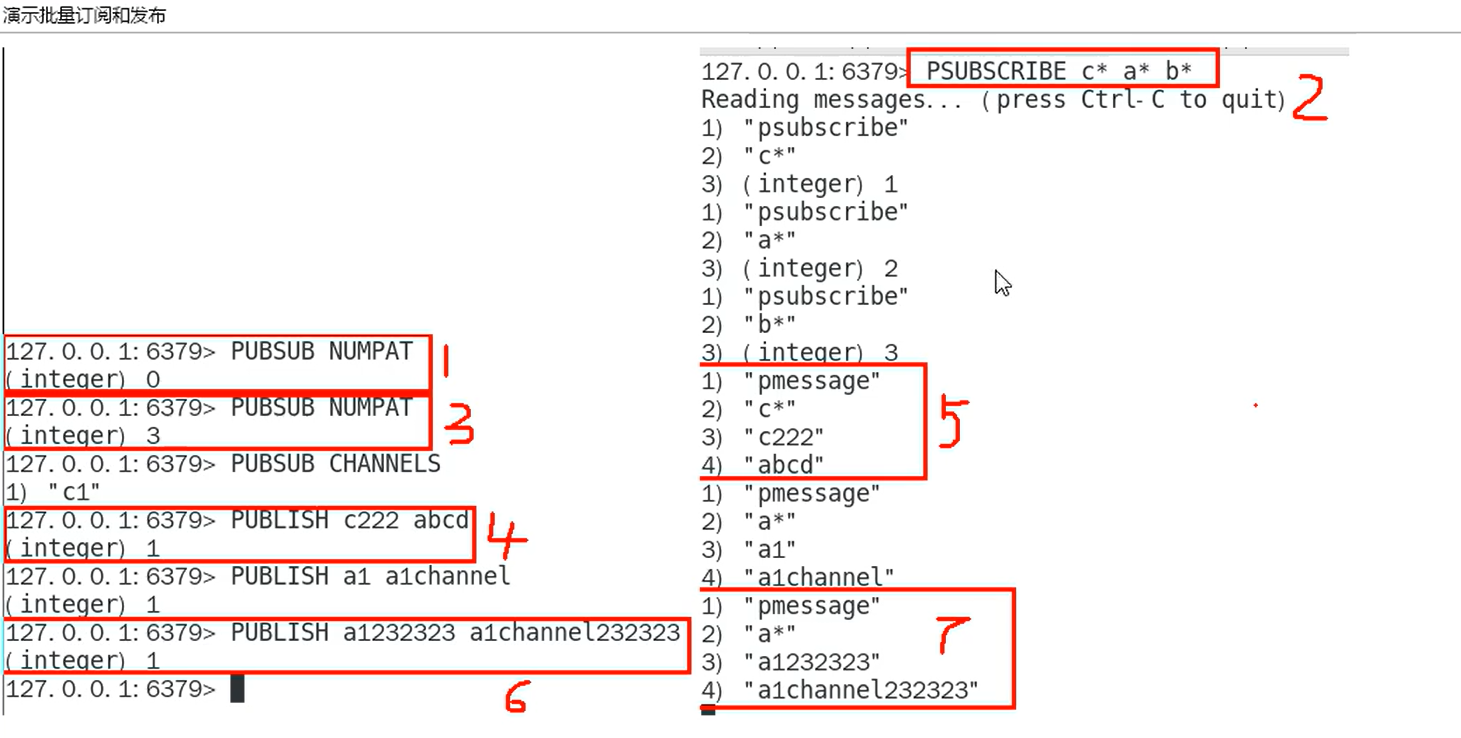
推荐先执行订阅后再发布,订阅成功之前发布的消息是收不到的

= = = = = = = = = 这是一个分水岭,之前是单机版本 = = = = = = = = = = =
= = = = = = = 复制 哨兵 集群 三位一体! 面试的重点 = = = = = = = = = = =
4. Redis复制(replica)
4.1 简介
https://redis.io/docs/management/replication/
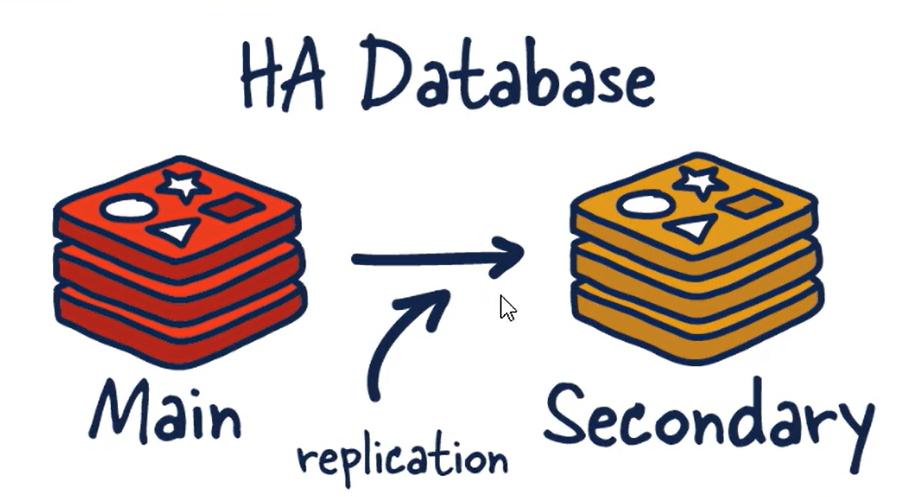
就是主从复制,master以写为主,Slave以读为主
当master数据变化的时候,自动将新的数据异步同步到其它slave数据库
能干吗?
- 读写分离
- 容灾恢复
- 数据备份
- 水平扩容支撑高并发

配从(库)不配主(库)

master如果配置了requirenass参数,需要密码登陆
那么slave就要配置masterauth来设置校验密码,否则的话master会拒绝slave的访问请求


4.2.1 基本操作命令
-
info replication
- 可以查看复制节点的主从关系和配置信息
-
replicaof主库IP主库端口
- 一般写入进redis.conf配置文件内
-
slaveof主库IP主库端口
- 每次与master断开之后,都需要重新连接,除非你配置进redis.conf文件
- 在运行期间修改slave节点的信息,如果该数据库已经是某个主数据库的从数据库,那么会停止和原主数据库的同步关系转而和新的主数据库同步,重新拜码头
-
slaveof no one
- 使当前数据库停止与其他数据库的同步,转成主数据库,自立为王

4.2 案例演示
4.2.1 架构说明
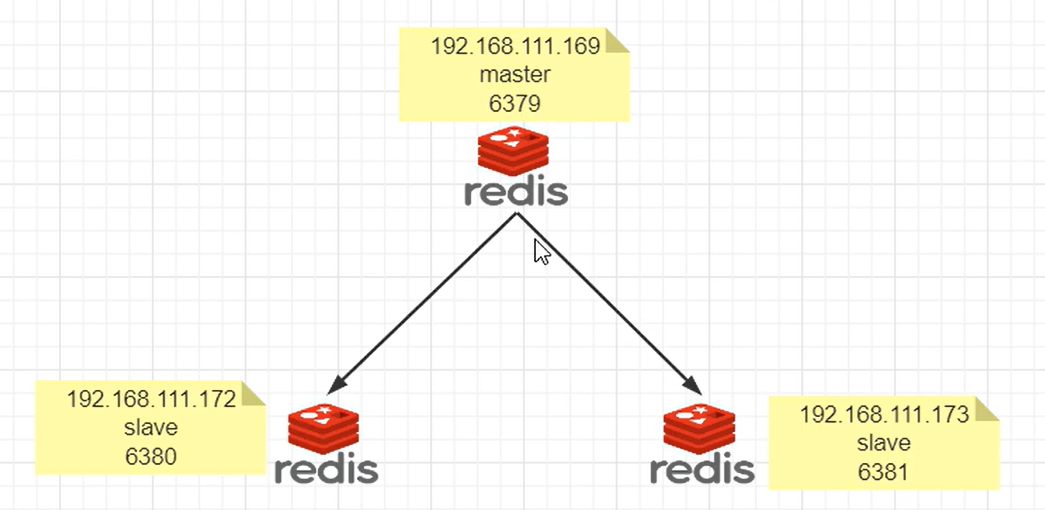
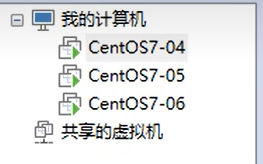
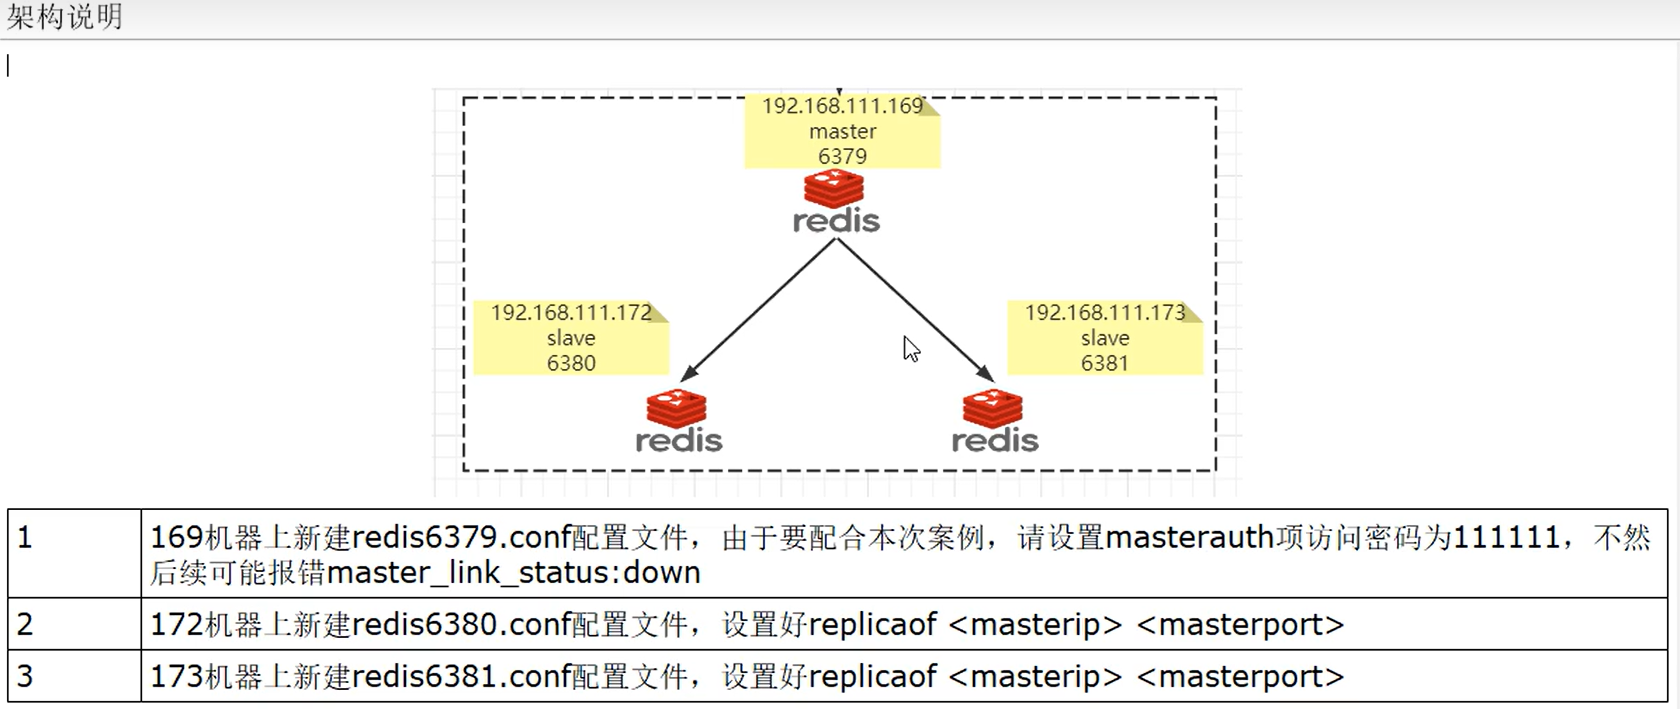
由于内存原因,这里我采用一台虚拟机安装3台redis。
主机:6379,从机:6380、6381。

复制多个redis.conf 也可以!!!
root@matthew-virtual-machine:/usr/local/bin/myredis# ll
总用量 120
drwxr-xr-x 2 root root   4096 1月  26 14:07 ./
drwxr-xr-x 3 root root   4096 1月  26 10:53 ../
-rw-r--r-- 1 root root    107 1月  26 14:07 dump.rdb
-rw-r--r-- 1 root root 107532 1月  26 11:01 redis7.conf
root@matthew-virtual-machine:/usr/local/bin/myredis# cp redis7.conf redis6379.conf
root@matthew-virtual-machine:/usr/local/bin/myredis# cp redis7.conf redis6380.conf
root@matthew-virtual-machine:/usr/local/bin/myredis# cp redis7.conf redis6381.conf
root@matthew-virtual-machine:/usr/local/bin/myredis# ll
总用量 444
drwxr-xr-x 2 root root   4096 1月  26 14:09 ./
drwxr-xr-x 3 root root   4096 1月  26 10:53 ../
-rw-r--r-- 1 root root    107 1月  26 14:07 dump.rdb
-rw-r--r-- 1 root root 107532 1月  26 14:09 redis6379.conf
-rw-r--r-- 1 root root 107532 1月  26 14:09 redis6380.conf
-rw-r--r-- 1 root root 107532 1月  26 14:09 redis6381.conf
-rw-r--r-- 1 root root 107532 1月  26 11:01 redis7.conf
4.2.2 配置文件准备
Ubuntu小技巧
//打开行号
:set nu
//调到第n行,两个g,最后一个g开始跳转
309gg
387gg
111gg
138gg
504gg
341gg
354gg
1036gg
482gg
1379gg
528gg
logfile "/home/matthew/redis-7.2.4/myredis/myredis/6379.log"
dir ./myredis
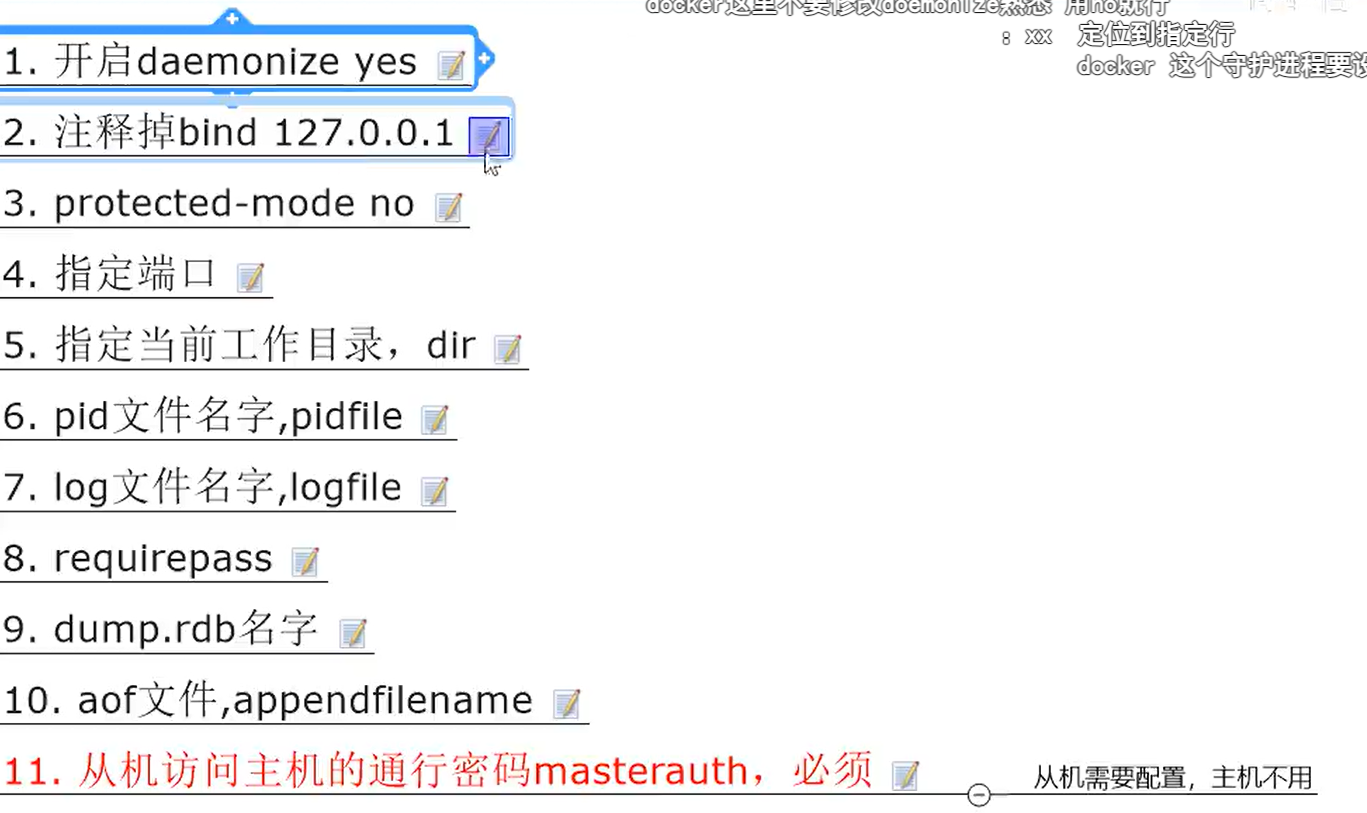
#1:守护模式
daemonize yes
#2:绑定ip
#bind 127.0.0.1 -::1
#3:保护模式
protected-mode no
#4:指定端口
port 6380
#5:指定工作目录
dir /myredis
#6:指定pid
pidfile /var/run/redis_6379.pid
#7:指定log文件名字和目录
logfile "/myredis/6379.log"
#8:指定密码
requirepass 123456
#9:指定RDB名字
dbfilename dump6379.rdb
#10:AOF 可选非必须
appendonly no
#11 从机配置主机的认证密码,建议主机也配,因为在哨兵切换时,主机会变为从机
masterauth 123456
4.2.3 Diskless replication(无盘复制)(知识点补充)
# Replication SYNC strategy: disk or socket.
#
# New replicas and reconnecting replicas that are not able to continue the
# replication process just receiving differences, need to do what is called a
# "full synchronization". An RDB file is transmitted from the master to the
# replicas.
#
# The transmission can happen in two different ways:
#
# 1) Disk-backed: The Redis master creates a new process that writes the RDB
#                 file on disk. Later the file is transferred by the parent
#                 process to the replicas incrementally.
# 2) Diskless: The Redis master creates a new process that directly writes the
#              RDB file to replica sockets, without touching the disk at all.
#
# With disk-backed replication, while the RDB file is generated, more replicas
# can be queued and served with the RDB file as soon as the current child
# producing the RDB file finishes its work. With diskless replication instead
# once the transfer starts, new replicas arriving will be queued and a new
# transfer will start when the current one terminates.
#
# When diskless replication is used, the master waits a configurable amount of
# time (in seconds) before starting the transfer in the hope that multiple
# replicas will arrive and the transfer can be parallelized.
#
# With slow disks and fast (large bandwidth) networks, diskless replication
# works better.
repl-diskless-sync yes
默认开启无盘模式,这个模式在慢硬盘或者快速网络情况下性能会更好。
其他参数
repl-diskless-sync-delay 5
repl-diskless-sync-max-replicas 0

4.3 主从复制之一主二仆
4.3.1 从机额外配置
在上面我们准备好了通用的配置文件,从机需要额外修改 replicaof
replicaof 127.0.0.1 6379
Tips:写入配置文件是永久有效,如果想要临时设置可以采用 config set + 命令的方式
配置后启动从机 redis 服务即可。
4.3.2 主从关系查看的两种方式

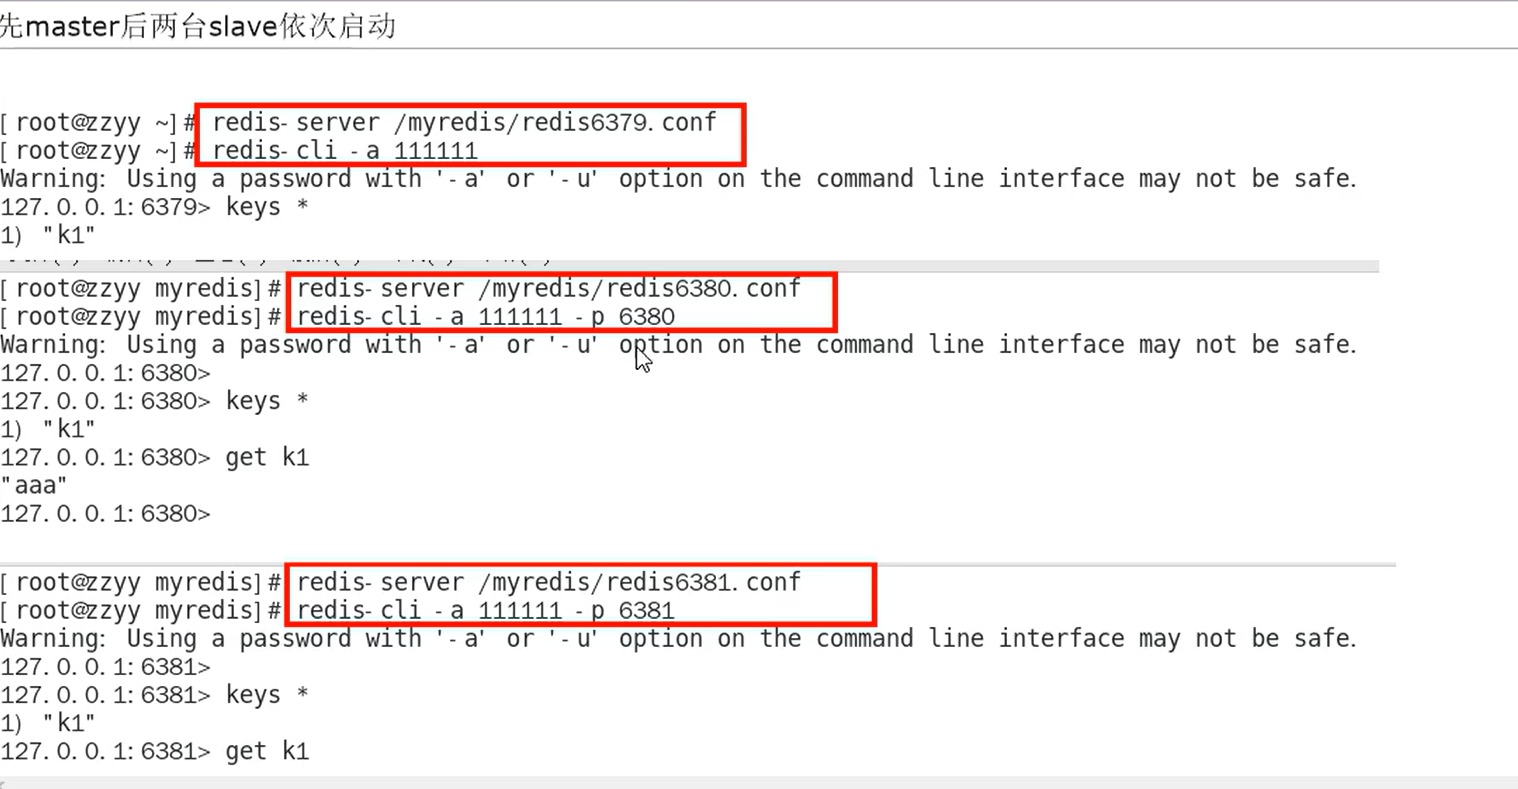
4.3.3 通过日志
主机日志
Synchronization with replica 192.168.139.137:6380 succeeded
Synchronization with replica 127.0.0.1:6381 succeeded
从机日志
MASTER <-> REPLICA sync: Finished with success

4.3.4 通过命令
#命令
info relication
主机信息
127.0.0.1:6379> info replication
# Replication
role:master
connected_slaves:2
slave0:ip=192.168.139.137,port=6380,state=online,offset=1497,lag=1
slave1:ip=127.0.0.1,port=6381,state=online,offset=1497,lag=1
从机信息
127.0.0.1:6380> info replication
# Replication
role:slave
master_host:192.168.139.137
master_port:6379
master_link_status:up

4.3.5 从机可以执行写命令吗?
不可以,配置文件默认主机只读。
# Since Redis 2.6 by default replicas are read-only.
#
# Note: read only replicas are not designed to be exposed to untrusted clients
# on the internet. It's just a protection layer against misuse of the instance.
# Still a read only replica exports by default all the administrative commands
# such as CONFIG, DEBUG, and so forth. To a limited extent you can improve
# security of read only replicas using 'rename-command' to shadow all the
# administrative / dangerous commands.
replica-read-only yes
127.0.0.1:6380> set k2 v2
(error) READONLY You can't write against a read only replica.
127.0.0.1:6380>

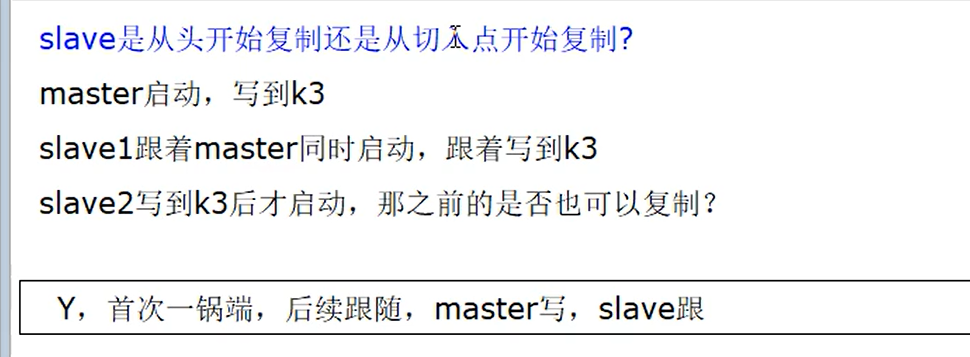
4.3.6 从机切入点问题?
- 从机晚于主机启动
- 从机shutdown关闭一会后启动
在上面这两种情况下,从机会获取master的全量数据。

4.3.7 主机shutdown后,从机会上位吗?
主机关闭后查看从机状态
	127.0.0.1:6381> info replication
# Replication
role:slave
master_host:127.0.0.1
master_port:6379
master_link_status:down
master_link_status变为 down,身份role不会改变。
master_link_status:up
重新启动后状态变回 up 。
Tips:如果主机没有开启 RDB,主机重启后数据丢失,从库数据丢失也为空。

4.3.8 主机shutdown后,重启后主从关系还在吗?从机还能否顺利复制?

青山依旧在!!!

4.3.9 某台从机down后,master继续,从机重启后它能跟上大部队吗?
完全没问题!!!

4.3.10 手动主从


4.4 薪火相传(SLAVEOF)
- 上一个
Slave可以是下一个Slave的Master,Slave同样可以接收其他Slaves的连接和同步请求,那么该Slave作为了链条中下一个的Master,可以有效减轻主Master的写压力 - 中途变更转向:会清除之前的数据,重新建立拷贝最新的
slaveof 新主库IP 新主库端口
为什么会有这个呢?
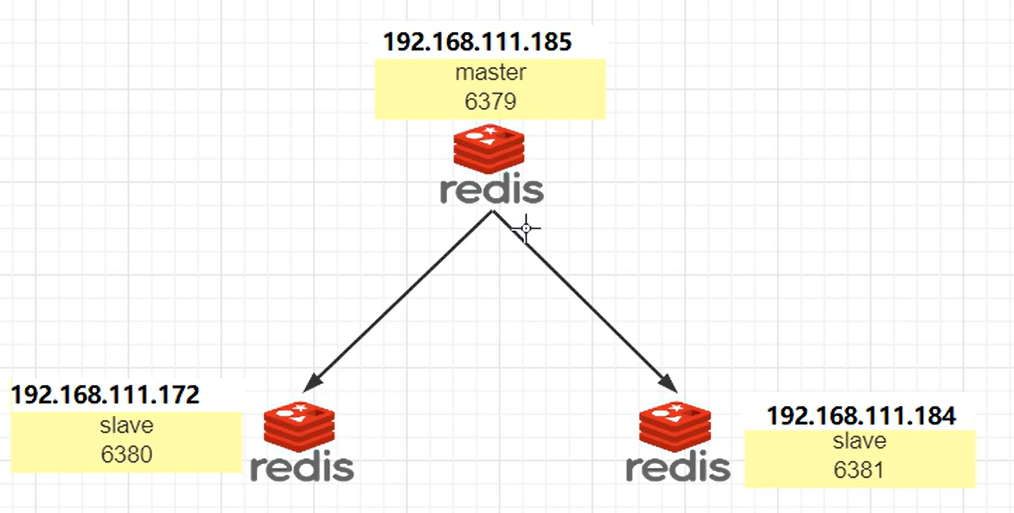
master连接的越多,性能越低
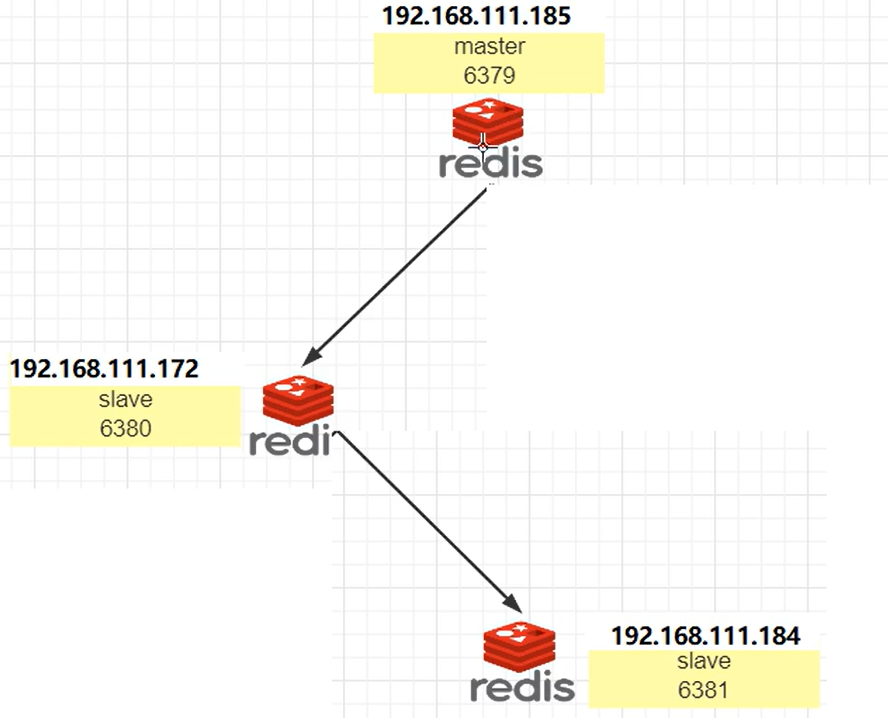
-
基本关系:6379作为主机,6380是6379的从机,6381是6380的从机,形成一个串型结构。
-
如何操作:6381 在一主二从的基础上使用 SLAVEOF 命令重定向到 6380。
-
写入问题:6380对上是从机,对下是主机,但是仍然不能写入。
127.0.0.1:6381> SLAVEOF 127.0.0.1 6380
OK
127.0.0.1:6381> info replication
# Replication
role:slave
master_host:127.0.0.1
master_port:6380
6379 的 connected_slaves 变为 1
127.0.0.1:6379> info replication
# Replication
role:master
connected_slaves:1

4.5 反客为主(SLAVEOF no one)
使用 SLAVEOF no one 命令升级为 master
127.0.0.1:6381> SLAVEOF no one
OK
127.0.0.1:6381> info replication
# Replication
role:master
connected_slaves:0
master_failover_state:no-failover
master_replid:f4029b340ab6291cf553d6e14e74524bf6fccb48
master_replid2:cbfda3355c0b49c7d2e3c86a1ebfe97358916d53
master_repl_offset:9226
second_repl_offset:9227
repl_backlog_active:1
repl_backlog_size:1048576
repl_backlog_first_byte_offset:1
repl_backlog_histlen:9226
127.0.0.1:6381>

4.6 总结
从机启动,数据覆盖。
首次连接,全量复制。
心跳持续,保持通讯。
进入平稳,增量复制。
从机下线,重连续传。
主节点默认情况每间隔10s向从机发送PINGs
# Master send PINGs to its replicas in a predefined interval. It's possible to
# change this interval with the repl_ping_replica_period option. The default
# value is 10 seconds.
#
# repl-ping-replica-period 10
4.7 主从复制痛点和改进需求
-
复制延时,信号衰减
- 由于所有的写操作都是先在Master上操作,然后同步更新到Slave上,所以从Master同步到Slave机器有一定的延迟,当系统很繁忙的时候,延迟问题会更加严重,Slave机器数量的增加也会使这个问题更加严重。
-
最大的问题:master(主)节点挂了。
- 默认情况下,不会在slave节点中自动重选一个master
-
那每次都要人工干预?
- 无人值守安装变成刚需

5. Redis哨兵(Sentinel)
5.1 哨兵简介
官网:https://redis.io/docs/management/sentinel/
作用:监控 redis 运行状态,当 master 挂了自动将 slave 升级为主机。
Redis Sentinel provides high availability for Redis when not using Redis Cluster.
无人值守的运维
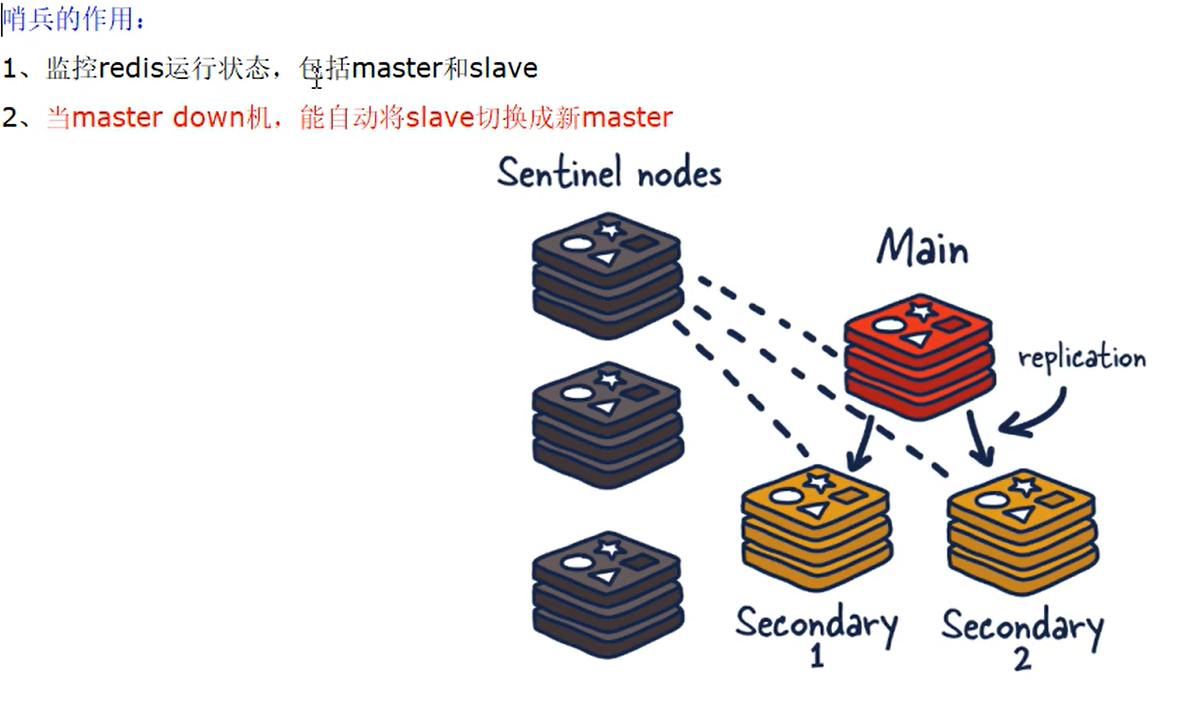
- 主从监控
- 监控主从redis库运行是否正常
- 消息通知
- 哨兵可以将故障转移的结果发送给客户端
- 故障转移
- 如果Master异常,则会进行主从切换,将其中一个Slave作为新Master
- 配置中心
- 客户端通过连接哨兵来获得当前Redis服务的主节点地址
5.1.1 Redis Sentinel架构
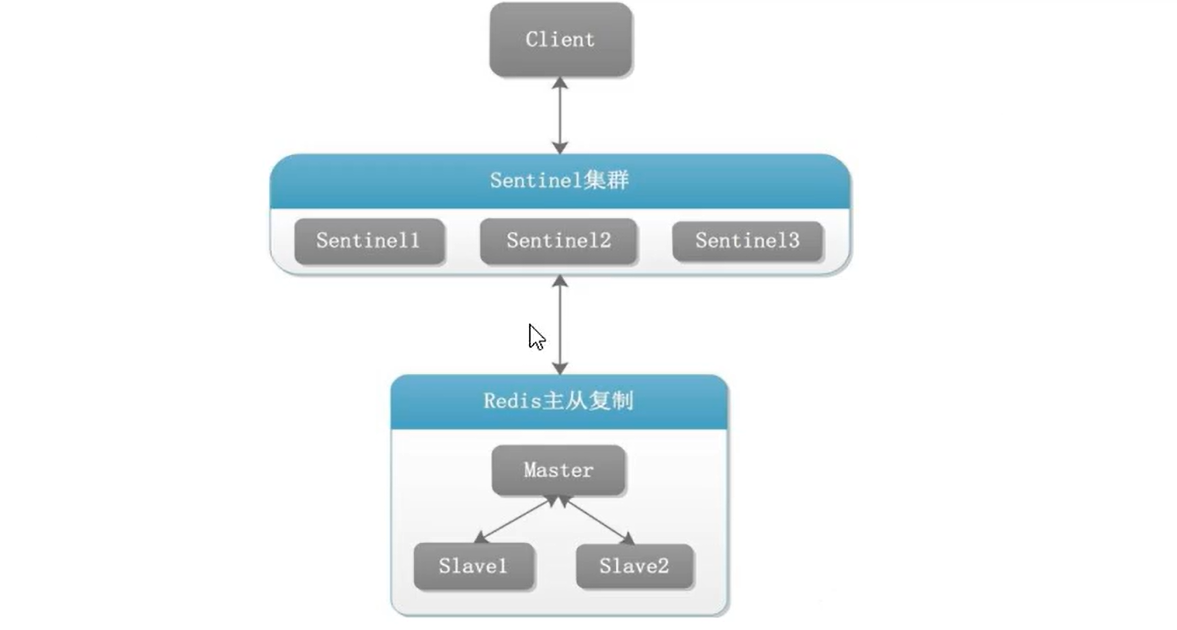
- 3个哨兵
- 中自动监控和维护集群,不存放数据,只是吹哨人
- 1主2从
- 用于数据读取和存放

5.1.2 Fundamental things to know about Sentinel before deploying
(部署Sentinel前的一些知识)
You need at least three Sentinel instances for a robust deployment. 至少3个实例。
The three Sentinel instances should be placed into computers or virtual machines that are believed to fail in an independent way. So for example different physical servers or Virtual Machines executed on different availability zones. 哨兵实例应该放在不同的物理机或者虚拟机上。
Sentinel + Redis distributed system does not guarantee that acknowledged writes are retained during failures, 不保证故障期间写入
客观下线(Objectively Down)):投票投下线的成为客观下线。
# sentinel monitor <master-name> <ip> <redis-port> <quorum>
#
# Tells Sentinel to monitor this master, and to consider it in O_DOWN
# (Objectively Down) state only if at least <quorum> sentinels agree.
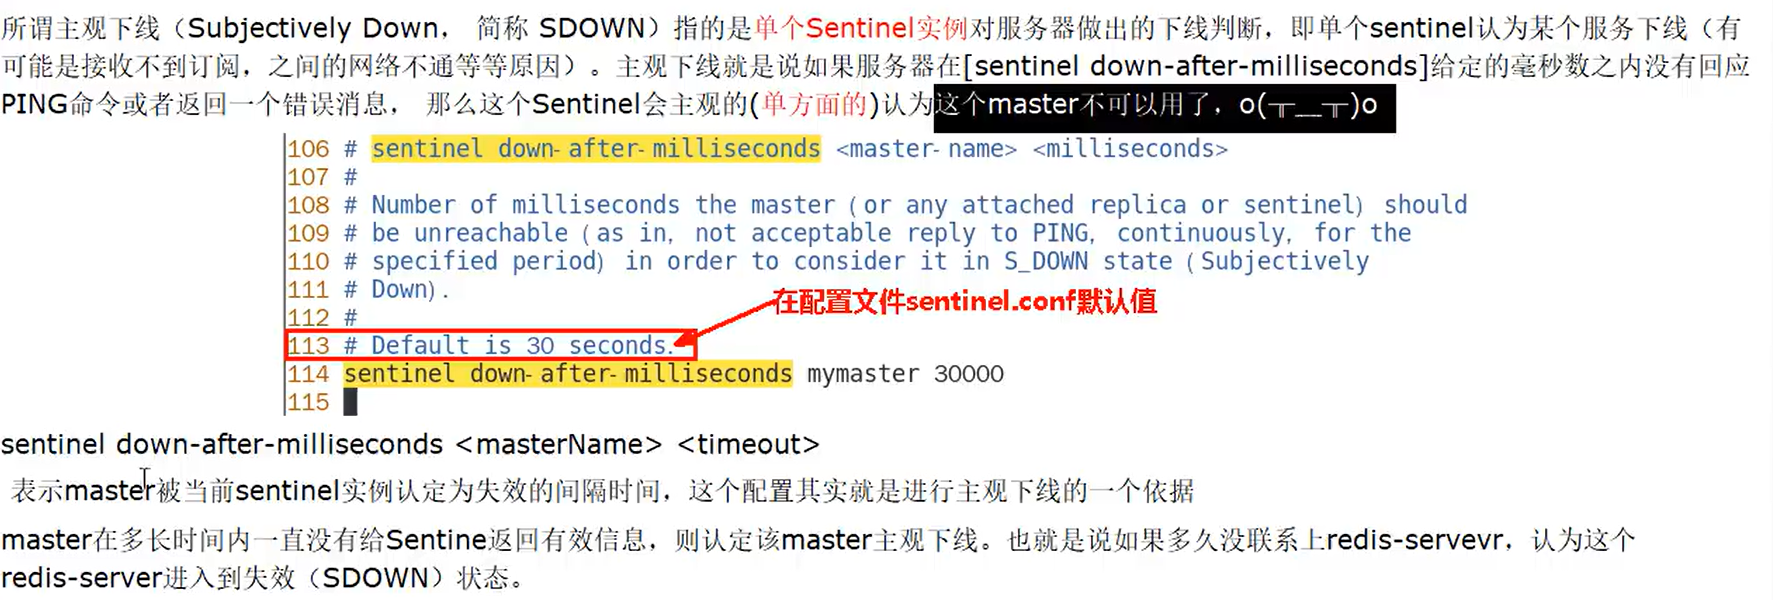
主观下线(Subjectively Down):
# sentinel down-after-milliseconds <master-name> <milliseconds>
#
# Number of milliseconds the master (or any attached replica or sentinel) should
# be unreachable (as in, not acceptable reply to PING, continuously, for the
# specified period) in order to consider it in S_DOWN state (Subjectively
# Down).
#
# Default is 30 seconds.
sentinel down-after-milliseconds mymaster 30000
两种启动方式
redis-sentinel /path/to/sentinel.conf
redis-server /path/to/sentinel.conf --sentinel

5.2 实际操作
架构:3台哨兵+3台Redis(1主2从)
哨兵的配置文件:sentinel.conf
第一步:拷贝出三个配置文件
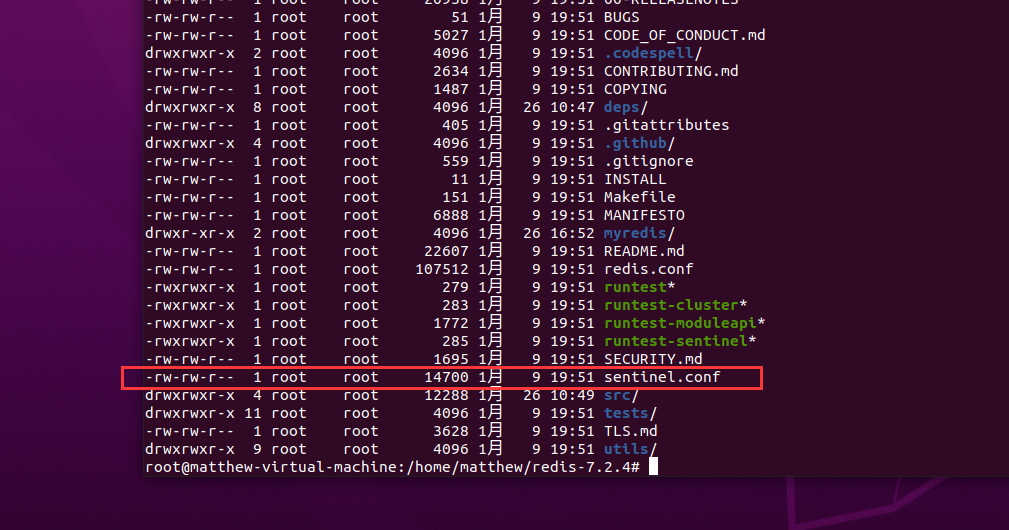
root@matthew-virtual-machine:/home/matthew/redis-7.2.4# pwd
/home/matthew/redis-7.2.4
root@matthew-virtual-machine:/home/matthew/redis-7.2.4# cp sentinel.conf myredis/sentinel.conf
root@matthew-virtual-machine:/home/matthew/redis-7.2.4# cd myredis
root@matthew-virtual-machine:/home/matthew/redis-7.2.4/myredis# vim sentinel.conf
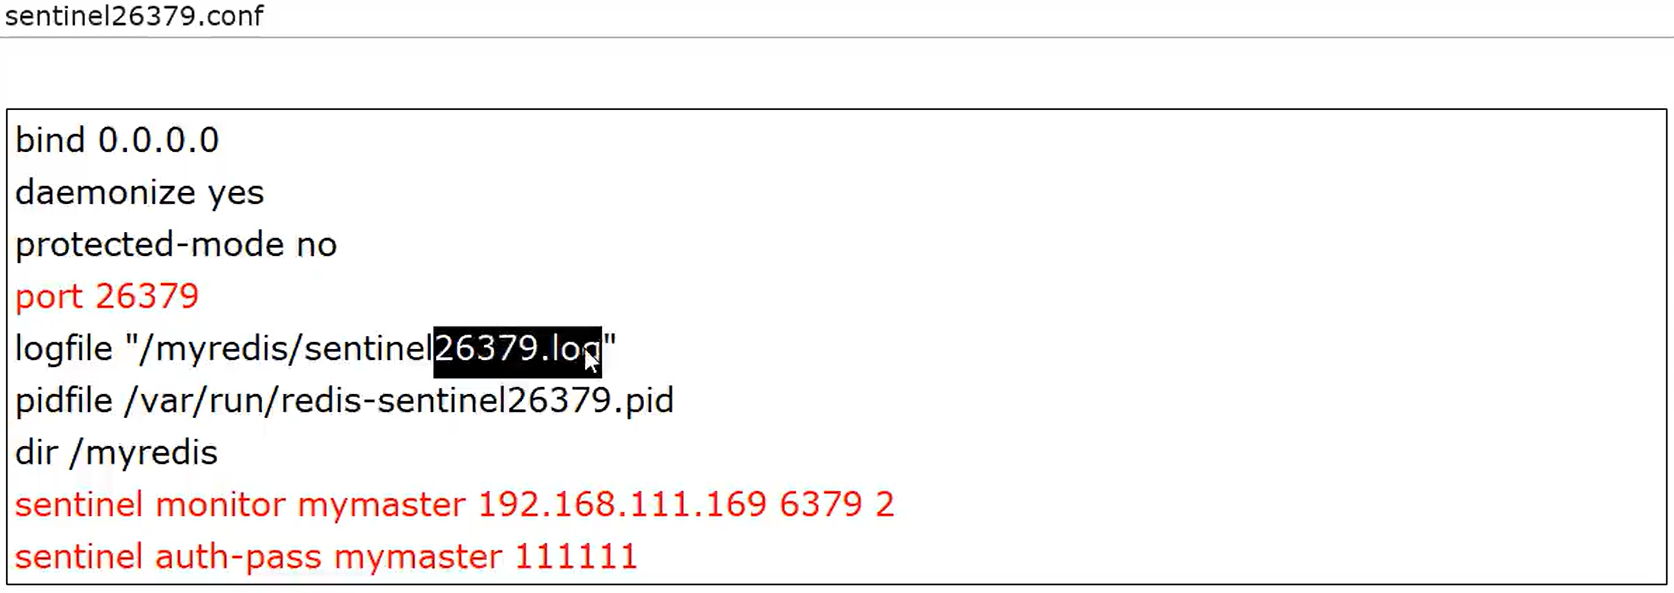
第二步:配置文件写入以下几个参数。
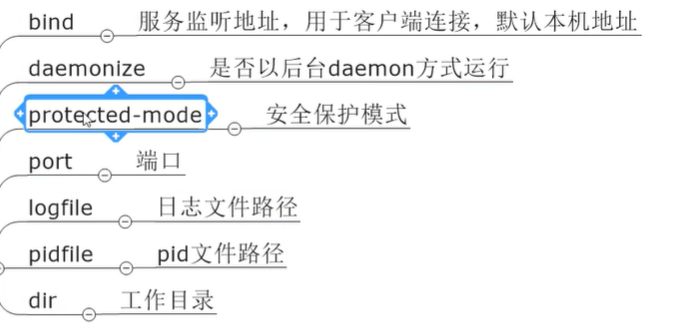

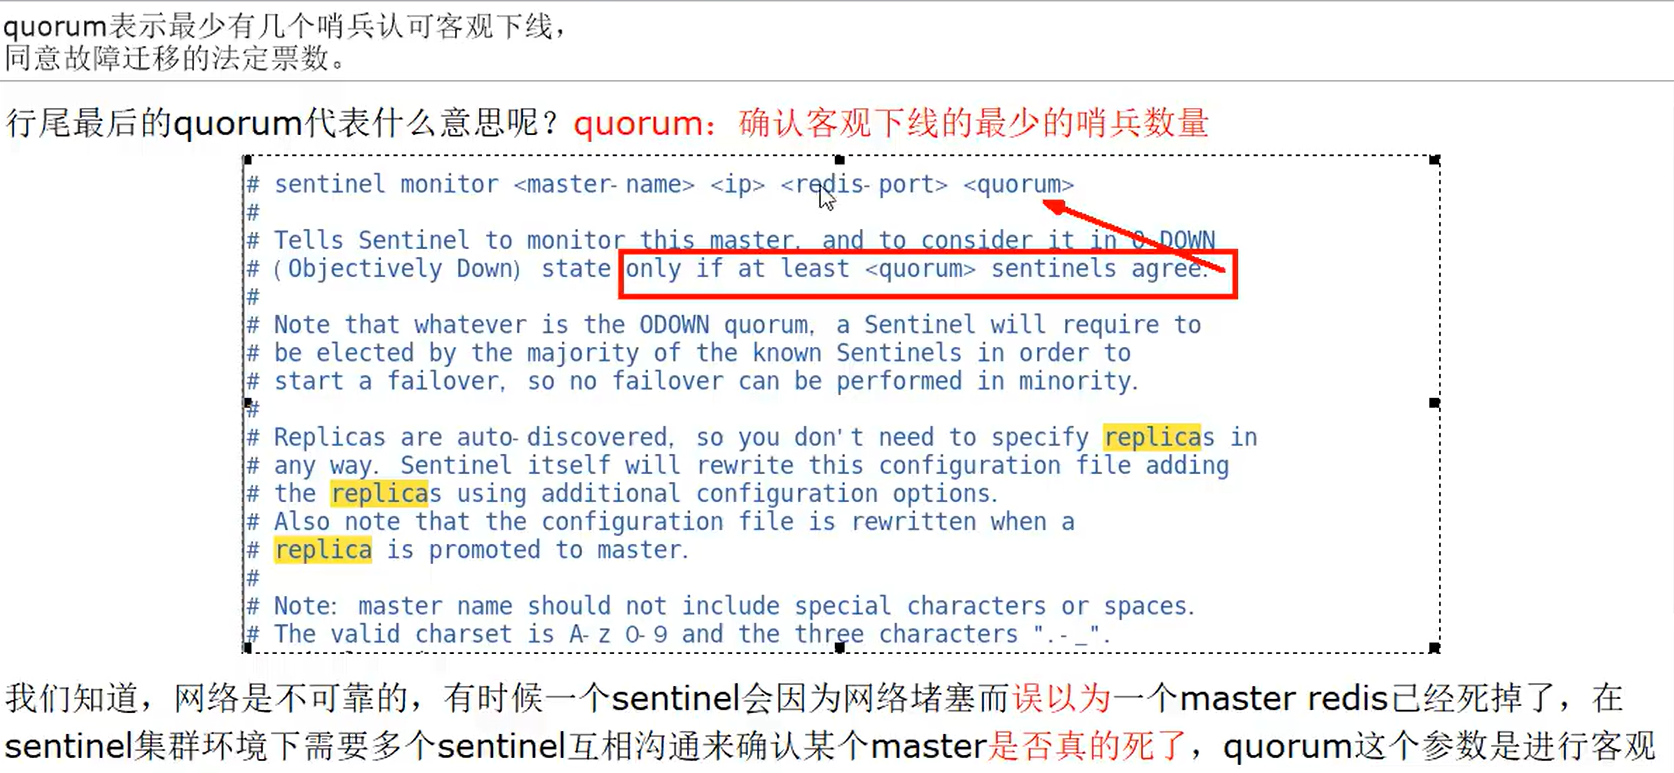
我们知道,网络是不可靠的,有时候一个sentinel会因为网络堵塞而误以为一个master redis已经死掉了,在sentinel集群环境下需要多个sentinel互相沟通来确认某个master是否真的死了,quorum这个参数是进行客观下线的一个依据,意思是至少有quorum个sentinel认为这个master有故障,才会对这个master进行下线以及故障转移。因为有的时候,某个sentinel节点可能因为自身网络原因,导致无法连接master, 而此时master并没有出现故障,所以,这就需要多个sentinel都一致认为该master有问题,才可以进行下一步操作,这就保证了公平性和高可用。
- 设置要监控的master服务器
- quorum表示最少有几个哨兵认可客观下线,同意故障迁移的法定票数。
logfile "/home/matthew/redis-7.2.4/myredis/myredis/6379.log"
dir ./myredis
logfile "/home/matthew/redis-7.2.4/myredis/myredis-sentinel/sentinel26379.log"
port 26379
dir "/home/matthew/redis-7.2.4/myredis/myredis-sentinel/26379"
pidfile "/var/run/redis-sentinel-26379.pid"
protected-mode no
port 26379
daemonize yes
pidfile /var/run/redis-sentinel-26379.pid
logfile "/root/redis-sentinel/26379/sentinel.log"
dir /root/redis-sentinel/26379sentinel monitor master-redis 127.0.0.1 6379 2
sentinel auth-pass master-redis 123456
其它默认即可
- sentinel down-after-milliseconds < master-name> < milliseconds> :
- 指定多少毫秒之后,主节点没有应答哨兵,此时哨兵主观上认为主节点下线
- sentinel parallel-syncs < master-name> :
- 表示允许并行同步的slave个数,当Master挂 了后,哨兵会选出新的Master,此时,剩余的slave会向新的master发起同步数据
- sentinel failover-timeout < master-name> < milliseconds>:
- 故障转移的超时时间,进行故障转移时,如果超过设置的毫秒,表示故障转移失败
- sentinel notification-script < master-name> < script-path> :
- 配置当某–事件发生时所需要执行的脚本
- sentinel client-reconfig-script < script-path>:
- 客户端重新配置主节点参数脚本
第三步:给 6380 修改配置文件master-auth,由于主机切换会后变成从机,后续访问主机需要密码。
masterauth 123456
第四步:启动三台redis服务(老朋友了)
root@matthew-virtual-machine:/home/matthew/redis-7.2.4/myredis# ll
总用量 360
drwxr-xr-x 2 root root   4096 1月  26 17:44 ./
drwxrwxr-x 9 root root   4096 1月  26 15:09 ../
-rw-r--r-- 1 root root    187 1月  26 17:12 dump6379.rdb
-rw-r--r-- 1 root root    187 1月  26 17:12 dump6380.rdb
-rw-r--r-- 1 root root    187 1月  26 17:12 dump6381.rdb
-rw-r--r-- 1 root root 107562 1月  26 17:40 redis6379.conf
-rw-r--r-- 1 root root 107595 1月  26 15:51 redis6380.conf
-rw-r--r-- 1 root root 107592 1月  26 15:51 redis6381.conf
-rw-r--r-- 1 root root  14794 1月  26 17:38 sentinel-26379.conf
root@matthew-virtual-machine:/home/matthew/redis-7.2.4/myredis# cp sentinel-26379.conf sentinel-26380.conf
root@matthew-virtual-machine:/home/matthew/redis-7.2.4/myredis# cp sentinel-26379.conf sentinel-26381.conf
root@matthew-virtual-machine:/home/matthew/redis-7.2.4/myredis# ll
总用量 392
drwxr-xr-x 2 root root   4096 1月  26 17:44 ./
drwxrwxr-x 9 root root   4096 1月  26 15:09 ../
-rw-r--r-- 1 root root    187 1月  26 17:12 dump6379.rdb
-rw-r--r-- 1 root root    187 1月  26 17:12 dump6380.rdb
-rw-r--r-- 1 root root    187 1月  26 17:12 dump6381.rdb
-rw-r--r-- 1 root root 107562 1月  26 17:40 redis6379.conf
-rw-r--r-- 1 root root 107595 1月  26 15:51 redis6380.conf
-rw-r--r-- 1 root root 107592 1月  26 15:51 redis6381.conf
-rw-r--r-- 1 root root  14794 1月  26 17:38 sentinel-26379.conf
-rw-r--r-- 1 root root  14794 1月  26 17:44 sentinel-26380.conf
-rw-r--r-- 1 root root  14794 1月  26 17:44 sentinel-26381.conf
root@matthew-virtual-machine:/home/matthew/redis-7.2.4/myredis#
第五步:启动一个 sentinel,并查看日志输出
# 启动命令
redis-sentinel sentinel-26379.conf
matthew@matthew-virtual-machine:~/redis-7.2.4/myredis$ redis-sentinel sentinel-26379.conf
第六步:启动剩余两个
redis-sentinel /root/redis-sentinel/26380/sentinel-26380.conf
redis-sentinel /root/redis-sentinel/26381/sentinel-26381.conf

此时后台进程如下,三台 redis服务,三台 sentinel 服务。
matthew@matthew-virtual-machine:~/redis-7.2.4/myredis$ ps -ef |grep redis
matthew    28845     852  0 22:35 ?        00:00:01 redis-server *:6380
matthew    28851   28796  0 22:35 pts/1    00:00:00 redis-cli -a 123456 -p 6380
matthew    28868     852  0 22:36 ?        00:00:01 redis-server *:6381
matthew    28874   28855  0 22:36 pts/2    00:00:00 redis-cli -a 123456 -p 6381
matthew    28885     852  0 22:37 ?        00:00:02 redis-sentinel 0.0.0.0:26379 [sentinel]
matthew    28900     852  0 22:37 ?        00:00:02 redis-sentinel 0.0.0.0:26380 [sentinel]
matthew    28914     852  0 22:37 ?        00:00:02 redis-sentinel 0.0.0.0:26381 [sentinel]
matthew    28987     852  0 22:42 ?        00:00:00 redis-server *:6379
matthew    28993   28780  0 22:42 pts/0    00:00:00 redis-cli -a 123456
matthew    28997   28878  0 22:43 pts/3    00:00:00 grep --color=auto redis

5.3 异常情况
26379 的日志
17313:X 26 Feb 2023 15:39:43.973 * Sentinel new configuration saved on disk
17313:X 26 Feb 2023 15:39:43.973 # Sentinel ID is 2a2b0adb1e3d2e32dbd6e331a87f0b9a3c0a8296
17313:X 26 Feb 2023 15:39:43.973 # +monitor master master-redis 127.0.0.1 6379 quorum 2
17313:X 26 Feb 2023 15:39:43.974 * +slave slave 127.0.0.1:6381 127.0.0.1 6381 @ master-redis 127.0.0.1 6379
17313:X 26 Feb 2023 15:39:43.976 * Sentinel new configuration saved on disk
17313:X 26 Feb 2023 15:39:43.976 * +slave slave 127.0.0.1:6380 127.0.0.1 6380 @ master-redis 127.0.0.1 6379
17313:X 26 Feb 2023 15:39:43.978 * Sentinel new configuration saved on disk
17313:X 26 Feb 2023 15:42:16.097 * +sentinel sentinel c5bcda82431d98d016b35c30285a8e0f5f96c53c 127.0.0.1 26380 @ master-redis 127.0.0.1 6379
17313:X 26 Feb 2023 15:42:16.099 * Sentinel new configuration saved on disk
17313:X 26 Feb 2023 15:42:23.348 * +sentinel sentinel c4e537f0ca663cbbae42408a62de2f2e22ed8dd5 127.0.0.1 26381 @ master-redis 127.0.0.1 6379
17313:X 26 Feb 2023 15:42:23.350 * Sentinel new configuration saved on disk
配置文件新增部分内容
# Generated by CONFIG REWRITE
bind 0.0.0.0
logfile "/home/matthew/redis-7.2.4/myredis/myredis-sentinel/sentinel26379.log"
protected-mode no
port 26379
dir "/home/matthew/redis-7.2.4/myredis/myredis-sentinel/26379"
pidfile "/var/run/redis-sentinel-26380.pid"
daemonize yes
sentinel monitor mymaster 192.168.64.130 6381 2
sentinel auth-pass mymaster 123456latency-tracking-info-percentiles 50 99 99.9
user default on nopass sanitize-payload ~* &* +@all
sentinel myid 52d92e13a9c03688f3a3f8d76435ade33fc58b1f
sentinel config-epoch mymaster 1
sentinel leader-epoch mymaster 1
sentinel current-epoch 1sentinel known-replica mymaster 192.168.64.130 6379
sentinel known-replica mymaster 127.0.0.1 6379
sentinel known-sentinel mymaster 192.168.64.130 26381 03454eab236b5411cfcaeea2a4612afd372afff8
sentinel known-sentinel mymaster 192.168.64.130 26380 7f70014ee49c48bcba440d8cc07be36227d42cf5
sentinel known-replica mymaster 192.168.64.130 6380
5.3.1 关闭主节点,会不会发挥哨兵的作用!
6381 起来!
是否会从剩下的两台选举出 master ?
127.0.0.1:6380> info replication
# Replication
role:slave
master_host:127.0.0.1
master_port:6381
master_link_status:up


这是什么原因??
进行网络读取和规划呢

sentinel 日志
17313:X 26 Feb 2023 15:51:30.956 # +sdown master master-redis 127.0.0.1 6379
17313:X 26 Feb 2023 15:51:31.002 * Sentinel new configuration saved on disk
17313:X 26 Feb 2023 15:51:31.002 # +new-epoch 1
17313:X 26 Feb 2023 15:51:31.008 * Sentinel new configuration saved on disk
17313:X 26 Feb 2023 15:51:31.008 # +vote-for-leader c4e537f0ca663cbbae42408a62de2f2e22ed8dd5 1
17313:X 26 Feb 2023 15:51:31.023 # +odown master master-redis 127.0.0.1 6379 #quorum 3/2
17313:X 26 Feb 2023 15:51:31.023 # Next failover delay: I will not start a failover before Sun Feb 26 15:57:31 2023
17313:X 26 Feb 2023 15:51:31.442 # +config-update-from sentinel c4e537f0ca663cbbae42408a62de2f2e22ed8dd5 127.0.0.1 26381 @ master-redis 127.0.0.1 6379
17313:X 26 Feb 2023 15:51:31.442 # +switch-master master-redis 127.0.0.1 6379 127.0.0.1 6381
17313:X 26 Feb 2023 15:51:31.442 * +slave slave 127.0.0.1:6380 127.0.0.1 6380 @ master-redis 127.0.0.1 6381
17313:X 26 Feb 2023 15:51:31.442 * +slave slave 127.0.0.1:6379 127.0.0.1 6379 @ master-redis 127.0.0.1 6381
17313:X 26 Feb 2023 15:51:31.449 * Sentinel new configuration saved on disk
17313:X 26 Feb 2023 15:52:01.514 # +sdown slave 127.0.0.1:6379 127.0.0.1 6379 @ master-redis 127.0.0.1 6381
5.3.2 之前down机的master机器重启回来,谁将会是新老大?会不会双master冲突?
将 6379 连回
17313:X 26 Feb 2023 15:59:25.835 # -sdown slave 127.0.0.1:6379 127.0.0.1 6379 @ master-redis 127.0.0.1 6381
17313:X 26 Feb 2023 15:59:35.857 * +convert-to-slave slave 127.0.0.1:6379 127.0.0.1 6379 @ master-redis 127.0.0.1 6381
127.0.0.1:6379> set k1 v123
(error) READONLY You can't write against a read only replica.
127.0.0.1:6379> keys *
1) "k2"
2) "k1"
对不起 我有新老大了,青山不在了

两个小问题
可能会遇到 Server closed the connection 或者 broken pipe

5.3.3 哨兵的配置文件写入
配置文件会在哨兵的运行中进行文件写入
6379(原主)
# Generated by CONFIG REWRITE
latency-tracking-info-percentiles 50 99 99.9
replicaof 127.0.0.1 6381
user default on #8d969eef6ecad3c29a3a629280e686cf0c3f5d5a86aff3ca12020c923adc6c92 ~* &* +@all
会写入 replicaof 127.0.0.1 6381,认 6381 做 master
6381(新主)同样会将 replicaof 去除。

当一个主从配置中的master失效之后,sentinel可 以选举出一个新的master用于自动接替原master的工作,主从配置中的其他redis服务器自动指向新的master同步数据。一般建议sentinel采取奇数台,防止某一台entine|无法连接到master导致误切换
5.3.4 主观下线
5.3.4 客观下线

5.3.4 选举出领导者哨兵Leader
当主节点被判断客观下线以后,各个哨兵节点会进行协商,先选举出一个领导者哨兵节点(兵王)并由该领导者节点,也即被选举出的兵王进行failover (故障迁移)
三哨兵日志文件2次解读分析
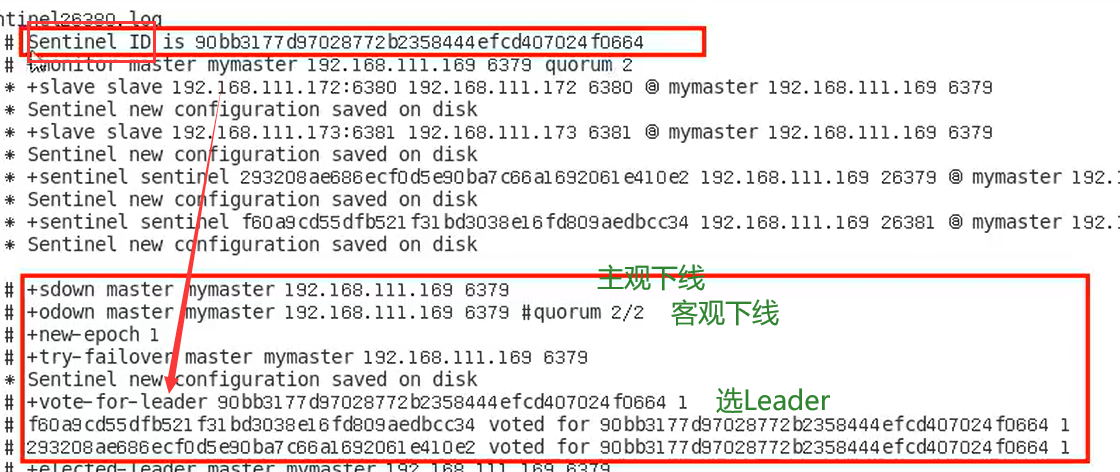
5.4 哨兵运行流程
单个
sentinel down-after-milliseconds mymaster 30000
多个哨兵打达到一致意见才可以认为某一个 master 节点宕机。
# Note that whatever is the ODOWN quorum, a Sentinel will require to
# be elected by the majority of the known Sentinels in order to
# start a failover, so no failover can be performed in minority.
为了防止在少数情况进行故障转移,哨兵集群需要选举出一个领导者。
具体的选举信息可以在 sentinel.log中查看
+vote-for-leader c4e537f0ca663cbbae42408a62de2f2e22ed8dd5 1
选举算法:Raft 算法,基本思想:先到先得。

5.5 选举算法
权限
replica offset 复制 偏移量
run ID

5.5.1 新主登基
某一个slave选中成为新的master
- 权限
- replica offset 复制 偏移量
- run ID
5.5.2 群臣俯首
朝天子一朝臣,换个码头重新拜
- 执行slaveof no one命令让选出来的从节点成为新的主节点,并通过slaveof命令让其他节点成从节点
- Sentinel leader会对选举出的新master执行slaveof no one操作,将其提升为master节点
- Sentinel leader向其它slave发送命令,让剩余的slave成为新的master节点的slave
5.5.3 旧主俯首
老master回来也认怂
- 将之前已下线的老master设置为新选出的新master的从节点,当老master重新上线后,它会成为新master的slave
- Sentinel leader会让原来的master降级为slave并恢复正常工作。
上述的failover操作均由sentinel自 己独自完成,完全无需人工干预。
5.6 哨兵使用建议
- 节点数量为奇数,起步三个。
- 各个节点配置相同。
- 如果哨兵部署在Docker应该注意端口映射。
- 哨兵+主从复制在主从切换的过程中不可避免的产生数据丢失。
所以我们引入集群


)

)
)


扩写)

:pytorch 实现简单 diffusion)

)


