Spring + SpringMVCM + Mybatis 整合
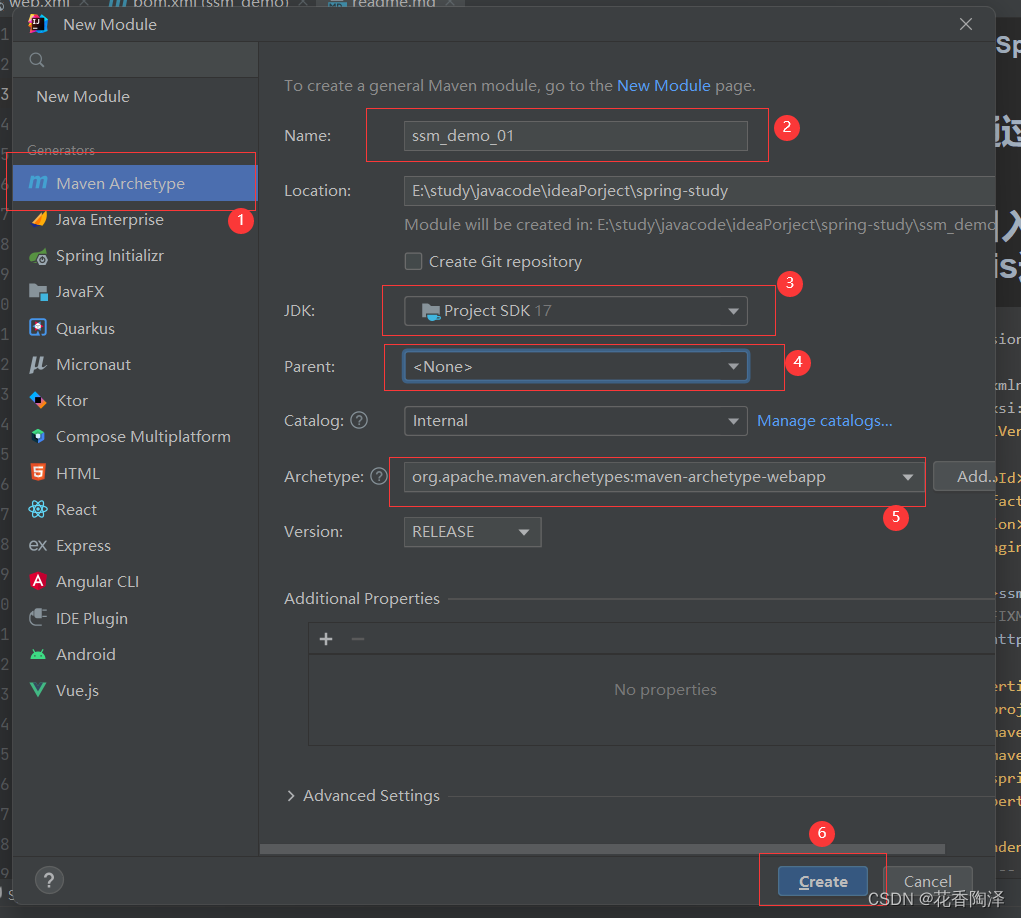
一、 通过idea创建maven工程

二、 引入依赖项以及导入mybatis逆向工程的插件
将如下的文件替换所在工程的pom文件
<?xml version="1.0" encoding="UTF-8"?><project xmlns="http://maven.apache.org/POM/4.0.0" xmlns:xsi="http://www.w3.org/2001/XMLSchema-instance"xsi:schemaLocation="http://maven.apache.org/POM/4.0.0 http://maven.apache.org/xsd/maven-4.0.0.xsd"><modelVersion>4.0.0</modelVersion><groupId>org.example</groupId><artifactId>ssm_demo</artifactId><version>1.0-SNAPSHOT</version><packaging>war</packaging><name>ssm_demo Maven Webapp</name><!-- FIXME change it to the project's website --><url>http://www.example.com</url><properties><project.build.sourceEncoding>UTF-8</project.build.sourceEncoding><maven.compiler.source>1.7</maven.compiler.source><maven.compiler.target>1.7</maven.compiler.target><spring.version>5.3.6</spring.version></properties><dependencies><!-- spring 核心包--><dependency><groupId>org.springframework</groupId><artifactId>spring-core</artifactId><version>${spring.version}</version></dependency><dependency><groupId>org.springframework</groupId><artifactId>spring-aspects</artifactId><version>${spring.version}</version></dependency><dependency><groupId>org.springframework</groupId><artifactId>spring-orm</artifactId><version>${spring.version}</version></dependency><dependency><groupId>org.springframework</groupId><artifactId>spring-test</artifactId><version>${spring.version}</version></dependency><!--springmvc的依赖--><dependency><groupId>org.springframework</groupId><artifactId>spring-webmvc</artifactId><version>${spring.version}</version></dependency><dependency><groupId>javax.servlet</groupId><artifactId>javax.servlet-api</artifactId><version>3.1.0</version></dependency><dependency><groupId>com.fasterxml.jackson.core</groupId><artifactId>jackson-databind</artifactId><version>2.14.1</version></dependency><dependency><groupId>commons-fileupload</groupId><artifactId>commons-fileupload</artifactId><version>1.4</version></dependency><!--Mybatis 框架的功能--><dependency><groupId>org.mybatis</groupId><artifactId>mybatis</artifactId><version>3.5.9</version></dependency><dependency><groupId>mysql</groupId><artifactId>mysql-connector-java</artifactId><version>8.0.28</version></dependency><dependency><groupId>com.alibaba</groupId><artifactId>druid</artifactId><version>1.1.22</version></dependency><dependency><groupId>org.mybatis</groupId><artifactId>mybatis-spring</artifactId><version>2.0.6</version></dependency><dependency><groupId>com.github.pagehelper</groupId><artifactId>pagehelper</artifactId><version>5.3.2</version></dependency><!-- 杂项 --><dependency><groupId>ch.qos.logback</groupId><artifactId>logback-classic</artifactId><version>1.2.3</version></dependency><dependency><groupId>org.projectlombok</groupId><artifactId>lombok</artifactId><version>1.18.24</version></dependency><dependency><groupId>junit</groupId><artifactId>junit</artifactId><version>4.13.2</version><scope>test</scope></dependency></dependencies><build><finalName>ssm_demo</finalName><plugins><!-- 具体插件,逆向工程的操作是以构建过程中插件形式出现的 --><plugin><groupId>org.mybatis.generator</groupId><artifactId>mybatis-generator-maven-plugin</artifactId><version>1.3.0</version><!--允许覆盖原始数据--><configuration><overwrite>true</overwrite></configuration><!-- 插件的依赖 --><dependencies><!-- 逆向工程的核心依赖 --><dependency><groupId>org.mybatis.generator</groupId><artifactId>mybatis-generator-core</artifactId><version>1.3.2</version></dependency><!-- 阿里巴巴的 druid 连接池--><dependency><groupId>com.alibaba</groupId><artifactId>druid</artifactId><version>1.1.22</version></dependency><!-- MySQL驱动 --><dependency><groupId>mysql</groupId><artifactId>mysql-connector-java</artifactId><version>8.0.28</version></dependency></dependencies></plugin></plugins></build>
</project>
三、 配置web.xml
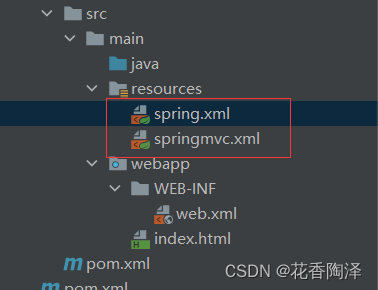
由于这里有两个 spring的配置文件,一个是Springmvc的配置文件一个是spring的配置文件所以
配置时将其改成了spring*.xml

<!DOCTYPE web-app PUBLIC"-//Sun Microsystems, Inc.//DTD Web Application 2.3//EN""http://java.sun.com/dtd/web-app_2_3.dtd" ><web-app><display-name>Archetype Created Web Application</display-name><servlet><servlet-name>springmvc</servlet-name><servlet-class>org.springframework.web.servlet.DispatcherServlet</servlet-class><init-param><param-name>contextConfigLocation</param-name><!-- 这里 因为有两个spring的配置文件一个是springmvc的一个是 spring的所以在这里 写成了这样的。--><param-value>classpath:/spring*.xml</param-value></init-param><load-on-startup>1</load-on-startup></servlet><servlet-mapping><servlet-name>springmvc</servlet-name><url-pattern>/</url-pattern></servlet-mapping>
</web-app>
四、 配置springMVC.xml
<?xml version="1.0" encoding="UTF-8"?>
<beans xmlns="http://www.springframework.org/schema/beans"xmlns:xsi="http://www.w3.org/2001/XMLSchema-instance"xmlns:context="http://www.springframework.org/schema/context"xmlns:mvc="http://www.springframework.org/schema/mvc"xsi:schemaLocation="http://www.springframework.org/schema/beans http://www.springframework.org/schema/beans/spring-beans.xsd http://www.springframework.org/schema/context https://www.springframework.org/schema/context/spring-context.xsd http://www.springframework.org/schema/mvc https://www.springframework.org/schema/mvc/spring-mvc.xsd"><!-- 开启包扫描--><context:component-scan base-package="com.atguigu"></context:component-scan><!--开启springmvc的注解驱动--><mvc:annotation-driven/><!--开启静态资源拦截--><mvc:default-servlet-handler/>
</beans>
五、 配置 spring.xml
<?xml version="1.0" encoding="UTF-8"?>
<beans xmlns="http://www.springframework.org/schema/beans"xmlns:xsi="http://www.w3.org/2001/XMLSchema-instance"xmlns:context="http://www.springframework.org/schema/context"xmlns:mvc="http://www.springframework.org/schema/mvc" xmlns:tx="http://www.springframework.org/schema/tx"xsi:schemaLocation="http://www.springframework.org/schema/beans http://www.springframework.org/schema/beans/spring-beans.xsd http://www.springframework.org/schema/context https://www.springframework.org/schema/context/spring-context.xsd http://www.springframework.org/schema/mvc https://www.springframework.org/schema/mvc/spring-mvc.xsd http://www.springframework.org/schema/tx http://www.springframework.org/schema/tx/spring-tx.xsd"><!-- 加载配置文件--><context:property-placeholder location="classpath:jdbc.properties"></context:property-placeholder><!-- 开启数据源连接--><bean id="dataSource" class="com.alibaba.druid.pool.DruidDataSource"><property name="driverClassName" value="${jdbc.driver}"></property><property name="url" value="${jdbc.url}"></property><property name="username" value="${jdbc.username}"></property><property name="password" value="${jdbc.password}"></property></bean><!--3.配置事务管理器--><bean id="transactionManager" class="org.springframework.jdbc.datasource.DataSourceTransactionManager"><property name="dataSource" ref="dataSource"/></bean><!--4.开启事务注解--><tx:annotation-driven/><!--5.Spring整合Mybatis--><bean id="sqlSessionFactory" class="org.mybatis.spring.SqlSessionFactoryBean"><!--引入数据源--><property name="dataSource" ref="dataSource"/><!--配置别名包--><property name="typeAliasesPackage" value="com.atguigu.pojo"/><!--引入mybatis配置文件--><property name="configLocation" value="classpath:/mybatis-config.xml"/><!--引入映射文件--><property name="mapperLocations" value="classpath:/mapper/*.xml"></property></bean><!--6.让spring为mapper接口创建代理对象  --><bean id="mapperScannerConfigurer" class="org.mybatis.spring.mapper.MapperScannerConfigurer"><property name="basePackage" value="com.atguigu.mapper"/></bean></beans>
六、 通过Mybatis逆向工程生成持久层代码
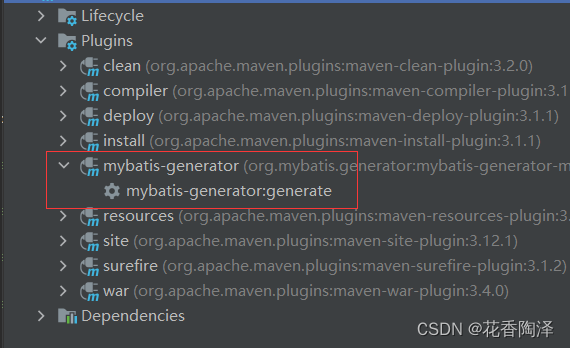
找到当前项目的 maven 插件 中的 Plugins 中的 mybatis-generator 进行双击

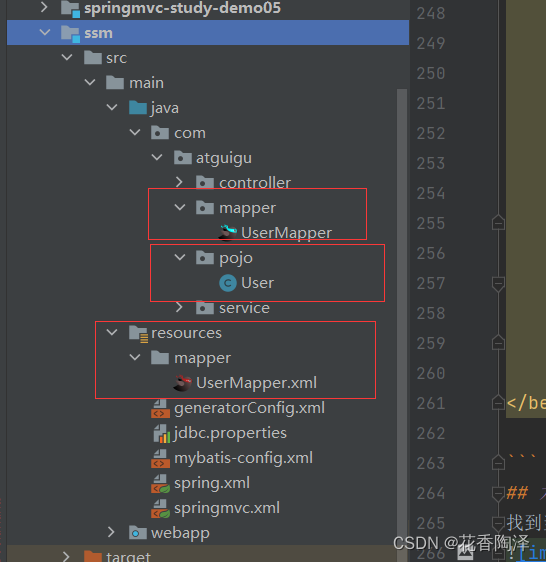
当运行成功之后会生成 三个文件夹和类


中断下文 tasklet)
)


