HBase 基础
- HBase
- 1. HBase简介
- 1.1 HBase定义
- 1.2 HBase数据模型
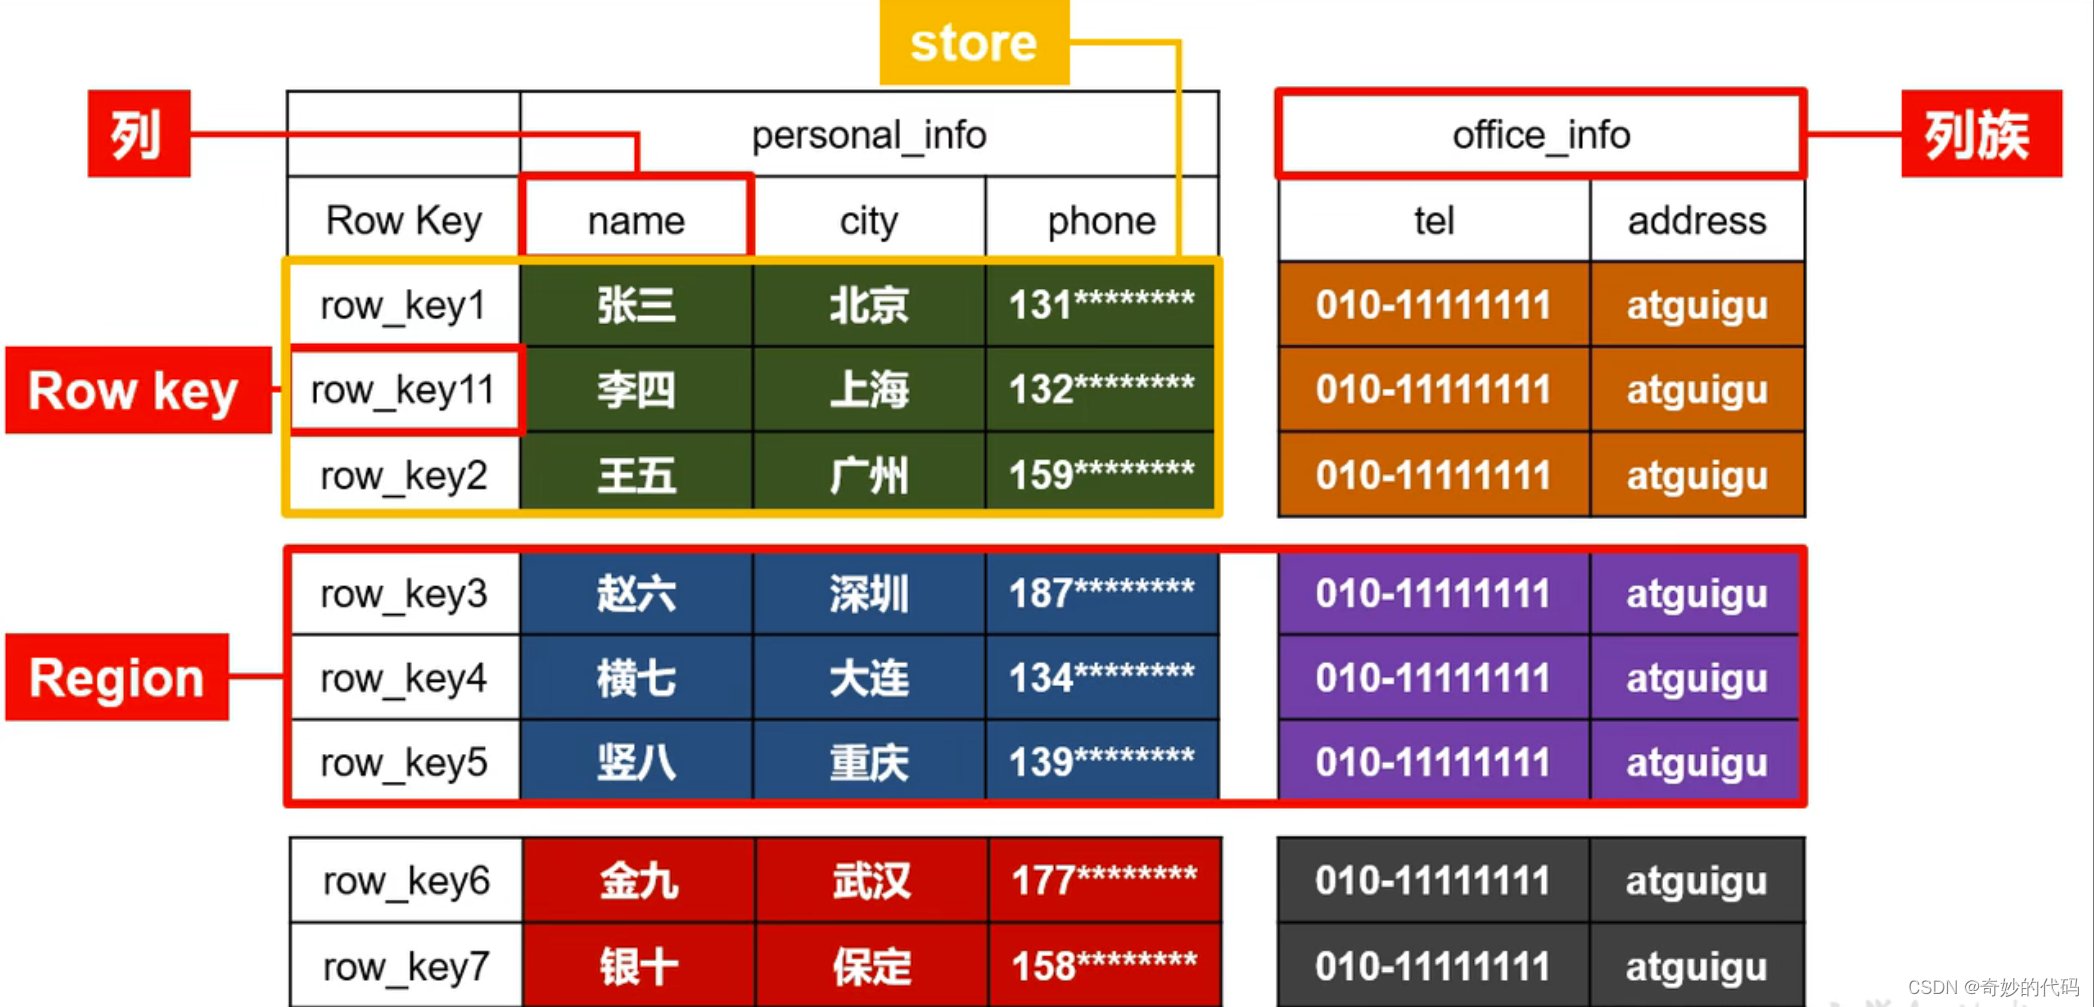
- 1.2.1 HBase逻辑结构
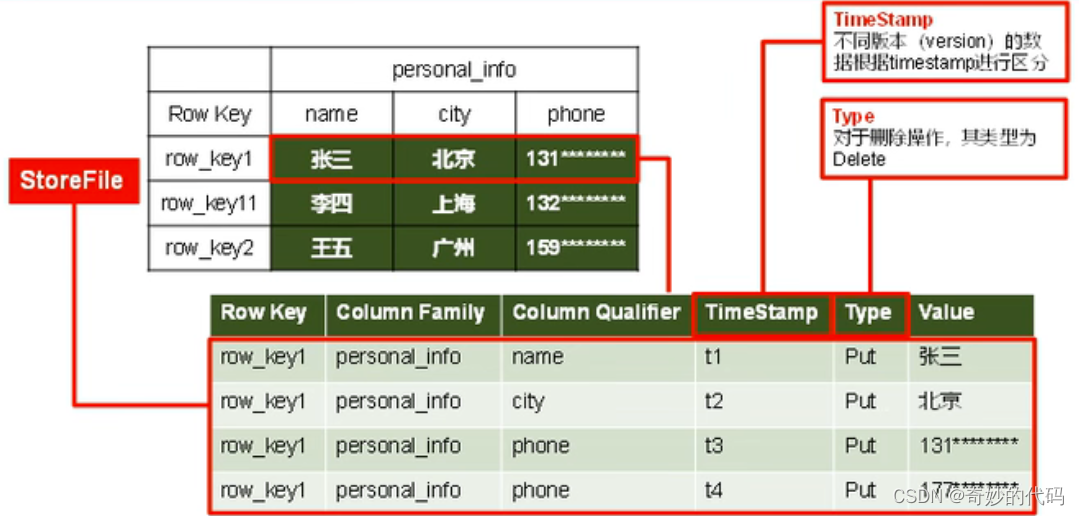
- 1.2.2 HBase物理存储结构
- 1.2.3 数据模型
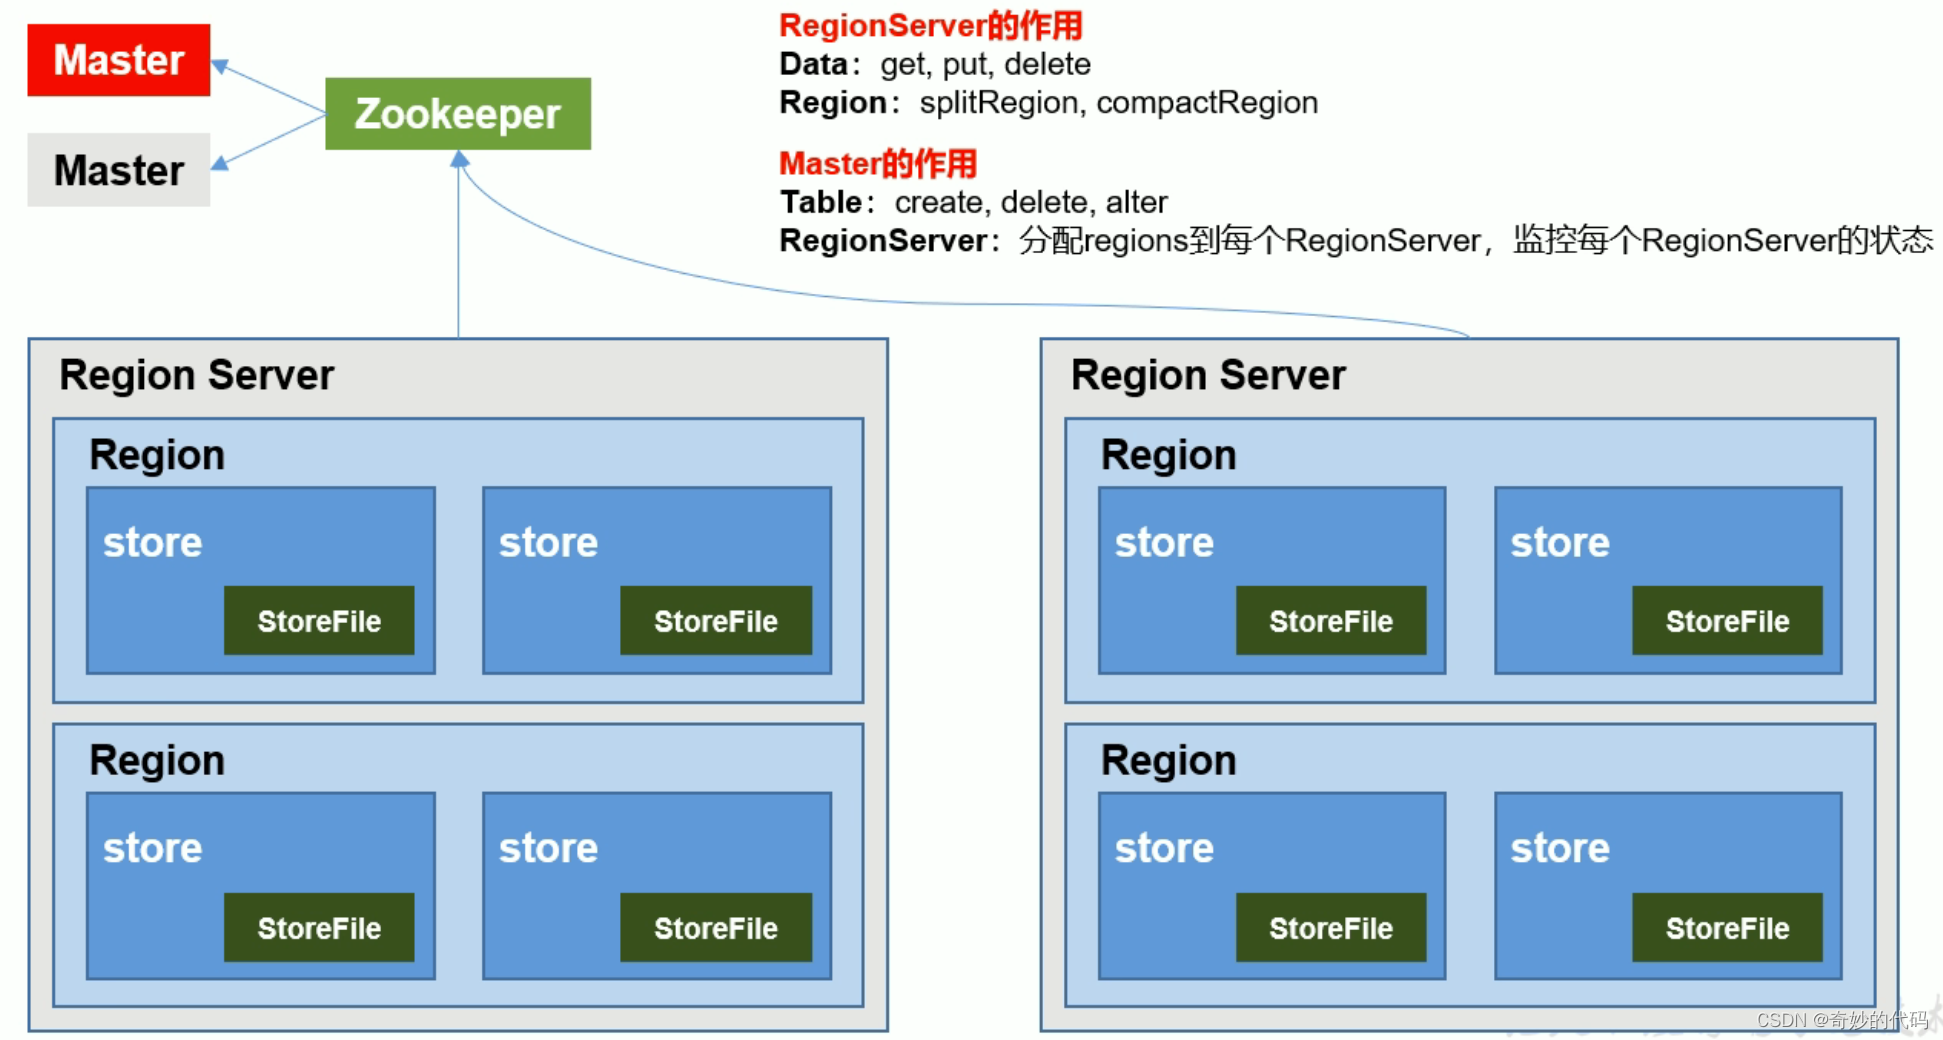
- 1.3 HBase基本架构
- 2. HBase环境安装
- 2.1 HBase 安装部署
- 2.1.1 HBase 本地按照
- 2.1.2 HBase 伪分布模式安装
- 2.1.3 HBase 集群安装
- 2.2 HBase Shell操作
- 2.2.1 DDL操作
- 2.2.2 DML 操作
- 3. HBase 的 Java API
HBase
1. HBase简介
1.1 HBase定义
HBase 是一种分布式、可扩展、支持海量数据存储的 NOSQL 数据库。
1.2 HBase数据模型
逻辑上,HBase 的数据模型同关系型数据库很类似,数据存储在一张表中,有行有列。
但从HBase 的底层物理存储结构(K-V) 来看,HBase 更像是一个 multi-dimensionalmap。
HBase 的设计理念依据 Google 的 BigTable 论文,论文中对于数据模型的首句介绍。BigTable 是一个稀疏的、分布式的、持久的多维排序 map。
之后对于映射的解释如下:
该映射由行键、列键和时间戳索引;映射中的每个值都是一个未解释的字节数组。
最终 HBase 关于数据模型和 BigTable 的对应关系如下:
HBase 使用与 BigTable 非常相似的数据模型。用户将数据行存储在带标签的表中。数据行具有可排序的键和任意数量的列。该表存储稀疏,因此如果用户喜欢,同一表中的行可以具有疯狂变化的列。
最终理解 HBase 数据模型的关键在于稀疏、分布式、多维、排序的映射。其中映射 map指代非关系型数据库的 key-Value 结构。
1.2.1 HBase逻辑结构

1.2.2 HBase物理存储结构

1.2.3 数据模型
- Name Space
命名空间,类似于关系型数据库的 database 概念,每个命名空间下有多个表。Hbase 有两个自带的命名空间,分别是 hbase 和 default;hbase 中存放的是 HBase 内置的表,default表是用户默认使用的命名空间。
- Region
类似于关系型数据库的表概念。不同的是,HBase 定义表时只需要声明列族即可,不需要声明具体的列。这意味着,往 HBase 写入数据时,字段可以动态、按需指定。因此,和关系型数据库相比,HBase 能够轻松应对字段变更的场景。
- Row
HBase表中的每行数据都由一个 RowKey 和多个 Column (列)组成,数据是按照 RowKey的字典顺序存储的,并且查询数据时只能根据 RowKey 进行检索,所以 RowKey 的设计十分重要
- Column
HBase 中的每个列都由 Column Family(列族)和 Column Qualifier (列限定符)进行限定,例如 info: name,info:age。建表时,只需指明列族,而列限定符无需预先定义。
- Time Stamp
用于标识数据的不同版本 (version),每条数据写入时,如果不指定时间戳,系统会自动为其加上该字段,其值为写入 HBase 的时间。
- Cell
由{ rowkey, column Family: column Qualifier, time Stamp }唯一确定的单元。cell 中的数据是没有类型的,全部是字节码形式存贮。
1.3 HBase基本架构

2. HBase环境安装
我为各位提供了
env-hadoop-3.3.5-zookeeper-3.8.2.tar.gz文件这个压缩包内置了 Hadoop 和 Zookeeper 环境的一键部署指令,将这个压缩包放到
/root下解压后,使用launcher指令可以实现一键部署并启动这个集群环境,具体执行命令如下,等待大概十分钟左右,脚本会自动启动 HDFS 和 Zookeeper 的集群环境,方便各位同学做后面的 HBase 的安装实验
[root@c7100 ~]# tar -zxvf env-hadoop-3.3.5-zookeeper-3.8.2.tar.gz
[root@c7100 ~]# /root/env/sh/launcher
需要注意的是:
- 本教程中给出的是完整的 HBase 的安装步骤,如果是使用我发的
env-hadoop-3.3.5-zookeeper-3.8.2.tar.gz来进行一键部署 Hadoop 和 Zookeeper 的同学,使用hstart和hstop也可以实现 hdfs 的手动启动和停止,使用zk start和zk stop也可以实现 Zookeeper 的手动启动和停止 - 使用
launcher指令的使用前提:应当确保三台 Linux 系统相互能免密登录。 - 使用
launcher指令来进行一键部署的时候,只能使用一次,再次使用可能结果不是预期
2.1 HBase 安装部署
2.1.1 HBase 本地按照
- 将 hbase-2.4.17-bin.tar.gz 文件上传到 CentOS 并解压到 opt 目录
mkdir /opt/apache/
tar -zxvf hbase-2.4.17-bin.tar.gz -C /opt/apache/
- 使用 vim 修改 HBase 的配置文件
/opt/apache/hbase-2.4.17/conf/hbase-site.xml
</configuration>  <property><name>hbase.rootdir</name><value>file:///opt/apache/data/hbase/rootdir</value>><description>HBase 根目录,这里需要在地址前增加 file:// 协议</description></property><property><name>hbase.cluster.distributed</name><value>false</value><description>是否开启 HBase 分布式集群</description></property><property><name>hbase.tmp.dir</name><value>/opt/apache/data/hbase/tmp</value><description>指定 HBase 临时目录</description></property><property><name>hbase.unsafe.stream.capability.enforce</name><value>false</value><description>控制 HBase 是否检查流功能(hflush/hsync)</description></property>
</configuration>
要注意,目录
/opt/apache/data/hbase需要提前创建的
- 创建 HBase 的环境变量文件
/etc/profile.d/env-hbase.sh,内容如下:
HBASE_HOME=/opt/apache/hbase-2.4.17
PATH=$PATH:$HBASE_HOME/bin
export HBASE_HOME PATH
完成后,需要使用
source /etc/profile使其立即生效
- 开放防火墙端口 16010
firewall-cmd --add-port=16010/tcp --permanent
firewall-cmd --reload
- 启动 HBase
start-hbase.sh
2.1.2 HBase 伪分布模式安装
强烈建议在学习 HBase 的初期采用伪分布模式来安装
- 启动 Zookeeper(前提是已经安装了 Zookeeper)
[root@c7100 ~]# zkServer.sh start
[root@c7101 ~]# zkServer.sh start
- 启动 Hadoop 的 HDFS(前提是已经安装了 Hadoop)
[root@c7100 ~]# start-dfs.sh
- HBase的解压
[root@c7100 ~]# cd /opt/apache
[root@c7100 apache]# tar -zxvf hbase-2.5.5-bin.tar.gz
- HBase的配置文件
- ① 修改
hbase-env.sh文件,内容如下,修改完成之后需要使用source命令使其生效!
# Tell HBase whether it should manage it's own instance of ZooKeeper or not.
# export HBASE_MANAGES_ZK=true
export HBASE_MANAGES_ZK=false
- ② 修改配置文件
hbase-site.xml文件,内容如下
<configuration><property><name>hbase.rootdir</name><value>hdfs://c7100.vm:9000/hbase</value><description>The directory shared by region servers and into which HBase persists.</description></property><property><name>hbase.cluster.distributed</name><value>true</value><description>The mode the cluster will be in.Possible values are false for standalone mode and true for distributed mode. If false, startup will run all HBase and ZooKeeper daemons together in the one JVM.</description></property><property><name>hbase.tmp.dir</name><value>/opt/apache/data/hbase/tmp/hbase-${user.name}</value><description>Temporary directory on the local filesystem.Change this setting to point to a location more permanent than '/tmp',the usual resolve for java.io.tmpdir,as the '/tmp' directory is cleared on machine restart.</description></property><property><name>hbase.unsafe.stream.capability.enforce</name><value>false</value></property><property><name>hbase.zookeeper.quorum</name><value>c7100.vm,c7101.vm,c7102.vm</value><description>Comma separated list of servers in the ZooKeeper ensemble(This config. should have been named hbase.zookeeper.ensemble).For example, "host1.mydomain.com,host2.mydomain.com,host3.mydomain.com".</description></property><property><name>hbase.zookeeper.property.dataDir</name><value>/opt/apache/data/zookeeper</value><description>Property from ZooKeeper's config zoo.cfg. The directory where the snapshot is stored.</description></property><property><name>hbase.wal.provider</name><value>filesystem</value><description>write ahead log</description></property>
</configuration>
- ③解决 log4j 的 jar 包冲突
mv /opt/apache/hbase-2.4.17/lib/client-facing-thirdparty/slf4j-reload4j-1.7.33.jar /opt/apache/hbase-2.4.17/lib/client-facing-thirdparty/slf4j-reload4j-1.7.33.jar.bak
- 开放防火墙端口
firewall-cmd --zone=public --add-port=2181/tcp --permanent
firewall-cmd --zone=public --add-port=2888/tcp --permanent
firewall-cmd --zone=public --add-port=3888/tcp --permanent
firewall-cmd --zone=public --add-port=16000/tcp --permanent
firewall-cmd --zone=public --add-port=16010/tcp --permanent
firewall-cmd --zone=public --add-port=16020/tcp --permanent
firewall-cmd --zone=public --add-port=16030/tcp --permanent
firewall-cmd --reload
- HBase服务的启动
start-hbase.sh
- 查看HBase页面
使用浏览器打开 http://c7100:16010 即可
2.1.3 HBase 集群安装
- 启动 Zookeeper(前提是已经安装了 Zookeeper)
[root@c7100 ~]# zkServer.sh start
[root@c7101 ~]# zkServer.sh start
- 启动 Hadoop 的 HDFS(前提是已经安装了 Hadoop)
[root@c7100 ~]# start-dfs.sh
- HBase的解压
[root@c7100 ~]# cd /opt/apache
[root@c7100 apache]# tar -zxvf hbase-2.5.5-bin.tar.gz
- HBase的配置文件
- ① 修改
hbase-env.sh文件,内容如下,修改完成之后需要使用source命令使其生效!
# The java implementation to use.  Java 1.8+ required.
# export JAVA_HOME=/usr/java/jdk1.8.0/
# export JAVA_HOME=/opt/java-se-8u41-ri/# The directory where pid files are stored. /tmp by default.
# export HBASE_PID_DIR=/var/hadoop/pids
export HBASE_PID_DIR=/opt/apache/data/hbase/pids# Tell HBase whether it should manage it's own instance of ZooKeeper or not.
# export HBASE_MANAGES_ZK=true
export HBASE_MANAGES_ZK=false
- ② 修改配置文件
hbase-site.xml文件,内容如下
<configuration><property><name>hbase.rootdir</name><value>hdfs://c7100.vm:9000/hbase</value><description>The directory shared by region servers and into which HBase persists.</description></property><property><name>hbase.cluster.distributed</name><value>true</value><description>The mode the cluster will be in.Possible values are false for standalone mode and true for distributed mode. If false, startup will run all HBase and ZooKeeper daemons together in the one JVM.</description></property><!--<property><name>hbase.master.port</name><value>16000</value><description>The port the HBase Master should bind to.</description></property><property><name>hbase.master.info.port</name><value>16010</value><description>The port for the HBase Master web UI.Set to -1 if you do not want a UI instance run.</description></property>--><property><name>hbase.tmp.dir</name><!--<value>${java.io.tmpdir}/hbase-${user.name}</value>--><value>/opt/apache/data/hbase/tmp/hbase-${user.name}</value><description>Temporary directory on the local filesystem.Change this setting to point to a location more permanent than '/tmp',the usual resolve for java.io.tmpdir,as the '/tmp' directory is cleared on machine restart.</description></property><property><name>hbase.unsafe.stream.capability.enforce</name><value>false</value></property><property><name>hbase.zookeeper.quorum</name><value>c7100.vm,c7101.vm,c7102.vm</value><description>Comma separated list of servers in the ZooKeeper ensemble(This config. should have been named hbase.zookeeper.ensemble).For example, "host1.mydomain.com,host2.mydomain.com,host3.mydomain.com".</description></property><property><name>hbase.zookeeper.property.dataDir</name><value>/opt/apache/data/zookeeper</value><description>Property from ZooKeeper's config zoo.cfg. The directory where the snapshot is stored.</description></property><property><name>hbase.wal.provider</name><value>filesystem</value><description>write ahead log</description></property>
</configuration>
- ③ 修改
regionservers文件
c7100.vm
c7101.vm
c7102.vm
- ④ 解决 log4j 的 jar 包冲突
mv /opt/apache/hbase-2.4.17/lib/client-facing-thirdparty/slf4j-reload4j-1.7.33.jar /opt/apache/hbase-2.4.17/lib/client-facing-thirdparty/slf4j-reload4j-1.7.33.jar.bak
- HBase远程发送
xsync /opt/apache/hbase-2.5.5/
- 开放防火墙端口
firewall-cmd --zone=public --add-port=2181/tcp --permanent
firewall-cmd --zone=public --add-port=2888/tcp --permanent
firewall-cmd --zone=public --add-port=3888/tcp --permanent
firewall-cmd --zone=public --add-port=16000/tcp --permanent
firewall-cmd --zone=public --add-port=16010/tcp --permanent
firewall-cmd --zone=public --add-port=16020/tcp --permanent
firewall-cmd --zone=public --add-port=16030/tcp --permanent
firewall-cmd --reload
- HBase服务的启动
start-hbase.sh
- 查看HBase页面
使用浏览器打开 http://c7100:16010 即可
2.2 HBase Shell操作
- help:是HBase 中最基础的命令,能为需要执行的命令提供帮助
hbase:003:0> help
HBase Shell, version 2.4.17, r7fd096f39b4284da9a71da3ce67c48d259ffa79a, Fri Mar 31 18:10:45 UTC 2023
Type 'help "COMMAND"', (e.g. 'help "get"' -- the quotes are necessary) for help on a specific command.
Commands are grouped. Type 'help "COMMAND_GROUP"', (e.g. 'help "general"') for help on a command group.COMMAND GROUPS:Group name: generalCommands: processlist, status, table_help, version, whoamiGroup name: ddlCommands: alter, alter_async, alter_status, clone_table_schema, create, describe, disable, disable_all, drop, drop_all, enable, enable_all, exists, get_table, is_disabled, is_enabled, list, list_regions, locate_region, show_filtersGroup name: namespaceCommands: alter_namespace, create_namespace, describe_namespace, drop_namespace, list_namespace, list_namespace_tablesGroup name: dmlCommands: append, count, delete, deleteall, get, get_counter, get_splits, incr, put, scan, truncate, truncate_preserve
- 命名空间
# 创建新的命名空间
hbase:029:0>create_namespace 'hadoop'# 列举所有的命名空间
hbase:030:0>list_namespace
NAMESPACE
default
hadoop
hbase
3row(s)# 列举以特定字符开头的所有的命名空间,支持正则匹配
hbase:034:0>list_namespace 'h.*'
NAMESPACE
hadoop
hbase
2 row(s)# 查看命名空间描述
hbase:037:0>describe_namespace 'hadoop'
DESCRIPTION
{NAME => 'hadoop'}
Quota is disabled# 修改命名空间,为其增加一个附加属性 describe,其值为 'big data framework'
hbase:002:0> alter_namespace 'hadoop', {METHOD=>'set', 'describe'=>'big data framework'}hbase:003:0> describe_namespace 'hadoop'
DESCRIPTION
{NAME => 'hadoop', describe => 'big data framework'}
Quota is disabled# 修改命名空间,删除一个附加属性 describe
hbase:006:0> alter_namespace 'hadoop', {METHOD=>'unset', NAME=>'describe'}hbase:007:0> describe_namespace 'hadoop'
DESCRIPTION
{NAME => 'hadoop'}
Quota is disabled# 删除一个的命名空间,该明明空间必须是空的
hbase:016:0>drop_namespace 'hadoop'
Took 0.1541 secondshbase:017:0>list_namespace
NAMESPACE
default
hbase
2row(s)
2.2.1 DDL操作
# 建表
# ------------------------------------------------------# 在默认命名空间下创建表 t1
hbase:016:0> create 't1', {NAME => 'f1'}, {NAME => 'f2'}, {NAME => 'f3'}# 上一行可以简写成如下形式
hbase:016:0> create 't2', 'f1', 'f2', 'f3'# 创建表的时候为列族 f1 设置版本
hbase:016:0> create 't3', {NAME => 'f1', VERSIONS => 2}# 在命名空间 nano 下创建表 stu
hbase:016:0> create 'nano:stu', 'basic', {NAME=>'advanced', VERSIONS=>'2'}# 查看表信息
# ------------------------------------------------------# 查看所有用户表
hbase:043:0> list
TABLE
t1
t2
t3
nano:stu
4 row(s)
=> ["t1", "t2", "t3", "nano:stu"]# 查看某个表的信息
hbase:042:0> describe 't3'
Table t3 is ENABLED
t3
COLUMN FAMILIES DESCRIPTION
{NAME => 'f1', BLOOMFILTER => 'ROW', IN_MEMORY => 'false', VERSIONS => '2', KEEP_DELETED_CELLS => 'FALSE', DATA_BLOCK_ENCODING => 'NONE', COMPRESSION => 'NONE', TTL => 'FOREVER', MIN_VERSIONS => '0', BLOCKCACHE => 'true', BLOCKSIZE => '65536', REPLICATION_SCOPE => '0'} # 查看某个表是否存在
hbase:044:0> exists 't1'
Table t1 does exist
=> truehbase:045:0> exists 't4'
Table t4 does not exist
=> false# 禁用表
# ------------------------------------------------------
hbase:050:0> is_disabled 't3'
false
hbase:051:0> disable 't3'
hbase:052:0> is_disabled 't3'
true
hbase:053:0> enable 't3'
hbase:054:0> is_enabled 't3'
true# 删除表
# ------------------------------------------------------
hbase:004:0> drop 't3'ERROR: Table t3 is enabled. Disable it first.For usage try 'help "drop"'hbase:005:0> disable 't3'
hbase:006:0> drop 't3'
hbase:007:0> exists 't3'
Table t3 does not exist
=> false# 修改表
# ------------------------------------------------------# 修改列族 t1 的最大版本为 5
hbase:014:0> alter 't1', NAME => 'f1', VERSIONS => 5
Updating all regions with the new schema...
1/1 regions updated.
Done.# 支持同时多个列族,每个列族使用映射语法并用逗号隔开,
hbase:015:0> alter 't1', {NAME => 'f2', IN_MEMORY => true}, {NAME => 'f3', VERSIONS => 5}
Updating all regions with the new schema...
1/1 regions updated.
Done.# 删除一个列族
hbase:018:0> alter 't1', NAME => 'f1', METHOD => 'delete'
Updating all regions with the new schema...
1/1 regions updated.
Done.# 删除一个列族的简写形式【需要注意的是:仅剩余最后一个列族时,不可删除!】
hbase:019:0> alter 't1', 'delete' => 'f2'
Updating all regions with the new schema...
1/1 regions updated.
Done.
2.2.2 DML 操作
# 写入数据
# ------------------------------------------------------
hbase:005:0> put 'nano:stu', '1001', 'basic:name', 'tina'
Took 0.1454 seconds
hbase:006:0> put 'nano:stu', '1001', 'basic', 'this is basic information!'
Took 0.0296 seconds
hbase:007:0> put 'nano:stu', '1001', 'basic:age', '19'
Took 0.0328 seconds
hbase:008:0> put 'nano:stu', '1001', 'basic:name', 'coco'
Took 0.0097 seconds
hbase:009:0> put 'nano:stu', '1001', 'basic:name', 'yoyo'
Took 0.0160 seconds
hbase:015:0> put 'nano:stu', '1002', 'basic:name', 'Jenkins'
Took 0.0431 seconds
hbase:016:0> put 'nano:stu', '1002', 'basic:age', '20'
Took 0.0254 seconds
hbase:017:0> put 'nano:stu', '1003', 'basic:name', 'Lucas'
Took 0.1106 seconds# 读取数据
# ------------------------------------------------------# 获取行键为 1001 的数据
hbase:010:0> get 'nano:stu', '1001'
COLUMN         CELLbasic:        timestamp=2023-09-02T21:51:35.249, value=this is basic information!basic:age     timestamp=2023-09-02T21:51:49.318, value=19basic:name    timestamp=2023-09-02T21:52:02.590, value=yoyo
1 row(s)
Took 0.0285 seconds
# 获取行键为 1001 的数据的 name 列的数据
hbase:011:0> get 'nano:stu', '1001', {COLUMN => 'basic:name'}
COLUMN         CELLbasic:name    timestamp=2023-09-02T21:52:02.590, value=yoyo
1 row(s)
Took 0.0557 seconds# 获取 nano:stu 表所有行的数据
hbase:017:0> scan 'nano:stu'
ROW       COLUMN+CELL1001     column=basic:, timestamp=2023-09-02T21:51:35.249, value=this is basic information!1001     column=basic:age, timestamp=2023-09-02T21:51:49.318, value=191001     column=basic:name, timestamp=2023-09-02T21:52:02.590, value=yoyo1002     column=basic:age, timestamp=2023-09-02T21:55:51.626, value=201002     column=basic:name, timestamp=2023-09-02T21:55:32.903, value=Jenkins1003     column=basic:name, timestamp=2023-09-02T21:55:57.235, value=Lucas
3 row(s)
Took 0.0727 seconds# 获取 nano:stu 表所有行的数据,过滤所有 name 列
hbase:005:0> scan 'nano:stu', {COLUMNS => 'basic:name'}
ROW                       COLUMN+CELL1001                     column=basic:name, timestamp=2023-09-02T23:13:44.212, value=yoyo1002                     column=basic:name, timestamp=2023-09-02T23:13:44.251, value=Jenkins1003                     column=basic:name, timestamp=2023-09-02T23:13:44.336, value=Lucas
3 row(s)# 获取 nano:stu 表所有行的数据,过滤所有 name 列
hbase:005:0> scan 'nano:stu', {COLUMNS => 'basic:name'}
ROW                       COLUMN+CELL1001                     column=basic:name, timestamp=2023-09-02T23:13:44.212, value=yoyo1002                     column=basic:name, timestamp=2023-09-02T23:13:44.251, value=Jenkins1003                     column=basic:name, timestamp=2023-09-02T23:13:44.336, value=Lucas
3 row(s)# 获取 nano:stu 表所有行的数据,从 1001 开始,只查询两行
hbase:008:0> scan 'nano:stu', {LIMIT => 2, STARTROW => '1001'}
ROW                       COLUMN+CELL1001                     column=basic:, timestamp=2023-09-02T23:13:43.967, value=this is basicinformation!1001                     column=basic:age, timestamp=2023-09-02T23:13:44.031, value=191001                     column=basic:name, timestamp=2023-09-02T23:13:44.212, value=yoyo1002                     column=basic:age, timestamp=2023-09-02T23:13:44.307, value=201002                     column=basic:name, timestamp=2023-09-02T23:13:44.251, value=Jenkins
2 row(s)# 删除数据,删除 1003 的 name,因为 1003 只有 name 这一列,如果它被删除,则意味着这一整行被删除
# ------------------------------------------------------
hbase:012:0> delete 'nano:stu', '1003', 'basic:name'
Took 0.0884 seconds
hbase:013:0> scan 'nano:stu'
ROW                       COLUMN+CELL1001                     column=basic:, timestamp=2023-09-02T23:13:43.967, value=this is basicinformation!1001                     column=basic:age, timestamp=2023-09-02T23:13:44.031, value=191001                     column=basic:name, timestamp=2023-09-02T23:13:44.212, value=yoyo1002                     column=basic:age, timestamp=2023-09-02T23:13:44.307, value=201002                     column=basic:name, timestamp=2023-09-02T23:13:44.251, value=Jenkins
2 row(s)# 删除数据,删除 1002 的 name,因为 1002 不止 name 这一列,此操作仅仅 name 这一个单元格
hbase:014:0> delete 'nano:stu', '1002', 'basic:name'
Took 0.0114 seconds
hbase:015:0> scan 'nano:stu'
ROW                       COLUMN+CELL1001                     column=basic:, timestamp=2023-09-02T23:13:43.967, value=this is basicinformation!1001                     column=basic:age, timestamp=2023-09-02T23:13:44.031, value=191001                     column=basic:name, timestamp=2023-09-02T23:13:44.212, value=yoyo1002                     column=basic:age, timestamp=2023-09-02T23:13:44.307, value=20
2 row(s)# 删除数据,删除 1001 的所有单元格的数据,意味着这一整行都将被删除
hbase:018:0> deleteall 'nano:stu', '1001'
Took 0.0248 seconds
hbase:019:0> scan 'nano:stu'
ROW                       COLUMN+CELL1002                     column=basic:age, timestamp=2023-09-02T23:13:44.307, value=20
1 row(s)
Took 0.0241 seconds
3. HBase 的 Java API
- 新建 Maven 项目,pom 文件如下:
<?xml version="1.0" encoding="UTF-8"?>
<project xmlns="http://maven.apache.org/POM/4.0.0" xmlns:xsi="http://www.w3.org/2001/XMLSchema-instance"
xsi:schemaLocation="http://maven.apache.org/POM/4.0.0 http://maven.apache.org/xsd/maven-4.0.0.xsd"><modelVersion>4.0.0</modelVersion><groupId>cn.tedu.hbase</groupId><artifactId>hbase-learner</artifactId><version>1.0</version><properties><maven.test.skip>true</maven.test.skip><maven.compiler.target>1.8</maven.compiler.target><maven.compiler.source>1.8</maven.compiler.source><maven.compiler.encoding>UTF-8</maven.compiler.encoding><project.build.sourceEncoding>UTF-8</project.build.sourceEncoding><project.reporting.outputEncoding>UTF-8</project.reporting.outputEncoding></properties><dependencies><dependency><groupId>junit</groupId><artifactId>junit</artifactId><version>4.13.2</version><scope>test</scope></dependency><dependency><groupId>org.apache.hbase</groupId><artifactId>hbase-client</artifactId><version>2.4.17</version><exclusions><exclusion><groupId>org.glassfish</groupId><artifactId>javax.el</artifactId></exclusion></exclusions></dependency><dependency><groupId>org.glassfish</groupId><artifactId>javax.el</artifactId><version>3.0.1-b06</version></dependency></dependencies><repositories><repository><id>cloudera</id><url>https://repository.cloudera.com/artifactory/cloudera-repos/</url></repository><repository><id>apache release</id><url>https://repository.apache.org/content/repositories/releases/</url></repository></repositories></project>
- 在 maven 项目的 resources 目录中增加 hbase-site.xml 文件,其内容如下:
<?xml version="1.0"?>
<?xml-stylesheet type="text/xsl" href="configuration.xsl"?>
<configuration><property><name>hbase.zookeeper.quorum</name><value>c7100.vm,c7101.vm,c7102.vm</value><description>上一行的 value 的值需要跟服务器端 zookeeper 的集群的配置值保持一致</description></property>
</configuration>
- 在 maven 项目的 resources 目录中增加 log4j.properties 文件,其内容如下:
log4j.rootLogger=INFO,Console# Standard Console
log4j.appender.Console=org.apache.log4j.ConsoleAppender
log4j.appender.Console.Target=System.out
log4j.appender.Console.layout=org.apache.log4j.PatternLayout
log4j.appender.Console.layout.ConversionPattern=[%d{yyyy-MM-dd HH:mm:ss:SSS}][%C-%M] %m%n# MyBatis Console
log4j.logger.com.huofutp.uc.dao=DEBUG
log4j.logger.com.huofutp.crm.dao=DEBUG
log4j.logger.com.huofutp.log.dao=DEBUG
log4j.logger.com.huofutp.pis.dao=DEBUG
log4j.logger.com.huofutp.user.dao=DEBUG
log4j.logger.com.huofutp.common.dao=DEBUG
log4j.logger.com.huofutp.report.dao=DEBUG
log4j.logger.com.huofutp.logger.dao=DEBUG
log4j.logger.com.huofutp.workflow.dao=DEBUG
log4j.logger.com.huofutp.messenger.dao=DEBUG
log4j.logger.com.huofutp.bcs.dynamic.field.dao=DEBUG
- 创建单例的 HBase 的链接对象
public final class HBaseConnection {private static Connection connection = null;/*** 获取线程安全的 HBase 连接对象* @return HBase 连接对象*/public static Connection getConnection() {if(connection == null) {synchronized (HBaseConnection.class) {if(connection == null) {try {connection = ConnectionFactory.createConnection();} catch (IOException e) {e.printStackTrace();}}}}return connection;}
}
- 创建HBase的DDL操作类
public class HBaseDDL {/*** 创建命名空间** @param namespace 命名空间名称*/public static void createNamespace(String namespace) throws IOException {if (isNamespaceExists(namespace)) {System.out.println("namespace[" + namespace + "] already exists");return;}NamespaceDescriptor.Builder builder = NamespaceDescriptor.create(namespace);try (Admin admin = getConnection().getAdmin()) {try {admin.createNamespace(builder.build());} catch (IOException e) {System.out.println("create namespace had error.");}}System.out.println("namespace[" + namespace + "] has been created");}/*** 列出所有的命名空间*/public static void listNamespace() {try (Admin admin = getConnection().getAdmin()) {String[] strings = admin.listNamespaces();System.out.println("namespaces:[" + String.join("\t", strings) + "]");} catch (IOException e) {e.printStackTrace();}}/*** 判断命名空间是否存在*/public static boolean isNamespaceExists(String namespace) {try (Admin admin = getConnection().getAdmin()) {String[] strings = admin.listNamespaces();return Arrays.asList(strings).contains(namespace);} catch (IOException e) {e.printStackTrace();}return false;}/*** 删除命名空间** @param namespace 命名空间名称*/public static void deleteNamespace(String namespace) throws IOException {if (!isNamespaceExists(namespace)) {System.out.println("namespace[" + namespace + "] does not exist");return;}try (Admin admin = getConnection().getAdmin()) {admin.deleteNamespace(namespace);}boolean disappear = !isNamespaceExists(namespace);if (disappear) {System.out.println("namespace[" + namespace + "] has been deleted");}}/*** 判断表格是否存在*/public static void listTable() throws IOException {listTable(null);}/*** 判断表格是否存在** @param namespace 命名空间名称*/public static void listTable(String namespace) throws IOException {try (Admin admin = getConnection().getAdmin()) {List<String> strings = new ArrayList<>();if (namespace != null) {TableName[] names = admin.listTableNamesByNamespace(namespace);for (TableName name : names) {strings.add(name.getNameWithNamespaceInclAsString());}} else {List<TableDescriptor> descriptors = admin.listTableDescriptors();for (TableDescriptor descriptor : descriptors) {strings.add(descriptor.getTableName().getNameWithNamespaceInclAsString());}}System.out.println("tables:[" + String.join("\t", strings) + "]");}}/*** 判断表格是否存在** @param namespace 命名空间名称* @param tablename 表的名称* @return 返回 true 表示表存在*/public static boolean isTableExists(String namespace, String tablename) throws IOException {boolean exists = false;try (Admin admin = getConnection().getAdmin()) {try {exists = admin.tableExists(TableName.valueOf(namespace, tablename));} catch (IOException e) {e.printStackTrace();}}return exists;}/*** 创建表** @param namespace      命名空间* @param tablename      表名* @param columnFamilies 列族*/public static void createTable(String namespace, String tablename, String... columnFamilies) throws IOException {if (isTableExists(namespace, tablename)) {System.out.println("table[" + tablename + "] already exists");return;}if (columnFamilies == null || columnFamilies.length < 1) {System.out.println("Table should have at least one column family");return;}try (Admin admin = getConnection().getAdmin()) {TableName tn = TableName.valueOf(namespace, tablename);if (admin.tableExists(tn)) {return;}TableDescriptorBuilder builder = TableDescriptorBuilder.newBuilder(tn);List<ColumnFamilyDescriptor> descriptors = new ArrayList<>();for (String family : columnFamilies) {ColumnFamilyDescriptorBuilder descriptorBuilder = ColumnFamilyDescriptorBuilder.newBuilder(Bytes.toBytes(family));descriptors.add(descriptorBuilder.build());}builder.setColumnFamilies(descriptors);admin.createTable(builder.build());}System.out.println("table[" + namespace + ":" + tablename + "] has been created");}/*** 获取列族的最大 version 值** @param namespace    命名空间* @param tablename    表名* @param columnFamily 列族* @return 返回最大 version 值*/public static int getTableColumnFamilyMaxVersion(String namespace, String tablename, String columnFamily) throws IOException {if (!isTableExists(namespace, tablename)) {System.out.println("table[" + tablename + "] does not exist");return 0;}try (Admin admin = getConnection().getAdmin()) {TableName tn = TableName.valueOf(namespace, tablename);if (!admin.tableExists(tn)) {System.out.println("table[" + tablename + "] does not exist!");return 0;}TableDescriptor descriptor = admin.getDescriptor(tn);// 获取原表的列族描述信息ColumnFamilyDescriptor family = descriptor.getColumnFamily(Bytes.toBytes(columnFamily));return family.getMaxVersions();} catch (IOException e) {e.printStackTrace();}return 0;}/*** 修改表** @param namespace 命名空间* @param tablename 表名* @param version   最大版本号*/public static void modifyTableColumnFamilyMaxVersion(String namespace, String tablename, String columnFamily, int version) throws IOException {if (!isTableExists(namespace, tablename)) {System.out.println("table[" + tablename + "] does not exist");return;}try (Admin admin = getConnection().getAdmin()) {TableName tn = TableName.valueOf(namespace, tablename);if (!admin.tableExists(tn)) {System.out.println("table[" + tablename + "] does not exist!");return;}TableDescriptor descriptor = admin.getDescriptor(tn);// 获取原表的列族描述信息ColumnFamilyDescriptor family = descriptor.getColumnFamily(Bytes.toBytes(columnFamily));{ColumnFamilyDescriptorBuilder builder = ColumnFamilyDescriptorBuilder.newBuilder(family);// 修改 version 后重新构建列族描述信息builder.setMaxVersions(version);family = builder.build();}TableDescriptorBuilder builder = TableDescriptorBuilder.newBuilder(descriptor);builder.modifyColumnFamily(family);admin.modifyTable(builder.build());}}/*** 删除表** @param namespace 命名空间* @param tablename 表名*/public static void deleteTable(String namespace, String tablename) throws IOException {if (!isTableExists(namespace, tablename)) {System.out.println("table[" + tablename + "] does not exist");return;}try (Admin admin = getConnection().getAdmin()) {TableName tn = TableName.valueOf(namespace, tablename);if (!admin.isTableDisabled(tn)) {admin.disableTable(tn);}admin.deleteTable(tn);} catch (IOException e) {e.printStackTrace();}boolean disappear = !isTableExists(namespace, tablename);if (disappear) {System.out.println("table[" + namespace + ":" + tablename + "] has been deleted");}}
}
- 创建 HBase 的DML 操作类
public class HBaseDML {private static final Connection connection = HBaseConnection.getConnection();/*** 为表中特定的行的列赋值** @param namespace 命名空间* @param tablename 表名* @param rowKey    行键* @param column    列名,由列族和列标识符组成,例如 basic:name* @param value     该列的值*/public static void put(String namespace, String tablename, String rowKey, String column, String value) throws IOException {if (namespace == null || tablename == null || column == null) {return;}String[] strings = column.split(":");if (strings.length < 1) {return;}String columnName = strings.length > 1 ? strings[1] : "";Table table = connection.getTable(TableName.valueOf(namespace, tablename));Put put = new Put(Bytes.toBytes(rowKey));put.addColumn(Bytes.toBytes(strings[0]), Bytes.toBytes(columnName), Bytes.toBytes(value));table.put(put);table.close();}/*** 打印 Cell 并返回 Map 结果** @param result 数据返回结果* @return 返回 Map 集合*/private static List<Map<String, Object>> getListFromResult(Result result) {List<Map<String, Object>> maps = new ArrayList<>();assert result != null;Cell[] cells = result.rawCells();System.out.print(Bytes.toString(result.getRow()) + "[");for (Cell cell : cells) {Map<String, Object> map = new HashMap<>();long timestamp = cell.getTimestamp();String time = DateFormatUtils.format(timestamp, "yyyy-MM-dd HH:mm:ss");String row = Bytes.toString(CellUtil.cloneRow(cell));String family = Bytes.toString(CellUtil.cloneFamily(cell));String qualifier = Bytes.toString(CellUtil.cloneQualifier(cell));String value = Bytes.toString(CellUtil.cloneValue(cell));map.put("key", row);map.put("timestamp", timestamp);map.put("time", time);map.put("column", family + ":" + qualifier);map.put("value", value);System.out.print("(" + family + ":" + qualifier + ") => " + value + "\t");maps.add(map);}System.out.println("]");return maps;}/*** 扫描表的数据** @param namespace 命名空间* @param tablename 表名* @param start     起始行的主键[包含]* @param stop      结束行的主键[不包含]*/public static void scan(String namespace, String tablename, String start, String stop) throws IOException {scan(namespace, tablename, start, stop, null, null);}/*** 扫描表的数据** @param namespace 命名空间* @param tablename 表名* @param start     起始行的主键[包含]* @param stop      结束行的主键[不包含]* @param column    列名,由列族和列标识符组成,例如 basic:name* @param value     结束行的主键[不包含]*/public static void scan(String namespace, String tablename, String start, String stop, String column, String value) throws IOException {Table table = connection.getTable(TableName.valueOf(namespace, tablename));Scan scan = new Scan();scan.withStartRow(Bytes.toBytes(start));scan.withStopRow(Bytes.toBytes(stop));// 过滤器if (column != null && column.contains(":") && value != null) {String[] cs = column.split(":");if (cs.length > 0) {String cn = cs.length > 1 ? cs[1] : "";Filter filter = new ColumnValueFilter(Bytes.toBytes(cs[0]),Bytes.toBytes(cn),// 会查找到所有等于 value 的数据// 需要注意的是,如果该列不存在,不会被找到CompareOperator.EQUAL,Bytes.toBytes(value));// 1. scan 可以使用 FilterList 组装多个 Filter 后使用//    FilterList filters = new FilterList();// 2. SingleColumnValueFilter//    会查找到所有等于 value 的数据,如果该列不存在,也会被找到// 3. ColumnValueFilter//    会查找到所有等于 value 的数据,如果该列不存在,不会被找到scan.setFilter(filter);}}try (ResultScanner scanner = table.getScanner(scan)) {for (Result result : scanner) {List<Map<String, Object>> maps = getListFromResult(result);//System.out.println(maps);}} catch (IOException e) {e.printStackTrace();}table.close();}/*** 获取某行的所有数据** @param namespace 命名空间* @param tablename 表名* @param rowKey    行主键*/public static List<Map<String, Object>> get(String namespace, String tablename, String rowKey) throws IOException {return get(namespace, tablename, rowKey, null);}/*** 获取某个单元格的数据** @param namespace 命名空间* @param tablename 表名* @param rowKey    行主键* @param column    列名,由列族和列标识符组成,例如 basic:name* @return*/public static List<Map<String, Object>> get(String namespace, String tablename, String rowKey, String column) throws IOException {String[] cs = column != null && column.contains(":") ? column.split(":") : null;Table table = connection.getTable(TableName.valueOf(namespace, tablename));Get get = new Get(Bytes.toBytes(rowKey));if (cs != null && cs.length > 0) {String columnName = cs.length > 1 ? cs[1] : "";get.addColumn(Bytes.toBytes(cs[0]), Bytes.toBytes(columnName));}get.readAllVersions();Result result = null;try {result = table.get(get);} catch (IOException e) {e.printStackTrace();}assert result != null;List<Map<String, Object>> maps = getListFromResult(result);table.close();return maps;}
}
- 创建单元测试类
@RunWith(JUnit4.class)
public class JUnit4TestHBase {@Afterpublic void testClose() throws IOException {getConnection().close();System.out.println("单元测试结束!");}/*** DDL 相关测试 —— 命名空间*/@Testpublic void testNamespace() throws IOException {HBaseDDL.listNamespace();HBaseDDL.createNamespace("tmp");HBaseDDL.listNamespace();HBaseDDL.createTable("tmp", "stu", "basic", "advanced");HBaseDDL.listTable("tmp");}/*** DDL 相关测试 —— 修改表*/@Testpublic void testModifyTable() throws IOException {int version = HBaseDDL.getTableColumnFamilyMaxVersion("tmp", "stu", "basic");System.out.println("basic`s max version is:" + version);HBaseDDL.modifyTableColumnFamilyMaxVersion("tmp", "stu", "basic", version + 1);version = HBaseDDL.getTableColumnFamilyMaxVersion("tmp", "stu", "basic");System.out.println("basic`s max version is:" + version);}/*** DML相关测试*/@Testpublic void testDML() throws IOException {HBaseDML.put("tmp", "stu", "1001", "basic:name", "tina");HBaseDML.put("tmp", "stu", "1001", "basic", "this is basic information!");HBaseDML.put("tmp", "stu", "1001", "basic:age", "19");//HBaseDML.put("tmp", "stu", "1002", "basic:name", "Jenkins");HBaseDML.put("tmp", "stu", "1002", "basic:age", "20");HBaseDML.put("tmp", "stu", "1003", "basic:name", "Lucas");HBaseDML.put("tmp", "stu", "1003", "basic:age", "19");System.out.println("==GET[1003]basic:name============");HBaseDML.get("tmp", "stu", "1003", "basic:name");//System.out.println(maps);System.out.println("==GET[1003]======================");HBaseDML.get("tmp", "stu", "1003");//System.out.println(maps);System.out.println("==SCAN[1001:1003]===========================");HBaseDML.scan("tmp", "stu", "1001", "1003");System.out.println("==SCAN(name=tina)================");HBaseDML.scan("tmp", "stu", "1001", "1003", "basic:name", "tina");}/*** DDL 相关测试 —— 删除命名空间和表*/@Testpublic void testDeleteTable() throws IOException {HBaseDDL.listTable();HBaseDDL.deleteTable("tmp", "stu");HBaseDDL.listTable();HBaseDDL.listNamespace();HBaseDDL.deleteNamespace("tmp");HBaseDDL.listNamespace();}
}


)


)


