文章目录
- 参考链接
- 步骤
- 认识正确的instances_val2017.json文件格式
- 代码(mogui_tococo.py,用于我自己的数据集)
参考链接
- 需要先在环境中安装
pycocotools
pip install pycocotools
-
魔鬼面具的代码:objectdetection-tricks/tricks_4.py
- 相关视频教学:tricks_4 用于yolov5和v7中的yolo格式转换coco格式的脚本.(如何在v5和v7中输出ap_small,ap_middle,ap_large coco指标)
-
一些概念上的了解:通过pycocotools获取每个类别的COCO指标
步骤
步骤很简单,但难在第一步:
- 得到待检测的数据集的
instances_val2017.json文件,参考魔鬼面具代码和视频即可(我直接使用起来有错,应该是因为数据集分布的问题) - 在
test.py里面定位到anno_json =,然后指明1得到的instances_val2017.json文件的位置(我是像下面那样直接指明的绝对位置)
anno_json = r'G:\pycharmprojects\autodl-yolov7\yolov7-main-biyebase\TXTOCOCO\instances_val2017.json'
- 在
test.py中定位到'--save-json', action='store_true',然后加上default=True,(加上就能检测大中小尺寸了,就算json文件格式不对也不会直接报错终止,但是不会出现结果)
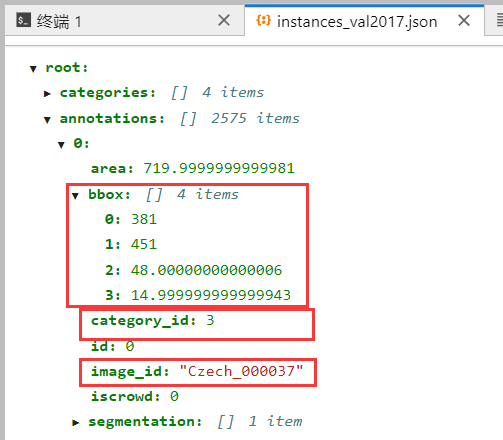
认识正确的instances_val2017.json文件格式
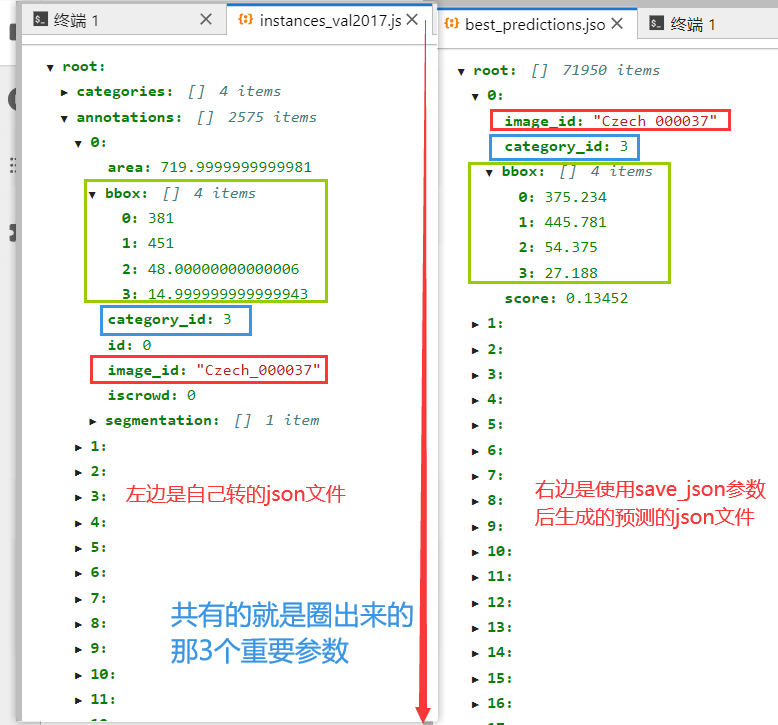
圈起来的就是正确信息,如果annotations为0 items的话,那就说明转出来的json文件内容有误(下图格式是在AutoDL云服务器上看的,看起来比较清楚,本地上看就比较杂乱。之前一直我运行一直有错,就是因为没有转正确,我的image_id的value值写成了test/Czech_000037,有了test/就报错了)

instances_val2017.json和best_predictions.json对比:

代码(mogui_tococo.py,用于我自己的数据集)
参考魔鬼面具的应该会没有错,以下是我针对我的数据集进行的一代你代码改动,留作备份
import os
import cv2
import json
from tqdm import tqdm
from sklearn.model_selection import train_test_split
import argparseparser = argparse.ArgumentParser()
parser.add_argument('--root_dir', default='/home/hjj/Desktop/dataset/dataset_seaship', type=str, help="root path of images and labels, include ./images and ./labels and classes.txt")
parser.add_argument('--save_path', type=str, default='instances_val2017.json', help="if not split the dataset, give a path to a json file")arg = parser.parse_args()def yolo2coco(arg):with open(r'G:\pycharmprojects\autodl-yolov7\yolov7-main-biyebase\TXTOCOCO\classes.txt', 'r') as f:classes = list(map(lambda x: x.strip(), f.readlines()))# --------------- lwd ---------------- #cities = ['Czech', 'India', 'Japan']indexes = []for city in cities:city_imagedir = f'F:/A_Publicdatasets/RDD2020-1202/train_valid/{city}/images/test'for file in os.listdir(city_imagedir):indexes.append(f'{city_imagedir}/{file}')# --------------- lwd ---------------- #dataset = {'categories': [], 'annotations': [], 'images': []}for i, cls in enumerate(classes, 0):dataset['categories'].append({'id': i, 'name': cls, 'supercategory': 'mark'})# 标注的idann_id_cnt = 0for k, index in enumerate(tqdm(indexes)):# 支持 png jpg 格式的图片。txtPath = index.replace('images', 'labels').replace('.jpg', '.txt')# 读取图像的宽和高im = cv2.imread(index)imageFile = index.split('/')[-1]    # img.jpgheight, width, _ = im.shape# 添加图像的信息if not os.path.exists(txtPath):# 如没标签,跳过,只保留图片信息。continuedataset['images'].append({'file_name': imageFile,'id': int(imageFile[:-4]) if imageFile[:-4].isnumeric() else imageFile[:-4],'width': width,'height': height})with open(txtPath, 'r') as fr:labelList = fr.readlines()for label in labelList:label = label.strip().split()x = float(label[1])y = float(label[2])w = float(label[3])h = float(label[4])# convert x,y,w,h to x1,y1,x2,y2H, W, _ = im.shapex1 = (x - w / 2) * Wy1 = (y - h / 2) * Hx2 = (x + w / 2) * Wy2 = (y + h / 2) * H# 标签序号从0开始计算, coco2017数据集标号混乱,不管它了。cls_id = int(label[0])width = max(0, x2 - x1)height = max(0, y2 - y1)dataset['annotations'].append({'area': width * height,'bbox': [x1, y1, width, height],'category_id': cls_id,'id': ann_id_cnt,'image_id': int(imageFile[:-4]) if imageFile[:-4].isnumeric() else imageFile[:-4],'iscrowd': 0,# mask, 矩形是从左上角点按顺时针的四个顶点'segmentation': [[x1, y1, x2, y1, x2, y2, x1, y2]]})ann_id_cnt += 1# 保存结果with open(arg.save_path, 'w') as f:json.dump(dataset, f)print('Save annotation to {}'.format(arg.save_path))if __name__ == "__main__":yolo2coco(arg)


确认了四家投资公司退出投资者赔偿基金(ICF)会员资格)


)


