前言
上一章节我们用我们开发板在UDP组播模式下进行数据回环测试,本章我们用开发板去主动ping主机IP地址来检测与该主机之间网络的连通性。
什么是PING?
PING是一种命令, 是用来探测主机到主机之间是否可通信,如果不能ping到某台主机,表明不能和这台主机建立连接。ping 使用的是ICMP协议,它发送icmp回送请求消息给目的主机。ICMP协议规定:目的主机必须返回ICMP回送应答消息给源主机。如果源主机在一定时间内收到应答,则认为主机可达。可以理解为ping命令是ICMP的一种形式,而ICMP属于网络层协议,因而ping也工作在网络层。
连接方式
- 开发板直连主机
- 开发板和主机都接在路由器LAN口
PING测试
我们的W5100S以太网芯片,既可以通过一个socket端口开启IPRAW模式自己组包(ICMP报文)对目标IP进行ping测试,从而在软件上实现ping功能,也可以通过配置SOCKET-less命令相关寄存器,通过SOCKET-less命令直接在硬件上实现ping功能,省去了在软件上组包、解析数据包的烦恼,而且不占用socket端口,非常方便和易于实现。下面我们通过这两种方式分别进行ping测试:
1. 相关代码
1. 通过IPRAW模式实现(软件)
我们打开库文件PING文件夹里的ping.c文件,我们主要用到这几个函数:ping_auto()、ping_request()、ping_reply()、do_ping()等,ping_request()和ping_reply()主要是ping请求的组包和收到ping回复的数据包解析,用到的数据转换和处理大家自行查看,这里我们主要看下ping_auto()函数,它通过在一个循环里构建一个状态机来对socket状态进行轮询,做出对应处理,如果端口关闭状态,就设置对应端口协议为ICMP协议,然后以IPRAW模式打开;进入IPRAW模式后,发送ping请求,然后判断是否收到或超时,收到就进行解析,之后跳出,超时则跳出,当请求数和回复数相等且为4次时结束大循环,然后将它再封装成do_ping()方便直接调用,如下所示:
/* Ping the Internet automatically. */
void ping_auto(uint8_t sn, uint8_t *addr)
{int32_t len = 0;uint8_t cnt = 0;uint8_t i;for (i = 0; i < 10; i++){if (req == rep && req == 4)break;switch (getSn_SR(sn)){case SOCK_IPRAW:ping_request(sn, addr);req++;while (1){if ((len = getSn_RX_RSR(sn)) > 0){ping_reply(sn, addr, len);sleep_ms(50);rep++;break;}else if (cnt > 200){printf("Request Time out.\r\n");cnt = 0;break;}else{cnt++;sleep_ms(50);}}break;case SOCK_CLOSED:close(sn);setSn_PROTO(sn, IPPROTO_ICMP);if (socket(sn, Sn_MR_IPRAW, 3000, 0) != 0){}while (getSn_SR(sn) != SOCK_IPRAW);sleep_ms(2000);default:break;}
#ifdef PING_DEBUGif (rep != 0){printf(" Ping Request = %d, PING_Reply = %d\r\n", req, rep);if (rep == req)printf(" PING SUCCESS\r\n ");elseprintf(" REPLY_ERROR\r\n ");}
#endif// if(rep==4)break;}
}/* ping response. */
uint8_t ping_request(uint8_t sn, uint8_t *addr)
{uint16_t i;int32_t t;ping_reply_received = 0;PingRequest.Type = PING_REQUEST;    /*Ping-Request*/PingRequest.Code = CODE_ZERO;       /*总是 '0'*/PingRequest.ID = htons(RandomID++); /*设置ping响应ID为随机的整型变量*/PingRequest.SeqNum = htons(RandomSeqNum++);for (i = 0; i < BUF_LEN; i++){PingRequest.Data[i] = (i) % 8;}PingRequest.CheckSum = 0;PingRequest.CheckSum = htons(checksum((uint8_t *)&PingRequest, sizeof(PingRequest)));t = sendto(sn, (uint8_t *)&PingRequest, sizeof(PingRequest), addr, 3000);if (t == 0){printf("\r\n Fail to send ping-reply packet  r\n");}else{printf(" 正在 Ping: %d.%d.%d.%d  \r\n", (addr[0]), (addr[1]), (addr[2]), (addr[3]));}return 0;
}/* Resolving ping reply. */
uint8_t ping_reply(uint8_t s, uint8_t *addr, uint16_t rlen)
{uint16_t tmp_checksum;uint16_t len;uint16_t i;uint8_t data_buf[128];uint16_t port = 3000;PINGMSGR PingReply;len = recvfrom(s, (uint8_t *)data_buf, rlen, addr, &port); /*从目的端接收数据*/if (data_buf[0] == PING_REPLY){PingReply.Type = data_buf[0];PingReply.Code = data_buf[1];PingReply.CheckSum = (data_buf[3] << 8) + data_buf[2];PingReply.ID = (data_buf[5] << 8) + data_buf[4];PingReply.SeqNum = (data_buf[7] << 8) + data_buf[6];for (i = 0; i < len - 8; i++){PingReply.Data[i] = data_buf[8 + i];}tmp_checksum = ~checksum(data_buf, len); /*检查ping回复的次数*/if (tmp_checksum != 0xffff)printf("tmp_checksum = %x\r\n", tmp_checksum);else{printf(" 来自 %d.%d.%d.%d 的回复: ID=%x 字节=%d \r\n",(addr[0]), (addr[1]), (addr[2]), (addr[3]), htons(PingReply.ID), (rlen + 6));ping_reply_received = 1; /*当退出ping回复循环时,设置ping回复标志为1*/}}else if (data_buf[0] == PING_REQUEST){PingReply.Code = data_buf[1];PingReply.Type = data_buf[2];PingReply.CheckSum = (data_buf[3] << 8) + data_buf[2];PingReply.ID = (data_buf[5] << 8) + data_buf[4];PingReply.SeqNum = (data_buf[7] << 8) + data_buf[6];for (i = 0; i < len - 8; i++){PingReply.Data[i] = data_buf[8 + i];}tmp_checksum = PingReply.CheckSum; /*检查ping回复次数*/PingReply.CheckSum = 0;if (tmp_checksum != PingReply.CheckSum){printf(" \n CheckSum is in correct %x shold be %x \n", (tmp_checksum), htons(PingReply.CheckSum));}else{}printf("  Request from %d.%d.%d.%d  ID:%x SeqNum:%x  :data size %d bytes\r\n",(addr[0]), (addr[1]), (addr[2]), (addr[3]), (PingReply.ID), (PingReply.SeqNum), (rlen + 6));ping_reply_received = 1; /* 当退出ping回复循环时,设置ping回复标志为1  */}else{printf(" Unkonwn msg. \n");}return 0;
}void do_ping(uint8_t sn, uint8_t *ip)
{if (req < 4){printf("------------------PING test start-----------------------\r\n");sleep_ms(1000);ping_auto(sn, ip);}else if (req == 4)close(sn);
}
2. 通过SOCKET-less命令实现(硬件)
我们找到SLping()函数,它需要我们传入两个参数:ping测试远程IP地址和ping测试次数,然后我们配置相应的SOCKET-less重传时间、重传次数、远程IP地址、中断屏蔽寄存器,然后根据传入的参数值设置ping次数,传入的值为0则将其设置为数据类型的最大值;接着在for循环里面,设置ping序列号和ID,并开启ping请求发送命令,用Switch状态机轮询中断寄存器,根据中断置位情况进行相应处理,这里分为超时和收到ping应答两个状态(情况),最后统计请求和应答成功、失败数后,进入阻塞;如下所示:
/*** socket-less ping* remote_ip:  ping ip address* ping_count: ping times, if its 0,always request to the max :65535 times.*/
void SLping(uint8_t *remote_ip, uint16_t ping_count)
{uint16_t i;static uint16_t succ_count = 0;setSLRTR(5000); // 5000 * 100us = 500mssetSLRCR(2);setSLPIPR(remote_ip);setSLIMR(0x05);if (ping_count == 0)ping_count = 65535;for (i = 0; i < ping_count; i++){printf("Ping the %d.%d.%d.%d \r\n", remote_ip[0], remote_ip[1], remote_ip[2], remote_ip[3]);setPINGSEQR(RandomSeqNum);setPINGIDR(RandomID);setSLCR(0X01);  // pingsleep_ms(2000); // waitswitch (getSLIR() & 0x07){case PING_INT:printf("Reply from %d.%d.%d.%d : ID: %x SeqNum: %x.\r\n", remote_ip[0], remote_ip[1], remote_ip[2], remote_ip[3], getPINGIDR(), getPINGSEQR());succ_count++;break;case TIMEOUT_INT:printf("Request timeout\r\n");default:break;}RandomID++;RandomSeqNum++;}printf("Ping request: %d, Succ: %d, Fail: %d.\r\n", ping_count, succ_count, (ping_count - succ_count));while (1);
}
主程序只需要初始化相关对应信息后,传入主函数循环调用即可,这里我们要进行ping测试的主机IP为我们开发板同一网段的电脑IP,如下所示:
#define SOCKET_ID 0
#define ETHERNET_BUF_MAX_SIZE (1024 * 2)void network_init(void);wiz_NetInfo net_info = {.mac = {0x00, 0x08, 0xdc, 0x16, 0xed, 0x2e},.ip = {192, 168, 1, 11},.sn = {255, 255, 255, 0},.gw = {192, 168, 1, 1},.dns = {8, 8, 8, 8},.dhcp = NETINFO_STATIC};
wiz_NetInfo get_info;
static uint8_t ethernet_buf[ETHERNET_BUF_MAX_SIZE] = {0,};
static uint8_t remote_ip[4] = {192, 168, 1, 2};int main()
{   stdio_init_all();sleep_ms(2000);network_init();while(true){do_ping(SOCKET_ID, remote_ip);// SLping(remote_ip, 4);sleep_ms(500);}
}void network_init(void)
{uint8_t temp;wizchip_initialize();printf("W5100s udp client example.\r\n");sleep_ms(2000);wizchip_setnetinfo(&net_info);print_network_information(get_info);sleep_ms(2000);
}
2. 测试现象
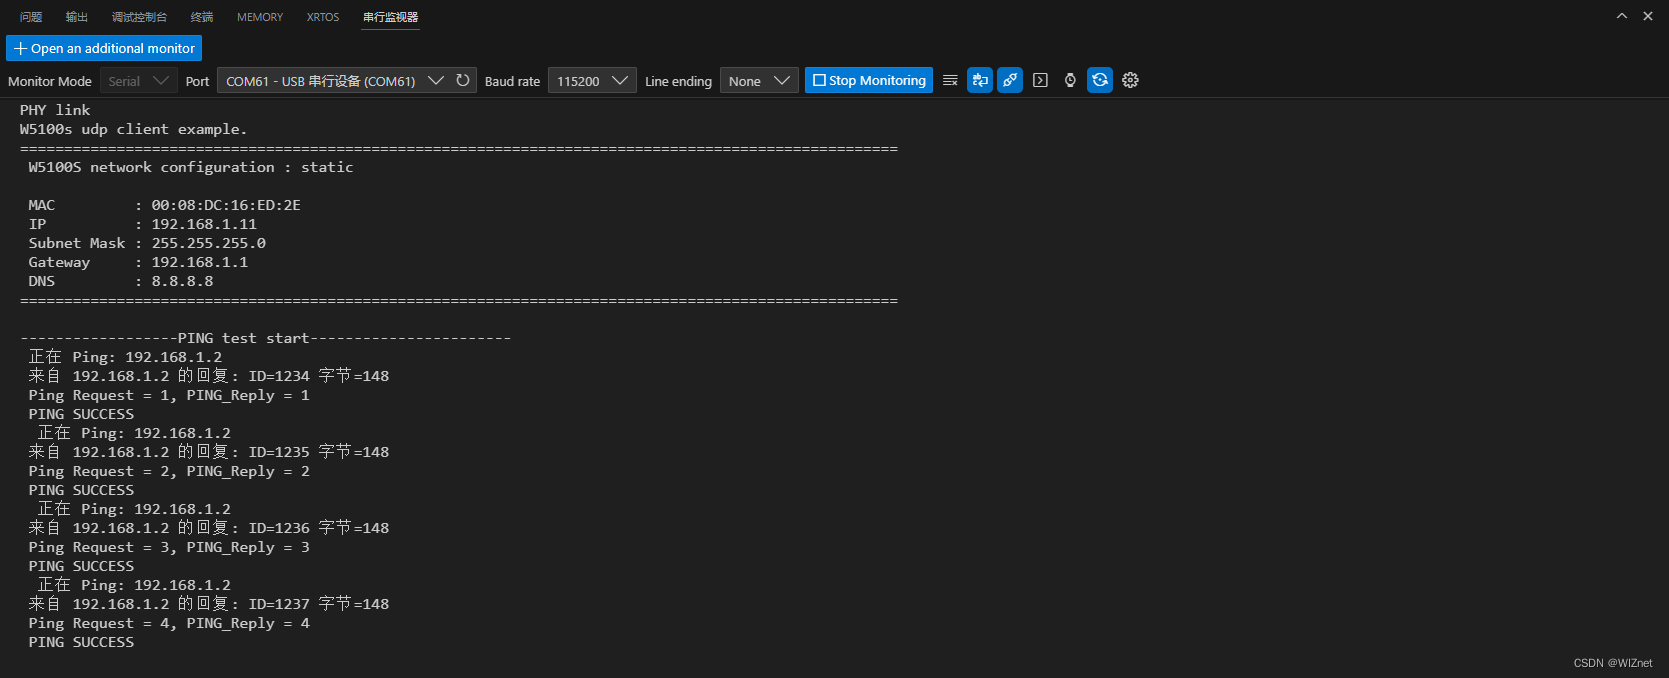
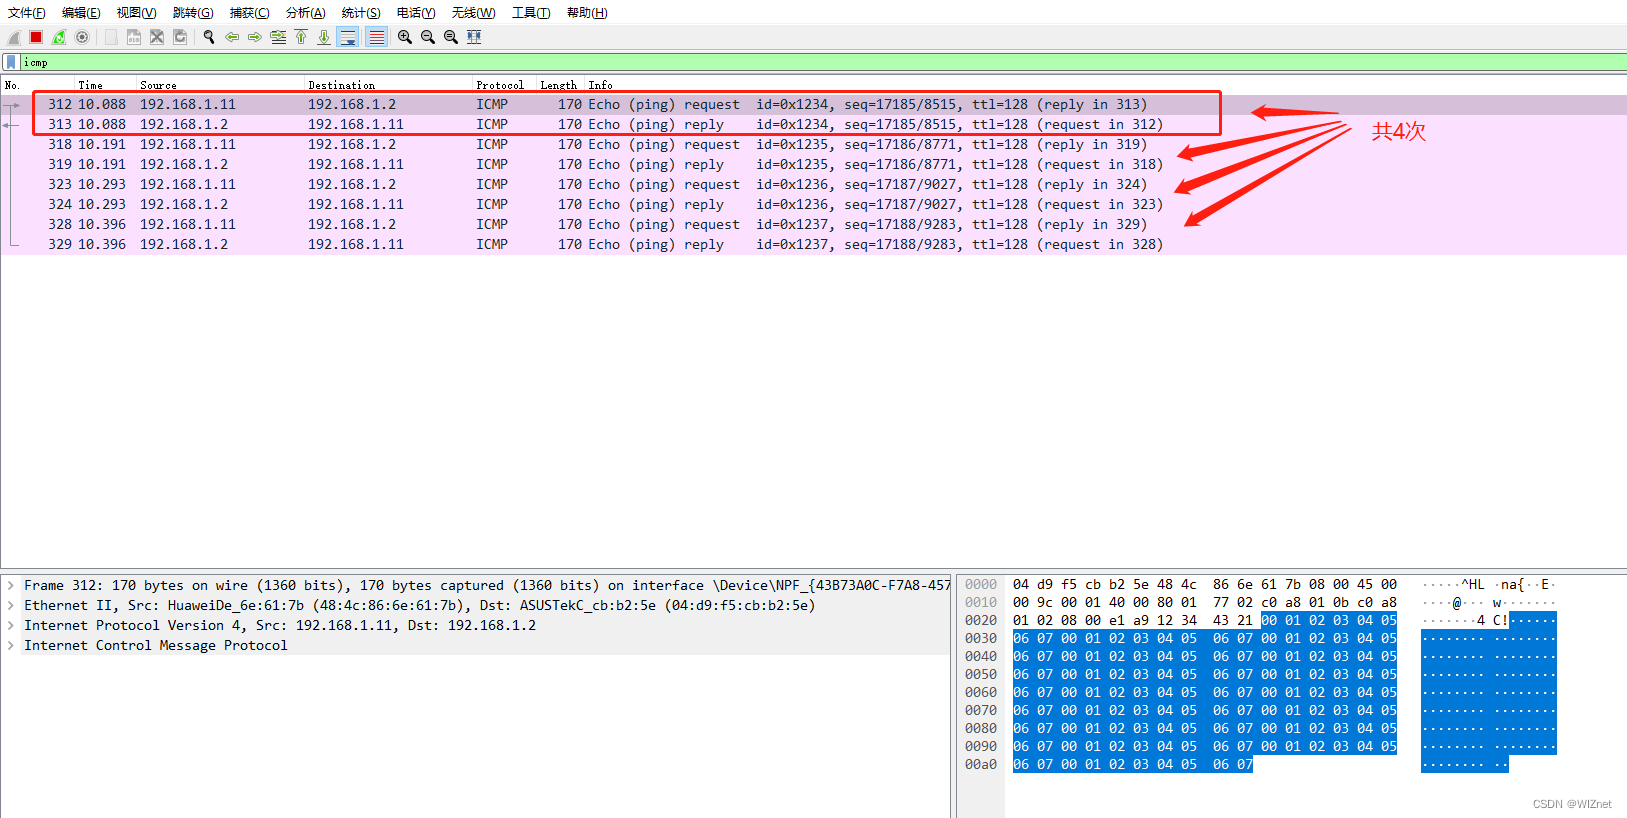
编译烧录后,打开串行监视器,打开wireshark输入过滤条件<icmp>然后开启监听,可以看到在串口打印的配置信息,以及ping测试情况,wireshark的抓包情况,这里是通过软件实现的测试,硬件实现大家自行尝试;测试结果如下图所示:

 相关链接
相关链接
本章例程链接![]() https://gitee.com/wiznet-hk/w5100s-evb-pico-routine.git
https://gitee.com/wiznet-hk/w5100s-evb-pico-routine.git

)


-- 算法导论8.2 1题)
- 源码解析-启动装配篇 @EnableRetry)

)


