五、优缺点
优点:
- 简单易用:Flex布局使用简单,只需通过设置容器的属性即可实现弹性布局,无需复杂的计算和调整。
- 自适应性:Flex布局可以根据容器的大小自动调整元素的位置和大小,适应不同的屏幕尺寸和设备。
- 灵活性:Flex布局提供了多种属性和选项,可以灵活地控制元素的对齐方式、排列顺序、间距等,满足不同的设计需求。
- 响应式设计:Flex布局可以轻松实现响应式设计,使网页在不同的屏幕尺寸下都能良好地显示和布局。
缺点:
- 学习成本高,要想熟练掌握好flex必须下功夫去多研究多使用
- 复杂度较高的布局还是需要配合其他布局去完成的
- 低版本浏览器不被完全支持,需要做一些兼容性行为去处理
六、tips
6.1 属性失效
flex布局中,子元素的浮动float、清除clear、垂直对齐方式vertical-align等属性将失效
- float属性浮动属性会失效是因为float属性是操作dom本身然后将其脱离标准文档流从而实现想要的效果,但是flex布局中是有两层的最少父级(盒子层)和子级(项目层)的,脱离出文档流我的flex布局就乱套了啊。就好比我一个大的flex布局这些dom是一条小河,那些子级项目就是是里面的鱼🐟,一个子级项目设了浮动就好像有一条鱼🐟说:“诶,不在河里呆着了我要溜出去了”,鱼从河里溜出去下场都知道吧。
- clear属性 这个属性的定义是 指定一个元素是否必须移动 (清除浮动后) 到在它之前的浮动元素下面 这一下就知道为啥失效了吧。它是基于上面跳出河的那条鱼的啊
- vertical-align属性 用来指定行内元素(inline)或表格单元格(table-cell)元素的垂直对齐方式。 flex布局没有绝对的垂直对齐方向,他都是相对的主轴要是竖着的那交叉轴就是横着的,那么这个属性就跟justify-content重叠了;反之则是与align-items重合了。
6.2 是一维布局
flexbox 是一种一维的布局,是因为一个 flexbox 一次只能处理一个维度上的元素布局,一行或者一列。
一维布局的特性让他无法单独排布出复杂布局需要配合其他布局来完成
七、与其他布局比较
7.1 gap 属性
属性row-gap 和 column-gap,其简写为gap,近期添加到了盒子布局规范中。
这些属性(名称为grid-row-gap, grid-column-gap and grid-gap)最初定义在 CSS 网格布局中。但是他们被重命名并移入盒子布局规范。这样的话,所有的布局方法都可以使用这些属性。
不过在浏览器实现 Flex 的这些属性之前只能通过margin 来控制元素之间的间隙距离。
7.2 Writing Modes书写模式
7.2.1 原文及部分解释
MDN原文如下:
In the Basic concepts of flexbox article, I explained that flexbox is writing mode aware. Writing modes are fully detailed in the CSS Writing Modes specification, which details how CSS supports the various different writing modes that exist internationally. We need to be aware of how this will impact our flex layouts as writing mode changes the direction that blocks are laid out in our document. Understanding block and inline directions is key to new layout methods.
这段大意是:
在flexbox文章的基本概念中,我解释了flexbox是有书写模式意识的。CSS写作模式规范中详细介绍了书写模式,其中详细介绍了CSS如何支持国际上存在的各种不同的书写模式。我们需要意识到,随着书写模式改变文档中块的布局方向,这将如何影响我们的灵活布局。了解块和内联方向是新布局方法的关键。
It is worth noting that we might want to change the writing mode of our document for reasons other than publishing content in a language that uses a different writing mode. See this article for a full description of writing modes and ways to use them, both for content in other languages and for creative reasons.
这段大意是:
需要注意的是,除了以使用不同书写模式的语言发布内容外,我们可能还想更改文档的写作模式。请参阅本文,了解写作模式和使用方式的完整描述,无论是出于其他语言的内容还是出于创作原因。
这两段大体下来就是说flexbox是有writing-mode属性的,需要注意书写模式意识。
自己的一些碎碎念:
我的理解是不同的语言写作习惯是不一样的,例如我们常用到或者涉及到的中英文都是从左往右的,但是阿拉伯文、希伯来文、波斯文这些都是从右往左写的。
基于不同语种的写作习惯,如果你的网站或者项目需要面向全球客户,那这方面需要注意一下。
不面向全球时但是你的客户要求你文字纵向排列从右往左之类的这种需求也是可以用这个实现的。
7.2.2 writing-mode值
书写模式规范定义了书写模式writing-mode属性的以下值
-
horizontal-tb- 对于左对齐(ltr)文本,内容从左到右水平流动。
- 对于右对齐(rtl)文本,内容从右到左水平流动。
- 下一水平行位于上一行下方。
-
vertical-rl- 对于左对齐(ltr)文本,内容从上到下垂直流动,下一垂直行位于上一行左侧。
- 对于右对齐(rtl)文本,内容从下到上垂直流动,下一垂直行位于上一行右侧。
-
vertical-lr- 对于左对齐(ltr)文本,内容从上到下垂直流动,下一垂直行位于上一行右侧。
- 对于右对齐(rtl)文本,内容从下到上垂直流动,下一垂直行位于上一行左侧。
-
sideways-rl仅在Firefox中支持- 对于左对齐(ltr)文本,内容从下到上垂直流动。
- 对于右对齐(rtl)文本,内容从上到下垂直流动。
- 所有字形(即使是垂直文本中的字形)都朝向右侧。
-
sideways-lr仅在Firefox中支持- 对于左对齐(ltr)文本,内容从上到下垂直流动。
- 对于右对齐(rtl)文本,内容从下到上垂直流动。
- 所有字形(即使是垂直文本中的字形)都朝向左侧。
这些值用于更改块元素在页面上的布局方向,以匹配在特定书写模式下格式化内容时块元素的布局方向。可以将下面的实际示例更改为这些模式,以观察flex布局变化。
7.2.3 完整代码示例
为了更好理解上面那些值,以下为一个完整的包含各个writing-mode值的例子
<table><tr><th>值</th><th>竖排文本</th><th>横排文本(从左到右)</th><th>横排文本(从右到左)</th><th>混合文本</th></tr><tr><td>horizontal-tb</td><td class="example Text1"><span>我家没有电脑。</span></td><td class="example Text1"><span>Example text</span></td><td class="example Text1"><span>מלל ארוך לדוגמא</span></td><td class="example Text1"><span>1994 年に至っては</span></td></tr><tr><td>vertical-lr</td><td class="example Text2"><span>我家没有电脑。</span></td><td class="example Text2"><span>Example text</span></td><td class="example Text2"><span>מלל ארוך לדוגמא</span></td><td class="example Text2"><span>1994 年に至っては</span></td></tr><tr><td>vertical-rl</td><td class="example Text3"><span>我家没有电脑。</span></td><td class="example Text3"><span>Example text</span></td><td class="example Text3"><span>מלל ארוך לדוגמא</span></td><td class="example Text3"><span>1994 年に至っては</span></td></tr><tr><td>sideways-lr</td><td class="example Text4"><span>我家没有电脑。</span></td><td class="example Text4"><span>Example text</span></td><td class="example Text4"><span>מלל ארוך לדוגמא</span></td><td class="example Text4"><span>1994 年に至っては</span></td></tr><tr><td>sideways-rl</td><td class="example Text5"><span>我家没有电脑。</span></td><td class="example Text5"><span>Example text</span></td><td class="example Text5"><span>מלל ארוך לדוגמא</span></td><td class="example Text5"><span>1994 年に至っては</span></td></tr>
</table>
.example.Text1 span,
.example.Text1 {writing-mode: horizontal-tb;
}.example.Text2 span,
.example.Text2 {writing-mode: vertical-lr;
}.example.Text3 span,
.example.Text3 {writing-mode: vertical-rl;
}.example.Text4 span,
.example.Text4 {writing-mode: sideways-lr;
}.example.Text5 span,
.example.Text5 {writing-mode: sideways-rl;
}
结果如图:
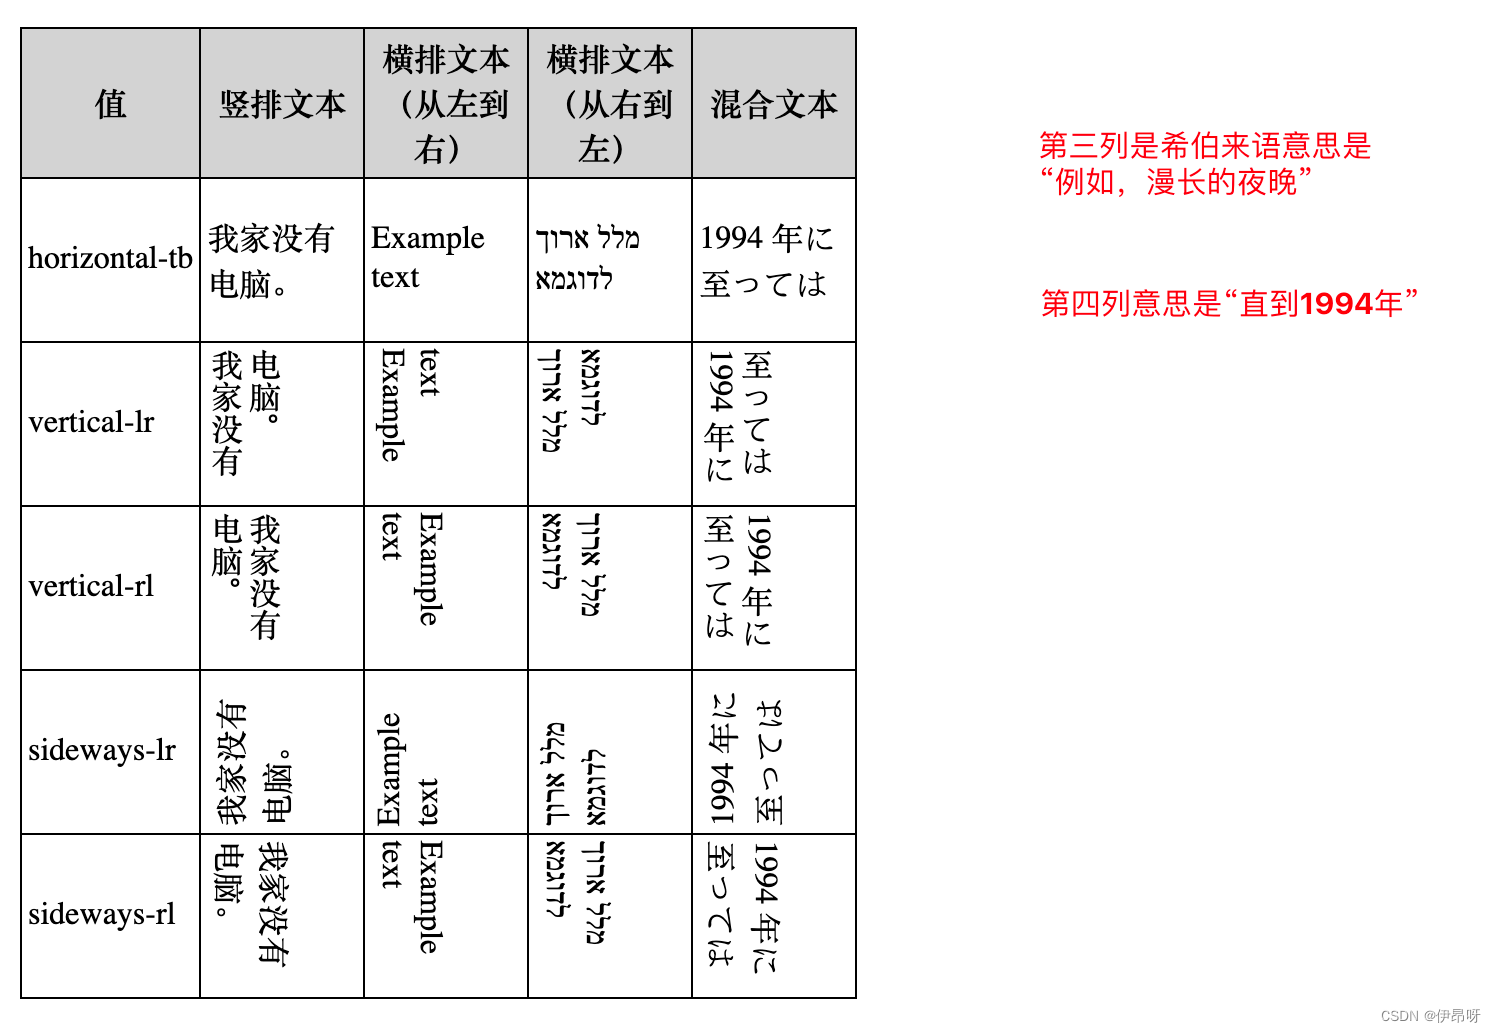
如果打算在布局中使用写作模式,那么仔细测试结果是明智的——毕竟这很容易让东西变得难以阅读!
关于更多浏览器兼容性的问题可以查看:书写模式的MDN文档
7.3 Flexbox 弹性布局和 Grid 网格布局
7.3.1 相同点
Grid网格布局和Flexbox弹性布局在覆盖其他方法时通常以相同的方式操作。
你可以使用Flexbox弹性布局作为Grid网格布局的后备方案,因为在较旧的浏览器中对Flexbox弹性布局有更好的支持。如果flex item成为grid item,则可能已分配给子元素的flex特性将被忽略。
您可以在两种布局方法中使用Box Alignment“长方体对齐”属性,因此使用flexbox作为网格布局的后备方案可以非常好地工作。
7.3.2 不同点
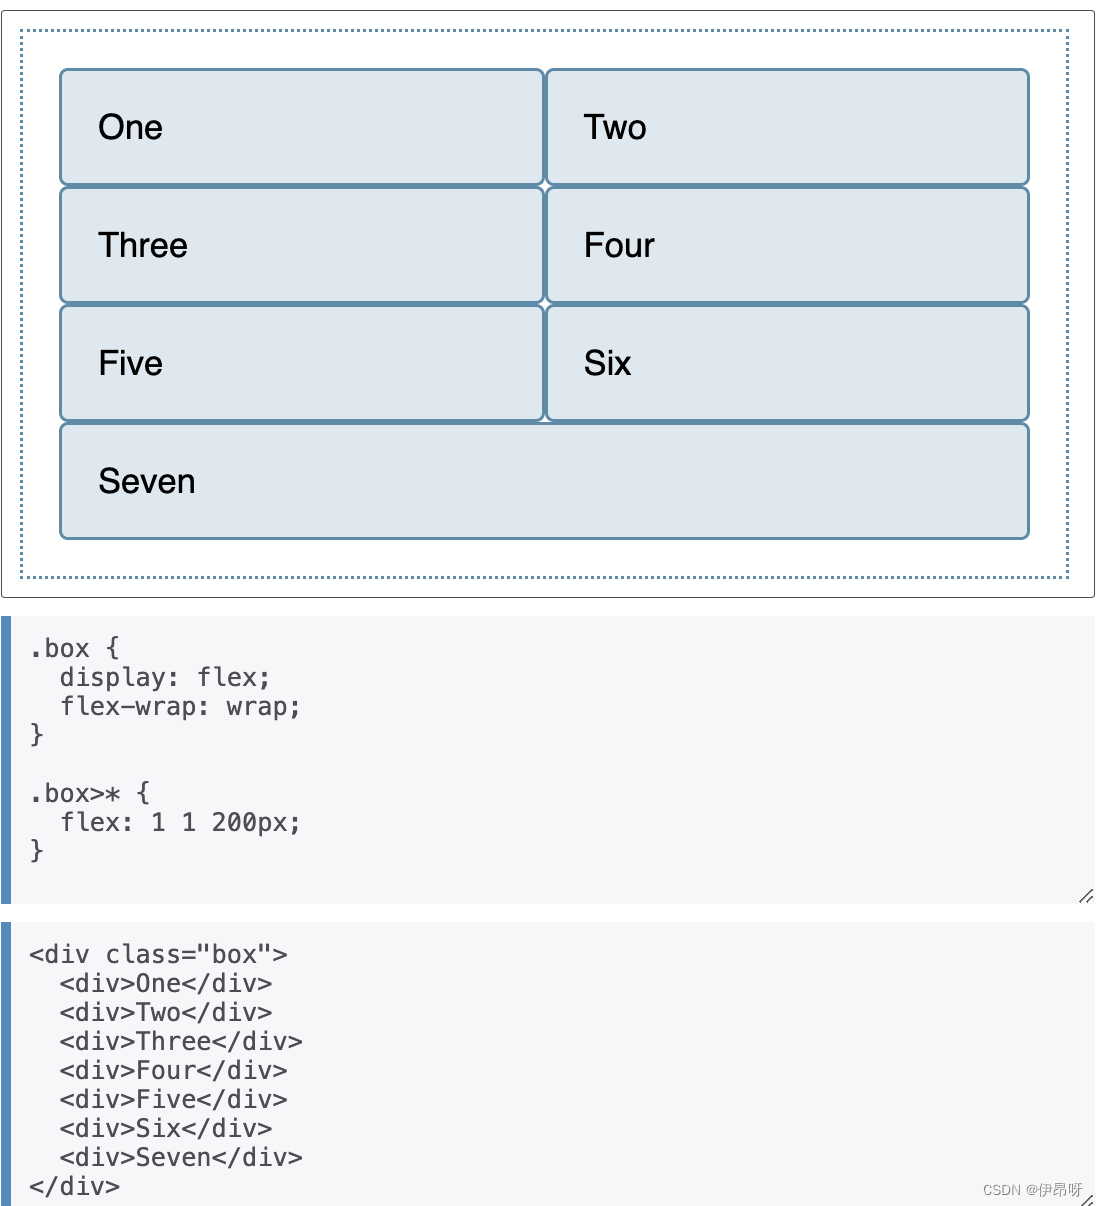
- Flexbox是一种一维布局方法,而Grid layout是一种二维布局方法。正如在基本概念文章中已经描述的那样,可以允许flex项进行包装,但一旦它们这样做,每一行都将成为自己的flex容器。当空间被分配时,flexbox不会查看其他行中项目的位置,而是试图将它们彼此对齐。
下面的例子是一个flex的布局。
相似的布局用Grid创建一个,我们可以控制行和列中的布局。
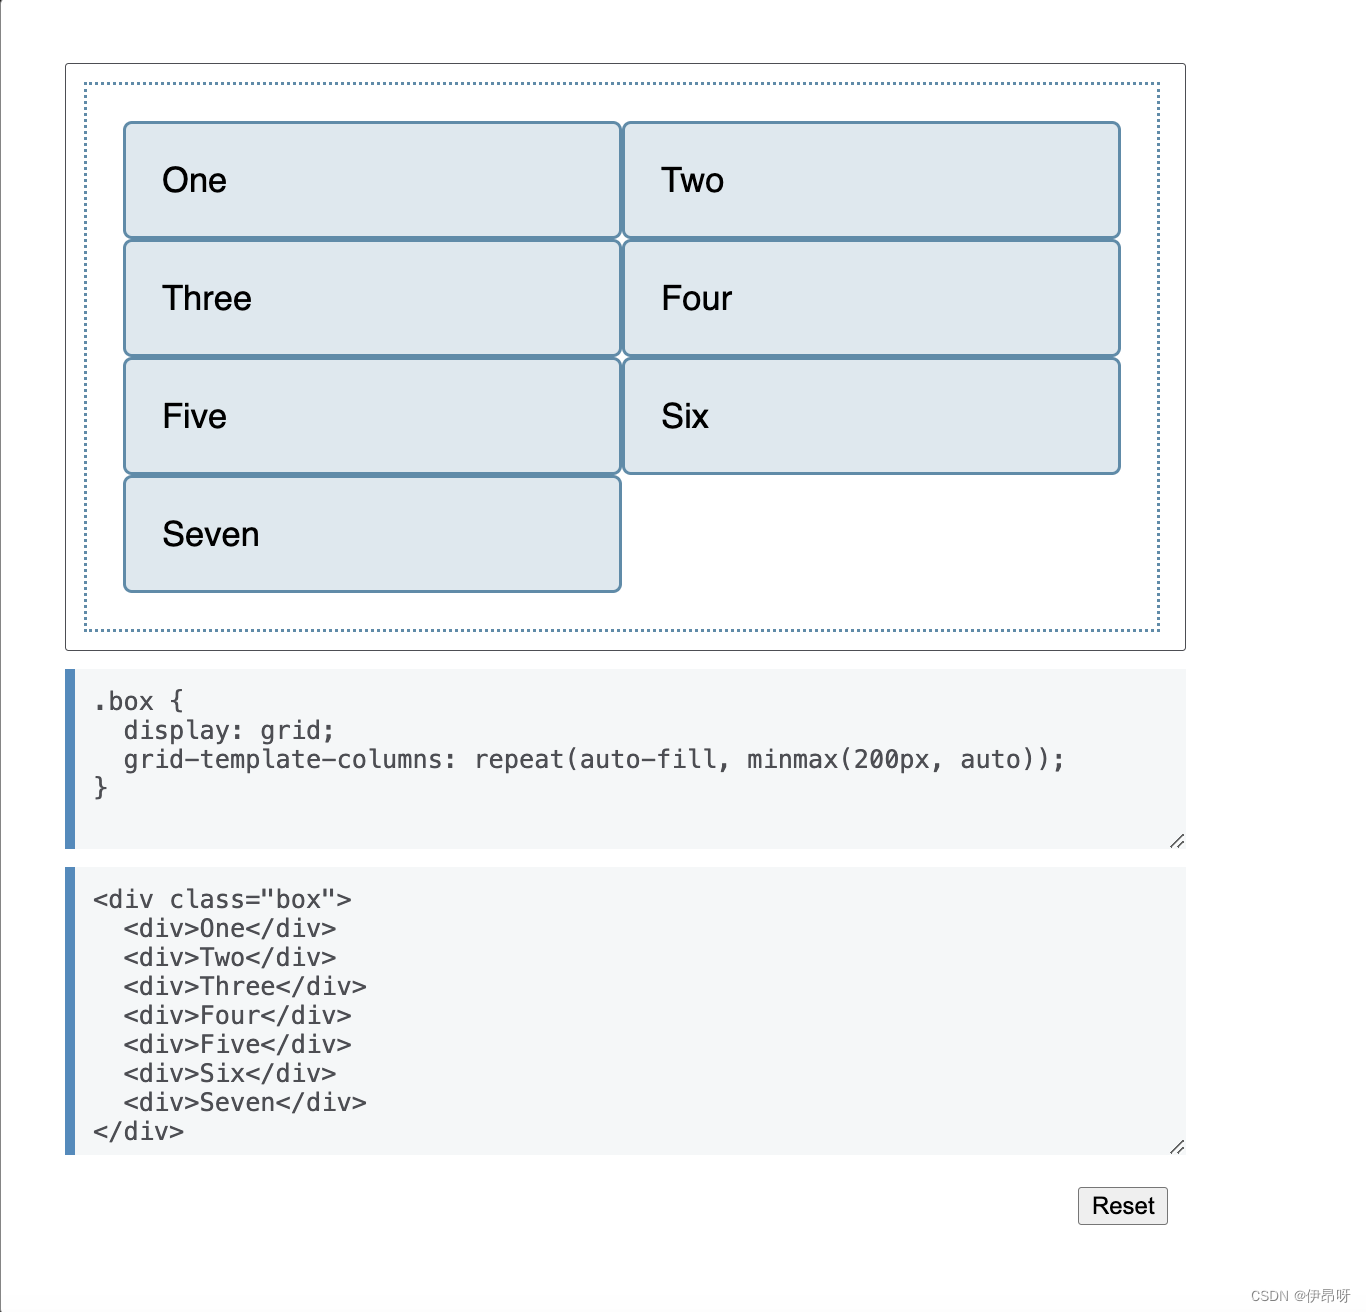
其实flex也可以实现上面网格布局那个效果不过是得给最后一个元素控制一下flex本质上确实没有网格布局好操控

-
这个案例中指出了这两种布局方法之间的另一个关键区别。
在Grid“网格布局”中,可以对容器执行大部分大小调整规范,设置轨迹,然后将项目放入其中。
在flex box中,当您创建一个flex容器并在该级别设置方向时,对项目大小的任何控制都需要发生在项目本身上。 -
根据经验,如果要为flex items添加宽度,以便使包装的flex容器的一行中的项目与上面的项目对齐,那么确实需要二维布局。在这种情况下,使用CSS网格布局可能会更好地布局组件。
-
对于较小的组件,不应该使用flexbox,而对于较大的组件,则不应该使用Grid网格布局;一个微小的组件可以是二维的,而一个大的布局可以用一维的布局更好地表示。
有关网格和flexbox的更多比较,请参阅文章“网格布局与其他布局方法的关系”
八、经典弹性盒子案例
8.1 导航
8.1.1 拆分开
nav ul {display: flex;justify-content: space-between;
}
<nav><ul><li><a href="#">Page 1</a></li><li><a href="#">Page 2</a></li><li><a href="#">Page 3 is longer</a></li><li><a href="#">Page 4</a></li></ul>
</nav>

8.1.2 占满
nav ul {display: flex;
}nav li {flex: auto ;
}
<nav><ul><li><a href="#">Page 1</a></li><li><a href="#">Page 2</a></li><li><a href="#">Page 3 is longer</a></li><li><a href="#">Page 4</a></li></ul>
</nav>

8.2 拆分导航
nav ul {display: flex;gap: 20px;
}.push-right {margin-left: auto;
}
<nav><ul><li><a href="#">Page 1</a></li><li><a href="#">Page 2</a></li><li><a href="#">Page 3 is longer</a></li><li class="push-right"><a href="#">Page 4</a></li></ul>
</nav>

8.3 元素居中
.box {display: flex;align-items: center;justify-content: center;
}.box div {width: 100px;height: 100px;
}
<div class="box"><div></div>
</div>

8.4 绝对底部
.card {display: flex;flex-direction: column;
}.card .content {flex: 1 1 auto;
}<div class="cards"><div class="card"><div class="content"><p>This card doesn't have much content.</p></div><footer>Card footer</footer></div><div class="card"><div class="content"><p>This card has a lot more content which means that it defines the height of the container the cards are in. I've laid the cards out using grid layout, so the cards themselves will stretch to the same height.</p></div><footer>Card footer</footer></div>
</div>
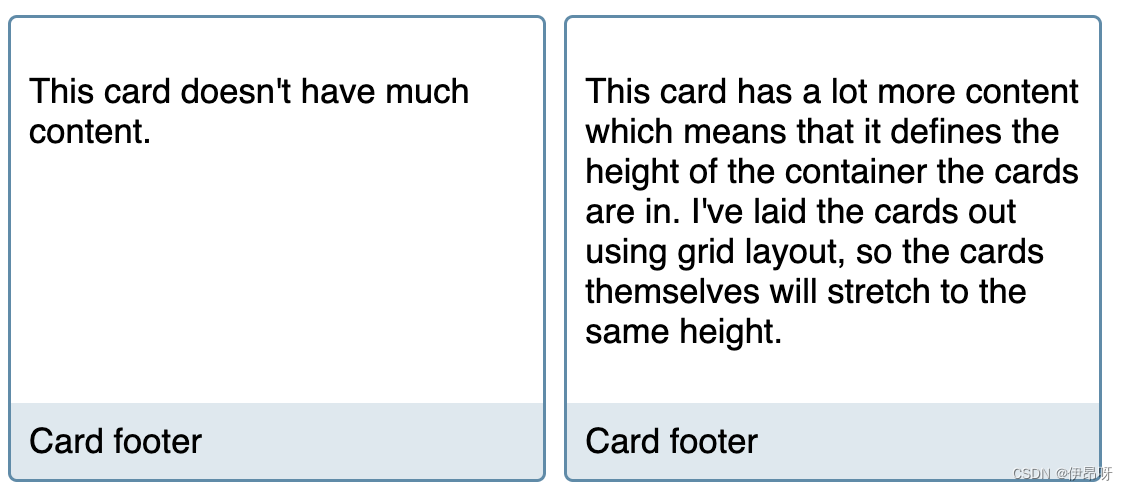
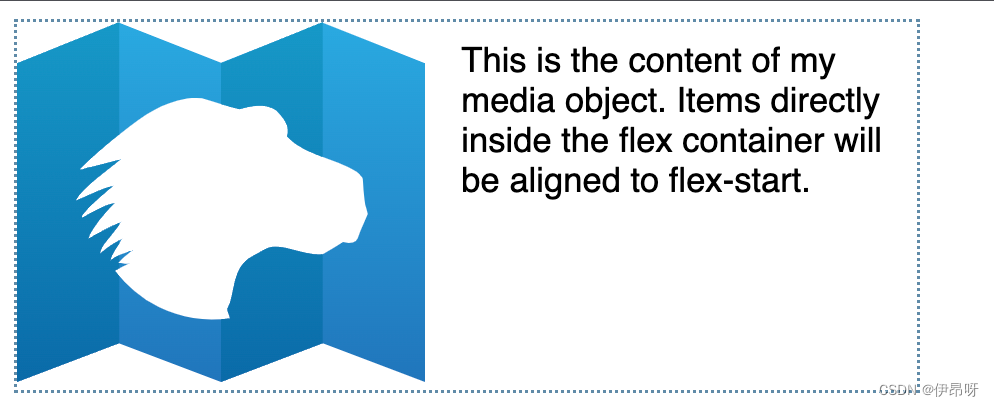
8.5 媒体对象
img {max-width: 100%;
}.media {display: flex;align-items: flex-start;
}.media .content {flex: 1;padding: 10px;
}<div class="media"><div class="image"><img src="MDN.svg" alt="MDN logo"></div><div class="content">This is the content of my media object. Items directly inside the flex container will be aligned to flex-start.</div>
</div>
8.6 Form controls表单控件
8.6.1
.wrapper {display: flex;
}.wrapper input[type="text"] {flex: 1 1 auto;
}<form class="example"><div class="wrapper"><input type="text" id="text"><input type="submit" value="Send"></div>
</form>

8.6.2
.wrapper {display: flex;}.wrapper input[type="text"] {flex: 1 1 auto;
}<form class="example"><div class="wrapper"><label for="text">Label</label><input type="text" id="text"><input type="submit" value="Send"></div>
</form>

参考资料
- 阮一峰的网络日志关于flex
- flex的MDN


(基于Kettle web版数据集成开源工具data-integration源码))
)


