在Java应用程序中操作 MongoDB 数据
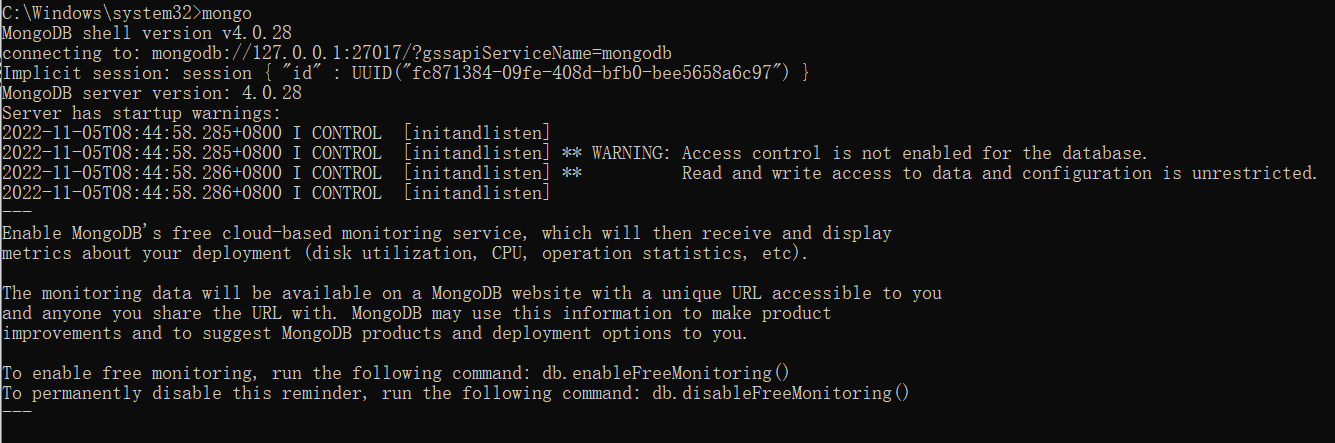
1. 启动MongoDB Shell
2. 切换到admin数据库,使用root账户

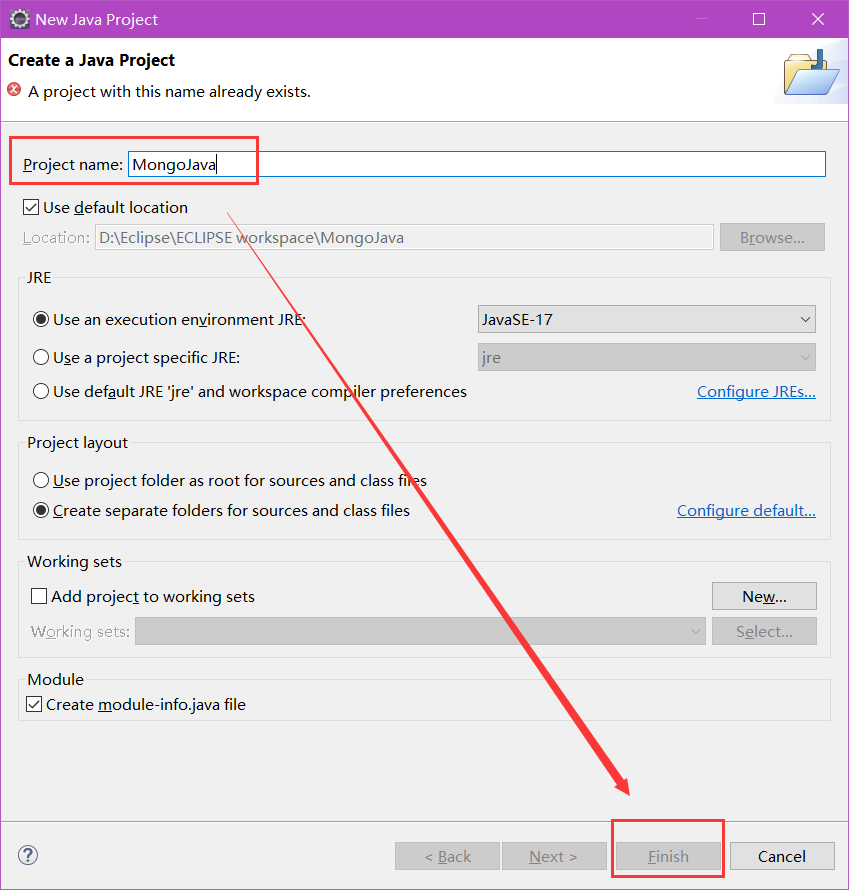
3.开启Eclipse,创建Java Project项目,命名为MongoJava
File --> New --> Java Project
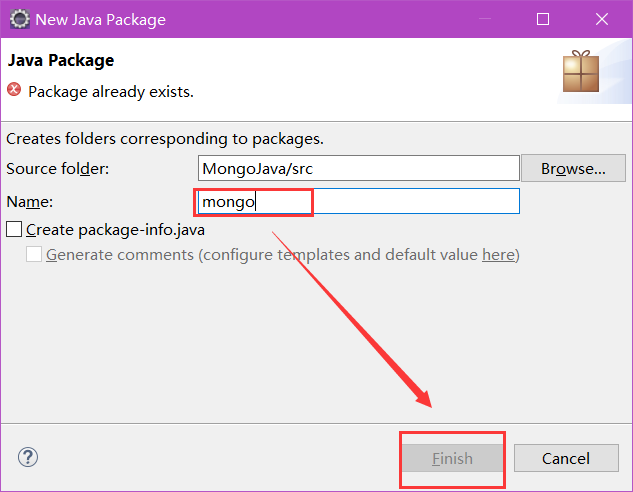
4.在MongoJava项目下新建包,包名为mongo
MongoJava右键 --> New --> mongo
5. 在mongo包下新建类,类名为mimalianjie
mongo右键 --> New --> Class

6. 添加项目依赖的jar包,右键单击MongoJava,选择Import
7. 选择General中的File System,点击Next

8. 选择存放mongo连接java的驱动程序的文件夹,并进行勾选Create top-level folder
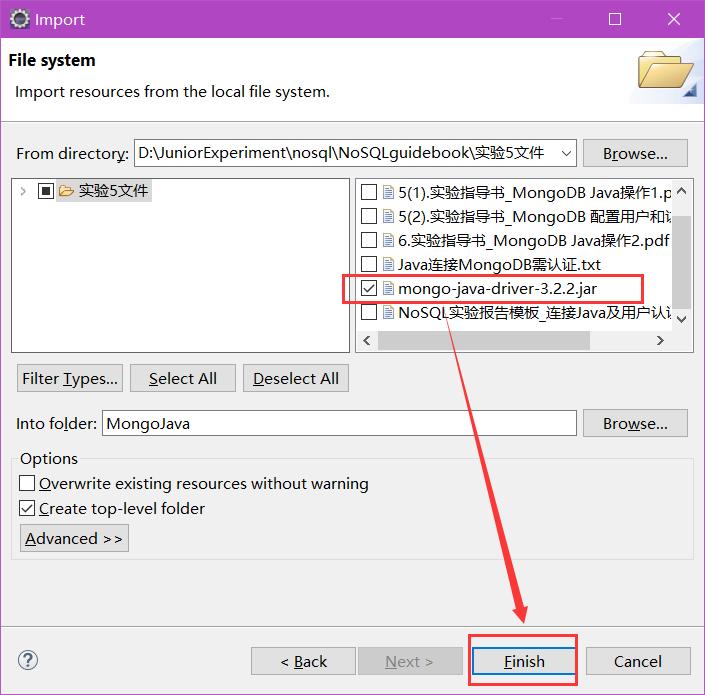
9. 选中导入的文件夹中的mongo-java-driver-3.2.2.jar,右击选择Build Path中的Add to Build Path。
10. 连接数据库:编写代码,功能为连接Mongodb数据库。我们需要指定数据库名称,如果指定的数据库不存在,mongo会自动创建数据库
package mongo;import java.util.ArrayList;import com.mongodb.MongoClient;
import com.mongodb.MongoCredential;
import com.mongodb.ServerAddress;
import com.mongodb.client.MongoDatabase;public class mimalianjie {public static void main(String[] args) {try {ServerAddress serverAddress = new ServerAddress("localhost",27017);ArrayList<ServerAddress> addrs = new ArrayList<ServerAddress>();addrs.add(serverAddress);MongoCredential credential = MongoCredential.createScramSha1Credential("root", "admin", "strongs".toCharArray());ArrayList<MongoCredential> credentials = newArrayList<MongoCredential>();credentials.add(credential);MongoClient mongoClient = new MongoClient(addrs,credentials);MongoDatabase mongoDatabase = mongoClient.getDatabase("databaseName");System.out.println("Connect to database successfully");} catch (Exception e) {System.err.println( e.getClass().getName() + ": " + e.getMessage() );}}}

11. 创建集合:与上述步骤相同,在mongo包下新建类,类名为chuangjianjihe,编写代码,功能为在test库下创建集合mycol(使用com.mongodb.client.MongoDatabase类中的createCollection()来创建集合)
package mongo;import java.util.ArrayList;import com.mongodb.MongoClient;
import com.mongodb.MongoCredential;
import com.mongodb.ServerAddress;
import com.mongodb.client.MongoDatabase;public class chuanjianjihe {public static void main(String[] args) {try {ServerAddress serverAddress = new ServerAddress("localhost",27017);ArrayList<ServerAddress> addrs = new ArrayList<ServerAddress>();addrs.add(serverAddress);MongoCredential credential = MongoCredential.createScramSha1Credential("root","admin","strongs".toCharArray());ArrayList<MongoCredential> credentials = new ArrayList<MongoCredential>();credentials.add(credential);MongoClient mongoClient = new MongoClient(addrs,credentials);MongoDatabase mongoDatabase = mongoClient.getDatabase("test");System.out.println("Connect to database successfully");mongoDatabase.createCollection("mycol");System.out.println("集合mycol创建成功");}catch (Exception e) {System.err.println( e.getClass().getName() + ": " + e.getMessage());}}}

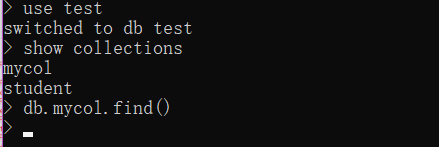
12. 在mongodb中进行验证

13. 获取集合:在mongo包下新建类,名为huoqujihe,并编写代码,功能为获取所需集合(使用com.mongodb.client.MongoDatabase类的 getCollection() 方法来获取一个集合)
package mongo;import java.util.ArrayList;import com.mongodb.MongoClient;
import com.mongodb.MongoCredential;
import com.mongodb.ServerAddress;
import com.mongodb.client.MongoCollection;
import com.mongodb.client.MongoDatabase;public class huoqujihe {public static void main(String[] args) {try {ServerAddress serverAddress = new ServerAddress("localhost",27017);ArrayList<ServerAddress> addrs = new ArrayList<ServerAddress>();addrs.add(serverAddress);MongoCredential credential = MongoCredential.createScramSha1Credential("root","admin","strongs".toCharArray());ArrayList<MongoCredential> credentials = new ArrayList<MongoCredential>();credentials.add(credential);MongoClient mongoClient = new MongoClient(addrs,credentials);MongoDatabase mongoDatabase = mongoClient.getDatabase("test");System.out.println("Connect to database successfully");MongoCollection<org.bson.Document> collection = mongoDatabase.getCollection("mycol");System.out.println("集合mycol选择成功");} catch (Exception e) {System.err.println( e.getClass().getName() + ": " + e.getMessage());}}}

14.插入文档:在mongo包中新建类,名为charuwendang,功能为连接test库,选择mycol集合并向其中插入文档。(使用com.mongodb.client.MongoCollection类的insertMany()方法来插入一个文档)
package mongo;import java.util.ArrayList;
import java.util.List;import org.bson.Document;import com.mongodb.MongoClient;
import com.mongodb.MongoCredential;
import com.mongodb.ServerAddress;
import com.mongodb.client.MongoCollection;
import com.mongodb.client.MongoDatabase;public class charuwendang {public static void main (String[] args) {try {ServerAddress serverAddress = new ServerAddress("localhost",27017);ArrayList<ServerAddress> addrs = new ArrayList<ServerAddress>();addrs.add(serverAddress);MongoCredential credential = MongoCredential.createScramSha1Credential("root","admin","strongs".toCharArray());ArrayList<MongoCredential> credentials = new ArrayList<MongoCredential>();credentials.add(credential);MongoClient mongoClient = new MongoClient(addrs,credentials);MongoDatabase mongoDatabase = mongoClient.getDatabase("test");System.out.println("Connect to database successfully");MongoCollection<org.bson.Document> collection = mongoDatabase.getCollection("mycol");System.out.println("集合mycol选择成功");Document document = new Document("name", "zhangyudashuju").append("description", "YXCX").append("likes", 100).append("location", "BJ");List<Document> documents = new ArrayList<Document>();documents.add(document);collection.insertMany(documents);System.out.println("文档插入成功");}catch(Exception e) {System.err.println( e.getClass().getName() + ": " + e.getMessage() );}}
}

15.在mongodb中进行查询验证

16. 检索文档:在mongo包中新建类,名为jiansuosuoyouwendang,功能为检索test库下,mycol集合中的所有文档(使用 com.mongodb.client.MongoCollection 类中的 find() 方法来获取集合中的所有文档)
package mongo;import java.util.ArrayList;import org.bson.Document;import com.mongodb.MongoClient;
import com.mongodb.MongoCredential;
import com.mongodb.ServerAddress;
import com.mongodb.client.FindIterable;
import com.mongodb.client.MongoCollection;
import com.mongodb.client.MongoCursor;
import com.mongodb.client.MongoDatabase;public class jiansuosuoyouwendang {public static void main( String args[] ){try{ServerAddress serverAddress = new ServerAddress("localhost",27017);ArrayList<ServerAddress> addrs = new ArrayList<ServerAddress>();addrs.add(serverAddress);MongoCredential credential = MongoCredential.createScramSha1Credential("root","admin", "strongs".toCharArray());ArrayList<MongoCredential> credentials = new ArrayList<MongoCredential>();credentials.add(credential);MongoClient mongoClient = new MongoClient(addrs,credentials);MongoDatabase mongoDatabase = mongoClient.getDatabase("test");System.out.println("Connect to database successfully");MongoCollection<org.bson.Document> collection = mongoDatabase.getCollection("mycol");System.out.println("集合mycol选择成功");FindIterable<Document> findIterable = collection.find();MongoCursor<Document> mongoCursor = findIterable.iterator();while(mongoCursor.hasNext()){System.out.println(mongoCursor.next());}}catch(Exception e){System.err.println( e.getClass().getName() + ": " + e.getMessage() );}}
}

17. 更新文档:在mongo包中新建类,名为gengxinwendang,功能为选择test库下mycol集合,将文档中的likes=100改为likes=200(使用 com.mongodb.client.MongoCollection 类中的updateMany()方法来更新集合中的文档)
package mongo;import java.util.ArrayList;import org.bson.Document;import com.mongodb.MongoClient;
import com.mongodb.MongoCredential;
import com.mongodb.ServerAddress;
import com.mongodb.client.FindIterable;
import com.mongodb.client.MongoCollection;
import com.mongodb.client.MongoCursor;
import com.mongodb.client.MongoDatabase;
import com.mongodb.client.model.Filters;public class gengxinwendang {public static void main( String args[] ){try{ServerAddress serverAddress = new ServerAddress("localhost",27017);ArrayList<ServerAddress> addrs = new ArrayList<ServerAddress>();addrs.add(serverAddress);MongoCredential credential = MongoCredential.createScramSha1Credential("root","admin", "strongs".toCharArray());ArrayList<MongoCredential> credentials = new ArrayList<MongoCredential>();credentials.add(credential);MongoClient mongoClient = new MongoClient(addrs,credentials);MongoDatabase mongoDatabase = mongoClient.getDatabase("test");System.out.println("Connect to database successfully");MongoCollection<org.bson.Document> collection = mongoDatabase.getCollection("mycol");System.out.println("集合mycol选择成功");collection.updateMany(Filters.eq("likes", 100), new Document("$set",new Document("likes",200)));FindIterable<Document> findIterable = collection.find();MongoCursor<Document> mongoCursor = findIterable.iterator();while(mongoCursor.hasNext()){System.out.println(mongoCursor.next());}}catch(Exception e){System.err.println( e.getClass().getName() + ": " + e.getMessage() );}}
}

18. 在mongodb中进行查询验证

19. 删除文档:在mongo包中新建类,名为sanchuwendang,功能为选择test库下mycol集合,删除所有符合条件(likes=200)的文档。(使用com.mongodb.DBCollection类中的findOne()方法来获取第一个文档,然后使用remove方法删除)
package mongo;import java.util.ArrayList;import org.bson.Document;import com.mongodb.MongoClient;
import com.mongodb.MongoCredential;
import com.mongodb.ServerAddress;
import com.mongodb.client.FindIterable;
import com.mongodb.client.MongoCollection;
import com.mongodb.client.MongoCursor;
import com.mongodb.client.MongoDatabase;
import com.mongodb.client.model.Filters;public class shanchuwendang {public static void main( String args[] ){try{ServerAddress serverAddress = new ServerAddress("localhost",27017);ArrayList<ServerAddress> addrs = new ArrayList<ServerAddress>();addrs.add(serverAddress);MongoCredential credential = MongoCredential.createScramSha1Credential("root","admin", "strongs".toCharArray());ArrayList<MongoCredential> credentials = new ArrayList<MongoCredential>();credentials.add(credential);MongoClient mongoClient = new MongoClient(addrs,credentials);MongoDatabase mongoDatabase = mongoClient.getDatabase("test");System.out.println("Connect to database successfully");MongoCollection<org.bson.Document> collection = mongoDatabase.getCollection("mycol");System.out.println("集合mycol选择成功");//删除符合条件的第一个文档//collection.deleteOne(Filters.eq("likes", 200));//删除所有符合条件的文档collection.deleteMany (Filters.eq("likes", 200));//检索查看结果FindIterable<Document> findIterable = collection.find();MongoCursor<Document> mongoCursor = findIterable.iterator();while(mongoCursor.hasNext()){System.out.println(mongoCursor.next());}}catch(Exception e){System.err.println( e.getClass().getName() + ": " + e.getMessage() );}}
}

20. 在mongodb中进行查询验证
查询结果为空,证明文档已被删除。
至此,实验结束!


