1、说明
Lighttpd 是一个德国人领导的开源Web服务器软件,其根本的目的是提供一个专门针对高性能网站,安全、快速、兼容性好并且灵活的web server环境。具有非常低的内存开销、cpu占用率低、效能好以及丰富的模块等特点。
Lighttpd是众多OpenSource轻量级的web server中较为优秀的一个。支持FastCGI,CGI,Auth,输出压缩(output compress),URL重写,Alias等重要功能。
PHP(PHP: Hypertext Preprocessor)即“超文本预处理器”,是在服务器端执行的脚本语言,尤其适用于Web开发并可嵌入HTML中。
本系统已经安装好,仅做过程演示;
2、安装步骤
sudo apt update
sudo apt install lighttpd
sudo apt-get install php7.2 php7.2-fpm php7.2-cgi
php -v
lighttpd -v
sunny@ubuntu:~$ uname -a
Linux ubuntu 5.4.0-150-generic #167~18.04.1-Ubuntu SMP Wed May 24 00:51:42 UTC 2023 x86_64 x86_64 x86_64 GNU/Linuxsunny@ubuntu:~$ sudo apt update
[sudo] password for sunny:
Hit:1 http://archive.ubuntu.com/ubuntu bionic InRelease
Hit:2 http://archive.ubuntu.com/ubuntu bionic-updates InRelease
Hit:3 http://ppa.launchpad.net/ubuntu-toolchain-r/test/ubuntu bionic InRelease
Hit:4 http://archive.ubuntu.com/ubuntu bionic-backports InRelease
Hit:5 http://archive.ubuntu.com/ubuntu bionic-security InRelease
Reading package lists... Done
Building dependency tree
Reading state information... Done
11 packages can be upgraded. Run 'apt list --upgradable' to see them.sunny@ubuntu:~$ sudo apt install lighttpd
Reading package lists... Done
Building dependency tree
Reading state information... Done
lighttpd is already the newest version (1.4.45-1ubuntu3.18.04.1).
The following packages were automatically installed and are no longer required:gir1.2-goa-1.0 gir1.2-snapd-1
Use 'sudo apt autoremove' to remove them.
0 upgraded, 0 newly installed, 0 to remove and 11 not upgraded.sunny@ubuntu:~$ sudo apt-get install php7.2 php7.2-fpm php7.2-cgi
Reading package lists... Done
Building dependency tree
Reading state information... Done
php7.2 is already the newest version (7.2.24-0ubuntu0.18.04.17).
php7.2-cgi is already the newest version (7.2.24-0ubuntu0.18.04.17).
php7.2-fpm is already the newest version (7.2.24-0ubuntu0.18.04.17).
The following packages were automatically installed and are no longer required:gir1.2-goa-1.0 gir1.2-snapd-1
Use 'sudo apt autoremove' to remove them.
0 upgraded, 0 newly installed, 0 to remove and 11 not upgraded.sunny@ubuntu:~$ lighttpd -v
lighttpd/1.4.45 (ssl) - a light and fast webserver
Build-Date: Jun 15 2021 14:44:25sunny@ubuntu:~$ php -v
PHP 7.2.24-0ubuntu0.18.04.17 (cli) (built: Feb 23 2023 13:29:25) ( NTS )
Copyright (c) 1997-2018 The PHP Group
Zend Engine v3.2.0, Copyright (c) 1998-2018 Zend Technologieswith Zend OPcache v7.2.24-0ubuntu0.18.04.17, Copyright (c) 1999-2018, by Zend Technologies
3、修改lighttpd配置文件
server.document-root = "/home/sunny/www"
server.upload-dirs = ( "/home/sunny/www/lighttpd/uploads" )
server.errorlog = "/home/sunny/www/lighttpd/error.log"
server.port = 8080
root@ubuntu:/usr/bin# cd /etc/lighttpd/
root@ubuntu:/etc/lighttpd# ls
conf-available  conf-enabled  lighttpd.conf
root@ubuntu:/etc/lighttpd# cat lighttpd.conf
server.modules = ("mod_access","mod_alias","mod_compress","mod_redirect",
)server.document-root        = "/home/sunny/www"
server.upload-dirs          = ( "/home/sunny/www/lighttpd/uploads" )
server.errorlog             = "/home/sunny/www/lighttpd/error.log"
server.pid-file             = "/var/run/lighttpd.pid"
server.username             = "www-data"
server.groupname            = "www-data"
server.port                 = 8080index-file.names            = ( "index.php", "index.html", "index.lighttpd.html" )
url.access-deny             = ( "~", ".inc" )
static-file.exclude-extensions = ( ".php", ".pl", ".fcgi" )compress.cache-dir          = "/var/cache/lighttpd/compress/"
compress.filetype           = ( "application/javascript", "text/css", "text/html", "text/plain" )# default listening port for IPv6 falls back to the IPv4 port
## Use ipv6 if available
#include_shell "/usr/share/lighttpd/use-ipv6.pl " + server.port
include_shell "/usr/share/lighttpd/create-mime.assign.pl"
include_shell "/usr/share/lighttpd/include-conf-enabled.pl"
4、启动lighttpd
sudo /etc/init.d/lighttpd start
sudo /etc/init.d/lighttpd start    // 启动
sudo /etc/init.d/lighttpd stop     // 停止
sudo /etc/init.d/lighttpd restart  // 重启,修改配置文件会后,需要执行后生效查看服务情况:
ps aux | grep lighttpd
lsof -i :8080
netstat -nlpt|grep 8080root@ubuntu:/etc/lighttpd# ps aux | grep lighttpd
www-data    858  0.0  0.2  57616  4900 ?        Ss   13:25   0:00 /usr/sbin/lighttpd -D -f /etc/lighttpd/lighttpd.conf
root       3988  0.0  0.0  14432  1040 pts/0    S+   13:53   0:00 grep --color=auto lighttpdroot@ubuntu:/etc/lighttpd# lsof -i :8080
COMMAND  PID     USER   FD   TYPE DEVICE SIZE/OFF NODE NAME
lighttpd 858 www-data    4u  IPv4  46670      0t0  TCP *:http-alt (LISTEN)root@ubuntu:/etc/lighttpd# netstat -nlpt|grep 8080
tcp        0      0 0.0.0.0:8080            0.0.0.0:*               LISTEN      858/lighttpd
5、创建测试文件
/home/sunny/www/index.php
sunny@ubuntu:~/www$ pwd
/home/sunny/wwwsunny@ubuntu:~/www$ mkdir lighttpd
sunny@ubuntu:~/www$ touch lighttpd/error.logsunny@ubuntu:~/www$ chmod  777  lighttpd
sunny@ubuntu:~/www$ chmod  777  lighttpd/error.logsunny@ubuntu:~/www$ tree ./
./
├── index.php
└── lighttpd├── error.log└── uploads2 directories, 2 filessunny@ubuntu:~/www$ vi index.php
<!DOCTYPE html>
<html>
<body><h1>My first PHP page</h1><?php
echo "Hello World!";
echo phpinfo();
?></body>
</html>
6、访问WEB
方法1:curl http://192.168.0.143:8080/
sunny@ubuntu:~/www$ curl http://192.168.0.143:8080/
<!DOCTYPE html>
<html>
<body><h1>My first PHP page</h1>Hello World!<!DOCTYPE html PUBLIC "-//W3C//DTD XHTML 1.0 Transitional//EN" "DTD/xhtml1-transitional.dtd">
<html xmlns="http://www.w3.org/1999/xhtml"><head>
<style type="text/css">
body {background-color: #fff; color: #222; font-family: sans-serif;}
pre {margin: 0; font-family: monospace;}
a:link {color: #009; text-decoration: none; background-color: #fff;}
a:hover {text-decoration: underline;}
table {border-collapse: collapse; border: 0; width: 934px; box-shadow: 1px 2px 3px #ccc;}
.center {text-align: center;}
.center table {margin: 1em auto; text-align: left;}
.center th {text-align: center !important;}
td, th {border: 1px solid #666; font-size: 75%; vertical-align: baseline; padding: 4px 5px;}
h1 {font-size: 150%;}
h2 {font-size: 125%;}
.p {text-align: left;}
.e {background-color: #ccf; width: 300px; font-weight: bold;}
.h {background-color: #99c; font-weight: bold;}
.v {background-color: #ddd; max-width: 300px; overflow-x: auto; word-wrap: break-word;}
.v i {color: #999;}
img {float: right; border: 0;}
hr {width: 934px; background-color: #ccc; border: 0; height: 1px;}
</style>
<title>phpinfo()</title><meta name="ROBOTS" content="NOINDEX,NOFOLLOW,NOARCHIVE" /></head>
<body><div class="center">
......
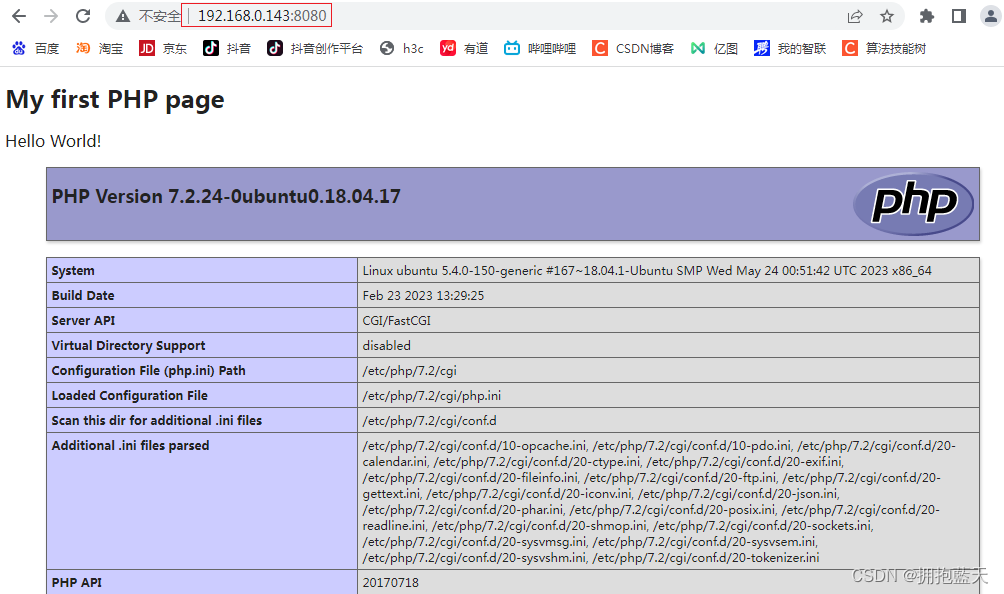
方法2,浏览器访问:

7、PHP FastCgi
示例中已经配置了PHP FastCgi,配置步骤如下:
1、放开如下配置项
sudo vi /etc/php/7.2/fpm/php.ini
cgi.fix_pathinfo=1sudo vi /etc/lighttpd/conf-available/15-fastcgi-php.conf
"socket" => "/var/run/lighttpd/php7.2.socket",2、重启php fpm
systemctl restart php7.2-fpm.service 3、查询php状态
sunny@ubuntu:/home$ ps aux | grep php
root      14974  0.3  0.8 290452 16744 ?        Ss   16:01   0:00 php-fpm: master process (/etc/php/7.2/fpm/php-fpm.conf)
www-data  14975  0.0  0.3 292748  7620 ?        S    16:01   0:00 php-fpm: pool www
www-data  14976  0.0  0.3 292748  7620 ?        S    16:01   0:00 php-fpm: pool www
sunny     14980  0.0  0.0  14432  1032 pts/0    S+   16:02   0:00 grep --color=auto php4、使能php fastcgi
sunny@ubuntu:/home$ sudo lighttpd-enable-mod fastcgi fastcgi-php
Enabling fastcgi: ok
Met dependency: fastcgi
Enabling fastcgi-php: ok
already enabled
Run "service lighttpd force-reload" to enable changes5、重启lighttpd
sudo /etc/init.d/lighttpd stop
sudo /etc/init.d/lighttpd start6、便能看到第6步的效果

)


--115讲 OLED)


