早就想写这个笔记用于记录这段知识,但是碍于太过庞大所以始终没有进行这段知识的整理
很多博客喜欢画一个时序图展示所有的流程,但是过于庞大,看起来有点吃力,这里我们画多个时序图来展示这个流程
1.app请求AMS启动Activity
在前面章节中介绍过,启动(或跳转)Activity会先配置一个Intent,这个Intent存放的数据可是很丰富了:包含了启动Activity的信息,传递给Activity的数据,甚至还有启动Activity的方式等等.app进程与AMS不处于同一进程,它们之间的通信使用的是binder,Intent会在"binder这条搭建好的公路"上传递到AMS.
@Overridepublic void startActivity(Intent intent, @Nullable Bundle options) {//省略if (options != null) {startActivityForResult(intent, -1, options);} else {// Note we want to go through this call for compatibility with// applications that may have overridden the method.//重点看这里startActivityForResult(intent, -1);//增加了requestCode为-1的参数,代表不需要关注这个Activity的返回数据}} public void startActivityForResult(@RequiresPermission Intent intent, int requestCode,@Nullable Bundle options) {//主要分析mParent== null的情况if (mParent == null) {options = transferSpringboardActivityOptions(options);//调用mInstrumentation.execStartActivity方法,Instrumentation.ActivityResult ar =mInstrumentation.execStartActivity(this, mMainThread.getApplicationThread(), mToken, this,intent, requestCode, options);if (ar != null) {mMainThread.sendActivityResult(mToken, mEmbeddedID, requestCode, ar.getResultCode(),ar.getResultData());}//对于requestCode大于0的情况,则把mStartedActivity置为trueif (requestCode >= 0) {// If this start is requesting a result, we can avoid making// the activity visible until the result is received. Setting// this code during onCreate(Bundle savedInstanceState) or onResume() will keep the// activity hidden during this time, to avoid flickering.// This can only be done when a result is requested because// that guarantees we will get information back when the// activity is finished, no matter what happens to it.mStartedActivity = true;}cancelInputsAndStartExitTransition(options);// TODO Consider clearing/flushing other event sources and events for child windows.} else {......省略代码}}
上面的方法主要做的事情:会根据mParent是否存在执行不同的逻辑,但是最终都会调用到同一方法。咱们主要分析mParent== null的情况。
介绍下mInstrumentation.execStartActivity方法的几个关键参数:
who:类型为Activity
contextThread:类型为IBinder,mMainThread.getApplicationThread()获取的是一个类型为IApplicationThread的对象,这个对象同时也是一个Binder对象,它会被传递给AMS,AMS拿到它可以与app进程进行通信。 mMainThread是ActivityThread的实例,一个进程内就进存在一个
token:类型IBinder,mToken是它的值,在上面原理篇介绍过。
intent:启动信息,参数等都在Intent内
requestCode:若是调用startActivityForResult方法,这个参数有用,否则没用。它若存在会传递给启动的Activity,Activity finish后并且调用了setResult方法,这个参数会被返回。当前值为-1
@UnsupportedAppUsagepublic ActivityResult execStartActivity(Context who, IBinder contextThread, IBinder token, Activity target,Intent intent, int requestCode, Bundle options) {IApplicationThread whoThread = (IApplicationThread) contextThread;//省略try {intent.migrateExtraStreamToClipData(who);intent.prepareToLeaveProcess(who);int result = ActivityTaskManager.getService().startActivity(whoThread,who.getOpPackageName(), who.getAttributionTag(), intent,intent.resolveTypeIfNeeded(who.getContentResolver()), token,target != null ? target.mEmbeddedID : null, requestCode, 0, null, options);checkStartActivityResult(result, intent);} catch (RemoteException e) {throw new RuntimeException("Failure from system", e);}return null;}该方法做的事情主要是为intent添加一些额外的信息外,最终通过binder调用把参数发送到系统进程
ActivityTaskManager.getService():获取的是ActivityTaskManagerService在app进程内的代理类的实例,这个代理类实现了IActivityTaskManager,同时它也是BinderProxy类型。
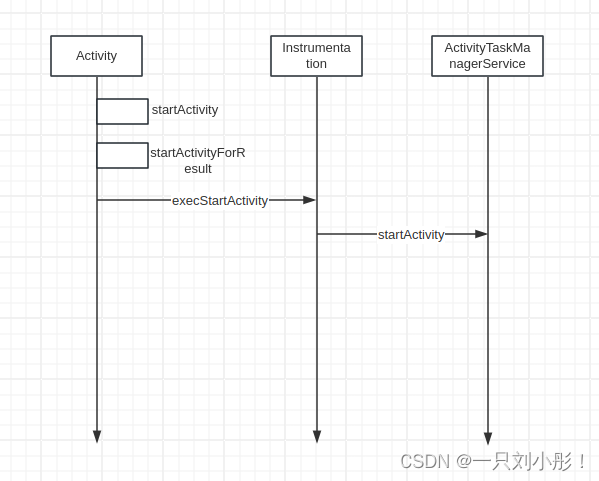
搞一张时序图来看下这个流程,这里只是一个请求流程

接下来是AMS内部如何处理这个请求?
@Overridepublic final int startActivity(IApplicationThread caller, String callingPackage,String callingFeatureId, Intent intent, String resolvedType, IBinder resultTo,String resultWho, int requestCode, int startFlags, ProfilerInfo profilerInfo,Bundle bOptions) {return startActivityAsUser(caller, callingPackage, callingFeatureId, intent, resolvedType,resultTo, resultWho, requestCode, startFlags, profilerInfo, bOptions,UserHandle.getCallingUserId());}private int startActivityAsUser(IApplicationThread caller, String callingPackage,@Nullable String callingFeatureId, Intent intent, String resolvedType,IBinder resultTo, String resultWho, int requestCode, int startFlags,ProfilerInfo profilerInfo, Bundle bOptions, int userId, boolean validateIncomingUser) {assertPackageMatchesCallingUid(callingPackage);enforceNotIsolatedCaller("startActivityAsUser");userId = getActivityStartController().checkTargetUser(userId, validateIncomingUser,Binder.getCallingPid(), Binder.getCallingUid(), "startActivityAsUser");// TODO: Switch to user app stacks here.return getActivityStartController().obtainStarter(intent, "startActivityAsUser").setCaller(caller).setCallingPackage(callingPackage).setCallingFeatureId(callingFeatureId).setResolvedType(resolvedType).setResultTo(resultTo).setResultWho(resultWho).setRequestCode(requestCode).setStartFlags(startFlags).setProfilerInfo(profilerInfo).setActivityOptions(bOptions).setUserId(userId).execute();}getActivityStartController().obtainStarter方法的介绍。
getActivityStartController()会获取一个ActivityStartController类的实例,ActivityStartController中缓存了ActivityStarter,这样就不需要每次都new一个ActivityStarter出来,浪费宝贵的内存了。
缓存池模式
ActivityStarter obtainStarter(Intent intent, String reason) {return mFactory.obtain().setIntent(intent).setReason(reason);}obtainStarter方法会获取一个已有或创建一个新的ActivityStarter类实例,这个类的主要职责就是根据各种信息来决定如何启动Activity,并且根据各种信息来决定是把Activity放在一个新task中还是放在roottask中。
ActivityStarter setProfilerInfo(ProfilerInfo info) {mRequest.profilerInfo = info;return this;}ActivityStarter setGlobalConfiguration(Configuration config) {mRequest.globalConfig = config;return this;}ActivityStarter setUserId(int userId) {mRequest.userId = userId;return this;}
最终调用 ActivityStarter 的 execute 方法
int execute() {try {省略代码......final LaunchingState launchingState;synchronized (mService.mGlobalLock) {//获取启动者final ActivityRecord caller = ActivityRecord.forTokenLocked(mRequest.resultTo);//获取callingUidfinal int callingUid = mRequest.realCallingUid == Request.DEFAULT_REAL_CALLING_UID? Binder.getCallingUid() : mRequest.realCallingUid;launchingState = mSupervisor.getActivityMetricsLogger().notifyActivityLaunching(mRequest.intent, caller, callingUid);}// If the caller hasn't already resolved the activity, we're willing// to do so here. If the caller is already holding the WM lock here,// and we need to check dynamic Uri permissions, then we're forced// to assume those permissions are denied to avoid deadlocking.//activityInfo为null 则需要去解析if (mRequest.activityInfo == null) {mRequest.resolveActivity(mSupervisor);}int res;//启动的时候使用mService.mGlobalLock锁保持同步synchronized (mService.mGlobalLock) {final boolean globalConfigWillChange = mRequest.globalConfig != null&& mService.getGlobalConfiguration().diff(mRequest.globalConfig) != 0;final Task rootTask = mRootWindowContainer.getTopDisplayFocusedRootTask();省略代码......res = executeRequest(mRequest);省略代码......if (mRequest.waitResult != null) {mRequest.waitResult.result = res;res = waitResultIfNeeded(mRequest.waitResult, mLastStartActivityRecord,launchingState);}return getExternalResult(res);}} finally {onExecutionComplete();}}
mRequest.activityInfo为null,回调用mRequest.resolveActivity(mSupervisor)方法开始解析,会在PMS中根据intent解析出ResolveInfo和ActivityInfo
调用executeRequest方法开始进入下个流程
ResolveInfo
看下它的几个关键属性:
public class ResolveInfo implements Parcelable {private static final String TAG = "ResolveInfo";private static final String INTENT_FORWARDER_ACTIVITY ="com.android.internal.app.IntentForwarderActivity";/*** The activity or broadcast receiver that corresponds to this resolution* match, if this resolution is for an activity or broadcast receiver.* Exactly one of {@link #activityInfo}, {@link #serviceInfo}, or* {@link #providerInfo} will be non-null.*/public ActivityInfo activityInfo;/*** The service that corresponds to this resolution match, if this resolution* is for a service. Exactly one of {@link #activityInfo},* {@link #serviceInfo}, or {@link #providerInfo} will be non-null.*/public ServiceInfo serviceInfo;/*** The provider that corresponds to this resolution match, if this* resolution is for a provider. Exactly one of {@link #activityInfo},* {@link #serviceInfo}, or {@link #providerInfo} will be non-null.*/public ProviderInfo providerInfo;/*** An auxiliary response that may modify the resolved information. This is* only set under certain circumstances; such as when resolving instant apps* or components defined in un-installed splits.* @hide*/public AuxiliaryResolveInfo auxiliaryInfo;/*** Whether or not an instant app is available for the resolved intent.*/public boolean isInstantAppAvailable;/*** The IntentFilter that was matched for this ResolveInfo.*/public IntentFilter filter;省略代码......
}
ResolveInfo实现了Parcelable,代表它可以通过binder在进程之间进行传递。在AndroidManifest配置的四大组件解析完后的数据会放入ResolveInfo类中。
如上,它里面的几个关键属性:
activityInfo,serviceInfo,providerInfo:分别代表Activity,Broadcast,Service,ContentProvider
filter:在AndroidManifest里面配置的Intent-filter这一项
用一个AndroidManifest.xml例子来说下ResolveInfo,
AndroidManifest.xml有如下信息:
<?xml version="1.0" encoding="utf-8"?>
<manifest xmlns:android="http://schemas.android.com/apk/res/android"package="com.example.lifecycledemo"><applicationandroid:allowBackup="true"android:icon="@mipmap/ic_launcher"android:label="@string/app_name"android:roundIcon="@mipmap/ic_launcher_round"android:supportsRtl="true"android:theme="@style/Theme.LifecycleDemo"><activityandroid:name=".MainActivity"android:exported="true"><intent-filter><action android:name="android.intent.action.MAIN" /><category android:name="android.intent.category.LAUNCHER" /></intent-filter></activity><activity android:name=".SecondActivity"/></application></manifest>
上面的清单文件信息会被解析成两个ResolveInfo:
其中一个它的activityInfo包含的信息是MainActivity,它的filter包含的信息是action为android.intent.action.MAIN,category为android.intent.category.LAUNCHER。
另一个它的activityInfo包含的信息是SecondActivity,它的filter为null
介绍完ResolveInfo,介绍下ActivityInfo这个类。
ActivityInfo
主要显示它的几个关键属性:
public class ActivityInfo extends ComponentInfo implements Parcelable {public int theme;public int launchMode;public String taskAffinity;public String name;public String packageName;省略代码......
}
ActivityInfo包含了在AndroidManifest里面配置的Activity的信息,它上面的几个属性:
theme:Activity的主题
launchMode:配置的Activity的启动模式
taskAffinity:指定Activity放在哪个名字下面的task
name:Activity的完整的classname
packageName:包名
private int executeRequest(Request request) {if (TextUtils.isEmpty(request.reason)) {throw new IllegalArgumentException("Need to specify a reason.");}mLastStartReason = request.reason;mLastStartActivityTimeMs = System.currentTimeMillis();mLastStartActivityRecord = null;final IApplicationThread caller = request.caller;Intent intent = request.intent;NeededUriGrants intentGrants = request.intentGrants;String resolvedType = request.resolvedType;ActivityInfo aInfo = request.activityInfo;ResolveInfo rInfo = request.resolveInfo;final IVoiceInteractionSession voiceSession = request.voiceSession;final IBinder resultTo = request.resultTo;String resultWho = request.resultWho;int requestCode = request.requestCode;int callingPid = request.callingPid;int callingUid = request.callingUid;String callingPackage = request.callingPackage;String callingFeatureId = request.callingFeatureId;final int realCallingPid = request.realCallingPid;final int realCallingUid = request.realCallingUid;final int startFlags = request.startFlags;final SafeActivityOptions options = request.activityOptions;Task inTask = request.inTask;int err = ActivityManager.START_SUCCESS;省略代码......WindowProcessController callerApp = null;//根据caller获取callerAppif (caller != null) {callerApp = mService.getProcessController(caller);if (callerApp != null) {callingPid = callerApp.getPid();callingUid = callerApp.mInfo.uid;} else {Slog.w(TAG, "Unable to find app for caller " + caller + " (pid=" + callingPid+ ") when starting: " + intent.toString());err = ActivityManager.START_PERMISSION_DENIED;}}//获取userIdfinal int userId = aInfo != null && aInfo.applicationInfo != null? UserHandle.getUserId(aInfo.applicationInfo.uid) : 0;if (err == ActivityManager.START_SUCCESS) {Slog.i(TAG, "START u" + userId + " {" + intent.toShortString(true, true, true, false)+ "} from uid " + callingUid);}ActivityRecord sourceRecord = null;ActivityRecord resultRecord = null;if (resultTo != null) {//根据resultTo找到sourceRecord,resultTo是一个Token,sourceRecord启动者sourceRecord = mRootWindowContainer.isInAnyTask(resultTo);if (DEBUG_RESULTS) {Slog.v(TAG_RESULTS, "Will send result to " + resultTo + " " + sourceRecord);}if (sourceRecord != null) {//如果是startActivityForResult启动的,则对resultRecord赋值if (requestCode >= 0 && !sourceRecord.finishing) {resultRecord = sourceRecord;}}}final int launchFlags = intent.getFlags();省略各种出错信息的判断代码......//根据resultRecord找到resultRootTaskfinal Task resultRootTask = resultRecord == null? null : resultRecord.getRootTask();if (err != START_SUCCESS) {if (resultRecord != null) {resultRecord.sendResult(INVALID_UID, resultWho, requestCode, RESULT_CANCELED,null /* data */, null /* dataGrants */);}SafeActivityOptions.abort(options);return err;}省略权限判断等各种其他代码......//构造ActivityRecordfinal ActivityRecord r = new ActivityRecord.Builder(mService).setCaller(callerApp).setLaunchedFromPid(callingPid).setLaunchedFromUid(callingUid).setLaunchedFromPackage(callingPackage).setLaunchedFromFeature(callingFeatureId).setIntent(intent).setResolvedType(resolvedType).setActivityInfo(aInfo).setConfiguration(mService.getGlobalConfiguration()).setResultTo(resultRecord).setResultWho(resultWho).setRequestCode(requestCode).setComponentSpecified(request.componentSpecified).setRootVoiceInteraction(voiceSession != null).setActivityOptions(checkedOptions).setSourceRecord(sourceRecord).build();mLastStartActivityRecord = r;//调用startActivityUnchecked方法开始进入下个启动mLastStartActivityResult = startActivityUnchecked(r, sourceRecord, voiceSession,request.voiceInteractor, startFlags, true /* doResume */, checkedOptions, inTask,restrictedBgActivity, intentGrants);if (request.outActivity != null) {request.outActivity[0] = mLastStartActivityRecord;}return mLastStartActivityResult;}
该方法主要做了以下工作:
在启动之前,对各种基础的异常进行检测,发现有异常则退出启动Activity流程
检测通过后构造了一个ActivityRecord实例
开始进入启动Activity的流程
构造了一个ActivityRecord实例,对这个实例初始化主要用到了以下参数:
callerApp:WindowProcessController类型,主要是启动者相关的信息
callingPid:启动者的进程id
callingUid:启动者的id,每个安装的app都会分配一个唯一的id,这个id在当前的用户空间内是不会变化的
intent:把intent存起来
aInfo:从AndroidManifest中解析出来的Activity信息
resultRecord:对于startActivityForResult启动activity时候的启动这信息,用于把返回结果返回给resultRecord
requestCode:对于startActivityForResult启动activity时候传递的值
sourceRecord:启动者,代表谁启动了Activity
ActivityRecord就把app进程要启动的Activity及相关的其他信息保存下来了,要注意这里提到的Activity和app进程中要启动的Activity是两码事。
该方法调用startActivityUnchecked方法进入启动的下个流程,调用的时候关键参数有:
r: ActivityRecord类型
sourceRecord:启动者,是一个ActivityRecord
doResume:它的值为true
options:它的值为checkedOptions,checkedOptions的值现在是为null
inTask:代表启动的Activity存放的task,当前它的值为null(因为在初始化ActivityRecord的时候就没有设置它)
private int startActivityUnchecked(final ActivityRecord r, ActivityRecord sourceRecord,IVoiceInteractionSession voiceSession, IVoiceInteractor voiceInteractor,int startFlags, boolean doResume, ActivityOptions options, Task inTask,boolean restrictedBgActivity, NeededUriGrants intentGrants) {int result = START_CANCELED;final Task startedActivityRootTask;省略代码......try {mService.deferWindowLayout();Trace.traceBegin(Trace.TRACE_TAG_WINDOW_MANAGER, "startActivityInner");[2.5]//doResume:true,options值为null,inTask:nullresult = startActivityInner(r, sourceRecord, voiceSession, voiceInteractor,startFlags, doResume, options, inTask, restrictedBgActivity, intentGrants);} finally {省略代码......}postStartActivityProcessing(r, result, startedActivityRootTask);return result;}
int startActivityInner(final ActivityRecord r, ActivityRecord sourceRecord,IVoiceInteractionSession voiceSession, IVoiceInteractor voiceInteractor,int startFlags, boolean doResume, ActivityOptions options, Task inTask,boolean restrictedBgActivity, NeededUriGrants intentGrants) {//调用这个方法重置activityStarter的各种数据setInitialState(r, options, inTask, doResume, startFlags, sourceRecord, voiceSession,voiceInteractor, restrictedBgActivity);//设置launchmodecomputeLaunchingTaskFlags();//查找mSourceRootTaskcomputeSourceRootTask();mIntent.setFlags(mLaunchFlags);//获取reusabletaskfinal Task reusedTask = getReusableTask();省略冻结task代码......// Compute if there is an existing task that should be used for.//如果reusedTask为null,则调用computeTargetTask()方法获取final Task targetTask = reusedTask != null ? reusedTask : computeTargetTask();//newTask是否是新taskfinal boolean newTask = targetTask == null;mTargetTask = targetTask;computeLaunchParams(r, sourceRecord, targetTask);省略代码......//如果mTargetRootTask为null,则调用getLaunchRootTask方法会获取或者创建一个taskif (mTargetRootTask == null) {mTargetRootTask = getLaunchRootTask(mStartActivity, mLaunchFlags, targetTask, mOptions);}//如果是新的task,则进行创建task流程,并且把ActivityRecord放置在task中if (newTask) {final Task taskToAffiliate = (mLaunchTaskBehind && mSourceRecord != null)? mSourceRecord.getTask() : null;setNewTask(taskToAffiliate);} else if (mAddingToTask) {//把ActivityRecord放置在找到的task中addOrReparentStartingActivity(targetTask, "adding to task");}省略代码......if (mDoResume) {final ActivityRecord topTaskActivity =mStartActivity.getTask().topRunningActivityLocked();//不关注这块逻辑,直接看下面的elseif (!mTargetRootTask.isTopActivityFocusable()|| (topTaskActivity != null && topTaskActivity.isTaskOverlay()&& mStartActivity != topTaskActivity)) {// If the activity is not focusable, we can't resume it, but still would like to// make sure it becomes visible as it starts (this will also trigger entry// animation). An example of this are PIP activities.// Also, we don't want to resume activities in a task that currently has an overlay// as the starting activity just needs to be in the visible paused state until the// over is removed.// Passing {@code null} as the start parameter ensures all activities are made// visible.mTargetRootTask.ensureActivitiesVisible(null /* starting */,0 /* configChanges */, !PRESERVE_WINDOWS);// Go ahead and tell window manager to execute app transition for this activity// since the app transition will not be triggered through the resume channel.mTargetRootTask.mDisplayContent.executeAppTransition();} else {// If the target root-task was not previously focusable (previous top running// activity on that root-task was not visible) then any prior calls to move the// root-task to the will not update the focused root-task. If starting the new// activity now allows the task root-task to be focusable, then ensure that we// now update the focused root-task accordingly.//如果mTargetRootTask在mRootWindowContainer不处于focus状态,则调用mTargetRootTask.moveToFront方法把它设置为focus状态if (mTargetRootTask.isTopActivityFocusable()&& !mRootWindowContainer.isTopDisplayFocusedRootTask(mTargetRootTask)) {mTargetRootTask.moveToFront("startActivityInner");}// 开始进入下一步的启动Activity操作mRootWindowContainer.resumeFocusedTasksTopActivities(mTargetRootTask, mStartActivity, mOptions, mTransientLaunch);}}省略代码......return START_SUCCESS;}
startActivityInner方法的逻辑相对复杂,下面先简要的分析下调用的几个方法做的事情:
setInitialState方法
该方法主要对当前ActivityStarter的相关属性进行初始化,介绍下ActivityStarter的几个关键属性:
mStartActivity:代表正在启动的Activity,类型为ActivityRecord
mIntent:存放启动的其他信息
mCallingUid:启动者的uid
mSourceRecord:启动这,类型为ActivityRecord
mLaunchMode:启动模式
mLaunchFlags:启动的flags
mInTask:ActivityRecord放入的task
mNoAnimation:启动过程中是否有动画
mInTask:启动的Activity放入的task
computeLaunchingTaskFlags方法
该方法做的工作是设置mLaunchFlags,依据以下条件进行设置:
如果mSourceRecord为null并且mInTask为不null,在根据一些条件判断是否能使用mInTask(这个暂时不在这节的讨论范围)
如果不满足步骤1,则进入步骤2,把mInTask置为null
如果mInTask为null,则会有如下情况为mLaunchFlags增加FLAG_ACTIVITY_NEW_TASK
3.1. mSourceRecord为null(这种情况一般发生于比如在Service中或者Broadcast中启动Activity)
3.2. mSourceRecord启动者的启动模式是LAUNCH_SINGLE_INSTANCE(singleInstance启动模式代表Activity只能处于自己单独的task中)
3.3. 正在启动的Activity的mLaunchMode是LAUNCH_SINGLE_INSTANCE, LAUNCH_SINGLE_TASK中的任意一个
computeSourceRootTask
该方法主要工作是获取mSourceRootTask,简单来介绍下rootTask和task,task不单单可以包含ActivityRecord,它还可以包含task,rootTask就是ActivityRecord的task的task的task等(直到task的parent不是task的时候就结束)
getReusableTask
这个方法的主要工作就是获取是否有可以重用的task,如果有则返回,否则返回null,大概的一个过程如下:
putIntoExistingTask的值主要由 mInTask == null && mStartActivity.resultTo == null来决定,mInTask如果不为null,肯定不需要查找可重用的task了
如果putIntoExistingTask为true,则根据一些条件获取intentActivity
在根据一些条件决定intentActivity是否置为null
如果intentActivity不为null,则把它的task返回
computeTargetTask
该方法的主要工作是获取Activity可以放入的task,分以下条件获取:
根据mInTask,mLaunchFlags,mStartActivity.resultTo,mAddingToTask判断是否需要创建新task,是的话返回null
mSourceRecord不为null的话,返回它的task
mInTask不为null,则返回它
其他情况获取task
startActivityInner方法主要做了以下事情:
根据一些条件来决定是创建一个新的task还是使用已有的task,并且把ActivityRecord放入task中
如果mDoResume为true,则最终会调用mRootWindowContainer.resumeFocusedTasksTopActivities方法进入下一步启动Activity的操作。
调用mRootWindowContainer.resumeFocusedTasksTopActivities方法,来介绍下它的参数:
targetRootTask:Task类型,它的值是mTargetRootTask,正在启动的Activity对应的ActivityRecord已经放入了这个task内
ActivityRecord: ActivityRecord类型,它的值是mStartActivity(保存了正在启动的activity等信息)
targetOptions:ActivityOptions类型,它的值为null
deferPause:代表是否延迟pause top Activity,它的值为false(mTransientLaunch默认是false)
boolean resumeFocusedTasksTopActivities(Task targetRootTask, ActivityRecord target, ActivityOptions targetOptions,boolean deferPause) {if (!mTaskSupervisor.readyToResume()) {return false;}boolean result = false;//targetRootTask不为null并且targetRootTask是在DisplayArea中是最顶层的roottask,则进入下面逻辑if (targetRootTask != null && (targetRootTask.isTopRootTaskInDisplayArea()|| getTopDisplayFocusedRootTask() == targetRootTask)) {[2.7]//targetOptions为null,deferPause为falseresult = targetRootTask.resumeTopActivityUncheckedLocked(target, targetOptions,deferPause);}省略代码......return result;}
boolean resumeTopActivityUncheckedLocked(ActivityRecord prev, ActivityOptions options,boolean deferPause) {//正在resume top,则直接返回if (mInResumeTopActivity) {// Don't even start recursing.return false;}boolean someActivityResumed = false;try {// Protect against recursion.mInResumeTopActivity = true;//当前的task是叶子task(就是task的孩子都是ActivityRecord),就执行下面逻辑(咱们分析这个流程)if (isLeafTask()) {//task是否focus并且可见if (isFocusableAndVisible()) {[2.8]//prev为正在启动的Activity对应的ActivityRecord,options:null,deferPause:falsesomeActivityResumed = resumeTopActivityInnerLocked(prev, options, deferPause);}} else {//当前的task的孩子还是task,走下面逻辑int idx = mChildren.size() - 1;while (idx >= 0) {final Task child = (Task) getChildAt(idx--);if (!child.isTopActivityFocusable()) {continue;}if (child.getVisibility(null /* starting */) != TASK_VISIBILITY_VISIBLE) {break;}someActivityResumed |= child.resumeTopActivityUncheckedLocked(prev, options,deferPause);// Doing so in order to prevent IndexOOB since hierarchy might changes while// resuming activities, for example dismissing split-screen while starting// non-resizeable activity.if (idx >= mChildren.size()) {idx = mChildren.size() - 1;}}}省略代码......} finally {mInResumeTopActivity = false;}return someActivityResumed;}
private boolean resumeTopActivityInnerLocked(ActivityRecord prev, ActivityOptions options,boolean deferPause) {if (!mAtmService.isBooting() && !mAtmService.isBooted()) {// Not ready yet!return false;}// Find the next top-most activity to resume in this root task that is not finishing and is// focusable. If it is not focusable, we will fall into the case below to resume the// top activity in the next focusable task.//next代表当前task中已经显示的ActivityActivityRecord next = topRunningActivity(true /* focusableOnly */);省略代码......//deferPause的值为falseboolean pausing = !deferPause && taskDisplayArea.pauseBackTasks(next);//mResumedActivity代表当前task中已经显示的Activity,若不为null,说明在启动其他Activity的时候,需要让mResumedActivity进入pause状态if (mResumedActivity != null) {ProtoLog.d(WM_DEBUG_STATES, "resumeTopActivityLocked: Pausing %s", mResumedActivity);//下面方法会让mResumedActivity进入pause状态,为启动新的Activity做准备pausing |= startPausingLocked(false /* uiSleeping */, next,"resumeTopActivityInnerLocked");}//如果mResumedActivity正在处于pausing状态,进入下面的逻辑if (pausing) {ProtoLog.v(WM_DEBUG_STATES, "resumeTopActivityLocked: Skip resume: need to"+ " start pausing");// At this point we want to put the upcoming activity's process// at the top of the LRU list, since we know we will be needing it// very soon and it would be a waste to let it get killed if it// happens to be sitting towards the end.//next.attachedToProcess()为true,代表next已经启动过了,则更新它的进程等信息if (next.attachedToProcess()) {next.app.updateProcessInfo(false /* updateServiceConnectionActivities */,true /* activityChange */, false /* updateOomAdj */,false /* addPendingTopUid */);} else if (!next.isProcessRunning()) {// Since the start-process is asynchronous, if we already know the process of next// activity isn't running, we can start the process earlier to save the time to wait// for the current activity to be paused.final boolean isTop = this == taskDisplayArea.getFocusedRootTask();//next.isProcessRunning()为false,代表启动的activity的进程还没被启动,乘mResumedActivity处于pausing的状态,去异步启动进程mAtmService.startProcessAsync(next, false /* knownToBeDead */, isTop,isTop ? "pre-top-activity" : "pre-activity");}if (lastResumed != null) {lastResumed.setWillCloseOrEnterPip(true);}return true;} else if (mResumedActivity == next && next.isState(RESUMED)&& taskDisplayArea.allResumedActivitiesComplete()) {// It is possible for the activity to be resumed when we paused back stacks above if the// next activity doesn't have to wait for pause to complete.// So, nothing else to-do except:// Make sure we have executed any pending transitions, since there// should be nothing left to do at this point.executeAppTransition(options);ProtoLog.d(WM_DEBUG_STATES, "resumeTopActivityLocked: Top activity resumed "+ "(dontWaitForPause) %s", next);return true;}省略代码......//next.attachedToProcess()为true,代表next已经启动过了,执行下面的逻辑,会把让Activity进入resume状态if (next.attachedToProcess()) {省略代码......try {final ClientTransaction transaction =ClientTransaction.obtain(next.app.getThread(), next.appToken);// Deliver all pending results.ArrayList<ResultInfo> a = next.results;//a代表从上个Activity是否返回了一些数据if (a != null) {final int N = a.size();if (!next.finishing && N > 0) {if (DEBUG_RESULTS) Slog.v(TAG_RESULTS,"Delivering results to " + next + ": " + a);//从上个Activity返回了数据,则给transaction add一个ActivityResultItemtransaction.addCallback(ActivityResultItem.obtain(a));}}if (next.newIntents != null) {//若存在newIntents,则add 一个NewIntentItem,这种情况针对的Activity的启动模式是singleTask,singleInstance,singleToptransaction.addCallback(NewIntentItem.obtain(next.newIntents, true /* resume */));}// Well the app will no longer be stopped.// Clear app token stopped state in window manager if needed.next.notifyAppResumed(next.stopped);EventLogTags.writeWmResumeActivity(next.mUserId, System.identityHashCode(next),next.getTask().mTaskId, next.shortComponentName);mAtmService.getAppWarningsLocked().onResumeActivity(next);next.app.setPendingUiCleanAndForceProcessStateUpTo(mAtmService.mTopProcessState);next.abortAndClearOptionsAnimation();//通知Activity进入resume状态transaction.setLifecycleStateRequest(ResumeActivityItem.obtain(next.app.getReportedProcState(),dc.isNextTransitionForward()));mAtmService.getLifecycleManager().scheduleTransaction(transaction);ProtoLog.d(WM_DEBUG_STATES, "resumeTopActivityLocked: Resumed %s", next);} catch (Exception e) {省略代码......return true;}省略代码......} else {省略代码......//Activity需要从onCreate方法开始执行mTaskSupervisor.startSpecificActivity(next, true, true);}return true;}
resumeTopActivityInnerLocked方法的逻辑相对复杂,下面就来介绍下它主要做的事情:
如果正在显示的Activity(mResumedActivity)存在,则需要让它进入pause状态(最终会把这个消息通知到app对应的Activity)
如果正在显示的Activity已处于pausing状态,这时候需要分情况来处理:
2.1 若正在启动的Activity(next)之前已经启动过了,则需要更新它对应的进程状态
2.2 若正在启动的Activity的进程还没有启动,这时候异步启动进程的操作
接着暂停启动Activity的操作,直接返回。那什么时候继续开始启动Activity呢?答案是:当mResumedActivity对应的app端的Activity完全的进入pause状态后,才会接着继续启动Activity。
并且可以借助等待pause完毕的这个时机,更新进程状态或者异步启动进程
如果正在启动的Activity(next)已经启动过了(next.attachedToProcess()这值为true),则会走下面逻辑:
3.1 若从上个Activity返回了数据,则把数据返回给app端的Activity(onActivityForResult方法会被调用)
3.2 若存在newIntents,则把intent返回给app端的Activity(onNewIntent方法会被调用),这种情况针对的Activity的启动模式是singleTask,singleInstance,singleTop
通知app端Activity进入resume状态(onResume方法会被调用)
否则,调用mTaskSupervisor.startSpecificActivity正真进入Activity的启动流程
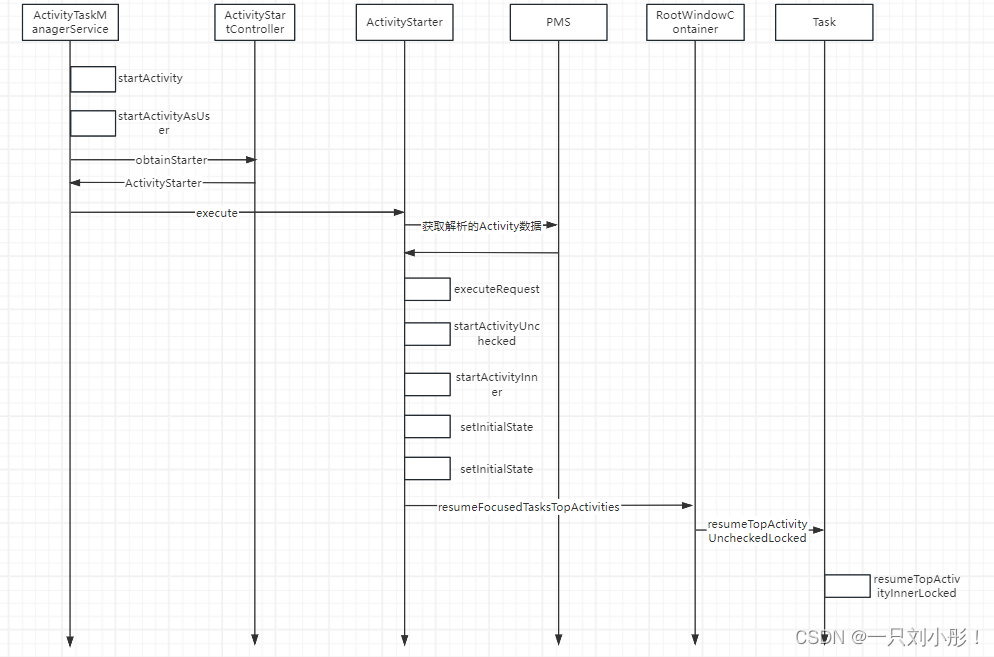
到这为止的时序图

接下来
//r:正在启动的Activity,andResume:当前值为true,checkConfig:当前值truevoid startSpecificActivity(ActivityRecord r, boolean andResume, boolean checkConfig) {// Is this activity's application already running?final WindowProcessController wpc =mService.getProcessController(r.processName, r.info.applicationInfo.uid);boolean knownToBeDead = false;//对应的app进程是否启动,启动则进入下面逻辑if (wpc != null && wpc.hasThread()) {try {[2.10]realStartActivityLocked(r, wpc, andResume, checkConfig);return;} catch (RemoteException e) {Slog.w(TAG, "Exception when starting activity "+ r.intent.getComponent().flattenToShortString(), e);}// If a dead object exception was thrown -- fall through to// restart the application.knownToBeDead = true;}r.notifyUnknownVisibilityLaunchedForKeyguardTransition();final boolean isTop = andResume && r.isTopRunningActivity();//异步启动进程mService.startProcessAsync(r, knownToBeDead, isTop, isTop ? "top-activity" : "activity");}
//r:正在启动的Activity,proc:对应的进程,andResume:true,checkConfig:trueboolean realStartActivityLocked(ActivityRecord r, WindowProcessController proc,boolean andResume, boolean checkConfig) throws RemoteException {if (!mRootWindowContainer.allPausedActivitiesComplete()) {// While there are activities pausing we skipping starting any new activities until// pauses are complete. NOTE: that we also do this for activities that are starting in// the paused state because they will first be resumed then paused on the client side.ProtoLog.v(WM_DEBUG_STATES,"realStartActivityLocked: Skipping start of r=%s some activities pausing...",r);return false;}final Task task = r.getTask();final Task rootTask = task.getRootTask();beginDeferResume();// The LaunchActivityItem also contains process configuration, so the configuration change// from WindowProcessController#setProcess can be deferred. The major reason is that if// the activity has FixedRotationAdjustments, it needs to be applied with configuration.// In general, this reduces a binder transaction if process configuration is changed.proc.pauseConfigurationDispatch();try {r.startFreezingScreenLocked(proc, 0);// schedule launch ticks to collect information about slow apps.r.startLaunchTickingLocked();//设置了proc后,r.attachedToProcess()的值就为truer.setProcess(proc);// Ensure activity is allowed to be resumed after process has set.if (andResume && !r.canResumeByCompat()) {andResume = false;}省略代码......try {//proc.hasThread()代表app端是否活着if (!proc.hasThread()) {throw new RemoteException();}List<ResultInfo> results = null;List<ReferrerIntent> newIntents = null;if (andResume) {// We don't need to deliver new intents and/or set results if activity is going// to pause immediately after launch.results = r.results;newIntents = r.newIntents;}if (DEBUG_SWITCH) Slog.v(TAG_SWITCH,"Launching: " + r + " savedState=" + r.getSavedState()+ " with results=" + results + " newIntents=" + newIntents+ " andResume=" + andResume);EventLogTags.writeWmRestartActivity(r.mUserId, System.identityHashCode(r),task.mTaskId, r.shortComponentName);if (r.isActivityTypeHome()) {// Home process is the root process of the task.updateHomeProcess(task.getBottomMostActivity().app);}mService.getPackageManagerInternalLocked().notifyPackageUse(r.intent.getComponent().getPackageName(), NOTIFY_PACKAGE_USE_ACTIVITY);r.forceNewConfig = false;mService.getAppWarningsLocked().onStartActivity(r);r.compat = mService.compatibilityInfoForPackageLocked(r.info.applicationInfo);// Because we could be starting an Activity in the system process this may not go// across a Binder interface which would create a new Configuration. Consequently// we have to always create a new Configuration here.final Configuration procConfig = proc.prepareConfigurationForLaunchingActivity();final MergedConfiguration mergedConfiguration = new MergedConfiguration(procConfig, r.getMergedOverrideConfiguration());r.setLastReportedConfiguration(mergedConfiguration);logIfTransactionTooLarge(r.intent, r.getSavedState());if (r.isEmbedded()) {// Sending TaskFragmentInfo to client to ensure the info is updated before// the activity creation.mService.mTaskFragmentOrganizerController.dispatchPendingInfoChangedEvent(r.getOrganizedTaskFragment());}// Create activity launch transaction.//ClientTransaction主要用于添加各种callback以及Activity要执行的生命周期方法,它会通过binder传递到app进程//proc.getThread()获取的是IApplicationThread的实例,主要通过它给app发送消息,r.appToken发送给app的tokenfinal ClientTransaction clientTransaction = ClientTransaction.obtain(proc.getThread(), r.appToken);final boolean isTransitionForward = r.isTransitionForward();//add一个LaunchActivityItem类型的callbackclientTransaction.addCallback(LaunchActivityItem.obtain(new Intent(r.intent),System.identityHashCode(r), r.info,// TODO: Have this take the merged configuration instead of separate global// and override configs.mergedConfiguration.getGlobalConfiguration(),mergedConfiguration.getOverrideConfiguration(), r.compat,r.getFilteredReferrer(r.launchedFromPackage), task.voiceInteractor,proc.getReportedProcState(), r.getSavedState(), r.getPersistentSavedState(),results, newIntents, r.takeOptions(), isTransitionForward,proc.createProfilerInfoIfNeeded(), r.assistToken, activityClientController,r.createFixedRotationAdjustmentsIfNeeded(), r.shareableActivityToken,r.getLaunchedFromBubble()));// Set desired final state.final ActivityLifecycleItem lifecycleItem;if (andResume) {//因为andResume为true,进入这,构造一个ResumeActivityItem实例,Activity的onResume方法被执行lifecycleItem = ResumeActivityItem.obtain(isTransitionForward);} else {//否则构造一个PauseActivityItem实例,Activity的onPause方法会被执行lifecycleItem = PauseActivityItem.obtain();}clientTransaction.setLifecycleStateRequest(lifecycleItem);// Schedule transaction.//clientTransaction会被传递到app进程mService.getLifecycleManager().scheduleTransaction(clientTransaction);省略代码......} catch (RemoteException e) {省略代码......}} finally {endDeferResume();proc.resumeConfigurationDispatch();}r.launchFailed = false;省略代码......return true;}
该方法主要做的事情是把各种数据整理收集好后,通过binder发送到app进程,那就来看下这个过程:
1.获取一个ClientTransaction实例
通过ClientTransaction.obtain方法获取一个ClientTransaction实例,为了避免浪费内存从缓存池中获取,ClientTransaction代表要传递给app的事务,它可以包含多个callback和一个lifecycleStateRequest。
来介绍下ClientTransaction.obtain这个方法它的参数:
client:IApplicationThread类型,AMS通过它把消息发送给app,它的值是proc.getThread()
activityToken:IBinder类型,它的值是r.appToken。AMS并没有把ActiviityRecord传递给app(传过去不安全),而是把ActiviityRecord的appToken传递过去,简单看下这个appToken
static class Token extends IApplicationToken.Stub {private WeakReference<ActivityRecord> weakActivity;private final String name;private final String tokenString;Token(Intent intent) {name = intent.getComponent().flattenToShortString();tokenString = "Token{" + Integer.toHexString(System.identityHashCode(this)) + "}";}private void attach(ActivityRecord activity) {if (weakActivity != null) {throw new IllegalStateException("Already attached..." + this);}weakActivity = new WeakReference<>(activity);}private static @Nullable ActivityRecord tokenToActivityRecordLocked(Token token) {if (token == null) {return null;}ActivityRecord r = token.weakActivity.get();if (r == null || r.getRootTask() == null) {return null;}return r;}@Overridepublic String toString() {StringBuilder sb = new StringBuilder(128);sb.append("Token{");sb.append(Integer.toHexString(System.identityHashCode(this)));sb.append(' ');if (weakActivity != null) {sb.append(weakActivity.get());}sb.append('}');return sb.toString();}@Overridepublic String getName() {return name;}}ActivityRecord的appToken是一个类型为Token的实例。Token它继承了IApplicationToken.Stub说明它是一个IBinder类型,它用弱引用的方式持有ActivityRecord,appToken作为一个“令牌”被传递到app进程,就是告诉app,我给了你一个token,如果想给我发送消息,就带上这个token,我就能通过token找到ActivityRecord了(tokenToActivityRecordLocked方法)
最后把clientTransaction发送给app
调用mService.getLifecycleManager().scheduleTransaction(clientTransaction)方法把clientTransaction发送到app端那么如何发送的?
public class ClientTransaction implements Parcelable, ObjectPoolItem {省略进行传递public void schedule() throws RemoteException {mClient.scheduleTransaction(this);}省略/** Obtain an instance initialized with provided params. */这里会将app的 IApplicationThread 对象传进来public static ClientTransaction obtain(IApplicationThread client, IBinder activityToken) {ClientTransaction instance = ObjectPool.obtain(ClientTransaction.class);if (instance == null) {instance = new ClientTransaction();}instance.mClient = client;instance.mActivityToken = activityToken;return instance;}
}
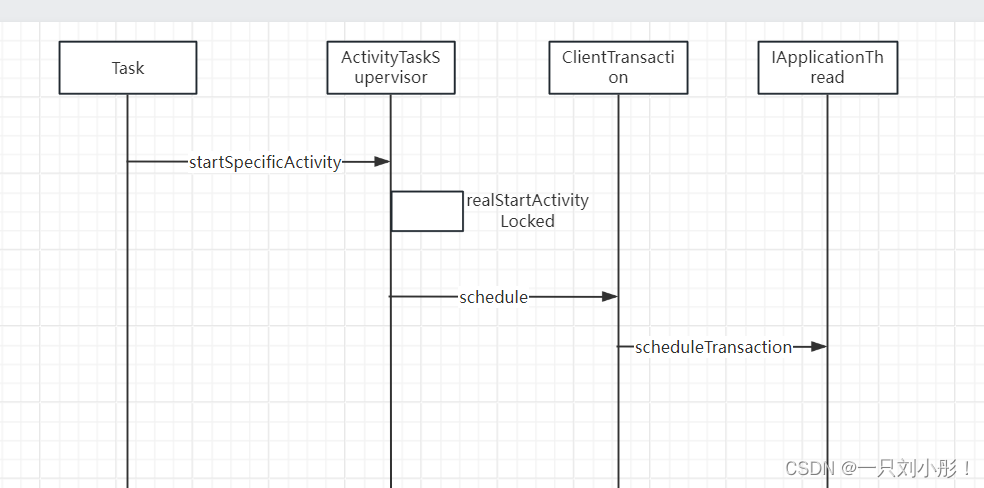
该段时序图如下

@Overridepublic Activity handleLaunchActivity(ActivityClientRecord r,PendingTransactionActions pendingActions, Intent customIntent) {省略代码......WindowManagerGlobal.initialize();// Hint the GraphicsEnvironment that an activity is launching on the process.GraphicsEnvironment.hintActivityLaunch();//开始启动Activity[3.5]final Activity a = performLaunchActivity(r, customIntent);省略代码......return a;}
private Activity performLaunchActivity(ActivityClientRecord r, Intent customIntent) {ActivityInfo aInfo = r.activityInfo;if (r.packageInfo == null) {r.packageInfo = getPackageInfo(aInfo.applicationInfo, r.compatInfo,Context.CONTEXT_INCLUDE_CODE);}//ComponentName封装了mPackage和mClass,component是真正Activity的对应的信息,先从r.intent.getComponent()获取ComponentName component = r.intent.getComponent();if (component == null) {//没获取到从PMS中去解析component = r.intent.resolveActivity(mInitialApplication.getPackageManager());r.intent.setComponent(component);}//如果targetActivity存在,则从targetActivity获取if (r.activityInfo.targetActivity != null) {component = new ComponentName(r.activityInfo.packageName,r.activityInfo.targetActivity);}//初始化appContext它的类型是ContextImpl,像Activity调用到的Context的方法最终都是通过ContextImpl来实现的ContextImpl appContext = createBaseContextForActivity(r);Activity activity = null;try {//获取ClassLoader,来加载Activityjava.lang.ClassLoader cl = appContext.getClassLoader();//mInstrumentation.newActivity方法中通过反射来实例化一个Activityactivity = mInstrumentation.newActivity(cl, component.getClassName(), r.intent);StrictMode.incrementExpectedActivityCount(activity.getClass());r.intent.setExtrasClassLoader(cl);r.intent.prepareToEnterProcess(isProtectedComponent(r.activityInfo),appContext.getAttributionSource());if (r.state != null) {r.state.setClassLoader(cl);}} catch (Exception e) {if (!mInstrumentation.onException(activity, e)) {throw new RuntimeException("Unable to instantiate activity " + component+ ": " + e.toString(), e);}}try {//尝试去make Application(一般情况下都已经创建成功了),如果存在直接返回Application app = r.packageInfo.makeApplication(false, mInstrumentation);if (localLOGV) Slog.v(TAG, "Performing launch of " + r);if (localLOGV) Slog.v(TAG, r + ": app=" + app+ ", appName=" + app.getPackageName()+ ", pkg=" + r.packageInfo.getPackageName()+ ", comp=" + r.intent.getComponent().toShortString()+ ", dir=" + r.packageInfo.getAppDir());if (activity != null) {CharSequence title = r.activityInfo.loadLabel(appContext.getPackageManager());Configuration config =new Configuration(mConfigurationController.getCompatConfiguration());if (r.overrideConfig != null) {config.updateFrom(r.overrideConfig);}if (DEBUG_CONFIGURATION) Slog.v(TAG, "Launching activity "+ r.activityInfo.name + " with config " + config);Window window = null;if (r.mPendingRemoveWindow != null && r.mPreserveWindow) {window = r.mPendingRemoveWindow;r.mPendingRemoveWindow = null;r.mPendingRemoveWindowManager = null;}// Activity resources must be initialized with the same loaders as the// application context.appContext.getResources().addLoaders(app.getResources().getLoaders().toArray(new ResourcesLoader[0]));appContext.setOuterContext(activity);//attach方法把各种数据传递给activityactivity.attach(appContext, this, getInstrumentation(), r.token,r.ident, app, r.intent, r.activityInfo, title, r.parent,r.embeddedID, r.lastNonConfigurationInstances, config,r.referrer, r.voiceInteractor, window, r.configCallback,r.assistToken, r.shareableActivityToken);if (customIntent != null) {activity.mIntent = customIntent;}r.lastNonConfigurationInstances = null;checkAndBlockForNetworkAccess();activity.mStartedActivity = false;int theme = r.activityInfo.getThemeResource();if (theme != 0) {activity.setTheme(theme);}if (r.mActivityOptions != null) {activity.mPendingOptions = r.mActivityOptions;r.mActivityOptions = null;}activity.mLaunchedFromBubble = r.mLaunchedFromBubble;activity.mCalled = false;//下面是根据r.isPersistable(),分别调用Activity的onCreate方法if (r.isPersistable()) {mInstrumentation.callActivityOnCreate(activity, r.state, r.persistentState);} else {mInstrumentation.callActivityOnCreate(activity, r.state);}//如果自己实现的Activity的onCreate方法没有调用父类的onCreate方法,则抛异常if (!activity.mCalled) {throw new SuperNotCalledException("Activity " + r.intent.getComponent().toShortString() +" did not call through to super.onCreate()");}r.activity = activity;mLastReportedWindowingMode.put(activity.getActivityToken(),config.windowConfiguration.getWindowingMode());}r.setState(ON_CREATE);// updatePendingActivityConfiguration() reads from mActivities to update// ActivityClientRecord which runs in a different thread. Protect modifications to// mActivities to avoid race.synchronized (mResourcesManager) {//AMS传递过来的token作为key,r作为value存放在mActivities中mActivities.put(r.token, r);}} catch (SuperNotCalledException e) {throw e;} catch (Exception e) {if (!mInstrumentation.onException(activity, e)) {throw new RuntimeException("Unable to start activity " + component+ ": " + e.toString(), e);}}return activity;}
该方法是启动Activity的核心方法主要做了以下几件事:
获取到ComponentName,它包含了真正Activity的包名,class信息
使用ClassLoader,通过反射对第1步的类进行实例化,会实例化一个Activity
尝试创建/获取Application的实例
通过Activity的attach方法把各种信息传递给它
调用Activity的onCreate方法
AMS传递过来的token作为key,r作为value存放在mActivities中(这样通过tokenActivityRecord和ActivityClientRecord就建立了关系)
最后分析下mInstrumentation.callActivityOnCreate这个方法
final void performCreate(Bundle icicle) {performCreate(icicle, null);}@UnsupportedAppUsage(maxTargetSdk = Build.VERSION_CODES.R, trackingBug = 170729553)final void performCreate(Bundle icicle, PersistableBundle persistentState) {if (Trace.isTagEnabled(Trace.TRACE_TAG_WINDOW_MANAGER)) {Trace.traceBegin(Trace.TRACE_TAG_WINDOW_MANAGER, "performCreate:"+ mComponent.getClassName());}dispatchActivityPreCreated(icicle);mCanEnterPictureInPicture = true;// initialize mIsInMultiWindowMode and mIsInPictureInPictureMode before onCreatefinal int windowingMode = getResources().getConfiguration().windowConfiguration.getWindowingMode();mIsInMultiWindowMode = inMultiWindowMode(windowingMode);mIsInPictureInPictureMode = windowingMode == WINDOWING_MODE_PINNED;restoreHasCurrentPermissionRequest(icicle);//onCreate方法被调用if (persistentState != null) {onCreate(icicle, persistentState);} else {onCreate(icicle);}EventLogTags.writeWmOnCreateCalled(mIdent, getComponentName().getClassName(),"performCreate");mActivityTransitionState.readState(icicle);mVisibleFromClient = !mWindow.getWindowStyle().getBoolean(com.android.internal.R.styleable.Window_windowNoDisplay, false);mFragments.dispatchActivityCreated();mActivityTransitionState.setEnterActivityOptions(this, getActivityOptions());dispatchActivityPostCreated(icicle);到此Activity的onCreate方法被调用,因为clientTransaction.setLifecycleStateRequest(lifecycleItem),lifecycleItem是ResumeActivityItem类型,Activity的onResume方法也会被调用,这个流程就不分析了.
借鉴的原文链接:https://blog.csdn.net/niurenwo/article/details/127896874


)


)
)


![[元带你学: eMMC协议 31] CRC 错误检测保证可靠性](http://pic.xiahunao.cn/[元带你学: eMMC协议 31] CRC 错误检测保证可靠性)

)