python+TensorFlow实现人脸识别智能小程序的项目(包含TensorFlow版本与Pytorch版本)(一)
- 一:TensorFlow基础知识内容部分(简明扼要,快速适应)
- 1、下载Cifar10数据集,并进行解压缩处理
- 2、将Cifar10数据集利用OpenCV转换成数据图像保存在对应类别的目录下
- 3、将本地Cifar10图像数据打包成TF-Record的格式
- 4、将本地Cifar10图像数据打包成TF-Record的格式并写入宽、高数据
- 5、TensorFlow有关的数据加载读取方式
- 1、读取文件地址列表以及对应的标签列表数据
- 2、读取csv格式类的文件名列表数据形式如下:
- 3、读取本地图像路径列表数据
- 4、读取本地TF-Record格式的数据
- 1、TF-Record数据格式讲述
- 6、Graph的概念
- 1、声明Graph以及Graph的获取
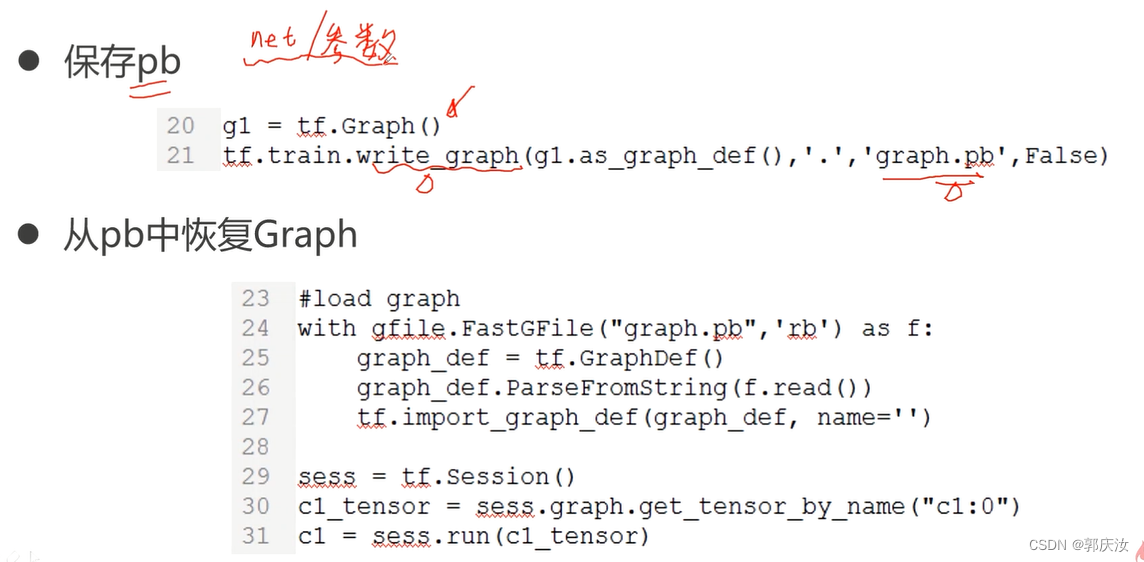
- 2、保存pb文件以及利用pb文件恢复Graph
- 3、使用tensorboard可视化计算图结构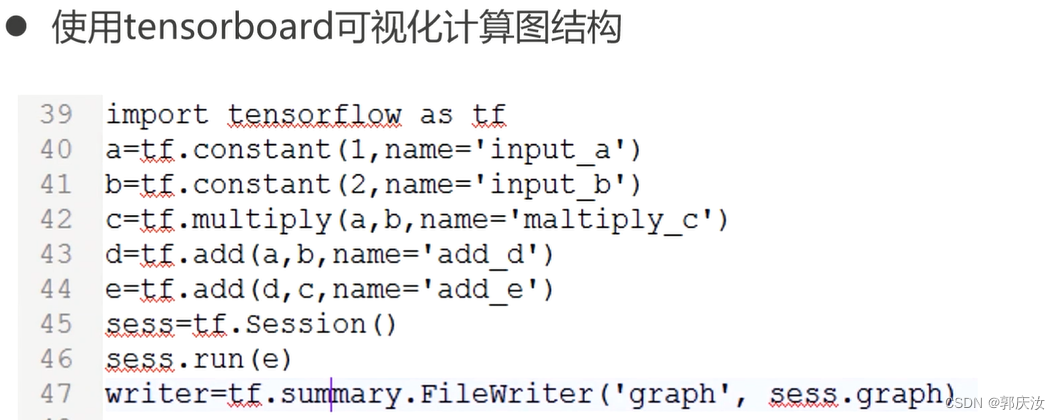
- 7、Session的概念
- 1、Session的几种创建方式
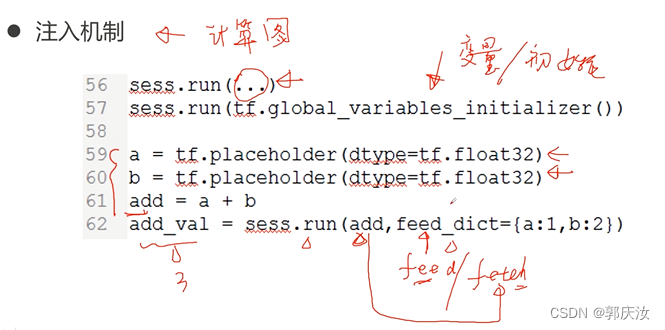
- 2、Session的注入机制
- 3、制定资源设备
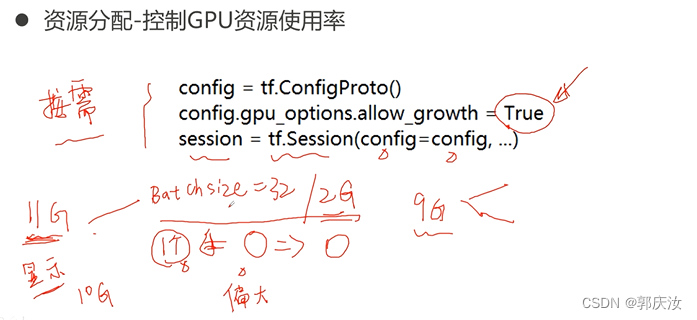
- 4、资源分配
- 8、Tensor
- 1、Tensor的定义
- 9、Operation
- 10、feed数据的喂入
- 11、TensorFlow中常用的API
- 1、tf.nn库
- 2、tf.train库
- 12、TensorFlow中数据的处理方式
- 1、数据的写入相关API
- 2、数据读取相关API
- 13、TensorFlow中的高级API接口------TF-slim
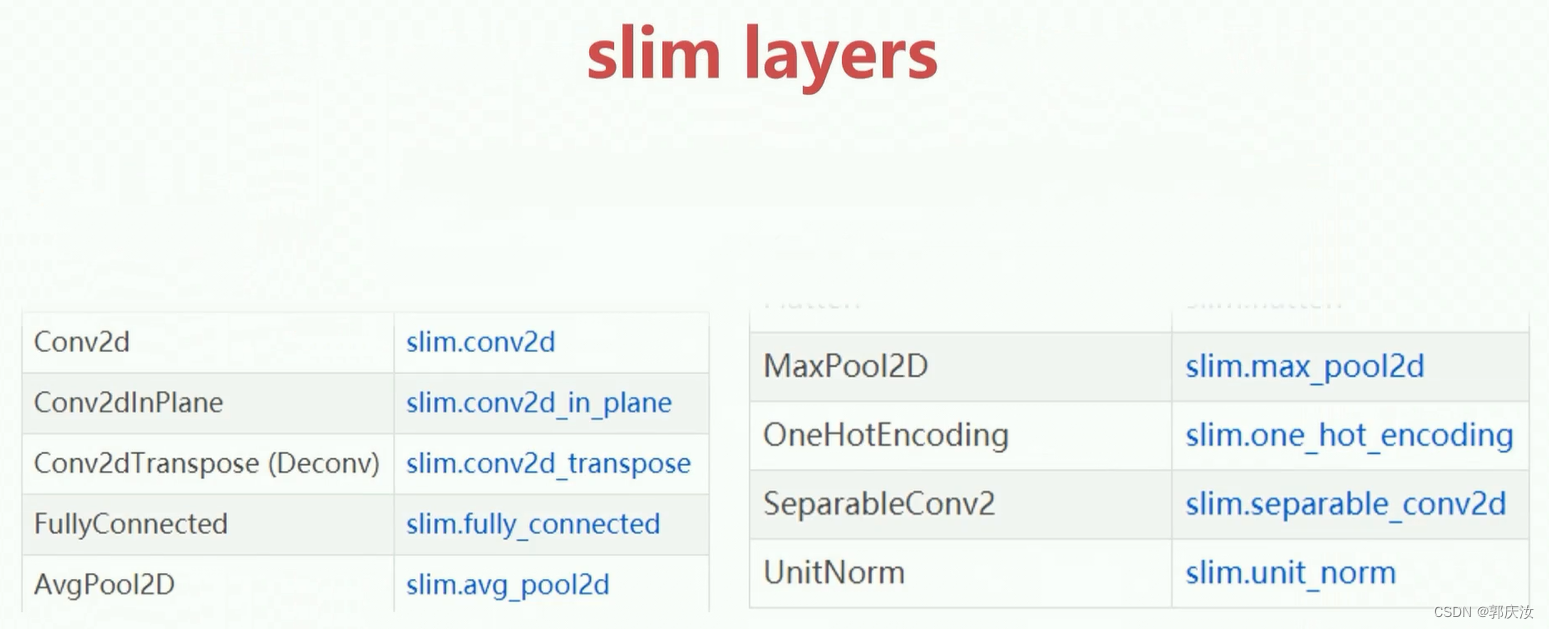
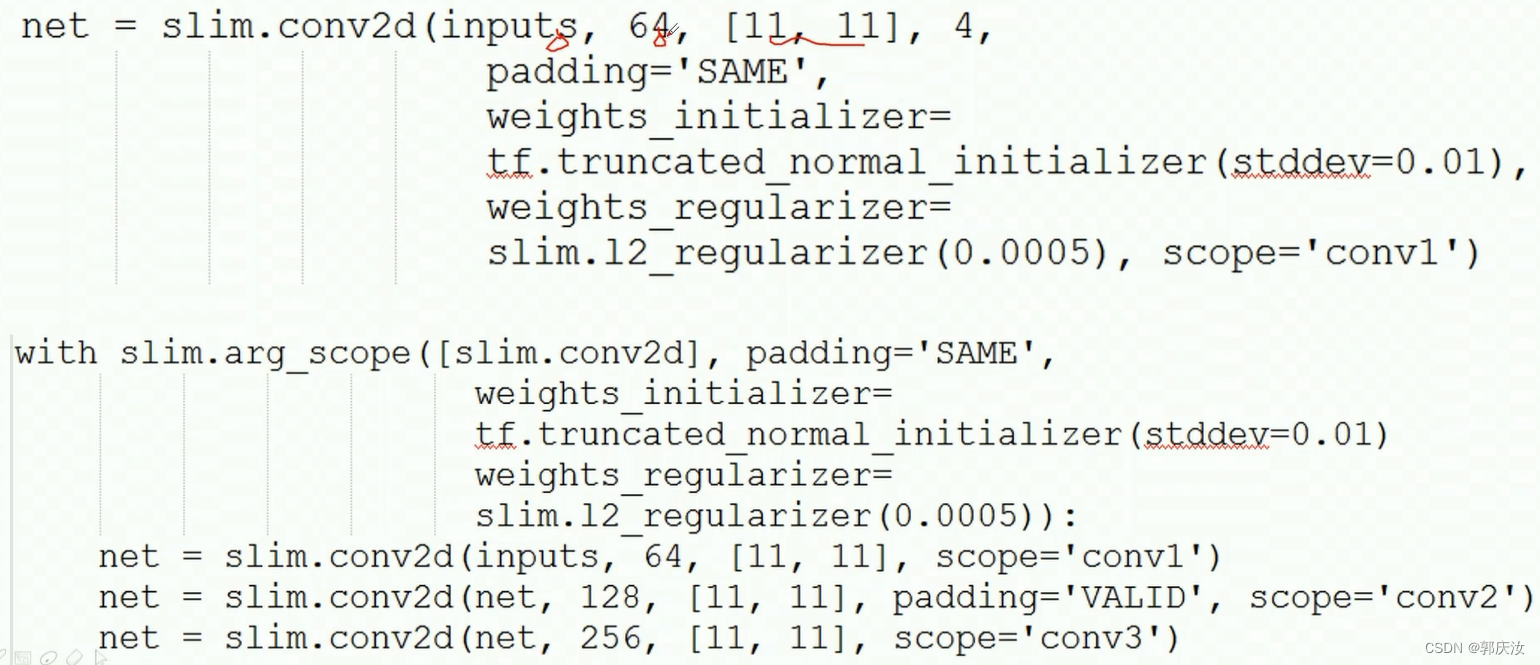
- 1、slim包参数作用域相关
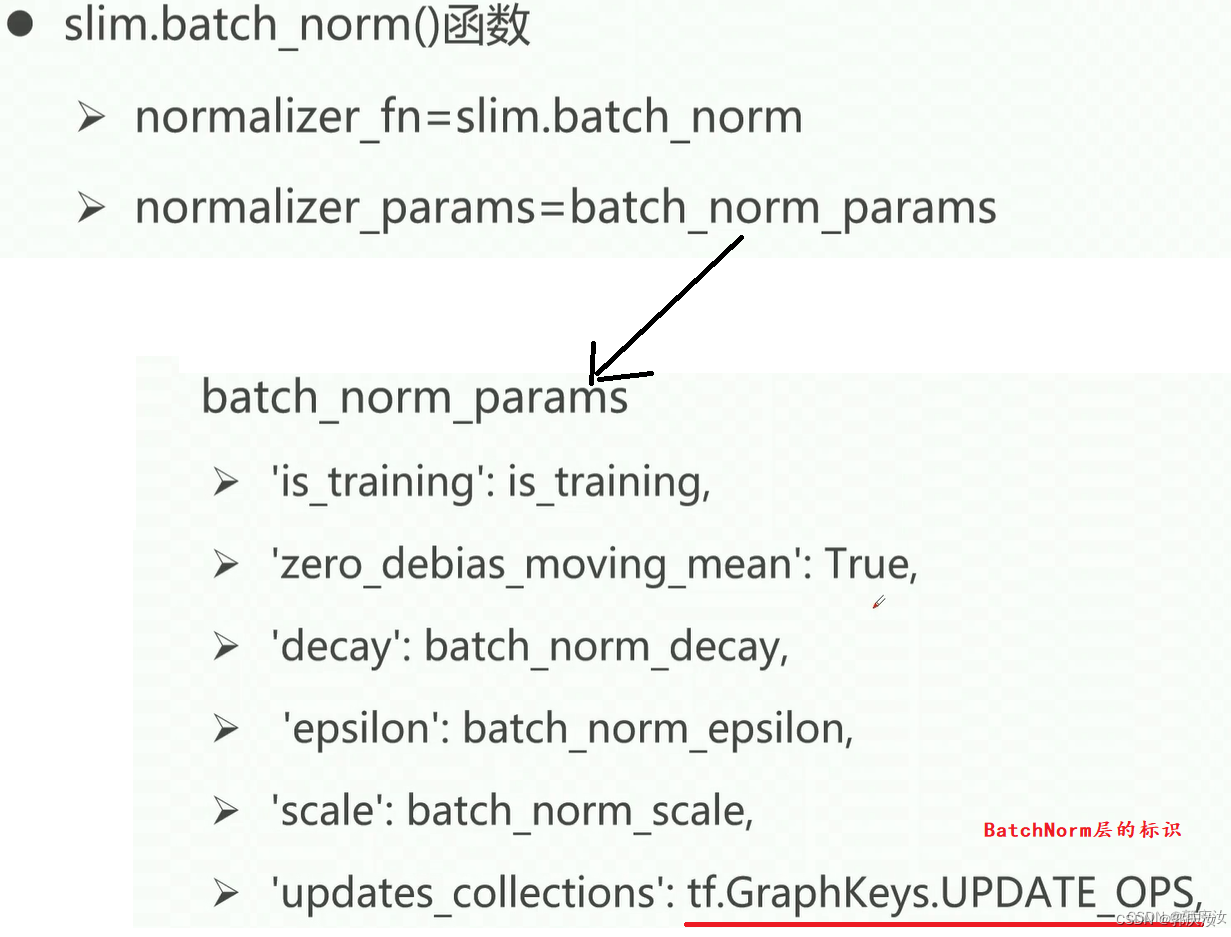
- 2、slim包的BatchNorm层相关
- 3、slim包的net模型
- 4、slim包的loss损失
- 5、slim包的学习率
- 6、slim包的优化器
- 7、slim包的模型度量
- 8、slim包的评估
- 9、slim包的数据操作方法
- 9、slim数据增强的方法
- 15、Tensorbord使用
- 1、tf.summary写入数据方式
- 16、TensorFlow实战Cifar10图像分类项目代码实现
- 1、将Cifar10数据打包成TF-record格式
- 2、读取Cifar10格式数据与数据增强部分
- 3、网络结构定义、tensorbord具体使用以及模型训练部分
- 4、更换另一个骨干网络——ResNet网络模型骨干网络定义
- 5、保存的文件详解
- 17、TensorFlow-slim包进行图像数据集分类---具体流程
一:TensorFlow基础知识内容部分(简明扼要,快速适应)
1、下载Cifar10数据集,并进行解压缩处理
import urllib.request as ur
import os
import sys
import tarfile
import glob
import pickle
import numpy as np
import cv2# gqr:下载Cifair10数据集,并进行解压缩处理def download_and_uncompress_tarball(tarball_url, dataset_dir):"""Downloads the `tarball_url` and uncompresses it locally.Args:tarball_url: The URL of a tarball file.dataset_dir: The directory where the temporary files are stored."""filename = tarball_url.split('/')[-1]   # gqr:获取文件名filepath = os.path.join(dataset_dir, filename)   # gqr:拼接数据集存放路径# gqr:_progress为下载数据集时的回调函数,显示当前的下载进度def _progress(count, block_size, total_size):print("-------------------",count, block_size, total_size)sys.stdout.write('\r>> Downloading %s %.1f%%' % (filename, float(count * block_size) / float(total_size) * 100.0))sys.stdout.flush()filepath, _ = ur.urlretrieve(tarball_url, filepath, _progress)   # gqr:_progress为下载数据集时的回调函数,显示当前的下载进度print()statinfo = os.stat(filepath)  # gqr: 是用来获取指定路径的状态信息,这里的指定路径可以是文件,也可以是文件夹print('Successfully downloaded', filename, statinfo.st_size, 'bytes.')tarfile.open(filepath, 'r:gz').extractall(dataset_dir)   # gqr:解压压缩包数据DATA_URL = 'http://www.cs.toronto.edu/~kriz/cifar-10-python.tar.gz'
DATA_DIR = 'data'download_and_uncompress_tarball(DATA_URL, DATA_DIR)   # gqr:下载数据集代码
2、将Cifar10数据集利用OpenCV转换成数据图像保存在对应类别的目录下
import urllib.request as ur
import os
import sys
import tarfile
import glob
import numpy as np
import cv2# gqr:官方解析cifair10的脚本函数  对数据集进行解码
def unpickle(file):import picklewith open(file, 'rb') as fo:dict = pickle.load(fo, encoding='bytes')return dictfolders = './data/cifar-10-batches-py'# trfiles = glob.glob(folders + "/data_batch*")   # gqr:训练集存放
trfiles = glob.glob(folders + "/test_batch*")   # gqr:测试集存放
print("--------------------")data  = []
labels = []
for file in trfiles:dt = unpickle(file)    # gqr:对数据进行解码,得到解码后的数据data += list(dt[b"data"])   # gqr:读取字典中的数据labels += list(dt[b"labels"])   # gqr:解析labelsprint(labels)imgs = np.reshape(data, [-1, 3, 32, 32])      # gqr:将数据进行转化,得到四维度的数据  通道优先classification = ['airplane','automobile','bird','cat','deer','dog','frog','horse','ship','truck']for i in range(imgs.shape[0]):im_data = imgs[i, ...]im_data = np.transpose(im_data, [1, 2, 0])   # gqr:交换数据的通道,RGB排列im_data = cv2.cvtColor(im_data, cv2.COLOR_RGB2BGR)# f = "{}/{}".format("data/image/train", classification[labels[i]])  # gqr:存放训练集f = "{}/{}".format("data/image/test", classification[labels[i]])  # gqr:存放测试集if not os.path.exists(f):  # gqr:判断对应类别的目录是否存在os.makedirs(f)cv2.imwrite("{}/{}.jpg".format(f, str(i)), im_data)
3、将本地Cifar10图像数据打包成TF-Record的格式
import tensorflow as tf
import cv2
import numpy as np
classification = ['airplane','automobile','bird','cat','deer','dog','frog','horse','ship','truck']import glob
idx = 0
im_data = []    # gqr:总的图像数据路径list
im_labels = []  # 类别标签对对应的id list
for path in classification:# path = "data/image/train/" + path    # gqr:训练数据路径地址path = "data/image/test/" + path    # gqr:测试数据路径地址im_list = glob.glob(path + "/*")im_label = [idx for i in  range(im_list.__len__())]    # gqr:表示对应图片的id标签idx += 1im_data += im_listim_labels += im_label# print(im_labels)
# print(im_data)# tfrecord_file = "data/train.tfrecord"      # gqr:生成的Tf-record文件存放路径
tfrecord_file = "data/test.tfrecord"      # gqr:生成的Tf-record文件存放路径
writer = tf.python_io.TFRecordWriter(tfrecord_file)   # gqr:定义Tf-record的写入的实例index = [i for i in range(im_data.__len__())]np.random.shuffle(index)      # gqr:对打包的数据进行shuffle处理for i in range(im_data.__len__()):im_d = im_data[index[i]]im_l = im_labels[index[i]]data = cv2.imread(im_d)#data = tf.gfile.FastGFile(im_d, "rb").read()               # gqr:也可以使用该方法读取数据图像,读取到的数据为byte形式,所以以下进行数据封装时不需要再转换成byte形式# gqr:对一组图片的数据与标签进行封装ex = tf.train.Example(features = tf.train.Features(feature = {"image":tf.train.Feature(bytes_list=tf.train.BytesList(value=[data.tobytes()])),    # gqr:图像采用byte格式的形式进行存储"label": tf.train.Feature(int64_list=tf.train.Int64List(value=[im_l])),              # gqr:图片的标签数据是一个int型的数据,所以使用int64_list,value为一个列表的形式}))# gqr:将封装好的数据进行序列化,写入到TF-Record中writer.write(ex.SerializeToString())writer.close()
4、将本地Cifar10图像数据打包成TF-Record的格式并写入宽、高数据
import tensorflow as tf
import cv2
import numpy as np"""
tf.train.Example 是 TensorFlow 中用于序列化和反序列化数据的协议缓冲区消息类型之一。它是一种通用的数据表示格式,用于在 TensorFlow 训练和推理过程中存储和传输数据。tf.train.Example 包含一个或多个 tf.train.Feature 对象,每个 tf.train.Feature 对象都可以是以下三种类型之一:tf.train.BytesList:用于表示字节字符串的列表。
tf.train.FloatList:用于表示浮点数的列表。
tf.train.Int64List:用于表示整数的列表。
通过将数据转换为这些基本类型之一,并将其包装在 tf.train.Feature 对象中,我们可以将数据转换为可以序列化和存储的格式。然后,可以使用 tf.train.Example 对象将这些特征进行组合,并进行序列化和存储,或者在需要时进行反序列化和解析。例如,可以使用 tf.train.Example 来表示图像数据,其中图像的原始字节字符串存储在 BytesList 中,标签或类别信息存储在 Int64List 中。"""classification = ['airplane','automobile','bird','cat','deer','dog','frog','horse','ship','truck']import glob
idx = 0
im_data = []
im_labels = []
for path in classification:path = "data/image/test/" + path    # gqr:数据路径地址im_list = glob.glob(path + "/*")im_label = [idx for i in  range(im_list.__len__())]idx += 1im_data += im_listim_labels += im_labelprint(im_labels)
print(im_data)tfrecord_file = "data/test.tfrecord"      # gqr:生成的Tf-record文件存放路径
writer = tf.python_io.TFRecordWriter(tfrecord_file)   # gqr:定义Tf-record的写入的实例index = [i for i in range(im_data.__len__())]   np.random.shuffle(index)        # gqr:对打包的数据进行shuffle处理for i in range(im_data.__len__()):im_d = im_data[index[i]]im_l = im_labels[index[i]]data = cv2.imread(im_d)    # gqr:读取数据图像#data = tf.gfile.FastGFile(im_d, "rb").read()   # gqr:也可以使用该方法读取数据图像,读取到的数据为byte形式,所以以下进行数据封装时不需要再转换成byte形式# gqr:对一组图片的数据与标签进行封装ex = tf.train.Example(features = tf.train.Features(feature = {"image":tf.train.Feature(bytes_list=tf.train.BytesList(value=[data.tobytes()])),    # gqr:图像采用byte格式的形式进行存储"label": tf.train.Feature(int64_list=tf.train.Int64List(value=[im_l])),              # gqr:图片的标签数据是一个int型的数据,所以使用int64_list,value为一个列表的形式# gqr:也可以将图像的高与宽打包到TF-Record中"height": tf.train.Feature(int64_list=tf.train.Int64List(value=[data.shape[0]])),              # gqr:图片的标签数据是一个int型的数据,所以使用int64_list,value为一个列表的形式"width": tf.train.Feature(int64_list=tf.train.Int64List(value=[data.shape[1]])),              # gqr:图片的标签数据是一个int型的数据,所以使用int64_list,value为一个列表的形式}))# gqr:将封装好的数据进行序列化,写入到TF-Record中writer.write(ex.SerializeToString())writer.close()
5、TensorFlow有关的数据加载读取方式
tf.train.slice_input_producer()
tf.train.string_input_producer()
1、读取文件地址列表以及对应的标签列表数据
import tensorflow as tf# 为tensorflow对文件列表中的样本进行读取的方式
images = ['image1.jpg', 'image2.jpg', 'image3.jpg', 'image4.jpg']   # gqr:图片的路径list
labels = [1, 2, 3, 4]    # gqr:图片对应的label[images, labels] = tf.train.slice_input_producer([images, labels],num_epochs=None,   # gqr:所有样本循环的次数shuffle=True)   # gqr:tf.train.slice_input_producer可以对输入的list按照特征的规则生成张量,输出是一个tensorwith tf.Session() as sess:sess.run(tf.local_variables_initializer())   # gqr:初始化所有的变量tf.train.start_queue_runners(sess=sess)    # gqr:构建文件队列填充的线程,启动后文件队列才可以进行填充,才可以获取图片数据for i in range(10):   print(sess.run([images, labels]))
2、读取csv格式类的文件名列表数据形式如下:
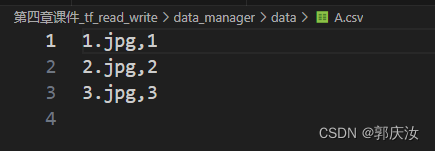
逗号前的事图像路径,逗号后的事对应的标签
import tensorflow as tf# gqr:Tensorflow对文件数据进行读取
filename = ['data/A.csv', 'data/B.csv', 'data/C.csv']file_queue = tf.train.string_input_producer(filename,shuffle=True,num_epochs=2)  # gqr:其输出是一个文件队列,而不是一个tensor
reader = tf.WholeFileReader()  # gqr:定义文件读取器,用于从文件队列中进行数据的读取
key, value = reader.read(file_queue)   #返回的key是文件的绝对路径,value是这个文件的数据with tf.Session() as sess:sess.run(tf.local_variables_initializer())    # gqr:局部变量初始化tf.train.start_queue_runners(sess=sess)    # gqr:构建文件队列填充的线程,启动后文件队列才可以进行填充for i in range(6):print(sess.run([key, value]))
3、读取本地图像路径列表数据
import tensorflow as tf# gqr:Tensorflow对文件数据进行读取
filename = ['data/pictures/3.jpg', 'data/pictures/10.jpg', 'data/pictures/21.jpg']file_queue = tf.train.string_input_producer(filename,shuffle=True,num_epochs=2)  # gqr:其输出是一个文件队列,而不是一个tensor
reader = tf.WholeFileReader()  # gqr:定义文件读取器,用于从文件队列中进行数据的读取
key, value = reader.read(file_queue)   #返回的key是文件的绝对路径,value是这个文件的数据with tf.Session() as sess:sess.run(tf.local_variables_initializer())    # gqr:局部变量初始化tf.train.start_queue_runners(sess=sess)    # gqr:构建文件队列填充的线程,启动后文件队列才可以进行填充i=0for i in range(6):image_path,image_data=sess.run([key, value])with open('data/result/%d.jpg' % i,'wb') as f:f.write(image_data)i+=1
##############################################################################################
########如果图片带有标签信息,可以把这里的string_input_producer换成slice_input_producer##########
##############################################################################################
"""
将文件名列表交给tf.train.string_input_producer函数,string_input_producer会生成一个先入先出的队列, 文件阅读器会需要它来读取数据
tf.train.string_input_producer(string_tensor,num_epochs=None,shuffle=True,seed=None,capacity=32,shared_name=None,name=None,cancel_op=None
)
string_tensor:传入string_input_producer的张量或文件名列表
num_epochs:ephoch的数量,一个整数,如果指定,string_input_producer在产生OutOfRange错误之前从string_tensor中产生num_epochs次字符串。如果未指定,则可以无限次循环遍历字符串。
shuffle:是否随机打乱数据
seed:随机数种子,配合shuffle = True使用,设定之后每个ephoch的顺序都一样。
capacity:一个整数。设置队列容量。
share_name:如果设置,则此队列将在多个会话的给定名称下共享。对具有此队列的设备打开的所有会话都可以通过shared_name访问它。在分布式设置中使用它意味着只有能够访问此操作的其中一个会话才能看到每个名称。
name:此操作的名称
cancel_op:取消队列的操作"""
4、读取本地TF-Record格式的数据
1、TF-Record数据格式讲述
对于大数据,TensorFlow中都需要转换成TFRecord格式的文件,TFRecord文件同样是以二进制进行存储数据的,适合以串行的方式读取大批量数据。其优势是能更好的利用内存,更方便地复制和移动,这更符合TensorFlow执行引擎的处理方式。通常数据转换成tfrecord格式需要写个小程序将每一个样本组装成protocol buffer定义的Example的对象,序列化成字符串,再由tf.python_io.TFRecordWriter写入文件即可。这里为了方便快捷我更改了一部分代码直接调用datasets下的flowers模型文件来生成我们的tfrecord格式和labels文件,我们进入我们下载好的slim文件夹下,然后再进入datasets文件夹下
import tensorflow as tf# tensorflow对TF-Record打包过的数据进行解析
filelist = ['data/train.tfrecord']
# 将文件名列表交给tf.train.string_input_producer函数,string_input_producer会生成一个先入先出的队列, 文件阅读器会需要它来读取数据
file_queue = tf.train.string_input_producer(filelist,num_epochs=None,shuffle=True)
reader = tf.TFRecordReader()  # gqr:创建TF-record文件读写器
_, ex = reader.read(file_queue)   # gqr:得到序列化的数据# gqr:对序列化后的数据进行解码
# gqr:格式
feature = {'image':tf.FixedLenFeature([], tf.string),  # gqr:因为将图像数据打包成TF_record时是以byte格式存储的,所以在解码时解码成String类型'label':tf.FixedLenFeature([], tf.int64)    # gqr:label是int型
}batchsize = 2
batch  = tf.train.shuffle_batch([ex], batchsize, capacity=batchsize*10,min_after_dequeue=batchsize*5)   # gqr:capacity:队列的容量;min_after_dequeue:最小的队列容量
# gqr:对batch size的数据进行解码
example = tf.parse_example(batch, features=feature)image = example['image']
label = example['label']# 解码操作
image = tf.decode_raw(image, tf.uint8)      # gqr:因为image解码格式是字符串,所以需要调用解码函数将其转换成byte格式
image = tf.reshape(image, [-1, 32, 32, 3])with tf.Session() as sess:sess.run(tf.local_variables_initializer())          # gqr:初始化所有变量tf.train.start_queue_runners(sess=sess)   # gqr:创建文件填充队列for i in range(1):image_bth, _ = sess.run([image,label])  # gqr:获取到图片的数据以及对应的labelimport cv2cv2.imshow("image", image_bth[0,...])   #gqr:因为batchsize为2,所以取第一个cv2.waitKey(0)
6、Graph的概念
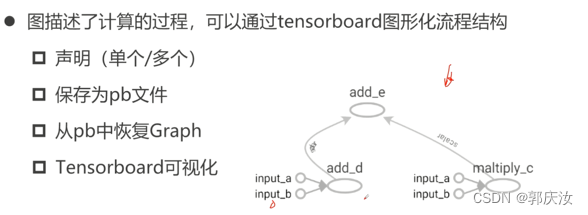
1、声明Graph以及Graph的获取
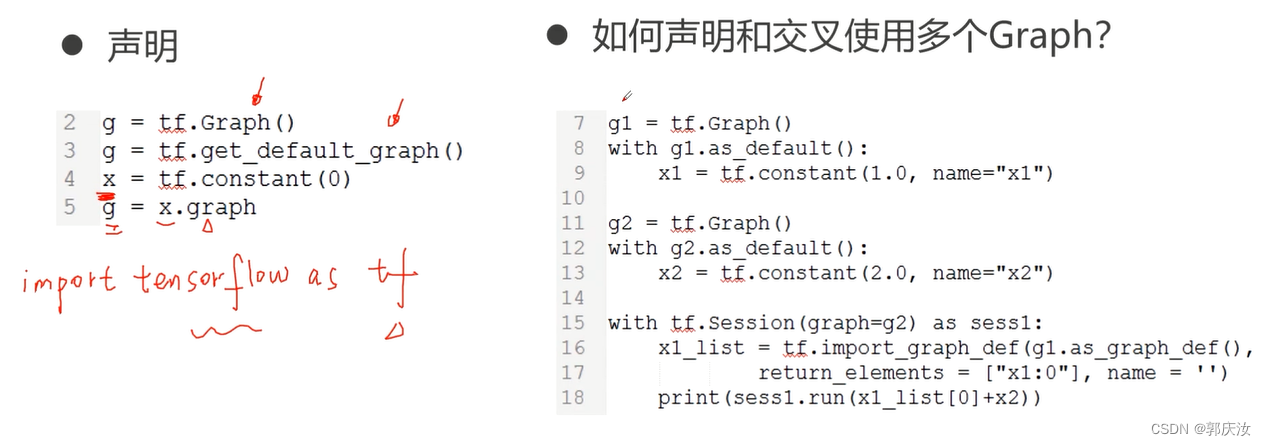
2、保存pb文件以及利用pb文件恢复Graph
3、使用tensorboard可视化计算图结构
7、Session的概念
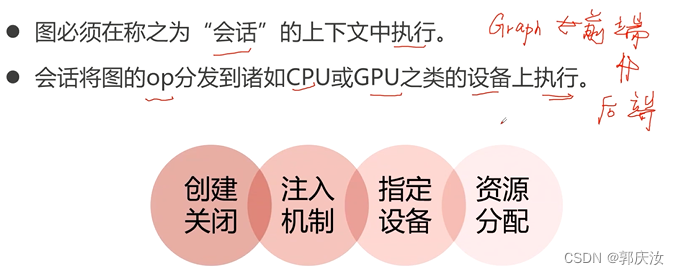
1、Session的几种创建方式

2、Session的注入机制
3、制定资源设备

4、资源分配
8、Tensor
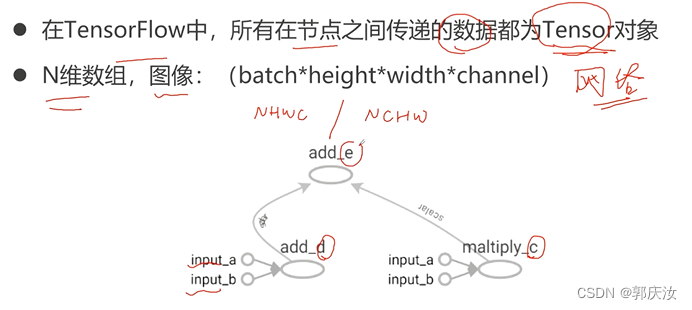
1、Tensor的定义
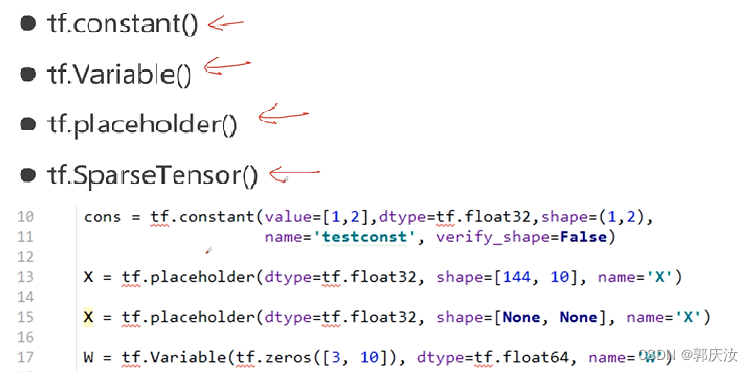
9、Operation

10、feed数据的喂入

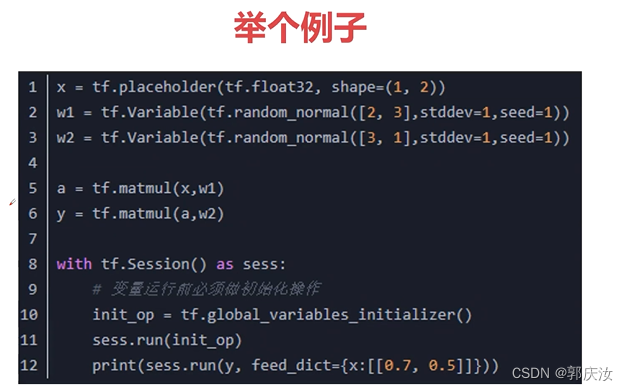
11、TensorFlow中常用的API

1、tf.nn库
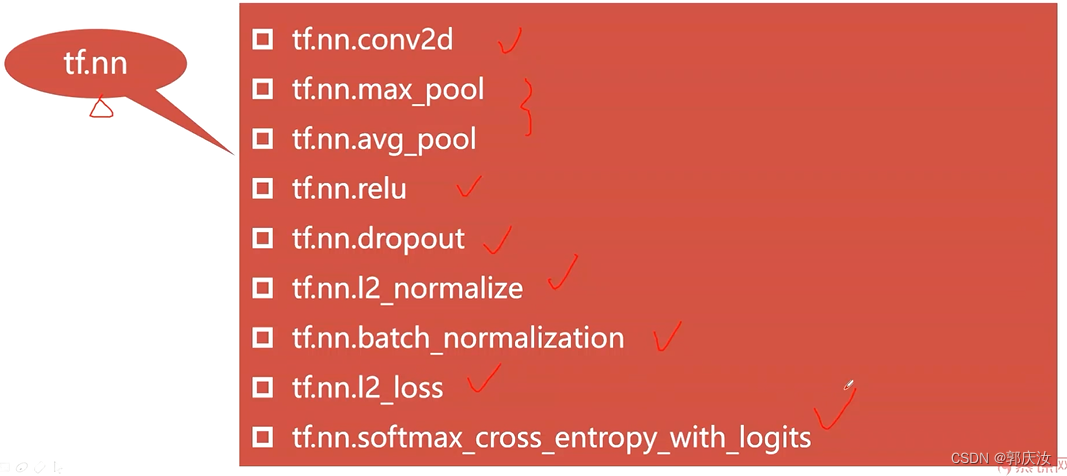
2、tf.train库
定义了模型存储、模型恢复、优化函数以及与学习率相关的设定

关于数据处理相关:
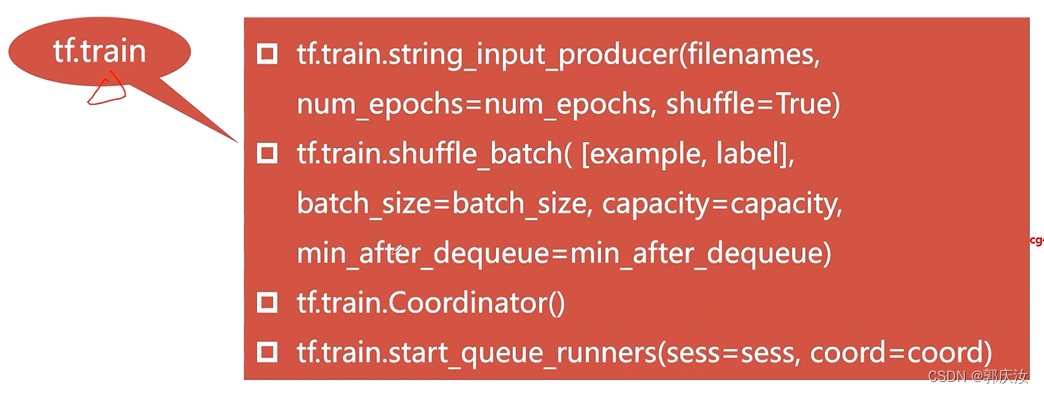
12、TensorFlow中数据的处理方式
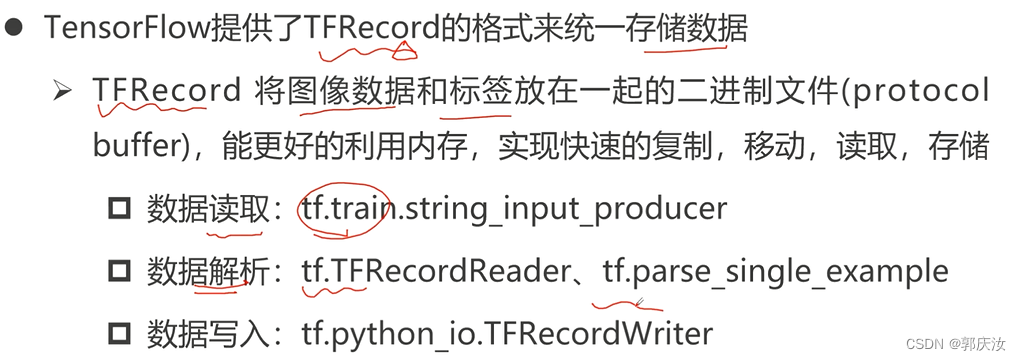
1、数据的写入相关API


2、数据读取相关API
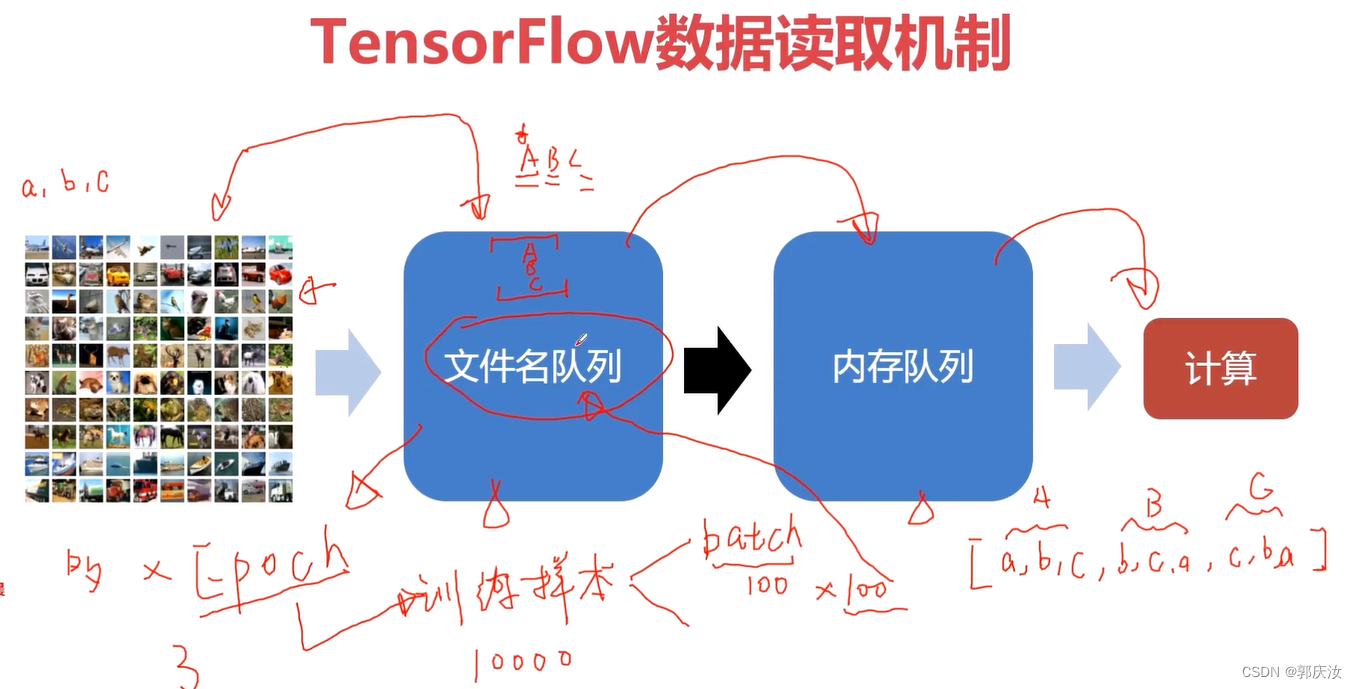
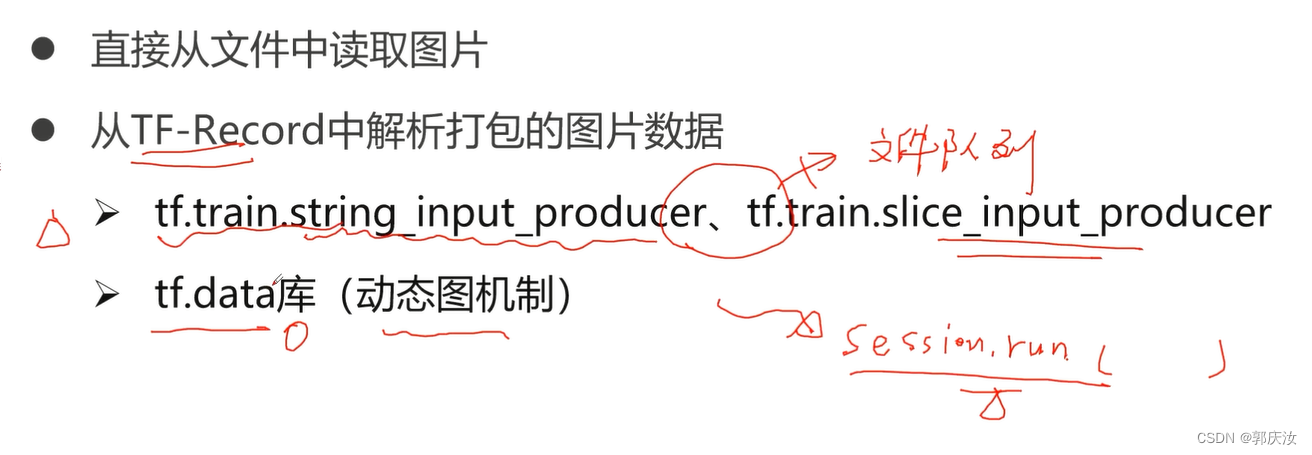
13、TensorFlow中的高级API接口------TF-slim

1、slim包参数作用域相关

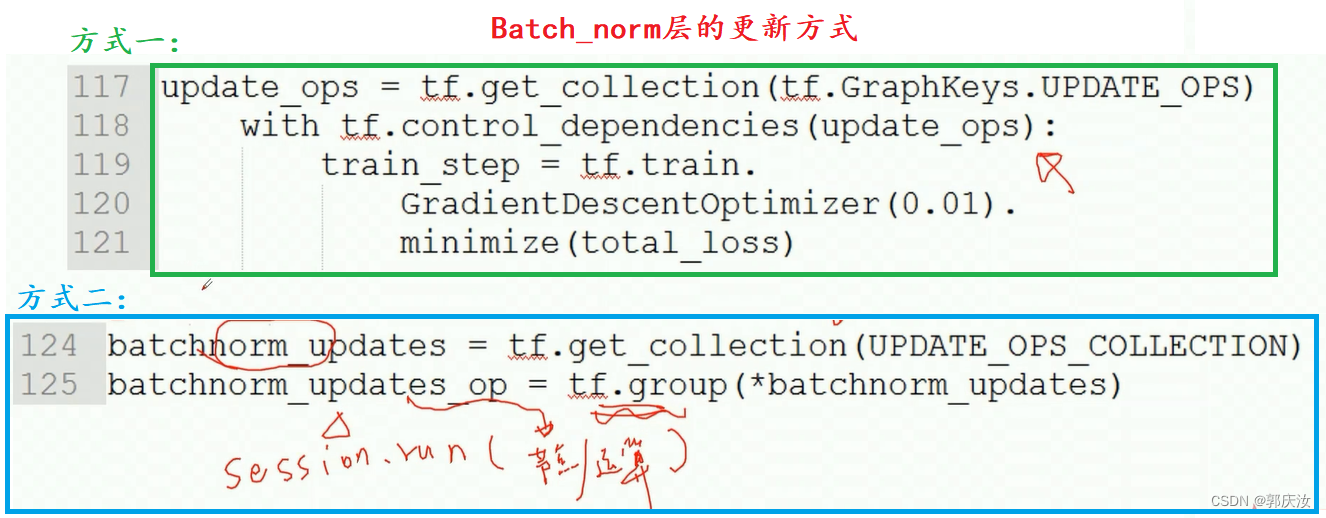
2、slim包的BatchNorm层相关
定义方式:
例子:
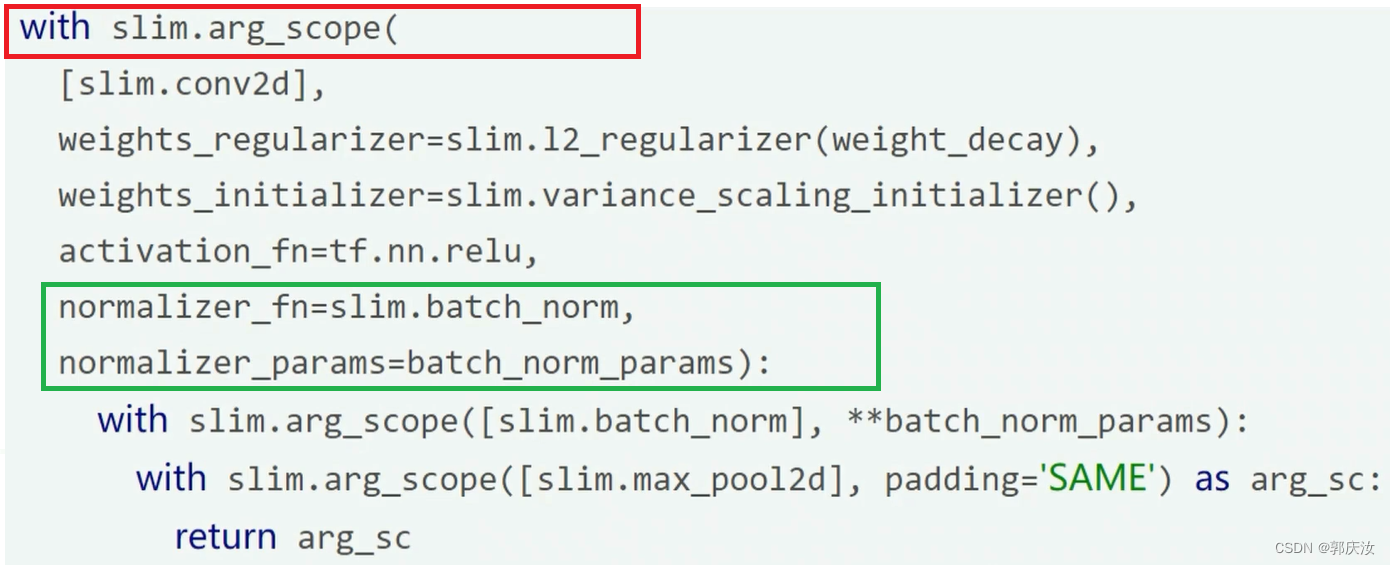
以上定义好batch_norm层后,在网络训练时需要对其进行单独的更新:
3、slim包的net模型

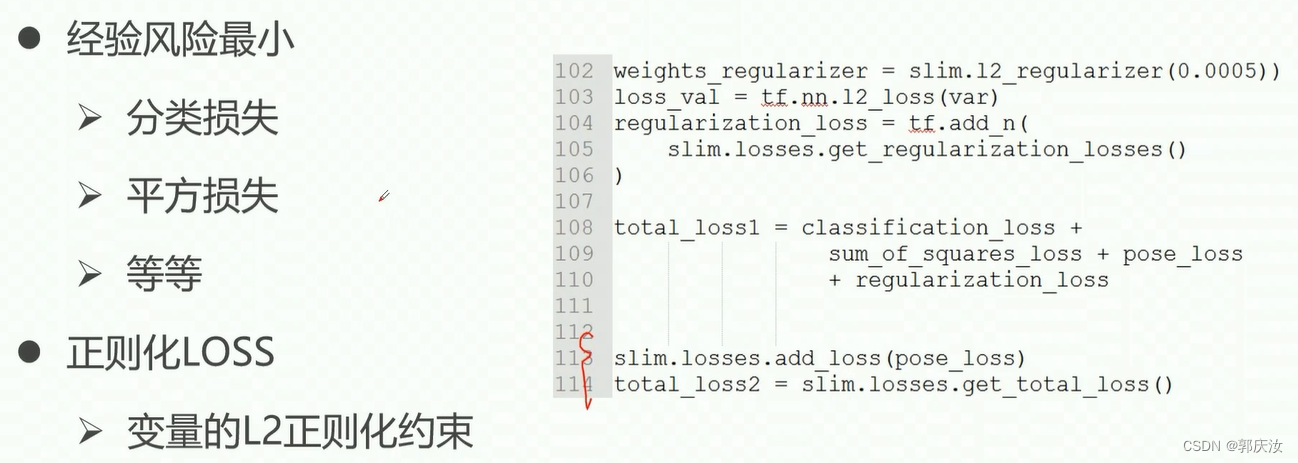
4、slim包的loss损失
5、slim包的学习率

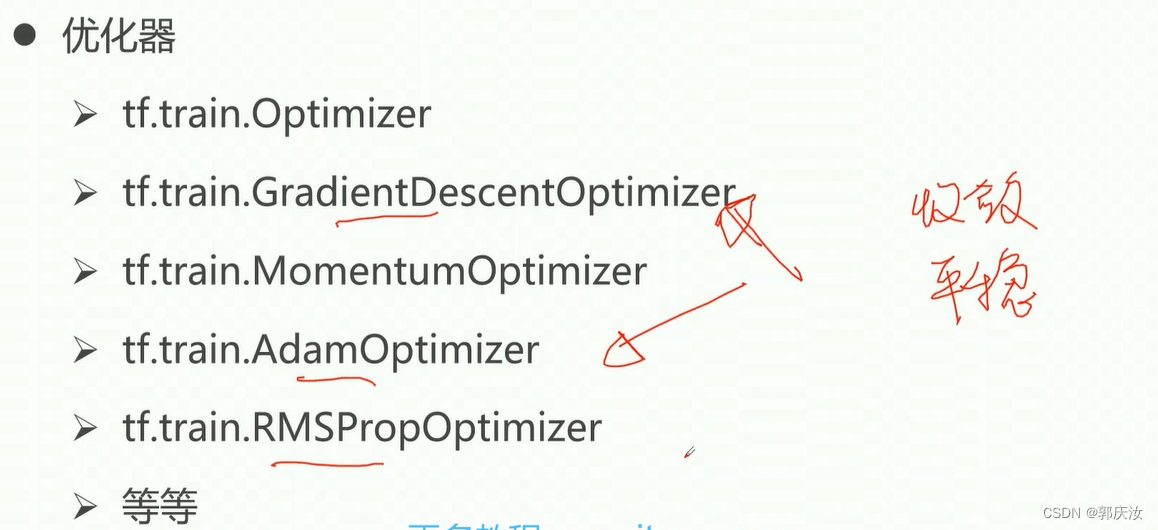
6、slim包的优化器
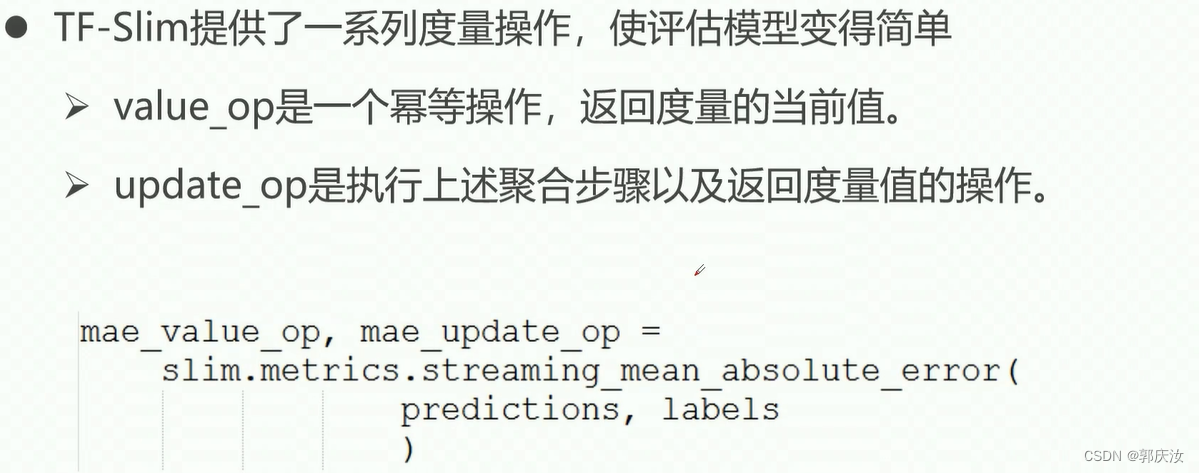
7、slim包的模型度量
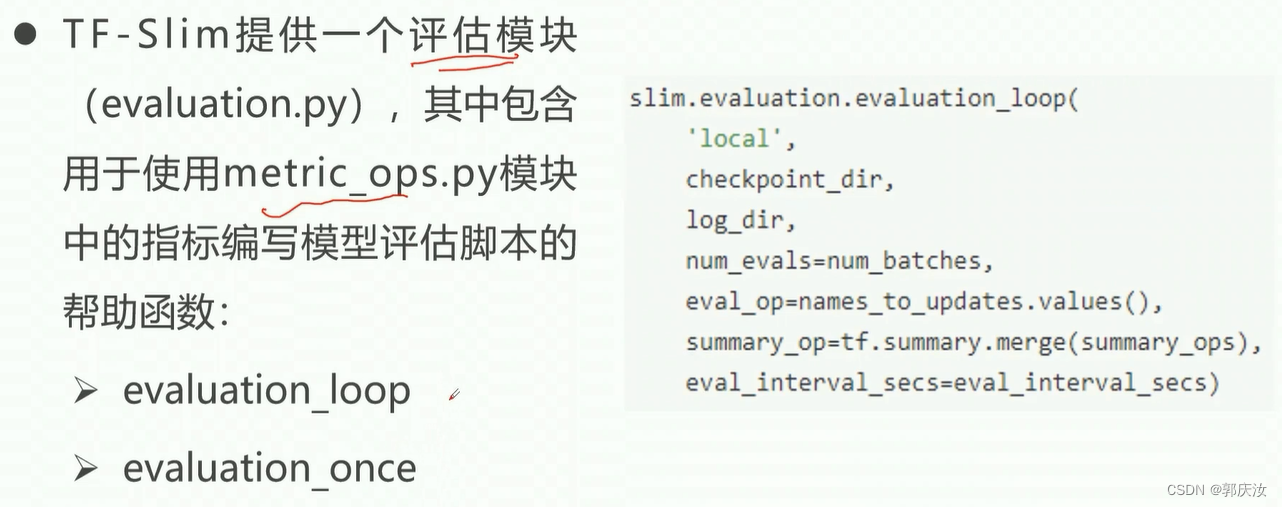
8、slim包的评估
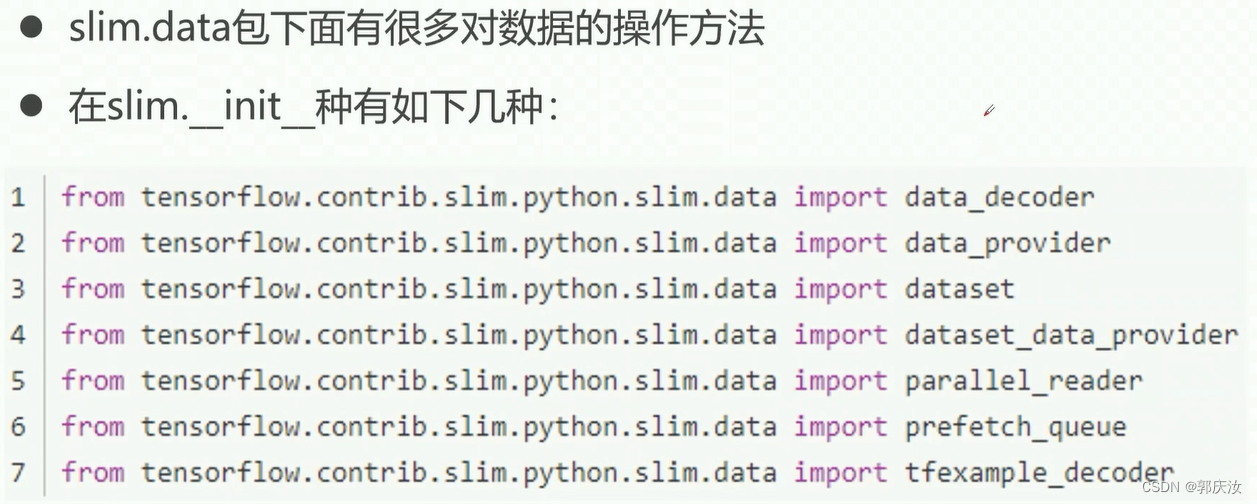
9、slim包的数据操作方法
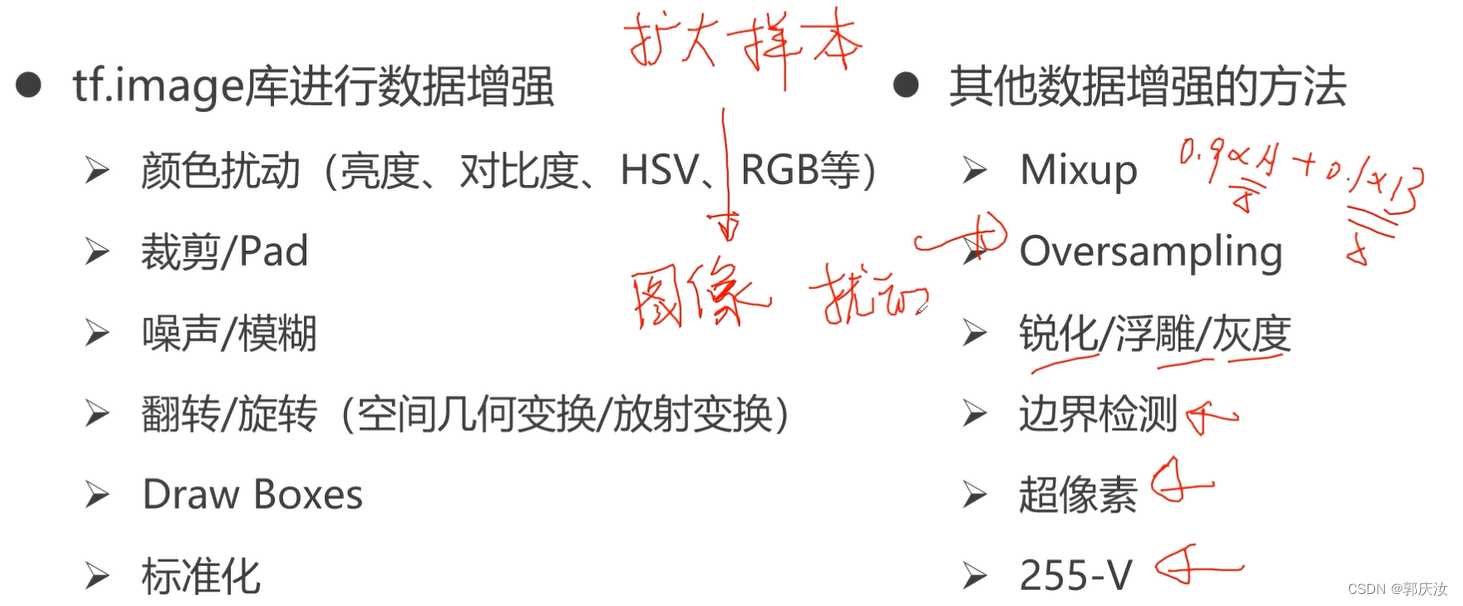
9、slim数据增强的方法

15、Tensorbord使用
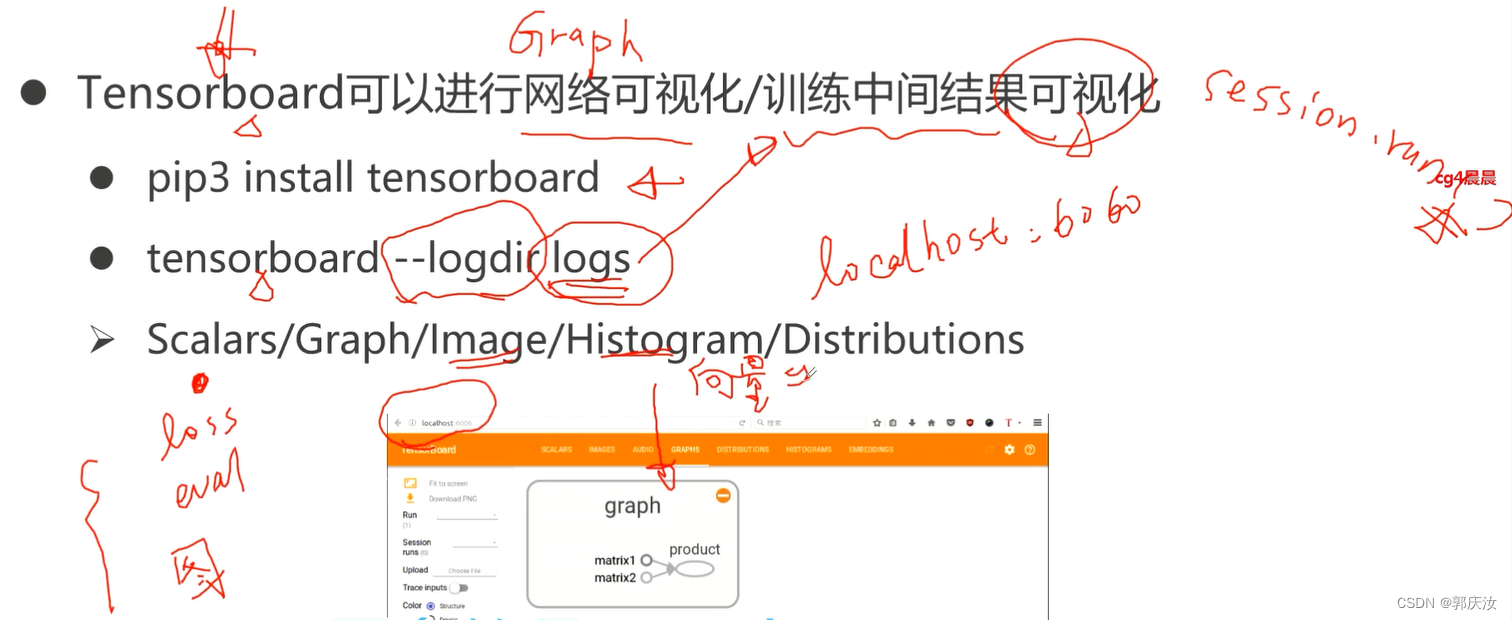
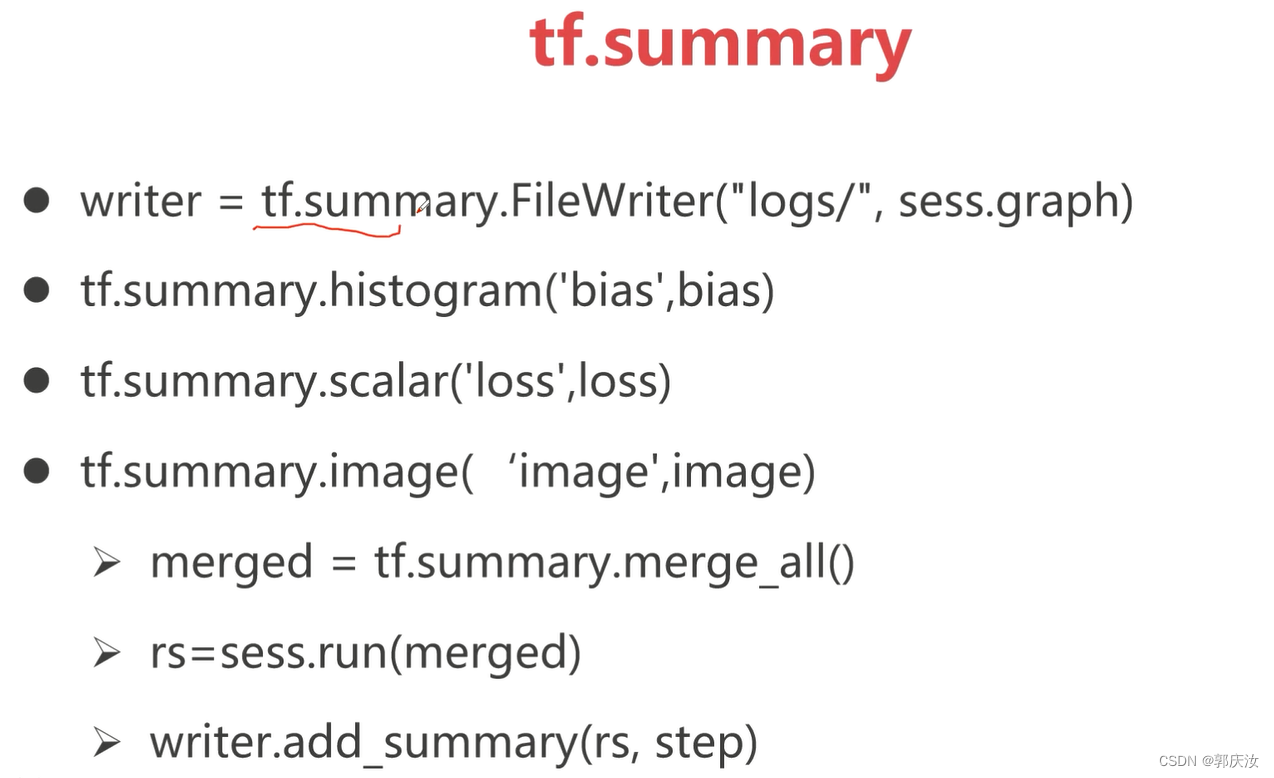
1、tf.summary写入数据方式
16、TensorFlow实战Cifar10图像分类项目代码实现
1、将Cifar10数据打包成TF-record格式
代码:
import tensorflow as tf
import cv2
import numpy as np
classification = ['airplane','automobile','bird','cat','deer','dog','frog','horse','ship','truck']import glob
idx = 0
im_data = []    # gqr:总的图像数据路径list
im_labels = []  # 类别标签对对应的id list
for path in classification:# path = "data/image/train/" + path    # gqr:训练数据路径地址path = "data/image/test/" + path    # gqr:测试数据路径地址im_list = glob.glob(path + "/*")im_label = [idx for i in  range(im_list.__len__())]    # gqr:表示对应图片的id标签idx += 1im_data += im_listim_labels += im_label# print(im_labels)
# print(im_data)# tfrecord_file = "data/train.tfrecord"      # gqr:生成的Tf-record文件存放路径
tfrecord_file = "data/test.tfrecord"      # gqr:生成的Tf-record文件存放路径
writer = tf.python_io.TFRecordWriter(tfrecord_file)   # gqr:定义Tf-record的写入的实例index = [i for i in range(im_data.__len__())]np.random.shuffle(index)      # gqr:对打包的数据进行shuffle处理for i in range(im_data.__len__()):im_d = im_data[index[i]]im_l = im_labels[index[i]]data = cv2.imread(im_d)#data = tf.gfile.FastGFile(im_d, "rb").read()               # gqr:也可以使用该方法读取数据图像,读取到的数据为byte形式,所以以下进行数据封装时不需要再转换成byte形式# gqr:对一组图片的数据与标签进行封装ex = tf.train.Example(features = tf.train.Features(feature = {"image":tf.train.Feature(bytes_list=tf.train.BytesList(value=[data.tobytes()])),    # gqr:图像采用byte格式的形式进行存储"label": tf.train.Feature(int64_list=tf.train.Int64List(value=[im_l])),              # gqr:图片的标签数据是一个int型的数据,所以使用int64_list,value为一个列表的形式}))# gqr:将封装好的数据进行序列化,写入到TF-Record中writer.write(ex.SerializeToString())writer.close()
2、读取Cifar10格式数据与数据增强部分

import tensorflow as tfdef read(batchsize=64, type=1, no_aug_data=1):reader = tf.TFRecordReader() # gqr:创建读写器if type == 0: #trainfile_list = ["data/train.tfrecord"]if type == 1: #testfile_list = ["data/test.tfrecord"]filename_queue = tf.train.string_input_producer(file_list, num_epochs=None, shuffle=True)_, serialized_example = reader.read(filename_queue) # gqr:得到序列化的数据batch = tf.train.shuffle_batch([serialized_example], batchsize, capacity=batchsize * 10,min_after_dequeue= batchsize * 5) # gqr:capacity:队列的容量;min_after_dequeue:最小的队列容量feature = {'image': tf.FixedLenFeature([], tf.string),'label': tf.FixedLenFeature([], tf.int64)}features = tf.parse_example(batch, features = feature) # gqr:对batch size的数据进行解码images = features["image"]img_batch = tf.decode_raw(images, tf.uint8) # gqr:因为image解码格式是字符串,所以需要调用解码函数将其转换成byte格式img_batch = tf.cast(img_batch, tf.float32)img_batch = tf.reshape(img_batch, [batchsize, 32, 32, 3])# gqr:以下为数据增强操作if type == 0 and no_aug_data == 1:distorted_image = tf.random_crop(img_batch,[batchsize, 28, 28, 3]) # gqr:随机的裁剪distorted_image = tf.image.random_contrast(distorted_image,lower=0.8,upper=1.2) # gqr:随机的对比度distorted_image = tf.image.random_hue(distorted_image,max_delta=0.2) # gqr:随机的hsv,饱和度distorted_image = tf.image.random_saturation(distorted_image,lower=0.8,upper=1.2) # gqr:色调img_batch = tf.clip_by_value(distorted_image, 0, 255) # gqr:对处理过的图像进行取值范围的约束img_batch = tf.image.resize_images(img_batch, [32, 32]) # gqr:将图像进行尺寸缩放label_batch = tf.cast(features['label'], tf.int64) # gqr:tf.cast:将张量转换为新类型#-1,1 # gqr:将图像数据处理到[-1,1]之间img_batch = tf.cast(img_batch, tf.float32) / 128.0 - 1.0 # gqr:原始数据是0~255,除以128再减去1,就转换到[-1,1]之间#return img_batch, label_batch
3、网络结构定义、tensorbord具体使用以及模型训练部分

import tensorflow as tf
import readcifar10
slim = tf.contrib.slim
import os
import resnetdef model(image, keep_prob=0.8, is_training=True):# gqr:定义batch-norm相关的参数batch_norm_params = {"is_training": is_training,   # gqr:训练时为True;测试时为False"epsilon":1e-5,    # gqr:防止在进行归一化时除0"decay":0.997,     # gqr:衰减系数'scale':True,'updates_collections':tf.GraphKeys.UPDATE_OPS  # gqr:实现参数的可收集}# gqr:设置卷积操作的作用域with slim.arg_scope([slim.conv2d],weights_initializer = slim.variance_scaling_initializer(), # gqr:采用方差尺度不变的方式进行全局初始化activation_fn = tf.nn.relu,  # gqr:定义卷积层激活函数weights_regularizer = slim.l2_regularizer(0.0001),  # gqr:定义正则化约束,L2正则normalizer_fn = slim.batch_norm,  # gqr:卷积后的Batch-normnormalizer_params = batch_norm_params):     # gqr:定义Batch-norm后指定其参数# gqr:添加对max_pool2d的约束with slim.arg_scope([slim.max_pool2d], padding="SAME"):   # gqr:将padding设置为“SAME”,保证每次池化等比例net = slim.conv2d(image, 32, [3, 3], scope='conv1')   # gqr:scope:对当前的操作进行命名net = slim.conv2d(net, 32, [3, 3], scope='conv2')net = slim.max_pool2d(net, [3, 3], stride=2, scope='pool1')net = slim.conv2d(net, 64, [3, 3], scope='conv3')net = slim.conv2d(net, 64, [3, 3], scope='conv4')net = slim.max_pool2d(net, [3, 3], stride=2, scope='pool2')net = slim.conv2d(net, 128, [3, 3], scope='conv5')net = slim.conv2d(net, 128, [3, 3], scope='conv6')net = slim.max_pool2d(net, [3, 3], stride=2, scope='pool3')net = slim.conv2d(net, 256, [3, 3], scope='conv7')net = tf.reduce_mean(net, axis=[1, 2]) #nhwc--n11c   # gqr:相当于全局平均池化net = slim.flatten(net)   # gqr:展平操作net = slim.fully_connected(net, 1024)    # 全连接层slim.dropout(net, keep_prob)   # gqr:drop out层net = slim.fully_connected(net, 10)return net #10 dim vecdef loss(logits, label):# gqr:分类的lossone_hot_label = slim.one_hot_encoding(label, 10)  # gqr:对label进行one-hot编码slim.losses.softmax_cross_entropy(logits, one_hot_label)    # gqr:使用交叉熵损失reg_set = tf.get_collection(tf.GraphKeys.REGULARIZATION_LOSSES)    # gqr:获取正则化的loss的集合l2_loss = tf.add_n(reg_set)   # gqr:将所有的L2 loss相加到一起,得到总体的l2 lossslim.losses.add_loss(l2_loss)   # gqr:将L2 loss添加到loss中totalloss = slim.losses.get_total_loss()    # gqr:将所有的loss合并到一起return totalloss, l2_lossdef func_optimal(batchsize, loss_val):   # gqr:定义优化器global_step = tf.Variable(0, trainable=False)# gqr:定义学习率# gqr:tf.train.exponential_decay:采用指数衰减形式lr = tf.train.exponential_decay(0.01,   # gqr:初始学习率global_step,  # gqr:当前迭代次数decay_steps= 50000// batchsize,   # 每次衰减对应的步长,为 总样本量//batchsizedecay_rate= 0.95,    # gqr:每次衰减量staircase=False)   # gqr:staircase:学习率衰减形式,False:为平滑衰减 True:为阶梯衰减update_ops = tf.get_collection(tf.GraphKeys.UPDATE_OPS)   # gqr:收集与batch-norm相关的参数,用于对batch-norm进行更新with tf.control_dependencies(update_ops):  # gqr:完成对BN层的更新op = tf.train.AdamOptimizer(lr).minimize(loss_val, global_step)return global_step, op, lr# gqr:定义训练代码
def train():batchsize = 64floder_log = 'logdirs-resnet'   # gqr:日志存放的目录floder_model = 'model-resnet'   # gqr:模型存放路径if not os.path.exists(floder_log):os.mkdir(floder_log)if not os.path.exists(floder_model):os.mkdir(floder_model)tr_summary = set()  # gqr:用于记录训练日志te_summary = set()  # gqr:用于记录测试日志##data  # gqr:获取文件队列中的图片与labeltr_im, tr_label = readcifar10.read(batchsize, 0, 1)    # batchsize=训练批次, type=训练, no_aug_data=数据增强te_im, te_label = readcifar10.read(batchsize, 1, 0)##net   # gqr:定义输入数据input_data = tf.placeholder(tf.float32, shape=[None, 32, 32, 3],name='input_data')   # 定义输入数据input_label = tf.placeholder(tf.int64, shape=[None],name='input_label')keep_prob = tf.placeholder(tf.float32, shape=None,name='keep_prob')is_training = tf.placeholder(tf.bool, shape=None,name='is_training')   # gqr:batch-norm中需要用到的参数logits = model(input_data, keep_prob=keep_prob, is_training=is_training)# logits = resnet.model_resnet(input_data, keep_prob=keep_prob, is_training=is_training)##losstotal_loss, l2_loss = loss(logits, input_label)   # gqr:定义损失函数tr_summary.add(tf.summary.scalar('train total loss', total_loss))    # tf.summary.scalar: 这个方法是添加变量到直方图中tr_summary.add(tf.summary.scalar('test l2_loss', l2_loss))te_summary.add(tf.summary.scalar('train total loss', total_loss))te_summary.add(tf.summary.scalar('test l2_loss', l2_loss))##accurancy  准确率pred_max  = tf.argmax(logits, 1)   # gqr:得到最大值对用的索引值correct = tf.equal(pred_max, input_label)   # gqr:得到bool值accurancy = tf.reduce_mean(tf.cast(correct, tf.float32))   # 得到准确率tr_summary.add(tf.summary.scalar('train accurancy', accurancy))    # gqr:tf.summary.scalar:tensorbord绘制网格图的方式te_summary.add(tf.summary.scalar('test accurancy', accurancy))##op定义优化器,将loss传入其中global_step, op, lr = func_optimal(batchsize, total_loss)tr_summary.add(tf.summary.scalar('train lr', lr))te_summary.add(tf.summary.scalar('test lr', lr))tr_summary.add(tf.summary.image('train image', input_data * 128 + 128))te_summary.add(tf.summary.image('test image', input_data * 128 + 128))with tf.Session() as sess:sess.run(tf.group(tf.global_variables_initializer(),tf.local_variables_initializer()))   # gqr:进项参数的初始化,初始化全局变量与局部变量# gqr:启动文件队列写入线程tf.train.start_queue_runners(sess=sess,coord=tf.train.Coordinator())     # gqr:coord=tf.train.Coordinator():表示启动多线程管理器# gqr:加载预训练模型的操作saver = tf.train.Saver(tf.global_variables(), max_to_keep=5)   # gqr:定义模型存储对象ckpt = tf.train.latest_checkpoint(floder_model)   # gqr: 获取模型文件中最新的文件if ckpt:   # gqr:判断是否存在最先的model,如果存在,则恢复当前的session,传去session和模型saver.restore(sess, ckpt)epoch_val = 100  # gqr:训练的epochtr_summary_op = tf.summary.merge(list(tr_summary))   # gqr:合并日志信息te_summary_op = tf.summary.merge(list(te_summary))summary_writer = tf.summary.FileWriter(floder_log, sess.graph)   # gqr:定义summary.FileWriterfor i in range(50000 * epoch_val):   # gqr:样本总量 x epochtrain_im_batch, train_label_batch = \sess.run([tr_im, tr_label])   # gqr:获取batchsize的训练样本、训练标签# gqr:喂入数据字典feed_dict = {input_data:train_im_batch,input_label:train_label_batch,keep_prob:0.8,is_training:True}# gqr:完成对网络参数的更新_, global_step_val, \lr_val, \total_loss_val, \accurancy_val, tr_summary_str = sess.run([op,global_step,lr,total_loss,accurancy, tr_summary_op],feed_dict=feed_dict)summary_writer.add_summary(tr_summary_str, global_step_val)   # gqr:写入训练集对应的日志信息if i % 100 == 0:print("{},{},{},{}".format(global_step_val,lr_val, total_loss_val,accurancy_val))   # gqr:accurancy_val:为当前batch-size的精度,非总体精度# gqr:测试if i % (50000 // batchsize) == 0:test_loss = 0test_acc = 0for ii in range(10000//batchsize):test_im_batch, test_label_batch = \sess.run([te_im, te_label])feed_dict = {input_data: test_im_batch,input_label: test_label_batch,keep_prob: 1.0,     # gqr:测试期间,dropout为保留率1is_training: False  # gqr:测试期间,BN参数为False}total_loss_val, global_step_val, \accurancy_val, te_summary_str = sess.run([total_loss,global_step,accurancy, te_summary_op],feed_dict=feed_dict)summary_writer.add_summary(te_summary_str, global_step_val)   # gqr:写入测试集对应的日志信息test_loss += total_loss_valtest_acc += accurancy_valprint('test:', test_loss * batchsize / 10000,test_acc* batchsize / 10000)if i % 1000 == 0:saver.save(sess, "{}/model.ckpt{}".format(floder_model, str(global_step_val)))   # gqr:保存模型returnif __name__ == '__main__':train()
4、更换另一个骨干网络——ResNet网络模型骨干网络定义
import tensorflow as tf
slim = tf.contrib.slim# gqr:设置ResNet残差单元
def resnet_blockneck(net, numout, down, stride, is_training):"""net:特征图numout:输出的channel的数量down:在残差模块中,1x1卷积核下采样的倍率stride:步长,用于判断是否进行下采样is_training:BN参数"""batch_norm_params = {'is_training': is_training,'decay': 0.997,'epsilon': 1e-5,'scale': True,'updates_collections': tf.GraphKeys.UPDATE_OPS,}with slim.arg_scope(    # gqr:卷积作用率[slim.conv2d],weights_regularizer=slim.l2_regularizer(0.0001),weights_initializer=slim.variance_scaling_initializer(),activation_fn=tf.nn.relu,normalizer_fn=slim.batch_norm,normalizer_params=batch_norm_params):with slim.arg_scope([slim.batch_norm], **batch_norm_params):with slim.arg_scope([slim.conv2d, slim.max_pool2d], padding='SAME') as arg_sc:shortcut = net   # gqr:将输入的特征图进行备份if numout != net.get_shape().as_list()[-1]:   # gqr:判断输入特征图与输出特征图通道是否一致,不一致,则用1x1卷积核调整shortcut = slim.conv2d(net, numout, [1, 1])if stride != 1:   # gqr:如果strde为2,则进行下采样shortcut = slim.max_pool2d(shortcut, [3, 3],stride=stride)net = slim.conv2d(net, numout // down, [1, 1])    # gqr:调整通道的数量net = slim.conv2d(net, numout // down, [3, 3])net = slim.conv2d(net, numout, [1, 1])   # # gqr:调整通道的数量if stride != 1:    # gqr:为True则进行下采样处理net = slim.max_pool2d(net, [3, 3], stride=stride)net = net + shortcut   # gqr:残差链接return netdef model_resnet(net, keep_prob=0.5, is_training = True):with slim.arg_scope([slim.conv2d, slim.max_pool2d], padding='SAME') as arg_sc:net = slim.conv2d(net, 64, [3, 3], activation_fn=tf.nn.relu)net = slim.conv2d(net, 64, [3, 3], activation_fn=tf.nn.relu)net = resnet_blockneck(net, 128, 4, 2, is_training)net = resnet_blockneck(net, 128, 4, 1, is_training)net = resnet_blockneck(net, 256, 4, 2, is_training)net = resnet_blockneck(net, 256, 4, 1, is_training)net = resnet_blockneck(net, 512, 4, 2, is_training)net = resnet_blockneck(net, 512, 4, 1, is_training)net = tf.reduce_mean(net, [1, 2])net = slim.flatten(net)net = slim.fully_connected(net, 1024, activation_fn=tf.nn.relu, scope='fc1')net = slim.dropout(net, keep_prob, scope='dropout1')net = slim.fully_connected(net, 10, activation_fn=None, scope='fc2')return net
5、保存的文件详解

1、checkpoint:文件记录了最新的模型

2、.meta文件定义的是graph结构
3、.data文件存放了网络具体参数值
17、TensorFlow-slim包进行图像数据集分类—具体流程
查看已写博文:https://blog.csdn.net/guoqingru0311/article/details/132514699


](http://pic.xiahunao.cn/[力扣146. LRU 缓存 ](https://leetcode.cn/problems/lru-cache/description/))

:全局向量的词嵌入(GloVe))
:GPIO接口开发)


)


)


)