这是一个成熟的框架,不是要让别人当小白鼠,它已经先后在两家公司的5条业务线进行了推广应用,用例条数到了几千条以上,并且从2018年开始每天都在CI/CD流程中被调用执行。
已有那么多接口测试框架,为什么重复造轮子?首先,本框架如题目描述,适用于多接口的业务自动化测试,不是简单的接口测试框架;其次框架始于2017、2018 年,当时也没有现在如此多的接口测试框架。
代码地址:https://github.com/HzlGauss/bulls
框架介绍
接口自动化测试无疑是测试提效最为行之有效的方案,市面上的接口自动化测试框架很众多,而本框架与其它框架的区别如以下:
-
用例代码编写简单,让使用者精力集中在所测试系统的业务逻辑上,而 http 接口的定义,请求的发送,测试报告信息等都由框架完成;
-
不只适用于单个接口的测试,同样适用于多个接口组成的完整的业务逻辑的测试,这往往是接口自动化测试更应该做到的;
-
登录等前置的业务操作也由框架完成,用例中只需引用相应 cookie;
-
框架同样支持环境、各类账号以及其它测试物料信息维护;
-
简单易用,java 小白也能在半小时内学会使用。
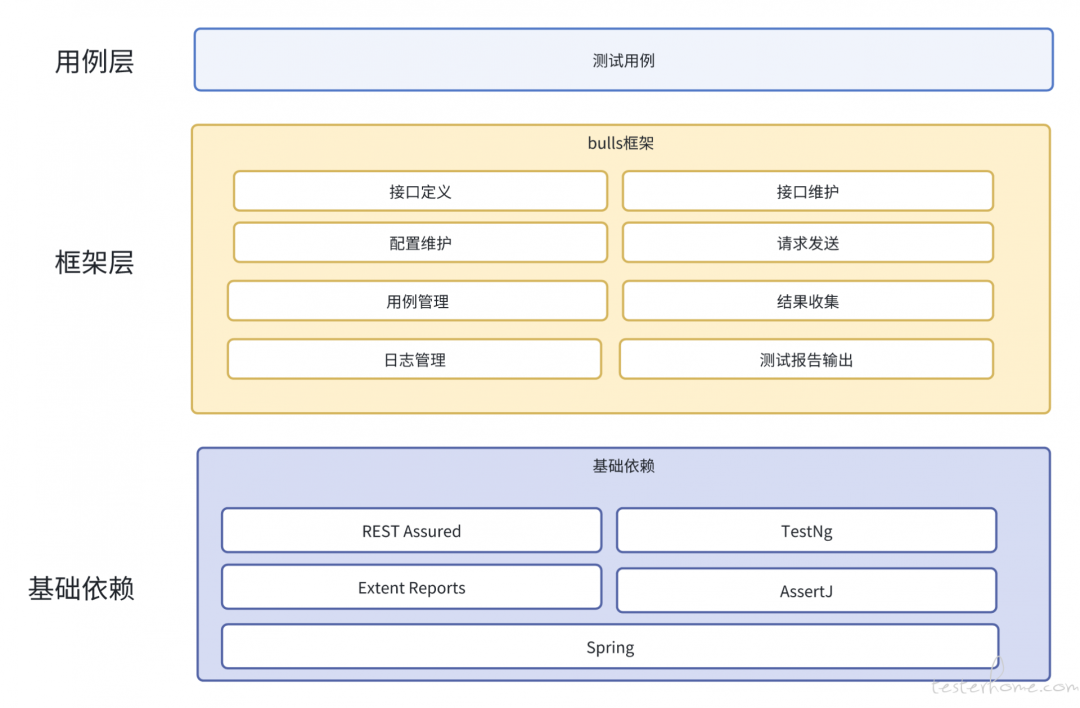
框架结构

现在我也找了很多测试的朋友,做了一个分享技术的交流群,共享了很多我们收集的技术文档和视频教程。
如果你不想再体验自学时找不到资源,没人解答问题,坚持几天便放弃的感受
可以加入我们一起交流。而且还有很多在自动化,性能,安全,测试开发等等方面有一定建树的技术大牛
分享他们的经验,还会分享很多直播讲座和技术沙龙
可以免费学习!划重点!开源的!!!
qq群号:691998057【暗号:csdn999】
上手指南
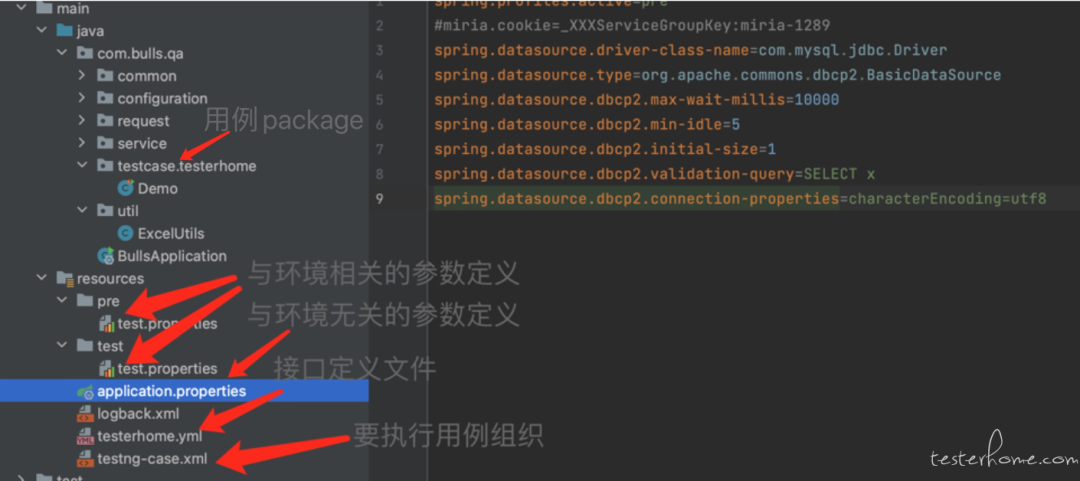
工程结构说明

下面是一个论坛登录、浏览帖子、帖子点赞这样一个简单的业务场景进行举例,如何用框架完成这一几步操作的。
定义http接口
接口定义是在 yml 文件中,建议按照被测系统维护 yml 文件
api:globalVariables:- UA: "Mozilla/5.0(Macintosh;IntelMacOSX10_13_6)AppleWebKit/537.36(KHTML,likeGecko)Chrome/81.0.4044.138Safari/537.36"pioneers:- name: testerhome登录id: testerhomeLoginpriority: 1path: https://$testerhomeHost/account/sign_inmethod: postheaders: >-\{"Content-Type":"application/x-www-form-urlencoded; charset=UTF-8","User-Agent":"$UA","x-requested-with":"XMLHttpRequest","cookie":"user_id=eyJfcmFpbHMiOnsibWVzc2FnZSI6Ik1UVTJOamM9IiwiZXhwIjpudWxsLCJwdXIiOiJjb29raWUudXNlcl9pZCJ9fQ%3D%3D--43f5d4f117b5459e67c85cc6c569820abb1e6068; _homeland_session=Y2ljEAtdhRcbEHaTSSHMb3%2FUyn0aLrFrHoEP8QVjVq%2BvXMCEi9n57WDgHBw40L%2Bo%2Fghe148%2B%2B429DbYDWNAiC4FBFYFnEghtzkQWPpKsOm21DZQkUDLvYqr4Z2ylpkiGHqjpppkhw0LLke61psEh7ZKQte3Ia3TTzTSu9ifDtHEl9FBlZUXNgwi%2F5kscioZqkobTyJpCGp5M4mSrLiunIZUHbgm05AuWa5%2Bu2TwgsxOfpdAumg6Q0SoT7ipMLaGaprobuP0Kj2q5ZH4CKqG7fb%2FU0WwzsTgTCtMXaWLz5WYHizGKRD5CWysSMseGn5I%3D--5LouY27EpiVkGarr--tpTXhgdFShw4Qyn6sThkpg%3D%3D","x-csrf-token":"zr6fgSyPS5nyqcwGdzD7R6T51aAK6L9Dv42Lao0CSPZo4jEn3pT5fNN2eTk84VdmqhzQasF+sdHQrvvxsLYSmg=="\}parameters: user[login]=&user[password]=&user[remember_me]=0&user[remember_me]=1&commit=登录extractors: \[{"name":"token","value":"cookies"}\]requests:- name: 读帖子id: topicspath: https://$testerhomeHost/topics/38484method: getheaders: >-\{"User-Agent":"$UA","Content-Type":"application/x-www-form-urlencoded","cookie":"$token","x-requested-with":"XMLHttpRequest","x-csrf-token":"r3E8899sEAEnqST2dmtIEluqG5C/nL/Rwp2l4ITtNDU3XpF4eULhClMRoWweMt6XWSmBn2H8fmPRas+CVkA/BA=="\}- name: 点赞id: likespath: https://$testerhomeHost/likesmethod: postheaders: >-\{"User-Agent":"$UA","Content-Type":"application/x-www-form-urlencoded","cookie":"$token","x-requested-with":"XMLHttpRequest","x-csrf-token":"r3E8899sEAEnqST2dmtIEluqG5C/nL/Rwp2l4ITtNDU3XpF4eULhClMRoWweMt6XWSmBn2H8fmPRas+CVkA/BA=="\}parameters: type=Topic&id=38484如上,接口定义文件大体分为三部分:globalVariables,pioneers,requests。
-
globalVariables:定义全局变量,为key、value形式
-
pioneers 定义前置接口,用于定义登录等前置接口。程序启动后、用例开始执行前,会自动先执行pioneers中定义的接口。其中name随意起;id 要唯一,建议按照接口请求地址的缩写命名id属性;priority,整数类型,当pioneers中定义了多个接口,执行时会按照priority属性排序,之后顺序执行。extractors:接口返回内容的提取,name,为提取的变量命名,后面接口可以通过 $name 名对其进行引用;value,变量的提取内容,支持提取cookie或返回json字符串中的某个属性 (填写属性的json path)
-
requests定义接口,基本同pioneers部分,少了extractors部分。
说明:此处的接口请求参数可以通过抓包工具抓包获取,然后复制到这里。接口定义只需定义一次,在用例中随意获取,使用接口时,根据需要设置请求参数,未设置的请求参数按照此处定义的值作为默认值。
用例代码:
@Test(enabled = true, description = "打开帖子详情页→点赞")public void test() {log.info("test start");//请求实例1,打开帖子详情页Request request = Request.getInstance("topics");//请求1发送Response response = request.doRequest();//返回为html,取其中的x_csrf_token,后面点赞接口用String html = response.asString();Headers headers = response.getHeaders();Map<String, String> cookies = response.getCookies();Document document = Jsoup.parse(html);Element metaElement = document.select("meta[name=csrf-token]").first();String x_csrf_token = null;if (metaElement != null) {x_csrf_token = metaElement.attr("content");}//请求实例2,点赞接口request = Request.getInstance("likes");//更新cookierequest.addCookies(cookies);if (x_csrf_token != null) {request.addHeader("x-csrf-token",x_csrf_token);}//发送点赞请求response = request.doRequest();assertThat(response.getStatusCode()).isGreaterThanOrEqualTo(200).as("返回状态码校验");}测试报告
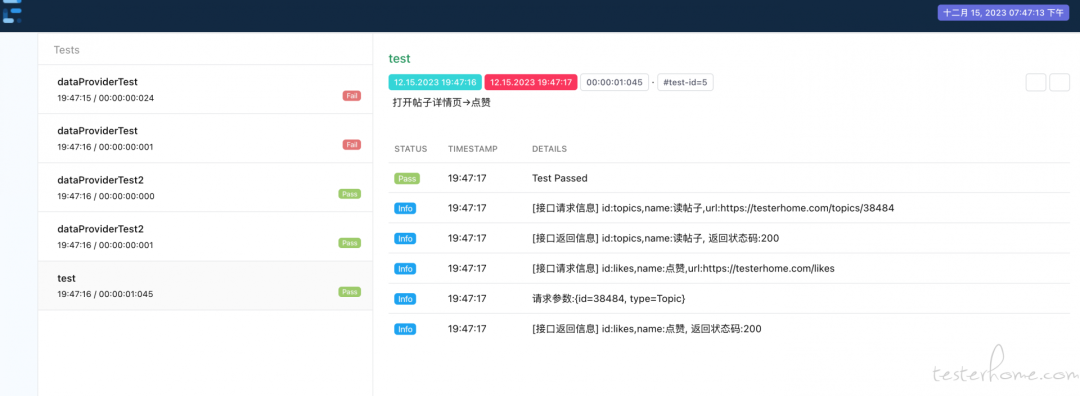
如下图,用例相关接口的请求信息、返回信息也都由框架自动记录在了报告中,如有其它需要内容输出到测试报告,可以在用例中添加 Report.log("要添加内容")。

其它
-
配置:如其它 spring 工程,配置文件在 resources 目录下,类似 pre、test 区分不同环境,application.properties 中定义一般的配置信息(和环境无光),其中 pring.profiles.active=pre 来切换不同环境
-
测试范围定义:测试用例由testng维护,如框架中所示,详细使用方法参见testng官网(https://testng.org/doc/documentation-main.html#testng-xml)
<!DOCTYPE suite SYSTEM "http://testng.org/testng-1.0.dtd" ><suite verbose="1" name="bulls-test" ><listeners><listener class-name="com.bulls.qa.service.CustomListener"></listener><listener class-name="com.bulls.qa.service.NoticeListener"></listener></listeners><test name="bulls自动化" preserve-order="true"><parameter name="reruntimes" value="0"></parameter><packages></packages><classes><class name="com.bulls.qa.testcase.testerhome.Demo"><methods><include name="test"></include></methods></class></classes></test></suite> -
运行:项目入口 com.bulls.qa.BullsApplication.main
//打包
mvn clean -DskipTests=true  package
//运行
java -jar target/bulls-0.6-SNAPSHOT.jar  测试范围配置文件.xml
如上面例子,测试范围配置文件可以配置多个,执行时指定测试范围,如不指定默认使用打包的程序代码中的测试范围配置文件
-
测试报告:测试报道为单html文件,方便jenkins配置展示,报告地址运行时所在目录下bulls.html
-
断言,选用的断言框架为 AssertJ,AssertJ 的强大无需赘述,详细使用方法参见 AssertJ 官网(https://assertj.github.io/doc/)
assertThat(response.jsonPath().getList("recommendations")).size().isGreaterThan(0).as("recommendations长度大于0");assertThat(response.jsonPath().getBoolean("has_more")).isTrue().as("has_more为true");assertThat(response.jsonPath().getList("recommendations")).as("recommendations长度大于0").size().isEqualTo(3);List<String> types = JsonPath.from(response.asString()).getList("recommendations.item_type");String[] strs = "product,product-ad-card,deal,ad,shopping-curated-collection,auto-generated-collection,video,campaign-banner,benefit,web-view".split(",");assertThat(strs).containsAll(types).as("types在枚举范围内");-
发送测试结果消息通知,参见代码 NoticeListener,具体根据需要自行扩展
-
接口传参设置,较复杂的接口参数设置
相关接口定义
- name: 编辑商品id: itemEditpath: http://$mnghost/item/editmethod: postcookies: $XXXXXXCookiesheaders: >-\{"User-Agent":"$UA","Content-Type": "application/json"\}parameters: >-\{"itemId":"2904"\}- name: 添加商品id: itemSavepath: http://$mnghost/item/savemethod: postcookies: $XXXCookiesheaders: >-\{"User-Agent":"$UA","Content-Type": "application/json"\}parameters: >-\{"itemId":"2913","categoryIdList":[1],"topCategoryName":"美食","itemName":"autoTest goods","limitNumber":3,"priceText":"","countDownCycle":"3","countDownLimit":"1","itemNo":"12sqw","delivery":"MANUAL","image":"//yun.XXXXXX.com/images/202005/4su03vvahd.jpg","detail":"","itemStatus":"ON","skuProperties":[],"skuList":[{"id":3375,"stock":999999,"stockId":null,"sellingPrice":100,"originalPrice":100,"costPrice":100,"realPayPrice":100,"properties":null,"skuNo":"1","skuEnable":true,"changeStock":0}],"supportCOD":true,"originItemId":null,"merchantId":73,"tagIds":[],"id":2913,"topCategoryId":1,"itemShortName":"autoTest goo","url":null,"minPrice":100,"stock":0,"isRecommend":false,"minSkuOriginalPrice":null,"minSkuPriceDiff":null,"maxPriceDiff":null,"maxPriceDiffPrice":null,"maxPriceDiffOriginalPrice":null,"gmtModified":"2020-06-19 16:57:36","gmtModifyName":"测试专用","gmtModifyEmail":"test@XXXXXX.com.cn","mainRecomIds":null,"merchantName":"autoTestShop01","merchantDelivery":"MANUAL","imgHeight":[{"imgUrl":"http://yun.XXXXXX.com/images/202006/mj3yg07pj8.jpg","height":136},{"imgUrl":"http://yun.XXXXXX.com/images/202006/d47ad68hhc.jpg","height":372}],"mainImgUrl":null,"itemIntroduce":null,"saleLableUrl":null,"ssoDesc":null\}相关代码
goodsId = 2904;//编辑接口,获取测试的商品信息Request request = Request.getInstance("itemEdit");//直接设置,key-value形式Response response = request.setParameter("itemId", goodsId).doRequest();//库存小于50,更新库存JsonPath jsonPath = response.jsonPath();if (jsonPath.getBoolean("success") && jsonPath.getInt("data.stock") >= 50) {// dosomething}Map<String, Object> map = response.jsonPath().getMap("data");if (map == null) {map = new HashMap<>();}map.put("itemId", goodsId);map.put("stock", 9999999);request = Request.getInstance("itemSave");//遍历接口的传参结构定义,替换掉key完全匹配的那个map部分request.setParameters(map);//按照json path定位要设置的keyrequest.setParameter("$.skuList[0].stock", 9999999);request.setParameter("$.skuList[0].changeStock", null);//根据路径删除,路径按json pathrequest.removeParameterByPath("$.skuList[0].stockId");request.removeParameterByPath("$.skuList[0].id");request.doRequest();-
详尽的json-path使用方法,参见JsonPath使用(https://www.javadoc.io/doc/io.rest-assured/json-path/latest/io/restassured/path/json/JsonPath.html)
END今天的分享就到此结束了!点赞关注不迷路!


)


