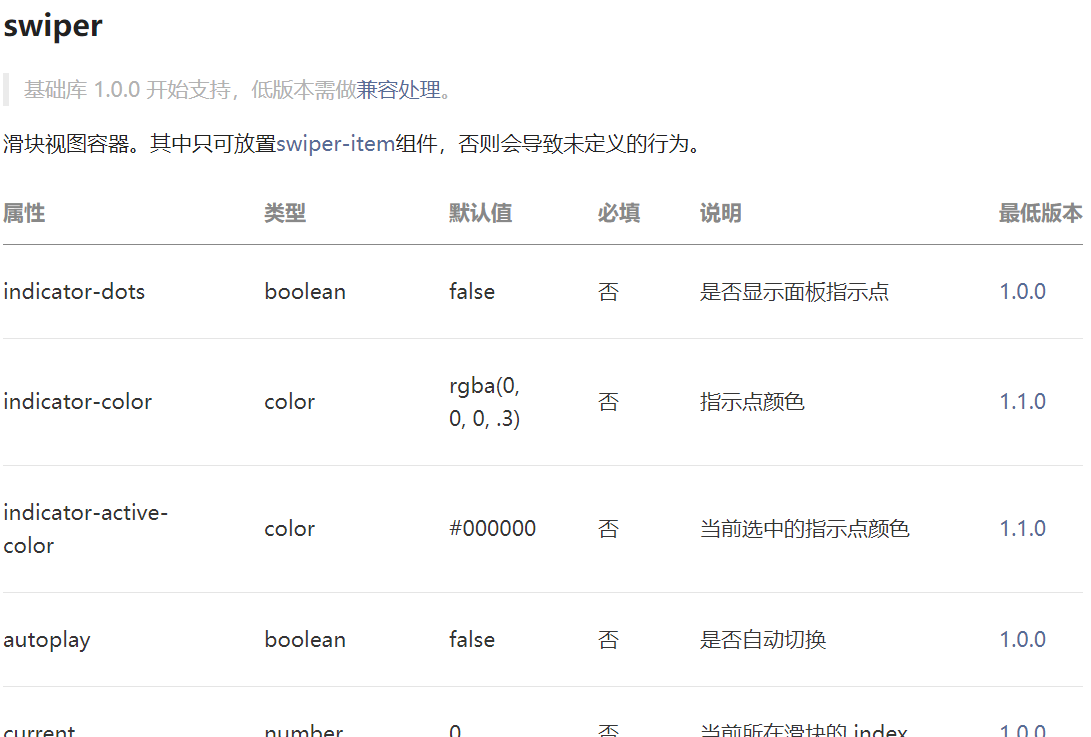
相信大家在平常购物的时候都会看到轮播图,轮播图里面播放的是热门商品的信息。在小程序里面我们可以通过swiper滑动视图容器组件来实现,让我们一起来看下swiper组件都有哪些属性:

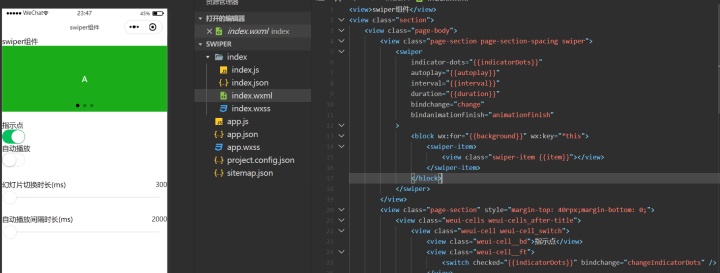
我们看到可以通过一些属性给视图容器增加一些指示点,这些指示点代表了这些滑块在容器中的位置。我们也可以设置指示点的颜色或者对当前选中的指示点设置颜色,同时我们也可以通过autoplay这个属性来设置自动播放轮播图。现在让我们通过一个实例来看下吧:

从图中我们可以看到,通过<button>组件我们可以设置轮播图的一些功能:
<!--index.wxml-->
<view>swiper组件</view>
<view class="section">
<view class="page-body">
<view class="page-section page-section-spacing swiper">
<swiper
indicator-dots="{{indicatorDots}}"
autoplay="{{autoplay}}"
interval="{{interval}}"
duration="{{duration}}"
bindchange="change"
bindanimationfinish="animationfinish"
>
<block wx:for="{{background}}" wx:key="*this">
<swiper-item>
<view class="swiper-item {{item}}"></view>
</swiper-item>
</block>
</swiper>
</view>
<view class="page-section" style="margin-top: 40rpx;margin-bottom: 0;">
<view class="weui-cells weui-cells_after-title">
<view class="weui-cell weui-cell_switch">
<view class="weui-cell__bd">指示点</view>
<view class="weui-cell__ft">
<switch checked="{{indicatorDots}}" bindchange="changeIndicatorDots" />
</view>
</view>
<view class="weui-cell weui-cell_switch">
<view class="weui-cell__bd">自动播放</view>
<view class="weui-cell__ft">
<switch checked="{{autoplay}}" bindchange="changeAutoplay" />
</view>
</view>
</view>
</view>
<view class="page-section page-section-spacing">
<view class="page-section-title">
<text>幻灯片切换时长(ms)</text>
<text class="info">{{duration}}</text>
</view>
<slider bindchange="durationChange" value="{{duration}}" min="500" max="2000" />
<view class="page-section-title">
<text>自动播放间隔时长(ms)</text>
<text class="info">{{interval}}</text>
</view>
<slider bindchange="intervalChange" value="{{interval}}" min="2000" max="10000" />
</view>
</view>
</view>
/*index.wxss*/
button {
margin-bottom: 30rpx;
}
button:last-child {
margin-bottom: 0;
}
.page-body {
width: 100%;
}
.page-section-title {
padding: 0;
}
.swiper-item {
display: block;
height: 150px;
}
.page-section-title {
margin-top: 60rpx;
position: relative;
}
.info {
position: absolute;
right: 0;
color: #353535;
font-size: 30rpx;
}
.page-foot {
margin-top: 50rpx;
}
.demo-text-1 {
position: relative;
align-items: center; /*居中对齐各项demo-text-1元素*/
justify-content: center; /*居中排列,周围留有空白*/
background-color: #1AAD19;
color: #FFFFFF;
font-size: 36rpx;
}
.demo-text-1:before { /*向demo-text-1元素前加入*/
content: 'A';
position: absolute;
top: 50%;
left: 50%;
transform: translate(-50%, -50%);
}
.demo-text-2 {
position: relative;
align-items: center;
justify-content: center;
background-color: #2782D7;
color: #FFFFFF;
font-size: 36rpx;
}
.demo-text-2:before {
content: 'B';
position: absolute;
top: 50%;
left: 50%;
transform: translate(-50%, -50%); /*旋转元素*/
}
.demo-text-3 {
position: relative;
align-items: center;
justify-content: center;
background-color: #F1F1F1;
color: #353535;
font-size: 36rpx;
}
.demo-text-3:before {
content: 'C';
position: absolute;
top: 50%;
left: 50%;
transform: translate(-50%, -50%);
}
//index.js
Page({
data: {
background: ['demo-text-1', 'demo-text-2', 'demo-text-3'],
indicatorDots: true,
vertical: false,
autoplay: false,
interval: 2000,
duration: 300
},
changeIndicatorDots: function (e) {
console.log('切换指示点开关');
this.setData({
indicatorDots: !this.data.indicatorDots /*!在Javascript中是取反的意思*/
})
},
changeAutoplay: function (e) {
console.log('切换自动播放开关');
this.setData({
autoplay: !this.data.autoplay
})
},
intervalChange: function (e) {
console.log(`调整自动播放间隔时长为: ${e.detail.value}ms`);
this.setData({
interval: e.detail.value /*取值*/
})
},
durationChange: function (e) {
console.log(`调整幻灯片切换时长为: ${e.detail.value}ms`);
this.setData({
duration: e.detail.value
})
},
animationfinish: function(e) {
console.log(e);
},
change: function(e) {
console.log(e);
}
})
今天的内容就到这里了,我们明天见。


概述与线性结构)


