Swagger 是一个规范和完整的框架,用于生成、描述、调用和可视化 RESTful 风格的 Web 服务。总体目标是使客户端和文件系统作为服务器以同样的速度来更新。文件的方法,参数和模型紧密集成到服务器端的代码,允许API来始终保持同步。
作用:
接口的文档在线自动生成。
功能测试。
下面通过实现一个web项目来演示Swagger的使用。
1. 新建SpringMVC项目
1.1 新建项目
新建基于maven的web项目,导入spring相关依赖如下
4.0.0
com.zang.xz
mySwagger
0.0.1-SNAPSHOT
war
mySwagger Maven Webapp
http://www.example.com
UTF-8
4.3.6.RELEASE
com.fasterxml.jackson.core
jackson-databind
2.8.9
org.springframework
spring-core
${spring.framework.version}
org.springframework
spring-context
${spring.framework.version}
org.springframework
spring-webmvc
${spring.framework.version}
mySwagger
1.2 配置web.xml和spring-mvc.xml
web.xml
Archetype Created Web Application
spring-mvc
org.springframework.web.servlet.DispatcherServlet
contextConfigLocation
classpath:spring-mvc.xml
1
true
spring-mvc
/
encodingFilter
org.springframework.web.filter.CharacterEncodingFilter
encoding
UTF-8
forceEncoding
true
encodingFilter
/*
spring-mvc.xml
http://www.springframework.org/schema/context http://www.springframework.org/schema/context/spring-context-4.0.xsd
http://www.springframework.org/schema/mvc http://www.springframework.org/schema/mvc/spring-mvc-4.0.xsd">
1.3 新建entity和controller测试
为求简便,这里不集成dao层,数据直接从controller中封装返回。
Product.java
packagecom.zang.xz.entity;public classProduct {private static final long serialVersionUID = 1L;/**ID*/
privateLong id;/**产品名称*/
privateString name;/**产品型号*/
privateString productClass;/**产品ID*/
privateString productId;publicLong getId() {returnid;
}public voidsetId(Long id) {this.id =id;
}publicString getName() {returnname;
}public voidsetName(String name) {this.name =name;
}publicString getProductClass() {returnproductClass;
}public voidsetProductClass(String productClass) {this.productClass =productClass;
}publicString getProductId() {returnproductId;
}public voidsetProductId(String productId) {this.productId =productId;
}
@OverridepublicString toString() {return "Product [id=" + id + ", name=" + name + ", productClass="
+ productClass + ", productId=" + productId + "]";
}
}
ProductController.java
packagecom.zang.xz.controller;importjava.util.Arrays;importjava.util.List;importorg.springframework.http.ResponseEntity;importorg.springframework.web.bind.annotation.PathVariable;importorg.springframework.web.bind.annotation.RequestMapping;importorg.springframework.web.bind.annotation.RequestMethod;importorg.springframework.web.bind.annotation.RestController;importcom.zang.xz.entity.Product;
@RestController
@RequestMapping(value= {"/product/"})public classProductController {
@RequestMapping(value= "/{id}", method =RequestMethod.GET)public ResponseEntityget(@PathVariable Long id) {
Product product= newProduct();
product.setName("空气净化器");
product.setId(1L);
product.setProductClass("filters");
product.setProductId("T12345");returnResponseEntity.ok(product);
}
}
测试

至此,创建了一个简单的基于SpringMVC的Web项目,并能对外提供REST风格的API接口。接下来,我们要整合SpringFox和SwaggerUI到该SpringMVC项目中去,使其对外接口文档化。
2. 集成Swagger
2.1 添加swagger相关jar包
io.springfox
springfox-swagger2
2.7.0
io.springfox
springfox-swagger-ui
2.7.0
此处swagger 的核心依赖使用springfox-swagger2,SpringFox已经可以代替swagger-springmvc, 目前SpringFox同时支持Swagger 1.2 和 2.0。
2.2 添加SwaggerConfig
packagecom.zang.xz.controller;importorg.springframework.context.annotation.Bean;importorg.springframework.context.annotation.Configuration;importspringfox.documentation.builders.ApiInfoBuilder;importspringfox.documentation.builders.RequestHandlerSelectors;importspringfox.documentation.service.ApiInfo;importspringfox.documentation.spi.DocumentationType;importspringfox.documentation.spring.web.plugins.Docket;importspringfox.documentation.swagger2.annotations.EnableSwagger2;
@Configuration
@EnableSwagger2public classSwaggerConfig {
@BeanpublicDocket api() {return newDocket(DocumentationType.SWAGGER_2)
.select()
.apis(RequestHandlerSelectors.any())//显示所有类//.apis(RequestHandlerSelectors.withClassAnnotation(Api.class))//只显示添加@Api注解的类
.build()
.apiInfo(apiInfo());
}privateApiInfo apiInfo() {return newApiInfoBuilder()
.title("开放接口API") //粗标题
.description("HTTP对外开放接口") //描述
.version("1.0.0") //api version
.termsOfServiceUrl("http://xxx.xxx.com")
.license("LICENSE") //链接名称
.licenseUrl("http://xxx.xxx.com") //链接地址
.build();
}
}
2.3 静态资源访问配置
上面引入的springfox-swagger-ui依赖为我们提供了静态资源访问的支持,通过访问他为我们提供的页面,可以直观的看出项目所开放的接口API。

要想访问该页面,还需要增加访问配置,方法有两种:
2.3.1 在spring-mvc.xml中增加配置
2.3.2 或者增加配置类WebAppConfig
packagecom.zang.xz.controller;importorg.springframework.context.annotation.Configuration;importorg.springframework.web.servlet.config.annotation.EnableWebMvc;importorg.springframework.web.servlet.config.annotation.ResourceHandlerRegistry;importorg.springframework.web.servlet.config.annotation.WebMvcConfigurerAdapter;
@Configuration
@EnableWebMvcpublic class WebAppConfig extendsWebMvcConfigurerAdapter {
@Overridepublic voidaddResourceHandlers(ResourceHandlerRegistry registry) {
registry.addResourceHandler("swagger-ui.html").addResourceLocations("classpath:/META-INF/resources/");
registry.addResourceHandler("/webjars/**").addResourceLocations("classpath:/META-INF/resources/webjars/");
}
}
3. 测试API接口
3.1 访问“项目地址/swagger-ui.html#/”查看api
访问 http://localhost:8090/mySwagger/swagger-ui.html#/出现如下界面,说明我们的swagger集成项目成功。
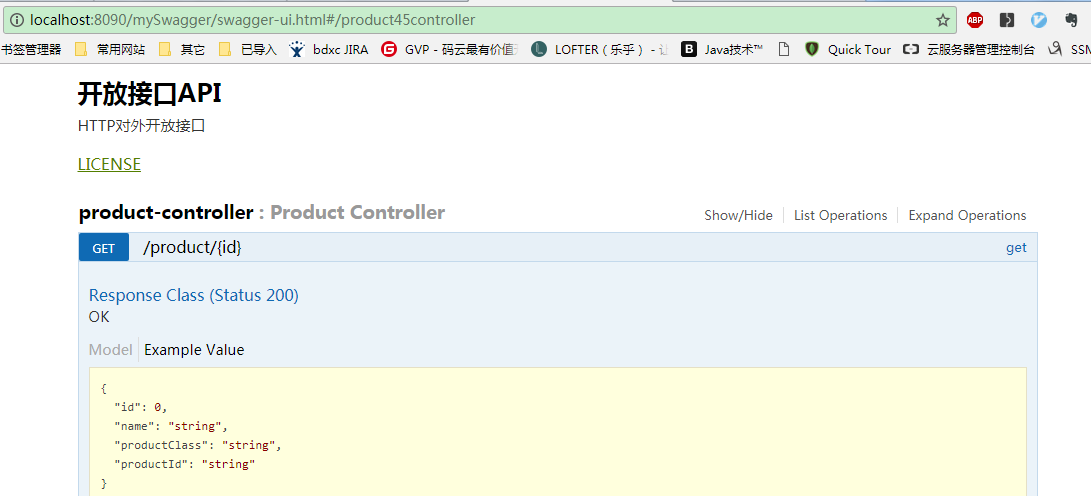
在参数中输入信息,可实现对接口的调用

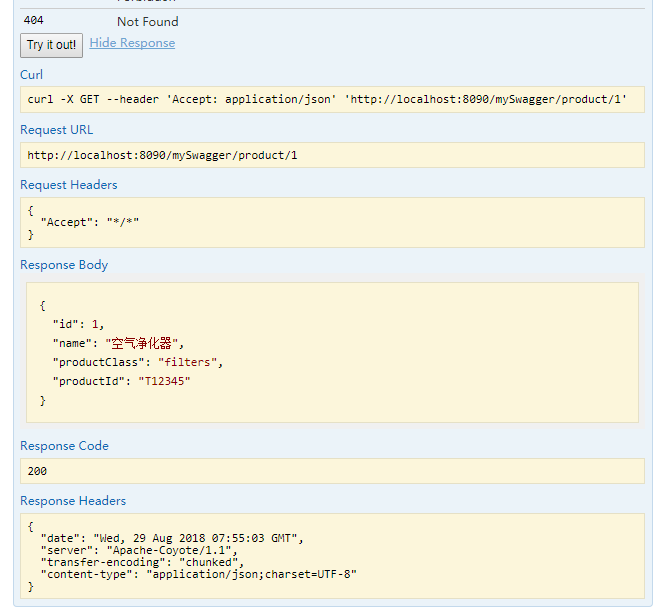
但是单调的页面没有实现swagger作为API文档工具的作用,这需要我们通过注解在接口方法中配置。
3.2 通过注解生成API文档
常用注解如下:
常用注解:
@Api()用于类; 表示标识这个类是swagger的资源
@ApiOperation()用于方法; 表示一个http请求的操作
@ApiParam()用于方法,参数,字段说明; 表示对参数的添加元数据(说明或是否必填等)
@ApiModel()用于类 表示对类进行说明,用于参数用实体类接收
@ApiModelProperty()用于方法,字段 ;表示对model属性的说明或者数据操作更改
@ApiIgnore()用于类,方法,方法参数 ;表示这个方法或者类被忽略
@ApiImplicitParam() 用于方法 ;表示单独的请求参数
@ApiImplicitParams() 用于方法,包含多个 @ApiImplicitParam
@RestController
@RequestMapping(value= { "/product/"})//类上加@Api注解
@Api(value = "/ProductController", tags = "接口开放示例")public classProductController {
@RequestMapping(value= "/{id}", method =RequestMethod.GET)//方法上加ApiOpreation注解
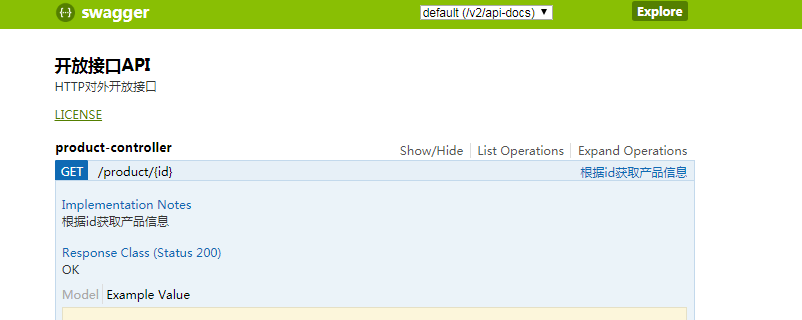
@ApiOperation(value = "根据id获取产品信息", notes = "根据id获取产品信息", httpMethod = "GET", response = Product.class)public ResponseEntityget(@PathVariable Long id) {
Product product= newProduct();
product.setName("空气净化器");
product.setId(1L);
product.setProductClass("filters");
product.setProductId("T12345");returnResponseEntity.ok(product);
}
}
添加注解之后,访问swagger界面如下
3.3 其他方法测试
多增加几个测试方法
@RequestMapping(method =RequestMethod.POST)
@ApiOperation(value= "添加一个新的产品")
@ApiResponses(value= { @ApiResponse(code = 405, message = "参数错误") })public ResponseEntityadd(Product product) {return ResponseEntity.ok("SUCCESS");
}
@RequestMapping(method=RequestMethod.PUT)
@ApiOperation(value= "更新一个产品")
@ApiResponses(value= { @ApiResponse(code = 400, message = "参数错误") })public ResponseEntityupdate(Product product) {return ResponseEntity.ok("SUCCESS");
}
@RequestMapping(method=RequestMethod.GET)
@ApiOperation(value= "获取所有产品信息", notes = "获取所有产品信息", httpMethod = "GET", response = Product.class, responseContainer = "List")public ResponseEntity>getAllProducts() {
Product product= newProduct();
product.setName("七级滤芯净水器");
product.setId(1L);
product.setProductClass("seven_filters");
product.setProductId("T12345");returnResponseEntity.ok(Arrays.asList(product, product));
}
swagger界面为不同方法提供不同颜色显示,可在其中对各个接口进行测试
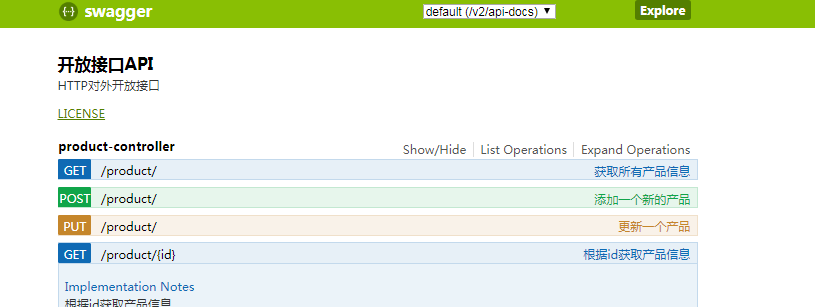
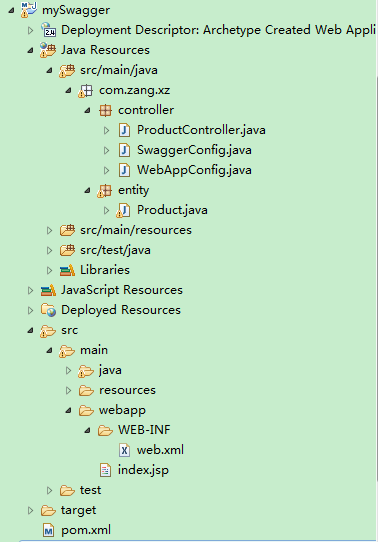
项目结构如下:


)


)


详解)