1. 项目背景
要啥项目背景,就是干!!!
- SpringBoot版本:2.7.12
2. Rabbit MQ安装
这里讲解使用docker安装RabbitMQ,如果在windows下面安装RabbitMQ,参考下文
【笑小枫的按步照搬系列】Windows下安装RabbitMQ,图文完整教程
本文演示使用的windows下的mq,下面额外提供下使用docker安装RabbitMQ。
2.1 docker拉取RabbitMQ镜像
[root@k8s-n1 /]# docker pull rabbitmq:3.7.7-management
如下图:

2.2 创建挂载目录
[root@k8s-n1 /]# mkdir /mnt/rabbitMQ/data
2.3 查看下载镜像的镜像id
[root@k8s-n1 /]# docker images

2.4 启动docker里的RabbitMQ镜像
[root@k8s-n1 /]# docker run -d --name rabbitmq3.7.7 -p 5672:5672 -p 15672:15672 -v /mnt/rabbitMQ/data:/var/lib/rabbitmq --hostname myRabbit -e RABBITMQ_DEFAULT_VHOST=my_vhost -e RABBITMQ_DEFAULT_USER=admin -e RABBITMQ_DEFAULT_PASS=admin 2888deb59dfc
参数说明:
-d 后台运行容器;
–name 指定容器名;
-p 指定服务运行的端口(5672:应用访问端口;15672:控制台Web端口号);
-v 映射目录或文件;
–hostname 主机名(RabbitMQ的一个重要注意事项是它根据所谓的 “节点名称” 存储数据,默认为主机名);
-e 指定环境变量;(RABBITMQ_DEFAULT_VHOST:默认虚拟机名;RABBITMQ_DEFAULT_USER:默认的用户名;RABBITMQ_DEFAULT_PASS:默认用户名的密码)
2.5 启动成功
[root@k8s-n1 /]# docker ps
- 查看docker容器:

- 浏览器访问
用浏览器访问http://192.168.2.21:15672访问成功,表示RabbitMQ安装成功。 
3. Rabbit MQ基础概念
3.1 虚拟机(Virtual Host)
虚拟主机,表示一批交换器、消息队列和相关对象。
虚拟主机是共享相同的身份认证和加密环境的独立服务器域。
vhost 是 AMQP 概念的基础,必须在连接时指定,RabbitMQ 默认的 vhost 是 / 。每个 vhost 本质上就是一个 mini 版的 RabbitMQ 服务器,拥有自己的队列、交换器、绑定和权限机制。
3.2 发布者、消费者
- 发布者(Publisher)
生产消息,并将其推送到broker。
- 消费者(Consumer)
消费者消费消息。
3.3 交换机(exchange)
- 默认交换机Default Exchange
默认交换机是直接交换机的一种特殊形式,能够使得它对简单的应用程序非常有用,即创建的每个队列都会自动绑定到默认交换机上,并使用与队列名称相同的routing key。
常用场景
没有配置交换机使用的都是默认交换机
- 直接交换机Direct Exchange
直接交换机根据消息的routing key将消息传递到匹配的队列。直接交换机是消息单播路由的理想选择,但是也可以广播。
常用场景
- 点对点聊天
- 新闻消息分类(体育、娱乐、社会等)分发
- 扇形交换机Fanout Exchange
扇形交换机将消息路由到绑定到它的所有队列,并忽略routing key。如果N个队列绑定到扇形交换机,则当向该交换机发布消息时,该消息的副本将传递给这N个队列。
常用场景
- 大型多人在线游戏可将扇形交换机用于排行榜(积分、名次等)更新
- 体育新闻网站可以使用扇形交换机向移动客户端近乎实时地分发分数更新
- 分布式系统可以利用扇形交换机,广播各种状态和配置的更新
- 群聊可以利用扇形交换机分发消息
- 主题交换机Topic Exchange
主题交换机会将消息路由到和其绑定的一个或者多个队列。主题交换机通常用于发布订阅模式,以及广播。当一个问题涉及到多个消费者/应用程序,它们有选择地选择要接收哪种类型的消息时,应考虑使用主题交换机。
主题交换机对路由键进行模式匹配后进行投递,符号#表示一个或多个词,*表示一个词。因此“abc.#”能够匹配到“abc.def.ghi”,但是“abc.*” 只会匹配到“abc.def”。
常用场景
- 多个工作线程处理后台任务,每个工作线程处理特定的任务
- 股票价格更新(以及其他类型财务数据的更新)
- 头交换机Headers Exchange
头交换机,不处理路由键,而是根据发送的消息内容中的headers属性进行匹配。
3.4 队列(Queue)
队列存储消息。发布者生成的消息都在队列中,消费者从队列中获取消息进行消费。
3.5 路由键(Routing Key)
路由关键字,exchange根据这个关键字进行消息投递。
4. SpringBoot集成Rabbit MQ
4.1 环境准备
SpringBoot创建过程不多介绍,这里就是一个最简单的项目,文末提供项目源码
- 软件版本
SpringBoot 2.7.12
Erlang 25.2.1
RabbitMQ 3.11.0
- 添加依赖
pom.xml
<!-- 引入MQ依赖 --><dependency><groupId>org.springframework.boot</groupId><artifactId>spring-boot-starter-amqp</artifactId></dependency>
- 添加配置文件
application.yml
server:port: 8080spring:rabbitmq:addresses: 127.0.0.1:5672username: guestpassword: guest# 环境隔离,默认使用“/”(虚拟主机)virtual-host: /connection-timeout: 6000
4.2 单生产者单消费者,简单的小栗子
配置队列
import org.springframework.amqp.core.Queue;
import org.springframework.context.annotation.Bean;
import org.springframework.context.annotation.Configuration;/*** @author 笑小枫 <https://www.xiaoxiaofeng.com/>* @date 2023/12/18*/
@Configuration
public class SimpleQueueConfig {/*** 使用默认的交换机,进行消息发布消费*/@Beanpublic Queue simpleQueue() {return new Queue("simpleQueue");}
}
生产者代码
import lombok.AllArgsConstructor;
import lombok.extern.slf4j.Slf4j;
import org.springframework.amqp.core.AmqpTemplate;
import org.springframework.stereotype.Component;/*** @author 笑小枫 <https://www.xiaoxiaofeng.com/>* @date 2023/12/18*/
@Component
@AllArgsConstructor
@Slf4j
public class SimpleMsgSender {private final AmqpTemplate rabbitTemplate;/*** 直接没有配置交换机(exchange),使用默认的交换机*/public void send(String msg) {rabbitTemplate.convertAndSend("simpleQueue", msg);log.info("SimpleMsgSender 发送消息成功:" + msg);}
}
消费者代码
import lombok.extern.slf4j.Slf4j;
import org.springframework.amqp.rabbit.annotation.RabbitListener;
import org.springframework.stereotype.Component;/*** @author 笑小枫 <https://www.xiaoxiaofeng.com/>* @date 2023/12/18*/
@Component
@Slf4j
public class SimpleMsgReceiver {/*** 监听simpleQueue队列的消息,进行消费*/@RabbitListener(queues = "simpleQueue")public void simpleMsgHandle(String msg) {log.info("SimpleMsgReceiver消费消息: " + msg);}
}
模拟发送消息调用
/*** 模拟使用默认的交换机,调用消息发送*/@GetMapping("/simpleQueueSend")public String simpleQueueSend(String msg) {simpleMsgSender.send(msg);return "发送成功";}
GET http://localhost:8080/simpleQueueSend?msg=一条简单MQ测试消息

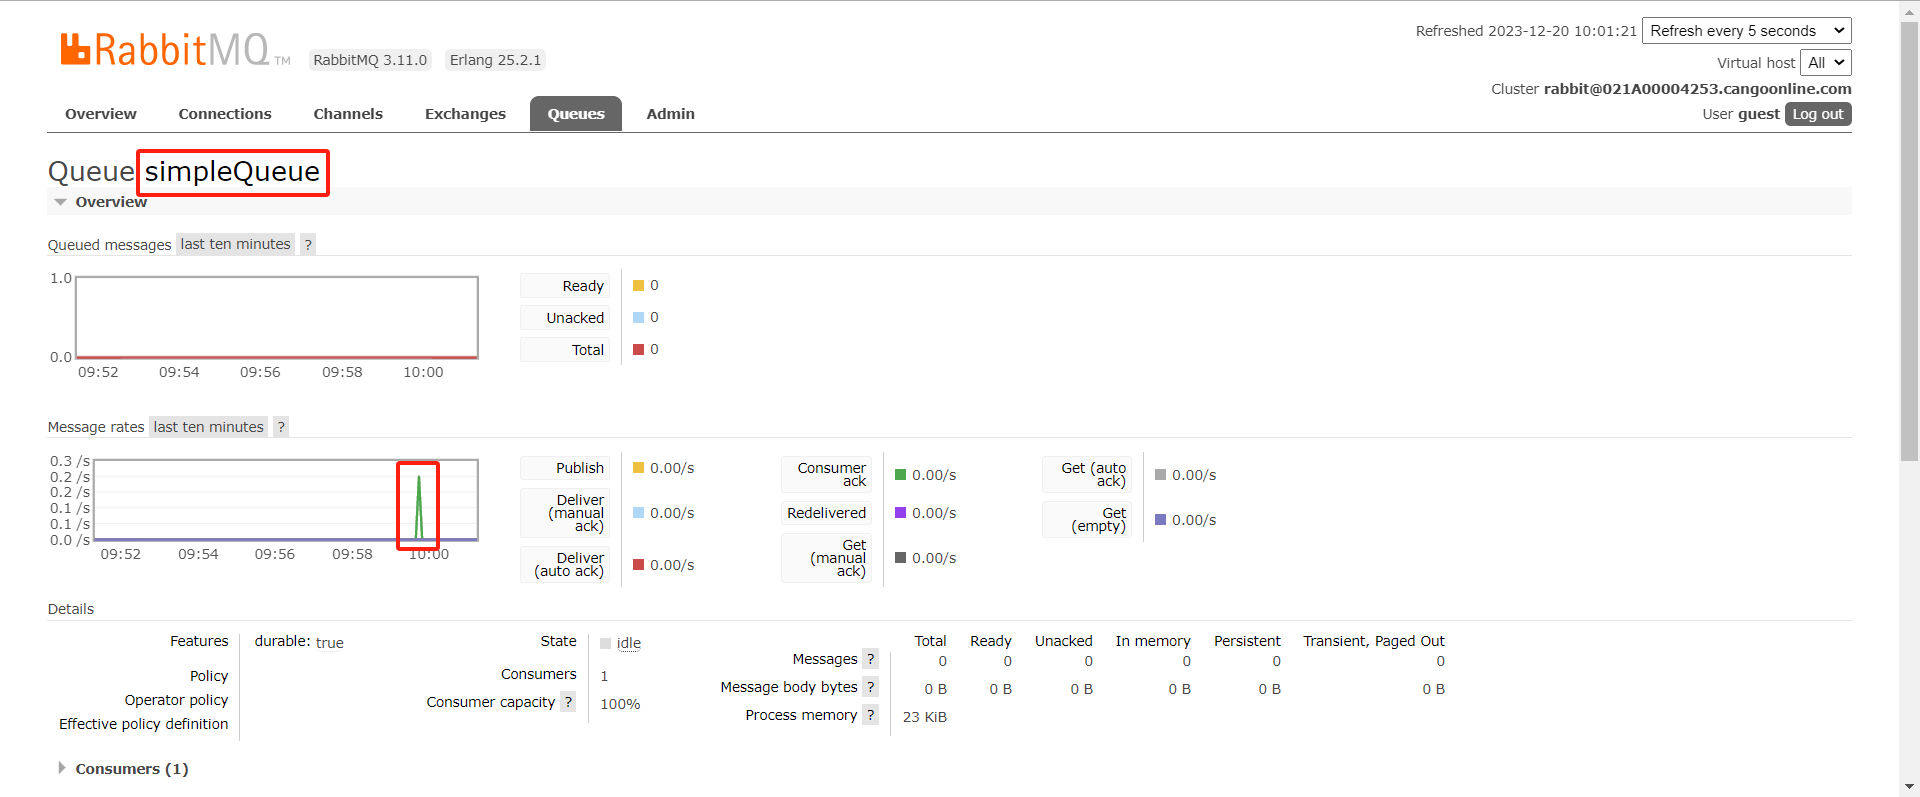
可以看到RabbitMQ成功产生一条消息,并且被消费成功哟。简单的例子实现啦,可以愉快的使用MQ了🚀🚀🚀

4.3 多生产者多消费者 的小栗子
配置队列
import org.springframework.amqp.core.Queue;
import org.springframework.context.annotation.Bean;
import org.springframework.context.annotation.Configuration;/*** @author 笑小枫 <https://www.xiaoxiaofeng.com/>* @date 2023/12/18*/
@Configuration
public class MoreToMoreQueueConfig {/*** 模拟多个生产者和多个消费者同时工作*/@Beanpublic Queue moreToMoreQueue() {return new Queue("moreToMoreQueue");}
}
生产者代码
import lombok.AllArgsConstructor;
import lombok.extern.slf4j.Slf4j;
import org.springframework.amqp.core.AmqpTemplate;
import org.springframework.stereotype.Component;/*** @author 笑小枫 <https://www.xiaoxiaofeng.com/>* @date 2023/12/18*/
@Component
@AllArgsConstructor
@Slf4j
public class MoreToMoreSender {private final AmqpTemplate rabbitTemplate;/*** 模拟多个生产者和多个消费者同时工作* 生产者1*/public void sendOne(String msg) {rabbitTemplate.convertAndSend("moreToMoreQueue", "MoreToMoreSender.sendOne:" + msg);log.info("MoreToMoreSender sendOne 发送消息成功:" + msg);}public void sendTwo(String msg) {rabbitTemplate.convertAndSend("moreToMoreQueue", "MoreToMoreSender.sendTwo:" + msg);log.info("MoreToMoreSender sendTwo 发送消息成功:" + msg);}
}
消费者代码
import lombok.extern.slf4j.Slf4j;
import org.springframework.amqp.rabbit.annotation.RabbitListener;
import org.springframework.stereotype.Component;/*** @author 笑小枫 <https://www.xiaoxiaofeng.com/>* @date 2023/12/18*/
@Component
@Slf4j
public class MoreToMoreReceiver {/*** 监听moreToMoreQueue队列的消息,进行消费*/@RabbitListener(queues = "moreToMoreQueue")public void moreToMoreHandleOne(String msg) {log.info("moreToMoreHandleOne消费消息: " + msg);}/*** 监听moreToMoreQueue队列的消息,进行消费*/@RabbitListener(queues = "moreToMoreQueue")public void moreToMoreHandleTwo(String msg) {log.info("moreToMoreHandleTwo消费消息: " + msg);}/*** 监听moreToMoreQueue队列的消息,进行消费*/@RabbitListener(queues = "moreToMoreQueue")public void moreToMoreHandleThree(String msg) {log.info("moreToMoreHandleThree消费消息: " + msg);}
}
模拟发送消息调用
/*** 模拟多生产者多消费者*/@GetMapping("/moreToMoreSend")public String moreToMoreSend(String msg) {moreToMoreSender.sendOne(msg);moreToMoreSender.sendTwo(msg);return "发送成功";}
失策了,应该3个生产者,2个消费者的,算了不想改了,发两次消息吧
GET http://localhost:8080/moreToMoreSend?msg=模拟2个生产者,3个消费者的MQ测试消息1
GET http://localhost:8080/moreToMoreSend?msg=模拟2个生产者,3个消费者的MQ测试消息2
可以看到发送的消息被不同的消费者消费

4.4 直接交换机 Direct Exchange 的小栗子
看一下演示配置
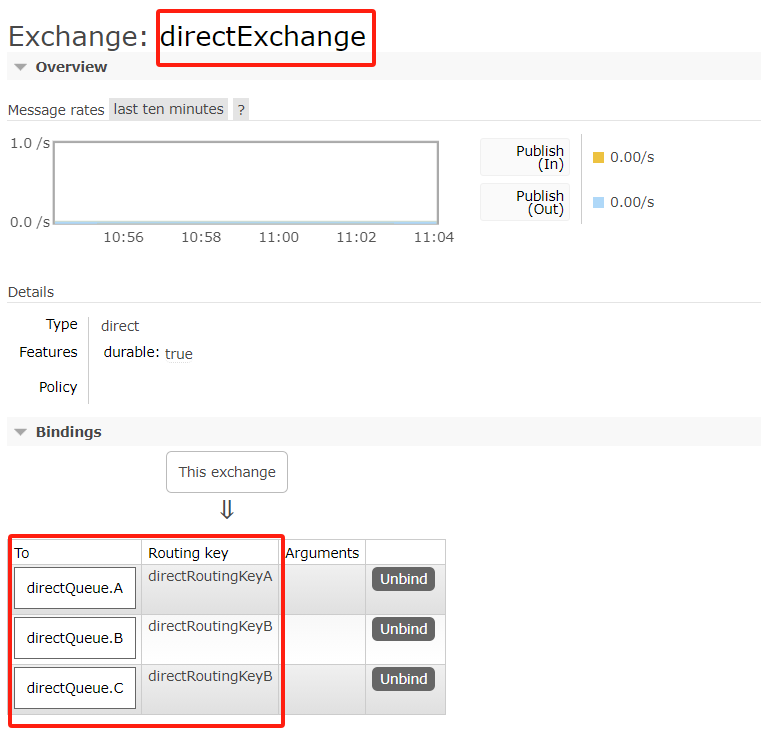
路由directRoutingKeyA属于单点发送(单播路由)
路由directRoutingKeyB属于广播,绑定B、C两个队列,分别被B、C队列的监听消费了(广播路由)

再看一下交换机对应Routing Key绑定的队列关系。(项目启动时,默认会自动创建交换机和队列哟,可以修改配置不自动创建)

配置队列
import org.springframework.amqp.core.*;
import org.springframework.context.annotation.Bean;
import org.springframework.context.annotation.Configuration;/*** @author 笑小枫 <https://www.xiaoxiaofeng.com/>* @date 2023/12/18*/
@Configuration
public class DirectExchangeConfig {/*** 使用直接交换机发送消息* directRoutingKeyA 单播路由* directRoutingKeyB 广播路由*/@Beanpublic Queue directQueueA() {return new Queue("directQueue.A");}@Beanpublic Queue directQueueB() {return new Queue("directQueue.B");}@Beanpublic Queue directQueueC() {return new Queue("directQueue.C");}@Beanpublic DirectExchange directExchange() {return new DirectExchange("directExchange");}@Beanpublic Binding bindingDirectExchangeA(Queue directQueueA, DirectExchange directExchange) {return BindingBuilder.bind(directQueueA).to(directExchange).with("directRoutingKeyA");}@Beanpublic Binding bindingDirectExchangeB(Queue directQueueB, DirectExchange directExchange) {return BindingBuilder.bind(directQueueB).to(directExchange).with("directRoutingKeyB");}@Beanpublic Binding bindingDirectExchangeC(Queue directQueueC, DirectExchange directExchange) {return BindingBuilder.bind(directQueueC).to(directExchange).with("directRoutingKeyB");}
}
生产者代码
import lombok.AllArgsConstructor;
import lombok.extern.slf4j.Slf4j;
import org.springframework.amqp.core.AmqpTemplate;
import org.springframework.stereotype.Component;/*** @author 笑小枫 <https://www.xiaoxiaofeng.com/>* @date 2023/12/18*/
@Component
@AllArgsConstructor
@Slf4j
public class DirectExchangeSender {private final AmqpTemplate rabbitTemplate;public void sendA(String msg) {rabbitTemplate.convertAndSend("directExchange", "directRoutingKeyA", "sendA:" + msg);log.info("DirectExchangeSender sendA 发送消息成功:" + msg);}public void sendB(String msg) {rabbitTemplate.convertAndSend("directExchange", "directRoutingKeyB", "sendB:" + msg);log.info("DirectExchangeSender sendB 发送消息成功:" + msg);}
}
消费者代码
import lombok.extern.slf4j.Slf4j;
import org.springframework.amqp.rabbit.annotation.RabbitListener;
import org.springframework.stereotype.Component;/*** @author 笑小枫 <https://www.xiaoxiaofeng.com/>* @date 2023/12/18*/
@Component
@Slf4j
public class DirectExchangeReceiver {/*** 监听directQueue.A队列的消息,进行消费*/@RabbitListener(queues = "directQueue.A")public void directHandleA(String msg) {log.info("directHandleA消费消息: " + msg);}/*** 监听directQueue.B队列的消息,进行消费*/@RabbitListener(queues = "directQueue.B")public void directHandleB(String msg) {log.info("directHandleB消费消息: " + msg);}/*** 监听directQueue.C队列的消息,进行消费*/@RabbitListener(queues = "directQueue.C")public void directHandleC(String msg) {log.info("directHandleC消费消息: " + msg);}
}
模拟发送消息调用
/*** 模拟使用直接交换机发送消息*/@GetMapping("/directExchangeSend")public String directExchangeSend(String msg) {directExchangeSender.sendA(msg);directExchangeSender.sendB(msg);return "发送成功";}
GET http://localhost:8080/directExchangeSend?msg=模拟直接交换机发送MQ测试消息

4.5 扇形交换机 Fanout Exchange 的小栗子
看一下演示配置

配置队列
import org.springframework.amqp.core.Binding;
import org.springframework.amqp.core.BindingBuilder;
import org.springframework.amqp.core.FanoutExchange;
import org.springframework.amqp.core.Queue;
import org.springframework.context.annotation.Bean;
import org.springframework.context.annotation.Configuration;/*** @author 笑小枫 <https://www.xiaoxiaofeng.com/>* @date 2023/12/18*/
@Configuration
public class FanoutExchangeConfig {/*** 模拟广播发送消息*/@Beanpublic Queue fanoutQueueA() {return new Queue("fanoutQueue.A");}@Beanpublic Queue fanoutQueueB() {return new Queue("fanoutQueue.B");}@Beanpublic Queue fanoutQueueC() {return new Queue("fanoutQueue.C");}@Beanpublic FanoutExchange fanoutExchange() {return new FanoutExchange("fanoutExchange");}@Beanpublic Binding bindingFanoutExchangeA(Queue fanoutQueueA, FanoutExchange fanoutExchange) {return BindingBuilder.bind(fanoutQueueA).to(fanoutExchange);}@Beanpublic Binding bindingFanoutExchangeB(Queue fanoutQueueB, FanoutExchange fanoutExchange) {return BindingBuilder.bind(fanoutQueueB).to(fanoutExchange);}@Beanpublic Binding bindingFanoutExchangeC(Queue fanoutQueueC, FanoutExchange fanoutExchange) {return BindingBuilder.bind(fanoutQueueC).to(fanoutExchange);}
}
生产者代码
import lombok.AllArgsConstructor;
import lombok.extern.slf4j.Slf4j;
import org.springframework.amqp.core.AmqpTemplate;
import org.springframework.stereotype.Component;/*** @author 笑小枫 <https://www.xiaoxiaofeng.com/>* @date 2023/12/18*/
@Component
@AllArgsConstructor
@Slf4j
public class FanoutExchangeSender {private final AmqpTemplate rabbitTemplate;/*** 直接没有配置交换机(exchange),使用默认的交换机*/public void send(String msg) {rabbitTemplate.convertAndSend("fanoutExchange", "", msg);log.info("FanoutExchangeSender 发送消息成功:" + msg);}
}
消费者代码
import lombok.extern.slf4j.Slf4j;
import org.springframework.amqp.rabbit.annotation.RabbitListener;
import org.springframework.stereotype.Component;/*** @author 笑小枫 <https://www.xiaoxiaofeng.com/>* @date 2023/12/18*/
@Component
@Slf4j
public class FanoutExchangeReceiver {/*** 监听simpleQueue队列的消息,进行消费*/@RabbitListener(queues = "fanoutQueue.A")public void fanoutHandleA(String msg) {log.info("fanoutHandleA消费消息: " + msg);}/*** 监听simpleQueue队列的消息,进行消费*/@RabbitListener(queues = "fanoutQueue.B")public void fanoutHandleB(String msg) {log.info("fanoutHandleB消费消息: " + msg);}/*** 监听simpleQueue队列的消息,进行消费*/@RabbitListener(queues = "fanoutQueue.C")public void fanoutHandleC(String msg) {log.info("fanoutHandleC消费消息: " + msg);}
}
模拟发送消息调用
@GetMapping("/fanoutExchangeSend")public String fanoutExchangeSend(String msg) {fanoutExchangeSender.send(msg);return "发送成功";}
GET http://localhost:8080/fanoutExchangeSend?msg=模拟扇形交换机发送MQ测试消息
可以看到一个生产者发送消息后,3个消费者都消费了消息

4.6 主题交换机 Topic Exchange 的小栗子
看一下演示配置

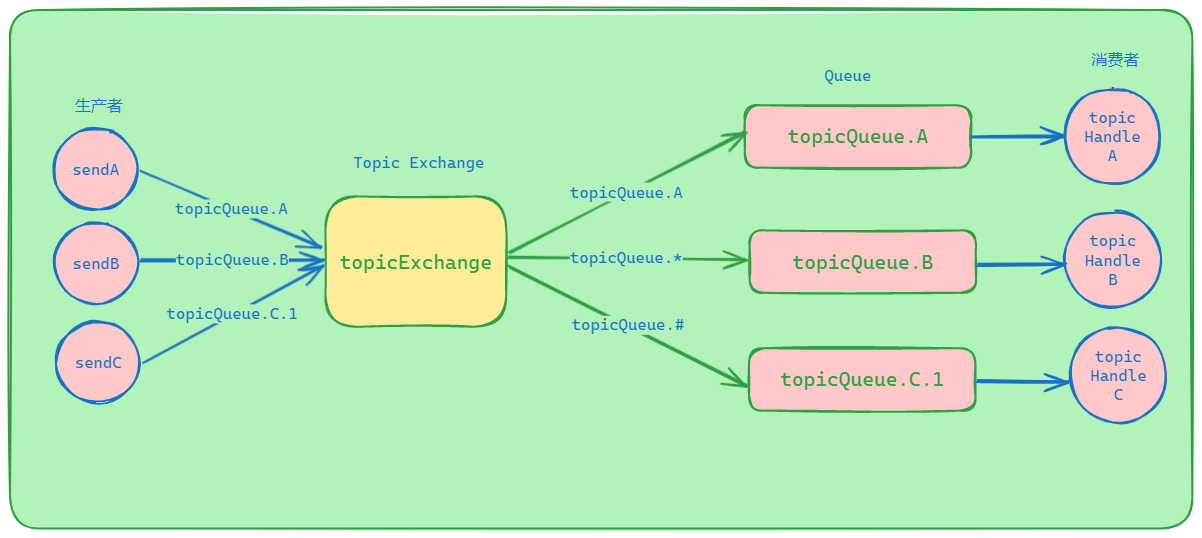
主题交换机对路由键进行模式匹配后进行投递,符号#表示一个或多个词,*表示一个词。
通过图,可以预测一下消息消费情况,如下,接下来让我们一起测试一下吧
topicHandleA 会消费routingKey为:fanoutQueue.A
topicHandleB 会消费routingKey为:fanoutQueue.A、fanoutQueue.B
topicHandleC 会消费routingKey为:fanoutQueue.A、fanoutQueue.B、fanoutQueue.C.1
配置队列
import org.springframework.amqp.core.Binding;
import org.springframework.amqp.core.BindingBuilder;
import org.springframework.amqp.core.Queue;
import org.springframework.amqp.core.TopicExchange;
import org.springframework.context.annotation.Bean;
import org.springframework.context.annotation.Configuration;/*** @author 笑小枫 <https://www.xiaoxiaofeng.com/>* @date 2023/12/18*/
@Configuration
public class TopicExchangeConfig {/*** 模拟主题交换机发送消息*/@Beanpublic Queue topicQueueA() {return new Queue("topicQueue.A");}@Beanpublic Queue topicQueueB() {return new Queue("topicQueue.B");}@Beanpublic Queue topicQueueC() {return new Queue("topicQueue.C.1");}@Beanpublic TopicExchange topicExchange() {return new TopicExchange("topicExchange");}@Beanpublic Binding bindingTopicExchangeA(Queue topicQueueA, TopicExchange topicExchange) {return BindingBuilder.bind(topicQueueA).to(topicExchange).with("topicQueue.A");}@Beanpublic Binding bindingTopicExchangeB(Queue topicQueueB, TopicExchange topicExchange) {return BindingBuilder.bind(topicQueueB).to(topicExchange).with("topicQueue.*");}@Beanpublic Binding bindingTopicExchangeC(Queue topicQueueC, TopicExchange topicExchange) {return BindingBuilder.bind(topicQueueC).to(topicExchange).with("topicQueue.#");}
}
生产者代码
import lombok.AllArgsConstructor;
import lombok.extern.slf4j.Slf4j;
import org.springframework.amqp.core.AmqpTemplate;
import org.springframework.stereotype.Component;/*** @author 笑小枫 <https://www.xiaoxiaofeng.com/>* @date 2023/12/18*/
@Component
@AllArgsConstructor
@Slf4j
public class TopicExchangeSender {private final AmqpTemplate rabbitTemplate;public void sendA(String msg) {rabbitTemplate.convertAndSend("topicExchange", "topicQueue.A", "sendA:" + msg);log.info("TopicExchangeSender sendA 发送消息成功:" + msg);}public void sendB(String msg) {rabbitTemplate.convertAndSend("topicExchange", "topicQueue.B", "sendB:" + msg);log.info("TopicExchangeSender sendB 发送消息成功:" + msg);}public void sendC(String msg) {rabbitTemplate.convertAndSend("topicExchange", "topicQueue.C.1", "sendC:" + msg);log.info("TopicExchangeSender sendC 发送消息成功:" + msg);}
}
消费者代码
import lombok.extern.slf4j.Slf4j;
import org.springframework.amqp.rabbit.annotation.RabbitListener;
import org.springframework.stereotype.Component;/*** @author 笑小枫 <https://www.xiaoxiaofeng.com/>* @date 2023/12/18*/
@Component
@Slf4j
public class TopicExchangeReceiver {/*** 监听topicQueue.A队列的消息,进行消费*/@RabbitListener(queues = "topicQueue.A")public void topicHandleA(String msg) {log.info("topicHandleA消费消息: " + msg);}/*** 监听topicQueue.B队列的消息,进行消费*/@RabbitListener(queues = "topicQueue.B")public void topicHandleB(String msg) {log.info("topicHandleB消费消息: " + msg);}/*** 监听topicQueue.C.1队列的消息,进行消费*/@RabbitListener(queues = "topicQueue.C.1")public void topicHandleC(String msg) {log.info("topicHandleC消费消息: " + msg);}
}
模拟发送消息调用
@GetMapping("/topicExchangeSend")public String topicExchangeSend(String msg) {topicExchangeSender.sendA(msg);topicExchangeSender.sendB(msg);topicExchangeSender.sendC(msg);return "发送成功";}
GET http://localhost:8080/topicExchangeSend?msg=模拟主题交换机发送MQ测试消息
可以看出,得到的结果和我们预测的一致✌✌✌

5. 接受确认机制 ACK 的小栗子
为了保证消息在消费过程中的可靠性,RabbitMQ 引入消息确认机制(ACK(Acknowledge)),消费者在接收到消息并且处理该消息之后,告诉RabbitMQ 它已经处理,RabbitMQ 再将该消息删除。
5.1 消费端收到消息后的三种确认方式
- auto:根据侦听器检测是正常返回、还是抛出异常来确认
- none:当消息一旦被消费者接收到,则自动确认收到,并将相应消息从 RabbitMQ的消息缓存中移除
- manual:将消息分发给了消费者,并且只有当消费者处理完成了整个消息之后才会被认为消息传递成功了,然后才会将内存中的消息删除。
5.2 手动确认,签收和拒绝的方法
如果消息成功处理,需要调用channel.basicAck()方法进行签收:
void basicAck(long deliveryTag, boolean multiple) throws IOException {}
basicAck()方法需要两个参数:
deliveryTag(唯一标识 ID):当一个消费者向RabbitMQ注册后,会建立起一个Channel,向消费者推送消息,这个方法携带了一个deliveryTag, 它代表了RabbitMQ向该Channel投递的这条消息的唯一标识 ID,是一个单调递增的正整数,deliveryTag的范围仅限于当前 Channel。multiple:为了减少网络流量,手动确认可以被批处理,当该参数为true时,则可以一次性确认deliveryTag小于等于传入值的所有消息
如果消息处理失败,调用channel.basicNack()方法拒绝签收:
public void basicNack(long deliveryTag, boolean multiple, boolean requeue) throws IOException {}
basicNack()方法需要三个参数:
deliveryTag:同basicAckmultiple:同basicAckrequeue:重回队列。如果设置为true,则消息重新回到queue,服务端会重新发送该消息给消费端
5.3 Demo演示
接下来我们演示一下manual手动确认应该怎么实现
可以通过application.yml配置文件和代码两种方法进行配置,这里主要以代码的形式讲解
spring:rabbitmq:username: guestpassword: guesthost: localhostport: 5672# 消息监听器配置listener:# 消息监听容器类型,默认 simpletype: simplesimple:# 消息确认模式,none、manual和autoacknowledge-mode: manual
创建工厂
import org.springframework.amqp.core.AcknowledgeMode;
import org.springframework.amqp.rabbit.config.SimpleRabbitListenerContainerFactory;
import org.springframework.amqp.rabbit.connection.CachingConnectionFactory;
import org.springframework.boot.context.properties.ConfigurationProperties;
import org.springframework.context.annotation.Bean;
import org.springframework.context.annotation.Configuration;/*** @author 笑小枫 <https://www.xiaoxiaofeng.com/>* @date 2023/12/19*/
@Configuration
public class AckRabbitListenerContainerFactory {@Bean(value = "ackListenerContainerFactory", name = "ackListenerContainerFactory")public SimpleRabbitListenerContainerFactory ackListenerContainerFactory() {SimpleRabbitListenerContainerFactory factory = new SimpleRabbitListenerContainerFactory();factory.setConnectionFactory(ackConnectionFactory());factory.setConcurrentConsumers(3);factory.setMaxConcurrentConsumers(10);// 设置消息为手动确认factory.setAcknowledgeMode(AcknowledgeMode.MANUAL);return factory;}/*** 获取rabbitmq连接.** @return 返回rabbitmq连接.*/@Bean(value = "ackConnectionFactory")@ConfigurationProperties(prefix = "spring.rabbitmq")public CachingConnectionFactory ackConnectionFactory() {return new CachingConnectionFactory();}
}
配置队列
import org.springframework.amqp.core.Binding;
import org.springframework.amqp.core.BindingBuilder;
import org.springframework.amqp.core.DirectExchange;
import org.springframework.amqp.core.Queue;
import org.springframework.context.annotation.Bean;
import org.springframework.context.annotation.Configuration;/*** @author 笑小枫 <https://www.xiaoxiaofeng.com/>* @date 2023/12/19*/
@Configuration
public class AckExchangeConfig {@Beanpublic Queue ackQueue() {return new Queue("ackQueue");}@Beanpublic DirectExchange ackExchange() {return new DirectExchange("ackExchange");}@Beanpublic Binding bindingAckExchange(Queue ackQueue, DirectExchange ackExchange) {return BindingBuilder.bind(ackQueue).to(ackExchange).with("ackRoutingKey");}
}
生产者代码
import lombok.AllArgsConstructor;
import lombok.extern.slf4j.Slf4j;
import org.springframework.amqp.core.AmqpTemplate;
import org.springframework.stereotype.Component;/*** @author 笑小枫 <https://www.xiaoxiaofeng.com/>* @date 2023/12/19*/
@Component
@AllArgsConstructor
@Slf4j
public class AckSender {private final AmqpTemplate rabbitTemplate;public void send(String msg) {rabbitTemplate.convertAndSend("ackExchange", "ackRoutingKey", msg);log.info("AckSender 发送消息成功:" + msg);}
}
消费者代码
import com.rabbitmq.client.Channel;
import lombok.extern.slf4j.Slf4j;
import org.springframework.amqp.rabbit.annotation.RabbitListener;
import org.springframework.amqp.support.AmqpHeaders;
import org.springframework.messaging.handler.annotation.Header;
import org.springframework.stereotype.Component;import java.io.IOException;/*** @author 笑小枫 <https://www.xiaoxiaofeng.com/>* @date 2023/12/19*/
@Component
@Slf4j
public class AckReceiver {/*** 监听ackQueue队列的消息,进行消费*/@RabbitListener(queues = {"ackQueue"}, containerFactory = "ackListenerContainerFactory")public void ackHandle(String msg, Channel channel, @Header(AmqpHeaders.DELIVERY_TAG) long deliveryTag) throws IOException {log.info("AckReceiver消费消息: " + msg);channel.basicAck(deliveryTag, false);}
}
模拟发送消息调用
@GetMapping("/ackSend")public String ackSend(String msg) {ackSender.send(msg);return "发送成功";}
6. 死信队列 的小栗子
6.1 什么是死信队列?
在消息队列中,执行异步任务时,通常是将消息生产者发布的消息存储在队列中,由消费者从队列中获取并处理这些消息。但是,在某些情况下,消息可能无法正常地被处理和消耗,例如:格式错误、设备故障等,这些未成功处理的消息就被称为“死信”。
为了避免这些未成功处理的消息导致程序异常或对系统造成影响,我们需要使用死信队列(Dead Letter Queue)。当我们设置死信队列后,所有无法成功处理的消息将被捕获并重定向到指定的死信交换机中。消费者可以从该交换机中读取并处理这些“死信”。
6.2 死信队列的优点
-
提高系统可靠性:避免因未处理的死信而导致程序异常,提高系统的可靠性。
-
实现延迟消息:可以通过设置TTL时间,将超时未消费的消息转移到死信队列中,实现延迟消息的功能。
-
防止滥用:当某些生产者恶意发送低质量的消息或进行滥用时,可以通过丢弃或重定向死信消息来防止滥用和恶意攻击。
6.3 死信队列的应用场景
-
消息格式错误:当消息格式错误时,可能会导致消费者无法正确地解析或处理该消息,这个问题通常与生产者的代码有关。为了避免消息失效,并提高系统可靠性,我们可以使用死信队列。
-
消费者故障:另一个常见的场景是消息处理者无法正确地处理或响应到推入到队列中的消息,例如消费者创建了一个协程并在逻辑执行完成后未正确地关闭该协程。由于该协程始终处于打开状态,它将一直阻止该消费者对其他消息进行正确消费。为了避免这种消息挂起并影响其他消息的正常处理,可以将其加入死信中心。
哪些情况的消息会进入死信队列
- 消息 TTL 过期
- 队列达到最大长度(队列满了,无法再添加数据到 mq 中)
- 消息被拒绝(basic.reject 或 basic.nack)并且 requeue=false
6.4 Demo演示
这里确认机制为auto的机制下,消息消费异常被拒绝的demo。消息 TTL 过期见延时队列。队列达到最大长度这个就不演示了😭😭😭

配置队列
import org.springframework.amqp.core.*;
import org.springframework.context.annotation.Bean;
import org.springframework.context.annotation.Configuration;/*** @author 笑小枫 <https://www.xiaoxiaofeng.com/>* @date 2023/12/19*/
@Configuration
public class DeadLetterQueueConfig {@Beanpublic Queue deadLetterQueue() {return QueueBuilder.durable("deadLetterQueue").withArgument("x-dead-letter-exchange", "dlx-exchange").build();}@Beanpublic Queue normalQueue() {// 声明该队列的死信消息发送到的 交换机 (队列添加了这个参数之后会自动与该交换机绑定,并设置路由键,不需要开发者手动设置)return QueueBuilder.durable("normalQueue").withArgument("x-message-ttl", 5000).withArgument("x-dead-letter-exchange", "dlx-exchange").build();}@Beanpublic TopicExchange dlxExchange() {return new TopicExchange("dlx-exchange");}@Beanpublic Binding dlxBinding(Queue deadLetterQueue, TopicExchange dlxExchange) {return BindingBuilder.bind(deadLetterQueue).to(dlxExchange).with("#");}
}
生产者代码
package com.maple.rabbit.sender;import lombok.AllArgsConstructor;
import lombok.extern.slf4j.Slf4j;
import org.springframework.amqp.core.AmqpTemplate;
import org.springframework.stereotype.Component;/*** @author 笑小枫 <https://www.xiaoxiaofeng.com/>* @date 2023/12/19*/
@Component
@AllArgsConstructor
@Slf4j
public class DeadLetterSender {private final AmqpTemplate rabbitTemplate;public void send(String msg) {rabbitTemplate.convertAndSend("normalQueue", msg);log.info("DeadLetterSender 发送消息成功:" + msg);}
}
消费者代码
package com.maple.rabbit.receiver;import lombok.extern.slf4j.Slf4j;
import org.springframework.amqp.rabbit.annotation.RabbitListener;
import org.springframework.stereotype.Component;/*** @author 笑小枫 <https://www.xiaoxiaofeng.com/>* @date 2023/12/19*/
@Component
@Slf4j
public class DeadLetterReceiver {/*** 监听normalQueue队列的消息,进行消费,模拟消费抛出异常,让消息进入死信队列*/@RabbitListener(queues = "normalQueue")public void normalHandle(String msg) {log.info("DeadLetterReceiver normalHandle 消费消息: " + msg);throw new RuntimeException("DeadLetterReceiver normalHandle 消费消息异常,测试死信队列");}/*** 处理进入到死信队列的消息*/@RabbitListener(queues = "deadLetterQueue")public void deadLetterHandle(String msg) {log.info("DeadLetterReceiver deadLetterHandle 消费消息: " + msg);}
}
模拟发送消息调用
@GetMapping("/deadLetterSend")public String deadLetterSend(String msg) {deadLetterSender.send(msg);return "发送成功";}
GET http://localhost:8080/deadLetterSend?msg=模拟死信队列,发送MQ测试消息
可以看到normalHandle()先消费了消息,但是抛出了异常,进入死信队列,后续deadLetterHandle()死信队列有监听消费了消息。

7. 延时队列 的小栗子
7.1 什么是延时队列
延时队列,首先,它是一种队列,队列意味着内部的元素是有序的,元素出队和入队是有方向性的,元素从一端进入,从另一端取出。
其次,延时队列,最重要的特性就体现在它的延时属性上,跟普通的队列不一样的是,普通队列中的元素总是等着希望被早点取出处理,而延时队列中的元素则是希望被在指定时间得到取出和处理,所以延时队列中的元素是都是带时间属性的,通常来说是需要被处理的消息或者任务。
简单来说,延时队列就是用来存放需要在指定时间被处理的元素的队列。
7.2 延时队列使用场景
- 订单在十分钟之内未支付则自动取消。
- 新创建的店铺,如果在十天内都没有上传过商品,则自动发送消息提醒。
- 账单在一周内未支付,则自动结算。
- 用户注册成功后,如果三天内没有登陆则进行短信提醒。
- 用户发起退款,如果三天内没有得到处理则通知相关运营人员。
- 预定会议后,需要在预定的时间点前十分钟通知各个与会人员参加会议。
7.3 TTL介绍
在介绍延时队列之前,还需要先介绍一下RabbitMQ中的一个高级特性——TTL(Time To Live)。
TTL是什么呢?TTL是RabbitMQ中一个消息或者队列的属性,表明一条消息或者该队列中的所有消息的最大存活时间,单位是毫秒。换句话说,如果一条消息设置了TTL属性或者进入了设置TTL属性的队列,那么这条消息如果在TTL设置的时间内没有被消费,则会成为“死信”。如果同时配置了队列的TTL和消息的TTL,那么较小的那个值将会被使用。
7.4 Demo延时
配置队列
import org.springframework.amqp.core.*;
import org.springframework.context.annotation.Bean;
import org.springframework.context.annotation.Configuration;/*** @author 笑小枫 <https://www.xiaoxiaofeng.com/>* @date 2023/12/19*/
@Configuration
public class DelayQueueConfig {@Beanpublic Queue delayDeadQueue() {return QueueBuilder.durable("delayDeadQueue").deadLetterExchange("delay-exchange").build();}@Beanpublic Queue delayQueue() {// 声明该队列的死信消息发送到的 交换机 (队列添加了这个参数之后会自动与该交换机绑定,并设置路由键,不需要开发者手动设置)// ttl = 5000,设置TTL,单位ms,5s 内没被消费,则进入死信队列return QueueBuilder.durable("delayQueue").ttl(5000).deadLetterExchange("delay-exchange").build();}@Beanpublic TopicExchange delayExchange() {return new TopicExchange("delay-exchange");}@Beanpublic Binding delayBinding(Queue delayDeadQueue, TopicExchange delayExchange) {return BindingBuilder.bind(delayDeadQueue).to(delayExchange).with("#");}
}
生产者代码
package com.maple.rabbit.sender;import lombok.AllArgsConstructor;
import lombok.extern.slf4j.Slf4j;
import org.springframework.amqp.core.AmqpTemplate;
import org.springframework.stereotype.Component;/*** @author 笑小枫 <https://www.xiaoxiaofeng.com/>* @date 2023/12/19*/
@Component
@AllArgsConstructor
@Slf4j
public class DelaySender {private final AmqpTemplate rabbitTemplate;public void send(String msg) {rabbitTemplate.convertAndSend("delayQueue", msg);log.info("DelaySender 发送消息成功:" + msg);}
}
消费者代码
package com.maple.rabbit.receiver;import lombok.extern.slf4j.Slf4j;
import org.springframework.amqp.rabbit.annotation.RabbitListener;
import org.springframework.stereotype.Component;/*** @author 笑小枫 <https://www.xiaoxiaofeng.com/>* @date 2023/12/19*/
@Component
@Slf4j
public class DelayReceiver {@RabbitListener(queues = "delayDeadQueue")public void delayHandle(String msg) {log.info("DelayReceiver delayHandle 消费消息: " + msg);}
}
模拟发送消息调用
@GetMapping("/delaySend")public String delaySend(String msg) {delaySender.send(msg);return "发送成功";}
GET http://localhost:8080/delaySend?msg=模拟延时队列,发送MQ测试消息
可以看到发送MQ消息后,5s多一点的时间(消息发送,接收,处理都需要耗时,所以会多一点),死信队列消费了消息

8. 消息重试机制
这个比较简单,以这个结尾吧,看下面配置,找个消费地方抛出异常,既可以看到重试,这里不做演示,累了😭😭😭
server:port: 8080spring:rabbitmq:addresses: 127.0.0.1:5672username: guestpassword: guest# 环境隔离,默认使用“/”(虚拟主机)virtual-host: /connection-timeout: 6000listener:simple:retry:# 是否开启重试机制enabled: true# 默认是3,是一共三次,而不是重试三次,三次包含了第一执行,所以只重试了两次max-attempts: 3# 重试间隔时间。毫秒initial-interval: 2000ms#重试最大时间间隔(单位毫秒)max-interval: 1200000ms#间隔时间乘子,间隔时间*乘子=下一次的间隔时间,最大不能超过设置的最大间隔时间multiplier: 29. 项目源码
本文到此就结束了,如果帮助到你了,帮忙点个赞👍
本文源码:https://github.com/hack-feng/maple-product/tree/main/maple-mq-rabbit
🐾我是笑小枫,全网皆可搜的【笑小枫】

和CCT的区别你了解多少?...)


函数与示例)
)


函数与示例)


创建堆| C ++ STL)


