一.基础知识:
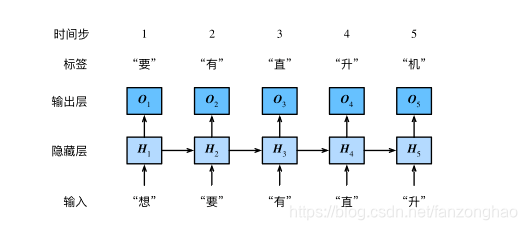
下图是一个循环神经网络实现语言模型的示例,可以看出其是基于当前的输入与过去的输入序列,预测序列的下一个字符.

序列特点就是某一步的输出不仅依赖于这一步的输入,还依赖于其他步的输入或输出.

其中n为批量大小,d为词向量大小
1.RNN:

xt不止与该时刻输入有关还与上一时刻的输出状态有关,而第t层的误差函数跟输出Ot直接相关,而Ot依赖于前面每一层的xi和si,故存在梯度消失或梯度爆炸的问题,对于长时序很难处理.所以可以进行改造让第t层的误差函数只跟该层{si,xi}有关.
RNN代码简单实现:
def one_hot(x, n_class, dtype=torch.float32):result = torch.zeros(x.shape[0], n_class, dtype=dtype, device=x.device) # shape: (n, n_class)result.scatter_(1, x.long().view(-1, 1), 1) # result[i, x[i, 0]] = 1return resultdef to_onehot(X, n_class):return [one_hot(X[:, i], n_class) for i in range(X.shape[1])]def get_parameters(num_inputs, num_hiddens,num_outputs):def init_parameter(shape):param = torch.zeros(shape, device=device,dtype=torch.float32)nn.init.normal_(param, 0, 0.01)return torch.nn.Parameter(param)#权重参数w_xh = init_parameter((num_inputs, num_hiddens))w_hh = init_parameter((num_hiddens, num_hiddens))b_h = torch.nn.Parameter(torch.zeros(num_hiddens,device=device))#输出层参数w_hq = init_parameter((num_hiddens, num_outputs))b_q = torch.nn.Parameter(torch.zeros(num_outputs,device=device))return (w_xh, w_hh, b_h, w_hq, b_q)def rnn(inputs,state,params):w_xh, w_hh, b_h, w_hq, b_q = paramsH = stateoutputs = []for x in inputs:print('===x:', x) #(batch_size,vocab_size) (vocab_size, num_hiddens)H = torch.tanh(torch.matmul(x, w_xh)+torch.matmul(H, w_hh)+b_h)# (batch_size,num_hiddens) (num_hiddens, num_hiddens)Y = torch.matmul(H, w_hq)+b_q# (batch_size,num_hiddens) (num_hiddens, num_outputs)outputs.append(Y)return outputs, Hdef init_rnn_state(batch_size, num_hiddens,device):return torch.zeros((batch_size, num_hiddens),device=device)def test_one_hot():X = torch.arange(10).view(2, 5)print('==X:', X)inputs = to_onehot(X, 10)print(len(inputs))print('==inputs:', inputs)# print('==inputs:', inputs[-1].shape)def test_rnn():X = torch.arange(5).view(1, 5)print('===X:', X)num_hiddens = 256vocab_size = 10#词典长度num_inputs, num_hiddens, num_outputs = vocab_size, num_hiddens, vocab_sizestate = init_rnn_state(X.shape[0], num_hiddens, device)inputs = to_onehot(X.to(device), vocab_size)print('===len(inputs), inputs', len(inputs), inputs)params = get_parameters(num_inputs, num_hiddens, num_outputs)outputs, state_new = rnn(inputs, state, params)print('==len(outputs), outputs[0].shape:', len(outputs), outputs[0].shape)print('==state.shape:', state.shape)print('==state_new.shape:', state_new.shape)if __name__ == '__main__':# test_one_hot()test_rnn()
2.LSTM:
传统RNN每个模块内只是一个简单的tanh层:

遗忘门:控制上一时间步的记忆细胞;
输入门:控制当前时间步的输入;
输出门:控制从记忆细胞到隐藏状态;
记忆细胞:⼀种特殊的隐藏状态的信息的流动,表示的是长期记忆;
h 是隐藏状态,表示的是短期记忆;

LSTM每个循环的模块内又有4层结构:3个sigmoid层,1个tanh层

细胞状态Ct,类似short cut信息流通畅顺,故可以解决梯度消失或爆炸的问题.

遗忘层,决定信息保留多少

更新层,这里要注意的是用了tanh,值域在-1,1,起到信息加强和减弱的作用.

输出层,上述两层的信息相加流通到这里以后,经过tanh函数得到输出值候选项,而候选项中的哪些部分最终会被输出由一个sigmoid层来决定.这时就得到了输出状态和输出值,下一时刻也是如此.

LSTM简单实现代码:
def one_hot(x, n_class, dtype=torch.float32):result = torch.zeros(x.shape[0], n_class, dtype=dtype, device=x.device)  # shape: (n, n_class)result.scatter_(1, x.long().view(-1, 1), 1)  # result[i, x[i, 0]] = 1return resultdef to_onehot(X, n_class):return [one_hot(X[:, i], n_class) for i in range(X.shape[1])]def get_parameters(num_inputs, num_hiddens,num_outputs):def init_parameter(shape):param = torch.zeros(shape, device=device,dtype=torch.float32)nn.init.normal_(param, 0, 0.01)return torch.nn.Parameter(param)def final_init_parameter():return (init_parameter((num_inputs, num_hiddens)),init_parameter((num_hiddens, num_hiddens)),torch.nn.Parameter(torch.zeros(num_hiddens,device=device,dtype=torch.float32,requires_grad=True)))w_xf, w_hf, b_f = final_init_parameter()#遗忘门参数w_xi, w_hi, b_i = final_init_parameter()#输入门参数w_xo, w_ho, b_o = final_init_parameter()#输出门参数w_xc, w_hc, b_c = final_init_parameter()#记忆门参数w_hq = init_parameter((num_hiddens, num_outputs))#输出层参数b_q = torch.nn.Parameter(torch.zeros(num_outputs, device=device, dtype=torch.float32, requires_grad=True))return nn.ParameterList([w_xi, w_hi, b_i, w_xf, w_hf, b_f, w_xo, w_ho, b_o, w_xc, w_hc, b_c, w_hq, b_q])def init_lstm_state(batch_size, num_hiddens, device):return (torch.zeros((batch_size, num_hiddens), device=device),torch.zeros((batch_size, num_hiddens), device=device))def lstm(inputs, states, params):[w_xi, w_hi, b_i, w_xf, w_hf, b_f, w_xo, w_ho, b_o, w_xc, w_hc, b_c, w_hq, b_q] = params[H, C] = statesoutputs = []for x in inputs:print('===x:',x)I = torch.sigmoid(torch.matmul(x, w_xi) + torch.matmul(H, w_hi) + b_i)#输入门数据F = torch.sigmoid(torch.matmul(x, w_xf) + torch.matmul(H, w_hf) + b_f)#遗忘门数据O = torch.sigmoid(torch.matmul(x, w_xo) + torch.matmul(H, w_ho) + b_o)#输出门数据C_tila = torch.tanh(torch.matmul(x, w_xc) + torch.matmul(H, w_hc) + b_c)#C冒数据C = F*C + I*C_tilaH = torch.tanh(C)*O# print('H.shape', H.shape)# print('w_hq.shape', w_hq.shape)# print('b_q.shape:', b_q.shape)Y = torch.matmul(H, w_hq)+b_qoutputs.append(Y)return outputs, (H,C)def test_lstm():batch_size = 1X = torch.arange(5).view(batch_size, 5)print('===X:', X)num_hiddens = 256vocab_size = 10  # 词典长度inputs = to_onehot(X.to(device), vocab_size)print('===len(inputs), inputs', len(inputs), inputs)num_inputs, num_hiddens, num_outputs = vocab_size, num_hiddens, vocab_sizestates = init_lstm_state(batch_size, num_hiddens, device='cpu')params = get_parameters(num_inputs, num_hiddens, num_outputs)outputs, new_states = lstm(inputs, states, params)H, C = new_statesprint('===H.shape', H.shape)print('===C.shape', C.shape)print('===len(outputs), outputs[0].shape:', len(outputs), outputs[0].shape)
if __name__ == '__main__':# test_one_hot()# test_rnn()test_lstm()
3.Seq2seq模型在于,encoder层,由双层lstm实现隐藏状态编码信息,decoder层由双层lstm将encode层隐藏状态编码信息解码出来,这样也造成了decoder依赖最终时间步的隐藏状态,且RNN机制实际中存在长程梯度消失的问题,对于较长的句子,所以随着所需翻译句子的长度的增加,这种结构的效果会显著下降,也就引入后面的attention。与此同时,解码的目标词语可能只与原输入的部分词语有关,而并不是与所有的输入有关。 例如,当把“Hello world”翻译成“Bonjour le monde”时,“Hello”映射成“Bonjour”,“world”映射成“monde”。 # 在seq2seq模型中, 解码器只能隐式地从编码器的最终状态中选择相应的信息。然而,注意力机制可以将这种选择过程显式地建模。

Seq2seq代码案例,batch为4,单词长度为7,每个单词对应的embedding向量为8,lstm为两层
import torch.nn as nn
import d2l
import torch
import math#由于依赖最终时间步的隐藏状态,RNN机制实际中存在长程梯度消失的问题,对于较长的句子,
# 我们很难寄希望于将输入的序列转化为定长的向量而保存所有的有效信息,
# 所以随着所需翻译句子的长度的增加,这种结构的效果会显著下降。
#与此同时,解码的目标词语可能只与原输入的部分词语有关,而并不是与所有的输入有关。
# 例如,当把“Hello world”翻译成“Bonjour le monde”时,“Hello”映射成“Bonjour”,“world”映射成“monde”。
# 在seq2seq模型中,
# 解码器只能隐式地从编码器的最终状态中选择相应的信息。然而,注意力机制可以将这种选择过程显式地建模。#双层lstm实现隐藏层编码信息encode
class Seq2SeqEncoder(d2l.Encoder):def __init__(self, vocab_size, embed_size, num_hiddens, num_layers,dropout=0, **kwargs):super(Seq2SeqEncoder, self).__init__(**kwargs)self.num_hiddens = num_hiddensself.num_layers = num_layersself.embedding = nn.Embedding(vocab_size, embed_size)#每个字符编码成一个向量self.rnn = nn.LSTM(embed_size, num_hiddens, num_layers, dropout=dropout, batch_first=False)def begin_state(self, batch_size, device):#(H, C)return [torch.zeros(size=(self.num_layers, batch_size, self.num_hiddens), device=device),torch.zeros(size=(self.num_layers, batch_size, self.num_hiddens), device=device)]def forward(self, X, *args):X = self.embedding(X)  # X shape: (batch_size, seq_len, embed_size)print('===encode X.shape', X.shape)X = X.transpose(0, 1)  # (seq_len, batch_size, embed_size)print('===encode X.shape', X.shape)state = self.begin_state(X.shape[1], device=X.device)out, state = self.rnn(X,state)print('===encode out.shape:', out.shape)#(seq_len, batch_size, num_hiddens)H, C = stateprint('===encode H.shape:', H.shape)#(num_layers, batch_size, num_hiddens)print('===encode C.shape:', C.shape)#(num_layers, batch_size, num_hiddens)return out, state#双层lstm将encode层隐藏层信息解码出来
class Seq2SeqDecoder(d2l.Decoder):def __init__(self, vocab_size, embed_size, num_hiddens, num_layers,dropout=0, **kwargs):super(Seq2SeqDecoder, self).__init__(**kwargs)self.embedding = nn.Embedding(vocab_size, embed_size)self.rnn = nn.LSTM(embed_size, num_hiddens, num_layers, dropout=dropout)self.dense = nn.Linear(num_hiddens, vocab_size)def init_state(self, enc_outputs, *args):return enc_outputs[1]def forward(self, X, state):X = self.embedding(X).transpose(0, 1)print('==decode X.shape', X.shape)# (seq_len, batch_size, embed_size)out, state = self.rnn(X, state)print('==decode out.shape:', out.shape)# (seq_len, batch_size, num_hiddens)H, C = stateprint('==decode H.shape:', H.shape)  # (num_layers, batch_size, num_hiddens)print('==decode C.shape:', C.shape)  # (num_layers, batch_size, num_hiddens)# Make the batch to be the first dimension to simplify loss computation.out = self.dense(out).transpose(0, 1)# (batch_size, seq_len, vocab_size)print('==decode final out.shape', out.shape)return out, statedef SequenceMask(X, X_len,value=0):print(X)print(X_len)print(X_len.device)maxlen = X.size(1)print('==torch.arange(maxlen)[None, :]:', torch.arange(maxlen)[None, :])print('==X_len[:, None]:', X_len[:, None])mask = torch.arange(maxlen)[None, :] < X_len[:, None]print(mask)X[~mask] = valueprint('X:', X)return Xdef masked_softmax(X, valid_length):# X: 3-D tensor, valid_length: 1-D or 2-D tensorsoftmax = nn.Softmax(dim=-1)if valid_length is None:return softmax(X)else:shape = X.shapeif valid_length.dim() == 1:try:valid_length = torch.FloatTensor(valid_length.numpy().repeat(shape[1], axis=0))  # [2,2,3,3]except:valid_length = torch.FloatTensor(valid_length.cpu().numpy().repeat(shape[1], axis=0))  # [2,2,3,3]else:valid_length = valid_length.reshape((-1,))# fill masked elements with a large negative, whose exp is 0X = SequenceMask(X.reshape((-1, shape[-1])), valid_length)return softmax(X).reshape(shape)
class MLPAttention(nn.Module):def __init__(self, ipt_dim, units, dropout, **kwargs):super(MLPAttention, self).__init__(**kwargs)# Use flatten=True to keep query's and key's 3-D shapes.self.W_k = nn.Linear(ipt_dim, units, bias=False)self.W_q = nn.Linear(ipt_dim, units, bias=False)self.v = nn.Linear(units, 1, bias=False)self.dropout = nn.Dropout(dropout)def forward(self, query, key, value, valid_length):query, key = self.W_k(query), self.W_q(key)print("==query.size, key.size::", query.size(), key.size())# expand query to (batch_size, #querys, 1, units), and key to# (batch_size, 1, #kv_pairs, units). Then plus them with broadcast.print('query.unsqueeze(2).shape', query.unsqueeze(2).shape)print('key.unsqueeze(1).shape', key.unsqueeze(1).shape)features = query.unsqueeze(2) + key.unsqueeze(1)#print("features:",features.size())  #--------------开启scores = self.v(features).squeeze(-1)print('===scores:', scores.shape)attention_weights = self.dropout(masked_softmax(scores, valid_length))return torch.bmm(attention_weights, value)def test_encoder():encoder = Seq2SeqEncoder(vocab_size=10, embed_size=8, num_hiddens=16, num_layers=2)X = torch.zeros((4, 7), dtype=torch.long)  # (batch_size, seq_len)output, state = encoder(X)def test_decoder():X = torch.zeros((4, 7), dtype=torch.long)  # (batch_size, seq_len)encoder = Seq2SeqEncoder(vocab_size=10, embed_size=8, num_hiddens=16, num_layers=2)decoder = Seq2SeqDecoder(vocab_size=10, embed_size=8, num_hiddens=16, num_layers=2)state = decoder.init_state(encoder(X))out, state = decoder(X, state)def test_loss():X = torch.FloatTensor([[1, 2, 3], [4, 5, 6]])SequenceMask(X, torch.FloatTensor([2, 3]))def test_dot():keys = torch.ones((2, 10, 2), dtype=torch.float)values = torch.arange((40), dtype=torch.float).view(1, 10, 4).repeat(2, 1, 1)print('==values.shape:', values.shape)# print(values)atten = MLPAttention(ipt_dim=2, units=8, dropout=0)atten(torch.ones((2, 1, 2), dtype=torch.float), keys, values, torch.FloatTensor([2, 6]))if __name__ == '__main__':test_encoder()# test_decoder()
encode输出:

decode输出:

二.基于pytorch的crnn网络结构
地址:https://github.com/zonghaofan/crnn_pytorch
1.网络图:
首先卷积提取特征以后再用两层双向lstm提取时序特征

2.代码实现
import torch.nn as nn
import torch.nn.functional as F
import torchclass BiLSTM(nn.Module):def __init__(self,nIn,nHidden,nOut):super(BiLSTM,self).__init__()self.lstm=nn.LSTM(input_size=nIn,hidden_size=nHidden,bidirectional=True)self.embdding=nn.Linear(nHidden*2,nOut)#Sequence batch channels (W,b,c)def forward(self, input):recurrent,_=self.lstm(input)S,b,h=recurrent.size()S_line = recurrent.view(S*b,h)output=self.embdding(S_line)#[S*b,nout]output=output.view(S,b,-1)return outputclass CRNN(nn.Module):def __init__(self,imgH,imgC,nclass,nhidden):assert imgH==32super(CRNN,self).__init__()cnn = nn.Sequential()cnn.add_module('conv{}'.format(0), nn.Conv2d(imgC, 64, 3, 1, 1))cnn.add_module('relu{}'.format(0), nn.ReLU(True))cnn.add_module('pooling{}'.format(0),nn.MaxPool2d(2,2))cnn.add_module('conv{}'.format(1), nn.Conv2d(64, 128, 3, 1, 1))cnn.add_module('relu{}'.format(1), nn.ReLU(True))cnn.add_module('pooling{}'.format(1), nn.MaxPool2d(2, 2))cnn.add_module('conv{}'.format(2), nn.Conv2d(128, 256, 3, 1, 1))cnn.add_module('relu{}'.format(2), nn.ReLU(True))cnn.add_module('conv{}'.format(3), nn.Conv2d(256, 256, 3, 1, 1))cnn.add_module('relu{}'.format(3), nn.ReLU(True))cnn.add_module('pooling{}'.format(3), nn.MaxPool2d((1,2), 2))cnn.add_module('conv{}'.format(4), nn.Conv2d(256, 512, 3, 1, 1))cnn.add_module('relu{}'.format(4), nn.ReLU(True))cnn.add_module('BN{}'.format(4), nn.BatchNorm2d(512))cnn.add_module('conv{}'.format(5), nn.Conv2d(512, 512, 3, 1, 1))cnn.add_module('relu{}'.format(5), nn.ReLU(True))cnn.add_module('BN{}'.format(5), nn.BatchNorm2d(512))cnn.add_module('pooling{}'.format(5), nn.MaxPool2d((1, 2), 2))cnn.add_module('conv{}'.format(6), nn.Conv2d(512, 512, 2, 1, 0))cnn.add_module('relu{}'.format(6), nn.ReLU(True))self.cnn=cnnself.rnn=nn.Sequential(BiLSTM(512,nhidden,nhidden),BiLSTM(nhidden, nhidden, nclass))def forward(self,input):conv = self.cnn(input)print('conv.size():',conv.size())b,c,h,w=conv.size()assert h==1conv=conv.squeeze(2)#b ,c wconv=conv.permute(2,0,1) #w,b,crnn_out=self.rnn(conv)print('rnn_out.size():',rnn_out.size())out=F.log_softmax(rnn_out,dim=2)print('out.size():',out.size())return out
def lstm_test():print('===================LSTM===========================')model = BiLSTM(512, 256, 5600)print(model)x = torch.rand((41, 32, 512))print('input:', x.size())out = model(x)print(out.size())
def crnn_test():print('===================CRNN===========================')model = CRNN(32, 1, 3600, 256)print(model)x = torch.rand((32, 1, 32, 200))  # b c h wprint('input:', x.size())out = model(x)print(out.size())
if __name__ == '__main__':lstm_test()crnn_test()
lstm输出:

#crnn输出


3.提特征输入ctc过程
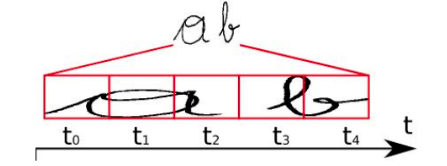
上面代码可看成,输入为(32,1,32,200)cnn提取特征过后,每张图片11个特征向量,每个特征向量长度为512,在LSTM中一个时间步就传入一个特征向量进行分类。一个特征向量就相当于原图中的一个小矩形区域,RNN的目标就是预测这个矩形区域为哪个字符,即根据输入的特征向量,进行预测,得到所有字符的softmax概率分布,这是一个长度为字符类别数的向量,作为CTC层的输入。如下图所示就是输入ctc的示例图

4.ctc loss
首先思考ctc解决什么问题,一般分类就是一张图片对应一类,那样拉一个全连接进行softmax即可分类,对于这种一张图片有好几个字符,上述就解决不了,故有一种思路是将输入图片的字符切割出来在进行分类,那这样的问题是分割不准怎么办?所以面临这种输入类别不定长的时候,就可以利用ctc进行解决,ctc的思想就是将输入图片提取特征变成时序步长,给出输入时序步长X的所有可能结果Y的输出分布。那么根据这个分布,我们可以输出最可能的结果。大胆猜测对于有一张个头差不多的猫猫与狗狗水平挨着的图片,ctc可能也能解决分类问题.
ctc的损失函数可以对CNN和RNN进行端到端的联合训练。

RNN这里有去冗余操作,例如,上图中RNN中有5个时间步,但最终输出两个字符,理想情况下 t0, t1, t2时刻都应映射为“a”,t3, t4 时刻都应映射为“b”,然后连接起来得到“aaabb”,那么合并结果为“ab”。但是在识别book这类字符会有问题。最后以“-”符号代表blank,RNN 输出序列时,在文本标签中的重复的字符之间插入一个“-”,比如输出序列为“bbooo-ookk”,则最后将被映射为“book”,即有blank字符隔开的话,连续相同字符就不进行合并。即对字符序列先删除连续重复字符,然后从路径中删除所有“-”字符,这个称为解码过程,而编码则是由神经网络来实现。引入blank机制,我们就可以很好地解决重复字符的问题。
4.1训练过程

其中t0,t1代表两个时间步长,黑色线代表a字符的路径,虚线代表空文本路径。
例如:对于时序步长为2的识别,有两个时间步长(t0,t1)和三个可能的字符为“a”,“b”和“-”,我们得到两个概率分布向量,如果采取最大概率路径解码的方法,则“--”的概率最大,即真实字符为空的概率为0.6*0.6=0.36。
但是为字符“a”的情况有多种组合,“aa”, “a-“和“-a”都是代表“a”,所以,输出“a”的概率应该为三种之和:
0.4*0.4+0.4*0.6+0.4*0.6=0.64 ,故a的概率最高。如果标签文本为“a”,则通过计算图像中为“a”的所有可能的对齐组合(或者路径)的分数之和来计算损失函数。
对于RNN给定输入概率分布矩阵为y={y1,y2,...,yT},T是序列长度,最后映射为标签文本l的总概率为:

其中B(π)代表从序列到序列的映射函数B变换后是文本l的所有路径集合,而π则是其中的一条路径。每条路径的概率为各个时间步中对应字符的分数的乘积。然后训练网络使得这个概率值最大化,类似于普通的分类,CTC的损失函数定义为概率的负最大似然函数,为了计算方便,对似然函数取对数。
然后通过对损失函数的计算,就可以对之前的神经网络进行反向传播,神经网络的参数根据所使用的优化器进行更新,从而找到最可能的像素区域对应的字符。这种通过映射变换和所有可能路径概率之和的方式使得CTC不需要对原始的输入字符序列进行准确的切分。
4.2推理过程
推理阶段,过程与训练阶段有所不同,我们用训练好的神经网络来识别新的文本图像。如果我们像上面一样将每种可能文本的所有路径计算出来,对于很长的时间步和很长的字符序列来说,计算量是非常庞大。
由于RNN在每一个时间步的输出为所有字符类别的概率分布,所以,我们取其中最大概率的字符作为该时间步的输出字符,然后将所有时间步得到一个字符进行拼接得到一个序列路径,即最大概率路径,再根据上面介绍的合并序列方法得到最终的预测文本结果。

如上图5个时间步长,输出结果为a->a->a->blank>b,合并去重结果就为ab。要注意的是字符之间有间距,需要添加blank。
4.3ctc loss代码示例
import torch
from torch import nnT = 50      #时序步长
C = 20      #类别数 排除blank
N = 2      # Batch size
S = 30      #一个batch中的label的最大时序步长
S_min = 10  #一个batch中label的最小字符个数# Initialize random batch of input vectors, for *size = (T,N,C)
#rnn输出结果
input = torch.randn(T, N, C).log_softmax(2).detach().requires_grad_()
print('==input.shape:', input.shape)
#字符对应的label idx
target = torch.randint(low=1, high=C+1, size=(N, S), dtype=torch.long)
print('==target:', target)
#序列长度的值
input_lengths = torch.full(size=(N,), fill_value=T, dtype=torch.long)
print('==input_lengths.shape:', input_lengths.shape)
print('=input_lengths:', input_lengths)
#字符的长度
target_lengths = torch.randint(low=S_min, high=S, size=(N,), dtype=torch.long)
print('==target_lengths.shape:', target_lengths.shape)
print('==target_lengths:', target_lengths)ctc_loss = nn.CTCLoss()
loss = ctc_loss(input, target, input_lengths, target_lengths)

5.一些可能改动的点
最后两层pooling设置为h=1,w=2的矩形,是因为文本大多数是高小而宽长,这样就可以不丢失宽度信息,利于区分i和L.
如果数字过小,那就可以让横向长度不变,pool可以换成如下,这样横向长度基本不变,纵向减少两倍。
pool2 = nn.MaxPool2d((2, 2), (2, 1), (0, 1))x=torch.rand((32,1,32,100))
print('=========input========')
print(x.shape)
print('=========output========')
pool = nn.MaxPool2d(kernel_size=(2,2),stride=(2,2))
y = pool(x)
print(y.shape)
# (h-2)/2+1 (w-1)/1+1
pool = nn.MaxPool2d(kernel_size=(2,1),stride=(2,1))
y = pool(x)
print(y.shape)# (h-2)+2*p/2+1 (w-2)+2*p/1+1
pool = nn.MaxPool2d(kernel_size=(2,2),stride=(2,1),padding=(1,0))
y = pool(x)
print(y.shape)
6.finetune新加字符
由于原先数据集不一定找得到,对于新加的字符,对除了最后一层的全连接进行冻结,例如原先最后一层是(512,5000),现在新加10个字符,变为(512,5010),则将原先的那一层权重矩阵平移过来.只需要训练(512,10)的矩阵.
参考:
http://colah.github.io/posts/2015-08-Understanding-LSTMs/
https://www.cnblogs.com/zhangchaoyang/articles/6684906.html
https://aijishu.com/a/1060000000135614
https://www.cnblogs.com/ydcode/p/11038064.html


+异步+gunicorn部署Flask服务+多gpu卡部署)

ant启动tomcat)

...)


)


)
