Halcon学习笔记:xyz_attrib_to_object_model_3d——从X、Y和Z图像中创建3D对象模型同时附加属性
xyz_attrib_to_object_model_3d.hdev
- This example program shows the usage of the procedure
- xyz_attrib_to_object_model_3d.
- It can be used to create 3D object models from X, Y and Z images,
- and simultaneously attach attributes to every point.
- 这个示例程序展示了 xyz_attrib_to_object_model_3d 算子的用法。
- 它可以用于从X、Y和Z图像中创建3D对象模型,并同时将属性附加到每个点上。
源码
* 初始化
dev_update_off ()
dev_close_window ()
*
* Read the digital surface model.
* 1、读取数字表面模型
read_image (Z, 'mreut_dgm_2.0.tif')
get_image_size (Z, Width, Height)
*
* 2、读取包含灰色值的图像,这些灰色值将作为属性添加到3D对象模型中
read_image (AerialImage, 'mreut4_3.png')
*
* Generate a label image with a second attribute.
* In this case, we label different terrain types very simply, just for demonstration purposes.
* 3、用第二个属性生成标签图像。
* 在这种情况下,我们很简单的为不同的地形类型标记,只是为了演示。* 1)将区域转换为标签图像
auto_threshold (AerialImage, Regions, 4)
region_to_label (Regions, LabelImage, 'byte', Width, Height)
*
* Create a multichannel image from both attribute images.
* 4、从两个属性图像中创建一个多通道图像
compose2 (AerialImage, LabelImage, MultiChannelAttribImage)
*
* Create images that contain X and Y coordinates in a regular grid.
* For a simple gray ramp, the input parameters of gen_image_surface_first_order are very simple:
* 5、在常规网格中创建包含X和Y坐标的图像。对于一个简单的灰色渐变,gen_image_surface_first_order 的输入参数非常简单:* 1)用一阶多项式创建两个倾斜(减变)的灰色表面(X Y)
GroundResolution := 2.0
gen_image_surface_first_order (X, 'real', 0, GroundResolution, 0, 0, 0, Width, Height)
gen_image_surface_first_order (Y, 'real', -GroundResolution, 0, 0, 0, 0, Width, Height)
*
* The following procedure creates a 3D object model from
* the X, Y and Z image and adds the information contained in the attribute image to each point.
* 6、下面的过程从X、Y和Z图像中创建一个3D对象模型,并将属性图像中包含的信息添加到每个点* 1)将3D点从图像转换为3D对象模型,并向对象模型的点添加扩展属性。(gray 灰度 + terrain 地形:添加两个通道进去)
AttribName := ['&gray','&terrain']
xyz_attrib_to_object_model_3d (X, Y, Z, MultiChannelAttribImage, AttribName, ObjectModel3D)
*
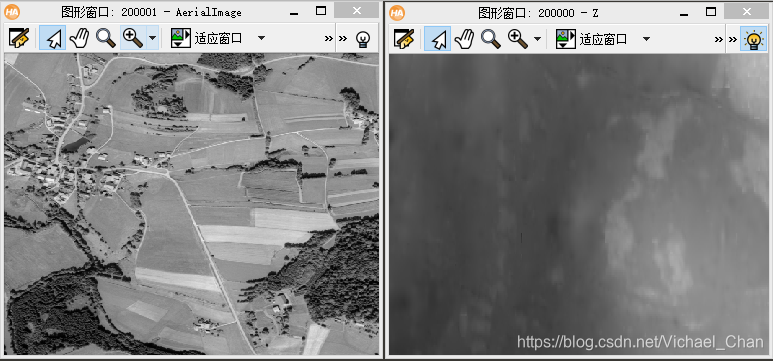
* 7、显示结果 * 1)显示“地形类型”
dev_open_window (Height / 2, 0, Width / 2, Height / 2, 'black', WindowHandle1)
dev_set_part (0, 0, Height - 1, Width - 1)
set_display_font (WindowHandle1, 16, 'mono', 'true', 'false')
dev_set_color (['red','green','blue'])
dev_set_draw ('fill')
dev_display (Regions)
disp_message (WindowHandle1, 'Terrain types', 'window', 12, 12, 'black', 'true')* 2)显示“鸟瞰图”
dev_open_window (0, 0, Width / 2, Height / 2, 'black', WindowHandle2)
set_display_font (WindowHandle2, 16, 'mono', 'true', 'false')
dev_display (AerialImage)
disp_message (WindowHandle2, 'Aerial image', 'window', 12, 12, 'black', 'true')* 3)显示“数字表面模型”
dev_open_window (0, Width / 2 + 8, Width, Height, 'gray', WindowHandle3)
set_display_font (WindowHandle3, 16, 'mono', 'true', 'false')
dev_display (Z)
disp_message (WindowHandle3, 'Digital surface model', 'window', 12, 12, 'black', 'true')
disp_continue_message (WindowHandle3, 'black', 'true')
stop ()
*
* Perform fast triangulation of the object model for better visualization.
* 8、对对象模型进行快速的三角测量,以便更好地进行可视化。* 1)为某个操作准备一个3D对象模型(此操作为segmentation分割)
prepare_object_model_3d (ObjectModel3D, 'segmentation', 'true', [], [])
* Visualize 3d object model interactively
* 9、交互式地可视化3d对象模型
create_pose (-620, -85, 17000, 135, 2, 10, 'Rp+T', 'gba', 'point', Pose)
Instructions := 'Rotate: Left button'
Instructions[1] := 'Zoom: Shift + left button'
Instructions[2] := 'Move: Ctrl + left button'* 1)创建使用了属性为:"&gray"的可视化的3D模型
visualize_object_model_3d (WindowHandle3, ObjectModel3D, [], Pose, ['color_attrib','color_attrib_start','color_attrib_end'], ['&gray',0,255], ['Created 3D model','Attribute used for visualization: \'&gray\''], [], Instructions, PoseOut)* 2)创建使用了属性为:"&terrain"的可视化的3D模型属性:
visualize_object_model_3d (WindowHandle3, ObjectModel3D, [], PoseOut, ['color_attrib','lut'], ['&terrain','color1'], ['Created 3D model','Attribute used for visualization: \'&terrain\''], [], Instructions, PoseOut)
disp_end_of_program_message (WindowHandle3, 'black', 'true')
stop ()
*
clear_object_model_3d (ObjectModel3D)
结果:
1、获得两个属性的多通道图像


2、创建 X Y 图像,灰度值变化方向如图:


3、结果显示


4、验证结果:


)

)
)


:数据加密(Data Encryption))


