1、配置java环境
检查java环境

满足elasticsearch6.1.1java环境要求;
2、安装ElasticSearch6.1.1
①为es新生成用户、用户组
su root
groupadd esgroup
useradd ela -g esgroup -p 5tgbhu8[root@localhost fibonacci]# su ela
Attempting to create directory /home/ela/perl5
[ela@localhost fibonacci]$
②进入ela用户工作目录,将elasticsearch-6.1.1,kibana-6.1.1,x-pck-6.1.1拷到工作目录待用,注意版本号必须一模一样,否则会出错;
[ela@localhost Work]$ ls
elasticsearch-6.1.1.tar.gz  kibana6.1.1.gz  x-pack-6.1.1.zip
③解压elasticsearch-6.1.1.tar.gz,拷贝到/opt中;
tar -zxvf elasticsearch-6.1.1.tar.gz
[ela@localhost Work]$ ls
elasticsearch-6.1.1  elasticsearch-6.1.1.tar.gz  kibana6.1.1.gz  x-pack-6.1.1.zip
[ela@localhost Work]$ su root
Password:
[root@localhost Work]# cp  -r elasticsearch-6.1.1 /opt/
cd /opt/
chown -R ela:esgroup elasticsearch-6.1.1/
④试运行elasticsearch;
[ela@localhost opt]$ cd /opt/elasticsearch-6.1.1/
[ela@localhost elasticsearch-6.1.1]$ bin/elasticsearch
运气比较好,这次成功了,如下出现started表示elasticsearch运行成功:
[2019-11-22T10:06:57,893][INFO ][o.e.n.Node               ] [nwkzLZ5] started
[2019-11-22T10:06:57,898][INFO ][o.e.g.GatewayService     ] [nwkzLZ5] recovered [0] indices into cluster_state
使用curl在本机(虚拟机)测试一下成功如下:
[fibonacci@localhost ~]$ curl 127.0.0.1:9200
{"name" : "nwkzLZ5","cluster_name" : "elasticsearch","cluster_uuid" : "EYzfoBkET_q85hsPsVzIDQ","version" : {"number" : "6.1.1","build_hash" : "bd92e7f","build_date" : "2017-12-17T20:23:25.338Z","build_snapshot" : false,"lucene_version" : "7.1.0","minimum_wire_compatibility_version" : "5.6.0","minimum_index_compatibility_version" : "5.0.0"},"tagline" : "You Know, for Search"
}
要想在其它计算机上可以访问虚拟机数据库,就要简单设置配置文件:
在/opt/elasticsearch-6.1.1/config中找到elasticsearch.yml,简单设置elasticsearch配置文件,实现局域网其它机器可以访问该elasticsearch;
# Set the bind address to a specific IP (IPv4 or IPv6):
#
network.host: 192.168.1.211
#
# Set a custom port for HTTP:
#
http.port: 9200
#
# For more information, consult the network module documentation.
配置完这个就出现下面的问题了:

先把这两条改了:
#第一个问题
max file descriptors [4096] for elasticsearch process is too low, increase to at least [65536]#切换到root用户修改
vim /etc/security/limits.conf
# 在最后面追加下面内容
ela hard nofile 65536
ela soft nofile 65536#第二个问题
max virtual memory areas vm.max_map_count [65530] is too low, increase to at least [262144]在   /etc/sysctl.conf文件最后添加一行
vm.max_map_count=262144
并执行命令:sysctl -p
再次运行没有问题了;

3、安装kibana
Kibana是一个针对Elasticsearch的开源分析及可视化平台,使用Kibana可以查询、查看并与存储在ES索引的数据进行交互操作,使用Kibana能执行高级的数据分析,并能以图表、表格和地图的形式查看数据。
kibana的安装和使用都是使用root用户。
①把解压好的kibana放到/usr/local中;
[root@localhost Work]# cd /usr/local/
[root@localhost local]# ls
bin  etc  games  include  kibana-6.1.1-linux-x86_64  lib  lib64  libexec  man  sbin  share  src
②centos7系统网络设置;
Kibana的默认端口是5601
开启防火墙:systemctl start firewalld.service
开启5601端口:firewall-cmd --permanent --zone=public --add-port=5601/tcp
重启防火墙:firewall-cmd --reload
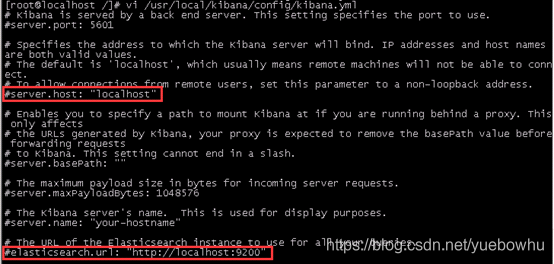
③根据elasticsearch网络配置,设置kibana配置,将下面两处的localhost换成elasticsearch的IP地址(也即虚拟机的IP地址):

④在/usr/local/kibana-6.1.1-linux-x86_64中运行kibana,并在真机(非虚拟机)上测试;
cd /usr/local/kibana-6.1.1-linux-x86_64
bin/kibana
运行结果:

在真机上测试成功如下,发现没有密码就直接进去使用了,所以x-pack解决的问题就是elasticsearch和kibana密码问题:

4、安装x-pack6.1.1
①在elasticsearch上安装x-pack;
[ela@localhost elasticsearch-6.1.1]$ bin/elasticsearch-plugin install file:///home/ela/Work/x-pack-6.1.1.zip#结果
[=================================================] 100%
@@@@@@@@@@@@@@@@@@@@@@@@@@@@@@@@@@@@@@@@@@@@@@@@@@@@@@@@@@@
@     WARNING: plugin requires additional permissions     @
@@@@@@@@@@@@@@@@@@@@@@@@@@@@@@@@@@@@@@@@@@@@@@@@@@@@@@@@@@@
* java.io.FilePermission \\.\pipe\* read,write
* java.lang.RuntimePermission accessClassInPackage.com.sun.activation.registries
* java.lang.RuntimePermission getClassLoader
* java.lang.RuntimePermission setContextClassLoader
* java.lang.RuntimePermission setFactory
* java.net.SocketPermission * connect,accept,resolve
* java.security.SecurityPermission createPolicy.JavaPolicy
* java.security.SecurityPermission getPolicy
* java.security.SecurityPermission putProviderProperty.BC
* java.security.SecurityPermission setPolicy
* java.util.PropertyPermission * read,write
See http://docs.oracle.com/javase/8/docs/technotes/guides/security/permissions.html
for descriptions of what these permissions allow and the associated risks.Continue with installation? [y/N]y
@@@@@@@@@@@@@@@@@@@@@@@@@@@@@@@@@@@@@@@@@@@@@@@@@@@@@@@@@@@
@        WARNING: plugin forks a native controller        @
@@@@@@@@@@@@@@@@@@@@@@@@@@@@@@@@@@@@@@@@@@@@@@@@@@@@@@@@@@@
This plugin launches a native controller that is not subject to the Java
security manager nor to system call filters.Continue with installation? [y/N]y
Elasticsearch keystore is required by plugin [x-pack], creating...
-> Installed x-pack
②在kibana上安装x-pack,有点慢;
[root@localhost kibana-6.1.1-linux-x86_64]# bin/kibana-plugin install file:///home/ela/Work/x-pack-6.1.1.zip
Attempting to transfer from file:///home/ela/Work/x-pack-6.1.1.zip
Transferring 307225451 bytes....................
Transfer complete
Retrieving metadata from plugin archive
③在elasticsearch上设置用户名密码:
首先运行elasticserch,另开一个ela界面,进行如下设置,为方便起见,所有密码设置相同;
[ela@localhost elasticsearch-6.1.1]$ bin/x-pack/setup-passwords interactive
Initiating the setup of passwords for reserved users elastic,kibana,logstash_system.
You will be prompted to enter passwords as the process progresses.
Please confirm that you would like to continue [y/N]yEnter password for [elastic]:
Reenter password for [elastic]:
Enter password for [kibana]:
Reenter password for [kibana]:
Enter password for [logstash_system]:
Reenter password for [logstash_system]:
Changed password for user [kibana]
Changed password for user [logstash_system]
Changed password for user [elastic]
④运行一下kibana,貌似出现很多问题:

不管它,先在浏览器上登录下试试,发现不让登录:

在kibana 的配置文件config/kibana.yml 中添加用户名和密码参数,就是上一步设置的elasticsearch的用户名和密码:

再试一下kibana,问题解决:

不过还有少许几个警告:

5、安装x-pack6.1.1

通过Management ->Elasticsearch ->License Management
发现x-pack是需要收费的,此处有安装方法,具体可参考https://blog.espnlol.com/?p=192,这个博客写的很详细,下面根据这个博客的步骤一步步操作一下。
①在真机上安装luyten,我安装的luyten-0.5.3.exe(luyten-0.5.4.exe安装不了),使用luyten打开x-pack-6.1.1.jar,找到LicenseVerifier.java,将其另存为到磁盘的一个地方,并更改为如下代码
package org.elasticsearch.license;public class LicenseVerifier
{public static boolean verifyLicense(final License license, final byte[] array) {return true;}public static boolean verifyLicense(final License license) {return true;}
}
如图:
②#将改好代码的文件上传到linux服务器,随意那个目录,接着我们需要编译这个文件,注意”“中的内容是x-pack安装后生成的文件:
javac -cp "/opt/elasticsearch-6.1.1/lib/elasticsearch-6.1.1.jar:/data/elk/elasticsearch-6.1.1/lib/lucene-core-7.1.0.jar:/opt/elasticsearch-6.1.1/plugins/x-pack/x-pack-6.1.1.jar" LicenseVerifier.java#此步之后生成了一个LicenseVerifier.class,此步类似与c语言中库和.c文件的编译;LicenseVerifier.class ③#将安装生成的x-pack-6.1.1.jar解压并替换成我们更改过的 LicenseVerifier.class
#新建一个文件夹test_jar,解压
cd test_jar
cp /opt/elasticsearch-6.1.1/plugins/x-pack/x-pack-6.1.1.jar ./
jar -xf x-pack-6.1.1.jar
rm -rf x-pack-6.1.1.jar#替换LicenseVerifier.class
cd test_jar/org/elasticsearch/license
cp LicenseVerifier.class ./#重新压缩成x-pack-6.1.1.jar
cd test_jar
jar -cvf x-pack-6.1.1.jar ./*#多了一个x-pack-6.1.1.jar,用这个替换x-pack-6.1.1.jar
cp  x-pack-6.1.1.jar /opt/elasticsearch-6.1.1/plugins/x-pack#通过时间看是否更新成功
-rw-r--r--. 1 ela esgroup    2973 Nov 22 11:32 plugin-security.policy
drwxr-xr-x. 2 ela esgroup      54 Nov 22 11:32 resources
-rw-r--r--. 1 ela esgroup   98092 Nov 22 11:32 super-csv-2.4.0.jar
-rw-r--r--. 1 ela esgroup   80555 Nov 22 11:32 transport-netty4-6.1.1.jar
-rw-r--r--. 1 ela esgroup 1980595 Nov 22 11:32 unboundid-ldapsdk-3.2.0.jar
-rw-r--r--. 1 ela esgroup 3984684 Nov 22 15:23 x-pack-6.1.1.jar
④配置elasticsearch.yml文件,这一步很关键,为了绕过验证,此步必须设置
#在elasticsearch.yml最后添加
xpack.security.enabled: false #xpack.security.transport.ssl.enabled: true
xpack.security.transport.ssl.enabled: true
⑤去官网申请一个免费的license,会发邮件给你,收到之后下载并更改文件申请地址:https://license.elastic.co/registration
{"license":{"uid":"XXXXXXXXXXXXXXX","type":"platinum","issue_date_in_millis":1514505600000,"expiry_date_in_millis":4102329600000,"max_nodes":999,"issued_to":"ae ae (beijingitjuzi)","issuer":"Web Form","signature":"XXXXXXXXXXXXXXXXX","start_date_in_millis":1514505600000}}这里,platinum表示白金版,可以使用所有功能。其他的如expiry_date_in_millis、max_nodes等根据自己需要修改即可。(仅需要修改type,expiry_date_in_millis,max_nodes)⑥开启elasticsearch,将license导入集群(单个节点)即可
curl -XPUT -u elastic:password 'http://$IP:9200/_xpack/license' -H "Content-Type: application/json" -d @license.json#运行结果
curl -XPUT -u elastic:5tgbhu8 'http://192.168.1.7:9200/_xpack/license' -H "Content-Type: application/json" -d @license.json
{"acknowledged":true,"license_status":"valid"}
⑦刚才为了绕过验证,在elasticsearch.yml中设置了xpack.security.enabled: false #xpack.security.transport.ssl.enabled: true,现在再重新设置回来
#在elasticsearch.yml最后添加
xpack.security.enabled: true #xpack.security.transport.ssl.enabled: true
xpack.security.transport.ssl.enabled: true
⑧安装成功;

参考的一些重要博客:
。。。。


ElasticSearch6.1.1 Python API)

:函数进阶)
ElasticSearch的基本概念)
ElasticSearch之数据)


:函数的调用)


:this指向问题)

ElasticSearch 6.1.1数据类型)
ElasticSearch 6.1.1聚合查询)


)
