网上有很多关于忘记MySQL root密码的一些文章,里面都有写怎么去解决,但有时觉得写得太恶心,要么一字不漏的抄别人的,要么就说得不清不楚,好了,不吐槽了,以下是解决的整个过程。
首先我们要知道忘记MySQL root密码后,能否重启mysql,能重启的操作是怎么样的?不能重启的操作又会是怎么样的?
情况一:(能重启情况下)
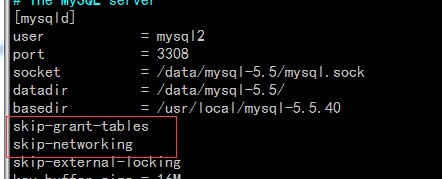
修改my.cnf配置文件,在mysqld栏下添加skip-grant-tables选项,意思是mysqld server启动之后并不使用权限系统(privilege system),也可以理解为跳过授权表。为了安全起见,通常加上skip-networking,mysqld不侦听任何TCP/IP连接请求。

重启mysqld,然后空密码连接:
[root ~]$mysql -uroot -S /data/mysql-5.5/mysql.sock
Welcome to the MySQL monitor.  Commands end with ; or \g.
Your MySQL connection id is 3
Server version: 5.5.40-log MySQL Community Server (GPL)Copyright (c) 2000, 2014, Oracle and/or its affiliates. All rights reserved.Oracle is a registered trademark of Oracle Corporation and/or its
affiliates. Other names may be trademarks of their respective
owners.Type 'help;' or '\h' for help. Type '\c' to clear the current input statement.mysql>
可以看到已经成功登录了,然后修改root密码:
mysql> update mysql.user set password=password('123456') where user='root';
Query OK, 4 rows affected (0.00 sec)
Rows matched: 4  Changed: 4  Warnings: 0
mysql> flush privileges;
Query OK, 0 rows affected (0.01 sec)
已经成功修改密码了,但还有事情要做,就是把刚刚添加到my.cnf里的skip-grant-tables和skip-networking删除掉或者注释掉。
情况二:(不能重启mysql的情况)
如果不能重启,mysql.user 刚好有权限比较低的用户,如果没有,你请神仙来帮你吧,哈哈
1、为了测试,我自己创建一个用户,可以没什么权限
mysql> create user xuanzhi@'localhost' identified by '123456';
Query OK, 0 rows affected (0.00 sec)
2、进到数据目录下:
[root mysql-5.5]$ pwd
/data/mysql-5.5
[root mysql-5.5]$ cp mysql/user.* test/
[root mysql-5.5]$ chown mysql.mysql test/user.*
3、用权限比较小的用户登录:
[root mysql-5.5]$mysql -uxuanzhi -p123456 -S /data/mysql-5.5/mysql.sock
Welcome to the MySQL monitor.  Commands end with ; or \g.
Your MySQL connection id is 3
Server version: 5.5.40-log MySQL Community Server (GPL)Copyright (c) 2000, 2014, Oracle and/or its affiliates. All rights reserved.Oracle is a registered trademark of Oracle Corporation and/or its
affiliates. Other names may be trademarks of their respective
owners.Type 'help;' or '\h' for help. Type '\c' to clear the current input statement.mysql> use test
Database changed
mysql> update user set password=password('123123') where user='root';
Query OK, 4 rows affected (0.00 sec)
Rows matched: 4  Changed: 4  Warnings: 0
4、把修改后的user.MYD和user.MYI复制到mysql目录下,记得备份之前的文件。
[root mysql-5.5]$ pwd
/data/mysql-5.5
[root mysql-5.5]$ mv mysql/user.MYD mysql/user.MYD.bak
[root mysql-5.5]$ mv mysql/user.MYI mysql/user.MYI.bak
[root mysql-5.5]$ cp test/user.MY* mysql/
[root mysql-5.5]$ chown mysql:mysql  mysql/user.*
5.查找mysql进程号,并且发送SIGHUP信号,重新加载权限表。(有时加载一次不行的时候,再加载多一次@。@)
[root mysql]$ pgrep -n mysql
23166
[root mysql]$ kill -SIGHUP 23166
[root mysql]$ /usr/local/mysql-5.5.40/bin/mysql -uroot -p123123 -S /data/mysql-5.5/mysql.sock
ERROR 1045 (28000): Access denied for user 'root'@'localhost' (using password: YES)
[root mysql]$ kill -SIGHUP 23166
[root mysql]$ /usr/local/mysql-5.5.40/bin/mysql -uroot -p123123 -S /data/mysql-5.5/mysql.sock
Welcome to the MySQL monitor.  Commands end with ; or \g.
Your MySQL connection id is 5
Server version: 5.5.40-log MySQL Community Server (GPL)Copyright (c) 2000, 2014, Oracle and/or its affiliates. All rights reserved.Oracle is a registered trademark of Oracle Corporation and/or its
affiliates. Other names may be trademarks of their respective
owners.Type 'help;' or '\h' for help. Type '\c' to clear the current input statement.mysql>
不重启的第二种方法:
1、创建新的数据目录,并给原来user相应的权限,忘记密码对应的实例它的user是mysql,所以把权限给mysql用户
[root data]$ mkdir -pv /dbdata/datadir/
mkdir: 已创建目录 "/dbdata"
mkdir: 已创建目录 "/dbdata/datadir/"
[root data]$ chown  -R mysql:mysql /dbdata/datadir/
2、执行初始化操作:(报错了)
[root scripts]$ pwd
/usr/local/mysql-5.5.40/scripts
[root scripts]$ ./mysql_install_db --datadir=/dbdata/datadir/ --user=mysql2FATAL ERROR: Could not find ./bin/my_print_defaultsIf you compiled from source, you need to run 'make install' to
copy the software into the correct location ready for operation.If you are using a binary release, you must either be at the top
level of the extracted archive, or pass the --basedir option
pointing to that location.
解决方法:
[root scripts]$ /usr/local/mysql-5.6.10/scripts/mysql_install_db --datadir=/dbdata/datadir/ --user=mysql --datadir=/dbdata/datadir/ --basedir=/usr/local/mysql-5.6.10/
Installing MySQL system tables...
141210 16:09:24 [Warning] 'THREAD_CONCURRENCY' is deprecated and will be removed in a future release.
OK
Filling help tables...
141210 16:09:24 [Warning] 'THREAD_CONCURRENCY' is deprecated and will be removed in a future release.
OK
3、启动一个新的进程,这里要注意一下port,sock文件,还有pid文件,这都是新的,user还是忘记密码实例的user,而不是忘记密码对应的那个数据库实例的,这里我们不需要用到InnoDB引擎,设置默认引擎为MyISAM:
[root ~]$  /usr/local/mysql-5.6.10/bin/mysqld_safe --datadir=/dbdata/datadir --plugin-dir=/usr/local/mysql-5.6.10/lib/plugin/  --skip-innodb \
> --default-storage-engine=myisam --socket=/dbdata/datadir/mysql2.sock --user=mysql --port=3305 --log-error=/dbdata/datadir/error2.log --pid-file=/data/mysql-5.6/mysql.pid &
[1] 21204
[root ~]$ 141210 16:56:11 mysqld_safe Logging to '/dbdata/datadir/error2.log'.
141210 16:56:11 mysqld_safe Starting mysqld daemon with databases from /dbdata/datadir
4、登录新启动的mysql实例,此时密码为空密码:
root datadir]$ /usr/local/mysql-5.6.10/bin/mysql -S /dbdata/datadir/mysql2.sock
Welcome to the MySQL monitor.  Commands end with ; or \g.
Your MySQL connection id is 1
Server version: 5.6.10-log Source distributionCopyright (c) 2000, 2013, Oracle and/or its affiliates. All rights reserved.Oracle is a registered trademark of Oracle Corporation and/or its
affiliates. Other names may be trademarks of their respective
owners.Type 'help;' or '\h' for help. Type '\c' to clear the current input statement.mysql> flush tables;
Query OK, 0 rows affected (0.00 sec)
修改root密码:
mysql> select user, host, password from user where user like 'root';
+------+-----------------------+----------+
| user | host                  | password |
+------+-----------------------+----------+
| root | localhost             |          |
| root | localhost.localdomain |          |
| root | 127.0.0.1             |          |
| root | ::1                   |          |
+------+-----------------------+----------+
4 rows in set (0.02 sec)mysql> update mysql.user set password=password('654321') where user='root';
Query OK, 4 rows affected (0.03 sec)
Rows matched: 4  Changed: 4  Warnings: 0
mysql> flush privileges;
Query OK, 0 rows affected (0.00 sec)
5、拷备新的user表到忘记密码的实例数据库的mysql目录下
[root mysql]$ pwd
/dbdata/datadir/mysql
[root mysql]$ cp user.* /data/mysql-5.6/mysql/
cp:是否覆盖"/data/mysql-5.6/mysql/user.frm"? y
cp:是否覆盖"/data/mysql-5.6/mysql/user.MYD"? y
cp:是否覆盖"/data/mysql-5.6/mysql/user.MYI"? y
[root mysql]$ chown -R mysql5.6:mysql5.6 /data/mysql-5.6/
[root mysql]$ chmod 660 /data/mysql-5.6/mysql/user.*
6、我们需要到mysqld发送一个sighup信号,MySQL响应这个信号加载授权表,刷新表,日志,线程缓存。
如果是单个MySQL实例,可以用这样的方法去重新加载
[root ~]$ kill -1 $(/sbin/pidof mysqld)
如果是多个MySQL实例在一台服务器上的话,就要注意点了,可以通过这样的方法找到pid,我旧实例的端口是3306:
[root mysql-5.6.10]$ netstat -nltp
Active Internet connections (only servers)
Proto Recv-Q Send-Q Local Address               Foreign Address             State       PID/Program name
tcp        0      0 0.0.0.0:3307                0.0.0.0:*                   LISTEN      8414/mysqld
tcp        0      0 0.0.0.0:3308                0.0.0.0:*                   LISTEN      6430/mysqld
tcp        0      0 0.0.0.0:22                  0.0.0.0:*                   LISTEN      1144/sshd

tcp        0      0 :::3310                     :::*                        LISTEN      17151/mysqld
tcp        0      0 :::22                       :::*                        LISTEN      1144/sshd
tcp        0      0 ::1:631                     :::*                        LISTEN      1109/cupsd
tcp        0      0 :::3306                     :::*                        LISTEN      2091/mysqld
[root mysql-5.6.10]$ kill -1 2091
有时kill -1一次不行,再执行一次就可以了:
[root mysql-5.6.10]$ kill -1 2091
[root mysql-5.6.10]$ /usr/local/mysql-5.6.10/bin/mysql -uroot -p654321 -S /data/mysql-5.6/mysql.sock
Warning: Using a password on the command line interface can be insecure.
ERROR 1045 (28000): Access denied for user 'root'@'localhost' (using password: YES)
[root mysql-5.6.10]$ kill -1 2091
[root mysql-5.6.10]$ /usr/local/mysql-5.6.10/bin/mysql -uroot -p654321 -S /data/mysql-5.6/mysql.sock
Warning: Using a password on the command line interface can be insecure.
Welcome to the MySQL monitor.  Commands end with ; or \g.
Your MySQL connection id is 13
Server version: 5.6.10-log MySQL Community Server (GPL)Copyright (c) 2000, 2013, Oracle and/or its affiliates. All rights reserved.Oracle is a registered trademark of Oracle Corporation and/or its
affiliates. Other names may be trademarks of their respective
owners.Type 'help;' or '\h' for help. Type '\c' to clear the current input statement.mysql>
OK,已经成功登录了,如果有更多好的方法,我们可以再一起讨论下
总结:
1)第一种方法简单,但需要重启MySQL,重启会影响线上业务,一般不建议重启
2)第二种方法比较好,不用重启MySQL实例,修改密码,只修改root用户的,而且其它保持不变
3)第三种方法也不需要重启,但是新的user表里,只有root一个用户,如果之前服务器还存在别的用户及权限,这就比较麻烦了
参考资料:http://www.percona.com/blog/2014/12/10/recover-mysql-root-password-without-restarting-mysql-no-downtime/
PS:本人也是参考别人的博客做的,但我没有照搬别人的东西,太恶心了,希望大家有自己的风格。^.^
| 作者:陆炫志 出处:xuanzhi的博客 http://www.cnblogs.com/xuanzhi201111 您的支持是对博主最大的鼓励,感谢您的认真阅读。本文版权归作者所有,欢迎转载,但请保留该声明。 |

:文件写入操作)

:系统模块path路径操作)

:相对路径和绝对路径)

:第三方模块npm)
![[BZOJ 1085] [SCOI2005] 骑士精神 [ IDA* 搜索 ]](http://pic.xiahunao.cn/[BZOJ 1085] [SCOI2005] 骑士精神 [ IDA* 搜索 ])

:第三方模块nodemon)
)

:第三方模块nodenrm)
:第三方模块gulp)
)

:gulp使用)

