install kinect driver for ARM---38

原创博客:转载请标明出处:http://www.cnblogs.com/zxouxuewei/


The video describes connecting a Microsoft Kinect to the NVIDIA Jetson TK1 Development Kit.

The Kinect provides 3D depth information about a scene. This is commonly referred to as a RGBD device because the depth information is returned encoded in an RGB image, with the color of each pixel representing how far away an object is from the sensor. Red is close, green is in the middle, blue is furthest away.

The demonstration shows a Microsoft Kinect 360 model 1414, the original XBOX 360 sensor. The Jetson and the Kinect are plugged into a 7 port USB hub, along with a keyboard and a mouse.

Some more information about Kinect

first install the libusb,By means of manual compilation

Download the libusb-master.zip or Can contact me via email 1192916972@qq.com

sudo ./autogen.sh
sudo make
sudo make install
sudo ldconfig


Installing the OpenKinect Drivers

Installing the OpenKinect libraries (libfreenect) is straightforward. A prerequisite for this installation is Internet access and installation of the Universe package repositories. These commands are entered using the ‘Terminal’ app, which is commonly referred to as the command line.

Universe packages can be added with:

$ sudo apt-add-repository universe
$ sudo apt-get update

$sudo apt-get install ros-indigo-openni*

To build the freenect library, first make sure that you have the build tools and library dependencies installed:

$ sudo apt-get install

cmake

freeglut3-dev

pkg-config

build-essential

libxmu-dev

libxi-dev

libusb-1.0-0-dev

Then Git clone the libfreenect repository:

$ git clone git://github.com/OpenKinect/libfreenect.git

Build libfreenect

To build the libfreenect library, start in the Home directory at the command line. Then enter the following commands:

$ cd libfreenect

$ mkdir build

$ cd build

$ cmake ..

$ make

$ sudo make install

NOTE: If you would like to uninstall libfreenect at some later time, go the ‘build’ directory:

$ sudo make uninstall

USB Autosuspend

As noted in the video, there is an issue with the default setting for USB ports being turned off when not in use. The Jetson does this to save energy. If this happens when the Kinect is connected, the Jetson will not recognize the Kinect. A solution is to execute commands automatically on every boot-up that alter this behavior. You can put your commands into the “/etc/rc.local” boot up script. For example, run this on your board:

$ sudo gedit /etc/rc.local

Then add this near the bottom of the file but before the “exit” line:

# Disable USB auto-suspend, since it disconnects some devices such as webcams on Jetson TK1.
echo -1 > /sys/module/usbcore/parameters/autosuspend

Save the file.

You then reboot the machine so that the changes take effect.

$ sudo reboot

NOTE: If you would like to do this more selectively, you can enter this command on the command line:

sudo bash -c ‘echo -1 > /sys/module/usbcore/parameters/autosuspend’

which will cause autosuspend to be turned off until the next boot cycle.

Sample Programs

Once the Jetson powers back up, and the Desktop appears on the screen. Plug in the Kinect to the USB hub. NOTE:You may have to unplug then plug back in the Kinect on every boot. The auto-suspension does not appear to take effect until after the port is powered down the first time. Navigate to the bin directory where the samples reside:

cd libfreenect/build/bin

and run one of the sample programs:

sudo ./freenect-glview
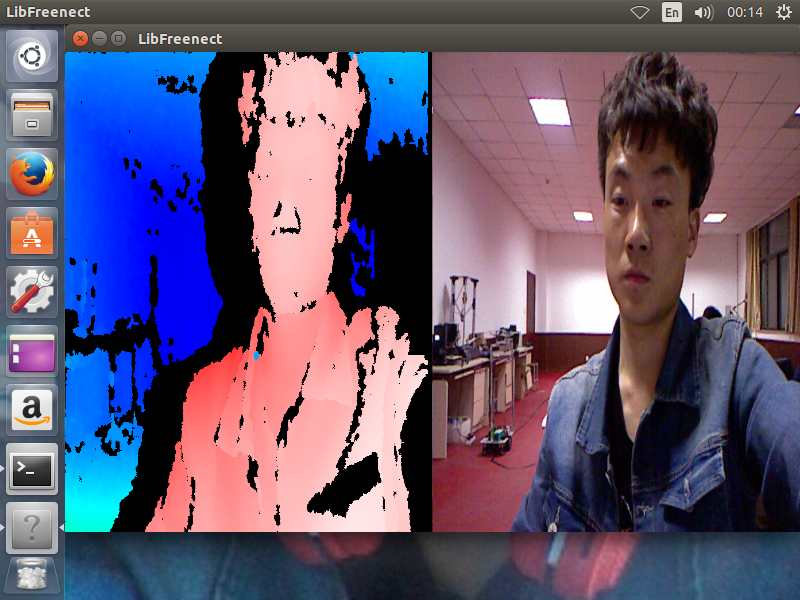
Then you are ready to play and have some fun!

Permissions

If you do not want to run your programs using sudo, you can add rules to your udev rules directory. Place the file ’51-kinect.rules’ into /etc/udev/rules.d directory, and set the video permissions.
First change your directory to your libfreenect/platform/linux/udev directory, then:

$ sudo adduser $USER video
$ sudo cp 51-kinect.rules /etc/udev/rules.d/51-kinect.rules

Make sure to log out and then log back in.

转载于:https://www.cnblogs.com/zxouxuewei/p/5430456.html

本文来自互联网用户投稿,该文观点仅代表作者本人,不代表本站立场。本站仅提供信息存储空间服务,不拥有所有权,不承担相关法律责任。如若转载,请注明出处:http://www.mzph.cn/news/418613.shtml

如若内容造成侵权/违法违规/事实不符,请联系多彩编程网进行投诉反馈email:809451989@qq.com,一经查实,立即删除!

相关文章

前端学习(1893)vue之电商管理系统电商系统之自定义状态列的效果

目录结构 router.js import Vue from vue import Router from vue-router import Login from ./components/Login.vue import Home from ./components/Home.vue import Welcome from ./components/Welcome.vue Vue.use(Router)const router new Router({routes: [{path: /,re…

tomcat学习笔记1

tomcat是一个开源软件,是由java语言编写的,它工作的话需要运行在jvm虚拟机中,说到jvm不得不说下java这个大名鼎鼎的编程 语言了 java这个编程语言最优秀的特点要数write once , run anywhere 额!怎么听起来有点流氓的感觉 没错&…

前端学习(1894)vue之电商管理系统电商系统之通过作用域插槽操作列

目录结构 router.js import Vue from vue import Router from vue-router import Login from ./components/Login.vue import Home from ./components/Home.vue import Welcome from ./components/Welcome.vue Vue.use(Router)const router new Router({routes: [{path: /,re…

前端学习(1895)vue之电商管理系统电商系统之组件的分页显示

目录结构 router.js import Vue from vue import Router from vue-router import Login from ./components/Login.vue import Home from ./components/Home.vue import Welcome from ./components/Welcome.vue Vue.use(Router)const router new Router({routes: [{path: /,re…

前端学习(1896)vue之电商管理系统电商系统之修改用户状态

目录结构 router.js import Vue from vue import Router from vue-router import Login from ./components/Login.vue import Home from ./components/Home.vue import Welcome from ./components/Welcome.vue Vue.use(Router)const router new Router({routes: [{path: /,re…

html5笔记

出处:http://www.cnblogs.com/xiaowei0705/archive/2011/04/19/2021372.html HTML5 LocalStorage 本地存储 HTML5 LocalStorage 本地存储 说到本地存储,这玩意真是历尽千辛万苦才走到HTML5这一步,之前的历史大概如下图所示: 最早的Cookies自然…

前端学习(1897)vue之电商管理系统电商系统之实现搜索功能

目录结构 router.js import Vue from vue import Router from vue-router import Login from ./components/Login.vue import Home from ./components/Home.vue import Welcome from ./components/Welcome.vue Vue.use(Router)const router new Router({routes: [{path: /,re…

前端学习(1898)vue之电商管理系统电商系统之渲染用户的对话框

目录结构 router.js import Vue from vue import Router from vue-router import Login from ./components/Login.vue import Home from ./components/Home.vue import Welcome from ./components/Welcome.vue Vue.use(Router)const router new Router({routes: [{path: /,re…

前端学习(1899)vue之电商管理系统电商系统之渲染添加用户的表单

目录结构 router.js import Vue from vue import Router from vue-router import Login from ./components/Login.vue import Home from ./components/Home.vue import Welcome from ./components/Welcome.vue Vue.use(Router)const router new Router({routes: [{path: /,re…

前端学习(1900)vue之电商管理系统电商系统之渲染添加用户的表单自定义邮箱的规则

目录结构 router.js import Vue from vue import Router from vue-router import Login from ./components/Login.vue import Home from ./components/Home.vue import Welcome from ./components/Welcome.vue Vue.use(Router)const router new Router({routes: [{path: /,re…

前端学习(1901)vue之电商管理系统电商系统之渲实现添加表单的重置规则

目录结构 router.js import Vue from vue import Router from vue-router import Login from ./components/Login.vue import Home from ./components/Home.vue import Welcome from ./components/Welcome.vue Vue.use(Router)const router new Router({routes: [{path: /,re…

前端学习(1902)vue之电商管理系统电商系统之渲实现添加用户前的预先校验

目录结构 router.js import Vue from vue import Router from vue-router import Login from ./components/Login.vue import Home from ./components/Home.vue import Welcome from ./components/Welcome.vue Vue.use(Router)const router new Router({routes: [{path: /,re…

git生成公钥和私钥

转自:http://blog.csdn.net/wqjsir/article/details/17386087/ 一、 Git windows 客服端(MsysGit)下载 下载地址:http://code.google.com/p/msysgit/ 二、从开始菜单中找到Git 点击Git Bash 弹出命令行窗体,如下图&…

前端学习(1903)vue之电商管理系统电商系统之调用api添加用户

目录结构 router.js import Vue from vue import Router from vue-router import Login from ./components/Login.vue import Home from ./components/Home.vue import Welcome from ./components/Welcome.vue Vue.use(Router)const router new Router({routes: [{path: /,re…

每日站立会议08

会议图片: 会议内容:祖浩然:昨天:对数据库的操作有了大概的了解;今天:制作增加、修改、删除、查询学生信息功能,以及退出主界面;遇到的问题:如何将网页地址以超链接形式…

前端学习(1904)vue之电商管理系统电商系统之修改用户的操作

目录结构 router.js import Vue from vue import Router from vue-router import Login from ./components/Login.vue import Home from ./components/Home.vue import Welcome from ./components/Welcome.vue Vue.use(Router)const router new Router({routes: [{path: /,re…

前端学习(1905)vue之电商管理系统电商系统之根据用户id查询对应的信息

目录结构 router.js import Vue from vue import Router from vue-router import Login from ./components/Login.vue import Home from ./components/Home.vue import Welcome from ./components/Welcome.vue Vue.use(Router)const router new Router({routes: [{path: /,re…

前端学习(1906)vue之电商管理系统电商系统之渲染修改用户的表单

目录结构 router.js import Vue from vue import Router from vue-router import Login from ./components/Login.vue import Home from ./components/Home.vue import Welcome from ./components/Welcome.vue Vue.use(Router)const router new Router({routes: [{path: /,re…

linux6.4 安装oracle11g 出现错误ORA-01078和LRM-00109错误

在linux中oracle11g安装成功后,启动监听(lsnrctl start)后,运行sqlplus / as sysdba后连接 startup出现了如下图的错误ORA-01078和LRM-00109错误 解决方法: 我当时也上网百度了一下,基本也都大同小异&…

前端学习(1907)vue之电商管理系统电商系统之渲染修改用户的表单的重置操作

目录结构 router.js import Vue from vue import Router from vue-router import Login from ./components/Login.vue import Home from ./components/Home.vue import Welcome from ./components/Welcome.vue Vue.use(Router)const router new Router({routes: [{path: /,re…