1.angularjs的SEO问题解决方案
我的前端用到angularjs,服务器用到nginx。
大体流程:
nginx服务器检测到爬虫访问,跳转到专门的url,此url是angularjs已经渲染过后的页面。非常的简单。
a).首先是angularjs的渲染问题
angular添加一个模块‘seo’,引入文件 angular-seo.js文件(附件中有)。
<script src="js/app/angular-seo.js"></script>
angular.module('app', ['ng', 'seo']);
然后你可以在每个controller中,觉得页面差不多已经创建好之后调用 $scope.htmlReady()(就是数据请求完成之后,随便你放哪里)。
然后用phantomjs进行页面的渲染,安装完成之后(自己百度怎么安装,很简单),用下面代码进行调用。
phantomjs --disk-cache=no /path/xxxxxx...../angular-seo-server.js 9001 http://localhost:8080
这个就是开启9001端口,调用angular-seo-server.js文件(附件中有)获得8080端口渲染的页面,渲染完成标志就是上面的$scope.htmlReady()。
那localhost:9001这个url地址就是爬虫应该访问的地址。
b).让nginx知道爬虫进行访问
在实际页面head中加入下面代码
<meta name="fragment" content="!" >
爬虫看到这段代码之后,它会知道这个页面有动态的javascript需要爬取。它会在你的url中添加?_escaped_fragment_=/,这个标志就是让nginx知道是爬虫进行访问了
nginx中进行下面配置
if ($args ~ _escaped_fragment_) { #这里面写你们的处理代码 rewrite ^ /bot/ ; }
还有angularjs的路径时 xxx/#/xxxx这种形式,爬虫是没办法识别 /#/之后的内容的,所以我们需要改成 xxxxx/!#/xxxxxx这种形式,很简答,添加下面代码即可
angular.config(['$routeProvider','$locationProvider', function ($routeProvider, $locationProvider,$httpProvider) { $routeProvider.when('/index', { templateUrl: '', controller: '' }); $locationProvider.hashPrefix('!'); }]);
c).跳转url,地址我们已经有了,即为localhost:9001,nginx配置如下(与前面的if语句代码呼应)
location /bot/ { proxy_pass http://localhost:9001/; proxy_http_version 1.1; proxy_set_header Host $host:80; proxy_set_header X-Real-IP $remote_addr; proxy_set_header X-Forworded-For $proxy_add_x_forwarded_for; proxy_set_header Via "nginx"; proxy_set_header Upgrade $http_upgrade; proxy_set_header Connection "upgrade";
注意:proxy_pass中的url地址一定要以“/"结尾,就是这个东西,我调试了大半天才搞出来,因为没有“\”则方位地址会变成 xxxx/bot/?_escaped_fragment_=/xxxxx,这样是不对的,应该是xxxx/?_escaped_fragment_=/xxxxx。
这样就大功告成了。以后只要在适当的地方添加$scope.htmlReady()即可。ps:经过测试貌似不需要$scope.htmlReady()
d).测试可以使用curl
例如本地测试 curl localhost:9001,最终测试 curl host/?_escaped_fragment_=/ ,这会返回页面内容,查看一下是否渲染完成即可。
测试:监听时,url没带上相对路径(https://www.hansap.com/XXX)
解决办法:
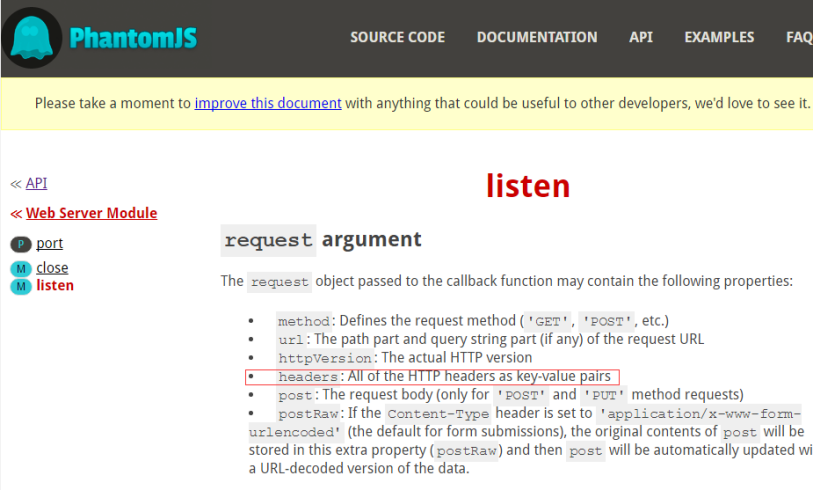
通过github查到phantomJs官网,查看API,request包含的信息。

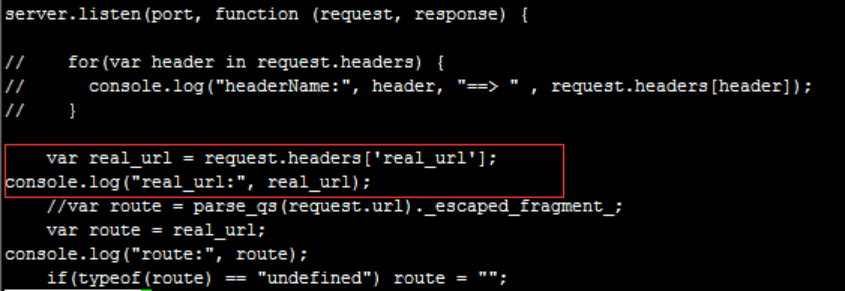
可以在angular-seo-server.js内把头部信息打印出来。既然如此,如果想对路径(/protal/product/1000)没带过来,那就可以在nginx端做处理。把爬虫的请求路劲塞到头部信息内(real_url $request_uri),然后在phontomJs端用request取到。

nginx配置:
server{
......
if ( $http_user_agent ~* "qihoobot|Baiduspider|Googlebot|Googlebot-Mobile|Googlebot-Image|Mediapartners-Google|Adsbot-Google|Feedfetcher-Google|Yahoo! Slurp|Yahoo! Slurp China|YoudaoBot|Sosospider|Sogou spider|Sogou web spider|MSNBot|ia_archiver|Tomato Bot|HaosouSpider|360Spider|Bingbot" ) {
rewrite ^ /bot/ ;
}
location /bot/ {
proxy_pass http://192.168.11.179:9001/;
proxy_http_version 1.1;
proxy_set_header real_url $request_uri; //请求想对路劲
proxy_set_header Host $host:80;
proxy_set_header X-Real-IP $remote_addr;
proxy_set_header X-Forworded-For $proxy_add_x_forwarded_for;
proxy_set_header Via "nginx";
proxy_set_header Upgrade $http_upgrade;
proxy_set_header Connection "upgrade";
}
}
解决思路:
a).定位问题
a.在angular-seo-server.js端打印出request.url每次都为'/'
问题为nginx重定向时,URL地址的想对路劲没带过来
b).解决问题
a.在phantomJsAPI中查出request的信息,可以查到头部相关信息,这就简单了,只需要在nginx重定向时,把想对路径加到头部信息即可
b.nginx中配置 proxy_set_header real_url $request_uri;
real_url(自定义名称) $request_uri(nginx全局变量:想对路径);
c.phantomJs端取到想对路径即可
2.优化AngularJs的URL # 号问题
a).在index.html页面添加<base href="/">
b).在路由js内添加
.config(
['$stateProvider', '$urlRouterProvider','$locationProvider',
function($stateProvider, $urlRouterProvider,$locationProvider) {
......
$locationProvider.html5Mode(true);
/*var mode = {enabled:true,requireBase:false,rewriteLinks:true};
$locationProvider.html5Mode(mode);
$locationProvider.html5Mode(true).hashPrefix('!');*/
}
]
);
c).定义前台过滤器(Filter)
<filter>
<filter-name>pageFilter</filter-name>
<filter-class>com.whicloud.filter.PageFilter</filter-class>
<init-param>
<param-name>prefix</param-name>
<param-value>/ajax;/buildrequest;/download;/upload</param-value>
</init-param>
<init-param>
<param-name>suffix</param-name>
<param-value>.do;.action</param-value>
</init-param>
<init-param>
<param-name>include</param-name>
<param-value>.</param-value>
</init-param>
</filter>
<filter-mapping>
<filter-name>pageFilter</filter-name>
<url-pattern>*</url-pattern>
</filter-mapping>
public class PageFilter implements Filter {
private final static Logger log = LoggerFactory.getLogger(PageFilter.class);
private final static List<String> PREFIX_MATCH = new ArrayList<>();
private final static List<String> SUFFIX_MATCH = new ArrayList<>();
private final static List<String> INCLUDE_MATCH = new ArrayList<>();
@Override
public void init(FilterConfig filterConfig) throws ServletException {
log.info("初始化page filter");
//前缀
String prefix = filterConfig.getInitParameter("prefix");
if (!StringUtils.isEmpty(prefix)) {
String[] prefixs = prefix.split(";");
PREFIX_MATCH.addAll(Arrays.asList(prefixs));
}
//后缀
String suffix = filterConfig.getInitParameter("suffix");
if (!StringUtils.isEmpty(suffix)) {
String[] suffixs = suffix.split(";");
SUFFIX_MATCH.addAll(Arrays.asList(suffixs));
}
//包含
String include = filterConfig.getInitParameter("include");
if (!StringUtils.isEmpty(include)) {
String[] includes = include.split(";");
INCLUDE_MATCH.addAll(Arrays.asList(includes));
}
log.info("初始化page filter完成");
}
private boolean isMatch(String uri) {
for (String prefix : PREFIX_MATCH) {
if (uri.startsWith(prefix))
return true;
}
for (String suffix : SUFFIX_MATCH) {
if (uri.endsWith(suffix))
return true;
}
for (String include : INCLUDE_MATCH) {
if (uri.indexOf(include) >= 0)
return true;
}
return false;
}
@Override
public void doFilter(ServletRequest request, ServletResponse response, FilterChain chain) throws IOException, ServletException {
HttpServletRequest req = (HttpServletRequest) request;
String root = req.getContextPath();
String uri = req.getRequestURI();
uri = uri.substring(root.length());
if (isMatch(uri)) {
chain.doFilter(request, response);
} else {
req.setAttribute("root", root);
req.getRequestDispatcher("/index.html").forward(request, response); //服务器端重定向到首页,前台angularJs会自动吧路由状态带上,并解析
}
}
@Override
public void destroy() {
}
}

:创建新页面和页面配置)


:配置tabber)


:配置tabber其他属性)


:condition模拟启动配置)

)

:text基本使用)
)


:view基本使用)