我爱撸码,撸码使我感到快乐!
大家好,我是Counter,本章微博主要利用了CSS3的一些新特性,
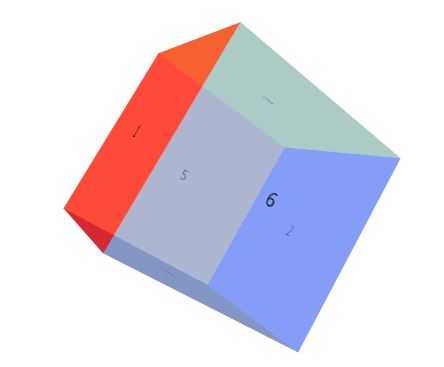
主要用到关键帧来使3D图形运动起来,涉及到了一些抽象的思想,立体的想象。
先给大家看看完成的效果,代码也不是很难,每行代码都给到了详细注释,纯CSS,没有用到JS,CSS3不错。
效果如下:

每一行基本都有注释,就不重复说了,代码如下:
3D旋转/* 给最外层父级设置景深,让里面的元素有立体的空间,并且设置宽高 */
.wrapper {
/* 景深600像素 */
perspective: 500px;
/* 设置margin距离上面100px,左右自适应,下面0 */
margin: 100px auto 0;
width: 200px;
height: 200px;
/* border: 1px solid black; */
}
.box {
/* 设置相对定位好让子元素相对于自己定位 */
position: relative;
/* 给item设置保留3D效果,如果没有设置里面的元素将不会呈现3D效果 */
transform-style: preserve-3d;
width: 200px;
height: 200px;
/* move为设置的关键帧,运动8秒,匀速运动,无限次(各个参数代表的含义) */
animation: move 8s linear infinite;
}
/* 选择所有开头带有item的元素,使其全部定位到父级所在的位置 */
div[class^="item"] {
position: absolute;
top: 0;
left: 0;
width: 200px;
height: 200px;
/* 使文本左右对齐 */
text-align: center;
/* 使文本上下对齐 */
line-height: 200px;
}
/* 立方体有六面,每个item1~6代表每一面,此时里面的item1~6具有三条轴,x,y,z */
/* x轴即是你电脑屏幕宽度的那条轴,从左到右。y轴即是你电脑屏幕高度的那条轴,从上到下。z轴即是你眼睛垂直看电脑屏幕的那条轴,方向从电脑屏幕到你的眼睛*/
/* 设置第一面 */
.item1 {
/* 沿z轴向你眼睛方向移动100px */
transform: translateZ(100px);
/* 设置背景颜色,最后一个参数为透明度设置为0.6 */
background-color: rgba(255, 0, 0, 0.6);
}
/* 设置第二面 */
.item2 {
/* 沿z轴向里移动100px即为-100px */
transform: translateZ(-100px);
background-color: rgba(72, 42, 245, 0.6);
}
/* 设置第三面 */
.item3 {
/* 沿x轴旋转90度,然后再向z轴移动100px(deg在这里表示度的意思) */
transform: rotateX(90deg) translateZ(100px);
background-color: rgba(217, 230, 36, 0.6);
}
/* 设置第四面 */
.item4 {
/* 沿x轴旋转90度,然后再向z轴移动-100px */
transform: rotateX(90deg) translateZ(-100px);
background-color: rgba(58, 7, 51, 0.6);
}
/* 设置第五面 */
.item5 {
/* 沿y轴旋转90度,然后再向z轴移动-100px */
transform: rotateY(90deg) translateZ(-100px);
background-color: rgba(241, 142, 75, 0.6);
}
/* 设置第六面 */
.item6 {
/* 沿y轴旋转90度,然后向z轴移动100px */
transform: rotateY(90deg) translateZ(100px);
background-color: rgba(125, 178, 238, 0.6);
}
/* 设置关键帧让box容器旋转起来,分别沿x,y,z轴从0旋转360度 */
@keyframes move {
0% {
transform: rotateX(0) rotateY(0) rotateZ(0);
}
100% {
transform: rotateX(360deg) rotateY(360deg) rotateZ(360deg);
}
}
以上就是本文的全部内容,希望对大家的学习有所帮助,也希望大家多多支持脚本之家。


)


-原创力文档)

)


