
前导知识点:静态路由
结合上一讲讲解的距离矢量路由协议,本讲我们讲解链路状态路由协议----OSPF,相比较于RIP,OSPF能够支持大型网络,下面列出RIP和OSPF的对比图,进一步说明了OSPF的强大。
- RIP最多支持15台路由器的串联,而OSPF没有这个限制,可以支持大规模的网络建设。
- RIP采用“跳数”作为路径选择的依据,而OSPF采用了带宽和延迟的综合指标作为路径选择的依据,更加合理。
- RIP隶属于距离矢量路由协议,网络拓扑变化时,重新构建路由表的速度很慢,我们称为路由的“收敛”速度,而OSPF是链路状态路由协议,收敛速度非常快,适合复杂的网络环境。
综合以上几点,OSPF是大型网络必备的路由协议。当然,OSPF本身的理论非常复杂,限于篇幅,这里不再赘述。有机会做个连载,再给大家详细讲解OSPF的工作原理。
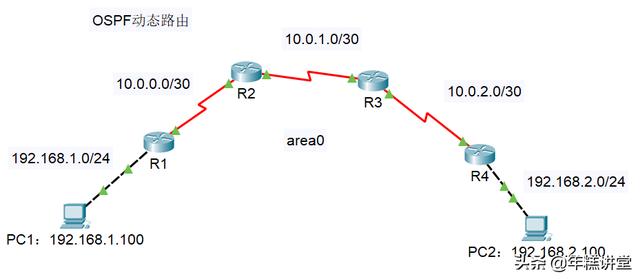
网络拓扑图:单区域OSPF的实现
如上图,我们今天做一个基础的OSPF,只做单区域,area0称为骨干区域。
实验步骤
1、定义客户端的IP地址

PC1设置

PC2设置
2、定义设备的IP地址
R1(config)#int s0/0
R1(config-if)#ip address 10.0.0.1 255.255.255.252
R1(config-if)#no shutdown
R1(config)#int f0/0
R1(config-if)#ip address 192.168.1.254 255.255.255.0
R1(config-if)#no shutdown
R2(config)#int s0/0
R2(config-if)#ip address 10.0.0.2 255.255.255.252
R2(config-if)#clock rate 64000
R2(config-if)#no shutdown
R2(config)#int s0/1
R2(config-if)#ip address 10.0.1.1 255.255.255.252
R2(config-if)#clock rate 64000
R2(config-if)#no shutdown
R3(config)#int s0/0
R3(config-if)#ip address 10.0.1.2 255.255.255.252
R3(config-if)#no shutdown
R3(config)#int s0/1
R3(config-if)#ip address 10.0.2.1 255.255.255.252
R3(config-if)#clock rate 64000
R3(config-if)#no shutdown
R4(config)#int s0/0
R4(config-if)#ip address 10.0.2.2 255.255.255.252
R4(config-if)#no shutdown
R4(config)#int f0/0
R4(config-if)#ip address 192.168.1.254 255.255.255.0
R4(config-if)#no shutdown
3、配置OSPF动态路由,注意ospf也是声明直连网段,但要注意路由器所属的区域,以及反转掩码的概念
R1(config)#router ospf 1#启用rip
R1(config-router)#router-id 1.1.1.1#设置RID,注意RID格式和ip地址相同,在ospf网络中,RID是唯一的
R1(config-router)# network 192.168.1.0 0.0.0.255 area 0 #设置192.168.1.0/24网段为area 0区域
R1(config-router)# network 10.0.0.0 0.0.0.3 area 0 #设置10.0.0.0/30网段为area 0区域
同样的方法设置R2、R3、R4
R2(config)#router ospf 1
R2(config-router)#router-id 2.2.2.2
R2(config-router)#network 10.0.0.0 0.0.0.3 area 0
R2(config-router)#network 10.0.1.0 0.0.0.3 area 0
R3(config)#router ospf 1
R3(config-router)#router-id 3.3.3.3
R3(config-router)#network 10.0.1.0 0.0.0.3 area 0
R3(config-router)#network 10.0.2.0 0.0.0.3 area 0
R4(config)#router ospf 1
R4(config-router)#router-id 4.4.4.4
R4(config-router)#network 192.168.2.0 0.0.0.255 area 0
R4(config-router)#network 10.0.2.0 0.0.0.3 area 0
验证效果

R1的邻居关系

R2的邻居关系

R3的邻居关系

R4的邻居关系
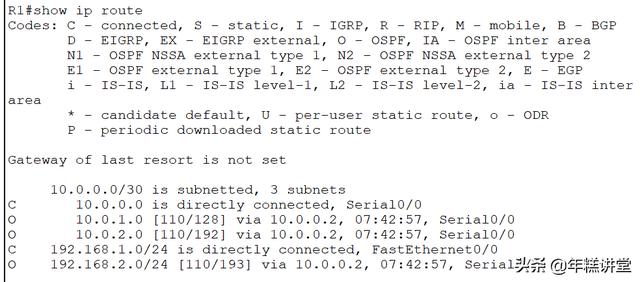
R1路由表
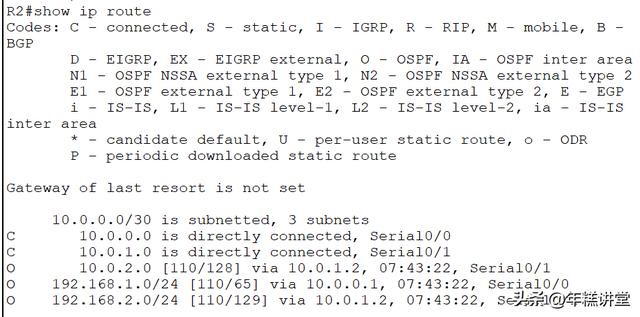
R2路由表
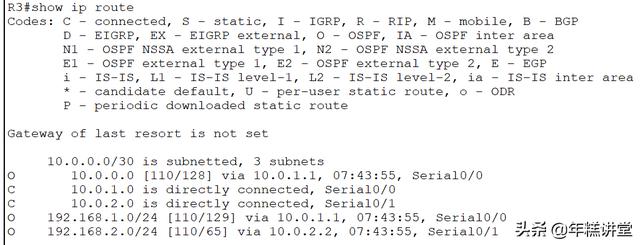
R3路由表
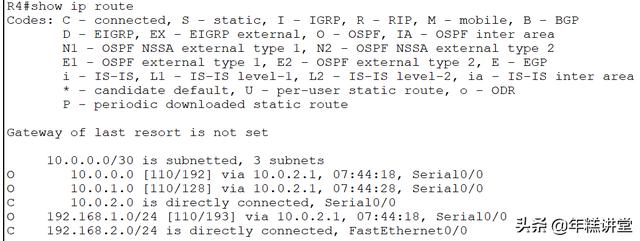
R4路由表
课后总结和作业
OSPF的基础配置不难,但是OSPF本身的理论很复杂,不适合大篇幅讲解。本次案例中使用了两个验证指令:show ip ospf neighbor和show ip route,前者用于查看路由器的邻居关系,如验证效果图中R1的邻居关系,显示的是“2.2.2.2 full”,表示已和RID为2.2.2.2的路由器建立了邻居关系。后者用于查看路由表,可以发现学到的路由条目类型是“O”,表示通过ospf学习到的。下面一个例子,同学们自行完成,通过ospf实现网络互联,一共四个区域,网络自行规划。

某大学园区网

)


的近似值)


)


_C++大作业-XXX管理程序)