1.创建web项目
2.导入ssh 所需要的多有jar包,到web-inf下面的lib里面
3.将导入过来的jar包都build–path一下
4.切换到myeclipse database视图中,添加链接数据库的链接
5.新建一个数据库连接:
常用数据库连接字符串:https://blog.csdn.net/qq_34137397/article/details/55548094

6.切换视图,在src下面新建一个名为org.entity的包:

7.添加hibernate,右击项目名,选择myeclipseadd HIbernaete ……


在自动创建的hibernate.cfg.xml文件中,新加两行代码,实现打印输出sql语句和格式化sql语句的功能。
true
true

8.右击项目,添加struts


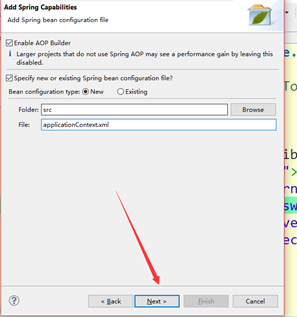
9.添加spring的内容:


10.web.xml里面的内容:
<?xml version="1.0" encoding="UTF-8"?> org.springframework.web.context.ContextLoaderListener contextConfigLocation classpath:applicationContext.xml openSessionInViewFilter org.springframework.orm.hibernate3.support.OpenSessionInViewFilter<init-param> <param-name>flushMode</param-name> <param-value>AUTO</param-value> </init-param>
11.配置spring的内容,打开applicationContext.xml文件:
<?xml version="1.0" encoding="UTF-8"?><!-- sessionFactory -->
<bean id="sessionFactory"class="org.springframework.orm.hibernate3.LocalSessionFactoryBean"><property name="configLocation"value="classpath:hibernate.cfg.xml"></property>
</bean>
<!-- 配置事务 -->
<bean id="txManage" class="org.springframework.orm.hibernate3.HibernateTransactionManager"><property name="sessionFactory" ref="sessionFactory"></property>
</bean>
<tx:advice id="txAdvice" transaction-manager="txManage"><tx:attributes><tx:method name="add*" propagation="REQUIRED"/><tx:method name="save*" propagation="REQUIRED"/><tx:method name="update*" propagation="REQUIRED"/><tx:method name="del*" propagation="REQUIRED"/><tx:method name="get*" read-only="true"/><tx:method name="find*" read-only="true"/></tx:attributes>
</tx:advice><!-- 切入点 -->
<aop:config><aop:pointcut expression="execution(* org.service..*.*(..))" id="mycut"/><aop:advisor advice-ref="txAdvice" pointcut-ref="mycut"/>
</aop:config></beans>
12.切换到myeclipse database视图:(反向生成实体类)

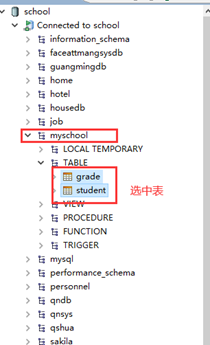
13.右击表:


点击finish完成即可。
14.切换视图至myeclipsep perspective
15.将项目发布到tomcat中。

16.启动tomcat服务,检查控制台是否有错误(一般只要控制台中没有超链接错误,正常显示毫秒数即可)。

17.如果没有错误,将服务关掉。
18.开始根据实体类写接口,一般一个实体类对应一个Dao接口

19.在IStudentDao接口中写增删改查的抽象方法。

20.开始写Dao层的实现类,新建一个StudentDaoImpl的实现类。需要继承HibernateDaoSupport类,实现IStudentDao接口。

实现类中的代码:
public class StudentDaoImpl extends HibernateDaoSupport implements IStudentDao {
//添加
@Override
public void saveStudent(Student student) {this.getHibernateTemplate().save(student);
}
//修改
@Override
public void updateStudent(Student student) {this.getHibernateTemplate().update(student);
}
//删除
@Override
public void delStudent(Student student) {this.getHibernateTemplate().delete(student);
}
//根据编号查询
@Override
public Student getStudentById(int sid) {return this.getHibernateTemplate().get(Student.class, sid);
}
//查询全部
@Override
public List<Student> getStudentAll() {return this.getSession().createQuery("from Student").list();
}
}
21.创建Service接口,IStudentService:

IStudentService中的代码:

22.创建Service的实现类,StudentServiceImpl。
在类中先创建dao层的对象,并且需要getters和setters

StudentServiceImpl中的代码:
public class StudentServiceImpl implements IStudentService {
//创建dao层的对象,需要getter和setter
private IStudentDao studentDao;
@Override
public void saveStudent(Student student) {studentDao.saveStudent(student);
}@Override
public void updateStudent(Student student) {studentDao.updateStudent(student);
}@Override
public void delStudent(Student student) {studentDao.delStudent(student);
}@Override
public Student getStudentById(int sid) {return studentDao.getStudentById(sid);
}@Override
public List<Student> getStudentAll() {return studentDao.getStudentAll();
}/**    * @author Mu Xiongxiong       * @created 2020-4-30 下午2:47:37 * @return type * 个人博客:https://blog.csdn.net/qq_34137397*/public IStudentDao getStudentDao() {return studentDao;
}/**     * @author Mu Xiongxiong      * @created 2020-4-30 下午2:47:37         * @param studentDao   * 个人博客:https://blog.csdn.net/qq_34137397*/
public void setStudentDao(IStudentDao studentDao) {this.studentDao = studentDao;
}
}
23.创建applicationContext-dao.xml文件(可以复制一份applicationContext.xml一份,对应的在改一下),代码如下:
<?xml version="1.0" encoding="UTF-8"?>
24.创建applicationContext-service.xml文件(可以复制一份applicationContext-dao.xml一份,对应的在改一下),代码如下:
<?xml version="1.0" encoding="UTF-8"?>
25.创建StudentAction类,继承ActionSupport.

StudentAction里面的代码,省略展示getters和setters的方法:

26.配置Struts.xml文件:
<?xml version="1.0" encoding="UTF-8" ?> index.jsp27.index.jsp页面,需要将学生信息用table的形式展示出来
首先在最上面添加jstl的标签库:
<%@ taglib uri=“http://java.sun.com/jsp/jstl/core” prefix=“c” %>
写一个table表格遍历信息:
<c:forEach items="${studentList }" var="stu"><tr><td>${stu.sid }</td><td>${stu.sname}</td><td>${stu.spass }</td><td>${stu.sphone }</td><td>${stu.grade.gname }</td><td><a href="getStudentByid?sid=${stu.sid }">修改</a>|<a href="delStudent?sid=${stu.sid }">删除</a></td></tr></c:forEach></table>
| 学号 | 姓名 | 密码 | 电话 | 年级 | 操作 |
- 创建applicationContext-action.xml文件(可以复制一份applicationContext-dao.xml一份,对应的在改一下),代码如下:
29.在applicationContext.xml中引入applicationContext-dao.xml, applicationContext-service.xml, applicationContext-action.xml文件,引入方式:

运行结果:


之使用FXML创建用户界面)
)

)
之JavaFX中的动画和视觉效果)

)
)

之转换)
)

)
的)
之转换类型和示例)


和字节(byte)(1byte=8bit))