目录:
面向.NET开发人员的Dapr——前言
面向.NET开发人员的Dapr——分布式世界
面向.NET开发人员的Dapr——俯瞰Dapr
Get started with Dapr
Dapr 入门
In the first two chapters, you learned basic concepts about Dapr. It's time to take it for a test drive. This chapter will guide you through preparing your local development environment and building two Dapr .NET applications.
前两章介绍了有关 Dapr 的基本概念。现在实操一下。本章将指导你完成本地开发环境的准备工作,并构建两个 Dapr .NET 应用程序。
Install Dapr into your local environment
将 Dapr 安装到本地环境中
You'll start by installing Dapr on your development computer. Once complete, you can build and run Dapr applications in self-hosted mode.
Install the Dapr CLI. It enables you to launch, run, and manage Dapr instances. It also provides debugging support.
Install Docker Desktop. If you're running on Windows, make sure that Docker Desktop for Windows is configured to use Linux containers.
首先,在开发计算机上安装 Dapr。完成后,可以在 自承载模式下构建并运行 Dapr 应用程序。
安装 DAPR CLI。它使您可以启动、运行和管理 Dapr 实例。它还提供调试支持。
安装 Docker Desktop。如果在 Windows 上运行,请确保将 适用于 windows 的 Docker Desktop 配置为使用 Linux 容器。
Note
By default, Dapr uses Docker containers to provide you the best out-of-the-box experience. To run Dapr outside of Docker, you can skip this step and execute a slim initialization. The examples in this chapter require you use Docker containers.
备注
默认情况下,Dapr 使用 Docker 容器为你提供最佳的开箱即用体验。若要在 Docker 外部运行 Dapr,可以跳过此步骤并 执行至简初始化。本章中的示例要求使用 Docker 容器。
Initialize Dapr. This step sets up your development environment by installing the latest Dapr binaries and container images.
Install the .NET Core 3.1 SDK.
初始化 Dapr。此步骤通过安装最新的 Dapr 二进制文件和容器映像来设置开发环境。
安装 .NET Core 3.1 SDK。
Now that Dapr is installed, it's time to build your first Dapr application!
安装 Dapr 后,就可以构建你的第一个 Dapr 应用程序了!
Build your first Dapr application
构建第一个 Dapr 应用程序
You'll start by building a simple .NET Console application that consumes the Dapr state management building block.
首先,你将构建一个简单的 .NET 控制台应用程序,该应用程序使用 Dapr 状态管理 构建块。
Create the application
创建应用程序
Open up the command shell or terminal of your choice. You might consider the terminal capabilities in Visual Studio Code. Navigate to the root folder in which you want to build your application. Once there, enter the following command to create a new .NET Console application: 打开命令行终端。可以考虑使用Visual Studio Code中的终端。 导航到要构建应用程序的根文件夹。完成后,输入以下命令以创建新的 .NET 控制台应用程序:
dotnet new console -o DaprCounterThe command scaffolds a simple "Hello World" .NET Core application. 该命令搭建简单的"Hello World“.NET Core 应用程序。
Then, navigate into the new directory created by the previous command: 然后,定位到上一命令创建的新目录:
cd DaprCounterRun the newly created application using the
dotnet runcommand. Doing so writes "Hello World!" to the console screen: 使用dotnet run命令运行新创建的应用程序。这样做会在控制台屏幕上输出"Hello World!" :
dotnet runAdd Dapr State Management
添加 Dapr 状态管理
Next, you'll use the Dapr state management building block to implement a stateful counter in the program.
接下来,你将使用 Dapr 状态管理构建块 在程序中实现有状态计数器。
You can invoke Dapr APIs across any development platform using Dapr's native support for HTTP and gRPC. However, .NET Developers will find the Dapr .NET SDK more natural and intuitive. It provides a strongly typed .NET client to call the Dapr APIs. The .NET SDK also tightly integrates with ASP.NET Core. 可以使用 Dapr 对 HTTP 和 gRPC 的本机支持跨任何开发平台调用 Dapr API。然而,.NET 开发者会发现 Dapr .NET SDK 更自然、更直观。它提供强类型的 .NET 客户端来调用 Dapr API。.NET SDK 还与 ASP.NET Core 紧密集成。
From the terminal window, add the
Dapr.ClientNuGet package to your application: 在终端窗口中,将Dapr.Client的NuGet 包添加到应用程序:dotnet add package Dapr.ClientNote
If you're working with a pre-release version of Dapr, be sure to add the
--prereleaseflag to the command.备注
如果使用 Dapr 的预发行版本,请确保在命令中添加
--prerelease标志。Open the
Program.csfile in your favorite editor and update its contents to the following code: 在你喜欢的编辑器中打开Program.cs文件,将其内容更新为以下代码:using System; using System.Threading.Tasks; using Dapr.Client;namespace DaprCounter {class Program{static async Task Main(string[] args){const string storeName = "statestore";const string key = "counter";var daprClient = new DaprClientBuilder().Build();var counter = await daprClient.GetStateAsync<int>(storeName, key);while (true){Console.WriteLine($"Counter = {counter++}");await daprClient.SaveStateAsync(storeName, key, counter);await Task.Delay(1000);}}} }The updated code implements the following steps: 更新的代码实现以下步骤:
First a new
DaprClientinstance is instantiated. This class enables you to interact with the Dapr sidecar. 首先实例化一个DaprClient新实例。此类使你可以与 Dapr 边车交互。From the state store,
DaprClient.GetStateAsyncfetches the value for thecounterkey. If the key doesn't exist, the defaultintvalue (which is0) is returned.DaprClient.GetStateAsync从状态存储中获取counter键对应的值 。如果该键不存在,返回默认的整数值0。The code then iterates, writing the
countervalue to the console and saving an incremented value to the state store. 然后,代码将在控制台上循环输出计数器值,并将递增的值保存到状态存储中。
The Dapr CLI
runcommand starts the application. It invokes the underlying Dapr runtime and enables both the application and Dapr sidecar to run together. If you omit theapp-id, Dapr will generate a unique name for the application. The final segment of the command,dotnet run, instructs the Dapr runtime to run the .NET core application. 使用Dapr CLIrun命令启动应用程序。它调用底层 Dapr 运行时,并使应用程序和 Dapr 边车一起运行。如果省略app-id参数,则 Dapr 将为应用程序生成唯一的名称。命令的最后一段dotnet run指示 Dapr 运行时运行 .net core 应用程序。Important
Care must be taken to always pass an explicit
app-idparameter when consuming the state management building block. The block uses the application id value as a prefix for its state key for each key/value pair. If the application id changes, you can no longer access the previously stored state.重要
使用状态管理构建块时,必须注意始终显式传递app-id参数。对于每个键/值对,状态管理构建块使用应用程序 id 值作为其状态键的 前缀 。如果应用程序 id 发生更改,则无法再访问以前存储的状态。
Now run the application with the following command: 现在,用以下命令运行应用程序:
dapr run --app-id DaprCounter dotnet runTry stopping and restarting the application. You'll see that the counter doesn't reset. Instead it continues from the previously saved state. The Dapr building block makes the application stateful.
尝试停止并重新启动应用程序。你将看到计数器未被重置。相反,它会从以前保存的状态继续。Dapr 构建块会使应用程序具有状态。
Important
It's important to understand your sample application communicates with a pre-configured state component, but has no direct dependency on it. Dapr abstracts away the dependency. As you'll shortly see, the underlying state store component can be changed with a simple configuration update.
重要
务必了解你的示例应用程序与预配置状态组件的通信,但没有直接依赖它。Dapr 消除依赖关系。如你稍后所见,可以通过简单的配置更新来替换底层状态存储组件。
You might be wondering, where exactly is the state stored?
你可能想知道状态存储在何处?
Component configuration files
组件配置文件
When you first initialized Dapr for your local environment, it automatically provisioned a Redis container. Dapr then configured the Redis container as the default state store component with a component configuration file, entitled
statestore.yaml. Here's a look at its contents:首次为本地环境初始化 Dapr 时,会自动预配 Redis 容器。然后,Dapr 使用名为
statestore.yaml的组件配置文件将 Redis 容器配置为默认状态存储组件。下面查看其内容:apiVersion: dapr.io/v1alpha1 kind: Component metadata:name: statestore spec:type: state.redisversion: v1metadata:- name: redisHostvalue: localhost:6379- name: redisPasswordvalue: ""- name: actorStateStorevalue: "true"Note
Default component configuration files are stored in the
$HOME/.dapr/componentsfolder on Linux/macOS, and in the%USERPROFILE%\.dapr\componentsfolder on Windows.备注
默认组件配置文件存储在 Linux/macOS 上的 $HOME/.dapr/components文件夹中,Windows 上的
%USERPROFILE%\.dapr\components文件夹中。Note the format of the previous component configuration file:
Each component has a name. In the sample above, the component is named
statestore. We used that name in our first code example to tell the Dapr sidecar which component to use.Each component configuration file has a
specp. It contains atypefield that specifies the component type. Theversionfield specifies the component version. Themetadatafield contains information that the component requires, such as connection details and other settings. The metadata values will vary for the different types of components.
请注意上一个组件配置文件的格式:
每个组件都有一个名称。在以上示例中,组件名为
statestore。我们在第一个代码示例中使用了该名称来告知 Dapr 边车要使用哪个组件。每个组件配置文件都有一个
spec节。它包含一个指定组件类型的type字段。version字段指定组件版本。metadata字段包含组件的必要信息,例如连接详细信息和其他设置。元数据值因不同类型的组件而异。
A Dapr sidecar can consume any Dapr component configured in your application. But, what if you had an architectural justification to limit the accessibility of a component? How could you restrict the Redis component to Dapr sidecars running only in a production environment?
Dapr 边车可以使用应用程序中配置的任何 Dapr 组件。但是,假如有构造的正当理由限制组件的可访问性,该怎么办呢?如何限制仅在生产环境中运行的Dapr 边车上使用 Redis 组件呢?
To do so, you could define a
namespacefor the production environment. You might name itproduction. In self-hosted mode, you specify the namespace of a Dapr sidecar by setting theNAMESPACEenvironment variable. When configured, the Dapr sidecar will only load the components that match the namespace. For Kubernetes deployments, the Kubernetes namespace determines the components that are loaded. The following sample shows the Redis component placed in aproductionnamespace. Note thenamespacedeclaration in themetadataelement:为此,可以为生产环境定义一个命名空间。可以将其命名为
production。在自承载模式下,通过设置NAMESPACE环境变量来指定 Dapr 边车的命名空间 。配置后,Dapr 边车将仅加载与该命名空间匹配的组件。对于 Kubernetes 部署,Kubernetes 命名空间决定加载的组件。下面的示例演示production命名空间中的 Redis 组件 。请注意metadata元素中的namespace声明 :apiVersion: dapr.io/v1alpha1 kind: Component metadata:name: statestorenamespace: production spec:type: state.redisversion: v1metadata:- name: redisHostvalue: localhost:6379- name: redisPasswordvalue: ""- name: actorStateStorevalue: "true"Important
A namespaced component is only accessible to applications running in the same namespace. If your Dapr application fails to load a component, make sure that the application namespace matches the component namespace. This can be especially tricky in self-hosted mode where the application namespace is stored in a
NAMESPACEenvironment variable.重要
只有在同一命名空间中运行的应用程序才能访问带命名空间组件。如果 Dapr 应用程序无法加载组件,请确保应用程序命名空间与组件命名空间相匹配。在自承载模式下要注意的一点是:应用程序命名空间存储于
NAMESPACE环境变量中(不知怎么翻译合适)。If needed, you could further restrict a component to a particular application. Within the
productionnamespace, you may want to limit access of the Redis cache to only theDaprCounterapplication. You do so by specifyingscopesin the component configuration. The following example shows how to restrict access to the Redisstatestorecomponent to the applicationDaprCounterin theproductionnamespace:如果需要,可以进一步将组件限制到特定的应用程序。在
production命名空间中,你可能需要将 Redis 缓存的访问限制为仅限DaprCounter应用程序。为此,请在组件配置中指定scopes。下面的示例演示如何将对 Redis 状态存储组件的访问限制 到production命名空间中的应用程序DaprCounter:apiVersion: dapr.io/v1alpha1 kind: Component metadata:name: statestorenamespace: production spec:type: state.redisversion: v1metadata:- name: redisHostvalue: localhost:6379- name: redisPasswordvalue: ""- name: actorStateStorevalue: "true"scopes:- DaprCounterBuild a multi-container Dapr application
构建多容器 Dapr 应用程序
In the first example, you created a simple .NET console application that ran side-by-side with a Dapr sidecar. Modern distributed applications, however, often consist of many moving parts. They can simultaneously run independent microservices. These modern applications are typically containerized and require container orchestration tools such as Docker Compose or Kubernetes.
在第一个示例中,创建了一个与 Dapr 边车并行运行的简单 .NET 控制台应用程序。不过,现代分布式应用程序通常由许多移动部件组成。它们可以同时运行,不依赖于微服务。这些现代应用程序通常容器化,并需要容器编排工具,例如 Docker Compose 或 Kubernetes。
In the next example, you'll create a multi-container application. You'll also use the Dapr service invocation building block to communicate between services. The solution will consist of a web application that retrieves weather forecasts from a web API. They will each run in a Docker container. You'll use Docker Compose to run the container locally and enable debugging capabilities.
在下一个示例中,将创建多容器应用程序。你还将使用 Dapr 服务调用 构建块在服务之间进行通信。该解决方案将包含一个从 Web API 检索天气预报的 Web 应用程序。它们在 各自的Docker 容器中运行。你将使用 Docker Compose在本地运行容器并启用调试功能。
Make sure you've configured your local environment for Dapr and installed the .NET Core 3.1 Development Tools (instructions are available at the beginning of this chapter).
请确保为 Dapr 配置了本地环境并安装了 .NET Core 3.1 开发工具 (请参阅本章开头部分) 。
Additionally, you'll need complete this sample using Visual Studio 2019 with the .NET Core cross-platform development workload installed.
此外,需要在安装了 .NET Core 跨平台开发工作负载的 Visual Studio 2019中完成此示例。
Create the application
创建应用程序
In Visual Studio 2019, create an ASP.NET Core Web App project: 在 Visual Studio 2019 中,创建ASP.NET Core Web 应用项目 :

Name your project
DaprFrontEndand your solutionDaprMultiContainer: 项目命名为DaprFrontEnd,解决方案命名为DaprMultiContainer:
Select Web Application to create a web application with Razor pages. Don't select Enable Docker Support. You'll add Docker support later. 选择“Web 应用程序”,创建使用 Razor Pages 的 Web 应用程序 。请勿选择"启用 Docker 支持"。 稍后添加 Docker 支持。

Add a ASP.NET Core Web API project to the same solution and call it DaprBackEnd. Select API as the project type. By default, a Dapr sidecar relies on the network boundary to limit access to its public API. So, clear the checkbox for Configure for HTTPS. 在解决方案中添加 ASP.NET Core Web API 项目,并命名为 DaprBackEnd。选择 "API" 作为项目类型。默认情况下,Dapr 边车依赖于网络边界来限制对公共 API 的访问。因此,请清除"为 HTTPS 配置"复选框。

Add Dapr service invocation
添加 Dapr 服务调用
Now, you'll configure communication between the services using Dapr service invocation building block. You'll enable the web app to retrieve weather forecasts from the web API. The service invocation building block features many benefits. It includes service discovery, automatic retries, message encryption (using mTLS), and improved observability. You'll use the Dapr .NET SDK to invoke the service invocation API on the Dapr sidecar.
现在,你将使用 Dapr 服务调用构建基块 配置服务 之间的通信。你将允许 Web 应用从 Web API 检索天气预报。服务调用构建基块具有许多优点。它包括服务发现、自动重试、 (使用 mTLS) 的消息加密,并改进了可观察性。你将使用 Dapr .NET SDK 调用 Dapr 边车上的服务调用 API。
In Visual Studio, open the Package Manager Console (Tools > NuGet Package Manager > Package Manager Console) and make sure that
DaprFrontEndis the default project. From the console, add theDapr.AspNetCoreNuGet package to the project: 在 Visual Studio 中,打开包管理器控制台 (工具 > "NuGet 包管理器" > 程序包管理器控制台) ,并确保这DaprFrontEnd是默认项目。从控制台中,将Dapr.AspNetCoreNuGet 包添加到项目:Install-Package Dapr.AspNetCoreNote
If you're targeting a version of
Dapr.AspNetCorethat is in prerelease, you need to specify the-Prereleaseflag.备注
如果要以
Dapr.AspNetCore的预发行版本为目标,则需要指定-Prerelease标志。In the
DaprFrontEndproject, open the Startup.cs file, and replace theConfigureServicesmethod with the following code: 在DaprFrontEnd项目中,打开 Startup.cs 文件,并将ConfigureServices方法替换为以下代码:// This method gets called by the runtime. Use this method to add services to the container. public void ConfigureServices(IServiceCollection services) {services.AddControllers().AddDapr();services.AddRazorPages(); }The call to
AddDaprregisters theDaprClientclass with the ASP.NET Core dependency injection system. With the client registered, you can now inject an instance ofDaprClientinto your service code to communicate with the Dapr sidecar, building blocks, and components. 对AddDapr的调用会将DaprClient类注册到 ASP.NET Core 依赖关系注入系统。在注册客户端的情况下,你现在可以将DaprClient的实例注入到你的服务代码中,以便与 Dapr边车、构建块和组件通信。Add a new C# class file named WeatherForecast to the
DaprFrontEndproject: 将名为 WeatherForecast 的新 c # 类文件添加到DaprFrontEnd项目:using System;namespace DaprFrontEnd {public class WeatherForecast{public DateTime Date { get; set; }public int TemperatureC { get; set; }public int TemperatureF { get; set; }public string Summary { get; set; }} }Open the Index.cshtml.cs file in the Pages folder, and replace its contents with the following code: 打开 Pages 文件夹中 的 Index.cshtml.cs 文件,然后将其 内容替换为以下代码:
using System;
using System.Collections.Generic;
using System.Net.Http;
using System.Threading.Tasks;
using Dapr.Client;
using Microsoft.AspNetCore.Mvc.RazorPages;namespace DaprFrontEnd.Pages
{public class IndexModel : PageModel{private readonly DaprClient _daprClient;public IndexModel(DaprClient daprClient){_daprClient = daprClient ?? throw new ArgumentNullException(nameof(daprClient));}public async Task OnGet(){var forecasts = await _daprClient.InvokeMethodAsync<IEnumerable<WeatherForecast>>(HttpMethod.Get,"daprbackend","weatherforecast");ViewData["WeatherForecastData"] = forecasts;}}
}
You add Dapr capabilities into the web app by injecting the
DaprClientclass intoIndexModelconstructor. In theOnGetmethod, you call the API service with the Dapr service invocation building block. TheOnGetmethod is invoked whenever a user visits the home page. You use theDaprClient.InvokeMethodAsyncmethod to invoke theweatherforecastmethod of thedaprbackendservice. You'll configure the web API to usedaprbackendas its application ID later on when configuring it to run with Dapr. Finally, the service response is saved in view data. 通过将DaprClient类注入IndexModel的构造函数,可将 Dapr 功能添加到 web 应用中 。在OnGet方法中,通过 Dapr 服务调用构建块来调用 Web API 服务Daprbackend。 每当用户访问主页时,都会调用OnGet方法。使用DaprClient.InvokeMethodAsync方法来调用daprbackend服务的weatherforecast方法 。稍后,将 web API 配置为使用Dapr,并将其应用程序Id设置为daprbackend。最后,将服务响应保存在ViewData中。Replace the contents of the Index.cshtml file in the Pages folder, with the following code. It displays the weather forecasts stored in the view data to the user: 用以下代码替换 Pages 文件夹中的Index.cshtml 文件的内容。它会将ViewData中存储的天气预报显示给用户:
@page
@model IndexModel
@{ViewData["Title"] = "Home page";
}<div class="text-center"><h1 class="display-4">Welcome</h1><p>Learn about <a href="https://docs.microsoft.com/aspnet/core">building Web apps with ASP.NET Core</a>.</p>@foreach (var forecast in (IEnumerable<WeatherForecast>)ViewData["WeatherForecastData"]){<p>The forecast for @forecast.Date is @forecast.Summary!</p>}
</div>
Add container support
添加容器支持
In the final part of this example, you'll add container support and run the solution using Docker Compose.
最后,你将添加容器支持,并使用 Docker Compose 运行解决方案。
Right-click the
DaprFrontEndproject, and choose Add > Container Orchestrator Support. The Add Container Orchestrator Support dialog appears: 右击DaprFrontEnd项目,然后选择 "添加 > 容器编排支持"。将显示 "添加容器编排支持 "对话框:
Choose Docker Compose. 选择“Docker Compose”。
In the next dialog, select Linux as the Target OS: 下一个对话框中,选择 "Linux" 作为"目标 OS":

Visual Studio creates a docker-compose.ymlfile and a .dockerignore file in the docker-compose folder in the solution: Visual Studio在解决方案中的 docker-compose 文件夹中创建 docker-compose.yml 文件和 .dockerignore 文件:

The docker-compose.yml file has the following content: docker-compose.yml 文件包含以下内容(不太清楚DOCKER_REGISTRY,它可能是表示docker注册中心的环境变量,如果没有设置此环境变量,则使用默认值(空字符串),待验证;image指令指定使用的镜像名称(和标签),context指令指定dockerfile文件所在的目录或一个git仓库,它可以是一个相对路径(相对于docker-compose.yml),dockerfile指定dockerfile文件(相对于context指定的路径)):
version: "3.4"services:daprfrontend:image: ${DOCKER_REGISTRY-}daprfrontendbuild:context: .dockerfile: DaprFrontEnd/DockerfileThe .dockerignore file contains file types and extensions that you don't want Docker to include in the container. These files are associated with the development environment and source control and not the app or service you're deploying. .dockerignore 文件包含你不希望 在Docker容器中包含的文件类型和扩展名。这些文件与开发环境和源代码管理相关联,而不是与要部署的应用或服务相关联。
In the root of the DaprFrontEnd project directory, a new Dockerfile was created. A Dockerfile is a sequence of commands that are used to build an image. For more information, see Dockerfile reference. 在 DaprFrontEnd 项目的根目录中,创建了一个新的 Dockerfile。 Dockerfile 是一系列用于生成镜像的命令。有关详细信息,请参阅 Dockerfile 参考。
The Dockerfile contains the YAML: Dockerfile 包含如下内容:
FROM mcr.microsoft.com/dotnet/aspnet:3.1 AS base
WORKDIR /app
EXPOSE 80
EXPOSE 443FROM mcr.microsoft.com/dotnet/sdk:3.1 AS build
WORKDIR /src
COPY ["DaprFrontEnd/DaprFrontEnd.csproj", "DaprFrontEnd/"]
RUN dotnet restore "DaprFrontEnd/DaprFrontEnd.csproj"
COPY . .
WORKDIR "/src/DaprFrontEnd"
RUN dotnet build "DaprFrontEnd.csproj" -c Release -o /app/buildFROM build AS publish
RUN dotnet publish "DaprFrontEnd.csproj" -c Release -o /app/publishFROM base AS final
WORKDIR /app
COPY --from=publish /app/publish .
ENTRYPOINT ["dotnet", "DaprFrontEnd.dll"]
The preceding Dockerfile sequentially performs the following steps when invoked: 在调用上面 Dockerfile 时按顺序执行以下步骤(此处用到了docker的多阶段构建方式,最后生成的镜像,以最后一条 FROM 为准,之前的 FROM作为中间阶段将会被抛弃):
Targeting the Release configuration and outputs to /app/publish. 将发布配置和输出定位到 /app/publish。
Targeting the Release configuration and outputs to /app/build. 将 发布配置和输出定位到 /app/build。
Pulls the
mcr.microsoft.com/dotnet/aspnet:3.1image and names itbase. 拉取mcr.microsoft.com/dotnet/aspnet:3.1镜像,将其命名为base。Sets the working directory to /app. 将工作目录设置为 /app。WORKDIR指令指定后续指令的工作目录
Exposes port
80and443. 声明窗口要公开80端口和443端口,这些端口都是容器内部端口,非宿主端口。Pulls the
mcr.microsoft.com/dotnet/sdk:3.1image and names itbuild. 拉取mcr.microsoft.com/dotnet/sdk:3.1镜像,将其命名为build。Sets the working directory to /src. 将工作目录设置为 /src。
Copies the DaprFrontEnd/DaprFrontEnd.csproj to a new directory named DaprFrontEnd/. 将 DaprFrontEnd/DaprFrontEnd.csproj 复制到名为 DaprFrontEnd/ 的新目录。COPY指令将Dockerfile所在目录中的文件拷贝到镜像中
Calls dotnet restore on the project. 对项目调用 dotnet restore 。
Copies everything from the root directory into the image's root. 将根目录中的所有内容复制到镜像的根目录中。
Sets the working directory to /src/DaprFrontEnd. 将工作目录设置为 /src/DaprFrontEnd。
Calls dotnet build on the project. 对该项目调用
dotnet buildInitializes a new build stage from the existing
buildbase image and names itpublish. 从现有build镜像初始化新的构建阶段并命名为publish。Calls
dotnet publishon the project. 对项目调用dotnet publish。Initializes a new build stage from the existing
publishbase image and names itfinal. 从现有base镜像初始化新的构建阶段并命名为final。Sets the working directory to /app. 将工作目录设置为 /app。
Copies the
/app/publishdirectory from thepublishimage into the root of thefinalimage. 从publish镜像将/app/publish目录复制到final镜像的根目录 。Sets the entry point as the image to
dotnetand passes theDaprFrontEnd.dllas an arg. 设置镜像的入口点为dotnet,并将DaprFrontEnd.dll作为参数传递。
In the
DaprBackEndweb API project, right-click on the project node, and choose Add > Container Orchestrator Support. Choose Docker Compose, and then select Linux again as the target OS. 在DaprBackEndweb API 项目中,右击项目,然后选择 "添加 > 容器 编排支持"。选择 " Docker Compose",然后再次选择 " Linux " 作为 "目标 OS"。In the root of the DaprBackEnd project directory, a new Dockerfile was created. The Dockerfile contains the following YAML: 在 DaprBackEnd 项目的根目录中,创建了一个新的 Dockerfile 。 Dockerfile 包含以下 YAML:
FROM mcr.microsoft.com/dotnet/aspnet:3.1 AS base
WORKDIR /app
EXPOSE 80
EXPOSE 443FROM mcr.microsoft.com/dotnet/sdk:3.1 AS build
WORKDIR /src
COPY ["DaprBackEnd/DaprBackEnd.csproj", "DaprBackEnd/"]
RUN dotnet restore "DaprBackEnd/DaprBackEnd.csproj"
COPY . .
WORKDIR "/src/DaprBackEnd"
RUN dotnet build "DaprBackEnd.csproj" -c Release -o /app/buildFROM build AS publish
RUN dotnet publish "DaprBackEnd.csproj" -c Release -o /app/publishFROM base AS final
WORKDIR /app
COPY --from=publish /app/publish .
ENTRYPOINT ["dotnet", "DaprBackEnd.dll"]
Open the docker-compose.yml file again and examine its contents. Visual Studio has updated the Docker Compose file. Now both services are included: 再次打开 docker-compose.yml docker-compose.override.yml 文件并检查其内容。Visual Studio 已更新 Docker Compose 文件。现在包括两个服务:
version: '3.4'services:daprfrontend:image: ${DOCKER_REGISTRY-}daprfrontendbuild:context: .dockerfile: DaprFrontEnd/Dockerfiledaprbackend:image: ${DOCKER_REGISTRY-}daprbackendbuild:context: .dockerfile: DaprBackEnd/DockerfileTo use Dapr building blocks from inside a containerized application, you'll need to add the Dapr sidecars containers to your Compose file. Carefully update the content of the docker-compose.yml file to match the following example. Pay close attention to the formatting and spacing and don't use tabs. 若要在容器化应用程序中使用 Dapr 构建块,需要将 Dapr 边车容器添加到Compose文件中。仔细更新 docker-compose.yml 文件的内容,以匹配以下示例。请密切注意格式和间距,请勿使用tabs。
version: '3.4'services:daprfrontend:image: ${DOCKER_REGISTRY-}daprfrontendbuild:context: .dockerfile: DaprFrontEnd/Dockerfileports:- "51000:50001"daprfrontend-dapr:image: "daprio/daprd:latest"command: [ "./daprd", "-app-id", "daprfrontend", "-app-port", "443", "-app-ssl" ]depends_on:- daprfrontendnetwork_mode: "service:daprfrontend"daprbackend:image: ${DOCKER_REGISTRY-}daprbackendbuild:context: .dockerfile: DaprBackEnd/Dockerfileports:- "52000:50001"daprbackend-dapr:image: "daprio/daprd:latest"command: [ "./daprd", "-app-id", "daprbackend", "-app-port", "443", "-app-ssl" ]depends_on:- daprbackendnetwork_mode: "service:daprbackend"In the updated file, we've added
daprfrontend-dapranddaprbackend-daprsidecars for thedaprfrontendanddaprbackendservices respectively. In the updated file, pay close attention to the following changes: 在更新的文件中,我们分别为daprfrontend和daprbackend服务添加了daprfrontend-dapr和daprbackend-dapr边车。在更新的文件中,请密切注意以下更改:The sidecars use the
daprio/daprd:latestcontainer image. The use of thelatesttag isn't recommended for production scenarios. For production, it's better to use a specific version number. 边车使用daprio/daprd:latest容器映像。不推荐在生产方案中使用latest标记。对于生产环境,最好使用特定的版本号。Each service defined in the Compose file has its own network namespace for network isolation purposes. The sidecars use
network_mode: "service:..."to ensure they run in the same network namespace as the application. Doing so allows the sidecar and the application to communicate usinglocalhost. 出于网络隔离目的,Compose 文件中定义的每个服务都有自己的网络命名空间。边车使用network_mode: "service:..."来确保它们在与应用程序相同的网络命名空间中运行。这样做可让边车和应用程序使用localhost进行通信 。The ports on which the Dapr sidecars are listening for gRPC communication (by default 50001) must be exposed to allow the sidecars to communicate with each other. Dapr 边车侦听 gRPC 通信的端口 (默认为 50001) ,使边车能够相互通信。ports指令使用"宿主(容器所在的主机,此处为wsl)端口:容器端口 (容器内部端口)
(HOST:CONTAINER)"格式,或者仅仅指定容器的端口(宿主将会随机选择端口)都可以。
Run the solution (F5 or Ctrl+F5) to verify that it works as expected. If everything is configured correctly, you should see the weather forecast data: 运行解决方案 (F5 或 Ctrl+F5) 验证其是否正常工作。如果一切配置正确,应会看到天气预报数据:
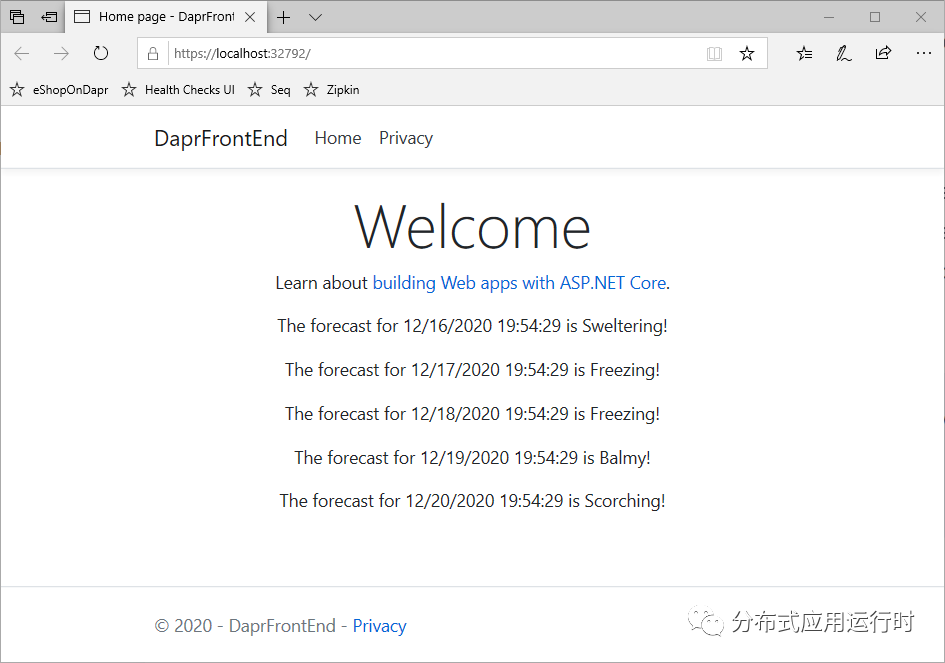
Running locally with Docker Compose and Visual Studio 2019, you can set breakpoints and debug into the application. For production scenarios, it's recommended to host your application in Kubernetes. This book includes an accompanying reference application, eShopOnDapr, that contains scripts to deploy to Kubernetes. 使用 Docker Compose 和 Visual Studio 2019 在本地运行,可以设置断点并在应用程序中调试。对于生产场景,建议在 Kubernetes 中托管应用程序。本书包含随附的参考应用程序 eShopOnDapr,其中包含要部署到 Kubernetes 的脚本。
To learn more about the Dapr service invocation building block used in this walkthrough, refer to chapter 6. 若要详细了解本演练中使用的 Dapr 服务调用构建块,请参阅第 6 章。
Summary
总结
In this chapter, you had an opportunity to test drive Dapr. Using the Dapr .NET SDK, you saw how Dapr integrates with the .NET application platform.
在本章中,你有机会尝试驾驭Dapr 。使用 Dapr .NET SDK,你已了解 Dapr 如何与 .NET 应用平台集成。
The first example was a simple, stateful, .NET Console application that used the Dapr state management building block.
第一个示例是使用 Dapr 状态管理构建块的简单有状态 .NET 控制台应用程序。
The second example involved a multi-container application running in Docker. By using Visual Studio with Docker Compose, you experienced the familiar F5 debugging experience available across all .NET apps.
第二个示例涉及在 Docker 中运行的多容器应用程序。通过结合使用Visual Studio 与 Docker Compose ,你可以在所有 .NET 应用中使用熟悉的 F5 调试体验 。
You also got a closer look at Dapr component configuration files. They configure the actual infrastructure implementation used by the Dapr building blocks. You can use namespaces and scopes to restrict component access to particular environments and applications.
你还可以更深入地了解 Dapr 组件配置文件。它们配置 Dapr 构建块使用的实际基础设施实现。你可以使用命名空间和范围限制特定环境和应用程序对组件的访问。
In the upcoming chapters, you'll dive deep into the building blocks offered by Dapr.
在即将推出的章节中,你将深入了解 Dapr 提供的构建块。
目录:
面向.NET开发人员的Dapr——前言
面向.NET开发人员的Dapr——分布式世界
面向.NET开发人员的Dapr——俯瞰Dapr


)


![[转]让Linux的tty界面支持中文](http://pic.xiahunao.cn/[转]让Linux的tty界面支持中文)


