准备环境:
rsync服务器:172.16.3.21
sersync2服务器:172.16.3.23
一、 rsync服务器
先把原来的rsync包删掉yum remove rsync-2.6.8-3.1 -y,
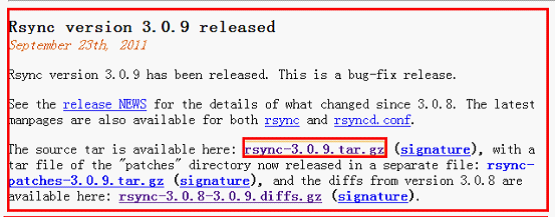
然后到http://rsync.samba.org/下载rsync包我用的包如下图所示

利用securecrt上传本地
[root@acong tongbu1]# cd /home/lincong/tools/
[root@acong tools]# ll
total 52084
drwxr-xr-x 19 root root 4096 Sep 20 2006 linux-2.6.18
-rw-r--r-- 1 root root 52467340 Aug 2 14:15 linux-2.6.18.tar.gz
drwxrwxr-x 10 root root 4096 Aug 2 23:36 rsync-3.0.9
-rw-r--r-- 1 root root 792725 Aug 2 15:34 rsync-3.0.9.tar.gz
[root@acong tools]# tar zxf rsync-3.0.9.tar.gz ##解压
[root@acong tools]# cd rsync-3.0.9 ##进入目录
[root@acong tools]# ./configure --prefix=/usr
[root@acong tools]# make && make install ##编译安装
[root@acong tools]# mkdir -p /opt/tongbu1
[root@acong tools]# vim /etc/rsyncd.conf
uid=root
gid=root
max connections=36000
use chroot=no
log file=/var/log/rsyncd.log
pid file=/var/run/rsyncd.pid
lock file=/var/run/rsyncd.lock
[tongbu1] ##模块
path=/opt/tongbu1 ##推送目录
comment = xoyo video files
ignore errors = yes
read only = no
hosts allow = 172.16.3.0/24
hosts deny = *
[root@acong tools]# rsync --daemon
[root@acong tools]# netstat -npl|grep 873
tcp 0 0 0.0.0.0:873 0.0.0.0:* LISTEN 6509/rsync
tcp 0 0 :::873 :::* LISTEN 6509/rsync
- 二、 sersync2服务器:
- 这里有两个连接一个是针对64位的,一个是32位的,所以一定要选好否则后面出错了你排查不到原因,所以在这里叮嘱一下。
- wget http://sersync.googlecode.com/files/sersync2.5_64bit_binary_stable_final.tar.gz
- wget http://sersync.googlecode.com/files/sersync2.5_32bit_binary_stable_final.tar.gz
[root@acong tools]# tar zxf sersync2.5_32bit_binary_stable_final.tar.gz
[root@acong tools]# cd GNU-Linux-x86/
[root@acong GNU-Linux-x86]# ll
total 1496
-rwxr-xr-x 1 root root 2217 Aug 3 00:56 confxml.xml
-rwxr-xr-x 1 root root 1520176 Jul 4 2010 sersync2
[root@acong GNU-Linux-x86]# vim confxml.xml ##找到一下模块
<sersync>
<localpath watch="/opt/tongbu1">
<remote ip="172.16.3.21" name="tongbu1"/>
## 指定 rsyncd 服务器的地址和备份的模块名称
<!--<remote ip="192.168.8.39" name="tongbu"/>-->
<!--<remote ip="192.168.8.40" name="tongbu"/>-->
</localpath>
<rsync>
<commonParams params="-artuz"/>
<auth start="false" users="root" passwordfile="/etc/rsync.pas"/>
<userDefinedPort start="false" port="874"/><!-- port=874 -->
<timeout start="false" time="100"/><!-- timeout=100 -->
<ssh start="false"/>
</rsync>
<failLog path="/var/log/rsync_fail.log" timeToExecute="60"/><!--default every 60mins execute once--> ##也可以把log文件指定到你熟悉的位置
[root@acong GNU-Linux-x86]# mkdir /opt/tongbu1 -p 建立目录
[root@acong GNU-Linux-x86]# cd /opt/tongbu1/
[root@liyao GNU-Linux-x86]# mkdir /etc/sersync2
[root@liyao GNU-Linux-x86]# cp confxml.xml /etc/sersync2/
[root@liyao GNU-Linux-x86]# cp sersync2 /usr/bin/
[root@rrd ~]# sersync2 -r -d -o /etc/sersync2/confxml.xml
set the system param
execute:echo 50000000 > /proc/sys/fs/inotify/max_user_watches
execute:echo 327679 > /proc/sys/fs/inotify/max_queued_events
parse the command param
option: -r rsync all the local files to the remote servers before the sersync work
option: -d run as a daemon
option: -o config xml name: /etc/sersync2/confxml.xml
daemon thread num: 10
parse xml config file
host ip : localhost host port: 8008
daemon start,sersync run behind the console
config xml parse success
please set /etc/rsyncd.conf max connections=0 Manually
sersync working thread 12 = 1(primary thread) + 1(fail retry thread) + 10(daemon sub threads)
Max threads numbers is: 22 = 12(Thread pool nums) + 10(Sub threads)
please according your cpu ,use -n param to adjust the cpu rate
------------------------------------------
rsync the directory recursivly to the remote servers once
working please wait...
execute command: cd /opt/tongbu1 && rsync -artuz -R --delete ./ 172.16.0.26::tongbu1 >/dev/null 2>&1
run the sersync:
watch path is: /opt/tongbu1
- #############################
- 测试1:sersync端
- 在sersync端新建一个文件,看rsync端否同步
- [root@acong tongbu1]# touch test.sh
- [root@acong tongbu1]# ll
- total 0
- -rw-r--r-- 1 root root 0 Aug 3 03:04 test.sh
- 查看下rsync端
- [root@acong tongbu1]# ll
- total 0
- -rw-r--r-- 1 root root 0 Aug 3 03:04 test.sh
- 结论:成功!
- #############################
- 测试2:在sersync端先删除刚才建立的test.sh,在建立一个acong.sh
- [root@acong tongbu1]# touch acong.sh
- [root@acong tongbu1]# ll
- total 0
- -rw-r--r-- 1 root root 0 Aug 3 03:09 acong.sh ##只有这一个文件
- 查看下rsync端
- [root@acong tongbu1]# ll
- total 0
- -rw-r--r-- 1 root root 0 Aug 3 03:09 acong.sh ##也是一样的
- 结论:成功!
- #############################
- 测试3:在rsync端建立文件,sersync端是否能一样呢
- [root@acong tongbu1]# touch xiaolin
- [root@acong tongbu1]# ll
- total 0
- -rw-r--r-- 1 root root 0 Aug 3 03:09 acong.sh
- -rw-r--r-- 1 root root 0 Aug 3 03:11 xiaolin
- [root@acong tongbu1]# ll
- total 0
- -rw-r--r-- 1 root root 0 Aug 3 03:09 acong.sh
- 结论:不成功,因为毕竟不是互为同步的。
- #############################
通过以上配置可以实现对目录的监控,以及实时的进行增量的数据同步。
转载于:https://blog.51cto.com/learon/980729


)


)


)
