在项目中,当我们需要远程调用一个 HTTP 接口时,我们经常会用到 RestTemplate 这个类。这个类是 Spring 框架提供的一个工具类。Spring 官网对它的介绍如下:
RestTemplate: The original Spring REST client with a synchronous, template method API.
从上面的介绍中我们可以知道:RestTemplate 是一个同步的 Rest API 客户端。下面我们就来介绍下 RestTemplate 的常用功能。
RestTemplate 简单使用#
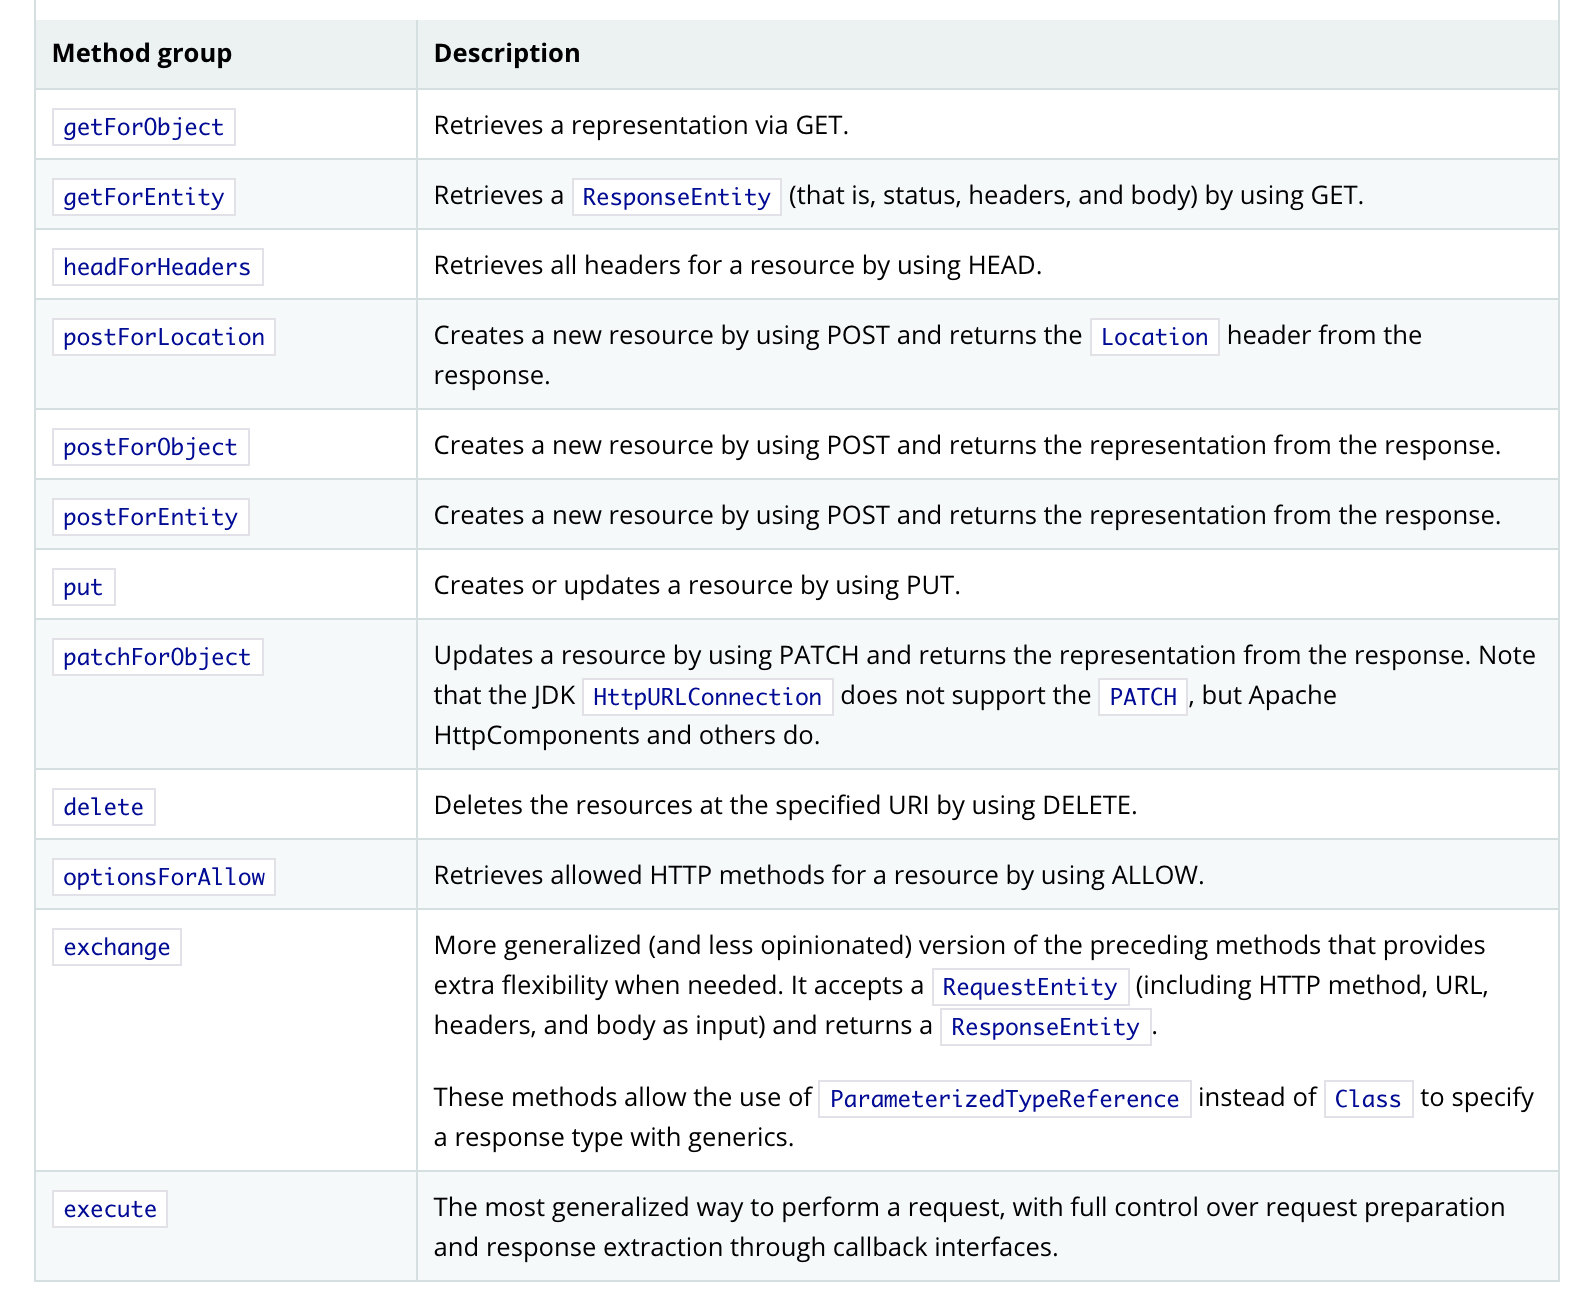
RestTemplate 提供高度封装的接口,可以让我们非常方便地进行 Rest API 调用。常见的方法如下:
表格:RestTemplate 的方法

上面的方法我们大致可以分为三组:
- getForObject --- optionsForAllow 分为一组,这类方法是常规的 Rest API(GET、POST、DELETE 等)方法调用;
- exchange:接收一个
RequestEntity参数,可以自己设置 HTTP method,URL,headers 和 body,返回 ResponseEntity; - execute:通过 callback 接口,可以对请求和返回做更加全面的自定义控制。
一般情况下,我们使用第一组和第二组方法就够了。
创建 RestTemplate#
@Bean
public RestTemplate restTemplate(ClientHttpRequestFactory factory) {RestTemplate restTemplate = new RestTemplate(factory);return restTemplate;
}@Bean
public ClientHttpRequestFactory simpleClientHttpRequestFactory() {SimpleClientHttpRequestFactory factory = new SimpleClientHttpRequestFactory();factory.setReadTimeout(5000);factory.setConnectTimeout(15000);// 设置代理//factory.setProxy(null);return factory;
}
创建 RestTemplate 时需要一个 ClientHttpRequestFactory,通过这个请求工厂,我们可以统一设置请求的超时时间,设置代理以及一些其他细节。通过上面代码配置后,我们直接在代码中注入 RestTemplate 就可以使用了。
有时候我们还需要通过 ClientHttpRequestFactory 配置最大链接数,忽略SSL证书等,大家需要的时候可以自己查看代码设置。
接口调用#
1. 普通接口调用
Map<String, String> vars = Collections.singletonMap("hotel", "42");
// 通过 GET 方式调用,返回一个 String 值,还可以给 URL 变量设置值(也可通过 uriTemplateHandler 这个属性自定义)
String result = restTemplate.getForObject("https://example.com/hotels/{hotel}/rooms/{hotel}", String.class, vars);String url = "http://127.0.0.1:8080/hello";
JSONObject param = new JSONObject();
//restTemplate 会根据 params 的具体类型,调用合适的 HttpMessageConvert 将请求参数写到请求体 body 中,并在请求头中添加合适的 content-type;
// 也会根据 responseType 的类型(本列子中是 JSONObject),设置 head 中的 accept 字段,当响应返回的时候再调用合适的 HttpMessageConvert 进行响应转换
ResponseEntity<JSONObject> responseEntity=restTemplate.postForEntity(url,params,JSONObject.class);
int statusCodeValue = responseEntity.getStatusCodeValue();
HttpHeaders headers = responseEntity.getHeaders();
JSONObject body = responseEntity.getBody();
2. 添加 Header 和 Cookie
有时候,我们需要在请求中的 Head 中添加值或者将某些值通过 cookie 传给服务端,那么上面这种调用形式就不太满足要求了。
 UriComponents uriComponents = UriComponentsBuilder.fromHttpUrl("127.0.0.1:8080").path("/test").build(true);URI uri = uriComponents.toUri();RequestEntity<JSONObject> requestEntity = RequestEntity.post(uri).// 添加 cookie(这边有个问题,假如我们要设置 cookie 的生命周期,作用域等参数我们要怎么操作)header(HttpHeaders.COOKIE,"key1=value1").// 添加 headerheader(("MyRequestHeader", "MyValue")accept(MediaType.APPLICATION_JSON).contentType(MediaType.APPLICATION_JSON).body(requestParam);
ResponseEntity<JSONObject> responseEntity = restTemplate.exchange(requestEntity,JSONObject.class);
// 响应结果
JSONObject responseEntityBody = responseEntity.getBody();
3. 文件上传
上面两个列子基本能覆盖我们平时开发的大多数功能了。这边再讲个文件上传的列子(RestTemplate 功能还是蛮全的)。
public Object uplaod(@RequestBody JSONObject params) throws Exception{final String url = "http://localhost:8888/hello/m3";// 设置请求头HttpHeaders headers = new HttpHeaders();headers.setContentType(MediaType.MULTIPART_FORM_DATA);// 设置请求体,注意是 LinkedMultiValueMapFileSystemResource resource1 = new FileSystemResource("D:\\dir1\\ss\\pic1.jpg");FileSystemResource resource2 = new FileSystemResource("D:\\dir1\\ss\\pic2.jpg");MultiValueMap<String, Object> form = new LinkedMultiValueMap<>();form.add("file", resource1);form.add("file", resource2);form.add("param1","value1");HttpEntity<MultiValueMap<String, Object>> files = new HttpEntity<>(form, headers);JSONObject s = restTemplate.postForObject(url, files, JSONObject.class);return s;}
上面的代码中上传了两个本地图片,通过下面代码可以顺利接收。
@RequestMapping("/m3")
public Object fileUpload(@RequestParam("file") MultipartFile[] files, HttpServletRequest request) throws Exception {// 携带的其他参数可以使用 getParameter 方法接收String param1 = request.getParameter("param1");Response response = new Response();if (files == null) {response.failure("文件上传错误, 服务端未拿到上传的文件!");return response;}for (MultipartFile file : files) {if (!file.isEmpty() && file.getSize() > 0) {String fileName = file.getOriginalFilename();// 参考 FileCopyUtils 这个工具类file.transferTo(new File("D:\\" + fileName));logger.info("文件:{} 上传成功...",fileName);}}response.success("文件上传成功");return response;}
但是我们发现上面的上传代码中,上传文件的类必须使用 FileSystemResource。有时我们会碰到这种情况:文件我们会从文件服务下载到内存中一个 InputStream 的形式存在,那此时在使用 FileSystemResource 就不行了。
当然,我们使用讨巧一点的办法也是可以的:先将下载下来的 InputStream 保存到本地,然后再读取到 FileSystemResource,上传后再删除本地临时文件。
但是总觉得这个方法不够完美。最后发现有个同事已经写了相关的实现。这边就直接拿来用了。
// 自己实现了一个 Resource
public class InMemoryResource extends ByteArrayResource {private final String filename;private final long lastModified;public InMemoryResource(String filename, String description, byte[] content, long lastModified) {super(content, description);this.lastModified = lastModified;this.filename = filename;}@Overridepublic long lastModified() throws IOException {return this.lastModified;}@Overridepublic String getFilename() {return this.filename;}
}
调整后的上传代码
@PostMapping("/m3")public Object m3(@RequestBody JSONObject params) throws Exception{final String url = "http://localhost:8888/hello/m3";// 设置请求头HttpHeaders headers = new HttpHeaders();headers.setContentType(MediaType.MULTIPART_FORM_DATA);// 设置请求体,注意是 LinkedMultiValueMap// 下面两个流从文件服务下载,这边省略(注意最后关闭流)InputStream fis1 = InputStream fis2 = InMemoryResource resource1 = new InMemoryResource("file1.jpg","description1", FileCopyUtils.copyToByteArray(fis1), System.currentTimeMillis());InMemoryResource resource2 = new InMemoryResource("file2.jpg","description2", FileCopyUtils.copyToByteArray(fis2), System.currentTimeMillis());MultiValueMap<String, Object> form = new LinkedMultiValueMap<>();form.add("file", resource1);form.add("file", resource2);form.add("param1","value1");HttpEntity<MultiValueMap<String, Object>> files = new HttpEntity<>(form, headers);JSONObject s = restTemplate.postForObject(url, files, JSONObject.class);return s;}
4. 文件下载
private InputStream downLoadVideoFromVod(String url) throws Exception {byte[] bytes = restTemplate.getForObject(url, byte[].class);return new ByteArrayInputStream(bytes);
}
一些其他设置#
1. 拦截器配置
RestTemplate 也可以设置拦截器做一些统一处理。这个功能感觉和 Spring MVC 的拦截器类似。配置也很简单:
class MyInterceptor implements ClientHttpRequestInterceptor{@Overridepublic ClientHttpResponse intercept(HttpRequest request, byte[] body, ClientHttpRequestExecution execution) throws IOException {logger.info("enter interceptor...");return execution.execute(request,body);}}
 @Bean
public RestTemplate restTemplate(ClientHttpRequestFactory factory) {RestTemplate restTemplate = new RestTemplate(factory);MyInterceptor myInterceptor = new MyInterceptor();List<ClientHttpRequestInterceptor> list = new ArrayList<>();list.add(myInterceptor);restTemplate.setInterceptors(list);return restTemplate;
}
2. ErrorHandler 配置
ErrorHandler 用来对调用错误对统一处理。
public class MyResponseErrorHandler extends DefaultResponseErrorHandler {@Overridepublic boolean hasError(ClientHttpResponse response) throws IOException {return super.hasError(response);}@Overridepublic void handleError(ClientHttpResponse response) throws IOException {HttpStatus statusCode = HttpStatus.resolve(response.getRawStatusCode());if (statusCode == null) {throw new UnknownHttpStatusCodeException(response.getRawStatusCode(), response.getStatusText(),response.getHeaders(), getResponseBody(response), getCharset(response));}handleError(response, statusCode);}@Overrideprotected void handleError(ClientHttpResponse response, HttpStatus statusCode) throws IOException {switch (statusCode.series()) {case CLIENT_ERROR:HttpClientErrorException exp1 = new HttpClientErrorException(statusCode, response.getStatusText(), response.getHeaders(), getResponseBody(response), getCharset(response));logger.error("客户端调用异常",exp1);throw exp1;case SERVER_ERROR:HttpServerErrorException exp2 = new HttpServerErrorException(statusCode, response.getStatusText(),response.getHeaders(), getResponseBody(response), getCharset(response));logger.error("服务端调用异常",exp2);throw exp2;default:UnknownHttpStatusCodeException exp3 = new UnknownHttpStatusCodeException(statusCode.value(), response.getStatusText(),response.getHeaders(), getResponseBody(response), getCharset(response));logger.error("网络调用未知异常");throw exp3;}}}
@Bean
public RestTemplate restTemplate(ClientHttpRequestFactory factory) {RestTemplate restTemplate = new RestTemplate(factory);MyResponseErrorHandler errorHandler = new MyResponseErrorHandler();restTemplate.setErrorHandler(errorHandler);List<HttpMessageConverter<?>> messageConverters = restTemplate.getMessageConverters();// 通过下面代码可以添加新的 HttpMessageConverter//messageConverters.add(new );return restTemplate;
}
3. HttpMessageConverter 配置
RestTemplate 也可以配置 HttpMessageConverter,配置的原理和 Spring MVC 中类似。
简单总结#
通过 RestTemplate,我们可以非常方便的进行 Rest API 调用。但是在 Spring 5 中已经不再建议使用 RestTemplate,而是建议使用 WebClient。WebClient 是一个支持异步调用的 Client。所以喜欢研究新东西的同学可以开始研究下新东西了。


![[转]Eureka工作原理](http://pic.xiahunao.cn/[转]Eureka工作原理)
的特殊用法)


![[转]高并发架构设计之--「服务降级」、「服务限流」与「服务熔断」](http://pic.xiahunao.cn/[转]高并发架构设计之--「服务降级」、「服务限流」与「服务熔断」)


)

移动互联网改造...)
)