版权声明:
- 本文原创发布于博客园"优梦创客"的博客空间(网址:
http://www.cnblogs.com/raymondking123/)以及微信公众号"优梦创客"(微信号:unitymaker) - 您可以自由转载,但必须加入完整的版权声明!
雪人兄弟游戏开发过程:
场景搭建:
1.将Map地图拖入场景,
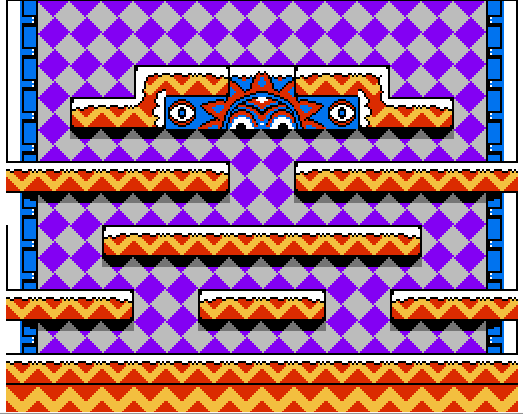
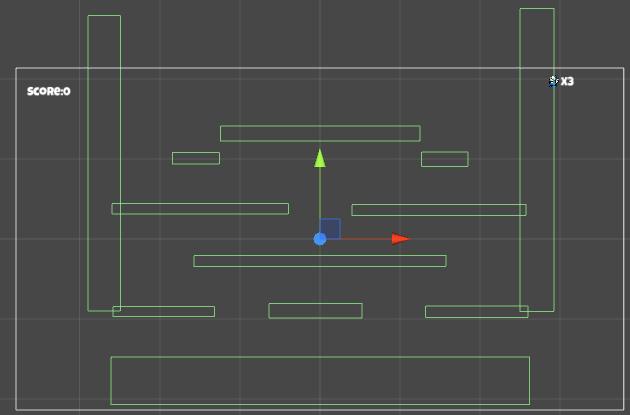
2.创建一个ground空对象给这个对象添加一些Collider 2D 组件,把这些Collide2D覆盖到地图可以行走的地方,创建以个wall空对象给这个对象添加两个Collider 2D组件,把这两个 Collide2D 覆盖到地图的两侧。
创建主角:
1.创建hero对象给其一张主角的图片精灵,给hero对象添加Rigidbody2D和Collider 2D组件使其可以进行物理运动和碰撞行为;

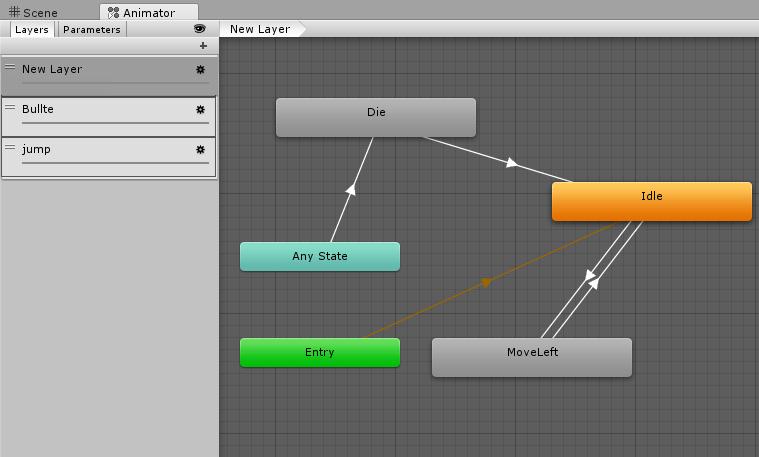
2. 创建动画控制器,编辑一些主角行为的的动画,再用动画控制器进行控制;
3. 添加HeroMove脚本,通过编辑代码使主角可以移动和跳跃;
//Update时通过射线检测判断是否可以跳跃:RaycastHit2D hit = Physics2D.Linecast(this.transform.position, t.position, 1 << LayerMask.NameToLayer("ground"));//Debug.DrawLine(this.transform.position, t.position);// t.position//print((bool)hit);if (Input.GetButtonDown("Jump") && hit){jump = true;}···
//FixedUpdatebool speed = false; //触发动画的布尔变量float h = Input.GetAxis("Horizontal");if (h != 0){speed = true;}Vector2 force = new Vector2(h * moveForce, 0);//限制移动速度if (Mathf.Abs(rb.velocity.x) < maxSpeed){GetComponent<Animator>().SetBool("Speed", speed);rb.AddForce(force);}if (Mathf.Abs(rb.velocity.x) >= maxSpeed){rb.velocity = new Vector2(Mathf.Sign(rb.velocity.x) * maxSpeed, rb.velocity.y);}//动画方向转变if (h < 0){var s = this.transform.localScale;s.x = Mathf.Abs(-s.x);this.transform.localScale = s;}else if (h > 0){var s = this.transform.localScale;s.x = -Mathf.Abs(-s.x);this.transform.localScale = s;}//跳跃if (jump){GetComponent<Animator>().SetTrigger("jump");rb.AddForce(Vector2.up * jumpForce);jump = false;}
4.让主角可以发射子弹:
1. 制作子弹预制体 ,

2.给hero添加一个子节点Gun作为生成子弹的点,并添加脚本控制子弹的发射和行为。
void Update () {if (Input.GetButtonDown("Fire1")){this.transform.parent.gameObject.GetComponent<Animator>().SetTrigger("Shoot");var rocket = Instantiate(rocketPrefab);rocket.transform.position = this.transform.position;if (this.transform.parent.localScale.x > 0){rocket.transform.rotation = Quaternion.Euler(0, 0, 0);rocket.GetComponent<Rigidbody2D>().velocity = new Vector2(speed, 0);}else{rocket.transform.rotation = Quaternion.Euler(0, 0, 180);rocket.GetComponent<Rigidbody2D>().velocity = new Vector2(-speed, 0);}}}创建敌人:
1.创建一个monsters空对象为了确定敌人生成的位置:
2. 创建monster对象给其一张敌人的图片精灵,给monster对象添加Rigidbody2D和Collider2D组件使其可以进行物理运动和碰撞行为,并把它做成预制体。

3. 添加Monster脚本,通过编辑代码使敌人可以移动和跳跃;
public class Monster : MonoBehaviour
{// public float speed = 3; private float MonsterMoveForce = 0.8f; //速度//private float MonsterMaxSpeed = 0.5f; //限制速度public float monsterJumpForce = 600f; //= 2.8f;private bool monsterJump = false;private Transform topCheck;private Transform frontCheck;private Transform downCheck;int h;private int hp = 1;public GameObject snowball;public void Start(){topCheck = transform.Find("topCheck");frontCheck = transform.Find("frontCheck");downCheck = transform.Find("DownCheck");}public void Update(){if (hp <= 0){Vector2 s = this.transform.position;hp = 0;Destroy(this.gameObject);GameObject g = Instantiate(snowball);g.transform.position = s;return;}}public void FixedUpdate(){// 跳跃 RaycastHit2D hit1 = Physics2D.Linecast(topCheck.position, this.transform.position, 1 << LayerMask.NameToLayer("ground"));RaycastHit2D hit2 = Physics2D.Linecast(downCheck.position, this.transform.position, 1 << LayerMask.NameToLayer("ground"));RaycastHit2D hit = Physics2D.Linecast(frontCheck.position, this.transform.position);h = Random.Range(0, 100);Rigidbody2D rb = this.transform.gameObject.GetComponent<Rigidbody2D>();Debug.DrawLine(this.transform.position, topCheck.position);Debug.DrawLine(this.transform.position, downCheck.position);Debug.DrawLine(this.transform.position, frontCheck.position);if (hit && hit.transform.gameObject.tag == "wall" || hit.transform.gameObject.tag == "destroyer"){Vector3 s = this.transform.localScale;//s.x = -s.x;this.transform.localScale = s;}else if (hit2 && hit && hit.transform.gameObject.tag == "ground"){monsterJump = true;}else{ //随机方向 if (h == 2){Vector3 s = this.transform.localScale;s.x = -s.x;this.transform.localScale = s;}}//移动 Vector2 x = new Vector2(-this.transform.localScale.x * MonsterMoveForce, rb.velocity.y);rb.velocity = x;this.gameObject.GetComponent<Animator>().SetTrigger("move");//跳跃if (hit1 && hit2 && h == 3){monsterJump = true;}if (monsterJump){rb.AddForce(Vector2.up * monsterJumpForce);monsterJump = false;}}public void OnCollisionEnter2D(Collision2D collision){if (collision.gameObject.tag == "ground"){this.gameObject.GetComponent<Animator>().SetTrigger("ground");}if (collision.gameObject.tag == "bullet"){hp--;}}public void OnCollisionExit2D(Collision2D collision){if (collision.gameObject.tag == "ground"){this.gameObject.GetComponent<Rigidbody2D>().velocity = new Vector2(0, 0);this.gameObject.GetComponent<Animator>().SetTrigger("groundl");}}}创建雪球:
1. 创建snowball对象给其一张默认的图片精灵,给snowball对象添加Rigidbody2D和lColider2D组件使其可以进行物理运动和碰撞行,并把它做成预制体。


2.给snowball对象添加脚本通过编辑代码,添加状态机使雪球状态可以切换。
public class Snowball : MonoBehaviour
{StateMachine<Snowball> stateMachine = new StateMachine<Snowball>();public Sprite snowball1;public Sprite snowball2;public Sprite snowball3;public GameObject monster;public Transform frontCheck;public GameObject[] props;public GameObject balldestory;// Use this for initialization//雪球状态public class SnowballStateB : State<Snowball>{public float explodeTime = 0;public bool gun = false;public float gunForce = 3f;float dir;public override void Enter(Snowball e){e.gameObject.GetComponent<SpriteRenderer>().sprite = e.snowball1; //获的图片e.gameObject.GetComponent<Animator>().SetTrigger("snowball1");e.frontCheck = e.transform.Find("frontCheck");e.gameObject.layer = LayerMask.NameToLayer("snowball");}public override void Update(Snowball e){//雪球没滚时隔 6 个时间点恢复成版雪球if (gun == false){explodeTime += Time.deltaTime;if (explodeTime > 6){explodeTime = 0;e.stateMachine.ChangeState(new SnowballStateA());return;}}else if (gun){Rigidbody2D rb = e.gameObject.GetComponent<Rigidbody2D>();rb.freezeRotation = false;Vector2 v = new Vector2(dir * gunForce, rb.velocity.y);// rb.AddForce(v);rb.velocity = v;Collider2D[] enemies = Physics2D.OverlapCircleAll(e.transform.position, 0.05f, 1 << LayerMask.NameToLayer("monster"));foreach (Collider2D a in enemies){Vector2 s = a.gameObject.transform.position;Destroy(a.gameObject);GameObject prop = Instantiate(e.props[Random.Range(0, e.props.Length)]);prop.transform.position = s;}}}public override void OnCollisionStay2D(Snowball e, Collision2D collision){ContactPoint2D[] a = collision.contacts;if (gun == false){if (collision.gameObject.tag == "player" && collision.gameObject.transform.FindChild("Gun").GetComponent<Gun>().isFire){//  dir = -GameObject.Find("hero").transform.localScale.x;gun = true;dir = -collision.transform.localScale.x;}}}public override void OnCollisionEnter2D(Snowball e, Collision2D collision){if (gun == false){if (collision.gameObject.tag == "snowball"){gun = true;dir = -collision.transform.localScale.x;}}if (gun){if (collision.gameObject.tag == "wall" || collision.gameObject.tag == "snowball"){dir = -dir;}if (collision.gameObject.tag == "player"){//TODO//雪球带着主角走//transform.SetParent//设置父节点 //collision.transform.SetParent(e.transform);//collision.transform.position = e.transform.position;//torque //旋转}}if (collision.gameObject.tag == "destroyer"){e.gameObject.GetComponent<Animator>().SetTrigger("destrayer");}}public override void Exit(Snowball e){}}//半雪球状态public class SnowballStateA : State<Snowball>{public float explodeTime = 0;int hp = 0;public override void Enter(Snowball e){e.gameObject.GetComponent<SpriteRenderer>().sprite = e.snowball2;e.gameObject.GetComponent<Animator>().SetTrigger("snowball2");e.gameObject.layer = LayerMask.NameToLayer("monster");hp = 2;}public override void Update(Snowball e){print(hp);if (hp <= 0){e.stateMachine.ChangeState(new SnowballStateB());return;}explodeTime += Time.deltaTime;if (explodeTime > 5 && hp > 0){explodeTime = 0;e.stateMachine.ChangeState(new SnowballState());return;}}public override void Exit(Snowball e){}public override void OnCollisionEnter2D(Snowball e, Collision2D collision){if (collision.gameObject.tag == "bullet"){hp--;}}}//monster被攻击状态;public class SnowballState : State<Snowball>{public float explodeTime = 0;Vector3 s;public int hp = 0;public override void Enter(Snowball e){//取得图片精灵e.gameObject.GetComponent<SpriteRenderer>().sprite = e.snowball3;e.gameObject.GetComponent<Animator>().SetTrigger("snowball3");e.gameObject.layer = LayerMask.NameToLayer("monster");hp = 3;}public override void Update(Snowball e){print(hp);if (hp <= 0){e.stateMachine.ChangeState(new SnowballStateA());hp = 0;return;}explodeTime += Time.deltaTime;print(explodeTime);//经过多少时    if (explodeTime > 4 && hp > 0){explodeTime = 0;hp = 0;s = e.gameObject.transform.position;GameObject g = Instantiate(e.monster);g.transform.position = s;Destroy(e.gameObject);return;}}public override void OnCollisionEnter2D(Snowball e, Collision2D collision){if (collision.gameObject.tag == "bullet"){hp--;}}}void Start(){stateMachine.Init(this, new SnowballState());}// Update is called once per framevoid Update(){}public void FixedUpdate(){stateMachine.Update();}public void OnCollisionEnter2D(Collision2D collision){stateMachine.OnCollisionEnter2D(this, collision);}public void OnCollisionStay2D(Collision2D collision){stateMachine.OnCollisionStay2D(this, collision);}public void Destory(){Instantiate(balldestory);Destroy(this.gameObject);}}
创建道具
1.添加道具预制体.
2.雪球撞到敌人时敌人死亡,在敌人死亡的地方随机生成一种道具。
3.主角吃到道具增加属性或者加分。
过关判定
- 判断场景中没有敌人并且没有雪球并且没有道具就过关了。


 --- salt-httpapi)


![MASA MAUI Plugin (六)集成个推,实现本地消息推送[Android] 篇](http://pic.xiahunao.cn/MASA MAUI Plugin (六)集成个推,实现本地消息推送[Android] 篇)

)

