服务介绍
×××直译就是虚拟专用通道,是提供给企业之间或者个人与公司之间安全数据传输的隧道,Open×××无疑是Linux下开源×××的先锋,提供了良好的性能和友好的用户GUI。它大量使用了OpenSSL加密库中的SSLv3/TLSv1协议函数库。
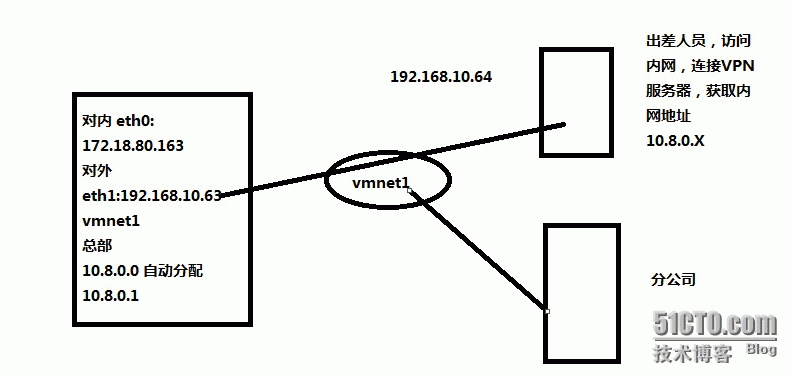
实验拓扑图
实验环境
xuegod 63 br0 IP :172.18.80.163 eth1:192.168.10.63 (vmnet1) DG:192.168.10.64
备注使用vmnet1 模拟公网
xuegod 64 eth1:192.168.10.64 DG:192.168.10.63 (vmnet1)
xuegod63 网络信息查看
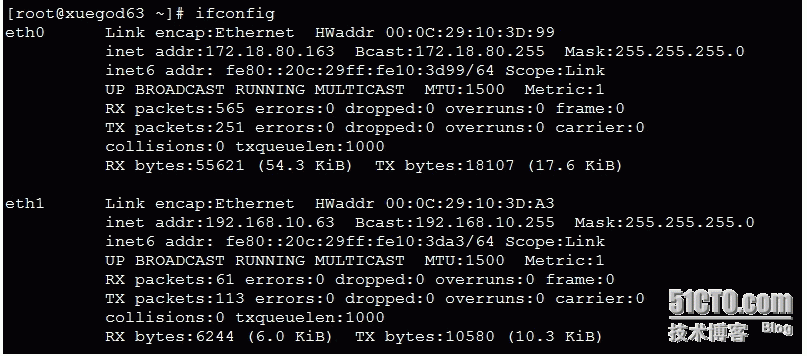
[root@xuegod63 桌面]# route -n
Kernel IP routing table
Destination Gateway Genmask Flags Metric Ref Use Iface
172.18.80.0 0.0.0.0 255.255.255.0 U 1 0 0 eth0
192.168.10.0 0.0.0.0 255.255.255.0 U 1 0 0 eth1
0.0.0.0 192.168.10.64 0.0.0.0 UG 0 0 0 eth1
xueggod 64网络信息查看

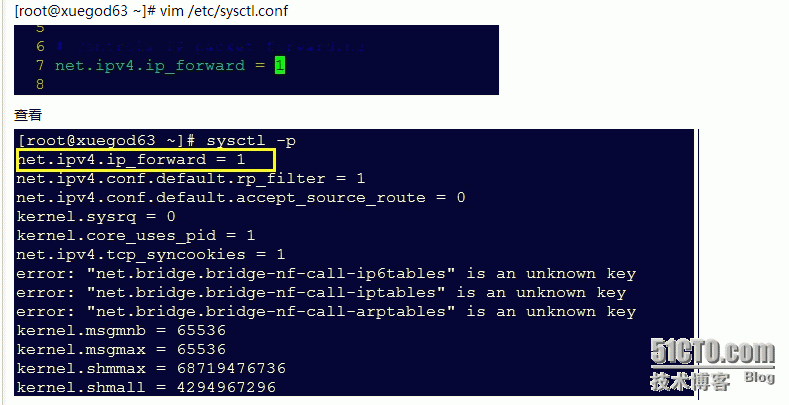
Xuegod63上面开启路由转发功能
[root@xuegod63 ~]# vim /etc/sysctl.conf
安装*** 前的准备工作
[root@xuegod63 ~]# yum install openssl openssl-devel gcc -y
[root@xuegod64 ~]# yum install openssl openssl-devel gcc -y
配置xuegod 63为open***服务器
上传需要的软件包 lzo-2.03.tar.gz open***-2.2.2.tar.gz
安装软件 lzo-2.03.tar.gz
[root@xuegod63 lzo-2.03]# tar zxvf lzo-2.03.tar.gz ; cd /root/open***/lzo-2.03
[root@xuegod63 lzo-2.03]# ./configure --prefix=/usr/ && make -j 4 && make install

建立CA中心
[root@xuegod63 2.0]# pwd
/root/open***/open***-2.2.2/easy-rsa/2.0
 配置CA中心的相关变量
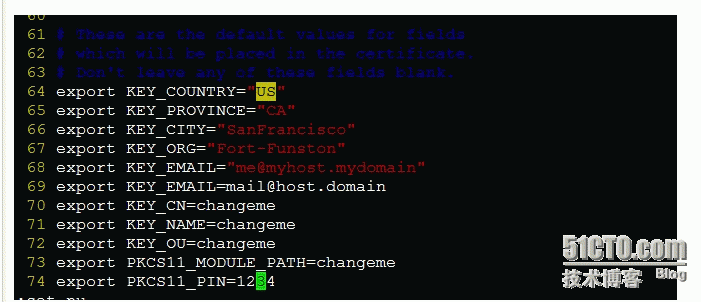
改
64 export KEY_COUNTRY="US"
65 export KEY_PROVINCE="CA"
66 export KEY_CITY="SanFrancisco"
67 export KEY_ORG="Fort-Funston"
68 export KEY_EMAIL="me@myhost.mydomain"
69 export KEY_EMAIL=mail@host.domain
70 export KEY_CN=changeme
71 export KEY_NAME=changeme
72 export KEY_OU=changeme
73 export PKCS11_MODULE_PATH=changeme
74 export PKCS11_PIN=1234
为
export KEY_COUNTRY="CN"
65 export KEY_PROVINCE="CA"
66 export KEY_CITY="beijing"
67 export KEY_ORG="xuegod"
68 export KEY_EMAIL="me@myhost.mydomain"
69 export KEY_EMAIL=mail@host.domain
70 export KEY_CN=changeme
71 export KEY_NAME=changeme
72 export KEY_OU=IT
73 export PKCS11_MODULE_PATH=changeme
74 export PKCS11_PIN=1234

[root@xuegod63 2.0]# ls keys/
index.txt serial
[root@xuegod63 keys]# cat serial CA认证签名的次数
01
[root@xuegod63 keys]# cat index.txt 签名过的用户
配置CA中心
[root@xuegod63 2.0]# ./build-ca 一路回车
[root@xuegod63 2.0]# ./build-ca
Generating a 1024 bit RSA private key
.++++++
...........++++++
writing new private key to 'ca.key'
-----
You are about to be asked to enter information that will be incorporated
into your certificate request.
What you are about to enter is what is called a Distinguished Name or a DN.
There are quite a few fields but you can leave some blank
For some fields there will be a default value,
If you enter '.', the field will be left blank.
-----
Country Name (2 letter code) [CN]:
State or Province Name (full name) [CA]:
Locality Name (eg, city) [beijing]:
Organization Name (eg, company) [xuegod]:
Organizational Unit Name (eg, section) [IT]:
Common Name (eg, your name or your server's hostname) [changeme]:xuegod63.cn
Name [changeme]:bob
Email Address [mail@host.domain]:bob@xuegod.com
[root@xuegod63 2.0]# ls keys/
ca.crt # 根证书 ca.key #私钥 index.txt serial
颁发证书
颁发证书给*** server
[root@xuegod63 2.0]# ./build-key-server server 颁发证书给server 一路回车

查看***生成的相关配置文件
[root@xuegod63 2.0]# ll keys/server.*
-rw-r--r-- 1 root root 3993 11月 12 02:20 keys/server.crt 服务器的证书
-rw-r--r-- 1 root root 712 11月 12 02:19 keys/server.csr 服务器的证书请求文件
-rw------- 1 root root 912 11月 12 02:19 keys/server.key 服务器的私钥
查看序列号和已经颁发的证书文件
[root@xuegod63 2.0]# cat keys/serial
02
[root@xuegod63 2.0]# cat keys/index.txt
V251108181933Z01unknown/C=CN/ST=beijing/L=beijing/O=xuegod/OU=IT/CN=server/name=changeme/emailAddress=mail@host.domain
颁发证书给客户端
[root@xuegod63 2.0]# ./build-key yonghu
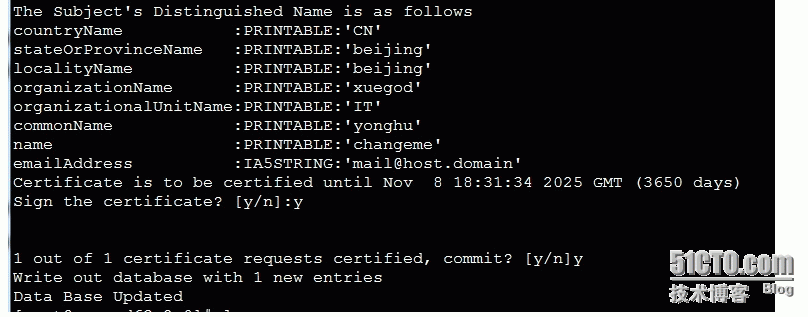
查看证书
[root@xuegod63 2.0]# ll keys/yonghu.*
-rw-r--r-- 1 root root 3871 11月 12 02:31 keys/yonghu.crt #客户端证书
-rw-r--r-- 1 root root 712 11月 12 02:31 keys/yonghu.csr #客户端证请求文件
-rw------- 1 root root 916 11月 12 02:31 keys/yonghu.key #客户端证 私钥
查看序列号和CA颁发的证书文件
[root@xuegod63 2.0]# cat keys/serial
03
[root@xuegod63 2.0]# cat keys/index.txt
V251108181933Z01unknown/C=CN/ST=beijing/L=beijing/O=xuegod/OU=IT/CN=server/name=changeme/emailAddress=mail@host.domain
V251108183134Z02unknown/C=CN/ST=beijing/L=beijing/O=xuegod/OU=IT/CN=yonghu/name=changeme/emailAddress=mail@host.domain
CA认证确认身份后,客户端和服务端需要协商一份对称秘钥,来加密数据
建立秘钥(迪菲尔曼)
[root@xuegod63 2.0]# ./build-dh
Generating DH parameters, 1024 bit long safe prime, generator 2
This is going to take a long time
........................................................................................+.....+..........................................+.............+............................................................................++*++*++*
[root@xuegod63 2.0]# ls keys/dh1024.pem
keys/dh1024.pem
[root@xuegod63 2.0]# cat keys/dh1024.pem
-----BEGIN DH PARAMETERS-----
MIGHAoGBAO+CR/g6dn05dNCsHTNMtaDoBXZJbs926pl2jKHpu2aMypLxsCRpKxDW
/imTYkftEGGzeqhOMigWgddgJhp3Cq1F+BWtgsm7bqFiPKa6x0M/ju0qZbePz8Jg
pC5aYNBh1ebuvj5co+gs2BjDmN1D050A652uNDHRVmso/XZe8MULAgEC
-----END DH PARAMETERS-----
备注以后若要添加客户端,使用CA重复给客户端颁发证书,以及生成对应的私钥使用下面的步骤
./build-key XXXX
./build-dh
配置×××服务器
cp sample-config-files/server.conf /etc/server.conf
ca的路径
[root@xuegod63 keys]# pwd
/root/open***/open***-2.2.2/easy-rsa/2.0/keys

需要修改的内容
;proto tcp
36 proto udp
改为
;proto tcp
proto tcp
78 ca ca.crt
ca /root/open***/open***-2.2.2/easy-rsa/2.0/keys/ca.crt ##ca中心的根证书
79 cert server.crt
cert /root/open***/open***-2.2.2/easy-rsa/2.0/keys/server.crt ##open***服务器的证书
80 key server.key # This file should be kept secret
key /root/open***/open***-2.2.2/easy-rsa/2.0/keys/server.key ##open***服务器的秘钥
87 dh1024.pem
dh /root/open***/open***-2.2.2/easy-rsa/2.0/keys/dh1024.pem
295 verb 3
verb 4
138行后追加1条路由
;push "route 192.168.10.0 255.255.255.0"
;push "route 192.168.20.0 255.255.255.0"
push "route 172.18.80.0 255.255.255.0"
启动open***
[root@xuegod63 ~]# /usr/local/sbin/open*** --config /etc/server.conf --daemon(表示在后台启动)
Thu Nov 12 05:33:58 2015 Initialization Sequence Completed
查看是否启动成功
[root@xuegod63 keys]# netstat -anutp | grep 1194
tcp 0 0 0.0.0.0:1194 0.0.0.0:* LISTEN 24646/open***
[root@xuegod63 keys]# ifconfig 多出一个网卡
tun0 Link encap:UNSPEC HWaddr 00-00-00-00-00-00-00-00-00-00-00-00-00-00-00-00
inet addr:10.8.0.1 P-t-P:10.8.0.2 Mask:255.255.255.255
UP POINTOPOINT RUNNING NOARP MULTICAST MTU:1500 Metric:1
RX packets:0 errors:0 dropped:0 overruns:0 frame:0
TX packets:0 errors:0 dropped:0 overruns:0 carrier:0
collisions:0 txqueuelen:100
RX bytes:0 (0.0 b) TX bytes:0 (0.0 b)
配置***客户端
安装lzo-2.03.tar.gz
[root@xuegod63 open***]# scp lzo-2.03.tar.gz open***-2.2.2.tar.gz 192.168.10.64:/root/
[root@xuegod64 lzo-2.03]# tar zxvf lzo-2.03.tar.gz
[root@xuegod64 lzo-2.03]# cd lzo-2.03
[root@xuegod64 lzo-2.03]# ./configure --prefix=/usr/ && make -j 4 && make install
[root@xuegod64 lzo-2.03]# echo $?
0
安装 open***
[root@xuegod64 open***-2.2.2]# tar zxvf open***-2.2.2.tar.gz
[root@xuegod64 open***-2.2.2]# cd open***-2.2.2
[root@xuegod64 open***-2.2.2]# ./configure --with-lzo-lib=/usr/ && make -j 4 && make install
[root@xuegod64 open***-2.2.2]# echo $?
0
把之前生成的证书颁发给客户端
[root@xuegod64 ~]# mkdir /etc/open*** 新建目录用于存放证书
拷贝证书

拷贝文件
[root@xuegod64 ~]# cp /root/open***-2.2.2/sample-config-files/client.conf /etc/open***/
编辑文件
[root@xuegod64 ~]# vim /etc/open***/client.conf
37行
;proto tcp
proto udp
proto tcp
remote my-server-1 1194
;remote my-server-2 1194
remote 192.168.10.63 1194
ca ca.crt
ca /etc/open***/ca.crt
cert client.crt
cert /etc/open***/yonghu.crt
key client.key
key /etc/open***/yonghu.key
启动客户端
[root@xuegod64 ~]# /usr/local/sbin/open*** --config /etc/open***/client.conf --daemon
查看启动情况
[root@xuegod64 open***]# ifconfig tun0
tun0 Link encap:UNSPEC HWaddr 00-00-00-00-00-00-00-00-00-00-00-00-00-00-00-00
inet addr:10.8.0.6 P-t-P:10.8.0.5 Mask:255.255.255.255
UP POINTOPOINT RUNNING NOARP MULTICAST MTU:1500 Metric:1
RX packets:0 errors:0 dropped:0 overruns:0 frame:0
TX packets:0 errors:0 dropped:0 overruns:0 carrier:0
collisions:0 txqueuelen:100
RX bytes:0 (0.0 b) TX bytes:0 (0.0 b)
 测试通信
测试通信
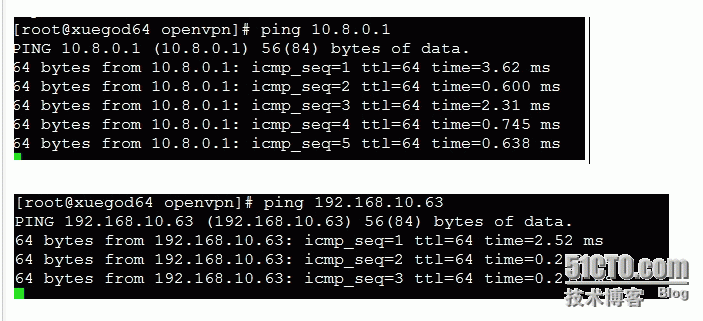
open×××搭建完成
场景模拟:在xuegod63上开启一台ftp服务器只允许内网用户和分公司的用户访问,可以先登录***,在访问192.168.10.63 或10.8.0.1
配置xuegod63为ftp 服务器
[root@xuegod63 keys]# rpm -ivh /mnt/Packages/vsftpd-2.2.2-11.el6_4.1.x86_64.rpm
[root@xuegod63 keys]# /etc/init.d/vsftpd restart
关闭 vsftpd: [失败]
为 vsftpd 启动 vsftpd: [确定]
xuegod 64 上进行测试
[root@xuegod64 open***]# rpm -ivh /mnt/Packages/lftp-4.0.9-1.el6.x86_64.rpm

测试2
[root@xuegod63 ~]# echo "zhe shi wod *** " > /var/www/html/index.html
[root@xuegod63 ~]# cd /var/www/html/
[root@xuegod63 html]# ls
index.html
[root@xuegod63 html]# cat index.html
zhe shi wod ***
[root@xuegod63 html]# /etc/init.d/httpd restart
停止 httpd: [失败]
正在启动 httpd: [确定]
[root@xuegod64 ~]# curl 10.8.0.1
zhe shi wod ***
在xuegod63上开启防火墙只允许 10.8.0.0/24 的20和21端口访问
[root@xuegod63 keys]# /etc/init.d/iptables restart
[root@xuegod63 keys]# iptables -t filter -A INPUT -s 10.8.8.0/24 -p tcp --dport 20 -j ACCEPT
[root@xuegod63 keys]# iptables -t filter -A INPUT -s 10.8.8.0/24 -p tcp --dport 21 -j ACCEPT
[root@xuegod63 keys]# /etc/init.d/iptables save
[root@xuegod63 keys]# iptables -nL --line-number
Chain INPUT (policy ACCEPT)
num target prot opt source destination
1 ACCEPT tcp -- 10.8.8.0/24 0.0.0.0/0 tcp dpt:20
2 ACCEPT tcp -- 10.8.8.0/24 0.0.0.0/0 tcp dpt:21
转载于:https://blog.51cto.com/sdsca/1713922


)

 -系统数据库)

)


