1.实例化spring容器 和 从容器获取Bean对象
实例化Spring容器常用的两种方式:
方法一:
在类路径下寻找配置文件来实例化容器 [推荐使用]
ApplicationContext ctx = new ClassPathXmlApplicationContext(new String[]{"beans.xml"});
方法二:
在文件系统路径下寻找配置文件来实例化容器 [这种方式可以在开发阶段使用]
ApplicationContext ctx = new FileSystemXmlApplicationContext(new String[]{“d:\\beans.xml“});
Spring的配置文件可以指定多个,可以通过String数组传入。
当spring容器启动后,因为spring容器可以管理bean对象的创建,销毁等生命周期,
所以我们只需从容器直接获取Bean对象就行,而不用编写一句代码来创建bean对象。
从容器获取bean对象的代码如下:
ApplicationContext ctx = new ClassPathXmlApplicationContext(“beans.xml”);
OrderService service = (OrderService)ctx.getBean("personService");
2.Spring实例化Bean的三种方式
以下是三种方式的例子:
1.使用类构造器实例化  [默认的类构造器]
<bean id=“orderService" class="cn.itcast.OrderServiceBean"/>2.使用静态工厂方法实例化
<bean id="personService" class="cn.itcast.service.OrderFactory" factory-method="createOrder"/>
public class OrderFactory {public static OrderServiceBean createOrder(){   // 注意这里的这个方法是 static 的!return new OrderServiceBean();}
}3.使用实例工厂方法实例化:
<bean id="personServiceFactory" class="cn.itcast.service.OrderFactory"/>
<bean id="personService" factory-bean="personServiceFactory" factory-method="createOrder"/>
public class OrderFactory {public OrderServiceBean createOrder(){return new OrderServiceBean();}
}
3.Bean的生命周期 (Bean的作用域)
bean的scope 属性
The scope of this bean: typically "singleton" (one shared instance, which will be returned by all calls
to getBean with the given id), or "prototype" (independent instance resulting from each call to
getBean). Default is "singleton". Singletons are most commonly used, and are ideal for multi-
threaded service objects. Further scopes, such as "request" or "session", might be supported by
extended bean factories (e.g. in a web environment). Note: This attribute will not be inherited by
child bean definitions. Hence, it needs to be specified per concrete bean definition. Inner bean
definitions inherit the singleton status of their containing bean definition, unless explicitly specified:
The inner bean will be a singleton if the containing bean is a singleton, and a prototype if the
containing bean has any other scope.
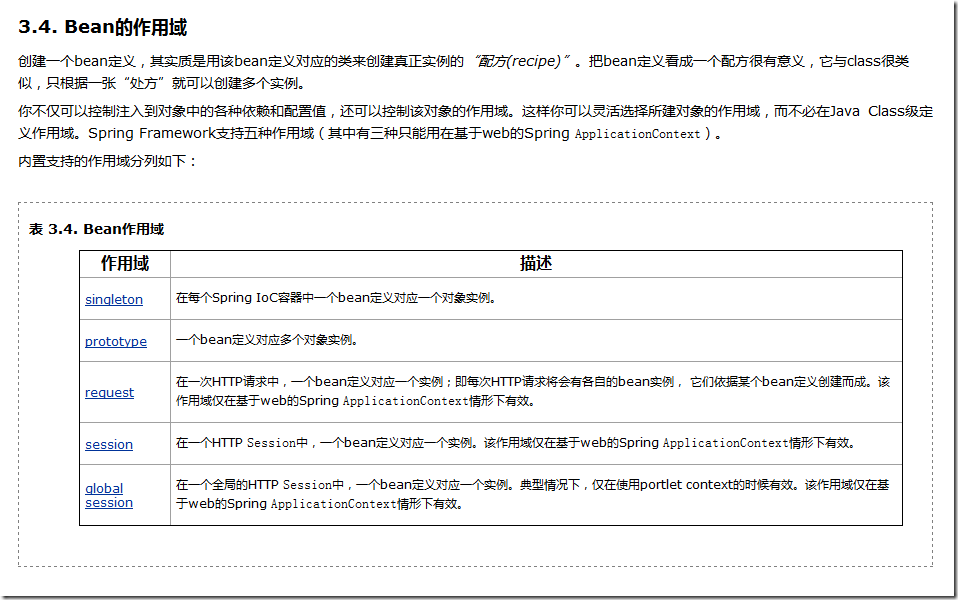
.singleton [单例]
eg:<bean id="personService" class="com.yinger.service.impl.PersonServiceBean" scope="singleton"></bean>
在每个Spring IoC容器中一个bean定义只有一个对象实例。
请注意Spring的singleton bean概念与“四人帮”(GoF)模式一书中定义的Singleton模式是完全不同的。
经典的GoF Singleton模式中所谓的对象范围是指在每一个ClassLoader中指定class创建的实例有且仅有一个。
把Spring的singleton作用域描述成一个container对应一个bean实例最为贴切。亦即,假如在单个Spring容器内定义了某个指定class的bean,
那么Spring容器将会创建一个且仅有一个由该bean定义指定的类实例。
默认情况下会在容器启动时初始化bean,但我们可以指定Bean节点的lazy-init=“true”来延迟初始化bean,这时候,只有第一次获取bean会才初始化bean。
如:<bean id="xxx" class="cn.itcast.OrderServiceBean" lazy-init="true"/>
如果想对所有bean都应用延迟初始化,可以在根节点beans设置default-lazy-init=“true“,如下:
<beans default-lazy-init="true“ ...>
.prototype [原型]
每次从容器获取bean都是新的对象。
对于prototype作用域的bean,有一点非常重要,那就是Spring不能对一个prototype bean的整个生命周期负责:容器在初始化、配置、装饰或者是
装配完一个prototype实例后,将它交给客户端,随后就对该prototype实例不闻不问了。不管何种作用域,容器都会调用所有对象的初始化生命周期回调方法。
但对prototype而言,任何配置好的析构生命周期回调方法都将不会被调用。清除prototype作用域的对象并释放任何prototype bean所持有的昂贵资源,
都是客户端代码的职责。(让Spring容器释放被prototype作用域bean占用资源的一种可行方式是,通过使用bean的后置处理器,该处理器持有要被清除的bean的引用。)
以下的三种scope只是在web应用中才可以使用
.request
.session
.global session
使用这三种配置之前要先初始化Web配置
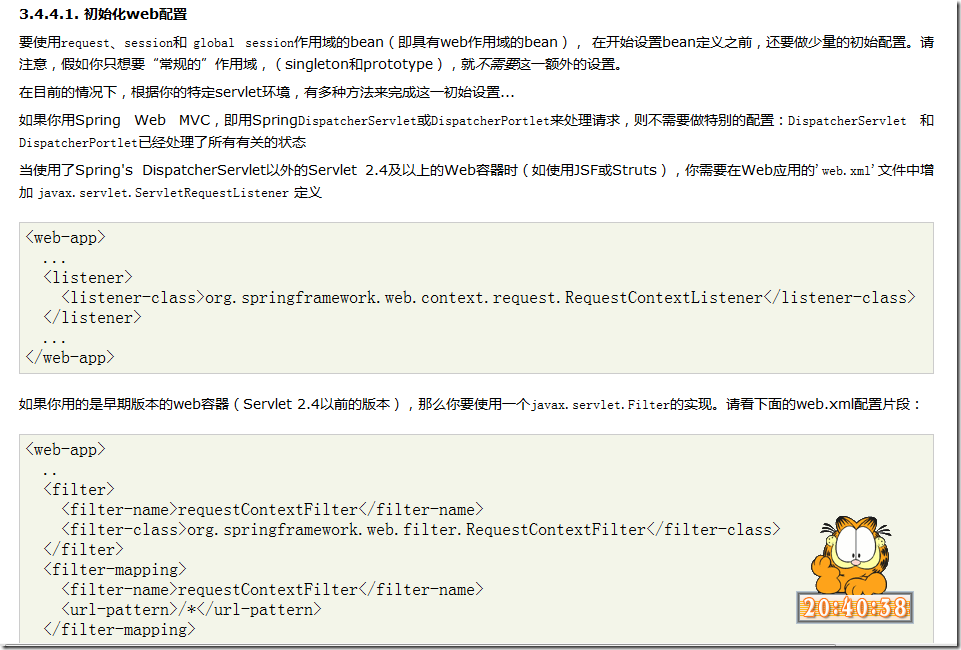
RequestContextListener和RequestContextFilter两个类做的都是同样的工作: 将HTTP request对象绑定到为该请求提供服务的Thread。
这使得具有request和session作用域的bean能够在后面的调用链中被访问到。
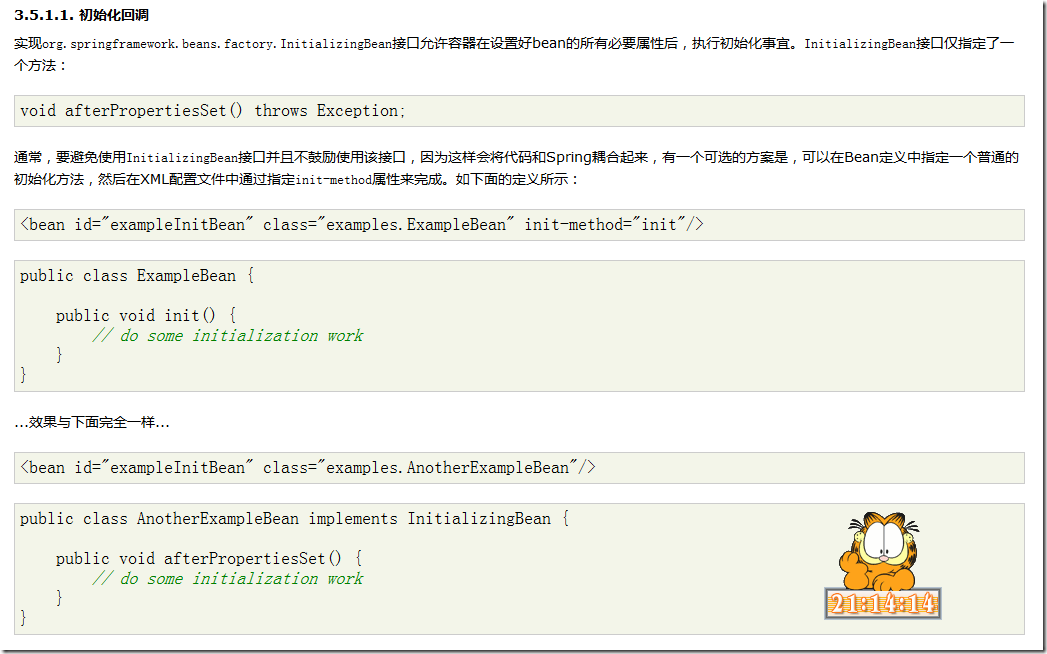
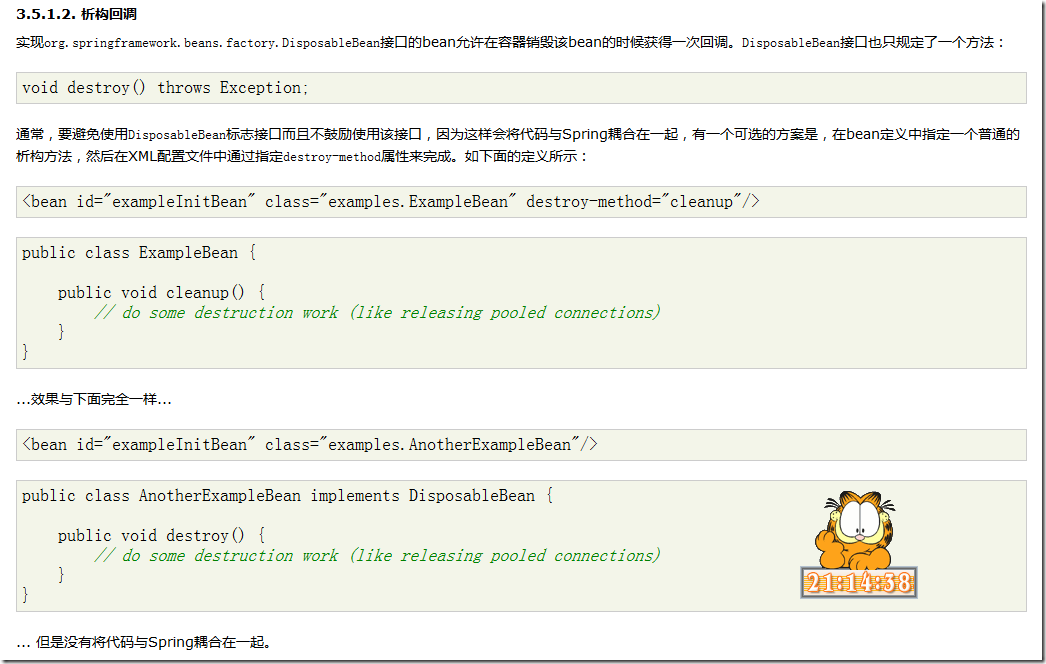
指定Bean的初始化方法和销毁方法
<bean id="xxx" class="cn.itcast.OrderServiceBean" init-method="init" destroy-method="close"/>
Spring提供了几个标志接口(marker interface),这些接口用来改变容器中bean的行为;它们包括InitializingBean和DisposableBean。
现这两个接口的bean在初始化和析构时容器会调用前者的afterPropertiesSet()方法,以及后者的destroy()方法。
Spring在内部使用BeanPostProcessor实现来处理它能找到的任何标志接口并调用相应的方法。
如果你需要自定义特性或者生命周期行为,你可以实现自己的 BeanPostProcessor。
初始化回调和析构回调:
测试:
bean对象:
package com.yinger.service.impl;public class PersonServiceBean implements com.yinger.service.PersonService{//构造器public PersonServiceBean(){System.out.println("instance me");}//save方法public void save() {System.out.println("save");}//初始化方法,这个方法是类被实例化了之后就会执行的!public void init(){System.out.println("init");}//销毁方法public void destroy(){System.out.println("destroy");}}
JUnit Test:
package com.yinger.test;import org.junit.BeforeClass;
import org.junit.Test;
import org.springframework.context.support.AbstractApplicationContext;
import org.springframework.context.support.ClassPathXmlApplicationContext;import com.yinger.service.PersonService;public class SpringTest {@BeforeClasspublic static void setUpBeforeClass() throws Exception {}@Test  //创建的单元测试public void testSave() {AbstractApplicationContext ctx = new ClassPathXmlApplicationContext("beans.xml");System.out.println("--------");PersonService ps = (PersonService)ctx.getBean("personService");ps.save();ctx.close(); //有了这一句才会有destroy方法的调用}}
beans.xml 设置:
如果lazy-init(默认是default,也就是false)没有设置,或者设置为default或者false
<bean id="personService" class="com.yinger.service.impl.PersonServiceBean"scope="singleton" init-method="init" destroy-method="destroy"lazy-init="false"></bean>那么结果是:
log4j:WARN No appenders could be found for logger (org.springframework.context.support.ClassPathXmlApplicationContext).
log4j:WARN Please initialize the log4j system properly.
instance me
init
--------
save
destroy
反之,如果设置为true,结果是:
log4j:WARN No appenders could be found for logger (org.springframework.context.support.ClassPathXmlApplicationContext).
log4j:WARN Please initialize the log4j system properly.
--------
instance me
init
save
destroy
修改测试代码:
    @Testpublic void testSave() {AbstractApplicationContext ctx = new ClassPathXmlApplicationContext("beans.xml");
//        System.out.println("--------");PersonService ps = (PersonService)ctx.getBean("personService");PersonService ps1 = (PersonService)ctx.getBean("personService");System.out.println(ps==ps1);
//        ps.save();ctx.close();}
重新测试:
log4j:WARN No appenders could be found for logger (org.springframework.context.support.ClassPathXmlApplicationContext).
log4j:WARN Please initialize the log4j system properly.
instance me
init
true
destroy
[在scope为singleton时,每次使用getBean得到的都是同一个bean,同一个对象]
修改bean中的scope属性:scope="prototype"
测试结果:
log4j:WARN No appenders could be found for logger (org.springframework.context.support.ClassPathXmlApplicationContext).
log4j:WARN Please initialize the log4j system properly.
instance me
init
instance me
init
false
[在scope为prototype时,每次得到的bean对象都是不同的,从上面可以看出实例化了两个对象,最终的比较是false]
4.依赖注入
来自Spring参考文档:依赖注入(DI)背后的基本原理是对象之间的依赖关系(即一起工作的其它对象)只会通过以下几种方式来实现:构造器的参数、工厂方法的参数,
或给由构造函数或者工厂方法创建的对象设置属性。因此,容器的工作就是创建bean时注入那些依赖关系。
相对于由bean自己来控制其实例化、直接在构造器中指定依赖关系或者类似服务定位器(Service Locator)模式这3种自主控制依赖关系注入的方法来说,
控制从根本上发生了倒转,这也正是控制反转(Inversion of Control, IoC) 名字的由来。
(1)基本类型的注入:
基本类型对象注入:
<bean id="orderService" class="cn.itcast.service.OrderServiceBean"><constructor-arg index=“0” type=“java.lang.String” value=“xxx”/>//构造器注入<property name=“name” value=“zhao/>//属性setter方法注入
</bean>注入其他bean:
方式一
<bean id="orderDao" class="cn.itcast.service.OrderDaoBean"/>
<bean id="orderService" class="cn.itcast.service.OrderServiceBean"><property name="orderDao" ref="orderDao"/>
</bean>方式二(使用内部bean,但该bean不能被其他bean使用)
<bean id="orderService" class="cn.itcast.service.OrderServiceBean"><property name="orderDao"><bean class="cn.itcast.service.OrderDaoBean"/></property>
</bean>
测试 构造器和setter 方式注入:
新建一个DAO的接口:
package com.yinger.dao;public interface PersonDao {public void save();}
新建一个接口的实现类:
package com.yinger.dao.impl;import com.yinger.dao.PersonDao;public class PersonDaoBean implements PersonDao{public void save() {System.out.println("PersonDaoBean.save()");}}
修改原有的PersonServiceBean,添加两个字段:
package com.yinger.service.impl;import com.yinger.dao.PersonDao;
import com.yinger.service.PersonService;public class PersonServiceBean implements PersonService{private PersonDao pDao;//这样设计就实现了业务层和数据层的彻底解耦private String name;//默认的构造器public PersonServiceBean(){System.out.println("instance me");}//带参数的构造器public PersonServiceBean(PersonDao pDao){this.pDao=pDao;}//带参数的构造器public PersonServiceBean(PersonDao pDao,String name){this.pDao=pDao;this.name=name;}//save方法public void save() {
//        System.out.println("save");pDao.save();System.out.println(this.getName());}//初始化方法,这个方法是类被实例化了之后就会执行的!public void init(){System.out.println("init");}//销毁方法public void destroy(){System.out.println("destroy");}public String getName() {return name;}public void setName(String name) {this.name = name;}}
修改beans.xml:
<bean id="personService" class="com.yinger.service.impl.PersonServiceBean"><constructor-arg index="0"><bean id="pDao" class="com.yinger.dao.impl.PersonDaoBean"></bean></constructor-arg><constructor-arg index="1" type="java.lang.String" value="name" /></bean>
新增一个测试方法:
@Testpublic void testInjection() {AbstractApplicationContext ctx = new ClassPathXmlApplicationContext("beans.xml");System.out.println("--------");PersonService ps = (PersonService)ctx.getBean("personService");ps.save();ctx.close();}
测试结果:
log4j:WARN No appenders could be found for logger (org.springframework.context.support.ClassPathXmlApplicationContext).
log4j:WARN Please initialize the log4j system properly.
--------
PersonDaoBean.save()
name
如果在beans.xml中再添加一句:
<property name="name" value="name2"></property>
重新测试,结果是:
log4j:WARN No appenders could be found for logger (org.springframework.context.support.ClassPathXmlApplicationContext).
log4j:WARN Please initialize the log4j system properly.
--------
PersonDaoBean.save()
name2
(2)集合类型的注入:
集合类型的装配:
public class OrderServiceBean {private Set<String> sets = new HashSet<String>();private List<String> lists = new ArrayList<String>();private Properties properties = new Properties();private Map<String, String> maps = new HashMap<String, String>();....//这里省略属性的getter和setter方法
}
XML配置:
<bean id="order" class="cn.itcast.service.OrderServiceBean"><property name="lists"><list><value>lihuoming</value></list></property>        <property name="sets"><set><value>set</value></set></property>        <property name="maps"><map><entry key="lihuoming" value="28"/></map></property>        <property name="properties"><props><prop key="12">sss</prop></props></property>
</bean>
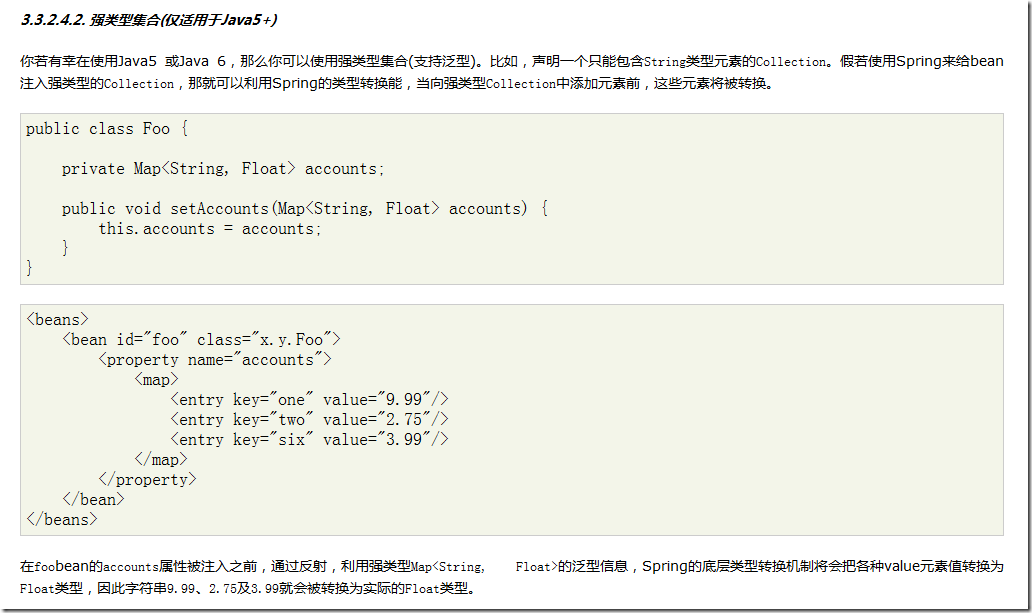
补充:Spring对泛型的支持
(3)三种依赖注入的方式 和 两种装配方式:
①使用构造器注入
②使用属性setter方法注入:
通过调用无参构造器或无参static工厂方法实例化bean之后,调用该bean的setter方法,即可实现基于setter的DI。
Spring开发团队提倡使用setter注入。而且setter DI在以后的某个时候还可将实例重新配置(或重新注入)
③使用Field注入(用于注解方式)
处理bean依赖关系通常按以下步骤进行:
-
根据定义bean的配置(文件)创建并初始化
BeanFactory实例(大部份的Spring用户使用支持XML格式配置文件的BeanFactory或ApplicationContext实现)。 -
每个bean的依赖将以属性、构造器参数、或静态工厂方法参数的形式出现。当这些bean被实际创建时,这些依赖也将会提供给该bean。
-
每个属性或构造器参数既可以是一个实际的值,也可以是对该容器中另一个bean的引用。
-
每个指定的属性或构造器参数值必须能够被转换成特定的格式或构造参数所需的类型。默认情况下,Spring会以String类型提供值转换成各种内置类型,
比如int、long、String、boolean等。
在<constructor-arg/>或<property/>元素内部还可以使用ref元素。该元素用来将bean中指定属性的值设置为对容器中的另外一个bean的引用。
注意:内部bean中的scope标记及id或name属性将被忽略。内部bean总是匿名的且它们总是prototype模式的。同时将内部bean注入到包含该内部bean之外的bean是不可能的。
注入依赖对象可以采用手工装配或自动装配,在实际应用中建议使用手工装配,因为自动装配会产生未知情况,开发人员无法预见最终的装配结果。
1.手工装配依赖对象
2.自动装配依赖对象
<1>手工装配
手工装配依赖对象,在这种方式中又有两种编程方式
1. 在xml配置文件中,通过在bean节点下配置,如
<bean id="orderService" class="cn.itcast.service.OrderServiceBean"><constructor-arg index=“0” type=“java.lang.String” value=“xxx”/>//构造器注入<property name=“name” value=“zhao”/>//属性setter方法注入</bean>2. 在java代码中使用@Autowired或@Resource注解方式进行装配。但我们需要在xml配置文件中配置以下信息:
<beans xmlns="http://www.springframework.org/schema/beans"xmlns:xsi="http://www.w3.org/2001/XMLSchema-instance"xmlns:context="http://www.springframework.org/schema/context"//注意这里,要添加的,还有下面的两个红色部分xsi:schemaLocation="http://www.springframework.org/schema/beanshttp://www.springframework.org/schema/beans/spring-beans-2.5.xsdhttp://www.springframework.org/schema/contexthttp://www.springframework.org/schema/context/spring-context-2.5.xsd"><context:annotation-config/>
</beans>
这个配置隐式注册了多个对注释进行解析处理的处理器:AutowiredAnnotationBeanPostProcessor,
CommonAnnotationBeanPostProcessor,PersistenceAnnotationBeanPostProcessor,RequiredAnnotationBeanPostProcessor
注: @Resource注解在spring安装目录的lib\j2ee\common-annotations.jar
* 注解方式的讲解
在java代码中使用@Autowired或@Resource注解方式进行装配,这两个注解的区别是:@Autowired 默认按类型装配,@Resource默认按名称装配,当找不到与名称匹配的bean才会按类型装配。@Autowired private PersonDao personDao;//用于字段上@Autowiredpublic void setOrderDao(OrderDao orderDao) {//用于属性的setter方法上this.orderDao = orderDao;}
@Autowired注解是按类型装配依赖对象,默认情况下它要求依赖对象必须存在,如果允许null值,可以设置它required属性为false。如果我们想使用按名称装配,可以结合@Qualifier注解一起使用。如下:@Autowired @Qualifier("personDaoBean")private PersonDao personDao;注:@Autowired 注解可以使用在很多地方,包括了 集合类型,Map,来自ApplicationContext的特殊类型的所有 beans等等特殊的情况:多个构造器虽然当 一个类只有一个连接构造器时它将被标记为 required, 但是还是可以标记多个构造器的。在这种情况下,每一个构造器都有可能被认为是连接构造器, Spring 将会把依赖关系能够满足的构造器认为是greediest 的构造器 测试:@Autowired注解 [如果两个构造器都使用了该注解会报错!所以,在多个构造器的情况下,要多多考虑]新建一个PersonServiceBean2类:其中有三处使用了 @Autowired注解 ,只要其中一个位置包含了注解就行[测试时]package com.yinger.service.impl;import org.springframework.beans.factory.annotation.Autowired;import com.yinger.dao.PersonDao;
import com.yinger.service.PersonService;public class PersonServiceBean2 implements PersonService{//Autowired默认是按照类型来装配,这里是放在字段上@Autowired private PersonDao pDao;//这样设计就实现了业务层和数据层的彻底解耦//默认的构造器public PersonServiceBean2(){System.out.println("instance me");}//带参数的构造器@Autowired //放在构造方法上public PersonServiceBean2(PersonDao pDao){this.pDao=pDao;}//save方法public void save() {pDao.save();}//初始化方法,这个方法是类被实例化了之后就会执行的!public void init(){System.out.println("init");}//销毁方法public void destroy(){System.out.println("destroy");}public PersonDao getpDao() {return pDao;}@Autowired //放在属性的setter上public void setpDao(PersonDao pDao) {this.pDao = pDao;}} beans.xml: <context:annotation-config/><bean id="personService2" class="com.yinger.service.impl.PersonServiceBean2"></bean><bean id="personDao" class="com.yinger.dao.impl.PersonDaoBean"></bean>
测试方法:
@Test //用于测试依赖注入的方法public void testInjection() {AbstractApplicationContext ctx = new ClassPathXmlApplicationContext("beans.xml");System.out.println("--------");PersonService ps = (PersonService)ctx.getBean("personService2");ps.save();ctx.close();}
测试结果:
log4j:WARN No appenders could be found for logger (org.springframework.context.support.ClassPathXmlApplicationContext).
log4j:WARN Please initialize the log4j system properly.
--------
PersonDaoBean.save()
从结果中可以看出,PersonDao是注入进去了!
[还有一个要注意,按照类型查找,并不是类型一定要完全吻合,可以是属性(字段,方法参数)的实现类(如果以上的是接口),上面的实例就是一个例子]
@Resource注解和@Autowired一样,也可以标注在字段或属性的setter方法上,但它默认按名称装配。名称可以通过@Resource的name属性指定,如果没有指定name属性,当注解标注在字段上,即默认取字段的名称作为bean名称寻找依赖对象,当注解标注在属性的setter方法上,即默认取属性名作为bean名称寻找依赖对象。 [推荐使用的方式]@Resource(name=“personDaoBean”)private PersonDao personDao;//用于字段上注意:如果没有指定name属性,并且按照默认的名称仍然找不到依赖对象时, @Resource注解会回退到按类型装配。但一旦指定了name属性,就只能按名称装配了。
测试: 测试时使用下面的一个注解就可以了
新建类PersonServiceBean3:
package com.yinger.service.impl;import javax.annotation.Resource;import com.yinger.dao.PersonDao;
import com.yinger.service.PersonService;public class PersonServiceBean3 implements PersonService{//Resource默认是按照名称来装配,这里是放在字段上@Resource private PersonDao pDao;//这样设计就实现了业务层和数据层的彻底解耦//默认的构造器public PersonServiceBean3(){System.out.println("instance me");}//带参数的构造器public PersonServiceBean3(PersonDao pDao){this.pDao=pDao;}//save方法public void save() {pDao.save();}//初始化方法,这个方法是类被实例化了之后就会执行的!public void init(){System.out.println("init");}//销毁方法public void destroy(){System.out.println("destroy");}public PersonDao getpDao() {return pDao;}@Resource //放在属性的setter上public void setpDao(PersonDao pDao) {this.pDao = pDao;}}
beans.xml中的配置:
<context:annotation-config/><bean id="personService3" class="com.yinger.service.impl.PersonServiceBean3"></bean><bean id="pDao" class="com.yinger.dao.impl.PersonDaoBean"></bean>
测试结果:
log4j:WARN No appenders could be found for logger (org.springframework.context.support.ClassPathXmlApplicationContext).
log4j:WARN Please initialize the log4j system properly.
instance me
--------
PersonDaoBean.save()
注:beans.xml中第二个bean的id也可以是其他的名称,例如personDao,同样是上面的结果,因为
如果没有指定name属性,并且按照默认的名称仍然找不到依赖对象时, @Resource注解会回退到按类型装配。
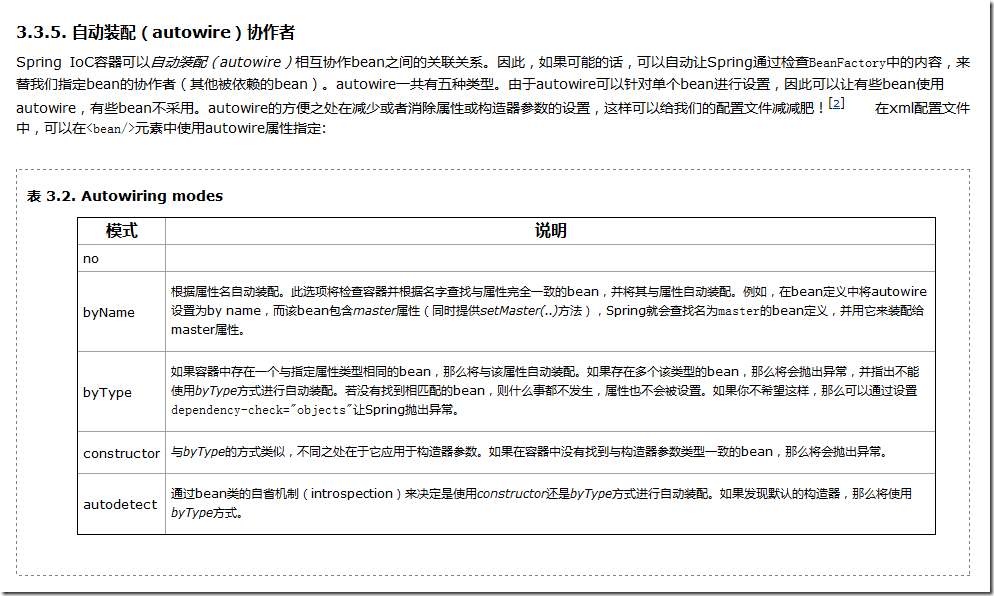
<2>自动装配:
对于自动装配,大家了解一下就可以了,实在不推荐大家使用。例子:
<bean id="..." class="..." autowire="byType"/>
autowire属性取值如下:
byType:按类型装配,可以根据属性的类型,在容器中寻找跟该类型匹配的bean。如果发现多个,那么将会抛出异常。如果没有找到,即属性值为null。
byName:按名称装配,可以根据属性的名称,在容器中寻找跟该属性名相同的bean,如果没有找到,即属性值为null。
constructor与byType的方式类似,不同之处在于它应用于构造器参数。如果在容器中没有找到与构造器参数类型一致的bean,那么将会抛出异常。
autodetect:通过bean类的自省机制(introspection)来决定是使用constructor还是byType方式进行自动装配。如果发现默认的构造器,那么将使用byType方式。
你也可以针对单个bean设置其是否为被自动装配对象。当采用XML格式配置bean时,<bean/>元素的 autowire-candidate属性可被设为false,这样容器在查找自动装配对象时将不考虑该bean。
5. 通过在classpath自动扫描方式把组件纳入spring容器中管理
前面的例子我们都是使用XML的bean定义来配置组件。在一个稍大的项目中,通常会有上百个组件,如果这些这组件采用xml的bean定义来配置,
显然会增加配置文件的体积,查找及维护起来也不太方便。spring2.5为我们引入了组件自动扫描机制,他可以在类路径底下寻找标注了@Component、
@Service、@Controller、@Repository注解的类,并把这些类纳入进spring容器中管理。
它的作用和在xml文件中使用bean节点配置组件是一样的。要使用自动扫描机制,我们需要打开以下配置信息:
<beans xmlns="http://www.springframework.org/schema/beans"xmlns:xsi="http://www.w3.org/2001/XMLSchema-instance"xmlns:context="http://www.springframework.org/schema/context"xsi:schemaLocation="http://www.springframework.org/schema/beanshttp://www.springframework.org/schema/beans/spring-beans-2.5.xsdhttp://www.springframework.org/schema/contexthttp://www.springframework.org/schema/context/spring-context-2.5.xsd"><context:component-scan base-package="cn.itcast"/>
</beans>
其中base-package为需要扫描的包(含子包)。
@Service用于标注业务层组件、 @Controller用于标注控制层组件(如struts中的action)、@Repository用于标注数据访问组件,即DAO组件。而@Component泛指组件,当组件不好归类的时候,我们可以使用这个注解进行标注。
测试:
在上面的例子中,添加如下内容:
@Service("personService3")
public class PersonServiceBean3 implements PersonService{
@Repository
public class PersonDaoBean implements PersonDao{
同时,在beans.xml中添加:
<context:component-scan base-package="com.yinger.dao.impl"></context:component-scan><context:component-scan base-package="com.yinger.service.impl"></context:component-scan>
测试方法不变,结果还是一样:
log4j:WARN No appenders could be found for logger (org.springframework.context.support.ClassPathXmlApplicationContext).
log4j:WARN Please initialize the log4j system properly.
instance me
--------
PersonDaoBean.save())


![[邻接表] 学习邻接表的表示方法+BFS](http://pic.xiahunao.cn/[邻接表] 学习邻接表的表示方法+BFS)
)


