大纲:
一、简介
二、Logstash
三、Redis
四、Elasticsearch
五、Kinaba
一、简介
1、核心组成
ELK由Elasticsearch、Logstash和Kibana三部分组件组成;
Elasticsearch是个开源分布式搜索引擎,它的特点有:分布式,零配置,自动发现,索引自动分片,索引副本机制,restful风格接口,多数据源,自动搜索负载等。
Logstash是一个完全开源的工具,它可以对你的日志进行收集、分析,并将其存储供以后使用
kibana 是一个开源和免费的工具,它可以为 Logstash 和 ElasticSearch 提供的日志分析友好的 Web 界面,可以帮助您汇总、分析和搜索重要数据日志。
2、四大组件
Logstash: logstash server端用来搜集日志;
Elasticsearch: 存储各类日志;
Kibana: web化接口用作查寻和可视化日志;
Logstash Forwarder: logstash client端用来通过lumberjack 网络协议发送日志到logstash server;
3、ELK工作流程
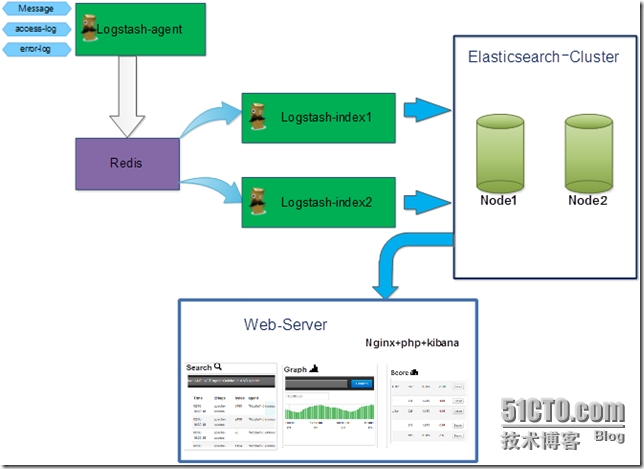
在需要收集日志的所有服务上部署logstash,作为logstash agent(logstash shipper)用于监控并过滤收集日志,将过滤后的内容发送到Redis,然后logstash indexer将日志收集在一起交给全文搜索服务ElasticSearch,可以用ElasticSearch进行自定义搜索通过Kibana 来结合自定义搜索进行页面展示。

4、ELK的帮助手册
ELK官网:https://www.elastic.co/
ELK官网文档:https://www.elastic.co/guide/index.html
ELK中文手册:http://kibana.logstash.es/content/elasticsearch/monitor/logging.html
注释
ELK有两种安装方式
(1)集成环境:Logstash有一个集成包,里面包括了其全套的三个组件;也就是安装一个集成包。
(2)独立环境:三个组件分别单独安装、运行、各司其职。(比较常用)
本实验也以第二种方式独立环境来进行演示;单机版主机地址为:192.168.1.104
二、Logstash
1、安装jdk
| 1 2 3 4 5 6 | Logstash的运行依赖于Java运行环境。# yum -y install java-1.8.0# java -versionopenjdk version "1.8.0_51"OpenJDK Runtime Environment (build 1.8.0_51-b16)OpenJDK 64-Bit Server VM (build 25.51-b03, mixed mode) |
2、安装logstash
| 1 2 3 4 5 6 | # wget https://download.elastic.co/logstash/logstash/logstash-1.5.4.tar.gz# tar zxf logstash-1.5.4.tar.gz -C /usr/local/配置logstash的环境变量# echo "export PATH=\$PATH:/usr/local/logstash-1.5.4/bin" > /etc/profile.d/logstash.sh# . /etc/profile |
3、logstash常用参数
| 1 2 | -e :指定logstash的配置信息,可以用于快速测试;-f :指定logstash的配置文件;可以用于生产环境; |
4、启动logstash
4.1 通过-e参数指定logstash的配置信息,用于快速测试,直接输出到屏幕。
| 1 2 3 4 5 | # logstash -e "input {stdin{}} output {stdout{}}" my name is zhengyansheng. //手动输入后回车,等待10秒后会有返回结果Logstash startup completed2015-10-08T13:55:50.660Z 0.0.0.0 my name is zhengyansheng.这种输出是直接原封不动的返回... |
4.2 通过-e参数指定logstash的配置信息,用于快速测试,以json格式输出到屏幕。
| 1 2 3 4 5 6 7 8 9 10 | # logstash -e 'input{stdin{}}output{stdout{codec=>rubydebug}}'my name is zhengyansheng. //手动输入后回车,等待10秒后会有返回结果Logstash startup completed{ "message" => "my name is zhengyansheng.", "@version" => "1", "@timestamp" => "2015-10-08T13:57:31.851Z", "host" => "0.0.0.0"}这种输出是以json格式的返回... |
5、logstash以配置文件方式启动
5.1 输出信息到屏幕
| 1 2 3 4 5 6 7 8 9 10 11 12 13 14 15 16 17 18 19 20 | # vim logstash-simple.conf input { stdin {} }output { stdout { codec=> rubydebug }}# logstash -f logstash-simple.conf //普通方式启动Logstash startup completed# logstash agent -f logstash-simple.conf --verbose //开启debug模式Pipeline started {:level=>:info}Logstash startup completedhello world. //手动输入hello world.{ "message" => "hello world.", "@version" => "1", "@timestamp" => "2015-10-08T14:01:43.724Z", "host" => "0.0.0.0"}效果同命令行配置参数一样... |
5.2 logstash输出信息存储到redis数据库中
刚才我们是将信息直接显示在屏幕上了,现在我们将logstash的输出信息保存到redis数据库中,如下
| 1 2 3 4 5 6 7 8 9 10 11 12 13 | 前提是本地(192.168.1.104)有redis数据库,那么下一步我们就是安装redis数据库.# cat logstash_to_redis.confinput { stdin { } }output { stdout { codec => rubydebug } redis { host => '192.168.1.104' data_type => 'list' key => 'logstash:redis' }}如果提示Failed to send event to Redis,表示连接Redis失败或者没有安装,请检查... |
6、 查看logstash的监听端口号
| 1 2 3 | # logstash agent -f logstash_to_redis.conf --verbose# netstat -tnlp |grep javatcp 0 0 :::9301 :::* LISTEN 1326/java |
三、Redis
1、安装Redis
| 1 2 3 4 5 6 7 8 9 10 11 12 13 14 15 16 17 18 19 20 21 22 23 24 25 26 27 28 29 30 31 32 33 34 35 36 | wget http://download.redis.io/releases/redis-2.8.19.tar.gzyum install tcl -ytar zxf redis-2.8.19.tar.gzcd redis-2.8.19make MALLOC=libcmake test //这一步时间会稍久点...make installcd utils/./install_server.sh //脚本执行后,所有选项都以默认参数为准即可Welcome to the redis service installerThis script will help you easily set up a running redis serverPlease select the redis port for this instance: [6379] Selecting default: 6379Please select the redis config file name [/etc/redis/6379.conf] Selected default - /etc/redis/6379.confPlease select the redis log file name [/var/log/redis_6379.log] Selected default - /var/log/redis_6379.logPlease select the data directory for this instance [/var/lib/redis/6379] Selected default - /var/lib/redis/6379Please select the redis executable path [/usr/local/bin/redis-server] Selected config:Port : 6379Config file : /etc/redis/6379.confLog file : /var/log/redis_6379.logData dir : /var/lib/redis/6379Executable : /usr/local/bin/redis-serverCli Executable : /usr/local/bin/redis-cliIs this ok? Then press ENTER to go on or Ctrl-C to abort.Copied /tmp/6379.conf => /etc/init.d/redis_6379Installing service...Successfully added to chkconfig!Successfully added to runlevels 345!Starting Redis server...Installation successful! |
2、查看redis的监控端口
| 1 2 3 4 | # netstat -tnlp |grep redistcp 0 0 0.0.0.0:6379 0.0.0.0:* LISTEN 3843/redis-server * tcp 0 0 127.0.0.1:21365 0.0.0.0:* LISTEN 2290/src/redis-serv tcp 0 0 :::6379 :::* LISTEN 3843/redis-server * |
3、测试redis是否正常工作
| 1 2 3 4 5 6 7 8 9 | # cd redis-2.8.19/src/# ./redis-cli -h 192.168.1.104 -p 6379 //连接redis192.168.1.104:6379> pingPONG192.168.1.104:6379> set name zhengyanshengOK192.168.1.104:6379> get name"zhengyansheng"192.168.1.104:6379> quit |
4、redis服务启动命令
| 1 2 | # ps -ef |grep redisroot 3963 1 0 08:42 ? 00:00:00 /usr/local/bin/redis-server *:6379 |
5、redis的动态监控
| 1 2 | # cd redis-2.8.19/src/# ./redis-cli monitor //reids动态监控 |
6、logstash结合redis工作
6.1 首先确认redis服务是启动的
| 1 2 3 4 | # netstat -tnlp |grep redistcp 0 0 0.0.0.0:6379 0.0.0.0:* LISTEN 3843/redis-server * tcp 0 0 127.0.0.1:21365 0.0.0.0:* LISTEN 2290/src/redis-serv tcp 0 0 :::6379 :::* LISTEN 3843/redis-server * |
6.2 启动redis动态监控
| 1 2 3 | # cd redis-2.8.19/src/# ./redis-cli monitorOK |
6.3 基于入口redis启动logstash
| 1 2 3 4 5 6 7 8 9 10 11 12 13 14 15 16 17 18 19 20 | # cat logstash_to_redis.confinput { stdin { } }output { stdout { codec => rubydebug } redis { host => '192.168.1.104' data_type => 'list' key => 'logstash:redis' }}# logstash agent -f logstash_to_redis.conf --verbosePipeline started {:level=>:info}Logstash startup completeddajihao linux{ "message" => "dajihao linux", "@version" => "1", "@timestamp" => "2015-10-08T14:42:07.550Z", "host" => "0.0.0.0"} |
6.4 查看redis的监控接口上的输出
| 1 2 3 4 5 | # ./redis-cli monitorOK1444315328.103928 [0 192.168.1.104:56211] "rpush" "logstash:redis" "{\"message\":\"dajihao linux\",\"@version\":\"1\",\"@timestamp\":\"2015-10-08T14:42:07.550Z\",\"host\":\"0.0.0.0\"}"如果redis的监控上也有以上信息输出,表明logstash和redis的结合是正常的。 |
四、Elasticsearch
1、安装Elasticsearch
| 1 2 | # wget https://download.elastic.co/elasticsearch/elasticsearch/elasticsearch-1.7.2.tar.gz# tar zxf elasticsearch-1.7.2.tar.gz -C /usr/local/ |
2、修改elasticsearch配置文件elasticsearch.yml并且做以下修改.
| 1 2 3 4 5 | # vim /usr/local/elasticsearch-1.7.2/config/elasticsearch.ymldiscovery.zen.ping.multicast.enabled: false #关闭广播,如果局域网有机器开9300 端口,服务会启动不了network.host: 192.168.1.104 #指定主机地址,其实是可选的,但是最好指定因为后面跟kibana集成的时候会报http连接出错(直观体现好像是监听了:::9200 而不是0.0.0.0:9200)http.cors.allow-origin: "/.*/"http.cors.enabled: true #这2项都是解决跟kibana集成的问题,错误体现是 你的 elasticsearch 版本过低,其实不是 |
3、启动elasticsearch服务
| 1 2 3 | # /usr/local/elasticsearch-1.7.2/bin/elasticsearch #日志会输出到stdout# /usr/local/elasticsearch-1.7.2/bin/elasticsearch -d #表示以daemon的方式启动# nohup /usr/local/elasticsearch-1.7.2/bin/elasticsearch > /var/log/logstash.log 2>&1 & |
4、查看elasticsearch的监听端口
| 1 2 3 | # netstat -tnlp |grep javatcp 0 0 :::9200 :::* LISTEN 7407/java tcp 0 0 :::9300 :::* LISTEN 7407/java |
5、elasticsearch和logstash结合
| 1 2 3 4 5 6 7 | 将logstash的信息输出到elasticsearch中# cat logstash-elasticsearch.conf input { stdin {} }output { elasticsearch { host => "192.168.1.104" } stdout { codec=> rubydebug }} |
6、基于配置文件启动logstash
| 1 2 3 4 5 6 7 8 9 10 | # /usr/local/logstash-1.5.4/bin/logstash agent -f logstash-elasticsearch.confPipeline started {:level=>:info}Logstash startup completedpython linux java c++ //手动输入{ "message" => "python linux java c++", "@version" => "1", "@timestamp" => "2015-10-08T14:51:56.899Z", "host" => "0.0.0.0"} |
7、curl命令发送请求来查看elasticsearch是否接收到了数据
| 1 2 3 4 5 6 7 8 9 10 11 12 13 14 15 16 17 18 19 20 21 | # curl http://localhost:9200/_search?pretty{ "took" : 28, "timed_out" : false, "_shards" : { "total" : 5, "successful" : 5, "failed" : 0 }, "hits" : { "total" : 1, "max_score" : 1.0, "hits" : [ { "_index" : "logstash-2015.10.08", "_type" : "logs", "_id" : "AVBH7-6MOwimSJSPcXjb", "_score" : 1.0, "_source":{"message":"python linux java c++","@version":"1","@timestamp":"2015-10-08T14:51:56.899Z","host":"0.0.0.0"} } ] }} |
8、安装elasticsearch插件
| 1 2 3 4 5 6 7 8 9 10 11 12 13 14 15 16 17 18 19 | #Elasticsearch-kopf插件可以查询Elasticsearch中的数据,安装elasticsearch-kopf,只要在你安装Elasticsearch的目录中执行以下命令即可:# cd /usr/local/elasticsearch-1.7.2/bin/# ./plugin install lmenezes/elasticsearch-kopf-> Installing lmenezes/elasticsearch-kopf...Trying https://github.com/lmenezes/elasticsearch-kopf/archive/master.zip...Downloading .............................................................................................Installed lmenezes/elasticsearch-kopf into /usr/local/elasticsearch-1.7.2/plugins/kopf执行插件安装后会提示失败,很有可能是网络等情况...-> Installing lmenezes/elasticsearch-kopf...Trying https://github.com/lmenezes/elasticsearch-kopf/archive/master.zip...Failed to install lmenezes/elasticsearch-kopf, reason: failed to download out of all possible locations..., use --verbose to get detailed information解决办法就是手动下载该软件,不通过插件安装命令...cd /usr/local/elasticsearch-1.7.2/pluginswget https://github.com/lmenezes/elasticsearch-kopf/archive/master.zipunzip master.zipmv elasticsearch-kopf-master kopf以上操作就完全等价于插件的安装命令 |
9、浏览器访问kopf页面访问elasticsearch保存的数据
| 1 2 3 4 | # netstat -tnlp |grep javatcp 0 0 :::9200 :::* LISTEN 7969/java tcp 0 0 :::9300 :::* LISTEN 7969/java tcp 0 0 :::9301 :::* LISTEN 8015/java |

10、从redis数据库中读取然后输出到elasticsearch中
| 1 2 3 4 5 6 7 8 9 10 11 12 13 14 15 16 17 | # cat logstash-redis.confinput { redis { host => '192.168.1.104' # 我方便测试没有指定password,最好指定password data_type => 'list' port => "6379" key => 'logstash:redis' #自定义 type => 'redis-input' #自定义 }}output { elasticsearch { host => "192.168.1.104" codec => "json" protocol => "http" #版本1.0+ 必须指定协议http }} |
五、Kinaba
1、安装Kinaba
| 1 2 | # wget https://download.elastic.co/kibana/kibana/kibana-4.1.2-linux-x64.tar.gz# tar zxf kibana-4.1.2-linux-x64.tar.gz -C /usr/local |
2、修改kinaba配置文件kinaba.yml
| 1 2 | # vim /usr/local/kibana-4.1.2-linux-x64/config/kibana.ymlelasticsearch_url: "http://192.168.1.104:9200" |
3、启动kinaba
| 1 2 3 4 5 6 | /usr/local/kibana-4.1.2-linux-x64/bin/kibana输出以下信息,表明kinaba成功.{"name":"Kibana","hostname":"localhost.localdomain","pid":1943,"level":30,"msg":"No existing kibana index found","time":"2015-10-08T00:39:21.617Z","v":0}{"name":"Kibana","hostname":"localhost.localdomain","pid":1943,"level":30,"msg":"Listening on 0.0.0.0:5601","time":"2015-10-08T00:39:21.637Z","v":0}kinaba默认监听在本地的5601端口上 |
4、浏览器访问kinaba
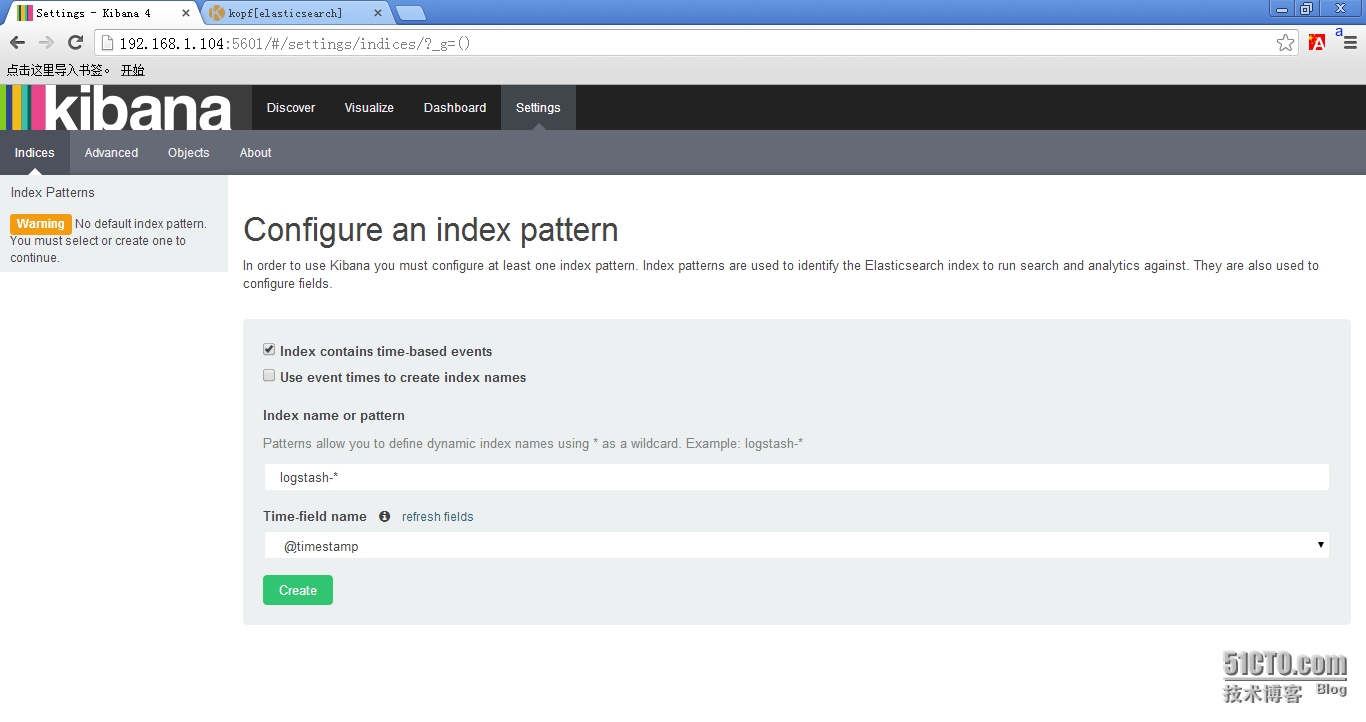
4.1 使用默认的logstash-*的索引名称,并且是基于时间的,点击“Create”即可。

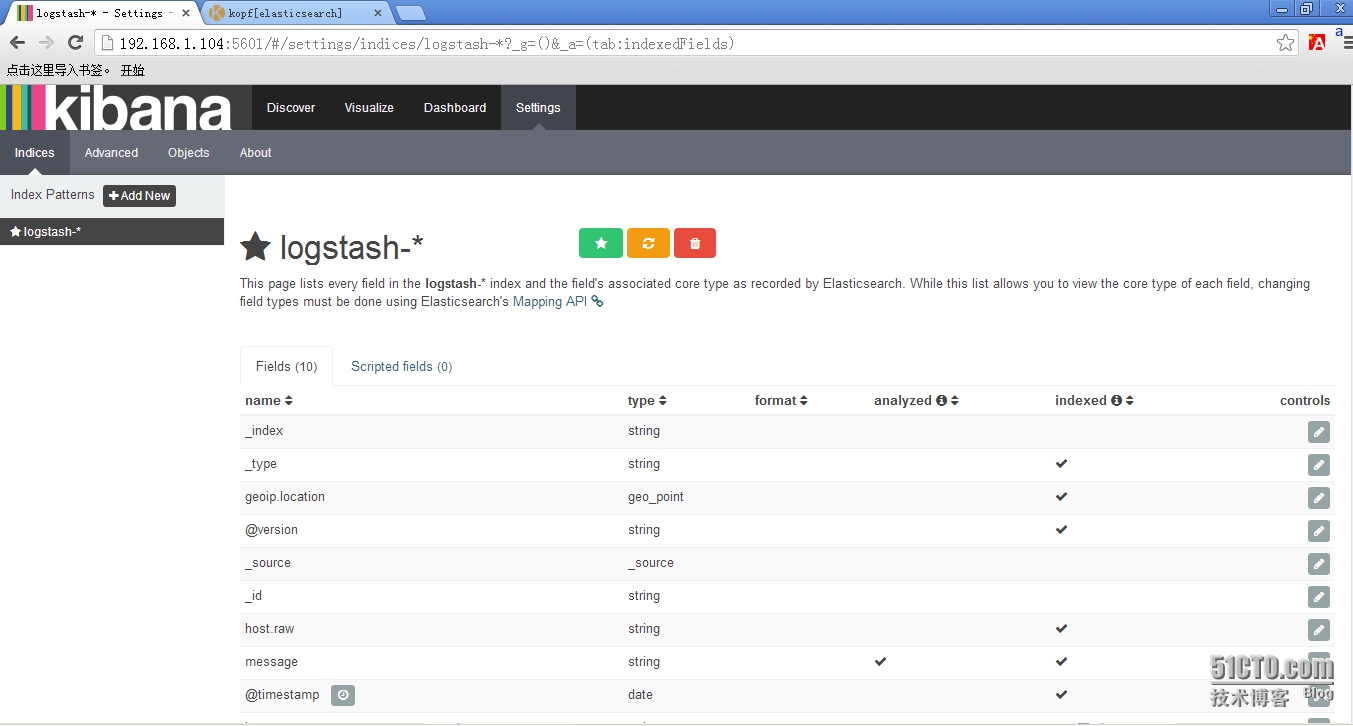
4.2 看到如下界面说明索引创建完成。

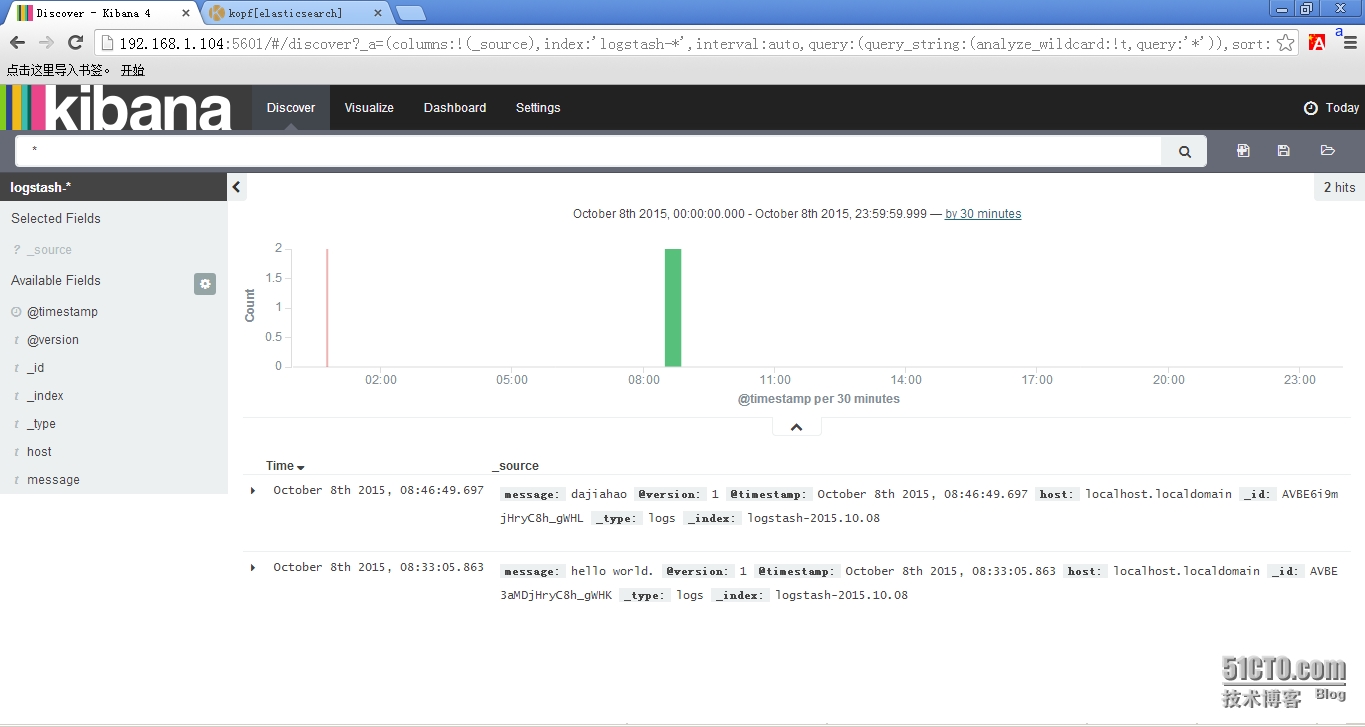
4.3 点击“Discover”,可以搜索和浏览Elasticsearch中的数据。

>>>结束<<<
| 1 2 3 4 5 6 7 8 9 10 11 12 13 | 1、ELK默认端口号elasticsearch:9200 9300logstash : 9301kinaba : 56012、错误汇总(1)java版本过低[2015-10-07 18:39:18.071] WARN -- Concurrent: [DEPRECATED] Java 7 is deprecated, please use Java 8.(2)Kibana提示Elasticsearch版本过低...This version of Kibana requires Elasticsearch 2.0.0 or higher on all nodes. I found the following incompatible nodes in your cluster: Elasticsearch v1.7.2 @ inet[/192.168.1.104:9200] (127.0.0.1)解决办法: |
软件包以打包上传:http://pan.baidu.com/s/1hqfeFvY
本文出自 “郑彦生” 博客,请务必保留此出处http://467754239.blog.51cto.com/4878013/1700828


)
——转载图片...)


的使用示例)


