Operator基础知识
Kubernetes Operator是一种用于管理和扩展Kubernetes应用程序的模式和工具。它们是一种自定义的Kubernetes控制器,可以根据特定的应用程序需求和业务逻辑扩展Kubernetes功能。
Kubernetes Operator基于Kubernetes的控制器模式,通过自定义资源定义(CRD)来描述和管理应用程序的状态。它们利用Kubernetes的控制循环(control loop)机制,监视和响应与应用程序相关的事件,并采取适当的操作来维护所需的状态。
自定义资源与内置资源关系:

行业内使用现状
operator基本成为应用上云,计算框架等上云的标准方案
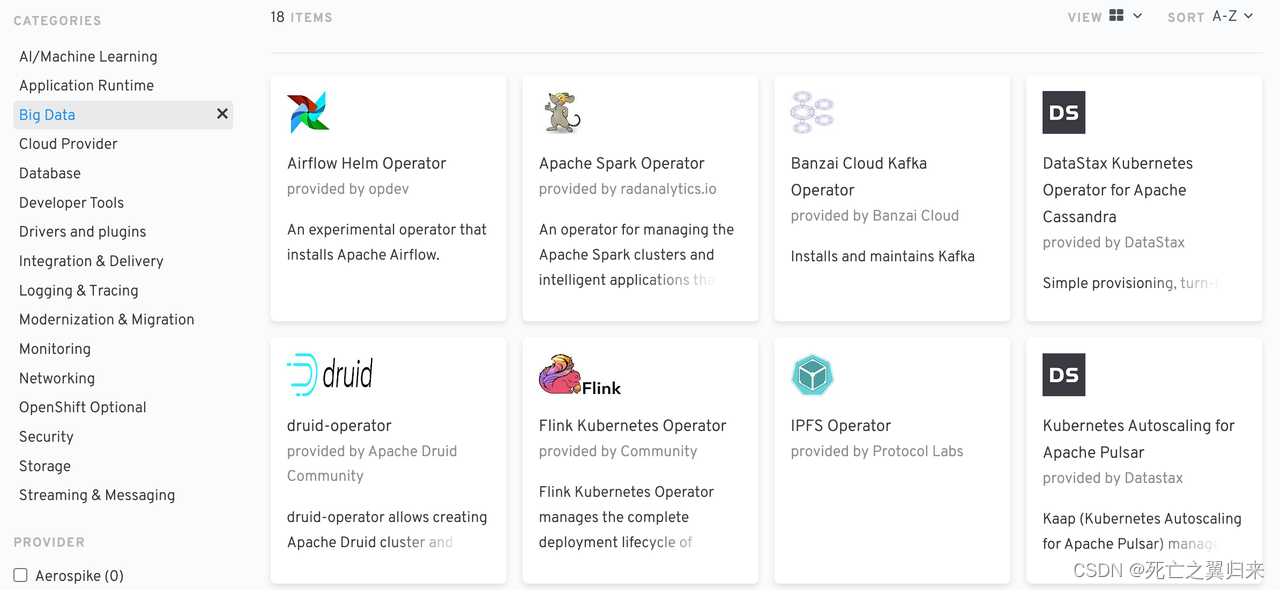
主流的开源operator,被统一收录在开源商城,涵盖大数据、数据库、机器学习、devops等领域。目前收录了300+款框架应用,用户在k8s集群可实现开箱即用。

redHat维护的一个operator商城:operatorhub
CRD基本概念
crd与controller一般是配套使用,在这里简单描述一下在实际运转中,他们的流程关系。
crd定义了自定义资源的结构和资源状态信息等,自定义的内置资源一般以yaml或者json结构形式被使用。一个crd定义完毕并成功注册到k8s后,会自动生成一个独有端口号的k8s api,这个api可以被kubectl工具以命令行的形式执行、或者以k8s client的方式被调用。最终用户在使用自定义cr(自定义资源实例对象)时,能享受到调用内置资源时的便捷。
controller依靠k8s提供的控制循环机制监视资源,调用对应资源的k8s api,依据资源的状态和期望状态之间的差异采取适当的操作,在这个循环机制中涉及创建、更新或删除其他 Kubernetes 资源。


云平台上的使用现状
典型应用案例:
1. 分布式训练training-operator
以pytorch ddp流程为例:
- 按自定义资源结构生成master和worker的pod、service配置和数量
- 将master和worker环境变量添加到对应pod
- worker ping master service
- 监听master和worker的运行状态

2. 工作流argo-workflow operator
定义、监听上下游任务顺序相关元数据
监听解析为pod的运行实例
容器的输出同步到自定义数据库,并负责将上下游stage数据在容器内传递

3. 分布式计算框架Spark on k8s operator
从spark2.3版本开始支持on k8s
只支持指定资源量、启停一个Spark Application集群,并指派作业任务到这些Executor中执行。

park operator对标spark on yarn生命周期和流程管理
- application事件监控、控制、管理;
- 自定义executor配置;
- 任务监控;
- 日志相关;
- Ui;
- …

更多应用:
- 快速服务seldon operator
- tensorboard应用tensorboard operator
- 算法开发web ide notebook operator
- 云存储缓存加速工具fluid dataset runtime operator
- …
Kubebuilder构建operator实践
在k8s集群部署一个服务应用,默认方式是需要同时创建Deployment和Service这两个默认资源对象。通过 Pod 的 label标签将service资源对象与deployment关联,最后通过 Ingress 或者 type=NodePort 类型的 Service 来暴露服务。
这一通流程下来比较繁琐,在创建多个服务应用时尤为突出。为了降低服务创建时过多的资源对象定义,这里以名为EasyService的CRD为例,从0开发一个简化版本的服务创建流程。
开发工具包
这里推荐使用脚手架工具kubebuilder
使用脚手架工具,能生成项目模板,开发人员只需要关注核心逻辑和方法即可
安装流程
mac安装流程
brew install kubebuilder
linux安装流程
在github下载最新最新:
https://github.com/kubernetes-sigs/kubebuilder/releases
我在这个例子中使用的go version 1.18.3,为了避免麻烦直接下载v3.5.0版本
# 重命名
$ mv kubebuilder_linux_amd64 kubebuilder# 赋予可执行权限
$ chmod a+x kubebuilder# 移动可执行文件到bin路径
$ mv kubebuilder /usr/local/bin# 为 PATH 环境变量追加 kubebuilder 二进制路径
$ export PATH=$PATH:/usr/local/bin
使用流程
example1.切入到项目文件夹
$ cd webapp-operator/2.初始化go modulm
$ go mod init webapp-operator3.初始化项目模板
$ kubebuilder init --domain kubebuilder.io4.创建api
这里我们创建一个 group 为 app, version 为 v1, kind 为 EasyService 的 api:
$ kubebuilder create api --group app --version v1 --kind EasyService
核心逻辑编写和测试
按以上流程,自动生成项目文件夹,文件夹的结构如下图所示:
.
├── Dockerfile          # 用于构建控制器镜像的 Dockerfile
├── Makefile            # 用于控制器构建及部署的 Makefile
├── PROJECT             # 勇于生成组件的 kubebuilder 元数据
├── README.md
├── api                                 # API 模板代码所在目录
│   └── v1
│       ├── easyservice_types.go       # API 类型文件, 主要关注 Spec 与 Status 结构体
│       ├── groupversion_info.go        # 此文件包含了 Group Version 的一些元信息
│       └── zz_generated.deepcopy.go    # 自动生成的 runtime.Object 实现
├── bin
│   └── manager
├── config              # 采用 Kustomize YAML 定义的配置
│   ├── certmanager/    # 证书管理相关
│   ├── crd/            # CRD 相关, 当 make install 将 apply 此目录 yaml
│   ├── default/        # 控制器相关, 当 make deploy 将 apply 此目录 yaml
│   ├── manager/
│   ├── prometheus/     # 监控相关
│   ├── rbac/           # RBAC 权限管理
│   ├── samples/        # CR 样例
│   └── webhook/        # webhook相关
├── controllers                     # 控制器逻辑所在目录
│   ├── easyservice_controller.go  # 控制器 reconcile 逻辑实现所在文件
│   └── suite_test.go               # 测试文件
├── cover.out
├── go.mod              # Go Mod 配置文件,记录依赖信息
├── go.sum
├── hack
│   └── boilerplate.go.txt
└── main.go             # 程序入口
核心逻辑编写
使用kubebuilder脚手架工具修改自定义operator,只需要修改2两处核心逻辑:
- api/v1/xxx_types.go的结构定义
- controllers/xxx_controller.go的调协、状态监控、更新等方法…
eg. 新建CR(用户自定义对象的实例)创建指定副本deployment和service,并对外暴露nodeport端口
对象结构、状态定义需要的字段:
// crd结构定义
// EasyService is the Schema for the easyservices API
type EasyService struct {metav1.TypeMeta   `json:",inline"`metav1.ObjectMeta `json:"metadata,omitempty"`Spec   EasyServiceSpec   `json:"spec,omitempty"`Status EasyServiceStatus `json:"status,omitempty"`
}// 创建cr结构定义
// EasyServiceSpec defines the desired state of EasyService
type EasyServiceSpec struct {// INSERT ADDITIONAL SPEC FIELDS - desired state of cluster// Important: Run "make" to regenerate code after modifying this file// Foo is an example field of EasyService. Edit easyservice_types.go to remove/update// Foo string `json:"foo,omitempty"`Size      *int32                      `json:"size"`Image     string                      `json:"image"`Resources corev1.ResourceRequirements `json:"resources,omitempty"`Envs      []corev1.EnvVar             `json:"envs,omitempty"`Ports     []corev1.ServicePort        `json:"ports,omitempty"`
}// 监控cr状态的内容(这里直接拿内置资源DeploymentStatus的实现)
// EasyServiceStatus defines the observed state of EasyService
type EasyServiceStatus struct {// INSERT ADDITIONAL STATUS FIELD - define observed state of cluster// Important: Run "make" to regenerate code after modifying this fileappsv1.DeploymentStatus `json:",inline"`
}
在调协代码中主要需要实现的方法:
func (r *EasyServiceReconciler) Reconcile(ctx context.Context, req ctrl.Request) (ctrl.Result, error) {// 如果不存在,则创建关联资源// 如果存在,判断是否需要更新// 如果需要更新,则直接更新// 如果不需要更新,则正常返回deploy := &appsv1.Deployment{}if err := r.Get(ctx, req.NamespacedName, deploy); err != nil && errors.IsNotFound(err) {// 1. 关联 Annotationsdata, _ := json.Marshal(easyService.Spec)if easyService.Annotations != nil {easyService.Annotations["spec"] = string(data)} else {easyService.Annotations = map[string]string{"spec": string(data)}}if err := r.Client.Update(ctx, &easyService); err != nil {return ctrl.Result{}, err}// 创建关联资源// 2. 创建 Deploymentdeploy := resources.NewDeploy(&easyService)if err := r.Client.Create(ctx, deploy); err != nil {return ctrl.Result{}, err}// 3. 创建 Serviceservice := resources.NewService(&easyService)if err := r.Create(ctx, service); err != nil {return ctrl.Result{}, err}return ctrl.Result{}, nil}oldspec := appv1.EasyServiceSpec{}if err := json.Unmarshal([]byte(easyService.Annotations["spec"]), &oldspec); err != nil {return ctrl.Result{}, err}// 当前规范与旧的对象不一致,则需要更新if !reflect.DeepEqual(easyService.Spec, oldspec) {// 更新关联资源newDeploy := resources.NewDeploy(&easyService)oldDeploy := &appsv1.Deployment{}if err := r.Get(ctx, req.NamespacedName, oldDeploy); err != nil {return ctrl.Result{}, err}oldDeploy.Spec = newDeploy.Specif err := r.Client.Update(ctx, oldDeploy); err != nil {return ctrl.Result{}, err}newService := resources.NewService(&easyService)oldService := &corev1.Service{}if err := r.Get(ctx, req.NamespacedName, oldService); err != nil {return ctrl.Result{}, err}// 需要指定 ClusterIP 为之前的,不然更新会报错newService.Spec.ClusterIP = oldService.Spec.ClusterIPoldService.Spec = newService.Specif err := r.Client.Update(ctx, oldService); err != nil {return ctrl.Result{}, err}return ctrl.Result{}, nil}
对象结构(API)、控制器(controller)修改完毕后,需要更新crd的定义
更新crd定义的指令:
root@dev06:/home/liuweibin/learn-kubebuilder/webapp-operator$ make manifests
/home/liuweibin/learn-kubebuilder/webapp-operator/bin/controller-gen rbac:roleName=manager-role crd webhook paths="./..." output:crd:artifacts:config=config/crd/bases
测试controller
前提条件:
登入到在集群master上操作
第一步:将CRD安装到集群
$ make install
安装完毕后,可以在集群查到crd的信息
liuweibin@dev06:~/learn-kubebuilder/webapp-operator/controllers$ sudo kubectl get crd | grep easyservice
easyservices.app.kubebuilder.io              2023-07-15T15:26:15Z
第二步:启动控制器
root@dev06:/home/liuweibin/learn-kubebuilder/webapp-operator$ make run
/home/liuweibin/learn-kubebuilder/webapp-operator/bin/controller-gen rbac:roleName=manager-role crd webhook paths="./..." output:crd:artifacts:config=config/crd/bases
/home/liuweibin/learn-kubebuilder/webapp-operator/bin/controller-gen object:headerFile="hack/boilerplate.go.txt" paths="./..."
go fmt ./...
controllers/easyservice_controller.go
go vet ./...
go run ./main.go
I0718 14:33:26.878953   13419 request.go:601] Waited for 1.033483673s due to client-side throttling, not priority and fairness, request: GET:https://localhost:6443/apis/serving.kserve.io/v1beta1?timeout=32s
1.6896620081329308e+09        INFO        controller-runtime.metrics        Metrics server is starting to listen        {"addr": ":8080"}
1.6896620081333506e+09        INFO        setup        starting manager
1.6896620081337626e+09        INFO        Starting server        {"kind": "health probe", "addr": "[::]:8081"}
1.689662008133777e+09        INFO        Starting server        {"path": "/metrics", "kind": "metrics", "addr": "[::]:8080"}
1.6896620081339505e+09        INFO        Starting EventSource        {"controller": "easyservice", "controllerGroup": "app.kubebuilder.io", "controllerKind": "EasyService", "source": "kind source: *v1.EasyService"}
1.689662008134056e+09        INFO        Starting Controller        {"controller": "easyservice", "controllerGroup": "app.kubebuilder.io", "controllerKind": "EasyService"}
1.689662008235348e+09        INFO        Starting workers        {"controller": "easyservice", "controllerGroup": "app.kubebuilder.io", "controllerKind": "EasyService", "worker count": 1}
控制器启动后,启动相应的事件源、开始监听事件
第三步:新建CR
新建名为easyservice-sample的自定义资源实例,创建副本数量和对应的nodeport端口
新建成功会controller会有事件变更:
1.689662008235704e+09 INFO fetch easyservice objects {"controller": "easyservice", "controllerGroup": "app.kubebuilder.io", "controllerKind": "EasyService", "easyService": {"name":"easyservice-sample","namespace":"default"}, "namespace": "default", "name": "easyservice-sample", "reconcileID": "31643862-0be9-4aed-b206-6759d72bbb3d", "easyservice": {"kind":"EasyService","apiVersion":"app.kubebuilder.io/v1","metadata":{"name":"easyservice-sample","namespace":"default","selfLink":"/apis/app.kubebuilder.io/v1/namespaces/default/easyservices/easyservice-sample","uid":"7f32f186-6641-46db-a2e2-413d3d678212","resourceVersion":"113468805","generation":1,"creationTimestamp":"2023-07-18T05:58:49Z","annotations":{"kubectl.kubernetes.io/last-applied-configuration":"{\"apiVersion\":\"app.kubebuilder.io/v1\",\"kind\":\"EasyService\",\"metadata\":{\"annotations\":{},\"name\":\"easyservice-sample\",\"namespace\":\"default\"},\"spec\":{\"image\":\"nginx:1.7.9\",\"ports\":[{\"nodePort\":31002,\"port\":80,\"targetPort\":80}],\"size\":2}}\n"},"managedFields":[{"manager":"kubectl-client-side-apply","operation":"Update","apiVersion":"app.kubebuilder.io/v1","time":"2023-07-18T05:58:49Z","fieldsType":"FieldsV1","fieldsV1":{"f:metadata":{"f:annotations":{".":{},"f:kubectl.kubernetes.io/last-applied-configuration":{}}},"f:spec":{".":{},"f:image":{},"f:ports":{},"f:size":{}}}}]},"spec":{"size":2,"image":"nginx:1.7.9","resources":{},"ports":[{"protocol":"TCP","port":80,"targetPort":80,"nodePort":31002}]},"status":{}}}
apiVersion: app.kubebuilder.io/v1
kind: EasyService
metadata:name: easyservice-sample
spec:# TODO(user): Add fields heresize: 2image: nginx:1.7.9ports:- port: 80targetPort: 80nodePort: 31002
在k8s管理端能成功看到CR创建,并启动了对应数量的内置资源实例:


打镜像和集群部署
第一步:制作推送controller镜像
$ make docker-build docker-push IMG=<some-registry>/<project-name>:tag
第二步:把controller部署到集群
建议:在正式上线时,使用git控制上线controller版本
make deploy IMG=<some-registry>/<project-name>:tag
参考项目:
https://github.com/Crazybean-lwb/webapp-operator (Kind=EasyService)
展望使用场景
在云原生场景,便捷定义流程化应用(弹性云:云资源类型不限,应用范畴:弹性服务、输出类任务…)
- 优化(自定义)训练框架使用流程化
- 批量流程化业务输出
- 申请带生命周期的自定义运行时资源
- …


)

)
和颜色(color)动态处理)
)


)
-alphapose模型导出、编译到推理(无封装))


——物联网之SIoT 2)