1、首先通过脚手架新建一个项目,过程略。
创建完项目后,在项目里安装vux, 通过命令 npm install vux --save 安装
2、安装vux-loader,
通过命令 npm install vux-loader --save-dev 安装(vux文档没说明)
3、安装less-loader,
通过命令 npm install less less-loader --save-dev 安装
4、在文件根目录下创建 build 文件夹
在 build 文件夹中创建 webpack.base.conf.js 文件 ,并进行配置
4.1、webpack.base.conf.js 代码如下
'use strict'
const path = require('path')
const utils = require('./utils')
const config = require('../config')
const vueLoaderConfig = require('./vue-loader.conf')function resolve (dir) {return path.join(__dirname, '..', dir)
}
const vuxLoader = require('vux-loader')
const webpackConfig  = {entry: {app: './src/main.js'},output: {path: config.build.assetsRoot,filename: '[name].js',publicPath: process.env.NODE_ENV === 'production'? config.build.assetsPublicPath: config.dev.assetsPublicPath},resolve: {extensions: ['.js', '.vue', '.json','.less'],alias: {'vue$': 'vue/dist/vue.esm.js','@': resolve('src'),}},module: {rules: [{test: /\.vue$/,loader: 'vue-loader',options: vueLoaderConfig},{test: /\.js$/,loader: 'babel-loader',include: [resolve('src'), resolve('test')]},{test: /\.(png|jpe?g|gif|svg)(\?.*)?$/,loader: 'url-loader',options: {limit: 10000,name: utils.assetsPath('img/[name].[hash:7].[ext]')}},{test: /\.(mp4|webm|ogg|mp3|wav|flac|aac)(\?.*)?$/,loader: 'url-loader',options: {limit: 10000,name: utils.assetsPath('media/[name].[hash:7].[ext]')}},{test: /\.(woff2?|eot|ttf|otf)(\?.*)?$/,loader: 'url-loader',options: {limit: 10000,name: utils.assetsPath('fonts/[name].[hash:7].[ext]')}}]}
}
module.exports = vuxLoader.merge(webpackConfig, { plugins: ['vux-ui'] })
5、然后根据 vux 组件库官方的方式进行 局部 、 全局 的引入并使用即可
案例: 以下为局部引入案例
在 vue 的单页面文件夹中设置
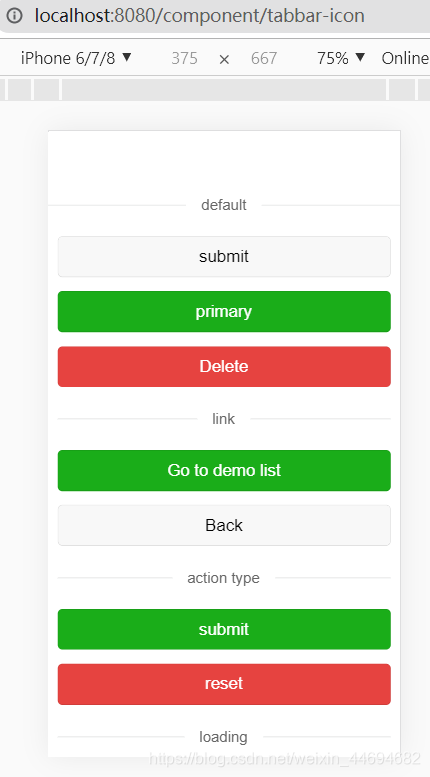
<template><div><divider>default</divider><box gap="10px 10px"><x-button>submit</x-button><x-button type="primary">primary</x-button><x-button type="warn">Delete</x-button><divider>link</divider><x-button type="primary" link="/demo">Go to demo list</x-button><x-button type="default" link="BACK">Back</x-button><divider>action type</divider><x-button type="primary" action-type="button">submit</x-button><x-button type="warn" action-type="reset">reset</x-button><divider>loading</divider><x-button type="default" show-loading>submit</x-button><x-button type="primary" show-loading>submit</x-button><x-button type="warn" show-loading>submit</x-button><divider>mini</divider><x-button mini>submit</x-button><x-button mini type="primary">primary</x-button><x-button mini type="warn">Delete</x-button><br><x-button mini plain>submit</x-button><x-button mini plain type="primary">primary</x-button><x-button mini plain type="warn">primary</x-button><divider>plain</divider><x-button plain>submit</x-button><x-button plain type="primary">primary</x-button><x-button plain type="warn">warn</x-button><divider>you can customize styles</divider><x-button plain type="primary" style="border-radius:99px;">primary</x-button><x-button plain type="primary" class="custom-primary-red">primary</x-button><divider>disabled</divider><x-button disabled>disable submit</x-button><x-button type="primary" disabled>disable primary</x-button><x-button type="warn" disabled>disable Delete</x-button><x-button mini disabled>disable mini submit</x-button><x-button mini type="primary" disabled>disable mini primary</x-button><x-button mini type="warn" disabled>disable mini Delete</x-button><x-button plain disabled>disable plain</x-button><x-button plain type="primary" disabled>disable plain primary</x-button><divider>use :text and :disabled</divider><x-button :text="submit001" :disabled="disable001" @click.native="processButton001" type="primary"></x-button><divider>combined with flexbox</divider><flexbox><flexbox-item><x-button type="primary">primary</x-button></flexbox-item><flexbox-item><x-button type="warn">Delete</x-button></flexbox-item></flexbox><divider>combined with flexbox</divider><flexbox><flexbox-item><x-button type="default">default</x-button></flexbox-item><flexbox-item><x-button type="primary">primary</x-button></flexbox-item><flexbox-item><x-button type="warn">Delete</x-button></flexbox-item></flexbox></box><divider>iOS Gradients(v2.7.4)</divider><box gap="10px 10px"><x-button :gradients="['#1D62F0', '#19D5FD']">iOS Gradients</x-button><x-button :gradients="['#A644FF', '#FC5BC4']">iOS Gradients</x-button><x-button :gradients="['#FF2719', '#FF61AD']">iOS Gradients</x-button><x-button :gradients="['#6F1BFE', '#9479DF']">iOS Gradients</x-button><x-button :gradients="['#FF5E3A', '#FF9500']">iOS Gradients</x-button></box></div>
</template><script>
// 局部引入对应的组件
import { XButton, Box, Flexbox, FlexboxItem, Divider } from 'vux'export default {
// 对应的组件实例化components: {XButton,Box,Flexbox,FlexboxItem,Divider},methods: {change (value) {console.log('change:', value)},processButton001 () {this.submit001 = 'processing'this.disable001 = true}},data () {return {submit001: 'click me',disable001: false}}
}
</script><style lang="less">
.custom-primary-red {border-radius: 99px!important;border-color: #CE3C39!important;color: #CE3C39!important;&:active {border-color: rgba(206, 60, 57, 0.6)!important;color: rgba(206, 60, 57, 0.6)!important;background-color: transparent;}
}
</style>
效果图:

注意引入出现以下报错时:


)


