SpringBoot3
1、简介
1. 前置知识
- Java17
- Spring、SpringMVC、MyBatis
- Maven、IDEA
2. 环境要求
| 环境&工具 | 版本(or later) |
|---|---|
| SpringBoot | 3.0.5+ |
| IDEA | 2022+ |
| Java | 17+ |
| Maven | 3.5+ |
3. SpringBoot是什么
Spring Boot是Spring项目中的一个子工程,与我们所熟知的Spring-framework 同属于spring的产品:
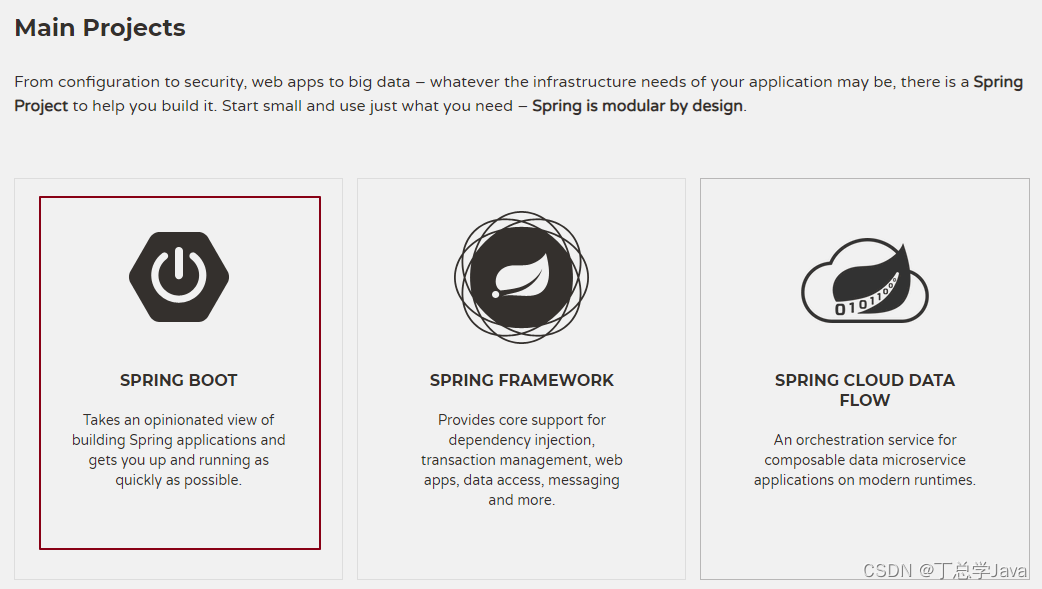
其最主要作用就是帮助开发人员快速的构建庞大的spring项目,并且尽可能的减少一切xml配置,做到开箱即用,迅速上手,让开发人员关注业务而非配置。
主要特点:
-
自动配置 : 不需要再关注各个框架的整合配置, springboot全部已经配置好了
-
起步依赖 : 我们在需要使用某个框架的时候, 直接添加这个框架的启动器依赖即可 , 不需要在关注jar包的冲突和整合
设计目的: 用来简化 Spring 应用的初始搭建以及开发过程。
从最根本上来讲,Spring Boot 就是一些库的集合,它能够被任意项目所使用。它使用 “习惯优于配置”的理念让你的项目快速运行起来。spring boot 其实不是什么新的框架,它默认配置了很多框架的使用方式,就像 maven 整合了所有的 jar 包,spring boot 整合了所有的框架,总结以下几点:
(1)为所有 Spring 开发提供一个更快更广泛的入门体验。
(2)零配置。无冗余代码生成和XML 强制配置,遵循“约定大于配置” 。
(3)集成了大量常用的第三方库的配置, Spring Boot 应用为这些第三方库提供了几乎可以零配置的开箱即用的能力。
(4)提供一系列大型项目常用的非功能性特征,如嵌入服务器等。
使用 Spring Boot有什么好处:
其实就是简单、快速、方便!
平时如果我们需要搭建一个 Spring Web 项目的时候需要怎么做呢?
1)配置 web.xml,加载 Spring 和 Spring mvc
2)配置数据库连接、配置 Spring 事务
3)配置加载配置文件的读取,开启注解
4)配置日志文件
…
配置完成之后部署 Tomcat 调试
…
总结:简化开发,简化配置,简化整合,简化部署,简化监控,简化运维。
2、快速体验
场景:浏览器发送**/hello**请求,返回"Hello,Spring Boot 3!"
1. 开发步骤
-
创建Maven工程
-
添加依赖(springboot父工程依赖 , web启动器依赖)
-
编写启动引导类(springboot项目运行的入口)
-
编写处理器Controller
-
启动项目
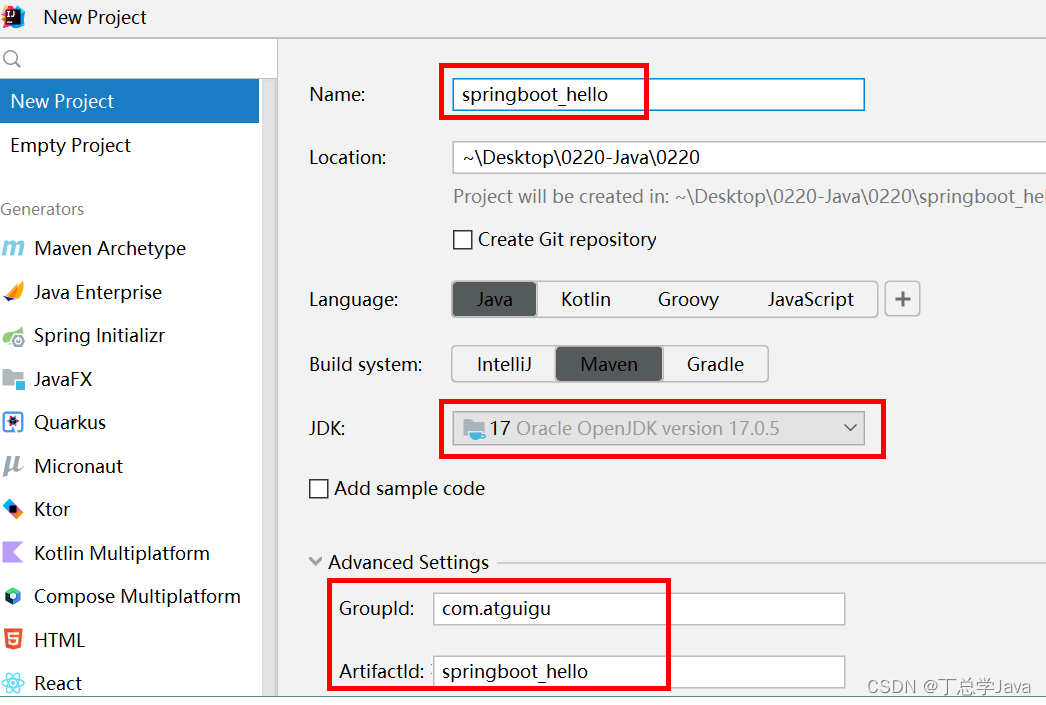
2. 创建项目
maven 项目 springboot_hello
3. 添加依赖
(1)添加父工程坐标
SpringBoot可以帮我们方便的管理项目依赖 , 在Spring Boot提供了一个名为spring-boot-starter-parent的工程,里面已经对各种常用依赖的版本进行了管理,我们的项目需要以这个项目为父工程,这样我们就不用操心依赖的版本问题了,需要什么依赖,直接引入坐标(不需要添加版本)即可!
<!--所有springboot项目都必须继承自 spring-boot-starter-parent -->
<parent><groupId>org.springframework.boot</groupId><artifactId>spring-boot-starter-parent</artifactId><version>3.0.5</version><!-- <relativePath /> -->  <!-- 根据情况添加 -->
</parent>
(2)添加web启动器
为了让Spring Boot帮我们完成各种自动配置,我们必须引入Spring Boot提供的自动配置依赖,我们称为启动器。因为我们是web项目,这里我们引入web启动器,在 pom.xml 文件中加入如下依赖:
<dependencies><!--web开发的场景启动器 --><dependency><groupId>org.springframework.boot</groupId><artifactId>spring-boot-starter-web</artifactId></dependency>
</dependencies>
4. 编写启动引导类
创建package:com.atguigu
创建启动类:MainApplication
package com.atguigu;import org.springframework.boot.SpringApplication;
import org.springframework.boot.autoconfigure.SpringBootApplication;@SpringBootApplication
public class MainApplication {public static void main(String[] args) {SpringApplication.run(MainApplication.class,args);}
}
5. 编写处理器Controller
创建package:com.atguigu.controller
创建类:HelloController
package com.atguigu.controller;import org.springframework.web.bind.annotation.GetMapping;
import org.springframework.web.bind.annotation.RestController;@RestController
public class HelloController {@GetMapping("/hello")public String hello(){return "Hello,Spring Boot 3!";}}
6. 启动测试
运行启动类main方法
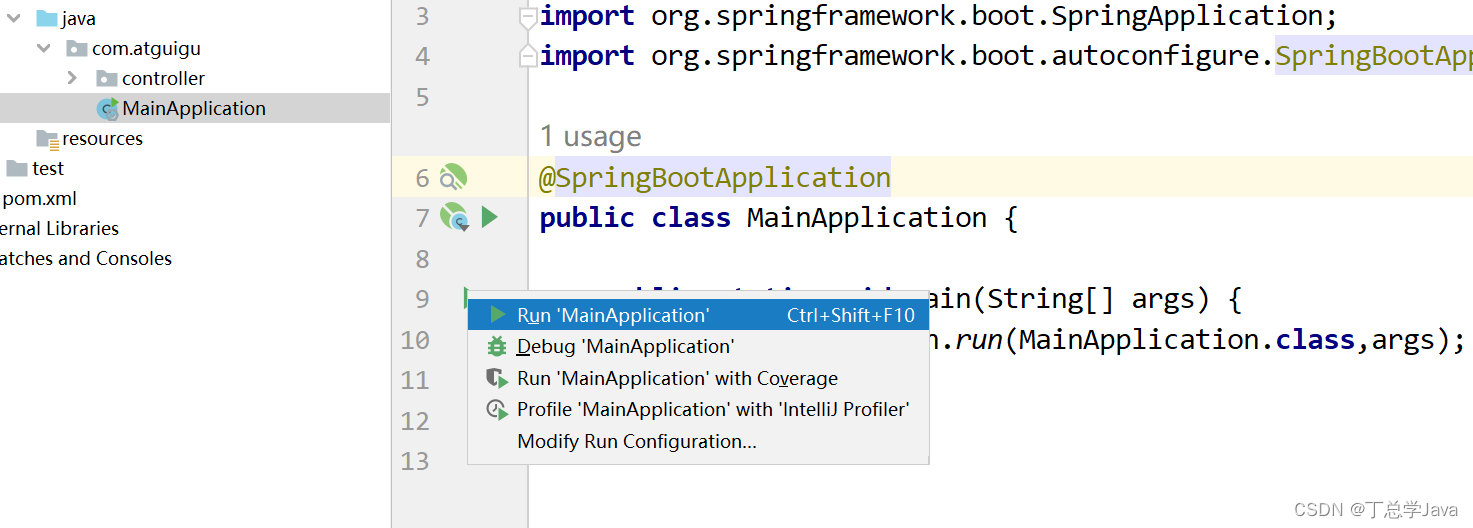
控制台会输出如下信息 :

打开浏览器,访问:http://localhost:8080/hello

7. 案例总结
1. 简化整合
导入相关的场景,拥有相关的功能。场景启动器
默认支持的所有场景:https://docs.spring.io/spring-boot/docs/current/reference/html/using.html#using.build-systems.starters
- 官方提供的场景:命名为:
spring-boot-starter-*
比如:spring-boot-starter-web
- 第三方提供场景:命名为:
*-spring-boot-starter
比如:mybatis-spring-boot-starter
☆ 场景一导入,万物皆就绪
2. 简化开发
无需编写任何配置,直接开发业务
3. 简化配置
application.properties:
- 集中式管理配置。只需要修改这个文件就行 。
- 配置基本都有默认值
- 能写的所有配置都在: https://docs.spring.io/spring-boot/docs/current/reference/html/application-properties.html#appendix.application-properties
…
8. 应用分析
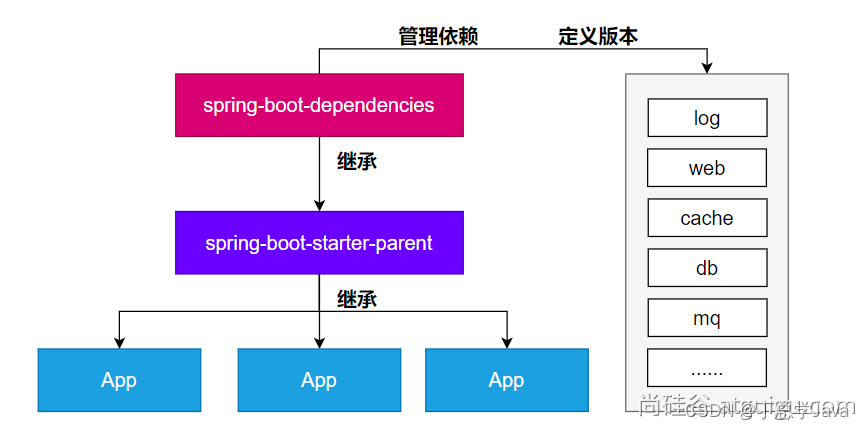
1. 依赖管理机制
思考:
1、为什么导入starter-web所有相关依赖都导入进来?
- 开发什么场景,导入什么场景启动器。
- maven依赖传递原则。A-B-C: A就拥有B和C
- 导入 场景启动器。 场景启动器 自动把这个场景的所有核心依赖全部导入进来

2、为什么版本号都不用写?
- 每个boot项目都有一个父项目
spring-boot-starter-parent - parent的父项目是
spring-boot-dependencies - 父项目 版本仲裁中心,把所有常见的jar的依赖版本都声明好了。
- 比如:
mysql-connector-j
3、自定义版本号
-
利用maven的就近原则
-
- 直接在当前项目
properties标签中声明父项目用的版本属性的key - 直接在导入依赖的时候声明版本
- 直接在当前项目
4、第三方的jar包
- boot父项目没有管理的需要自行声明好
<!-- https://mvnrepository.com/artifact/com.alibaba/druid -->
<dependency><groupId>com.alibaba</groupId><artifactId>druid</artifactId><version>1.2.16</version>
</dependency>
3、SpringBoot配置文件
1. 概述
(1)Springboot支持两种类型的配置文件
· properties属性配置文件
· yaml配置文件 (两种后缀都行:.yml 或者 .yaml)
(2)配置文件必须放置在项目的类加载目录下, 并且名字必须是application
springboot项目在运行的时候会自动加载这些配置文件
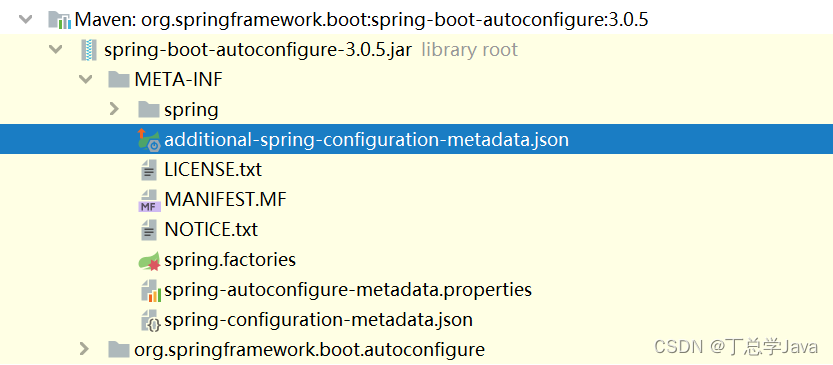
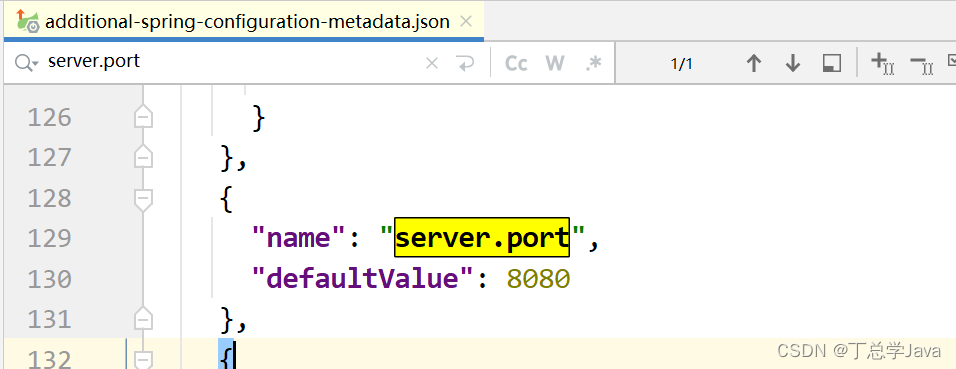
同级目录下打开:spring-configuration-metadata.json
搜素:server.port
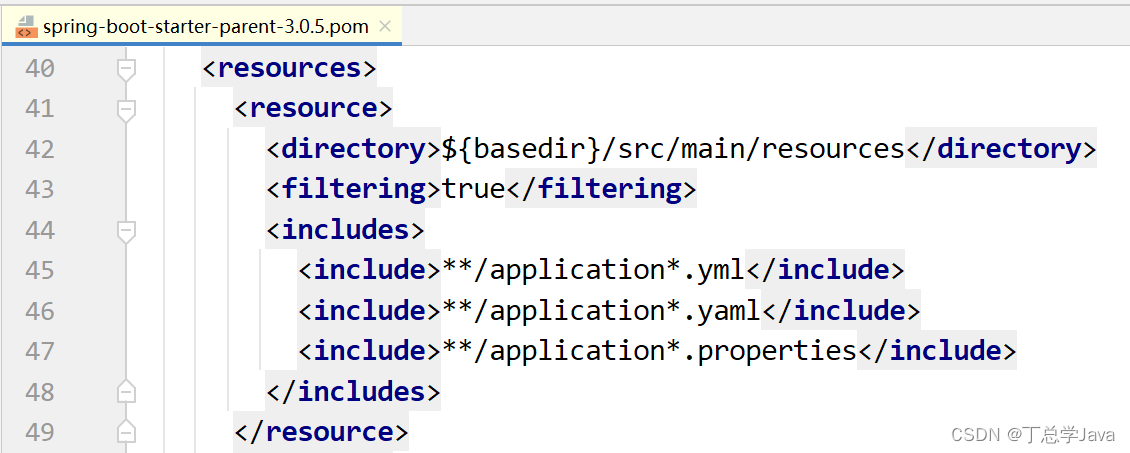
(3)为什么可以在resources下创建application.properties文件呢?
我们查看springboot的父启动依赖:点击spring-boot-starter-parent
2. 属性配置文件
(1)配置文件
在 resource 文件夹下面新建 application.properties 配置文件
spring.jdbc.datasource.driverClassName=com.mysql.cj.jdbc.driver
spring.jdbc.datasource.url=jdbc:mysql:///springboot_01
spring.jdbc.datasource.username=root
spring.jdbc.datasource.password=root
(2)读取配置文件
- 引入依赖
<dependency><groupId>org.projectlombok</groupId><artifactId>lombok</artifactId>
</dependency>
- 读取类
package com.atguigu.proper;import lombok.Data;
import org.springframework.beans.factory.annotation.Value;
import org.springframework.stereotype.Component;@Component
@Data
public class DataSourceProperties {@Value("${spring.jdbc.datasource.driverClassName}")private String driverClassName;@Value("${spring.jdbc.datasource.url}")private String url;@Value("${spring.jdbc.datasource.username}")private String username;@Value("${spring.jdbc.datasource.password}")private String password;}
(3)测试效果
在controller注入,输出进行测试
@Autowired
private DataSourceProperties dataSourceProperties ;@RequestMapping(path = "/hello")
public String sayHello() {System.out.println(dataSourceProperties);return "Hello Spring Boot ! " ;
}
浏览器访问路径,控制台查看效果

3. YAML配置文件
(1)什么是YAML
YAML是一种配置文件格式,yaml与properties配置文件除了展示形式不相同以外,其它功能和作用都是一样的
(2)语法
1.数据结构用树形结构呈现,通过缩进来表示层级,
2.连续的项目通过减号 ” - ” 来表示
3.键值结构里面的key/value对用冒号 ” : ” 来分隔,要注意后面的值前面必须得有一个空格!
4.YAML配置文件的扩展名是yaml 或 yml
yaml文件示例:
server:port: 8200
spring:data:redis:host: localhostport: 6379gateway:discovery:locator:enabled: trueroutes:- id: service-producturi: lb://service-productpredicates:- Path=/*/product/**
(3)读取文件
在 resource 文件夹下面新建 application.yml 配置文件,
修改 application.properties 配置文件名字为 application.properties.bak
spring:jdbc:datasource:driverClassName: com.mysql.jdbc.Driverurl: jdbc:mysql:///springboot_02username: rootpassword: root
运行项目,重新请求 http://localhost:8080/hello

4. 批量注入属性
@ConfigurationProperties是SpringBoot提供的重要注解, 他可以将一些配置属性批量注入到bean对象。
(1)创建类,添加属性和注解
· 在类上通过@ConfigurationProperties注解声明该类要读取属性配置
· prefix=“spring.jdbc.datasource” 读取属性文件中前缀为spring.jdbc.datasource的值。前缀和属性名称和配置文件中的key必须要保持一致才可以注入成功
package com.atguigu.proper;import lombok.Data;
import org.springframework.boot.context.properties.ConfigurationProperties;
import org.springframework.stereotype.Component;@Component
@Data
@ConfigurationProperties(prefix = "spring.jdbc.datasource")
public class DataSourceConfigurationProperties {private String driverClassName;private String url;private String username;private String password;
}
(2)添加controller测试
package com.atguigu.controller;import com.atguigu.properties.DataSourceConfigurationProperties;
import com.atguigu.properties.DataSourceProperties;
import org.springframework.beans.factory.annotation.Autowired;
import org.springframework.web.bind.annotation.GetMapping;
import org.springframework.web.bind.annotation.RestController;@RestController
public class HelloController {@Autowiredprivate DataSourceConfigurationProperties dataSourceConfigurationProperties;@GetMapping("/hello")public String hello(){System.out.println(dataSourceConfigurationProperties);return "Hello,Spring Boot 3!";}}
5. 多环境profile切换配置
Spring Boot项目中配置文件的名称只能是application , 如果我们把所有的配置全都写在一个配置文件中如果配置项比较多, 配置文件就会显得比较复杂和臃肿 ! 不利于后期的项目维护和开发
例如下面几个场景 :
1.因为开发环境变化, 我们需要修改配置文件中某一个配置项的值(比如之前是mysql数据库,切换oracle数据库)
2.项目开发完成需要上线了 , 需要把一些环境修改成正式环境(开发,测试,上线,多环境切换)
解决方案 :使用profiles拆分配置
spring boot项目中允许使用多个YAML配置文件。
这些文件名称必须为application-*.yml,并且在application.yml中激活。
(1)需求:
将项目的开发、测试、生产环境配置进行拆分,可以根据需求切换
(2)功能实现
第一步: 创建开发、测试、生产三个配置文件
application-dev.yml
spring:jdbc:datasource:driverClassName: com.mysql.cj.jdbc.Driverurl: jdbc:mysql:///devusername: rootpassword: root
application-test.yml
spring:jdbc:datasource:driverClassName: com.mysql.cj.jdbc.Driverurl: jdbc:mysql:///testusername: rootpassword: root
application-prod.yml
spring:jdbc:datasource:driverClassName: com.mysql.cj.jdbc.Driverurl: jdbc:mysql:///produsername: rootpassword: root
**第二步:**在application.yml激活
spring:profiles:active: dev
直接运行项目:http://localhost:8080/hello

注意 :
如果properties和yml文件都存在,没有spring.profiles.active设置,如果有重叠属性,默认以properties优先。
如果设置了spring.profiles.active,并且有重叠属性,以active设置优先。
4、SpringBoot自动配置原理
1. 初步理解
-
自动配置的 Tomcat、SpringMVC 等
-
- 导入场景,容器中就会自动配置好这个场景的核心组件。
- 以前:DispatcherServlet、ViewResolver、CharacterEncodingFilter…
- 现在:自动配置好的这些组件
- 验证:容器中有了什么组件,就具有什么功能
public static void main(String[] args) {var ioc = SpringApplication.run(MainApplication.class, args);//1、获取容器中所有组件的名字String[] names = ioc.getBeanDefinitionNames();//2、挨个遍历:// dispatcherServlet、beanNameViewResolver、characterEncodingFilter、multipartResolver// SpringBoot把以前配置的核心组件现在都给我们自动配置好了。for (String name : names) {System.out.println(name);}}
-
默认的包扫描规则
-
@SpringBootApplication标注的类就是主程序类- SpringBoot只会扫描主程序所在的包及其下面的子包,自动的component-scan功能
- 自定义扫描路径
-
-
- @SpringBootApplication(scanBasePackages = “com.atguigu”)
@ComponentScan("com.atguigu")直接指定扫描的路径
-
-
配置默认值
-
- 配置文件的所有配置项是和某个类的对象值进行一 一绑定的。
- 绑定了配置文件中每一项值的类: 属性类。
- 比如:
-
-
ServerProperties绑定了所有Tomcat服务器有关的配置MultipartProperties绑定了所有文件上传相关的配置- …参照官方文档:或者参照 绑定的 属性类。
-
-
按需加载自动配置
-
- 导入场景
spring-boot-starter-web - 场景启动器除了会导入相关功能依赖,导入一个
spring-boot-starter,是所有starter的starter,基础核心starter spring-boot-starter导入了一个包spring-boot-autoconfigure。包里面都是各种场景的AutoConfiguration自动配置类- 虽然全场景的自动配置都在
spring-boot-autoconfigure这个包,但是不是全都开启的。
- 导入场景
-
- 导入哪个场景就开启哪个自动配置
总结: 导入场景启动器、触发 spring-boot-autoconfigure这个包的自动配置生效、容器中就会具有相关场景的功能
2. 完整流程
思考:
1、SpringBoot怎么实现导一个starter、写一些简单配置,应用就能跑起来,我们无需关心整合
2、为什么Tomcat的端口号可以配置在application.properties中,并且Tomcat能启动成功?
3、导入场景后哪些自动配置能生效?
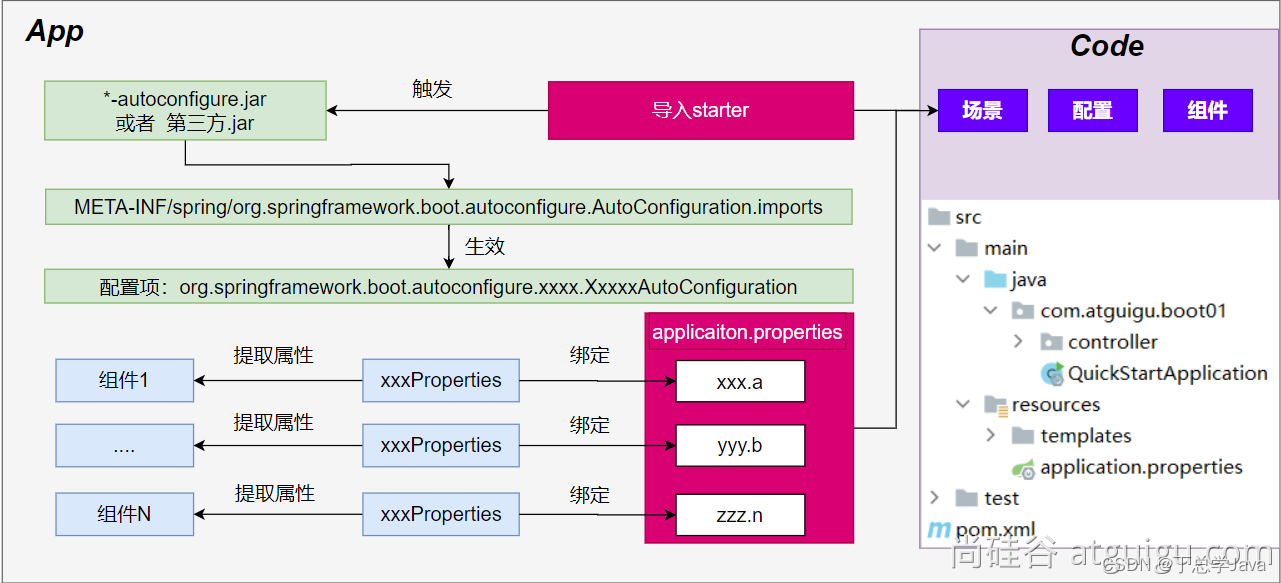
自动配置流程细节梳理:
**1、**导入starter-web:导入了web开发场景
- 1、场景启动器导入了相关场景的所有依赖:
starter-json、starter-tomcat、springmvc - 2、每个场景启动器都引入了一个
spring-boot-starter,核心场景启动器。 - 3、核心场景启动器引入了
spring-boot-autoconfigure包。 - 4、
spring-boot-autoconfigure里面囊括了所有场景的所有配置。 - 5、只要这个包下的所有类都能生效,那么相当于SpringBoot官方写好的整合功能就生效了。
- 6、SpringBoot默认却扫描不到
spring-boot-autoconfigure下写好的所有配置类。(这些配置类给我们做了整合操作),默认只扫描主程序所在的包。
**2、**主程序:@SpringBootApplication
-
1、
@SpringBootApplication由三个注解组成@SpringBootConfiguration、@EnableAutoConfiguration、@ComponentScan -
2、SpringBoot默认只能扫描自己主程序所在的包及其下面的子包,扫描不到
spring-boot-autoconfigure包中官方写好的配置类 -
3、
**@EnableAutoConfiguration**:SpringBoot 开启自动配置的核心。 -
-
- 是由
@Import(AutoConfigurationImportSelector.class)提供功能:批量给容器中导入组件。
- 是由
-
- SpringBoot启动会默认加载 142个配置类。
-
- 这142个配置类来自于
spring-boot-autoconfigure下META-INF/spring/**org.springframework.boot.autoconfigure.AutoConfiguration**.imports文件指定的
- 这142个配置类来自于
- 项目启动的时候利用 @Import 批量导入组件机制把
autoconfigure包下的142xxxxAutoConfiguration类导入进来(自动配置类) - 虽然导入了
142个自动配置类
-
-
4、按需生效:
-
- 并不是这
142个自动配置类都能生效 - 每一个自动配置类,都有条件注解
@ConditionalOnxxx,只有条件成立,才能生效
- 并不是这
3、**xxxxAutoConfiguration**自动配置类
- 1、给容器中使用@Bean 放一堆组件。
- 2、每个自动配置类都可能有这个注解
@EnableConfigurationProperties(**ServerProperties**.class),用来把配置文件中配的指定前缀的属性值封装到xxxProperties属性类中 - 3、以DataSourceAutoConfiguration为例:所有配置都是以
spring.datasource开头的,配置都封装到了属性类中。 - 4、给容器中放的所有组件的一些核心参数,都来自于
**xxxProperties**。**xxxProperties**都是和配置文件绑定。 - 只需要改配置文件的值,核心组件的底层参数都能修改
**4、**写业务,全程无需关心各种整合(底层这些整合写好了,而且也生效了)
核心流程总结:
1、导入starter,就会导入autoconfigure包。
2、autoconfigure 包里面 有一个文件 META-INF/spring/**org.springframework.boot.autoconfigure.AutoConfiguration**.imports,里面指定的所有启动要加载的自动配置类
3、@EnableAutoConfiguration 会自动的把上面文件里面写的所有自动配置类都导入进来。xxxAutoConfiguration 是有条件注解进行按需加载
4、xxxAutoConfiguration给容器中导入一堆组件,组件都是从 xxxProperties中提取属性值
5、xxxProperties又是和配置文件进行了绑定
**效果:**导入starter、修改配置文件,就能修改底层行为。
3. 进阶理解
1. @SpringBootApplication
@SpringBootConfiguration
就是: @Configuration ,容器中的组件,配置类。spring ioc启动就会加载创建这个类对象
@EnableAutoConfiguration
开启自动配置
@AutoConfigurationPackage:扫描主程序包:加载自己的组件
- 利用
@Import(AutoConfigurationPackages.Registrar.class)想要给容器中导入组件。 - 把主程序所在的包的所有组件导入进来。
- 为什么SpringBoot默认只扫描主程序所在的包及其子包
@Import(AutoConfigurationImportSelector.class):加载所有自动配置类:加载starter导入的组件
List<String> configurations = ImportCandidates.load(AutoConfiguration.class, getBeanClassLoader()).getCandidates();
扫描文件:META-INF/spring/org.springframework.boot.autoconfigure.AutoConfiguration.imports
@ComponentScan
组件扫描:排除一些组件(哪些不要)
排除前面已经扫描进来的配置类、和自动配置类。
@ComponentScan(excludeFilters = { @Filter(type = FilterType.CUSTOM, classes = TypeExcludeFilter.class),@Filter(type = FilterType.CUSTOM, classes = AutoConfigurationExcludeFilter.class) })
4. 自定义启动器
场景:抽取聊天机器人场景,它可以打招呼。
效果:任何项目导入此starter都具有打招呼功能,并且问候语中的人名需要可以在配置文件中修改
-
- 创建
自定义starter项目,引入spring-boot-starter基础依赖
- 创建
-
- 编写模块功能,引入模块所有需要的依赖。
-
- 编写
xxxAutoConfiguration自动配置类,帮其他项目导入这个模块需要的所有组件
- 编写
-
- 编写配置文件
META-INF/spring/org.springframework.boot.autoconfigure.AutoConfiguration.imports指定启动需要加载的自动配置
- 编写配置文件
-
- 其他项目引入即可使用
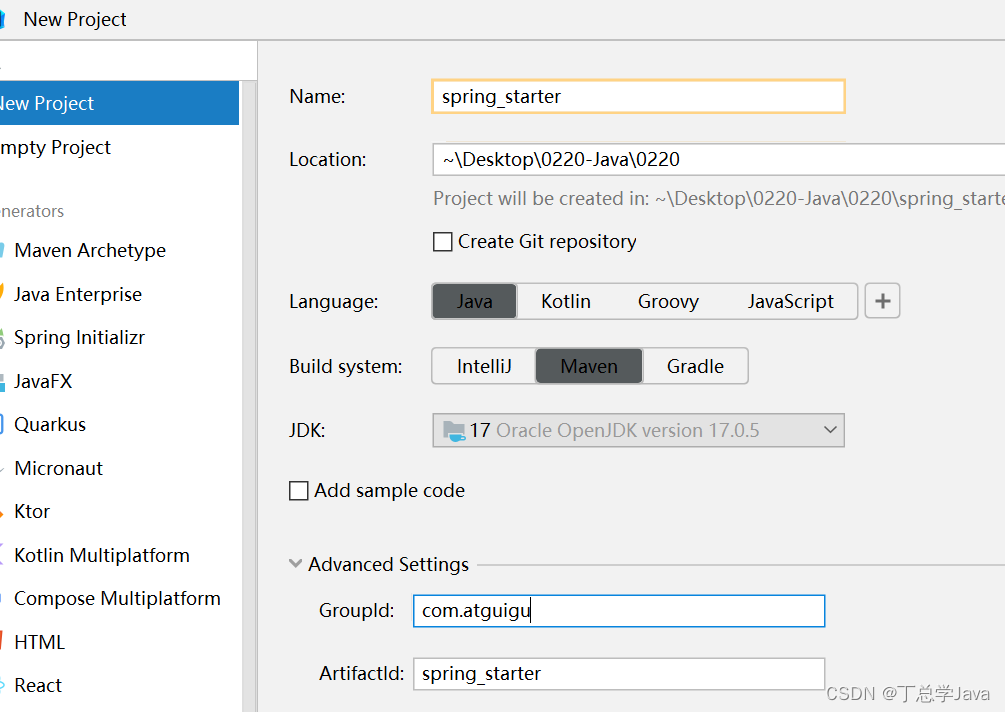
1. 创建自定义启动工程
2. 引入依赖
<parent><groupId>org.springframework.boot</groupId><artifactId>spring-boot-starter-parent</artifactId><version>3.0.5</version>
</parent><dependencies><dependency><groupId>org.springframework.boot</groupId><artifactId>spring-boot-starter-web</artifactId></dependency><!--导入配置处理器,配置文件自定义的properties配置都会有提示--><dependency><groupId>org.springframework.boot</groupId><artifactId>spring-boot-configuration-processor</artifactId><optional>true</optional></dependency><dependency><groupId>org.projectlombok</groupId><artifactId>lombok</artifactId></dependency>
</dependencies>
3. 创建业务类
(1)RobotProperties
@ConfigurationProperties(prefix = "robot")  //此属性类和配置文件指定前缀绑定
@Component
@Data
public class RobotProperties {private String name;private String age;private String email;
}
(2)RobotService
@Service
public class RobotService {@AutowiredRobotProperties robotProperties;public String sayHello(){return "你好:名字:【"+robotProperties.getName()+"】;年龄:【"+robotProperties.getAge()+"】";}
}
4. 基本抽取
-
自己写一个
RobotAutoConfiguration,给容器中导入这个场景需要的所有组件 -
- 为什么这些组件默认不会扫描进去?
- starter所在的包和 引入它的项目的主程序所在的包不是父子层级
-
别人引用这个
starter,直接导入这个RobotAutoConfiguration,就能把这个场景的组件导入进来
//给容器中导入Robot功能要用的所有组件
@Import({RobotProperties.class, RobotService.class})
@Configuration
public class RobotAutoConfiguration {}
5. 使用@EnableXxx机制
@Retention(RetentionPolicy.RUNTIME)
@Target({ElementType.TYPE})
@Documented
@Import(RobotAutoConfiguration.class)
public @interface EnableRobot {}
别人引入starter需要使用 @EnableRobot开启功能
6. 完全自动配置
- META-INF/spring/org.springframework.boot.autoconfigure.AutoConfiguration.imports 文件中编写好我们自动配置类的全类名即可
com.atguigu.RobotAutoConfiguration
把spring_starter项目进行install操作
7. 使用自定义启动器
(1)在使用的工程中引入自定义启动器项目依赖
<dependency><groupId>com.atguigu</groupId><artifactId>spring_starter</artifactId><version>1.0-SNAPSHOT</version>
</dependency>
(2)在使用工程的启动类添加注解
@SpringBootApplication
@EnableRobot
public class Application {public static void main(String[] args) {SpringApplication.run(Application.class,args);}
}
(3)在使用工程的配置文件添加数据
robot.name=lucy
robot.age=20
robot.email=java@atguigu.com
(4)编写controller测试
@RestController
//@EnableRobot
public class HelloController {@Autowiredprivate RobotService robotService;@GetMapping("/hello")public String hello(){System.out.println(robotService.sayHello());return "Hello,Spring Boot 3!";}
}
启动测试,访问路径:http://localhost:8080/robot/hello
8.条件化注解
@Bean
@ConditionalOnProperty(name="com.atguigu.datasource.type" , havingValue = "druid")public DataSource createDruidDataSource(){
5、SpringBoot常用启动器
5.1. SpringBoot整合MVC
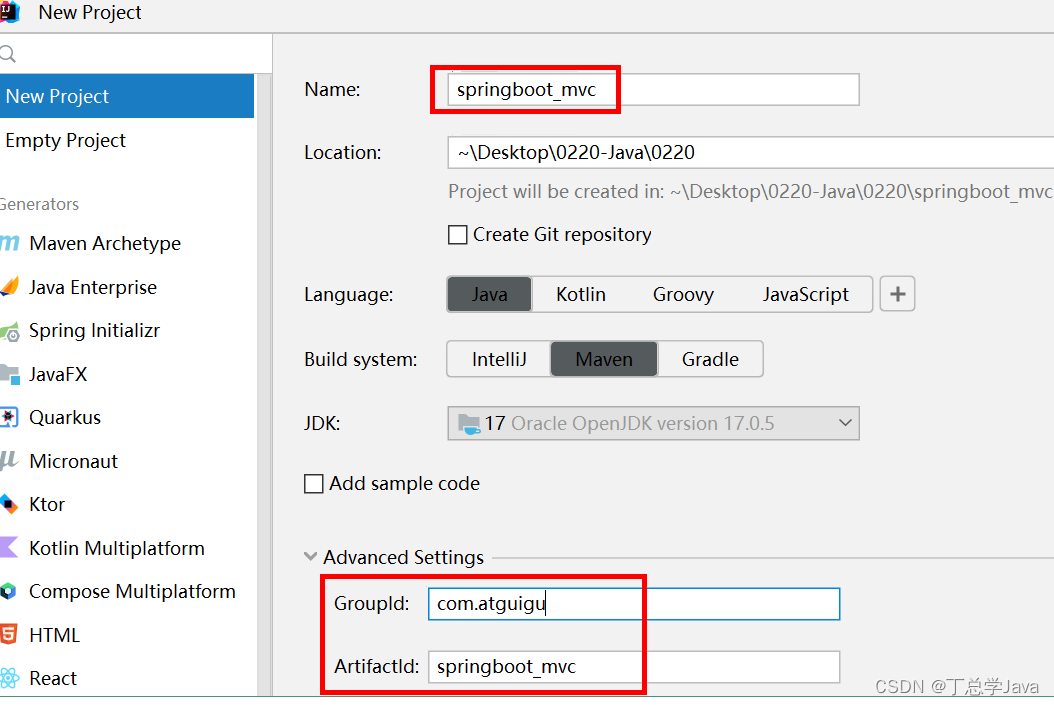
5.1.1. 起步依赖
(1)创建工程
(2)引入依赖
<!--所有springboot项目都必须继承自 spring-boot-starter-parent -->
<parent><groupId>org.springframework.boot</groupId><artifactId>spring-boot-starter-parent</artifactId><version>3.0.5</version>
</parent><dependencies><!--web开发的场景启动器 --><dependency><groupId>org.springframework.boot</groupId><artifactId>spring-boot-starter-web</artifactId></dependency><dependency><groupId>org.projectlombok</groupId><artifactId>lombok</artifactId></dependency>
</dependencies>
(3)创建启动类
创建package:com.atguigu
创建启动类:Application
package com.atguigu;import org.springframework.boot.SpringApplication;
import org.springframework.boot.autoconfigure.SpringBootApplication;@SpringBootApplication
public class Application {public static void main(String[] args) {SpringApplication.run(Application.class,args);}
}
(4)创建实体类
package com.atguigu.entity;import lombok.Data;@Data
public class User {private String username ;private String password ;private Integer age ;private String sex ;
}
(5)编写Controller
package com.atguigu.controller;import com.atguigu.entity.User;
import org.springframework.stereotype.Controller;
import org.springframework.web.bind.annotation.GetMapping;
import org.springframework.web.bind.annotation.RequestMapping;
import org.springframework.web.bind.annotation.ResponseBody;@Controller
@RequestMapping("/user")
public class UserController {@GetMapping("/getUser")@ResponseBodypublic User getUser(){User user = new User();user.setUsername("杨过");user.setPassword("123456");user.setAge(18);user.setSex("男");return user;}
}
(6)访问测试
运行项目,使用地址: http://localhost:8080/user/getUser 进行访问

5.1.2. 静态资源目录
目前项目开发中,一般都采用前后端分离开发模式,此部分内容了解即可
在WEB开发中我们需要引入一些静态资源 , 例如 : HTML , CSS , JS , 图片等 , 如果是普通的项目静态资源可以放在项目的webapp目录下。现在使用Spring Boot做开发 , 项目中没有webapp目录 , 我们的项目是一个jar工程,那么就没有webapp,我们的静态资源该放哪里呢?
(1)默认路径
在springboot中就定义了静态资源的默认查找路径:
@ConfigurationProperties("spring.web")
public class WebProperties {//..................public static class Resources {private static final String[] CLASSPATH_RESOURCE_LOCATIONS = new String[]{"classpath:/META-INF/resources/", "classpath:/resources/", "classpath:/static/", "classpath:/public/"};private String[] staticLocations;private boolean addMappings;private boolean customized;private final Chain chain;private final Cache cache;public Resources() {this.staticLocations = CLASSPATH_RESOURCE_LOCATIONS;this.addMappings = true;this.customized = false;this.chain = new Chain();this.cache = new Cache();}//...........
}
默认的静态资源路径为:
· classpath:/META-INF/resources/
· classpath:/resources/
· classpath:/static/
· classpath:/public/
我们只要静态资源放在这些目录中任何一个,SpringMVC都会帮我们处理。 我们习惯会把静态资源放在classpath:/static/ 目录下。在resources目录下创建index.html文件
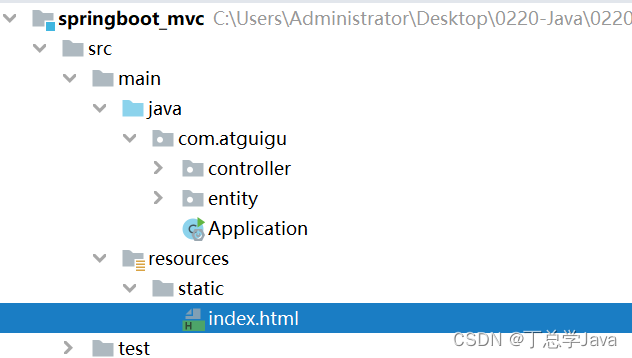
打开浏览器输入 : http://localhost:8080/index.html
(2)覆盖路径
如果想要修改默认的静态资源路径, 配置如下 :
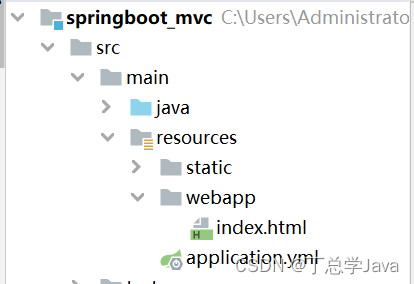
新建 application.yml
spring:web:resources:static-locations: classpath:/webapp/
请求地址 http://localhost:8080/index.html
5.1.3. 自定义拦截器
web开发中的拦截器也是我们经常需要使用的组件,可以帮我们完成一些日志记录 , 数据过滤 , 请求过滤等等很多功能,那么在SpringBoot中该如何配置呢?
(1)SpringMVC配置拦截器
-
编写一个拦截器(实现HandlerInterceptor接口)
-
注册拦截器(mvc:interceptors)
<!--配置拦截器--><mvc:interceptors><mvc:interceptor><!--配置拦截路径--><mvc:mapping path="/user/**"/><!--配置不拦截路径:不拦截路径是指从拦截路径中排除--><mvc:exclude-mapping path="/user/sayByby"></mvc:exclude-mapping><!--配置拦截器bean--><bean class="com.atguigu.interceptor.LogInterceptor2"></bean></mvc:interceptor></mvc:interceptors>
(2)SpringBoot实现拦截器
因为SpringBoot没有XML配置文件了 , 所以在SpringBoot中使用拦截器的注册拦截器的方式就不太一样了, 需要借助一个WebMvcConfigurer类帮助我们注册拦截器 , 实现拦截器的具体步骤如下 :
- 编写一个拦截器
package com.atguigu.interceptor;import jakarta.servlet.http.HttpServletRequest;
import jakarta.servlet.http.HttpServletResponse;
import org.springframework.stereotype.Component;
import org.springframework.web.servlet.HandlerInterceptor;
import org.springframework.web.servlet.ModelAndView;@Component
public class MyInterceptor implements HandlerInterceptor {@Overridepublic boolean preHandle(HttpServletRequest request, HttpServletResponse response, Object handler) throws Exception {System.out.println("MyInterceptor拦截器的preHandle方法执行....");return true;}@Overridepublic void postHandle(HttpServletRequest request, HttpServletResponse response, Object handler, ModelAndView modelAndView) throws Exception {System.out.println("MyInterceptor拦截器的postHandle方法执行....");}@Overridepublic void afterCompletion(HttpServletRequest request, HttpServletResponse response, Object handler, Exception ex) throws Exception {System.out.println("MyInterceptor拦截器的afterCompletion方法执行....");}
}
- 通过WebMvcConfigurer注册拦截器
package com.atguigu.config;import com.atguigu.interceptor.MyInterceptor;
import org.springframework.beans.factory.annotation.Autowired;
import org.springframework.context.annotation.Configuration;
import org.springframework.web.servlet.config.annotation.InterceptorRegistry;
import org.springframework.web.servlet.config.annotation.WebMvcConfigurer;
@Configuration
public class MvcConfig implements WebMvcConfigurer {@Autowiredprivate MyInterceptor myInterceptor ;/*** /**  拦截当前目录及子目录下的所有路径 /user/**   /user/findAll  /user/order/findAll* /*   拦截当前目录下的以及子路径   /user/*     /user/findAll* @param registry*/@Overridepublic void addInterceptors(InterceptorRegistry registry) {registry.addInterceptor(myInterceptor).addPathPatterns("/**");}
}
启动测试,控制台看到信息:

5.2. SpringBoot整合MyBatis
5.2.1. 创建工程
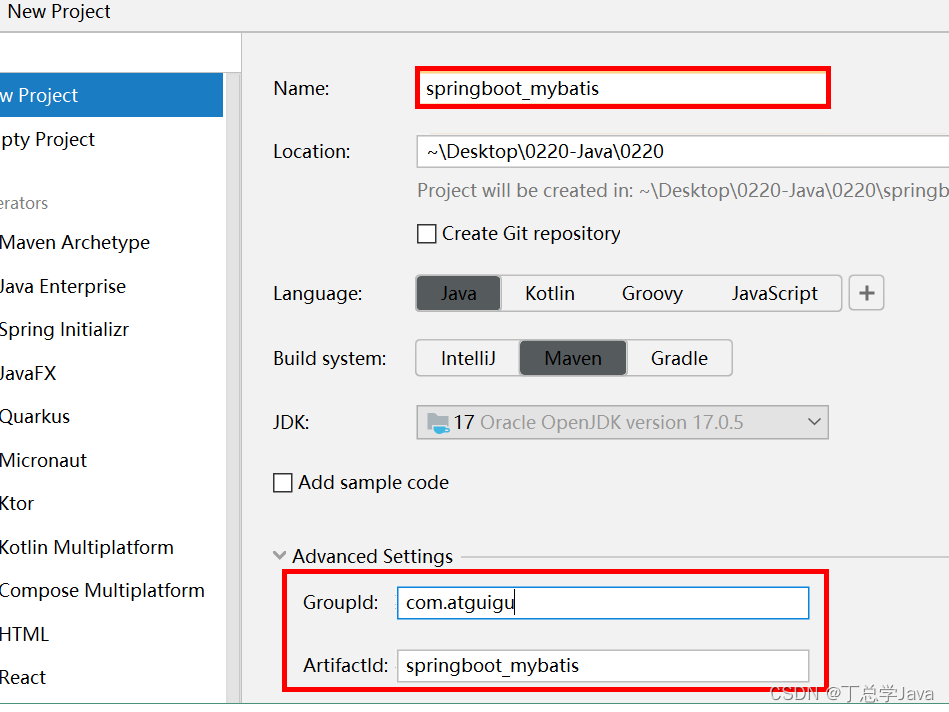
5.2.2. 添加依赖
<parent><groupId>org.springframework.boot</groupId><artifactId>spring-boot-starter-parent</artifactId><version>3.0.5</version>
</parent><dependencies><dependency><groupId>org.springframework.boot</groupId><artifactId>spring-boot-starter-web</artifactId></dependency><dependency><groupId>org.mybatis.spring.boot</groupId><artifactId>mybatis-spring-boot-starter</artifactId><version>3.0.1</version></dependency><dependency><groupId>mysql</groupId><artifactId>mysql-connector-java</artifactId><version>8.0.30</version></dependency><dependency><groupId>org.projectlombok</groupId><artifactId>lombok</artifactId></dependency>
</dependencies>
5.2.3. 创建配置文件
application.properties
spring.datasource.url=jdbc:mysql://localhost:3306/springboot
spring.datasource.driver-class-name=com.mysql.cj.jdbc.Driver
spring.datasource.username=root
spring.datasource.password=root
# springboot默认的数据源连接池产品,可以不配置。
# 如果使用其他的数据源产品,那么type必须要指定。
# 例如 com.alibaba.druid.pool.DruidDataSource
spring.datasource.type=com.zaxxer.hikari.HikariDataSource#指定mapper映射文件位置
#如果mapper映射文件的存储位置在resources下的文件夹和Mapper接口的包名一致,则不需要配置
mybatis.mapper-locations=classpath:/mapper/*.xml
5.2.4. 创建启动类
package com.atguigu;import org.springframework.boot.SpringApplication;
import org.springframework.boot.autoconfigure.SpringBootApplication;@SpringBootApplication
public class Application {public static void main(String[] args) {SpringApplication.run(Application.class,args);}
}
5.2.5. 创建表编写实体
(1)创建数据库和表
create database springboot;
use springboot;
create table user (id int primary key,username varchar(100),address varchar(100)
);insert into user values(11,'lucy','China');
(2)编写实体类
package com.atguigu.entity;import lombok.Data;@Data
public class User {private Integer id;private String username;private String address;
}
5.2.6. 编写Mapper
(1)创建UserMapper
package com.atguigu.mapper;import com.atguigu.entity.User;
import org.apache.ibatis.annotations.Mapper;
import org.springframework.stereotype.Repository;@Repository
@Mapper   //这个注解不能忘!否则装配失败!
public interface UserMapper {public User getUser(Integer id);
}
(2)创建UserMapper.xml
在resources下创建文件夹mapper,在mapper文件夹下创建UserMapper.xml
<?xml version="1.0" encoding="UTF-8"?>
<!DOCTYPE mapper PUBLIC "-//mybatis.org//DTD Mapper 3.0//EN" "http://mybatis.org/dtd/mybatis-3-mapper.dtd">
<mapper namespace="com.atguigu.mapper.UserMapper"><!--根据id查询--><select id="getUser" resultType="com.atguigu.entity.User">select * from user where id=#{id}</select></mapper>
5.2.7. 编写Service
(1)UserService
package com.atguigu.service;import com.atguigu.entity.User;public interface UserService {//查询索引User getUser(Integer id);
}
(2)UserServiceImpl
package com.atguigu.service;import com.atguigu.entity.User;
import com.atguigu.mapper.UserMapper;
import org.springframework.beans.factory.annotation.Autowired;
import org.springframework.stereotype.Service;@Service
@Transactional
public class UserServiceImpl implements UserService{@Autowiredprivate UserMapper userMapper;@Overridepublic User getUser(Integer id) {User user = userMapper.getUser(id);return user;}
}
5.2.8. 编写Controller
package com.atguigu.controller;import com.atguigu.entity.User;
import com.atguigu.service.UserService;
import org.springframework.beans.factory.annotation.Autowired;
import org.springframework.web.bind.annotation.GetMapping;
import org.springframework.web.bind.annotation.PathVariable;
import org.springframework.web.bind.annotation.RestController;@RestController
public class UserController {@Autowiredprivate UserService userService;@GetMapping("getUser/{id}")public User getUser(@PathVariable Integer id) {User user = userService.getUser(id);return user;}
}
运行测试:http://localhost:8080/getUser/11
5.3. SpringBoot整合定时任务
5.3.1. 定时任务概述
(1)什么是定时任务
定时任务,就是在指定时间内触发执行某个动作。
举例说明,比如小明在网上挂了某个医院的号,医院系统会在小明就诊的前一天晚上20点给小明发送短信,通知他记得明天去看病。这个实现流程:每天晚上20点,系统会查询有哪些人挂了第二天号,就给这些人分别发送提醒短信 spring1.2 quartz cron task schedule
(2)为什么要用定时任务
- 自动触发 ,无需手动触发动作
- 时间准确,会在准确的时间内进行业务处理;
- 低耦合,不影响其他业务功能
5.3.2. 创建工程
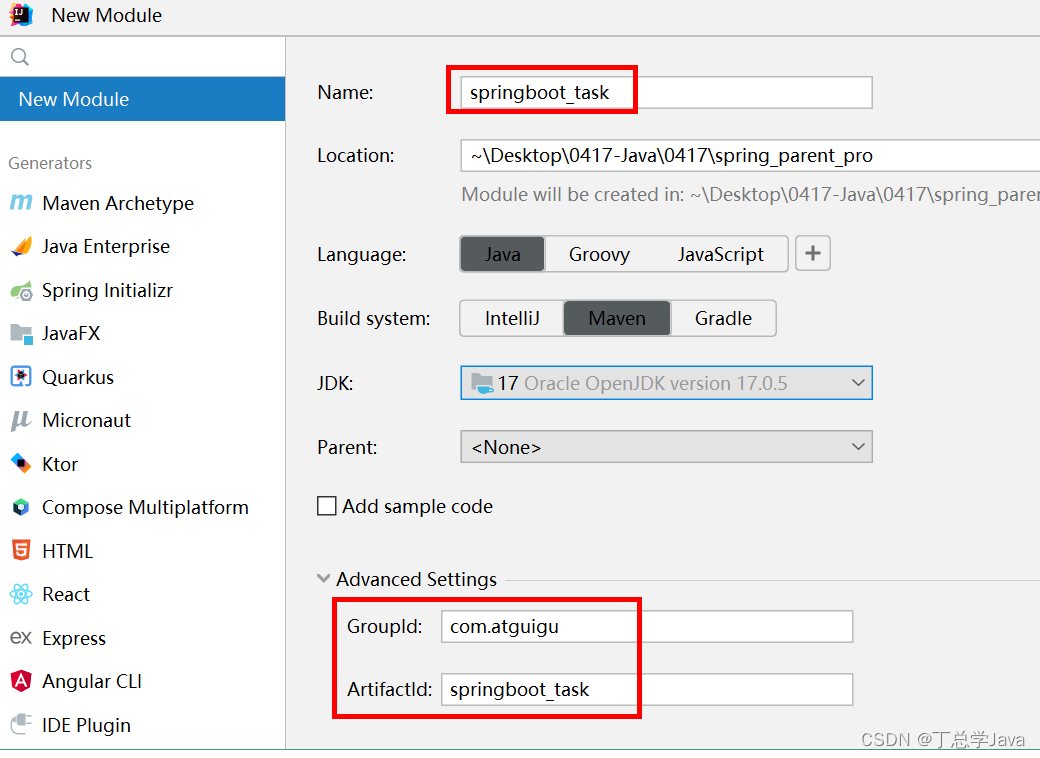
5.3.3. 添加依赖
<parent><groupId>org.springframework.boot</groupId><artifactId>spring-boot-starter-parent</artifactId><version>3.0.5</version>
</parent><dependencies><dependency><groupId>org.springframework.boot</groupId><artifactId>spring-boot-starter-web</artifactId></dependency><dependency><groupId>org.mybatis.spring.boot</groupId><artifactId>mybatis-spring-boot-starter</artifactId><version>3.0.1</version></dependency><dependency><groupId>mysql</groupId><artifactId>mysql-connector-java</artifactId><version>8.0.30</version></dependency><dependency><groupId>org.projectlombok</groupId><artifactId>lombok</artifactId></dependency>
</dependencies>
5.2.4. 创建配置文件
application.properties
spring.datasource.url=jdbc:mysql://localhost:3306/springboot
spring.datasource.driver-class-name=com.mysql.cj.jdbc.Driver
spring.datasource.username=root
spring.datasource.password=root
spring.datasource.type=com.zaxxer.hikari.HikariDataSource#指定mapper映射文件位置  Mapper接口和xml配置文件的包名一致时可以不用设置
mybatis.mapper-locations=classpath:/mapper/*.xml
mybatis.configuration.map-underscore-to-camel-case=true
5.2.5. 创建启动类
package com.atguigu;import org.springframework.boot.SpringApplication;
import org.springframework.boot.autoconfigure.SpringBootApplication;
import org.springframework.scheduling.annotation.EnableScheduling;@SpringBootApplication
@EnableScheduling //开启定时任务
//@MapperScan(basePackages = "com.atguigu.blog.mapper") 这样可以不用去一个一个添加@Mapper
public class TaskApplication {public static void main(String[] args) {SpringApplication.run(TaskApplication.class,args);}
}
5.2.6. 创建表编写实体
(1)创建测试表
USE `springboot`;/*Table structure for table `order_info` */DROP TABLE IF EXISTS `order_info`;CREATE TABLE `order_info` (`id` bigint NOT NULL AUTO_INCREMENT COMMENT '编号',`user_id` bigint DEFAULT NULL,`out_trade_no` varchar(300) DEFAULT NULL COMMENT '订单交易号',`hoscode` varchar(30) DEFAULT NULL COMMENT '医院编号',`hosname` varchar(100) DEFAULT NULL COMMENT '医院名称',`depcode` varchar(30) DEFAULT NULL COMMENT '科室编号',`depname` varchar(20) DEFAULT NULL COMMENT '科室名称',`title` varchar(20) DEFAULT NULL COMMENT '医生职称',`hos_schedule_id` varchar(50) DEFAULT NULL COMMENT '排班编号(医院自己的排班主键)',`reserve_date` date DEFAULT NULL COMMENT '安排日期',`reserve_time` tinyint DEFAULT '0' COMMENT '安排时间(0:上午 1:下午)',`patient_id` bigint DEFAULT NULL COMMENT '就诊人id',`patient_name` varchar(20) DEFAULT NULL COMMENT '就诊人名称',`patient_phone` varchar(11) DEFAULT NULL COMMENT '就诊人手机',`hos_record_id` varchar(30) DEFAULT NULL COMMENT '预约记录唯一标识(医院预约记录主键)',`number` int DEFAULT NULL COMMENT '预约号序',`fetch_time` varchar(50) DEFAULT NULL COMMENT '建议取号时间',`fetch_address` varchar(255) DEFAULT NULL COMMENT '取号地点',`amount` decimal(10,0) DEFAULT NULL COMMENT '医事服务费',`quit_time` datetime DEFAULT NULL COMMENT '退号时间',`order_status` tinyint DEFAULT NULL COMMENT '订单状态',`create_time` timestamp NOT NULL DEFAULT CURRENT_TIMESTAMP COMMENT '创建时间',`update_time` timestamp NOT NULL DEFAULT CURRENT_TIMESTAMP ON UPDATE CURRENT_TIMESTAMP COMMENT '更新时间',PRIMARY KEY (`id`),UNIQUE KEY `uk_out_trade_no` (`out_trade_no`),KEY `idx_user_id` (`user_id`),KEY `idx_hoscode` (`hoscode`),KEY `idx_hos_schedule_id` (`hos_schedule_id`),KEY `idx_hos_record_id` (`hos_record_id`)
) ENGINE=InnoDB AUTO_INCREMENT=19 DEFAULT CHARSET=utf8mb3 COMMENT='订单表';/*Data for the table `order_info` */insert  into `order_info`(`id`,`user_id`,`out_trade_no`,`hoscode`,`hosname`,`depcode`,`depname`,`title`,`hos_schedule_id`,`reserve_date`,`reserve_time`,`patient_id`,`patient_name`,`patient_phone`,`hos_record_id`,`number`,`fetch_time`,`fetch_address`,`amount`,`quit_time`,`order_status`,`create_time`,`update_time`) values (14,10,'162825325628088','10000','北京协和医院','200040878','多发性硬化专科门诊','副主任医师','610282d816d1020127ebf811','2023-07-03',0,7,'张翠山','15611248098','12',25,'2023-07-0309:00前','一层114窗口','100','2023-07-03 15:30:00',1,'2023-07-02 20:34:16','2023-07-02 18:35:33'),(15,11,'162829645831986','10001','北京安贞医院','410040832','神经多发性内科','专家','610282d816d1020127ebf812','2023-07-04',1,9,'张无忌','13511248778','13',7,'2023-07-0409:00前','一层09窗口','100','2023-07-04 15:30:00',1,'2023-07-02 08:34:18','2023-07-02 18:35:30'),(16,12,'162830304778619','10002','北京大学第三医院','200040862','耳鼻喉专科门诊','副主任医师','610282d816d1020127ebf812','2023-07-04',1,20,'张三丰','18911288709','14',8,'2023-07-0409:00前','一层114窗口','100','2023-07-04 15:30:00',1,'2023-07-02 10:24:07','2023-07-02 18:35:36');
(2)编写实体类
@Data
public class OrderInfo {//idprivate Long id;//创建时间@JsonFormat(pattern = "yyyy-MM-dd HH:mm:ss")private Date createTime;//更新时间private Date updateTime;//下单用户idprivate Long userId;//订单交易号private String outTradeNo;//医院编号private String hoscode;//医院名称private String hosname;//科室编号private String depcode;//科室名称private String depname;//排班idprivate String scheduleId;//医生职称private String title;//就诊日期private Date reserveDate;//就诊时间:上午 下午private Integer reserveTime;//就诊人idprivate Long patientId;//就诊人名称private String patientName;//就诊人手机号private String patientPhone;//预约记录唯一标识(医院预约记录主键)private String hosRecordId;//预约号序")private Integer number;//建议取号时间private String fetchTime;//取号地点private String fetchAddress;//医事服务费private BigDecimal amount;//退号时间private Date quitTime;//订单状态private Integer orderStatus;
}
5.2.7. 创建定时任务类
(1)cron表达式
由若干数字、空格、符号按一定的规则,组成的一组字符串,从而表达时间的信息,该字符串由 6 个空格分为 7 个域,每一个域代表一个时间含义。

通常定义 年 的部分可以省略,实际常用的由前六部分组成
其实我们还可以借助于一些可视化的工具来生成 cron 表达式 https://cron.qqe2.com/
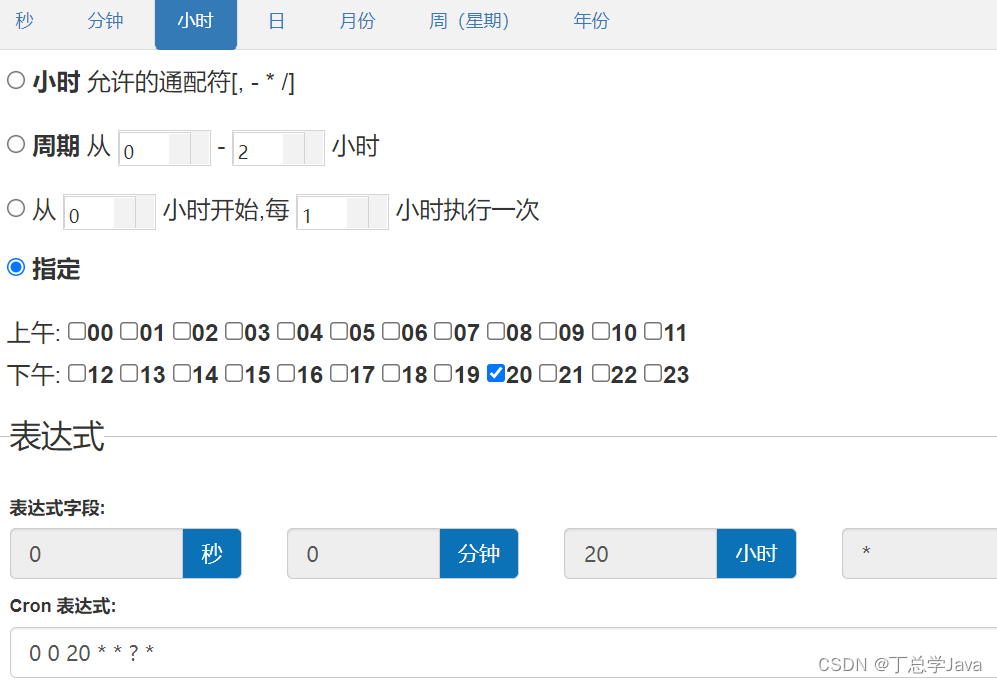
常用的cron表达式有:
1) 0/2 * * * * ?   表示每2秒 执行任务
2) 0 0/2 * * * ?    表示每2分钟 执行任务
3) 0 0 2 1 * ?   表示在每月的1日的凌晨2点调整任务
4) 0 15 10 ? * MON-FRI   表示周一到周五每天上午10:15执行作业
5) 0 15 10 ? 6L 2002-2006   表示2002-2006年的每个月的最后一个星期五上午10:15执行作
6) 0 0 10,14,16 * * ?   每天上午10点,下午2点,4点
7) 0 0/30 9-17 * * ?   朝九晚五工作时间内每半小时
8) 0 0 12 ? * WED    表示每个星期三中午12点
9) 0 0 12 * * ?   每天中午12点触发
10) 0 15 10 ? * *    每天上午10:15触发
11) 0 15 10 * * ?     每天上午10:15触发
12) 0 15 10 * * ?    每天上午10:15触发
13) 0 15 10 * * ? 2005    2005年的每天上午10:15触发
14) 0 * 14 * * ?     在每天下午2点到下午2:59期间的每1分钟触发
15) 0 0/5 14 * * ?    在每天下午2点到下午2:55期间的每5分钟触发
(2)定时任务类
package com.atguigu.task;import com.atguigu.service.OrderInfoService;
import org.joda.time.DateTime;
import org.springframework.beans.factory.annotation.Autowired;
import org.springframework.scheduling.annotation.Scheduled;
import org.springframework.stereotype.Component;@Component
public class ScheduledTask {@Autowiredprivate OrderInfoService orderInfoService;// cron表达式设置执行规则//@Scheduled(cron = "0 0 20 * * ?")@Scheduled(cron = "0/10 * * * * ?")public void remind() {//获取查询日期,获取第二天日期DateTime dateTime = new DateTime().plusDays(1);String dateString = dateTime.toString("yyyy-MM-dd");System.out.println(dateString);//调用方法查询orderInfoService.senMessageForHospital(dateString);}
}
5.2.8. 编写Service
(1)OrderInfoService
package com.atguigu.service;public interface OrderInfoService {void senMessageForHospital(String dateString);
}
(2)OrderInfoServiceImpl
package com.atguigu.service;import com.atguigu.entity.OrderInfo;
import com.atguigu.mapper.OrderInfoMapper;
import org.springframework.beans.factory.annotation.Autowired;
import org.springframework.stereotype.Service;
import java.util.List;@Service
public class OrderInfoServiceImpl implements OrderInfoService{@Autowiredprivate OrderInfoMapper orderInfoMapper;@Overridepublic void senMessageForHospital(String dateString) {List<OrderInfo> orderInfoList = orderInfoMapper.selectPatientInfoByDate(dateString);orderInfoList.forEach(orderInfo -> {System.out.println(orderInfo.getPatientName()+":"+orderInfo.getPatientPhone());});}
}
5.2.9. 编写Mapper
(1)创建OrderInfoMapper
package com.atguigu.mapper;import com.atguigu.entity.OrderInfo;
import org.apache.ibatis.annotations.Mapper;
import org.springframework.stereotype.Repository;
import java.util.List;@Repository
@Mapper
public interface OrderInfoMapper {//根据日期查询就诊人信息List<OrderInfo> selectPatientInfoByDate(String dateString);
}
(2)创建UserMapper.xml
在resources下创建文件夹mapper,在mapper文件夹下创建OrderInfoMapper.xml
<?xml version="1.0" encoding="UTF-8"?>
<!DOCTYPE mapper PUBLIC "-//mybatis.org//DTD Mapper 3.0//EN" "http://mybatis.org/dtd/mybatis-3-mapper.dtd">
<mapper namespace="com.atguigu.mapper.OrderInfoMapper"><!--根据id查询--><select id="selectPatientInfoByDate" resultType="com.atguigu.entity.OrderInfo">select * from order_info where reserve_date=#{dateString}</select>
</mapper>
6、SpringBoot项目打包
SpringBoot可以打包为可执行的jar包
6.1. 添加打包插件
<!--SpringBoot应用打包插件-->
<build><plugins><plugin><groupId>org.springframework.boot</groupId><artifactId>spring-boot-maven-plugin</artifactId><version>3.0.5</version></plugin></plugins>
</build>
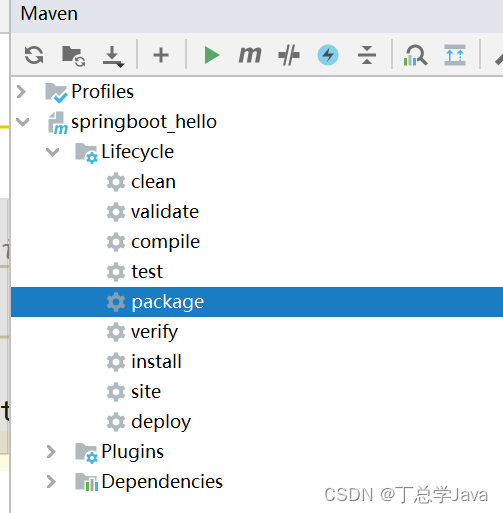
6.2. 执行打包
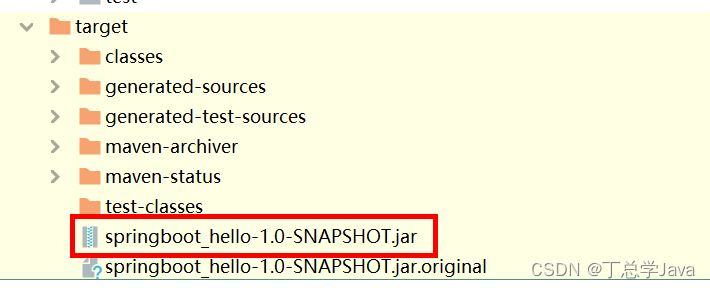
在idea点击package进行打包
6.3. 查看jar包
6.4. 运行jar包
进入jar包所在目录,使用命令java -jar jar名称
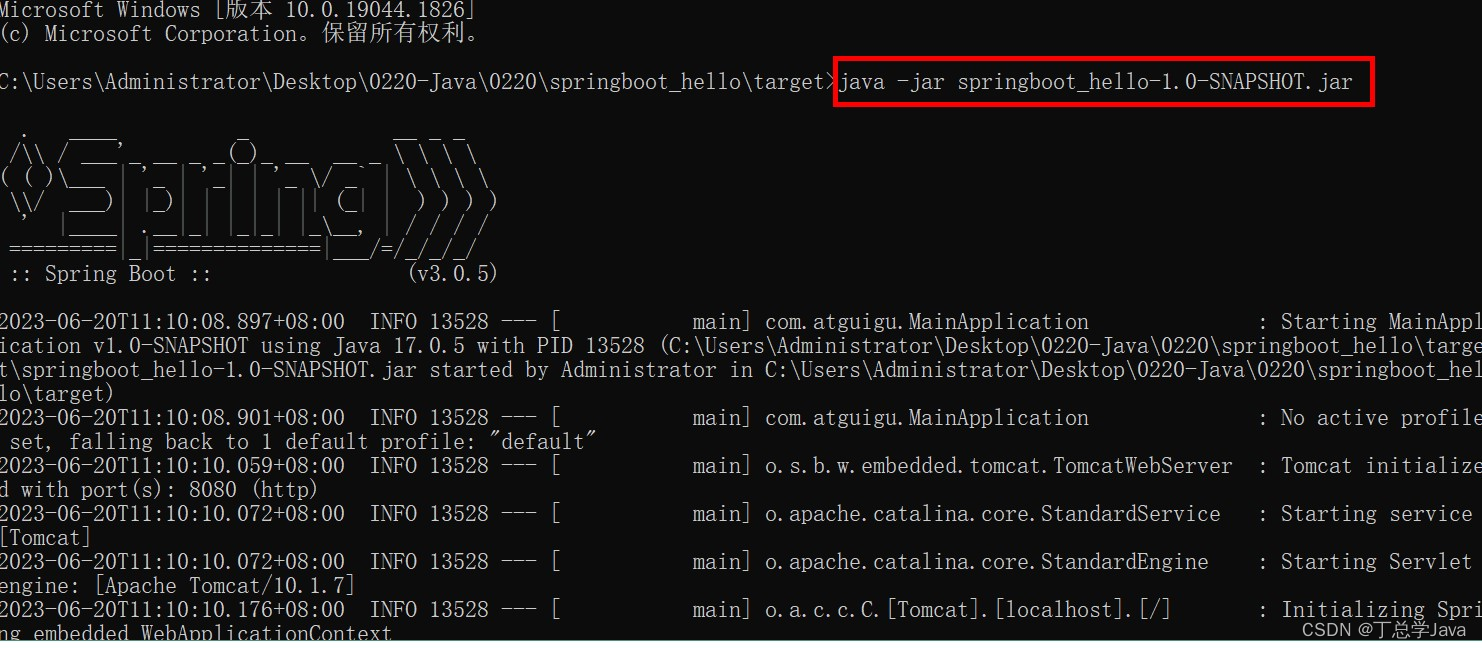
也可以直接在idea树形菜单的jar文件上右键run

投屏原理)
)


的时间序列预测)
![[ZJCTF 2019]NiZhuanSiWei1](http://pic.xiahunao.cn/[ZJCTF 2019]NiZhuanSiWei1)


python)


模块)