文章目录
- 前言
- 总览
- 全流程图
- 涉及模块关系
- 连接数据库函数调用流程图
- 数据库操作函数调用流程图
- 涉及到的代码文件
- 建立连接
- SCRAM
- SASL
- 操作数据库
- 结语
- 参考链接
前言
这篇文章总结 skynet 中 mongo 的接入流程,代码解析,读完它相信你对 skynet 中的 mongo 调用会更得心应手。
总览
先从宏观的角度介绍下 skynet 中 mongo 模块涉及的组件和代码文件,以及组件间的层次结构。然后再对关键接口进行详细分析。
全流程图

涉及模块关系

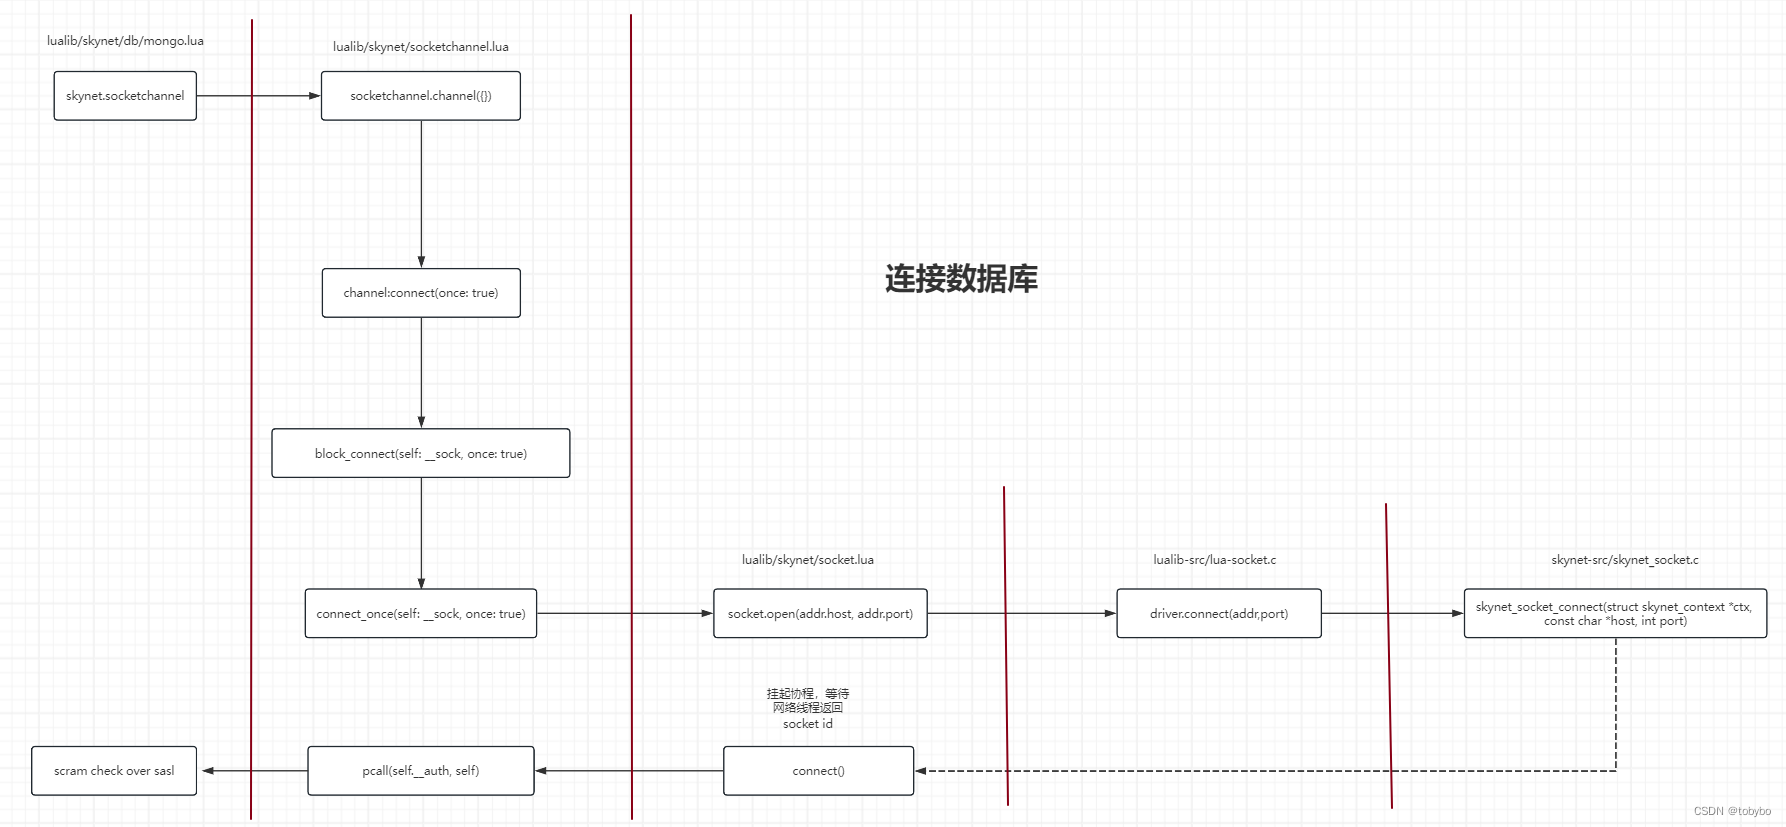
连接数据库函数调用流程图
数据库操作函数调用流程图
举例插入数据接口 insert

涉及到的代码文件
lua side:
- lualib/skynet/db/mongo.lua 业务层用到的数据库接口
- lualib/skynet/socketchannel.lua 业务层用到的网络会话接口(维护连接状态,隐藏 socket 细节)
- lualib/skynet/socket.lua 业务层用到的 socket 接口(封装 c 层提供的 socket 操作接口)
c side:
- lualib-src/lua-bson.c bson 序列化/反序列化接口具体实现
- lualib-src/lua-mongo.c mongo 消息序列化/反序列化接口具体实现
- lualib-src/lua-socket.c lua 服务的网络调用接口封装
- skynet-src/skynet_socket.c 网络模块对 skynet 服务提供支持的接口封装
建立连接
我们的业务要想可以操作数据库,首先得需要跟数据库建立连接。对于 skynet 中的 lua 服务来说,跟数据库建立连接很简单,只需要调用 mongo.client({}) 接口即可,如下:
dbL = mongo.client({host = "127.0.0.1", port = 27017,authdb = "admin",username = "my_username",password = "my_password",authmod = "my_authmechanism", -- 认证方式,可选 mongodb_cr 和 scram_sha1,默认为 scram_sha1}
)["my_dbname"]
连接接口所调用的流程图前面已经展示了,现在将其中重要的几个函数拿出来介绍一下:
-- file: lualib/skynet/socketchannel.lualocal function connect_once(self)...local function _connect_once(self, addr)-- 1. 建立连接local fd,err = socket.open(addr.host, addr.port)if not fd then...end...self.__sock = setmetatable( {fd} , self.__socket_meta )self.__dispatch_thread = skynet.fork(function()...end)if self.__auth thenself.__authcoroutine = coroutine.running()-- 2. 向数据库申请认证local ok , message = pcall(self.__auth, self)if not ok then...endself.__authcoroutine = falseif ok then...endendreturn trueend_add_backup()return _connect_once(self, { host = self.__host, port = self.__port })
end
这里有两个关键函数调用
- socket.open(addr.host, addr.port) 建立连接
- pcall(self.__auth, self) 向数据库申请认证
第一个函数的作用是通知网络模块创建一个 socket 对象,并且调用 connect 接口完成跟数据库的连接,背后网络模块的工作机制就不在这里赘述了,感兴趣的同学可以看一下skynet 网络模块解析:
-- file: lualib-src/lua-socket.cstatic int
lconnect(lua_State *L) {size_t sz = 0;const char * addr = luaL_checklstring(L,1,&sz);char tmp[sz];int port = 0;const char * host = address_port(L, tmp, addr, 2, &port);if (port == 0) {return luaL_error(L, "Invalid port");}struct skynet_context * ctx = lua_touserdata(L, lua_upvalueindex(1)); // skynet 风格,将服务注册为该服务启动的 c 库函数的上值,这样函数调用时,就可以直接从上值获取当前服务句柄int id = skynet_socket_connect(ctx, host, port);  // 调用网络模块提供给服务的接口lua_pushinteger(L, id);return 1;
}
第二个函数相对来说就比较复杂了,作用是向数据库发起认证,认证的方式支持 mongodb_cr 和 scram_sha1 两种,我们这里只介绍默认的认证方式 scram_sha1:
-- file: lualib/skynet/db/mongo.luafunction auth_method:auth_scram_sha1(username,password)--***************************************************************************-- 1. 这一块是按照 SCRAM 认证规格书约定的认证数据编码格式序列化我们传入的用户名和密码local user = string.gsub(string.gsub(username, '=', '=3D'), ',' , '=2C')local nonce = crypt.base64encode(crypt.randomkey())local first_bare = "n="  .. user .. ",r="  .. noncelocal sasl_start_payload = crypt.base64encode("n,," .. first_bare)--***************************************************************************--***************************************************************************-- 2. 这里调用 saslStart 指令向数据库发起认证的第一步,将用户名按照 SCRAM 规范编码后上传给数据库服务器local r = self:runCommand("saslStart",1,"autoAuthorize",1,"mechanism","SCRAM-SHA-1","payload",sasl_start_payload)if r.ok ~= 1 thenreturn falseend--***************************************************************************local conversationId = r['conversationId']local server_first = r['payload']local parsed_s = crypt.base64decode(server_first)local parsed_t = {}for k, v in string.gmatch(parsed_s, "(%w+)=([^,]*)") doparsed_t[k] = vendlocal iterations = tonumber(parsed_t['i'])local salt = parsed_t['s']local rnonce = parsed_t['r']if not string.sub(rnonce, 1, 12) == nonce thenskynet.error("Server returned an invalid nonce.")return falseendlocal without_proof = "c=biws,r=" .. rnoncelocal pbkdf2_key = md5.sumhexa(string.format("%s:mongo:%s",username,password))local salted_pass = salt_password(pbkdf2_key, crypt.base64decode(salt), iterations)local client_key = crypt.hmac_sha1(salted_pass, "Client Key")local stored_key = crypt.sha1(client_key)local auth_msg = first_bare .. ',' .. parsed_s .. ',' .. without_prooflocal client_sig = crypt.hmac_sha1(stored_key, auth_msg)local client_key_xor_sig = crypt.xor_str(client_key, client_sig)local client_proof = "p=" .. crypt.base64encode(client_key_xor_sig)local client_final = crypt.base64encode(without_proof .. ',' .. client_proof)local server_key = crypt.hmac_sha1(salted_pass, "Server Key")local server_sig = crypt.base64encode(crypt.hmac_sha1(server_key, auth_msg))--***************************************************************************-- 3. 这里调用 saslContinue 指令进行认证的第二步,将密码按照 SCRAM 编码规则编码后上传数据库r = self:runCommand("saslContinue",1,"conversationId",conversationId,"payload",client_final)if r.ok ~= 1 thenreturn falseend--***************************************************************************parsed_s = crypt.base64decode(r['payload'])parsed_t = {}for k, v in string.gmatch(parsed_s, "(%w+)=([^,]*)") doparsed_t[k] = vendif parsed_t['v'] ~= server_sig thenskynet.error("Server returned an invalid signature.")return falseendif not r.done then--***************************************************************************-- 4. 这里调用 saslContinue 指令进行认证的第三步r = self:runCommand("saslContinue",1,"conversationId",conversationId,"payload","")if r.ok ~= 1 thenreturn falseend--***************************************************************************if not r.done thenskynet.error("SASL conversation failed to complete.")return falseendendreturn true
end
看过 SCRAM 认证步骤后,我们可以大概了解下 SCRAM 是什么,mongo 的 sasl 认证指令又是什么。
SCRAM
SCRAM(the Salted Challenge Response Authentication Mechanism)解决了部署挑战-响应机制所需的要求,比过去的尝试更广泛。当与传输层安全(TLS;参见[RFC5246])或等效的安全层结合使用时,该机制家族中的一种机制可以改善应用协议身份验证的现状,并为未来应用协议标准的强制实施机制提供合适的选择。
简而言之就是说 SCRAM 是一种认证用的机制,而 mongo 官方支持的认证机制中包括它,我们想要正确的通过该机制完成认证,就需要根据 SCRAM 的认证规格书来编码我们的认证信息,从 RFC5802 文档中可以找到,有兴趣的同学可以点击文末的参考链接跳转查看,我们只截取一下跟 skynet 代码中认证第一步过程相关的内容进行展示:
-
The characters ‘,’ or ‘=’ in usernames are sent as ‘=2C’ and’=3D’ respectively. If the server receives a username that contains ‘=’ not followed by either ‘2C’ or ‘3D’, then the server MUST fail the authentication.
用户名中如果包含 ‘,’ 或者 ‘=’,则需要将 ‘,’ 替换为 ‘=2C’,将 ‘=’ 替换为 ‘=3D’ ,所以我们看到如下代码:
local user = string.gsub(string.gsub(username, '=', '=3D'), ',' , '=2C') -
n: This attribute specifies the name of the user whose password is used for authentication (a.k.a. “authentication identity” [RFC4422]).
n: 此属性指定用于身份验证的用户密码的名称(也称为“身份验证标识”[RFC4422])。就是用该标识来编码用户名,如下:
local first_bare = "n=" .. user .. ",r=" .. nonce -
r: This attribute specifies a sequence of random printable ASCII characters excluding ‘,’ (which forms the nonce used as input to the hash function).
r: 该属性指定了一个随机的可打印ASCII字符序列,不包括逗号(逗号用作哈希函数的输入)。
SASL
SASL(Simple Authentication and Security Layer)是一种身份验证框架,允许用户使用不同的机制进行身份验证,而无需重复编写大量代码。SASL机制是在进行身份验证时发生的一系列挑战和响应。SASL支持的身份验证机制有指定的列表,其中就包含了
SCRAM。CyrusSASL为客户端和服务器提供了一个SASL框架,并提供了一组独立的用于不同身份验证机制的包,这些包在运行时动态加载。SASL机制定义了客户端和服务器之间的通信方法。然而,它并没有定义用户凭据可以存储在何处。对于某些SASL机制,例如PLAIN,凭据可以存储在数据库本身或LDAP中。在运行身份验证之前,服务器在客户端上初始化一个AuthenticationSession。此会话在身份验证步骤之间保持信息,并在身份验证成功或失败时释放。
在身份验证的第一步中,客户端调用{saslStart:…},该调用到达doSaslStart,获取所使用的机制,并通过调用所选机制(在SASL部分中更多介绍)上的step函数(从ServerMechanismBase::step继承)执行实际的身份验证。然后,服务器向客户端发送带有有关身份验证状态的信息的回复。如果身份验证和授权都完成,客户端可以开始对服务器执行命令。如果身份验证需要更多信息才能完成,服务器会请求此信息。如果身份验证失败,则客户端接收到该信息,并可能关闭会话。
如果在第一个SASL步骤之后还有更多工作要做,客户端将向服务器发送一个带有服务器请求的额外信息的指令 saslContinue。然后,服务器执行另一个SASL步骤。然后,服务器向客户端发送与 saslStart 命令类似的回复。saslContinue 阶段重复,直到客户端被身份验证或遇到错误为止。
以上是官方文档说明,详细内容可查看文末链接。但是实际应用时,想要正确的完成 SASL 认证可不容易,因为官方文档对这方面的说明非常少,找到一篇国外的文章,也吐槽了这个,并且老外给了一个详细的认证步骤讲解,避免需要科学上网才看得到,我转载了一下, MongoDB SCRAM-SHA-1 over SASL。所以我们当前看的 skynet 代码中出现了 sasl 鉴权内容,是因为云风大佬是自己手写的 c/lua 版本的 mongodb 驱动,在 bson(MongoDB官方定义的一种二进制序列化格式) 官网所列的驱动列表中还能看到云风大佬的仓库,bson 驱动列表。

操作数据库
说完了连接数据库,接下来我们分析下操作数据库的主要函数。前面的流程图介绍的是 insert 操作,接下来我们用一个更复杂的指令 update 来讲解。比如,我们要更新一张名字为 “test” 的 table,在 skynet 中可以这么写:
dbL = mongo.client({host = "127.0.0.1", port = 27017,authdb = "admin",username = "my_username",password = "my_password",authmod = "my_authmechanism", -- 认证方式,可选 mongodb_cr 和 scram_sha1,默认为 scram_sha1}
)["my_dbname"]dbL.test.update({_id = "xxx"}, {["$set"] = { name = "test_name" }}, true, false)
其中调用的更新接口在 lualib/skynet/db/mongo.lua 中:
-- file: lualib/skynet/db/mongo.lualocal bson = require "bson"
local driver = require "skynet.mongo.driver"
local bson_encode =	bson.encode
local bson_encode_order	= bson.encode_order-- 指定集合的更新操作
function mongo_collection:update(query,update,upsert,multi)self.database:send_command("update", self.name, "updates", {bson_encode({q = query,u = update,upsert = upsert,multi = multi})})
end-- 发送数据库操作指令
--- send command without response
function mongo_db:send_command(cmd, cmd_v, ...)local conn = self.connectionlocal request_id = conn:genId()local sock = conn.__socklocal bson_cmdif not cmd_v then-- ensure cmd remains in first placebson_cmd = bson_encode_order(cmd, 1, "$db", self.name, "writeConcern", {w=0})elsebson_cmd = bson_encode_order(cmd, cmd_v, "$db", self.name, "writeConcern", {w=0}, ...)endlocal pack = driver.op_msg(request_id, 2, bson_cmd)sock:request(pack)return {ok=1} -- fake successful response
end
这里我们需要拆解几个重要的函数:
-
bson_encode
实际调用的是 lua-bson.c 中的 lencode,作用是将 lua 的 table 转化为 bson 格式的字符串,然后存放到 lightuserdata 中返回给 lua 层的调用者。 -
bson_encode_order
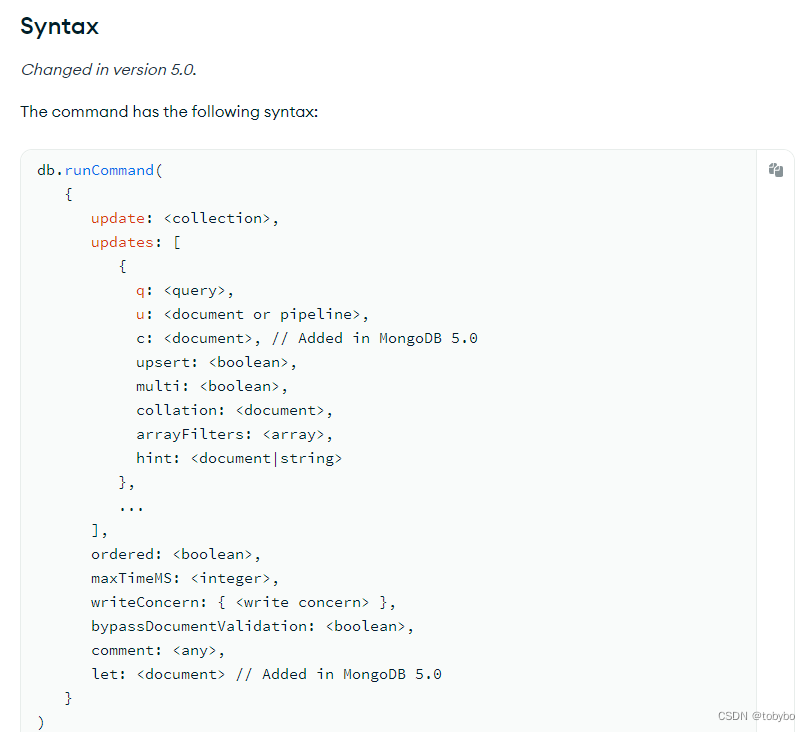
实际调用的是 lua-bson.c 中的 lencode_order,作用是将偶数个参数按照 key,val 的先后顺序转化为 bson 格式的字符串,这些字符串组合成一个 bson 的 object,然后存放到 lightuserdata 中返回给 lua 层的调用者。经过转换,上面代码的调用最终可以还原为 shell 上的 json 操作指令:self.database:send_command("update", "test", "updates", {bson_encode({q = {_id = "xxx"},u = {["$set"] = { name = "test_name" }},upsert = true,multi = false, })}) 等价于在 mongo 客户端的 shell 环境中执行如下指令: use my_dbname; db.runCommand({update: "test", updates: [{ q: {_id: "xxx"}, u: {"$set": { name: "test_name" }}, upsert: true, multi: false}]})以上指令转换是经过测试的,测试的mongo版本为v4.4:

支持这个指令的文档可以点击 这里 跳转:
-
driver.op_msg
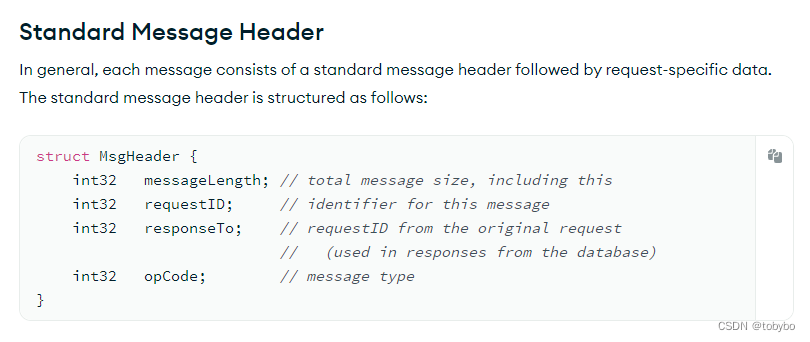
将上一步生成的 bson 对象,拷贝到将要发送的消息 buff 中,按照 mongo 约定的协议格式生成一个网络消息。对应的消息协议文档可以查看 这里:- message header:
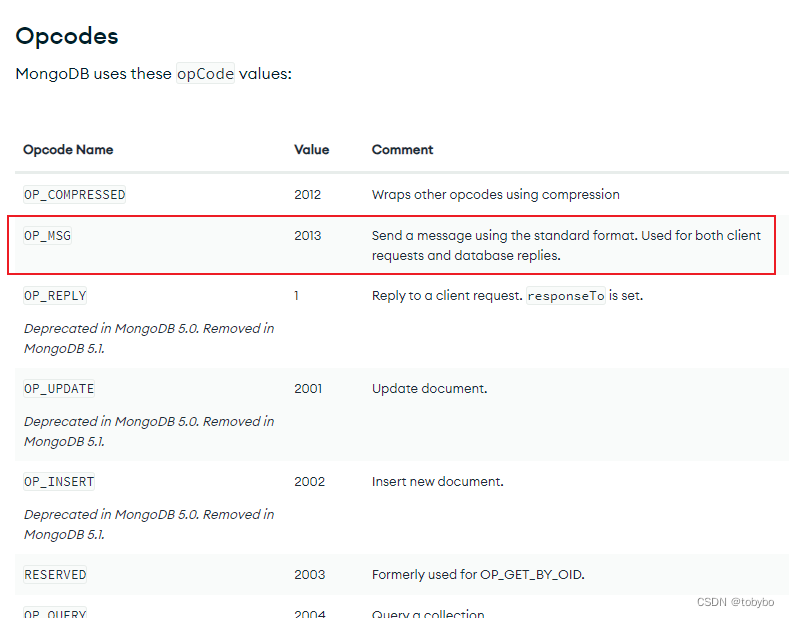
- opcode 采用 OP_MSG:
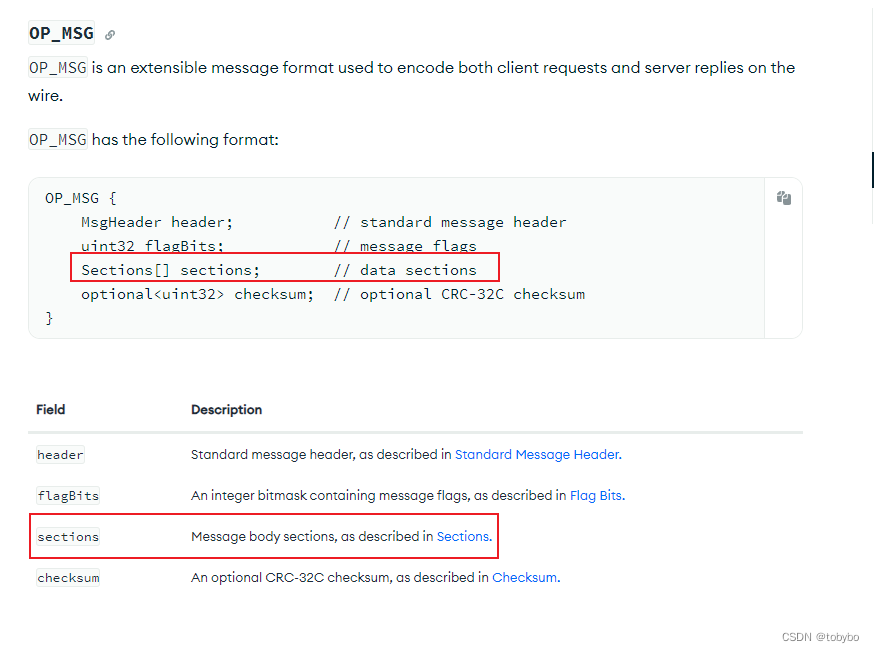
- 对于 OP_MSG ,后续数据定义中注意 sections 字段:
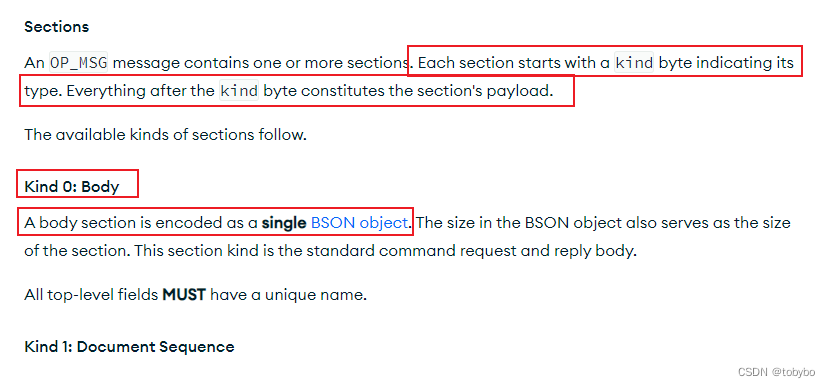
- sections 的结构定义中我们关注 kind 为 0 的数据结构细节,一个单独的 bson object 就是我们上面一个函数最终生成的内容:
- message header:
上面这几张图是按照 skynet 的 mongo 驱动的调用方式,选择的协议类型而针对性的提取出来的文档信息,有了这些文档帮助,我们才能理解 lua-mongo.c 中的 op_msg 这个函数中的行为:
// file: lualib-src/lua-mongo.c// @param 1 request_id int
// @param 2 flags int
// @param 3 command bson document
// @return
static int
op_msg(lua_State *L) {int id = luaL_checkinteger(L, 1);int flags = luaL_checkinteger(L, 2);document cmd = lua_touserdata(L, 3);if (cmd == NULL) {return luaL_error(L, "opmsg require cmd document");}luaL_Buffer b;luaL_buffinit(L, &b);struct buffer buf;buffer_create(&buf);//--------------------------------------// 这一块就是在构建 mongo 消息内容int len = reserve_length(&buf); // 保留四个字节稍后存放数据长度write_int32(&buf, id); // requestID 用于客户端接收数据库消息时明确是哪一次请求发出的回复write_int32(&buf, 0);  // 在数据库返回的消息中才有效,表示回复的是哪个 requestIDwrite_int32(&buf, OP_MSG); // opCodewrite_int32(&buf, flags);  // flagBitswrite_int8(&buf, 0);       // kind 0 表示后面跟着是一个 single BSON objectint32_t cmd_len = get_length(cmd);int total = buf.size + cmd_len; // 消息总长度要加上 BSON object 的长度write_length(&buf, total, len); // 总长度已经计算好,可以插入到之前保留给长度信息的位置了,这里用 len 命名变量有点不恰当,其实表示的是存放 len 的位置的偏移量,total 才是实际的长度信息luaL_addlstring(&b, (const char *)buf.ptr, buf.size); // 将 BSON object 插入到消息最后//--------------------------------------buffer_destroy(&buf);luaL_addlstring(&b, (const char *)cmd, cmd_len);luaL_pushresult(&b);return 1;
}
结语
在上一节中我们没有详细的拆解 bson_encode 和 bson_encode_order 两个函数,他们的作用已经介绍过,读者有兴趣可以自己细看一下代码,要读懂其中的序列化过程,需要参考文末的 BSON 官方文档。值得一提的是,skynet 中,这两个函数内部都用了 pcall 来调用一个子函数的方式来简化流程中出现错误的处理,并且这样做还有个好处是不需要限制外部调用采取 pcall 的形式也能保证系统不在 bson 序列化的过程出现问题而影响到系统本身。
参考链接
- rfc5802: SCRAM
- mongo: SCRAM
- mongo: SASL
- BSON

:ALSA音频)


![[Spring源码] 浅析 SpringApplication`的构造方法](http://pic.xiahunao.cn/[Spring源码] 浅析 SpringApplication`的构造方法)


:类型和字节序、错误处理和调试、获取系统信息)


:双核通信之MU消息单元详解)
