最近前端实现的量子纠缠在网络上火了起来,作者bgstaal的推文: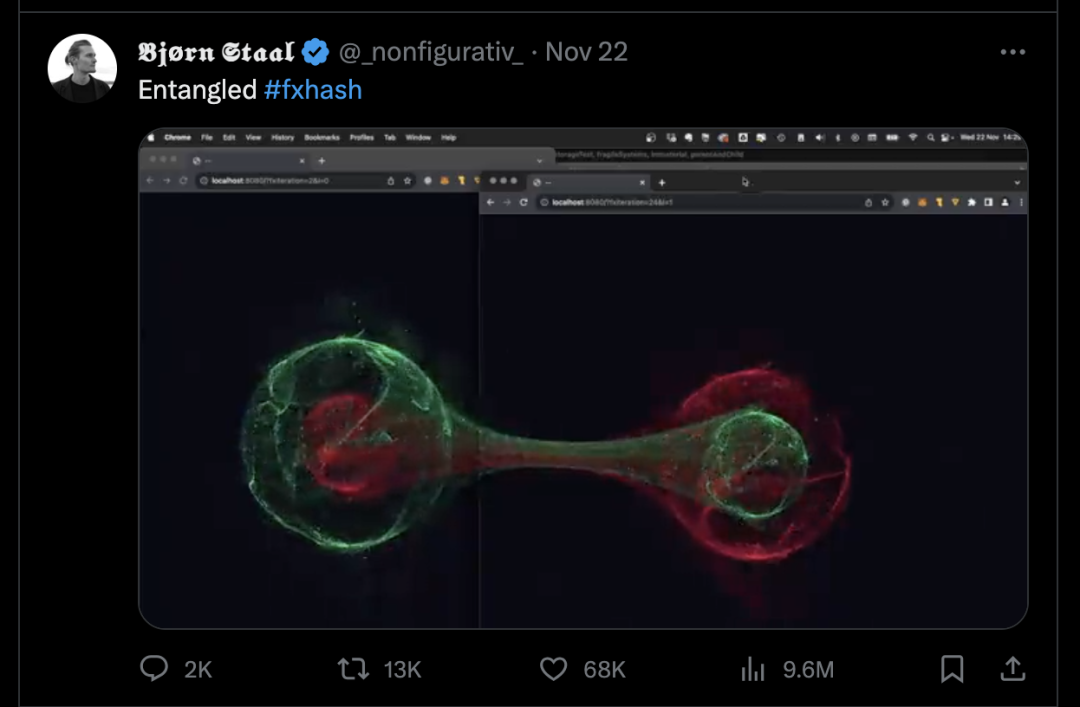 效果如下:
效果如下:
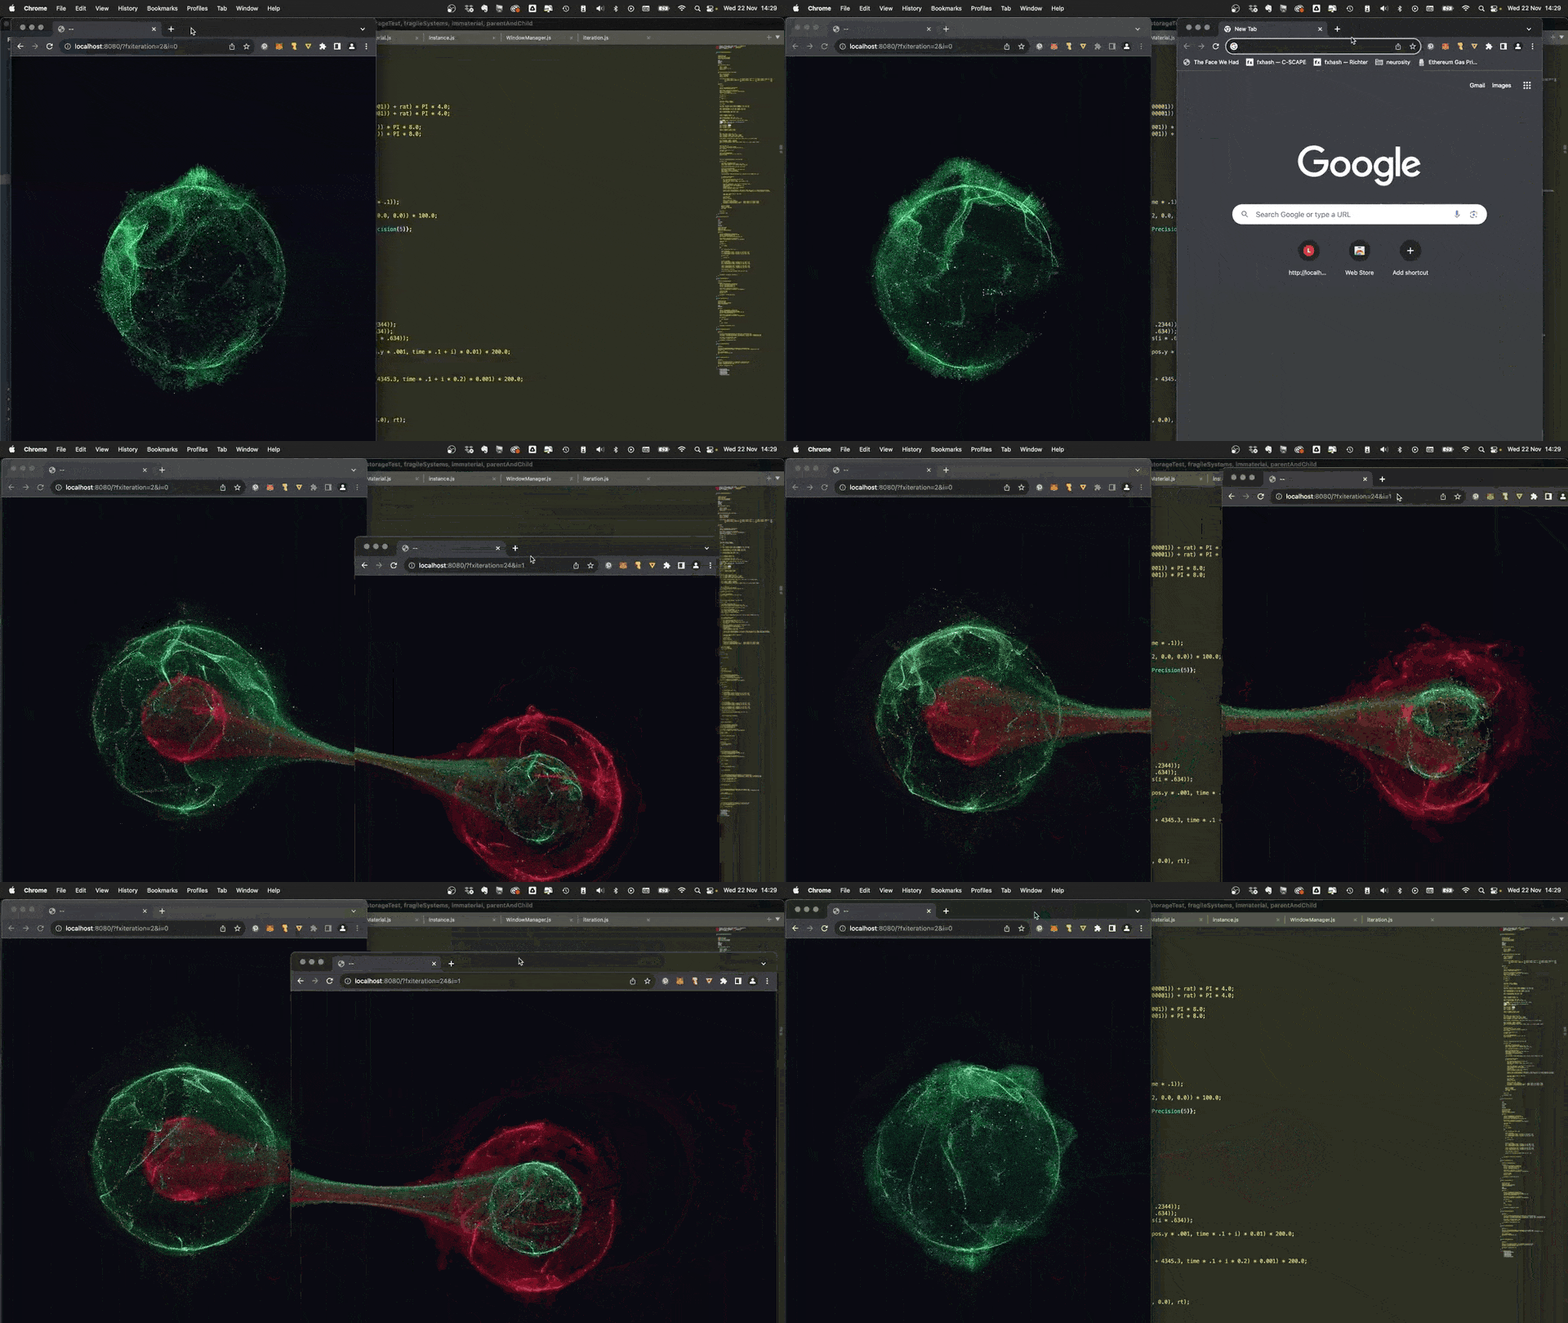
那我们一起来看下什么是量子纠缠,以及前端是如何实现的。
什么是量子纠缠?
在量子力学里,当几个粒子在彼此相互作用后,由于各个粒子所拥有的特性已综合成为整体性质,无法单独描述各个粒子的性质,只能描述整体系统的性质,则称这现象为量子缠结或量子纠缠。量子纠缠是一种奇怪的量子力学现象,处于纠缠态的两个量子不论相距多远都存在一种关联,其中一个量子状态发生改变,另一个的状态会瞬时发生相应改变。
前端如何来实现?
作者bgstaal在github上开源了一个项目,r说明如何使用 Three.js 和 localStorage 在多个窗口中设置3D场景。一起来看下代码如何实现的。
首先,从 Github 上克隆 multipleWindow3dScene 项目:
git clone https://github.com/bgstaal/multipleWindow3dScene.git接下来,通过 vscode 中的 Live Server, 启动该项目,并在浏览器中打开项目主页 http://127.0.0.1:5500/index.html。效果如下:
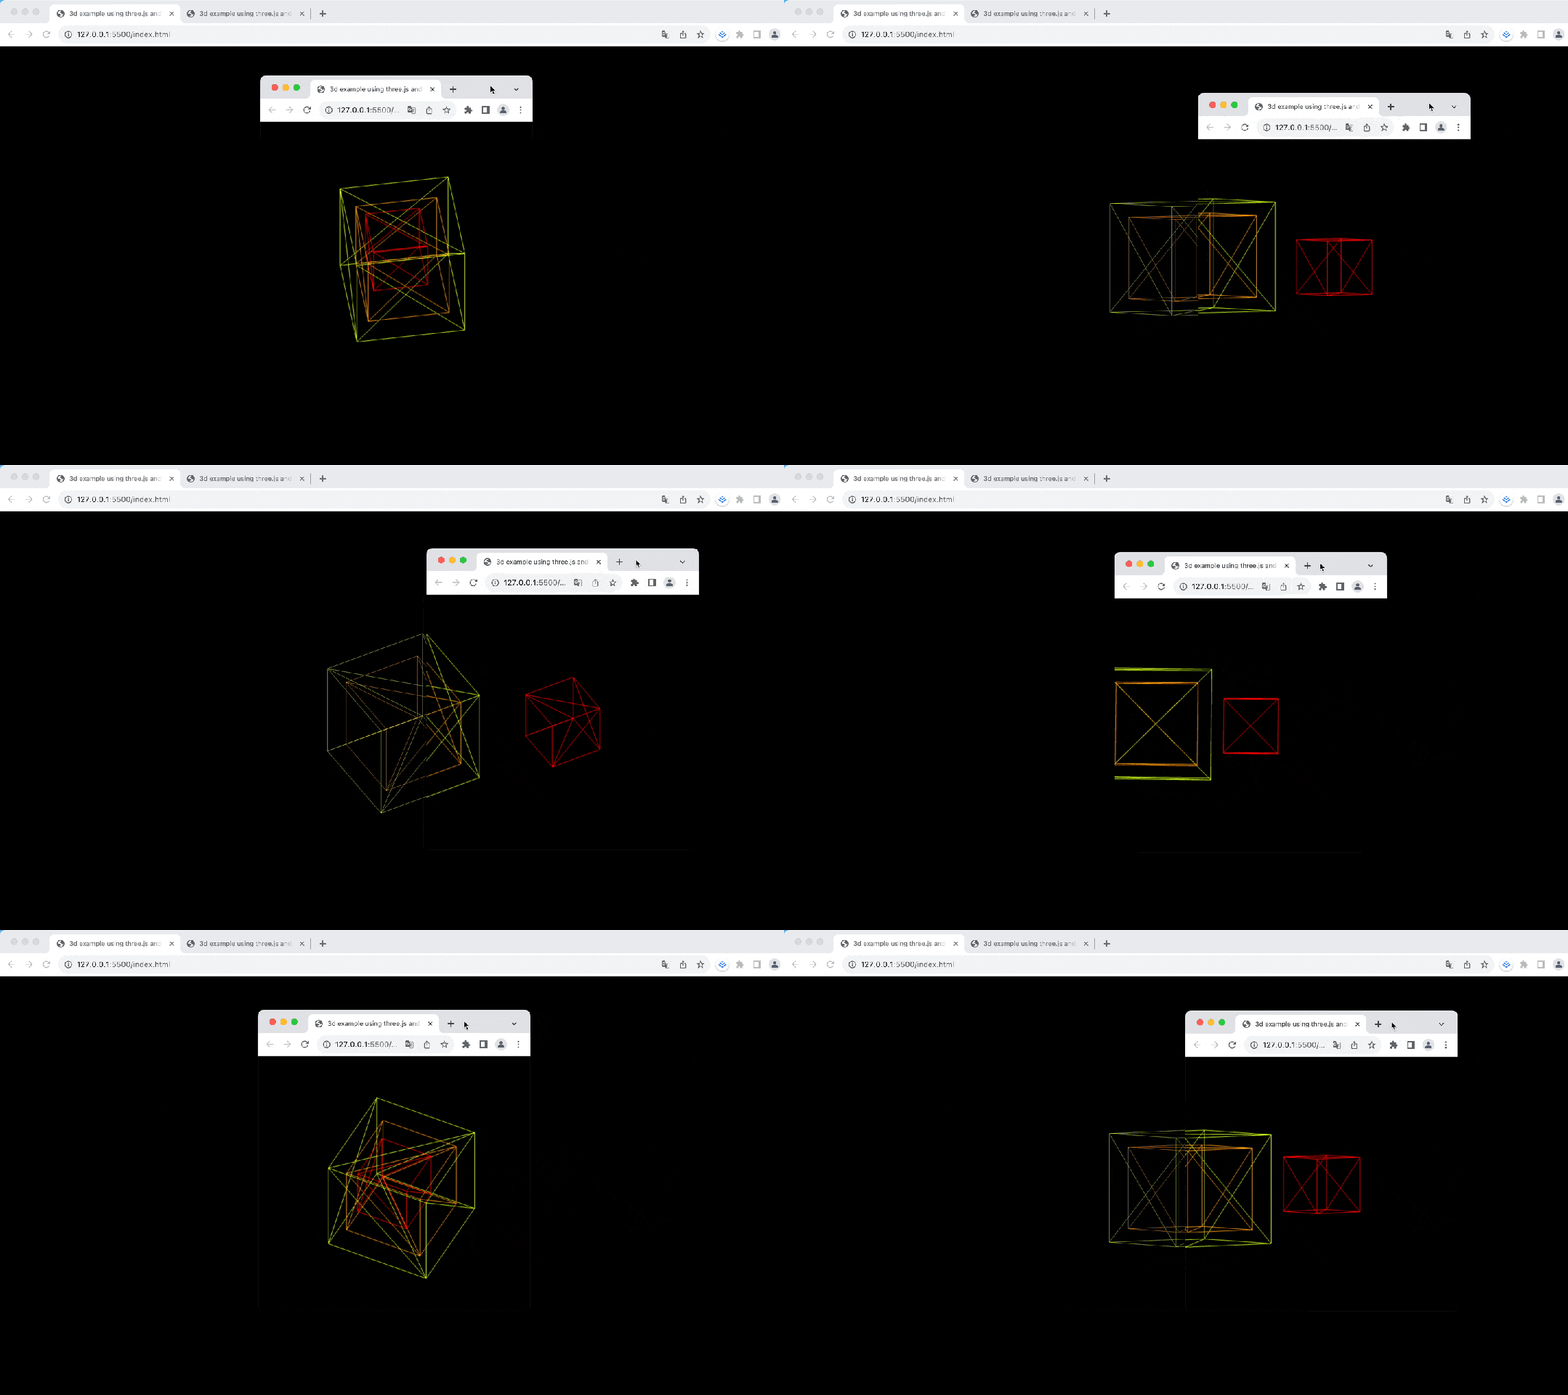
现在我们看下项目目录,如下图所示: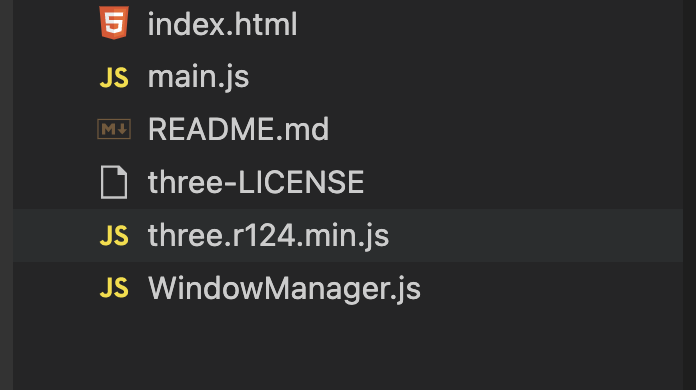
index.html:设置 HTML 结构的入口点。
main.js:使用 Three.js 初始化 3D 场景,管理窗口的调整大小事件,并根据窗口交互更新场景。
three.r124.min.js:用于 3D 图形渲染的 Three.js 库的压缩版本。
WindowManager.js:处理多个浏览器窗口的生命周期,包括创建、同步和删除。它使用 localStorage 来维护跨窗口的状态。
index.html
index.html:设置 HTML 结构的入口点,引入了压缩后的three.js以及main.js。
<!DOCTYPE html>
<html lang="en">
<head><title>3d example using three.js and multiple windows</title><script type="text/javascript" src="three.r124.min.js"></script><style type="text/css">*{margin: 0;padding: 0;}</style>
</head>
<body><script type="module" src="main.js"></script>
</body>
</html>
下来我们先看下main.js。
main.js
定义了存放3d场景以及时间变量,在网站加载成功,页面可见时,则执行初始化init函数,设置场景,窗口管理器等相关配置。
init函数
init 函数负责设置场景、窗口管理器、调整渲染器大小以适应窗口,并开始渲染循环。
function init () {initialized = true;// add a short timeout because window.offsetX reports wrong values before a short period setTimeout(() => {setupScene();setupWindowManager();resize();updateWindowShape(false);render();window.addEventListener('resize', resize);}, 500)
}
这里添加了一个定时器,主要是因为window.offsetX在短时间内会返回错误的值。
setupScene函数创建了相机、场景、渲染器和3D世界对象,并将渲染器的DOM元素添加到文档体中。
// 设置场景
function setupScene() {// 创建正交相机camera = new t.OrthographicCamera(0, 0, window.innerWidth, window.innerHeight, -10000, 10000);// 设置相机位置camera.position.z = 2.5;near = camera.position.z - .5;far = camera.position.z + 0.5;// 创建场景scene = new t.Scene();scene.background = new t.Color(0.0);scene.add(camera);// 创建渲染器renderer = new t.WebGLRenderer({ antialias: true, depthBuffer: true });renderer.setPixelRatio(pixR);// 创建对象3Dworld = new t.Object3D();scene.add(world);// 设置渲染器的idrenderer.domElement.setAttribute("id", "scene");// 将渲染器添加到body中document.body.appendChild(renderer.domElement);
}
窗口管理器的设置通过setupWindowManager函数完成,它实例化WindowManager,并定义窗口形状变化和窗口改变的回调函数。
窗口形状变化用于跟踪和反应窗口位置的移动。窗口改变的回调函数用于更新场景中的立方体数量。
// 创建一个WindowManager实例
function setupWindowManager() {windowManager = new WindowManager();// 设置窗口形状改变回调函数windowManager.setWinShapeChangeCallback(updateWindowShape);// 设置窗口改变回调函数windowManager.setWinChangeCallback(windowsUpdated);// here you can add your custom metadata to each windows instance// 在这里,您可以向每个窗口实例添加自定义元数据let metaData = { foo: "bar" };// this will init the windowmanager and add this window to the centralised pool of windows// 这将初始化窗口管理器并将此窗口添加到集中的窗口池中windowManager.init(metaData);// call update windows initially (it will later be called by the win change callback)// 调用updateWindows函数windowsUpdated();
}// 当窗口更新时调用该函数
function windowsUpdated() {// 更新立方体数量updateNumberOfCubes();
}
// 更新立方体数量
function updateNumberOfCubes() {// 获取所有窗口let wins = windowManager.getWindows();// remove all cubes// 移除所有立方体cubes.forEach((c) => {world.remove(c);})// 重新初始化立方体数组cubes = [];// add new cubes based on the current window setup// 根据当前窗口设置添加新的立方体for (let i = 0; i < wins.length; i++) {let win = wins[i];// 设置立方体的颜色let c = new t.Color();c.setHSL(i * .1, 1.0, .5);// 设置立方体的尺寸let s = 100 + i * 50;// 创建立方体let cube = new t.Mesh(new t.BoxGeometry(s, s, s), new t.MeshBasicMaterial({ color: c, wireframe: true }));// 设置立方体的位置cube.position.x = win.shape.x + (win.shape.w * .5);cube.position.y = win.shape.y + (win.shape.h * .5);// 将立方体添加到场景中world.add(cube);cubes.push(cube);}
}// 更新窗口形状函数,easing参数默认为true
function updateWindowShape(easing = true) {// storing the actual offset in a proxy that we update against in the render function// 将当前的偏移量存储在代理中,以便在渲染函数中更新sceneOffsetTarget = { x: -window.screenX, y: -window.screenY };// 如果easing参数为false,则将sceneOffset设置为sceneOffsetTargetif (!easing) sceneOffset = sceneOffsetTarget;
}
render函数
render函数是这段代码的核心,主要是获取当前时间,计算出每个立方体每一帧的动画,来处理窗口的变化,并渲染到页面上。还使用了浏览器的 requestAnimationFrame 方法,让render方法在下一次浏览器重绘之前执行,通常最常见的刷新率是 60hz(每秒 60 个周期/帧),以匹配大多数显示器的刷新率,起到优化动画性能的作用。
// 渲染函数,更新和渲染场景
function render() {// 获取当前时间let t = getTime();// update the window manager// 更新窗口管理器windowManager.update();// update the scene offset based on the current window manager state// this will create a smooth transition between the current scene offset and the target scene offset// calculate the new position based on the delta between current offset and new offset times a falloff value (to create the nice smoothing effect)let falloff = .05;// 计算场景偏移量sceneOffset.x = sceneOffset.x + ((sceneOffsetTarget.x - sceneOffset.x) * falloff);sceneOffset.y = sceneOffset.y + ((sceneOffsetTarget.y - sceneOffset.y) * falloff);// set the world position to the offset//设置场景偏移量world.position.x = sceneOffset.x;world.position.y = sceneOffset.y;// get the window manager and the window// 获取所有窗口let wins = windowManager.getWindows();// loop through all our cubes and update their positions based on current window positions// 遍历cubes数组,更新立方体的位置for (let i = 0; i < cubes.length; i++) {// 获取cubes数组中的第i个元素let cube = cubes[i];// 获取wins数组中的第i个元素let win = wins[i];// 将t赋值给_tlet _t = t;// + i * .2;let posTarget = { x: win.shape.x + (win.shape.w * .5), y: win.shape.y + (win.shape.h * .5) }// 计算cube当前位置到目标位置的距离,并乘以衰减系数cube.position.x = cube.position.x + (posTarget.x - cube.position.x) * falloff;cube.position.y = cube.position.y + (posTarget.y - cube.position.y) * falloff;// 计算cube的旋转角度cube.rotation.x = _t * .5;cube.rotation.y = _t * .3;};// render the scenerenderer.render(scene, camera);requestAnimationFrame(render);
}
resize函数
resize函数,在浏览器窗口大小改变时,调整渲染器的尺寸以适应窗口大小,相机和渲染器也进行更新调整。
// 调整渲染器的尺寸以适应窗口大小
function resize() {// 获取窗口的宽度let width = window.innerWidth;// 获取窗口的高度let height = window.innerHeight// 创建一个正交相机,参数为:left,right,top,bottom,near,farcamera = new t.OrthographicCamera(0, width, 0, height, -10000, 10000);// 更新相机的投影矩阵camera.updateProjectionMatrix();// 设置渲染器的尺寸renderer.setSize(width, height);
}
接下来看下我们看下WindowManager文件
WindowManager.js
窗口管理器WindowManager函数,主要是监听 localStorage 变化,刷新渲染立方体的位置。其中 localStorage,存储了立方体在浏览器窗口的位置,包含距离屏幕左上角x轴y轴的距离,和浏览器窗口的宽和高这些信息。
我们看下localStorage的信息,如下图所示: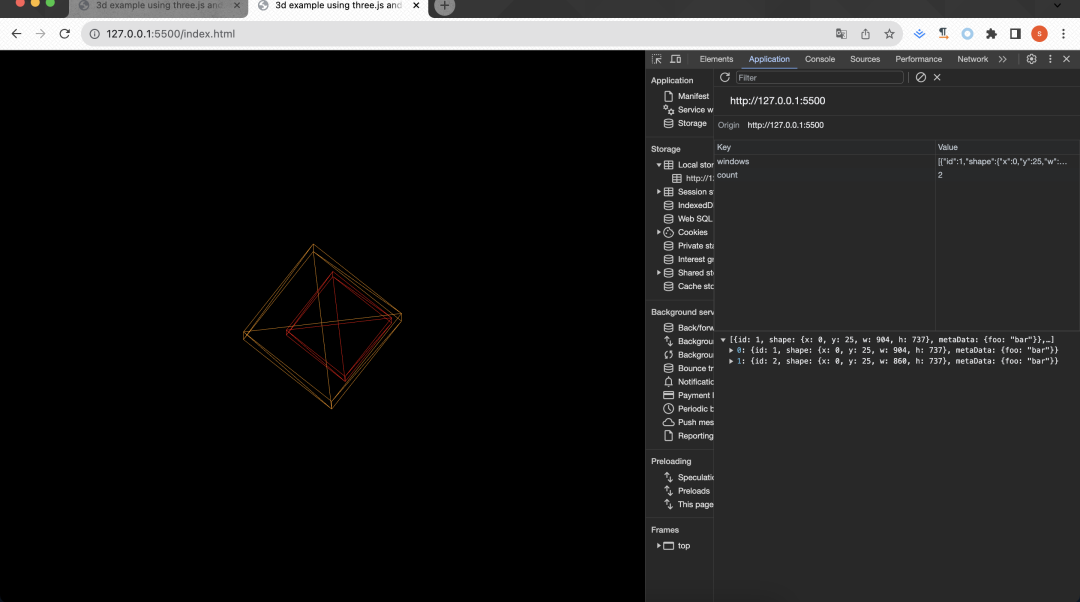
通过监听beforeunload事件监听窗口是否关闭,关闭则删除浏览器对应的立方体的信息。
// 当前窗口即将关闭时的事件监听器window.addEventListener('beforeunload', function (e) {// 获取窗口索引let index = that.getWindowIndexFromId(that.#id);//remove this window from the list and update local storage// 从列表中删除此窗口并更新本地存储that.#windows.splice(index, 1);that.updateWindowsLocalStorage();});窗口管理器的init方法,根据当前窗口的位置,创建当前窗口唯一的id,创建一个立方体的位置数据,存储在localStorage,方便监听,最后执行了windowsUpdated 方法,更新立方体数量,首先通过 getWindows方法,拿到所有立方体的数据,绘制出新的立方体信息。
// initiate current window (add metadata for custom data to store with each window instance)// 初始化当前窗口(添加元数据以将自定义数据存储到每个窗口实例中)init(metaData) {//将本地存储中的windows数据转换为JSON格式,若未存储,则初始化为空数组this.#windows = JSON.parse(localStorage.getItem("windows")) || [];//获取本地存储中的count值,若未存储,则初始化为0this.#count = localStorage.getItem("count") || 0;this.#count++;this.#id = this.#count;//获取窗口形状let shape = this.getWinShape();//将窗口数据赋值给this.#winDatathis.#winData = { id: this.#id, shape: shape, metaData: metaData };//将this.#winData添加到this.#windows数组中this.#windows.push(this.#winData);//将this.#count存储到本地localStorage.setItem("count", this.#count);//更新本地存储中的windows数据this.updateWindowsLocalStorage();}以上就是主要的核心效果代码。
参考来源
https://github.com/bgstaal/multipleWindow3dScene
https://developer.mozilla.org/en-US/docs/Web/API/window/requestAnimationFrame#browser_compatibility
https://zh.wikipedia.org/wiki/%E9%87%8F%E5%AD%90%E7%BA%8F%E7%B5%90
- END -
关于奇舞团
奇舞团是 360 集团最大的大前端团队,代表集团参与 W3C 和 ECMA 会员(TC39)工作。奇舞团非常重视人才培养,有工程师、讲师、翻译官、业务接口人、团队 Leader 等多种发展方向供员工选择,并辅以提供相应的技术力、专业力、通用力、领导力等培训课程。奇舞团以开放和求贤的心态欢迎各种优秀人才关注和加入奇舞团。

)
:Doris高级设置)

 on i.MX RT1060 EVK - 2 “架构 AWS”)


![题目分析,高度理解一维二维数组的申请和[]是什么运算符](http://pic.xiahunao.cn/题目分析,高度理解一维二维数组的申请和[]是什么运算符)


