1.【熟悉】Vue简介
1.1 简介
它是一个构建用户界面的框架 Vue是一个前端框架 js jq
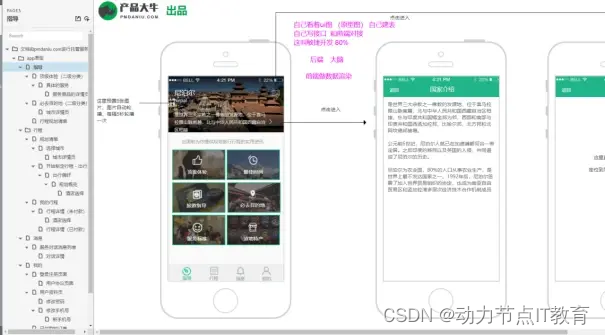
https://www.pmdaniu.com/#file UI网站
UI 一般开发者使用蓝湖 工具 看着UI图 写接口
https://lanhuapp.com/web/#/item
是一个轻量级的MVVM(Model-View-ViewModel),其实就是所谓的数据的双向绑定
Mvc
数据驱动和组件化的前端开发
通过简单的API就能实现响应式的数据绑定和组合的视图组件
指令:
用来扩展html标签的功能
https://cn.vuejs.org/
给页面的id=”app”的DIV里面插入某此HTML代码
JS— document.getElementById(‘app’).innerHtml=””
JQ— $(“#app”).text()
1.2 其它
简单、易学、更轻量
指令v-xxx开头 v-if v-for 这些作用在html标签中
HTML + JSON数据
开发者 尤雨溪 华人 Vue React
这几个框架都不兼容低版本IE window Xp
2.【重点】MVVM的思想
2.1 MVVM 设计思想
MVC
|–M Model (domain,service,serviceimpl.utils.pojo.mapper)
实体类
Entity Domain pojo —>指数据库里面的表的映射对象
Vo view object 后端构造数据对象转给前端的对象
DeptDto/DeptForm 数据传输对象 接收前端传过来的数据
|–V view thymeleaf jsp html
|–C controller 接收前端请求(控制器) /Servlet
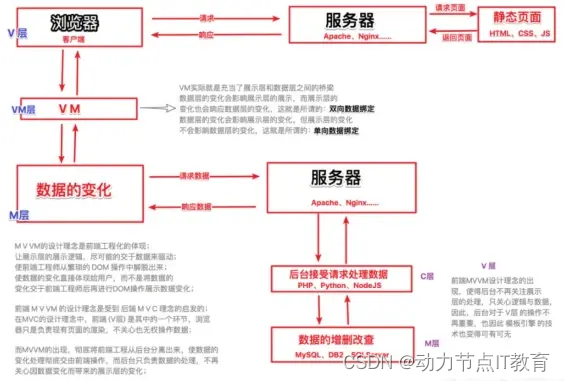
Model:对应数据层的域模型,它主要做域模型的同步。通过 Ajax/fetch 等 API 完成客户端和服务端业务 Model 的同步。在模型层间关系里,它主要用于抽象出 ViewModel 中视图的 Model。个人理解:后端提供API,后端服务架构是 控制器+数据模型 或者 纯控制器。
View:View是作为视图模板,用于定义结构、布局。它自己不处理数据,只是将ViewModel中的数据展现出来。此外为了和ViewModel产生关联,那么还需要做的就是数据绑定的声明,指令的声明,事件绑定的声明。ViewModel和View之间是双向绑定,意思就是说ViewModel的变化能够反映到View中,View的变化也能够改变ViewModel的数据值。
ViewModel:ViewModel起着连接View和Model的作用,同时用于处理View中的逻辑。在MVC框架中,视图模型通过调用模型中的方法与模型进行交互,然而在MVVM中View和Model并没有直接的关系,在MVVM中,ViewModel从Model获取数据,然后应用到View中。个人理解:Web前端的webserver对View进行双向绑定渲染。
整个MVVM实际上实现了前后端分离,通过api来实现前后端交互,前端通过纯js或者双向绑定框架来渲染页面。
前后端不分离(crm页面写在crm项目里面 html thymeleaf(模板引擎) )
前后端分离
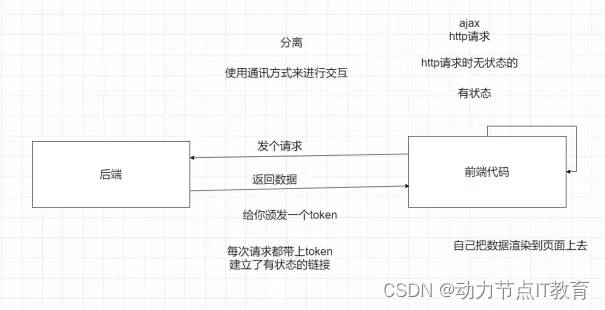
大概如:
数据库(MySQL、PostgreSQL)<—双向交互—>api(php、java、Python、node)<—双向交互—>ajax/fetch/websocket(node服务、jQ、js)<—双向绑定—>html(标签、css)。
MVVM有利于项目分工和升级,所谓对前后端分离。但也有缺点,就是不利于 。
MVC:服务端来渲染数据,老旧模式。MC属于纯后端,V属于前端,js权重不高,有利于SEO。
万物基于api,一套api可以针对小程序、app、前端,为何不首先使用。需要SEO对部分,单独分离出项目,采用MVC渲染静态页面或者纯html即可。
2.2 MVVM图例解析
3.【掌握】IDEA开发环境的配置
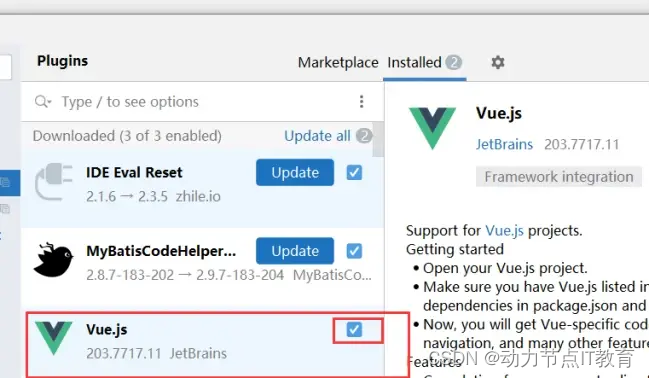
3.1 安装插件

3.2 创建前端项目
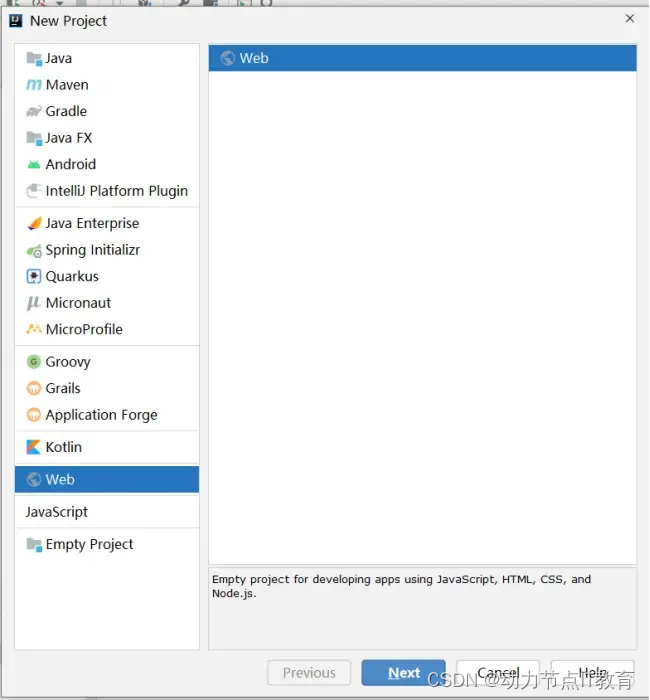
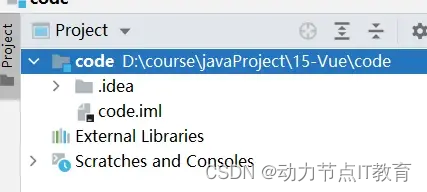
4.【掌握】安装和部署
https://cn.vuejs.org/v2/guide/installation.html
4.1 直接下载并用
在开发环境下不要使用压缩版本,不然你就失去了所有常见错误相关的警告!
开发版本包含完整的警告和调试模式
https://cn.vuejs.org/v2/guide/installation.html

4.2 CDN
对于制作原型或学习,你可以这样使用最新版本:
<script src="https://cdn.jsdelivr.net/npm/vue/dist/vue.js"></script>
对于生产环境,我们推荐链接到一个明确的版本号和构建文件,以避免新版本造成的不可预期的破坏:
<script src="https://cdn.jsdelivr.net/npm/vue@2.6.11"></script>
4.3 NPM【后面讲】
在用 Vue 构建大型应用时推荐使用 NPM 安装[1]。NPM 能很好地和诸如 webpack 或 Browserify 模块打包器配合使用。同时 Vue 也提供配套工具来开发单文件组件。
最新稳定版
$ npm install vue
4.4 导入js到项目里面
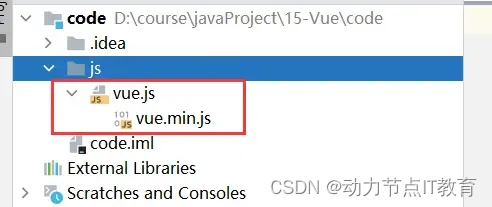
4.5 第一个Vue应用HelloWorld
1.idea下载插件 (因为下了插件有提示)Vue.js
<!DOCTYPE html>
<html lang="en">
<head><meta charset="UTF-8"><title>helloVue</title>
</head>
<body><!--声明一个页面容器--><div id="app">用户名:{{username}} <br>性别:<span v-text="sex"></span><br>性别:<span v-text="sex=='男'?'汉子':'妹子'"></span><br>备注:{{remark}}<br>备注:<span v-html="remark"></span><input type="button" value="点我" @click="clickMe(1)" ></div>
</body>
<script src="../js/vue.js"></script><script>//创建一个Vue实例let vue=new Vue({//指定个vue实例和页面的哪个容器关联el: "#app",data:{username:'小明',age:22,sex:'男',remark:'<font color=red>一个牛B的男人</font>'},methods:{// clickMe(id){//     alert(id)// }clickMe:function (id) {alert(id)}}})</script>
</html>
5.【掌握】v-text,v-html,v-pre,v-once指令
Js — innerText innerHtml
Jq — text() html()
Vue v-text v-html
5.1 概述
Vue.js 使用了基于 HTML 的模板语法,允许开发者声明式地将 DOM 绑定至底层 Vue 实例的数据。所有 Vue.js 的模板都是合法的 HTML ,所以能被遵循规范的浏览器和 HTML 解析器解析。
在底层的实现上,Vue 将模板编译成虚拟 DOM 渲染函数。结合响应系统,Vue 能够智能地计算出最少需要重新渲染多少组件,并把 DOM 操作次数减到最少。
5.2 v-text
v-text主要用来更新textContent,可以等同于JS的innerText属性。
<span v-text="msg"></span>
这两者等价:
<span>{{msg}}</span>
5.3 v-html
双大括号的方式会将数据解释为纯文本,而非HTML。为了输出真正的HTML,可以用v-html指令。它等同于JS的innerHtml属性。
或者jquery的$().html(aaa)
<div v-html="rawHtml"></div>
这个div的内容将会替换成属性值rawHtml,直接作为HTML进行渲染。
5.4 v-pre
v-pre主要用来跳过这个元素和它的子元素编译过程。可以用来显示原始的Mustache标签。跳过大量没有指令的节点加快编译。
<div id="app"><span v-pre>{{message}}</span> //这条语句不进行编译<span>{{message}}</span></div>
最终仅显示第二个span的内容
5.5 v-once
v-once关联的实例,只会渲染一次。之后的重新渲染,实例极其所有的子节点将被视为静态内容跳过,这可以用于优化更新性能。
<span v-once>This will never change:{{msg}}</span> //单个元素<div v-once>//有子元素<h1>comment</h1><p>{{msg}}</p></div>
上面的例子中,msg即使产生改变,也不会重新渲染。
5.6 案例
<!DOCTYPE html>
<html lang="en">
<head><meta charset="UTF-8"><title>02基本指令.html</title>
</head>
<body><!--声明一个页面容器--><div id="app"><h1> v-text  ===js里面innerText</h1>用户名:{{username}} <br>用户名:<span v-text="username"></span> <br>备注:{{remark}} <br>备注:<span v-text="remark"></span> <br>年龄:<span v-text="age>60?'老年':'青年'"></span> <br>年龄:{{age>60?'老年':'青年'}} <br>年龄:{{age}} <br><hr><h1> v-html  ===js里面的innerHTML</h1>用户名:<span v-html="username"></span> <br>备注:<span v-html="remark"></span> <br><hr><h1>v-pre 主要用来跳过这个元素和它的子元素编译过程</h1><span v-pre>{{username}}</span><hr><h1>v-once 这里面的元素是在页面加载时渲染一次,后面如果相关属性发生变化里面的值是不会变的</h1><span v-once>{{age}}</span><button @click="addAge">添加年龄</button><button @click="reduceAge">减少年龄</button></div>
</body>
<script src="../js/vue.js"></script><script>//创建一个Vue实例let vue=new Vue({//指定个vue实例和页面的哪个容器关联el: "#app",data:{username:'小明',remark:'<font color=red>一个牛B的男人</font>',age:22},methods:{addAge(){this.age++;},reduceAge(){this.age--;}}})</script>
</html>
6.【掌握】属性绑定、事件绑定、双向绑定
涉及指令
1,v-bind 字面意思为绑定。是vue中提供的用户绑定属性的指令。v-bind可简写成:
2,v-on 事件绑定指令 可以简写成@
3,v-model 只能用于表单元素的双向绑定指令
6.1 属性绑定
在以前的开发中。我们使用title属性去设置鼠标悬浮的显示值,在vue 中可以使用V-bind去动态设置属性,以title为例
<!DOCTYPE html>
<html lang="en">
<head><meta charset="UTF-8"><title>03属性绑定.html</title>
</head>
<body><!--声明一个页面容器--><div id="app"><img src="../images/mz.jpg" title="这是一个大妹子" width="320" height="480"><img v-bind:src="imgPath" v-bind:title="title" width="320" height="480"><img :src="imgPath" :title="title" width="320" height="480"><hr><a href="http://www.baidu.com">百度</a><br><a v-bind:href="sinaUrl">{{sinaTitle}}</a><br><a :href="sinaUrl">{{sinaTitle}}</a><br></div>
</body>
<script src="../js/vue.js"></script><script>//创建一个Vue实例let vue=new Vue({//指定个vue实例和页面的哪个容器关联el: "#app",data:{imgPath:'../images/mz.jpg',title:"这是一个大妹子",sinaUrl:'http://www.sina.com.cn',sinaTitle:"去新浪"},methods:{// clickMe(id){//     alert(id)// }clickMe:function (id) {alert(id)},addHandler(){this.score++},reduceHandler(){this.score--}}})</script>
</html>
6.2 事件绑定(v-model 一般用于表单)
在以前的开发中。我们使用onclick等属性去设置点击事件,在vue 中可以使用v-on去设置方式,可简写成@
<!DOCTYPE html>
<html lang="en">
<head><meta charset="UTF-8"><title>04事件绑定.html</title>
</head>
<body>
<h2>单击 双击  改变  进入 移出 移动  按下  松开   得到焦点  失去焦点</h2><!--声明一个页面容器--><div id="app"><input type="button" v-on:click="testClick" value="单击事件绑定"><input type="button" @click="testClick" value="单击事件绑定简写">|<input type="button" v-on:dblclick="testdbClick" value="双击事件绑定"><input type="button" @dblclick="testdbClick" value="双击事件绑定简写">|<select @change="changeValue"><option value="武汉1">武汉1</option><option value="武汉2">武汉2</option><option value="武汉3">武汉3</option><option value="武汉4">武汉4</option></select>|<input type="text" @focus="getFocus" @blur="lostFocus" :value="val"><hr><div style="width: 300px;height: 300px;border: 2px solid green;text-align: center"@mouseenter="testMouseenter"@mouseleave="testMouseleave"@mousedown="testMousedown"@mouseup="testMouseup"@mousemove="testMousemove">{{content}}</div></div>
</body>
<script src="../js/vue.js"></script><script>//创建一个Vue实例let vue=new Vue({//指定个vue实例和页面的哪个容器关联el: "#app",data:{val:'',content:''},methods:{testClick(){console.log("单击")},testdbClick(){console.log("双击")},changeValue(val){console.log("改变",val.srcElement.value)},getFocus(){console.log("得到焦点")this.val='得到焦点';},lostFocus(){console.log("失去焦点")this.val='失去焦点'},testMouseenter(event){this.content="鼠标进入"console.log("进入",event)},testMouseleave(event){this.content="鼠标离开"console.log("离开",event)},testMousedown(event){this.content="鼠标按下"console.log("按下",event)},testMouseup(event){this.content="鼠标松开"console.log("松开",event)},testMousemove(event){console.log(event)this.content="移动 x="+event.offsetX+"  y="+event.offsetYconsole.log("移动")}}})</script>
</html>
6.3 双向绑定v-model
v-model 只能用于表单元素的双向绑定指令
v-bind是单向绑定
<!DOCTYPE html>
<html lang="en">
<head><meta charset="UTF-8"><title>05双向绑定.html</title>
</head>
<body>
<h2>双向绑定</h2><!--声明一个页面容器--><div id="app"><div>{{score}}</div><hr><input type="text" name="score" placeholder="请输入分数" v-model="score"><input type="button" @click="addScore" value="+"><input type="button" @click="reduceScore" value="-"></div>
</body>
<script src="../js/vue.js"></script><script>//创建一个Vue实例let vue=new Vue({//指定个vue实例和页面的哪个容器关联el: "#app",data:{score:100},methods:{addScore(){this.score++;},reduceScore(){this.score--;}}})</script>
</html>
6.4 双向绑定v-model 小练习

<!DOCTYPE html><html lang="en"><head><meta charset="UTF-8"><meta name="viewport" content="width=device-width, initial-scale=1.0"><meta http-equiv="X-UA-Compatible" content="ie=edge"><title>Document</title><script src="./lib/vue.js"></script></head><body><div id ="app"><input v-model="number1" /><select v-model="opt" ><option value="+">+</option><option value="-">-</option><option value="*">*</option><option value="÷">÷</option></select><input v-model="number2" /><button @click="compute">=</button><input v-model="cutNumber"/></div><script>//创建Vue实例,得到 ViewModelvar vm = new Vue({el: '#app',data: {number1:0,number2:0,opt:'+',cutNumber:0},methods: {compute(){switch(this.opt){case '+':this.cutNumber=parseInt(this.number1)+parseInt(this.number2)break;case '-':this.cutNumber=parseInt(this.number1)-parseInt(this.number2)break;case '*':this.cutNumber=parseInt(this.number1)*parseInt(this.number2)break;case '÷':this.cutNumber=parseInt(this.number1)/parseInt(this.number2)break;}}}});</script></body></html>
7.【重要】条件渲染v-if v-show
7.1 相关指令
1,v-if
2,v-else
3,v-else -if
4,v-show
7.2 v-if
v-if可以实现条件渲染,Vue会根据表达式的值的真假条件来渲染元素。
<div id="app"><a v-if="ok">yes</a></div><script>var vue = new Vue({el: '#app',data: {ok:false,}})</script>
如果属性值ok为true,则显示。否则,不会渲染这个元素。
7.3 v-else
v-else是搭配v-if使用的,它必须紧跟在v-if或者v-else-if后面,否则不起作用。
<a v-if="ok">yes</a><a v-else>No</a>
7.4 v-else-if
v-else-if充当v-if的else-if块,可以链式的使用多次。可以更加方便的实现switch语句。
<div id="app"><div v-if="type==='A'">A</div><div v-else-if="type==='B'">B</div><div v-else-if="type==='C'">C</div><div v-else>Not A,B,C</div></div><script>var vue = new Vue({el: '#app',data: {ok:false,type:'A'}})</script>
7.5 v-show
<h1 v-show="ok">hello world</h1>
也是用于根据条件展示元素。和v-if不同的是,如果v-if的值是false,则这个元素被销毁,不在dom中。但是v-show的元素会始终被渲染并保存在dom中,它只是简单的切换css的dispaly属性。
注意:v-if有更高的切换开销
v-show有更高的初始渲染开销。
因此,如果要非常频繁的切换,则使用v-show较好;如果在运行时条件不太可能改变,则v-if较好
7.6 案例
<!DOCTYPE html><html lang="en"><head><meta charset="UTF-8"><meta name="viewport" content="width=device-width, initial-scale=1.0"><meta http-equiv="X-UA-Compatible" content="ie=edge"><title>Document</title><script src="./lib/vue.js"></script></head><body><div id ="app"><!-- v-if v-else 两个标签元素必须是相邻兄弟级别 --><div v-if="flag">我是 if true</div><!-- <div>sdafasdfasddf</div> --><div v-else>我是else</div><hr><div v-if="score>=90">你很优秀</div><div v-else-if="score>=80">良好</div><div v-else-if="score>=70">正常</div><div v-else-if="score>=60">及格</div><div v-else>兄弟努力吧</div><input v-model:value="score" /><!-- v-if 和show是有区别的1,v-if 如果为false 则,当前这个div根本不会创建 如果为true时会重新创建对象载入2,v-show 不管为true还是False 先把对象创建出来,再根据flag显示或隐藏--><div v-if="flag">我是 if true</div><div v-show="flag">显示吗,显示吧</div></div><script>//创建Vue实例,得到 ViewModelvar vm = new Vue({el: '#app',data: {flag:true,score:100},methods: {}});</script></body></html>8.【重点】列表渲染v-for
8.1 v-for
用v-for指令根据遍历数组来进行渲染 前端不叫集合
有下面两种遍历形式
<div v-for="(item,index) in items"></div> //使用in,index是一个可选参数,表示当前项的索引<div v-for="item in items"></div> //使用in
下面是一个例子,并且在v-for中,拥有对父作用域属性的完全访问权限。
8.2 v-for案例
<!DOCTYPE html><html lang="en"><head><meta charset="UTF-8"><meta name="viewport" content="width=device-width, initial-scale=1.0"><meta http-equiv="X-UA-Compatible" content="ie=edge"><title>Document</title><script src="./lib/vue.js"></script></head><body><div id ="app"><div v-for="(item,index) in arr1" v-text="item+'-'+index"> {{item}}-{{index}} </div><hr><div v-for="(item,index) in arr2">{{index}}-{{item.id}}-{{item.name}}-{{item.address}}</div>编号<input type="text" v-model="id" /><br />姓名<input type="text" v-model="name" /><br />地址<input type="text" v-model="address" /><br /><button @click="add">添加</button></div><script>//创建Vue实例,得到 ViewModelvar vm = new Vue({el: '#app',data: {arr1:[1,3,4,5,6,7,8],arr2:[{id:1,name:'小明1',address:'武汉1'},{id:2,name:'小明2',address:'武汉2'},{id:3,name:'小明3',address:'武汉3'},{id:4,name:'小明4',address:'武汉4'},{id:5,name:'小明5',address:'武汉5'}],id:undefined,name:undefined,address:undefined},methods: {add(){this.arr2.push({id:this.id,name:this.name,address:this.address})}}});</script></body></html>
8.3 for-layuiCRUD案例

<!DOCTYPE html><html lang="en"><head><meta charset="UTF-8"><meta name="viewport" content="width=device-width, initial-scale=1.0"><meta http-equiv="X-UA-Compatible" content="ie=edge"><title>Document</title><script src="./lib/vue.js"></script><link rel="stylesheet" href="./css/layui.css"></head><body><div id="app"><div class="layui-inline"><div class="layui-input-inline" style="width: 100px;"><input type="text" placeholder="ID" class="layui-input" v-model="id"></div><div class="layui-input-inline" style="width: 100px;"><input type="text" placeholder="姓名" class="layui-input" v-model="name"></div><div class="layui-input-inline" style="width: 100px;"><input type="text" placeholder="性别" class="layui-input" v-model="sex"></div><div class="layui-input-inline" style="width: 100px;"><input type="text" placeholder="备注" class="layui-input" v-model="comment"></div><div class="layui-input-inline" style="width: 100px;"><button type="button" class="layui-btn" @click="add">添加</button></div><div class="layui-input-inline" style="width: 100px;"><input type="text" placeholder="搜索姓名" class="layui-input" v-model="searchName"></div><div class="layui-input-inline" style="width: 100px;"><button type="button" class="layui-btn" @click="search">搜索</button></div></div><table class="layui-table"><colgroup><col width="150"><col width="200"><col></colgroup><thead><tr><th>ID</th><th>姓名</th><th>性别</th><th>备注</th><th>操作</th></tr></thead><tbody><tr v-for="(item, index) in userList" :key="index"><td>{{item.id}}</td><td>{{item.name}}</td><td>{{item.sex}}</td><td>{{item.comment}}</td><td><button class="layui-btn layui-btn-danger" @click="deleteById(item.id)">删除</button><button class="layui-btn layui-btn-primary" @click="updateById(item.id)">更新</button></td></tr></tbody></table><h1>修改用户</h1><div class="layui-inline"><div class="layui-input-inline" style="width: 100px;"><input type="text" placeholder="ID" class="layui-input" v-model="updateObj.id"></div><div class="layui-input-inline" style="width: 100px;"><input type="text" placeholder="姓名" class="layui-input" v-model="updateObj.name"></div><div class="layui-input-inline" style="width: 100px;"><input type="text" placeholder="性别" class="layui-input" v-model="updateObj.sex"></div><div class="layui-input-inline" style="width: 100px;"><input type="text" placeholder="备注" class="layui-input" v-model="updateObj.comment"></div><div class="layui-input-inline" style="width: 100px;"><button type="button" class="layui-btn" @click="doUpdate">确定修改</button></div></div></div><script>//创建Vue实例,得到 ViewModelvar vm = new Vue({el: '#app',data: {id: undefined,name: undefined,sex: undefined,comment: undefined,searchName: undefined,userList: [{ id: 1, name: '雷哥', sex: '男', comment: '地表最帅男人' },{ id: 2, name: '刘备', sex: '男', comment: '刘知兵' },{ id: 3, name: '关羽', sex: '男', comment: '关过江' },{ id: 4, name: '张飞', sex: '男', comment: '张爱兵' }],updateObj: {id: undefined,name: undefined,comment: undefined,sex: undefined}},methods: {add() {let obj = {id: this.id,name: this.name,sex: this.sex,comment: this.comment}this.userList.push(obj)},search() {let newUserList = new Array();let itemArr = this.userList.filter(item => {if (item.name.includes(this.searchName)) {newUserList.push(item)return item}})this.userList = newUserList;console.log(itemArr)},deleteById(id) {// es6语法新增了强大的数组操作函数let index = this.userList.findIndex(item => {if (item.id === id) {return true}})//js根据索引删除数组里面数据的方法 1删除this.userList.splice(index, 1)},updateById(id) {let itemArr = this.userList.filter(item => {if (item.id === id) {return item}})let item = itemArr[0];this.updateObj = {id: item.id,name: item.name,comment: item.comment,sex: item.sex}},doUpdate() {console.log(this.updateObj.id)let itemArr = this.userList.filter(item => {if (item.id === this.updateObj.id) {item.id=this.updateObj.iditem.name=this.updateObj.nameitem.sex=this.updateObj.sexitem.comment=this.updateObj.comment}})}}});</script></body></html>
9.【了解】过滤器的使用
作用就是格式化
9.1 概述
Vue.js 允许你自定义过滤器,可被用于一些常见的文本格式化。过滤器可以用在两个地方:双花括号插值和 v-bind 表达式 (后者从 2.1.0+ 开始支持)。过滤器应该被添加在 JavaScript 表达式的尾部,由“管道”符号指示:
过滤器分为两种
Ø 全局过滤器 所有Vue实例里面都可以使用
Ø 局部过滤器 当前的Vue实例里面可以使用
9.2 代码
<!DOCTYPE html>
<html lang="en">
<head><meta charset="UTF-8"><title>helloVue</title>
</head>
<body><!--声明一个页面容器--><div id="app"><div>{{money|handlerMoney}}</div><div>{{sex|handlerSex}}</div><div>{{birth|handlerBirth}}</div></div><div id="bpp"><div>{{money|handlerMoney}}</div><div>{{sex|handlerSex}}</div><div>{{birth|handlerBirth}}</div></div>
</body>
<script src="../js/vue.js"></script><script>//声明一个全局过滤器// Vue.filter("handlerMoney",function (value) {//     return value.toFixed(2);// })// Vue.filter("handlerSex",function (value) {//     return value==1?'男':'女';// })// Vue.filter("handlerBirth",function (value) {//     return value.getFullYear()+"-"+(value.getMonth()+1)+"-"+value.getDate();// })//创建一个Vue实例let vue1=new Vue({//指定个vue实例和页面的哪个容器关联el: "#app",filters:{handlerMoney(value){return value.toFixed(2);},handlerSex(value){return value==1?'男':'女';},handlerBirth(value){return  value.getFullYear()+"-"+(value.getMonth()+1)+"-"+value.getDate();}},data:{money:912312.12812,sex:1,birth:new Date()}})let vue2=new Vue({//指定个vue实例和页面的哪个容器关联el: "#bpp",data:{money:912312.12812,sex:1,birth:new Date()}})</script>
</html>
<script>import Layui from "../layui/layui";export default {components: {Layui}}
</script>
10.【了解】监听器的使用
10.1 作用
用来监听data里面的某一个数据是否发生变化。如果发生变化就会触发监听器的方法
10.2 代码
<!DOCTYPE html>
<html lang="en">
<head><meta charset="UTF-8"><title>11-监听器.html</title><!--引入js--><script src="../js/vue.js"></script><style>.clsDiv{border: 1px solid green;margin: 5px;}</style>
</head>
<body>
<!--声明一个页面模板-->
<div id="app"><div class="clsDiv"><p>{{count}}</p><p>{{user.name}}</p><input type="button" value="增加count" @click="addCount"><input type="button" value="修改user.name" @click="updateUserName"></div>
</div>
</body>
<!--通过JS去创建VUE的实例-->
<script>let vue=new Vue({el:"#app", //绑定的页面模板,data:{count:1,user:{id:1,name:"小明1",address:"武汉1"}},watch:{//参数1 新值  参数2 旧值count: function (newVal,oldVal) {console.log(newVal,oldVal);},"user.name":function (newVal,oldVal) {console.log(newVal,oldVal);}},methods:{addCount(){this.count++;},updateUserName(){this.user.name="德玛"}}})
</script>
</html>
11.【掌握】购物车
11.1 效果

11.2 代码
<!DOCTYPE html>
<html lang="en">
<head><meta charset="UTF-8"><title>04购物车.html</title><link rel="stylesheet" href="../layui/css/layui.css">
</head>
<body><!--声明一个页面容器--><div id="app"><h1 align="center">我的购物车</h1><hr><table class="layui-table"><thead><tr><th><input type="checkbox" :checked="checkAll" @click="handlerCheckAll"></th><th>编号</th><th>名称</th><th>单价</th><th>数量</th><th>小计</th><th>备注</th><th>操作</th></tr></thead><tbody><tr v-for="item in goodsList"><td><input type="checkbox" :checked="item.isChecked" @click="handlerItemCheckboxClick(item)"></td><td>{{item.id}}</td><td>{{item.goodsName}}</td><td>{{item.price|priceHandler}}</td><td><input type="button" value="-" class="layui-btn layui-btn-sm" @click="reduceNum(item)">{{item.num}}<input type="button" value="+" class="layui-btn layui-btn-sm"  @click="addNum(item)"></td><td>{{item.amount|priceHandler}}</td><td>{{item.remark}}</td><td><input type="button" class="layui-btn layui-btn-danger" @click="doDelete(item)" value="删除"></td></tr><tr><td align="right" colspan="11">应付:¥{{totalAmount|priceHandler}}<input type="button" class="layui-btn layui-btn-danger" value="结算"></td></tr></tbody></table></div>
</body>
<script src="../js/vue.js"></script><script>//创建一个Vue实例let vue=new Vue({//指定个vue实例和页面的哪个容器关联el: "#app",filters:{priceHandler(val){return val.toFixed(2);}},data:{goodsList:[{isChecked:false,id:1,goodsName:'小霸王1',price:200,num:1,amount:200,remark:'牛逼'},{isChecked:false,id:2,goodsName:'小霸王2',price:300,num:1,amount:300,remark:'牛逼'},{isChecked:false,id:3,goodsName:'小霸王3',price:200,num:1,amount:200,remark:'牛逼'},{isChecked:false,id:4,goodsName:'小霸王4',price:100,num:1,amount:100,remark:'牛逼'},{isChecked:false,id:5,goodsName:'小霸王5',price:50,num:1,amount:50,remark:'牛逼'},{isChecked:false,id:6,goodsName:'小霸王6',price:10,num:1,amount:10,remark:'牛逼'},],//总金额totalAmount:0,//是否全选checkAll:false},methods:{//减少reduceNum(item){if(item.num>1){item.num--item.amount=item.price*item.numthis.computedTotalAmount();}},//加addNum(item){item.num++item.amount=item.price*item.numthis.computedTotalAmount();},handlerCheckAll(val){this.checkAll=!this.checkAll;this.goodsList.filter((item)=>{item.isChecked=this.checkAll;})this.computedTotalAmount();},//行的复选框点击事件handlerItemCheckboxClick(item){item.isChecked=!item.isChecked//判断是否全选中。如果全选中要把checkall的状态变成选中let flag=true;this.goodsList.filter((item)=>{if(!item.isChecked){flag=false;}})this.checkAll=flag;this.computedTotalAmount();},//删除doDelete(obj){this.goodsList.filter((item,index)=>{if(item.id==obj.id){this.goodsList.splice(index,1)this.computedTotalAmount()}})let flag=true;this.goodsList.filter((item)=>{if(!item.isChecked){flag=false;}})this.checkAll=flag;},//计算最后的结果computedTotalAmount(){this.totalAmount=0;this.goodsList.filter((item)=>{if(item.isChecked){this.totalAmount+=item.amount}})}}})</script>
</html>
12.【重点】生命周期(页面渲染顺序)【重点内容】
12.1 生命周期图【重点注意create方法】
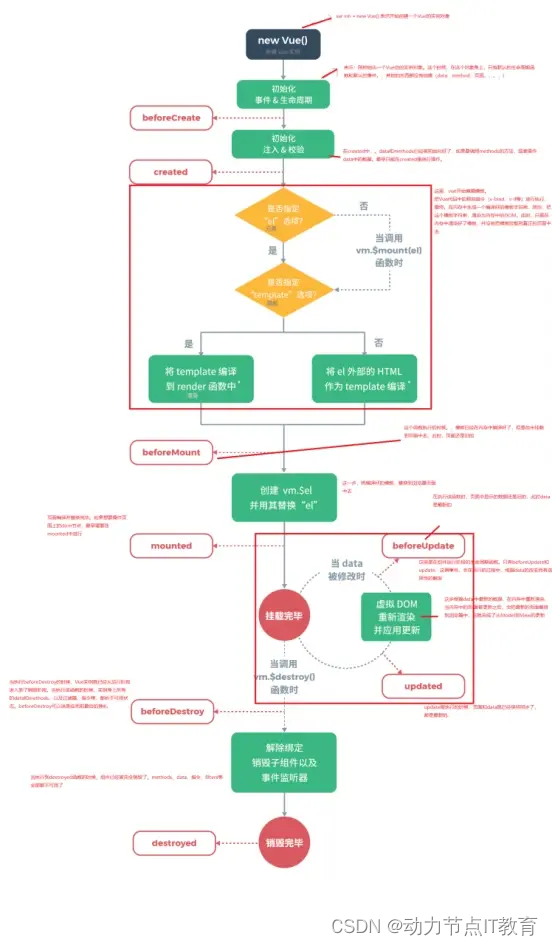
12.2 代码
<!DOCTYPE html><html lang="en"><head><meta charset="UTF-8"><meta name="viewport" content="width=device-width, initial-scale=1.0"><meta http-equiv="X-UA-Compatible" content="ie=edge"><title>Document</title><script src="./lib/vue.js"></script></head><body><div id ="app"><span>{{id}}</span><br /><button @click="changeId">修改id</button></div><script>//创建Vue实例,得到 ViewModelvar vm = new Vue({el: '#app',data: {id:1},beforeCreate() {console.log("beforeCreate:id:"+this.id)},//这个是重点created() {console.log("created:id:"+this.id)},beforeMount() {console.log("beforeMount:id:"+this.id)},mounted() {console.log("mounted:id:"+this.id)},beforeUpdate() {console.log("beforeUpdate:id:"+this.id)},updated() {console.log("updated:id:"+this.id)},beforeDestroy() {console.log("beforeDestroy:id:"+this.id)},destroyed() {console.log("destroyed:id:"+this.id)},methods: {changeId(){this.id=1000}}});</script></body></html>
13.【特别重点】组件使用
13.1 什么是组件
组件的出现,是为了拆分Vue的代码块,不用同的组件划分不同的功能模块,以后我们需要某个功能时,就直接调用对应的组件即可
模块化:模块化是从代码的角度去分析的,方便代码分层开发,保证每个模块职责单一
组件:组件化是从界面的角度去划分的,如:分页组件、轮播、颜色选择、文件上传等
抽象 是把公共的东西 像的东西抽出来 (好处:复用,公共的,缺点:代码的可读性直线下降)
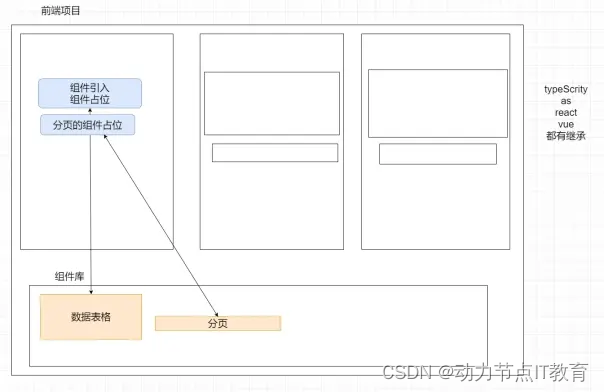
变量名说明:(组件的使用规范)
按java的开发思想,变量名往往是驼峰规则 myComponent my-component
在vue中定义组件可以使用驼峰规则,但是使用组件的时候如果存在驼峰,应该全部改成小写,并把每个单词用-连接 有点像springboot的yml配置文件的语法
组件模板的说明
组件里面必须只有一个template标签
组件的template里面的html代码只能有一个根节点
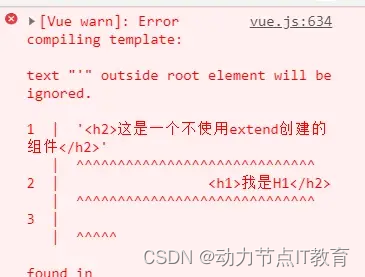
13.2 组件的第一种声明方式
<!DOCTYPE html><html lang="en"><head><meta charset="UTF-8"><meta name="viewport" content="width=device-width, initial-scale=1.0"><meta http-equiv="X-UA-Compatible" content="ie=edge"><title>Document</title><script src="./lib/vue.js"></script></head><body><div id="app"><my-component1></my-component1></div><script>var myComponent1=Vue.extend({template:'<div>我是一个使用Vue.extend方法创建的组件</div>'})Vue.component('my-component1',myComponent1);//创建Vue实例,得到 ViewModelvar vm = new Vue({el: '#app',data: {},methods: {}});</script></body></html>13.3 组件的第二种声明方式
<!DOCTYPE html><html lang="en"><head><meta charset="UTF-8"><meta name="viewport" content="width=device-width, initial-scale=1.0"><meta http-equiv="X-UA-Compatible" content="ie=edge"><title>Document</title><script src="./lib/vue.js"></script></head><body><div id ="app"><my-component1></my-component1><my-component1></my-component1><my-component1></my-component1><my-component1></my-component1></div><script>//注册组件Vue.component("my-component1",{template:'<div>不使用Vue.extend实现的组件<h1>我是h1</h1></div>'})//创建Vue实例,得到 ViewModelvar vm = new Vue({el: '#app',data: {},methods: {}});</script></body></html>
13.4 组件的第三种声明方式(常用)
<!DOCTYPE html><html lang="en"><head><meta charset="UTF-8"><meta name="viewport" content="width=device-width, initial-scale=1.0"><meta http-equiv="X-UA-Compatible" content="ie=edge"><title>Document</title><script src="./lib/vue.js"></script></head><body><div id ="app"><my-component1></my-component1><my-component1></my-component1><my-component1></my-component1><my-component1></my-component1></div><template id="temp1"><div><h1>我是HTML里面的H1</h1><h3>{{count}} <button @click="add">点击</button> </h3></button></div></template><script>var myComponent1={template:'#temp1',data(){ //在组件里面data是一个方法return {count:0}},methods: {add(){this.count++}},}//注册组件Vue.component("my-component1",myComponent1)//创建Vue实例,得到 ViewModelvar vm = new Vue({el: '#app',data: {},methods: {}});</script></body></html>
13.5 掌握vue中组件的data和methods
组件中也可以有自己的Data和methods,
组件里面的data必须是一个方法 原因如下
组件在存在是为有复用,定义一个组件之后,可能会有多个地方使用到该组件。如果按data:{}的写法,多个组件会复用同一个data,降低组件的复用性,而定义为function则不会
13.6 私有组件的使用
上面的创建方法都是公有的组件,如果只想一个组件在某一个Vue实例里面使用,就可以使用私有组件
<!DOCTYPE html><html lang="en"><head><meta charset="UTF-8"><meta name="viewport" content="width=device-width, initial-scale=1.0"><meta http-equiv="X-UA-Compatible" content="ie=edge"><title>Document</title><script src="./lib/vue.js"></script></head><body><div id ="app"><my-component1></my-component1><my-component1></my-component1><my-component1></my-component1><my-component1></my-component1></div><div id ="app2">11111<my-component1></my-component1><my-component1></my-component1><my-component1></my-component1><my-component1></my-component1></div><template id="temp1"><div><h1>我是HTML里面的H1</h1><h3>{{count}} <button @click="add">点击</button> </h3></button></template><script>var myComponent1={template:'#temp1',data(){ //在组件里面data是一个方法return {count:0,name:''}},methods: {add(){this.count++}},}//创建Vue实例,得到 ViewModelvar vm = new Vue({el: '#app',components:{"myComponent1":myComponent1},data: {count:0,name:''},methods: {}});var vm2 = new Vue({el: '#app2',data: {count:0,name:''},methods: {}});</script></body></html>
13.7 掌握vue组件之间的切换方式
13.7.1 使用v-if v-else v-else-if去切换组件
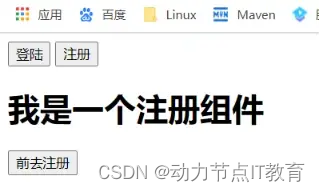
<!DOCTYPE html><html lang="en"><head><meta charset="UTF-8"><meta name="viewport" content="width=device-width, initial-scale=1.0"><meta http-equiv="X-UA-Compatible" content="ie=edge"><title>Document</title><script src="./lib/vue.js"></script></head><body><div id ="app"><button @click="flag=true">登陆</button><button @click="flag=false">注册</button><div><login v-if="flag"></login><register v-else></register></div></div><template id="login"><div><h1>我是一个登陆组件</h1><button>前去登陆</button></div></template><template id="register"><div><h1>我是一个注册组件</h1><button>前去注册</button></div></template><script>Vue.component("login",{template:'#login',data(){ //在组件里面data是一个方法return {}},methods: {},})Vue.component("register",{template:'#register',data(){ //在组件里面data是一个方法return {}},methods: {},})//创建Vue实例,得到 ViewModelvar vm = new Vue({el: '#app',data: {flag:true,},methods: {}});</script></body></html>13.7.2 使用component占位 去实现[适合组件多的情况]
<!DOCTYPE html><html lang="en"><head><meta charset="UTF-8"><meta name="viewport" content="width=device-width, initial-scale=1.0"><meta http-equiv="X-UA-Compatible" content="ie=edge"><title>Document</title><script src="./lib/vue.js"></script></head><body><div id ="app"><button @click="componentName='login'">登陆</button><button @click="componentName='register'">注册</button><!--Vue提供了component ,来展示对应名称的组件,这是一个占位符,使用:is来指定展示的组件名称--><component :is="componentName"></component></div><template id="login"><div><h1>我是一个登陆组件</h1><button>前去登陆</button></div></template><template id="register"><div><h1>我是一个注册组件</h1><button>前去注册</button></div></template><script>Vue.component("login",{template:'#login',data(){ //在组件里面data是一个方法return {}},methods: {},})Vue.component("register",{template:'#register',data(){ //在组件里面data是一个方法return {}},methods: {},})//创建Vue实例,得到 ViewModelvar vm = new Vue({el: '#app',data: {componentName:'login', //指定组件的名称},methods: {}});</script></body></html>
13.8 父子组件传值
13.8.1 子组件直接获取父组件数据(父组件将值传递给子组件)
场景:数据表格将值传递给分页组件
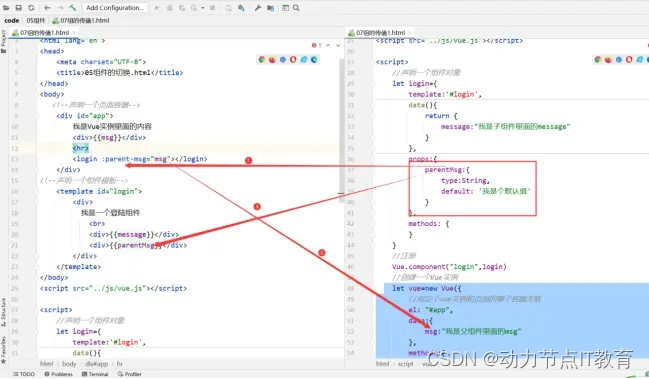
<!DOCTYPE html>
<html lang="en">
<head><meta charset="UTF-8"><title>05组件的切换.html</title>
</head>
<body><!--声明一个页面容器--><div id="app">我是Vue实例里面的内容<div>{{msg}}</div><hr><login :parent-msg="msg"></login></div>
<!--声明一个组件模板--><template id="login"><div>我是一个登陆组件<br><div>{{message}}</div><div>{{parentMsg}}</div></div></template>
</body>
<script src="../js/vue.js"></script><script>//声明一个组件对象let login={template:'#login',data(){return {message:"我是子组件里面的message"}},props:{parentMsg:{type:String,default: '我是个默认值'}},methods: {}}//注册Vue.component("login",login)//创建一个Vue实例let vue=new Vue({//指定个vue实例和页面的哪个容器关联el: "#app",data:{msg:"我是父组件里面的msg"},methods:{}})
</script>
</html>
13.8.2 使用方法把子组里面的数据传递到父组件(子传父)
场景:回调场景
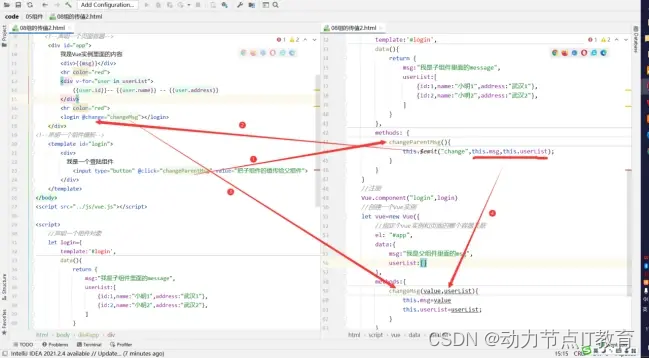
<!DOCTYPE html>
<html lang="en">
<head><meta charset="UTF-8"><title>08组的传值2.html</title>
</head>
<body><!--声明一个页面容器--><div id="app">我是Vue实例里面的内容<div>{{msg}}</div><hr color="red"><div v-for="user in userList">{{user.id}}-- {{user.name}} -- {{user.address}}</div><hr color="red"><login @change="changeMsg"></login></div>
<!--声明一个组件模板--><template id="login"><div>我是一个登陆组件<input type="button" @click="changeParentMsg" value="把子组件的值传给父组件"></div></template>
</body>
<script src="../js/vue.js"></script><script>//声明一个组件对象let login={template:'#login',data(){return {msg:"我是子组件里面的message",userList:[{id:1,name:"小明1",address:"武汉1"},{id:2,name:"小明2",address:"武汉2"},]}},methods: {changeParentMsg(){this.$emit("change",this.msg,this.userList);}}}//注册Vue.component("login",login)//创建一个Vue实例let vue=new Vue({//指定个vue实例和页面的哪个容器关联el: "#app",data:{msg:"我是父组件里面的msg",userList:[]},methods:{changeMsg(value,userList){this.msg=valuethis.userList=userList;}}})
</script>
</html>
13.9 掌握父组件调用子组件的方法【重点掌握】
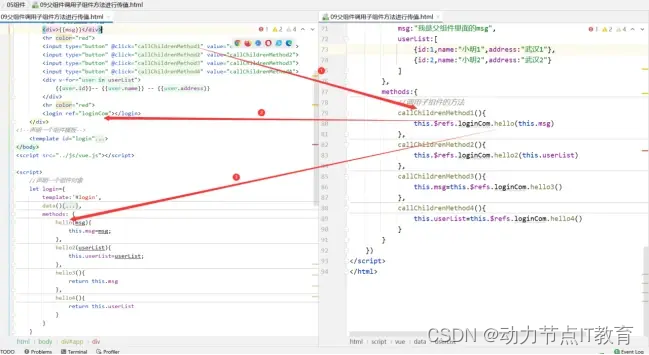
<!DOCTYPE html>
<html lang="en">
<head><meta charset="UTF-8"><title>09父组件调用子组件方法进行传值.html</title>
</head>
<body><!--声明一个页面容器--><div id="app">我是Vue实例里面的内容<div>{{msg}}</div><hr color="red"><input type="button" @click="callChildrenMethod1" value="callChildrenMethod1"><input type="button" @click="callChildrenMethod2" value="callChildrenMethod2"><input type="button" @click="callChildrenMethod3" value="callChildrenMethod3"><input type="button" @click="callChildrenMethod4" value="callChildrenMethod4"><div v-for="user in userList">{{user.id}}-- {{user.name}} -- {{user.address}}</div><hr color="red"><login ref="loginCom"></login></div>
<!--声明一个组件模板--><template id="login"><div>我是一个登陆组件<div>{{msg}}</div><div v-for="user in userList">{{user.id}}-- {{user.name}} -- {{user.address}}</div></div></template>
</body>
<script src="../js/vue.js"></script><script>//声明一个组件对象let login={template:'#login',data(){return {msg:"我是子组件里面的message",userList:[{id:3,name:"小明3",address:"武汉3"},{id:4,name:"小明4",address:"武汉4"}]}},methods: {hello(msg){this.msg=msg;},hello2(userList){this.userList=userList;},hello3(){return this.msg},hello4(){return this.userList}}}//注册Vue.component("login",login)//创建一个Vue实例let vue=new Vue({//指定个vue实例和页面的哪个容器关联el: "#app",data:{msg:"我是父组件里面的msg",userList:[{id:1,name:"小明1",address:"武汉1"},{id:2,name:"小明2",address:"武汉2"}]},methods:{//调用子组件的方法callChildrenMethod1(){this.$refs.loginCom.hello(this.msg)},callChildrenMethod2(){this.$refs.loginCom.hello2(this.userList)},callChildrenMethod3(){this.msg=this.$refs.loginCom.hello3()},callChildrenMethod4(){this.userList=this.$refs.loginCom.hello4()}}})
</script>
</html>
平级组件怎么互相传值:借助父组件来传递
14.【特别重点】路由
14.1 什么是路由及作用
什么是路由
后端:对于普通网站,所有的超链接都对应一个url地址,每个url都对应服务器上的资源
前端:对于单页面应用程序来说的,主要通过url中的#(hash)去实现的,(当关于a标签)
作用:就是用来做跳转的局部更新页面内容
14.2 掌握vue路由的基本使用
1.添加一个路由的js文件
<!DOCTYPE html><html lang="en"><head><meta charset="UTF-8"><meta name="viewport" content="width=device-width, initial-scale=1.0"><meta http-equiv="X-UA-Compatible" content="ie=edge"><title>Document</title><script src="./lib/vue.js"></script><script src="./lib/vue-router.js"></script></head><body><div id="app"><!-- 默认渲染成a标签 可以使用tag来改变渲染的标签 --><router-link to="/login" tag="button">登陆</router-link><router-link to="/register" tag="button">注册</router-link><!--一个路由的占位符,当中由进行切换的时候,在路由中匹配到对应的组件,就显示在这个位置 --><router-view></router-view></div><template id="login"><div><div>我是一个登陆组件</div><button @click="login">登陆</button></div></template><template id="register"><div><div>我是一个注册组件</div><button @click="register">注册</button></div></template><script>var login={template: '#login',methods:{login(){alert('登陆');}}}var register={template: '#register',methods:{register(){alert('注册');}}}//当引入vue-router之后,在全局对象中就有了一个VueRouter构造函数let routerObj=new VueRouter({routes:[{path:'/',redirect: '/login'},//就是重定向,默认进来没有,访问/路径时,会被重定向到指定的路由路径,非请求的重定向{path:'/login',component:login},//path表示路径的url地址 component:代表路由要跳转的组件{path:'/register',component:register}]})//创建Vue实例,得到 ViewModelvar vm = new Vue({el: '#app',data: {},router:routerObj //指定路由对象});</script></body></html>
127.0.0.1:8080/user?username=admin&password=123456
14.3 掌握路由跳转传参的方式
14.3.1 地址传参【不推荐】数据在$route.query里面
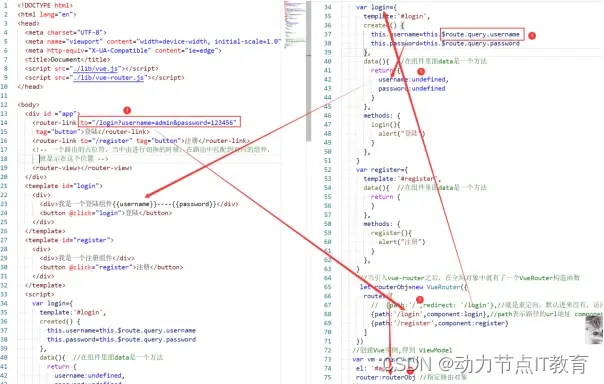
<!DOCTYPE html><html lang="en"><head><meta charset="UTF-8"><meta name="viewport" content="width=device-width, initial-scale=1.0"><meta http-equiv="X-UA-Compatible" content="ie=edge"><title>Document</title><script src="./lib/vue.js"></script><script src="./lib/vue-router.js"></script></head><body><div id ="app"><router-link to="/login?username=admin&password=123456"tag="button">登陆</router-link><router-link to="/register" tag="button">注册</router-link><!-- 一个路由的占位符,当中由进行切换的时候,在路由中匹配到对应的组件,就显示在这个位置 --><router-view></router-view></div><template id="login"><div><div>我是一个登陆组件{{username}}----{{password}}</div><button @click="login">登陆</button></div></template><template id="register"><div><div>我是一个注册组件</div><button @click="register">注册</button></div></template><script>var login={template:'#login',created() {this.username=this.$route.query.usernamethis.password=this.$route.query.password},data(){ //在组件里面data是一个方法return {username:undefined,password:undefined}},methods: {login(){alert("登陆")}},}var register={template:'#register',data(){ //在组件里面data是一个方法return {}},methods: {register(){alert("注册")}},}//当引入vue-router之后,在全局对象中就有了一个VueRouter构造函数let routerObj=new VueRouter({routes:[// {path:'/',redirect: '/login'},//就是重定向,默认进来没有,访问/路径时,会被重定向到指定的路由路径,非请求的重定向{path:'/login',component:login},//path表示路径的url地址 component:代表路由要跳转的组件{path:'/register',component:register}]})//创建Vue实例,得到 ViewModelvar vm = new Vue({el: '#app',router:routerObj //指定路由对象});</script></body></html>
14.3.2 rest风格【推荐】数据在$route.param里面
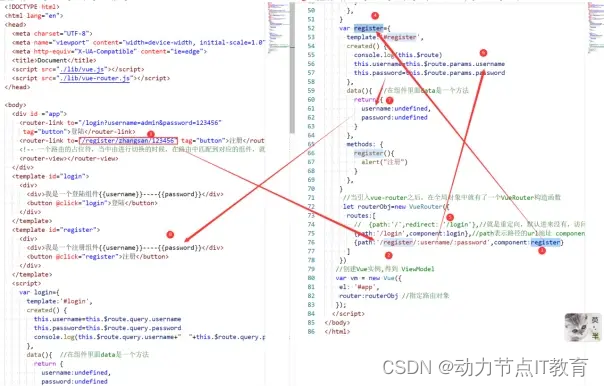
<!DOCTYPE html><html lang="en"><head><meta charset="UTF-8"><meta name="viewport" content="width=device-width, initial-scale=1.0"><meta http-equiv="X-UA-Compatible" content="ie=edge"><title>Document</title><script src="./lib/vue.js"></script><script src="./lib/vue-router.js"></script></head><body><div id ="app"><router-link to="/login?username=admin&password=123456"tag="button">登陆</router-link><router-link to="/register/zhangsan/123456" tag="button">注册</router-link><!-- 一个路由的占位符,当中由进行切换的时候,在路由中匹配到对应的组件,就显示在这个位置 --><router-view></router-view></div><template id="login"><div><div>我是一个登陆组件{{username}}----{{password}}</div><button @click="login">登陆</button></div></template><template id="register"><div><div>我是一个注册组件{{username}}----{{password}}</div><button @click="register">注册</button></div></template><script>var login={template:'#login',created() {this.username=this.$route.query.usernamethis.password=this.$route.query.passwordconsole.log(this.$route.query.username+" "+this.$route.query.password)},data(){ //在组件里面data是一个方法return {username:undefined,password:undefined}},methods: {login(){alert("登陆")}},}var register={template:'#register',created() {console.log(this.$route)this.username=this.$route.params.usernamethis.password=this.$route.params.password},data(){ //在组件里面data是一个方法return {username:undefined,password:undefined}},methods: {register(){alert("注册")}},}//当引入vue-router之后,在全局对象中就有了一个VueRouter构造函数let routerObj=new VueRouter({routes:[// {path:'/',redirect: '/login'},//就是重定向,默认进来没有,访问/路径时,会被重定向到指定的路由路径,非请求的重定向{path:'/login',component:login},//path表示路径的url地址 component:代表路由要跳转的组件{path:'/register/:username/:password',component:register}]})//创建Vue实例,得到 ViewModelvar vm = new Vue({el: '#app',router:routerObj //指定路由对象});</script></body></html>
14.4 掌握路由的嵌套使用
就是路由里面套路由,如登陆页面可以使用手机或者账号密码登陆
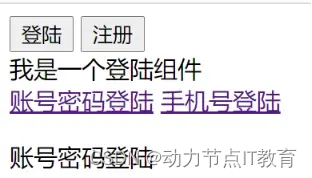
<!DOCTYPE html><html lang="en"><head><meta charset="UTF-8"><meta name="viewport" content="width=device-width, initial-scale=1.0"><meta http-equiv="X-UA-Compatible" content="ie=edge"><title>Document</title><script src="./lib/vue.js"></script><script src="./lib/vue-router.js"></script></head><body><div id="app"><!-- 默认渲染成a标签 可以使用tag来改变渲染的标签 --><router-link to="/login?username=admin&password=123456" tag="button">登陆</router-link><router-link to="/register/zhangsan/123456" tag="button">注册</router-link><!--一个路由的占位符,当中由进行切换的时候,在路由中匹配到对应的组件,就显示在这个位置 --><router-view></router-view></div><template id="login"><div><div>我是一个登陆组件</div><router-link to="/login/loginByPassword">账号密码登陆</router-link><router-link to="/login/loginBySms">手机号登陆</router-link><router-view></router-view></div></template><template id="register"><div><div>我是一个注册组件</div></div></template><script>var login={template: '#login',}var loginByPassword={template: '<p>账号密码登陆</p>',}var loginBySms={template: '<p>手机号登陆</p>',}var register={template: '#register',}//当引入vue-router之后,在全局对象中就有了一个VueRouter构造函数let routerObj=new VueRouter({routes:[{path:'/',redirect: '/login'},{path:'/login',component:login,children:[{path:'',redirect: 'loginByPassword'},{path:'loginByPassword',component:loginByPassword},{path:'loginBySms',component:loginBySms}]},//path表示路径的url地址 component:代表路由要跳转的组件{path:'/register/:username/:password',component:register}]})//创建Vue实例,得到 ViewModelvar vm = new Vue({el: '#app',data: {},router:routerObj //指定路由对象});</script></body></html>
14.5 掌握编程式导航的路由跳转
什么是编程试导航
就是通过按钮点击调用方法通过方法去转到某个路由
<!DOCTYPE html><html lang="en"><head><meta charset="UTF-8"><meta name="viewport" content="width=device-width, initial-scale=1.0"><meta http-equiv="X-UA-Compatible" content="ie=edge"><title>Document</title><script src="./lib/vue.js"></script><script src="./lib/vue-router.js"></script></head><body><div id ="app"><button @click="toLogin">登陆</button><button @click="toRegister">注册</button><!-- 一个路由的占位符,当中由进行切换的时候,在路由中匹配到对应的组件,就显示在这个位置 --><router-view></router-view></div><template id="login"><div><div>我是一个登陆组件</div></div></template><template id="register"><div><div>我是一个注册组件</div></div></template><script>var login={template:'#login',created() {console.log('我是登陆组件里面的')console.log(this.$route.query)},}var register={template:'#register',}//当引入vue-router之后,在全局对象中就有了一个VueRouter构造函数let routerObj=new VueRouter({routes:[// {path:'/',redirect: '/login'},//就是重定向,默认进来没有,访问/路径时,会被重定向到指定的路由路径,非请求的重定向{path:'/login',component:login},//path表示路径的url地址 component:代表路由要跳转的组件{path:'/register',component:register}]})//创建Vue实例,得到 ViewModelvar vm = new Vue({el: '#app',methods: {toLogin(){this.$router.push({'path':'/login',query:{username:'admin'}})//跳转并传参},toRegister(){this.$router.push('/register')}},router:routerObj //指定路由对象});</script></body></html>
)
))


![[网鼎杯 2020 青龙组]singal 1](http://pic.xiahunao.cn/[网鼎杯 2020 青龙组]singal 1)


)

)


