一、Spring Boot简介
1. 概念简介
Spring Boot是Spring公司的一个顶级项目,和Spring Framework是一个级别的。
Spring Boot实际上是利用Spring Framework 4 自动配置特性完成。编写项目时不需要编写xml文件。
2. 启动器介绍
Spring Boot的启动器实际上就是一个依赖。这个依赖中包含了整个这个技术的相关jar包,还包含了这个技术的自动配置,以前绝大多数XML配置都不需要配置了。当然了,启动器中自动配置无法实现所有内容的自动配置,在使用Spring Boot时还需要进行少量的配置(这个配置不是在xml中了,而是在properties或yml中即可)。如果是Spring自己封装的启动器的artifact id名字满足:spring-boot-starter-xxxx,如果是第三方公司提供的启动满足:xxxx-spring-boot-starter。
3. Spring Boot特征
使用Spring Boot可以创建独立的Spring应用程序。
在Spring Boot中直接嵌入了Tomcat、Jetty、Undertow等Web 容器,所以在使用SpringBoot做Web开发时不需要部署WAR文件。
通过提供自己的启动器(Starter)依赖,简化项目构建配置。
尽量的自动配置Spring和第三方库。
绝对没有代码生成,也不需要XML配置文件。
5. Spring Boot的核心
起步依赖: 起步依赖本质上是一个Maven项目对象模型(Project Object Model,POM),定义了对其他库的传递依赖,这些东西加在一起即支持某项功能。 简单的说,起步依赖就是将具备某种功能的坐标打包到一起,并提供一些默认的功能。
自动配置: Spring Boot的自动配置是一个运行时(更准确地说,是应用程序启动时)的过程,考虑了众多因素,才决定 Spring配置应该用哪个,不该用哪个。该过程是Spring自动完成的。
二、基于Maven工程的Spring Boot项目
1. 配置依赖
-
在pom.xml中添加一个继承(引入springmvc启动器)
-
继承依赖
-
继承插件
-
<parent><groupId>org.springframework.boot</groupId><artifactId>spring-boot-starter-parent</artifactId><version>2.7.17</version>
</parent>
<dependencies><dependency><groupId>org.springframework.boot</groupId><artifactId>spring-boot-starter-web</artifactId></dependency>
</dependencies>
2. 新建启动类
Spring Boot的启动类的作用是启动Spring Boot项目,是基于Main方法来运行的。
注意:启动类在启动时会做注解扫描(@Controller、@Service、@Repository......),扫描位置为同包或者子包下的注解,所以启动类的位置应放于包的根下。
2.1 启动类与启动器区别
启动类表示项目的启动入口。启动器表示jar包的坐标,必须在包中新建这个类,不能直接放入到java文件夹。
三、resources目录结构
1. 目录结构

2. 说明
-
static
-
存放静态资源(图片,css,js,静态html等)。
-
注意: static目录是SpringBoot可以直接识别的目录,会将其中的静态资源编译到web项目中,并放到tomcat中使用。静态资源的访问路径中无需声明static。例如: http://localhost:8080/a.png。
-
IDEA中经常出现放在static下的静态文件即使重启也不被编译。需要通过Maven面板进行清空缓存,重新编译启动即可识别。
-
-
templates
-
thymeleaf,FreeMarker等视图模板。
-
-
自定义cofig目录(也可以直接写配置文件)
-
存储配置文件application.properties。
-
四、Spring Boot配置文件
Spring Boot提供一个名称为application的全局配置文件,支持两种格式properteis格式与YML格式。
1. properties格式
-
例如:配置Tomcat监听端口,配置部署项目名。
server.port=8888
server.servlet.context-path=/test
2. yaml|yml格式
YML格式配置文件的扩展名可以是yaml或者yml,非常适合用来做以数据为中心的配置文件。
2.1基本格式要求
大小写敏感
使用缩进代表层级关系
缩进不允许使用tab,只允许空格
相同的部分只出现一次
'#'表示注释
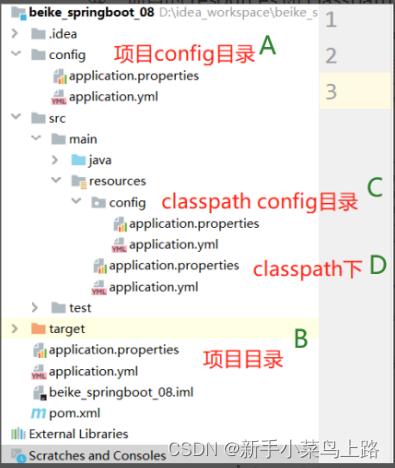
3. 配置文件存放位置
-
当前项目根目录中
-
当前项目根目录下的一个/config子目录中
-
项目的resources即classpath类路径中
-
项目的resources即classpath类路径下的/config目录中

4. 配置文件加载顺序
4.1 不同格式的加载顺序
如果同一个目录下,有application.yml也有application.properties,默认先读取application.properties。
如果同一个配置属性,在多个配置文件都配置了,默认使用第1个读取到的,后面读取的不覆盖前面读取到的。
4.2 不同位置的加载顺序(排序就是依次加载顺序)
config/application.properties
config/application.yml
application.properties
application.yml
resources/config/application.properties
resources/config/application.yml
resources/application.properties
resources/application.yml
五、Spring Boot整合MyBatis
1. 依赖启动器
<dependency><groupId>org.mybatis.spring.boot</groupId><artifactId>mybatis-spring-boot-starter</artifactId><version>2.2.2</version>
</dependency><dependency><groupId>mysql</groupId><artifactId>mysql-connector-java</artifactId>
</dependency><dependency><groupId>org.projectlombok</groupId><artifactId>lombok</artifactId><optional>true</optional>
</dependency>
2. 配置配置文件
在application.yml中添加
# 数据源(数据库连接池) 配置
spring:datasource:url: jdbc:mysql://127.0.0.1:3306/test?characterEncoding=utf8&useSSL=false&serverTimezone=Asia/Shanghaiusername: rootpassword: rootdriver-class-name: com.mysql.cj.jdbc.Driver
mybatis:# 加载mybatis配置文件(mybatis有特殊配置时使用)# config-location: classpath:mybatis/mybatis-config.xml  # 加载MyBatis的mapper.xml映射文件(映射接口和映射文件路径不一致时使用)# mapper-locations: classpath:mapper/*.xml              type-aliases-package: com.xxx.pojo        # 实体类定义别名
3. 修改启动类
1. 使用@MapperScan注解(全局设置)
在启动类上添加@MapperScan注解,表示mapper接口所在位置
2.使用@Mapper注解 (局部设置)
不在启动类上添加@MapperScan必须在UserMapper接口上添加 @Mapper注解。
六、Spring Boot整合Druid
1.添加依赖
<dependency><groupId>com.alibaba</groupId><artifactId>druid-spring-boot-starter</artifactId><version>1.2.11</version>
</dependency>
2.编写配置文件
spring:datasource:driver-class-name: com.mysql.cj.jdbc.Driverurl: jdbc:mysql://localhost:3306/test?serverTimezone=Asia/Shanghai&useSSL=false&characterEncoding=utf8username: rootpassword: root# 使用的连接池type: com.alibaba.druid.pool.DruidDataSource# 连接池的配置信息(可以不用配置)druid:# 初始化大小,最小,最大initial-size: 5max-active: 30min-idle: 5# 配置获取连接等待超时的时间max-wait: 60000validation-query: SELECT 1 FROM DUAL#配置一个连接在池中最小生存的时间,单位是毫秒min-evictable-idle-time-millis: 300000test-while-idle: true# 配置监控统计拦截的filters,去掉后监控界面sql无法统计,'wall'用于防火墙filters: stat,wall,slf4j# 配置DruidStatViewServletstat-view-servlet:# 登录名login-username: admin# 登录密码login-password: adminurl-pattern: /druid/*# IP白名单(没有配置或者为空,则允许所有访问)allow: 192.167.10.1,127.0.0.1reset-enable: false# 必须启用,要不会404enabled: true
七、SpringBoot整合Junit
1. 添加依赖
<dependency><groupId>org.springframework.boot</groupId><artifactId>spring-boot-starter-test</artifactId>
</dependency>
2. 测试类的编写
注意:
测试类不能叫做Test
测试方法返回值必须是void
测试方法必须没有参数
在springBoot2.4之前使用整合单元测试需要写 @SpringBootTest (classes={启动器类名.class})和RunWith(SpringRunner.class)
@SpringBootTest//必须添加此注解
public class MyTest {@AutowiredUserMapper userMapper;@Testpublic void test(){User user = userMapper.selectById(1L);}
}
如果测试类与启动器不在同一个包下面(com.lyx),需要写成@SpringBootTest (classes={启动器类名.class})
八、Spring Boot整合PageHelper(分页)
Spring Boot整合PageHelper不需要做任何配置文件的配置,添加依赖后就可以直接使用。
1. 添加依赖
<dependency><groupId>com.github.pagehelper</groupId><artifactId>pagehelper-spring-boot-starter</artifactId><version>1.4.2</version>
</dependency>
2. 编写代码
代码中一定要注意,要把PageHelper.startPage()写在查询数据库代码之上。
@Service
@Transactional
public class UserServiceImpl implements UserService{@Autowiredprivate UserMapper userMapper;public PageInfo<User> queryByPage(int pageNumber, int pageSize){// pageNumber当前页码   pageSize每页显示的条数PageHelper.startPage(pageNumber,pageSize);// 查询全部,查询方法必须是查询多行结果,且没有分页语法。否则无法在sql后面拼接limit子句。List<User> users = userMapper.selectAll();// PageInfo是分页查询所有查询结果封装的类,所有的结果都从这个类取PageInfo<Book> pageInfo = new PageInfo<>(users);return pageInfo;}
}
九、Spring Boot整合logback
Spring Boot默认使用Logback组件作为日志管理。Logback是由log4j创始人设计的一个开源日志组件。在Spring Boot项目中我们不需要额外的添加Logback的依赖,因为在spring-boot-starter或者spring-boot-starter-web中已经包含了Logback的依赖。
1. Logback读取配置文件的步骤
-
在classpath下查找文件logback-test.xml
-
如果文件不存在,则在classpath下查找logback.xml
2. 使用默认的logback.xml
logging:level:# 根日志级别root: warn# 具体包日志级别com.xxx.mapper: debugfile:name: mylogs/my.log3. 自定义logback.xml文件
<?xml version="1.0" encoding="UTF-8" ?><configuration><!--定义日志文件的存储地址-->  <property name="LOG_HOME" value="logs/" />  <!-- 控制台输出 -->   <appender name="Stdout" class="ch.qos.logback.core.ConsoleAppender"><!-- 日志输出编码 -->  <layout class="ch.qos.logback.classic.PatternLayout">   <!--格式化输出:%d表示日期,%thread表示线程名,%-5level:级别从左显示5个字符宽度%msg:日志消息,%n是换行符--> <pattern>%d{yyyy-MM-dd HH:mm:ss.SSS} [%thread] %-5level %logger{50} - %msg%n</pattern>   </layout>   </appender>   <!-- 按照每天生成日志文件 -->   <appender name="RollingFile"  class="ch.qos.logback.core.rolling.RollingFileAppender">   <rollingPolicy class="ch.qos.logback.core.rolling.TimeBasedRollingPolicy"><!--日志文件输出的文件名--><FileNamePattern>${LOG_HOME}/server.%d{yyyy-MM-dd}.log</FileNamePattern>   <MaxHistory>30</MaxHistory></rollingPolicy>   <layout class="ch.qos.logback.classic.PatternLayout">  <!--格式化输出:%d表示日期,%thread表示线程名,%-5level:级别从左显示5个字符宽度%msg:日志消息,%n是换行符--> <pattern>%d{yyyy-MM-dd HH:mm:ss.SSS} [%thread] %-5level %logger{50} - %msg%n</pattern>   </layout> <!--日志文件最大的大小--><triggeringPolicy class="ch.qos.logback.core.rolling.SizeBasedTriggeringPolicy"><MaxFileSize>10MB</MaxFileSize></triggeringPolicy></appender>     <!-- 日志输出级别 --><root level="info">   <appender-ref ref="Stdout" />   <appender-ref ref="RollingFile" />   </root><logger name="com.xxx.mapper" level="Trace"></logger>
</configuration>
十、Spring Boot整合JSP
1. 添加依赖
<dependency><groupId>org.apache.tomcat.embed</groupId><artifactId>tomcat-embed-jasper</artifactId><scope>provided</scope>
</dependency>
2. 在项目中创建webapp目录并将其设置为资源目录
3. 在 yml配置文件中配置视图解析器参数
spring:#设置响应路径的前缀和后缀mvc:view:prefix: /WEB-INF/suffix: .jsp4. 在控制类中声明单元方法请求转发jsp资源
@Controller
public class PageController {@RequestMapping("page/{pageName}")public String toPage(@PathVariable String pageName){return pageName;}
}
十一、SpringBoot整合Thymeleaf
常用的java模板引擎有Jsp、Freemarker、Thymeleaf 、Velocity 等。
1. Thymeleaf介绍
Thymeleaf是原生的,可以作为静态原型, 不依赖于标签库,它能够在接受原始HTML的地方进行编辑和渲染。
Thymeleaf在Spring Boot项目中放入到resources/templates中。是无法通过浏览器URL直接访问的(和WEB-INF效果一样),必须先走控制器。
模板引擎的示意图:(模板+数据模型=输出)

2. 使用
1 .添加依赖
<dependency><groupId>org.springframework.boot</groupId><artifactId>spring-boot-starter-thymeleaf</artifactId>
</dependency>
2.在resources下新建templates文件夹。新建index.html
3.创建页面访问控制器
4.Thymeleaf视图解析器自动加上前缀和后缀
3. Thymeleaf语法
添加命名空间,添加后可以使用提示。
<html xmlns:th="http://www.thymeleaf.org" >3.1 th:text属性
-
向指定标签中添加文本节。
<!-- 将th:text中的值添加到标签文本节点中,标签中有内容会覆盖 -->
<h2 th:text="hello"></h2>
3.2 获取域对象中数据
3.2.1 HttpServletRequest
@RequestMapping("page/{pageName}")
public ModelAndView toPage(@PathVariable String pageName, HttpServletRequest request){ModelAndView mv = new ModelAndView();mv.setViewName(pageName);/* 请求域添加数据 */request.setAttribute("req", "HttpServletRequest");mv.addObject("mod", "HttpServletRequest");User user = new User(1, "张三", "123");mv.addObject("user", user);return mv;
}
<!-- 将th:text中的值添加到标签文本节点中,标签中有内容会覆盖 -->
<span th:text="${#httpServletRequest.getAttribute('req')}"></span>
<span th:text="${#httpServletRequest.getAttribute('mod')}"></span>
<span th:text="${#httpServletRequest.getAttribute('user')}"></span>
<span th:text="${#httpServletRequest.getAttribute('user').uid}"></span>
<hr>
<span th:text="${#request.getAttribute('req')}"></span>
<span th:text="${#request.getAttribute('mod')}"></span>
<span th:text="${#request.getAttribute('user')}"></span>
<span th:text="${#request.getAttribute('user').uname}"></span>
<hr>
<span th:text="${req}"></span>
<span th:text="${mod}"></span>
<span th:text="${user}"></span>
<span th:text="${user.password}"></span>3.2.2 HttpSession
 <!-- 将th:text中的值添加到标签文本节点中,标签中有内容会覆盖 -->
<span th:text="${#httpSession.getAttribute('ses')}"></span>
<span th:text="${#httpSession.getAttribute('mod')}"></span>
<span th:text="${#httpSession.getAttribute('user')}"></span>
<span th:text="${#httpSession.getAttribute('user').uid}"></span>
<hr>
<span th:text="${#session.getAttribute('ses')}"></span>
<span th:text="${#session.getAttribute('mod')}"></span>
<span th:text="${#session.getAttribute('user')}"></span>
<span th:text="${#session.getAttribute('user').uname}"></span>
<hr>
<span th:text="${session.ses}"></span>
<span th:text="${session.mod}"></span>
<span th:text="${session.user}"></span>
<span th:text="${session.user.password}"></span>
3.2.3 ServletContext
<!-- 将th:text中的值添加到标签文本节点中,标签中有内容会覆盖 -->
<span th:text="${#servletContext.getAttribute('app')}"></span>
<span th:text="${#servletContext.getAttribute('mod')}"></span>
<span th:text="${#servletContext.getAttribute('user')}"></span>
<span th:text="${#servletContext.getAttribute('user').uname}"></span>
<hr>
<span th:text="${application.app}"></span>
<span th:text="${application.mod}"></span>
<span th:text="${application.user}"></span>
<span th:text="${application.user.password}"></span>
3.3 th:value
-
设置表单元素value属性时使用。
<input type="text" th:value="${name}"/>3.4 th:if
-
进行逻辑判断。如果成立该标签生效(显示),如果不成立,此标签无效(不显示)。
-
注意:判断条件中逻辑判断符号写在${}外面的
<span th:if="${name}!='张三'">会显示</span>3.5 th:each
-
循环遍历。
 <!--1. th:each=”u,i :${list}” 其中i表示迭代状态。2. index:当前迭代器的索引 从0开始3. count:当前迭代对象的计数 从1开始4. size:被迭代对象的长度5. even/odd:布尔值,当前循环是否是偶数/奇数 从0开始6. first:布尔值,当前循环的是否是第一条,如果是返回true否则返回false7. last:布尔值,当前循环的是否是最后一条,如果是则返回true否则返回false -->
<table border="1" width="500"><tr><td>编号</td><td>姓名</td></tr><tr th:each="u : ${list}"><td th:text="${u.uid}" ></td><td th:text="${u.uname}"></td></tr>
</table>
3.6 th:href
-
设置href属性的。取值使用@{}取值 。
<a th:href="@{/del(uid=1,uname='zs')}">跳转一</a>
<!-- 获取作用域值-->
<a th:href="@{/del(uid=${uid)}">跳转二</a>
3.7 th:onclick
-
点击传递参数的单击事件
<a href="javascript:void(0)"  th:onclick="'del('+${user.uid}+')'">删除</a>
<script>function del(id) {console.log("接收的数据:" , id);}
</script>
3.8 字符串操作
Thymeleaf提供了一些内置对象,内置对象可直接在模板中使用。
-
引用内置对象需要使用#
-
大部分内置对象的名称都以s结尾。如:strings、numbers、dates
| 方法 | 解释 |
|---|---|
| ${#strings.isEmpty(key)} | 判断字符串是否为空,如果为空返回true,否则返回false |
| ${#strings.contains(msg,'T')} | 判断字符串是否包含指定的子串,如果包含返回true,否则返回false |
| ${#strings.startsWith(msg,'a')} | 判断当前字符串是否以子串开头,如果是返回true,否则返回false |
| ${#strings.endsWith(msg,'a')} | 判断当前字符串是否以子串结尾,如果是返回true,否则返回false |
| ${#strings.length(msg)} | 返回字符串的长度 |
| ${#strings.indexOf(msg,'h')} | 查找子串的位置,并返回该子串的下标,如果没找到则返回-1 |
| ${#strings.substring(msg, 0, 3)} | 截取字串。前包含,后不包含 |
3.9 日期格式化处理
| 方法 | 解析 |
|---|---|
| ${#dates.format(key)} | 格式化日期,默认的以浏览器默认语言为格式化标准 |
| ${#dates.format(key,'yyyy/MM/dd')} | 按照自定义的格式做日期转换 |
| ${#dates.day(key)} | Year:取年 |
| ${#dates.month(key)} | Month:取月 |
| ${#dates.year(key)} | Day:取日 |


:修改RestSharp的引用)


![BUUCTF [GXYCTF2019]BabySQli 1 详解!(MD5与SQL之间的碰撞)](http://pic.xiahunao.cn/BUUCTF [GXYCTF2019]BabySQli 1 详解!(MD5与SQL之间的碰撞))


)


