版本: 3.4.0
语言: TypeScript
环境: Mac
简介
在CocosCreator 3.x版本后, Tween缓动系统代替了原有的Action动作。官方使用缓动系统的主要目的之一是用于解决离线动画无法满足需求时的动态动画问题。
简单的示例:
let duration = 2;
tween(this.tipNode)// 延迟两秒.delay(duration)// 2秒钟移动到(0, 300, 0)的位置,并缩放由1为0.to(duration, {position: new Vec3(0, 300, 0)})// 执行回调.call(() => {console.log("运行结束");})// 开始运行当前缓动对象.start();
使用缓动,主要通过tween函数来构建Tween实例化对象。它非Tween成员:
// tween 是一个工具函数,帮助实例化Tween实例,target用于设置缓动的目标
export function tween<T>(target?: T): Tween<T>;
在缓动中,主要通过by和to修改某些属性, 其中:
by使用 相对值 修改属性to使用 绝对值 修改属性
Tween提供的大部分接口返回的对象是this 或者一个新的Tween对象, 因此可以使用 链式调用。
上面的示例等同于:
// tweenObj 对象就是新生成的Tween实例化对象
let duration = 2;
let tweenObj_1 = tween(this.tipNode);
let tweenObj_2 = tweenObj_1.delay(duration);
let tweenObj_3 = tweenObj_2.to(duration, {position: new Vec3(0, 300, 0)});
let tweenObj_4 = tweenObj_3.call(() => {console.log("运行结束");
});
let tweenObj_5 = tweenObj_4.start();
console.log(typeof(tweenObj_5), tweenObj_5);
本篇文章主要讲述下关于缓动系统的使用,理解可能有误,欢迎您的指出。
常用接口
Tween类的基本使用:
// 声明的tween函数,用于实例化Tween对象
export function tween<T>(target?: T): Tween<T>;
// 构造函数相关,关于target可以通过构造函数或target方法设置缓动目标
export class Tween<T> {constructor(target?: T | null);target(target: T): Tween<T | undefined>;
}
创建缓动的简单示例:
let duration = 2;
// 使用构造函数
tween(this.node).to(duration, {position:new Vec3(0, 10, 0)}).start();
// 使用target
tween().target(this.node).to(duration, {position:new Vec3(0, 10, 0), scale: new Vec3(0, 0, 0)}).start();
注意:
Tween支持同时修改目标的多个属性,并非仅一个
Tween提供的接口较多,为了方便查看,主要为了如下几类:
- 静态接口
- 基础接口
- 队列接口 主要用于顺序执行,并列执行, 执行重复次数等复杂动作
静态接口
| 接口 | 说明 |
|---|---|
stopAll(): void | 停止所有缓动 |
stopAllByTag(tag: number, target?: object): void | 停止所有指定标签的缓动 |
stopAllByTarget(target?: object): void | 停止所有指定对象的缓动 |
简单示例:
tween(this.node).tag(1000).to(duration, {position:new Vec3(0, 10, 0)}).call(() => {// 三种方式,任一即可Tween.stopAllByTarget(this.tipNode);Tween.stopAllByTag(1000);Tween.stopAll();}).start();
基础接口
| 接口 | 说明 |
|---|---|
tag(tag: number): this | 设置缓动的标签 |
target(target: T): Tween<T> | 添加一个 直接设置缓动目标 的瞬时动作 |
start(): Tween<T> | 运行当前缓动 |
stop(): Tween<T> | 停止当前缓动 |
clone(target: T): Tween<T> | 克隆当前缓动 |
to(duration, props, opts): Tween<T> | 添加一个对属性进行 相对值 计算的间隔动作 |
by(duration, props, opts): Tween<T> | 添加一个对属性进行 绝对值 计算的间隔动作 |
set(props): Tween<T> | 添加一个 直接设置目标属性 的瞬时动作 |
delay(duration: number): Tween<T> | 添加一个延时 action |
call(callback: Function): Tween<T> | 添加一个回调 action |
show(): Tween<T> | 添加一个显示action,只适用target 是节点类型 |
hide(): Tween<T> | 添加一个隐藏 action,只适用target 是节点类型 |
removeSelf(): Tween<T> | 添加一个移除自己 action,只适用target是节点类型 |
简单示例:
let duration = 2;
// 示例1: 显示和隐藏节点
tween(this.node)        .hide()        .delay(1.0).show().start();
// 示例2: 移除节点
tween(this.node)        .delay(1.0).removeSelf()        .start();
// 示例3: 设置目标属性、可选选项及销毁缓动
tween().tag(1000).target(this.tipNode).set({position: new Vec3(0, 0, 0), scale: new Vec3(1, 1, 1)}).delay(duration)// 设置位置属性及缓动的可选选项.to(duration, {position: new Vec3(0, 300, 0), scale: new Vec3(0, 0, 0)}, {// 设置缓动方式easing: "smooth",onComplete: (target) => {console.log("当缓动动作完成时触发");},}).call(() => {Tween.stopAllByTarget(this.tipNode);}).start();
队列接口
| 接口 | 说明 |
|---|---|
union(): Tween<T> | 将之前所有的 action 整合为一个 action |
then(other: Tween<T>): Tween<T> | 插入一个 tween 到队列中 |
sequence(...args: Tween<T>[]): Tween<T> | 添加一个顺序执行的缓动 |
parallel(...args: Tween<T>[]): Tween<T> | 添加一个同时进行的缓动 |
repeat(repeatTimes, embedTween?): Tween<T> | 执行几次 |
repeatForever(embedTween?): Tween<T> | 一直重复执行 |
简单的示例:
let duration: number = 1.0;// 整合
tween(this.node).to(duration, {position:new Vec3(0, 10, 0)})// 此时 Tween 内的动作数量为 2.to(duration, {position:new Vec3(0, -10, 0)})// 这里会将上述的两个缓动整合成一个,此时 Tween 内的动作数量为 1.union().start(); // 插入
let t2 = tween(this.node).to(duration, { position: new Vec3(0, -10, 0) })tween(this.node).by(duration, { position: new Vec3(0, 10, 0) }).then(t2).start();// 使用sequence按照顺序执行
let t1 = tween(this.node).to(duration, {position: new Vec3(0, 10, 0)})
let t2 = tween(this.node).to(duration, {position: new Vec3(0, -10, 0)})
tween(this.node).sequence(t1, t2).start();// 使用parallel同时执行
let t1 = tween(this.node).to(duration, {position: new Vec3(0, 10, 0)})
let t2 = tween(this.node).to(duration, {position: new Vec3(0, -10, 0)})
tween(this.node).parallel(t1, t2).start();// 重复执行
// 方式1:
let tweenDuration: number = 1.0;
tween(this.node).to(tweenDuration, { position: new Vec3(0, 10, 0) }).by(tweenDuration, { position: new Vec3(0, -10, 0) }).repeat(3) // 注意这里会重复 by 这个缓动 3 次.start()
// 方式2:
let embedTween = tween(this.node).by(tweenDuration, {position: new Vec3(0, -10, 0)})tween(this.node).to(tweenDuration, {position: new Vec3(0, 10, 0)}).repeat(3, embedTween)  // 这里会重复 embedTween.start();
ITweenOption 缓动选项
ITweenOption主要应用于Tween的 to和by方法中, 它作为可选参数,用于设定缓动的方式和回调相关。
export class Tween<T> {// 添加相对值属性to(duration: number, props: __private.cocos_tween_tween_ConstructorType<T>, opts?: ITweenOption): Tween<T>;// 添加绝对值属性by(duration: number, props: __private.cocos_tween_tween_ConstructorType<T>, opts?: ITweenOption): Tween<T>;
}
这样可以更灵活的控制或修改目标的属性, 主要定义如下:
// 缓动方式
export type TweenEasing =
'linear'    | 'smooth'     | 'fade'         | 'constant'     |
'quadIn'    | 'quadOut'    | 'quadInOut'    | 'quadOutIn'    |
'cubicIn'   | 'cubicOut'   | 'cubicInOut'   | 'cubicOutIn'   |
'quartIn'   | 'quartOut'   | 'quartInOut'   | 'quartOutIn'   |
'quintIn'   | 'quintOut'   | 'quintInOut'   | 'quintOutIn'   |
'sineIn'    | 'sineOut'    | 'sineInOut'    | 'sineOutIn'    |
'expoIn'    | 'expoOut'    | 'expoInOut'    | 'expoOutIn'    |
'circIn'    | 'circOut'    | 'circInOut'    | 'circOutIn'    |
'elasticIn' | 'elasticOut' | 'elasticInOut' | 'elasticOutIn' |
'backIn'    | 'backOut'    | 'backInOut'    | 'backOutIn'    |
'bounceIn'  | 'bounceOut'  | 'bounceInOut'  | 'bounceOutIn';// 缓动选项
export interface ITweenOption {// 设置缓动方式easing?: TweenEasing | ((k: number) => number);// 插值函数,参数的意义 start:起始值,end:目标值,current:当前值,ratio:当前进度progress?: (start: number, end: number, current: number, ratio: number) => number;// 回调,当缓动动作启动时触发onStart?: (target?: object) => void;// 回调,当缓动动作更新时触发onUpdate?: (target?: object, ratio?: number) => void;// 回调,当缓动动作完成时触发onComplete?: (target?: object) => void;
}
官方提供的示例:
let duration: number = 1.0;
tween(this.node).to(duration, {position: new Vec3(0, 10, 0)}, {// 设置缓动函数easing: "backIn",onStart: (target?: object) => {console.log("缓动动作启动时触发");},onUpdate: (target: Vec3, ratio: number) => {console.log("当缓动动作更新时触发, 进度:", ratio);// 将缓动系统计算出的结果赋予 node 的位置this.node.position = target;                    },onComplete: (target?: object) => {console.log("当缓动动作完成时触发");},progress: (start, end, current, ratio): number => {// 返回自定义插值进度return 0.0;}}).start();
这里做下延伸,在CocosCreator 3.x以后,节点透明度的参数opacity修改为了组件: UIOpactiy
节点的基本属性仅包含: 位置、缩放和旋转。
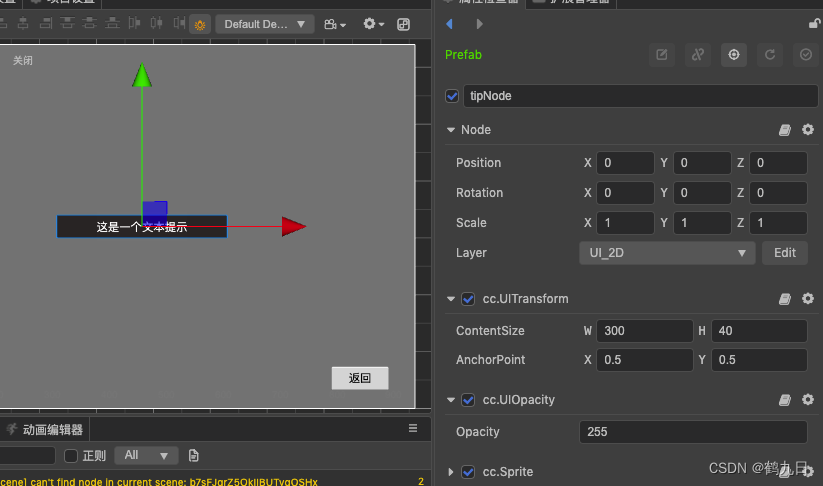
如果想实现一个提示功能,在节点上移的过程中逐渐透明, UI如下:

代码如下:
let duration = 2;
let tweenObj = tween(this.tipNode).tag(1000).delay(duration).to(duration, {position: new Vec3(0, 300, 0)}, {easing: "smooth",onUpdate: (target, ratio) => {// 更新时触发的回调,使用进度修改透明度let uiOpacity = this.tipNode.getComponent(UIOpacity);uiOpacity.opacity = (1 - ratio) * 255;},}).removeSelf().start();
console.log("tweenObj:", tweenObj);
最后看下tween对象的构成:

主要组成部分:
- _actions 用于创建一组对象的缓冲
- _finalAction 最终使用的Action对象
- _tag 标记
- _target 目标
至此结束。
)


事件管理系统,11种不良事件类型,覆盖全院全部科室及所有可能发生的不良事件)


