首先我们得了解一下大致的架构 ,如下:
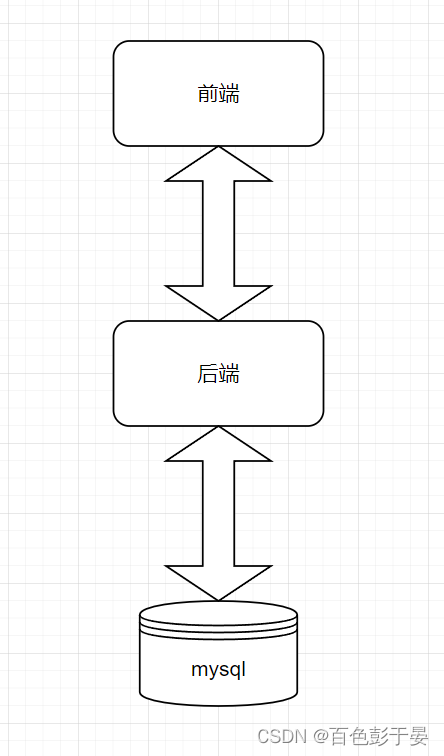
我们采用自底向上的方式进行开发,
一、先写mysql数据库
二、再写java后端(Spring MVC架构)(这个是什么东西不懂不要紧,跟着步骤做就行了)
三、最后写前端页面(HTML)
一、 Mysql数据库部分
我们要通过网页对数据库进行开发,那么我们需要先准备数据库。
为了方便开发,直接用navicat来创建数据库,名字叫做crud,字符集为utf8
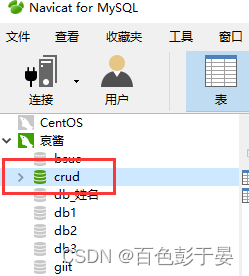
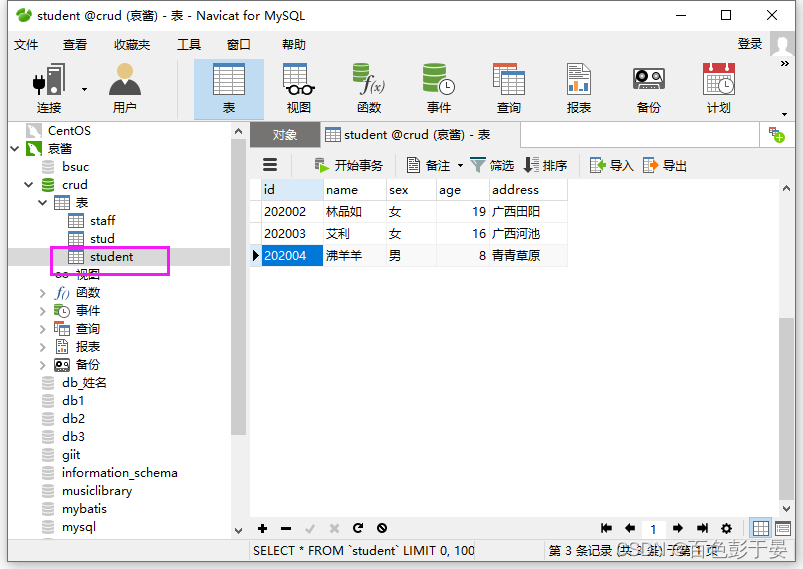
接着在数据库中建立数据表,我们以学生信息为例,建立一个名字叫做student的数据表
字段列表如下:

顺便向数据库中添加一些数据
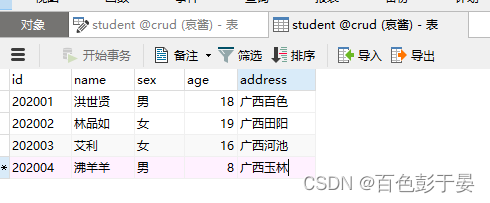
这样,我们第一部分就做好了,点支烟奖励一下自己~~
二、 编写java后端代码
1.打开IDEA, 新建spring项目
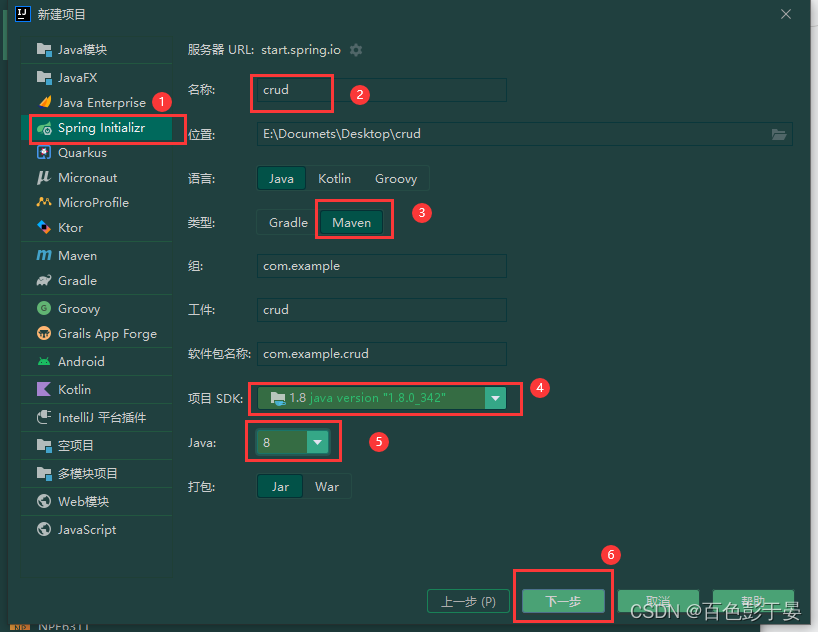
勾选web依赖,就勾这个就好了
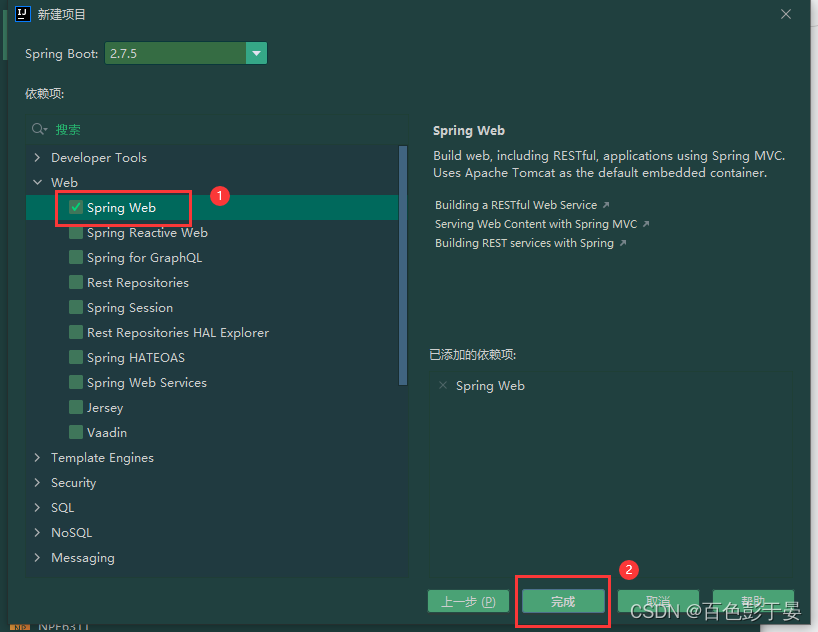
点击完成后,如果报错就打开这个链接:
IDEA创建springboot项目时提示https://start.spring.io初始化失败_暮晨丶的博客-CSDN博客
2.编写pom.xml文件
我们先找到这个“dependencies”标签
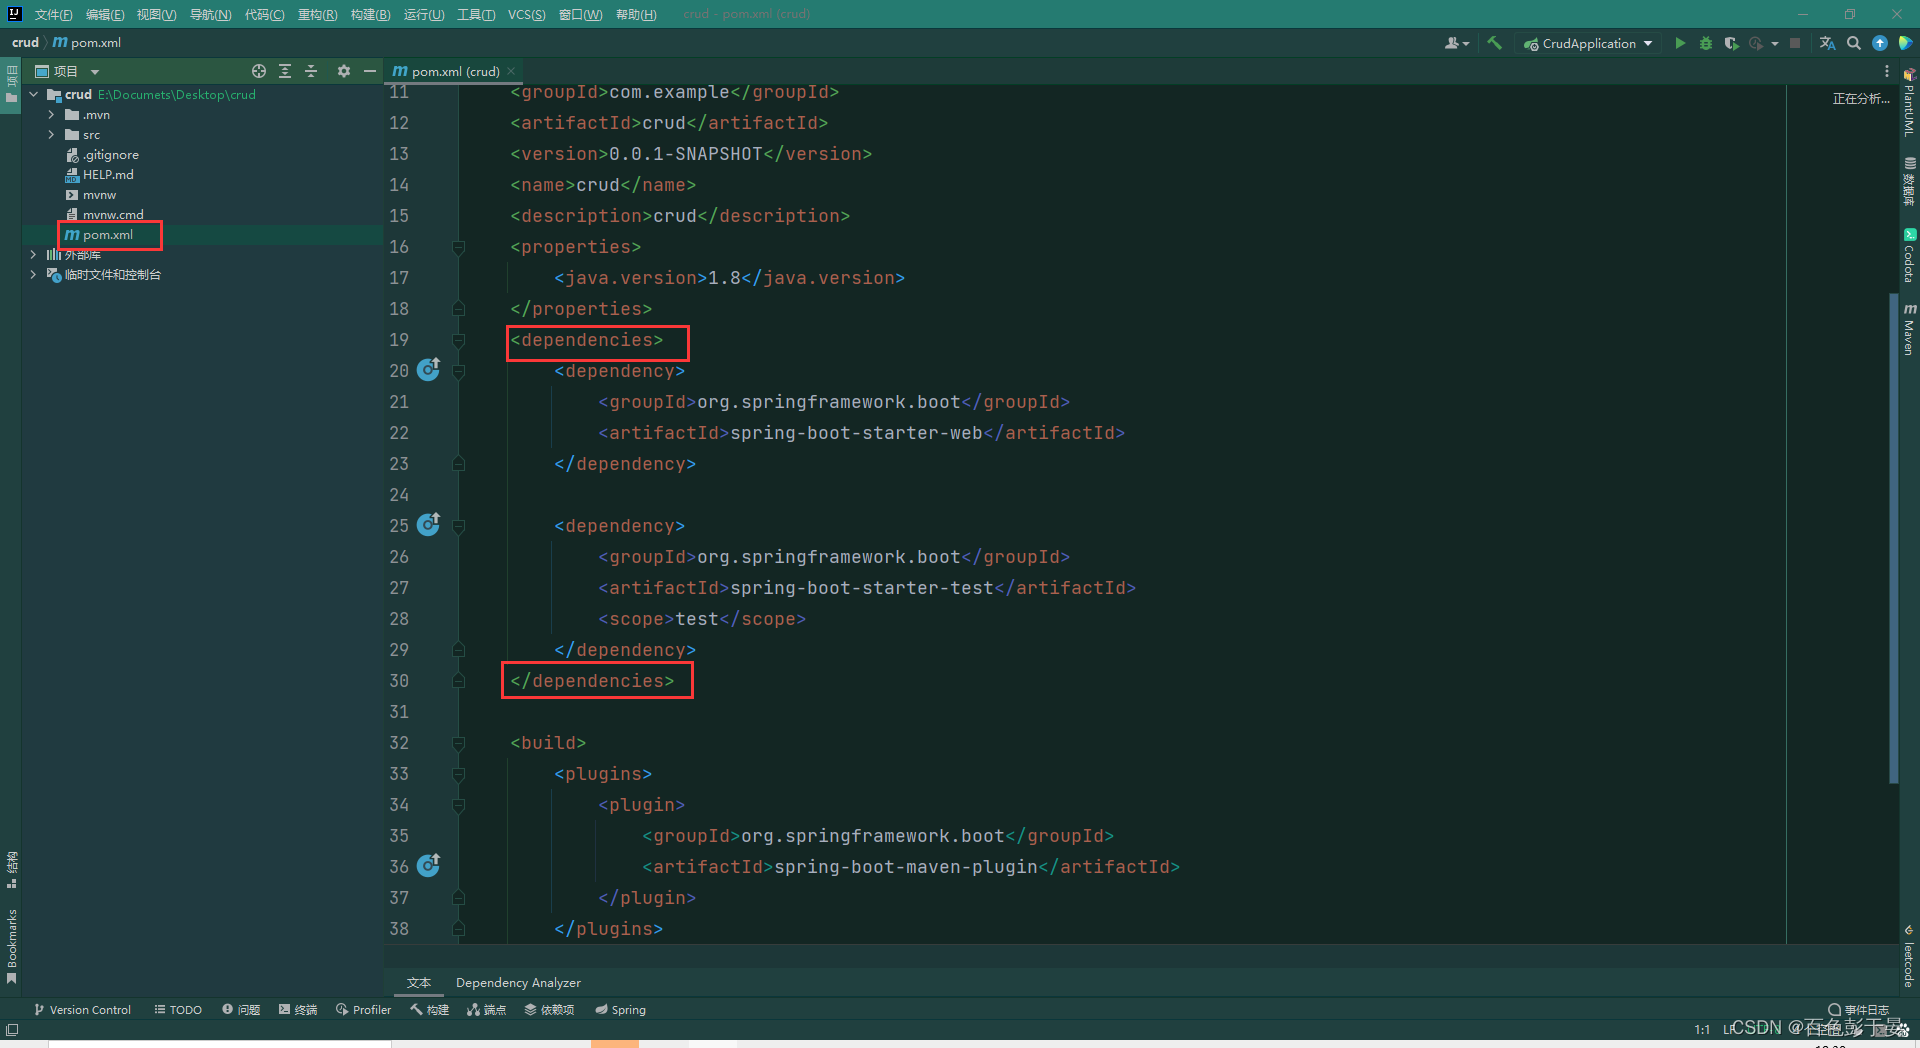
在这个标签内添加依赖坐标。
这个文件就是项目用到的外部依赖,我们分析一下:
连接mysql数据库我们需要添加驱动:
<dependency><groupId>mysql</groupId><artifactId>mysql-connector-java</artifactId><scope>runtime</scope></dependency>为了简化交互我们还需要添加mybatis的依赖坐标
<dependency><!--Springboot和MyBatis整合得ar包坐标--><groupId>org.mybatis.spring.boot</groupId><artifactId>mybatis-spring-boot-starter</artifactId><version>2.1.3</version></dependency>还有和前端交互用 的thymeleaf依赖坐标
<dependency><!--和前端交互用的--><groupId>org.springframework.boot</groupId><artifactId>spring-boot-starter-thymeleaf</artifactId></dependency>还有一些杂七杂八好用的依赖
<dependency><!--德鲁伊数据源坐标--><groupId>com.alibaba</groupId><artifactId>druid</artifactId><version>1.2.8</version></dependency><dependency><!--注解开发自动导入的依赖 @Data那种 --><groupId>org.projectlombok</groupId><artifactId>lombok</artifactId></dependency>最后结果:
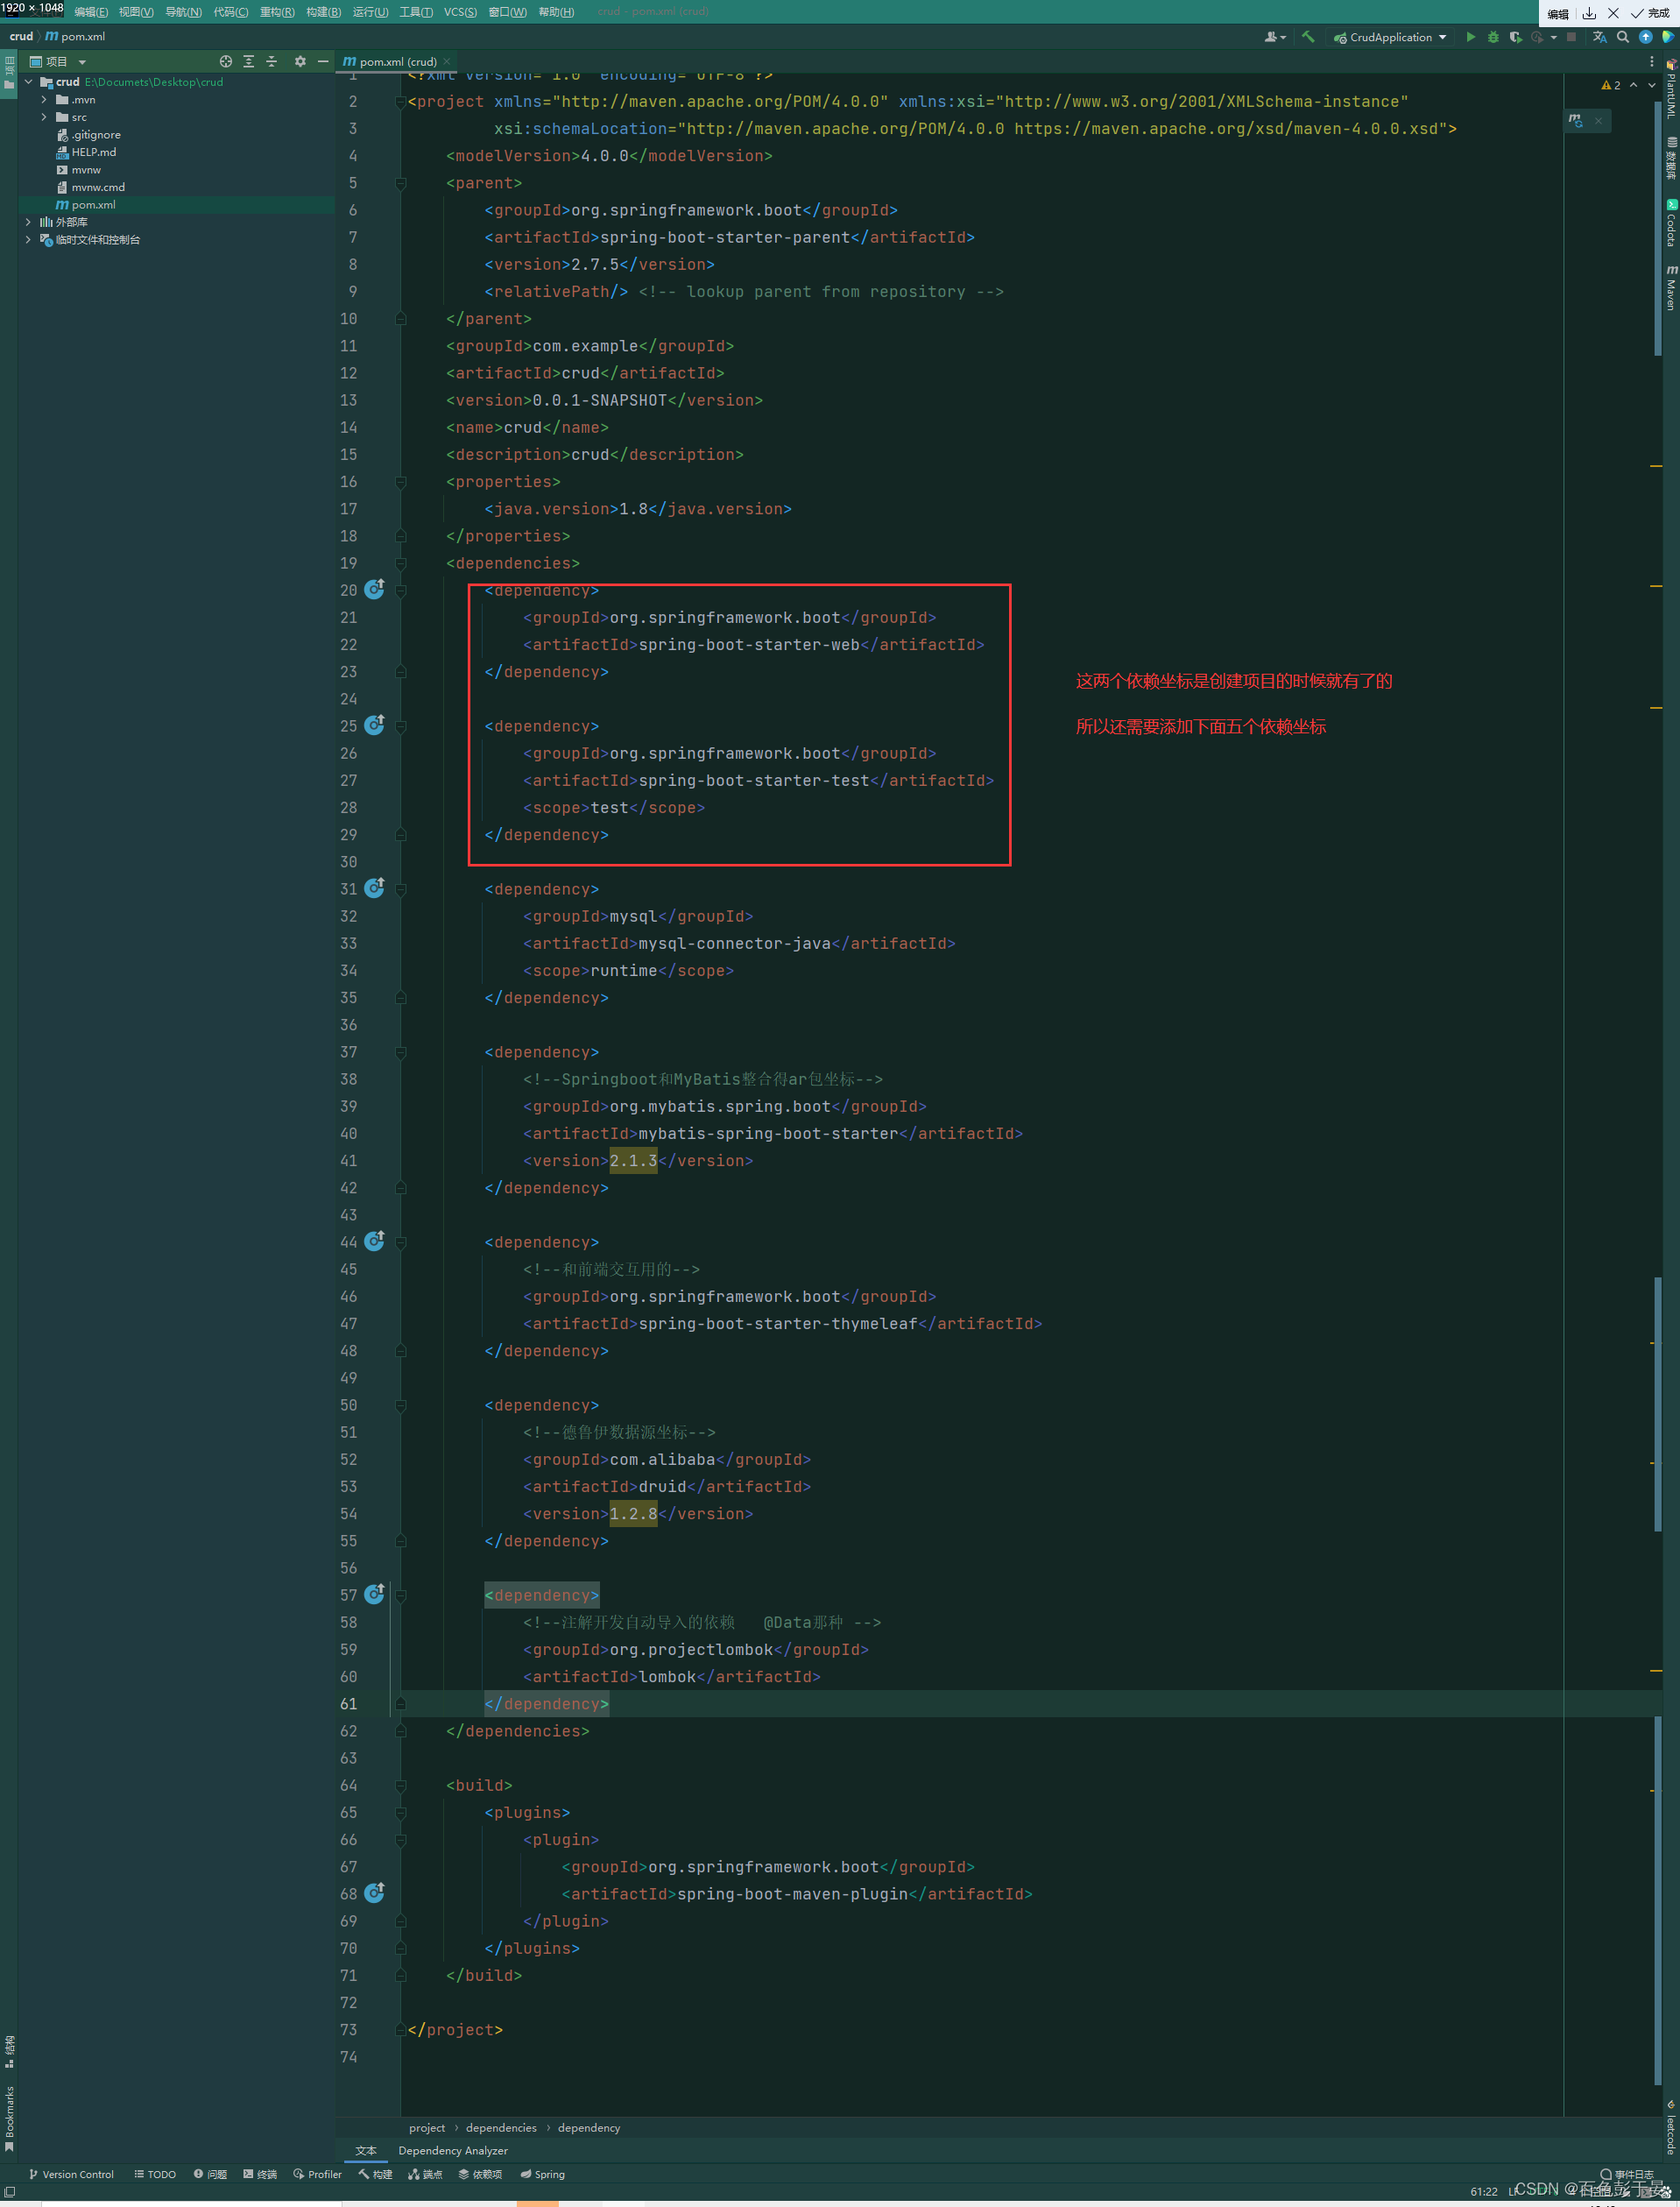
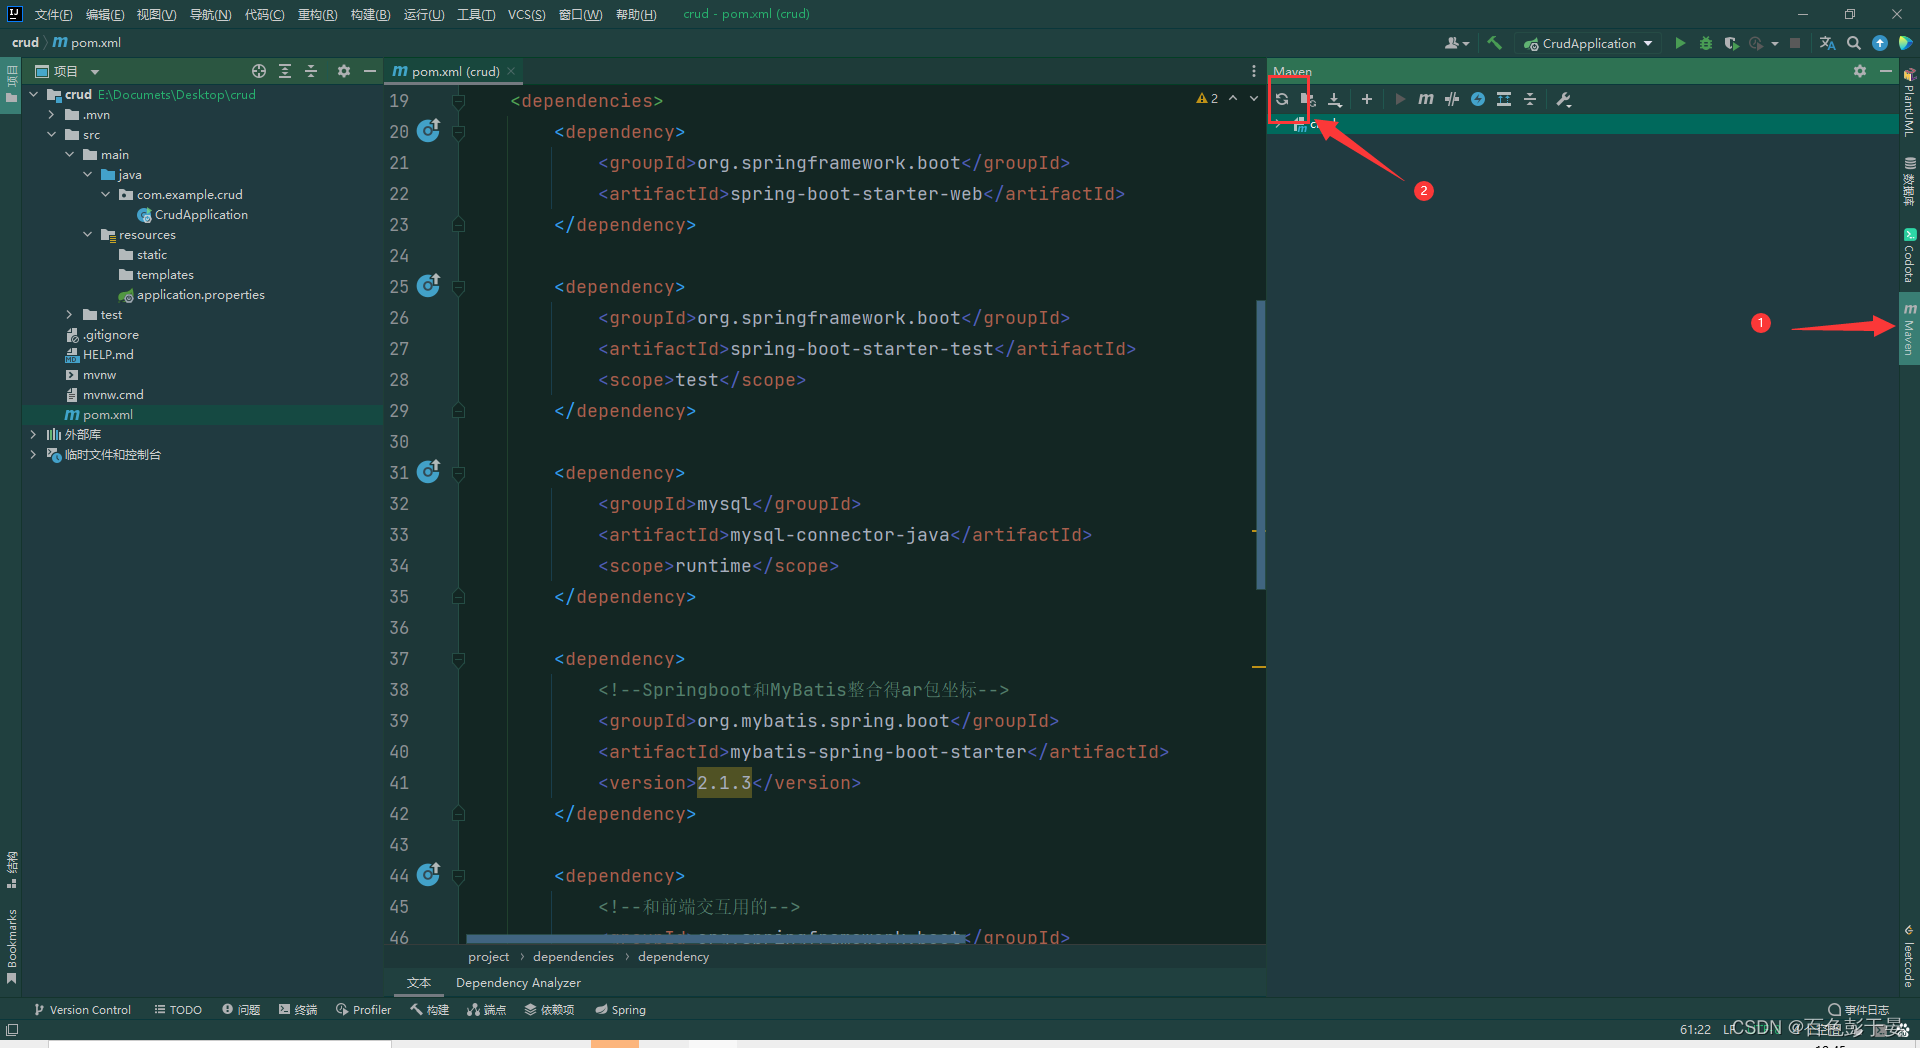
然后刷新maven pom文件就编写好了
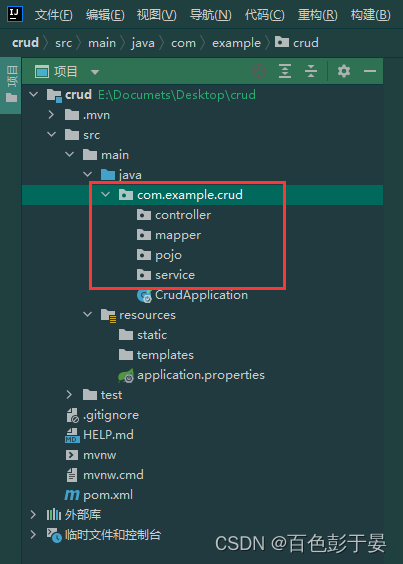
3.建包(3+1=4个包)
MVC架构:controller、service、mapper
存放实体类的包:pojo
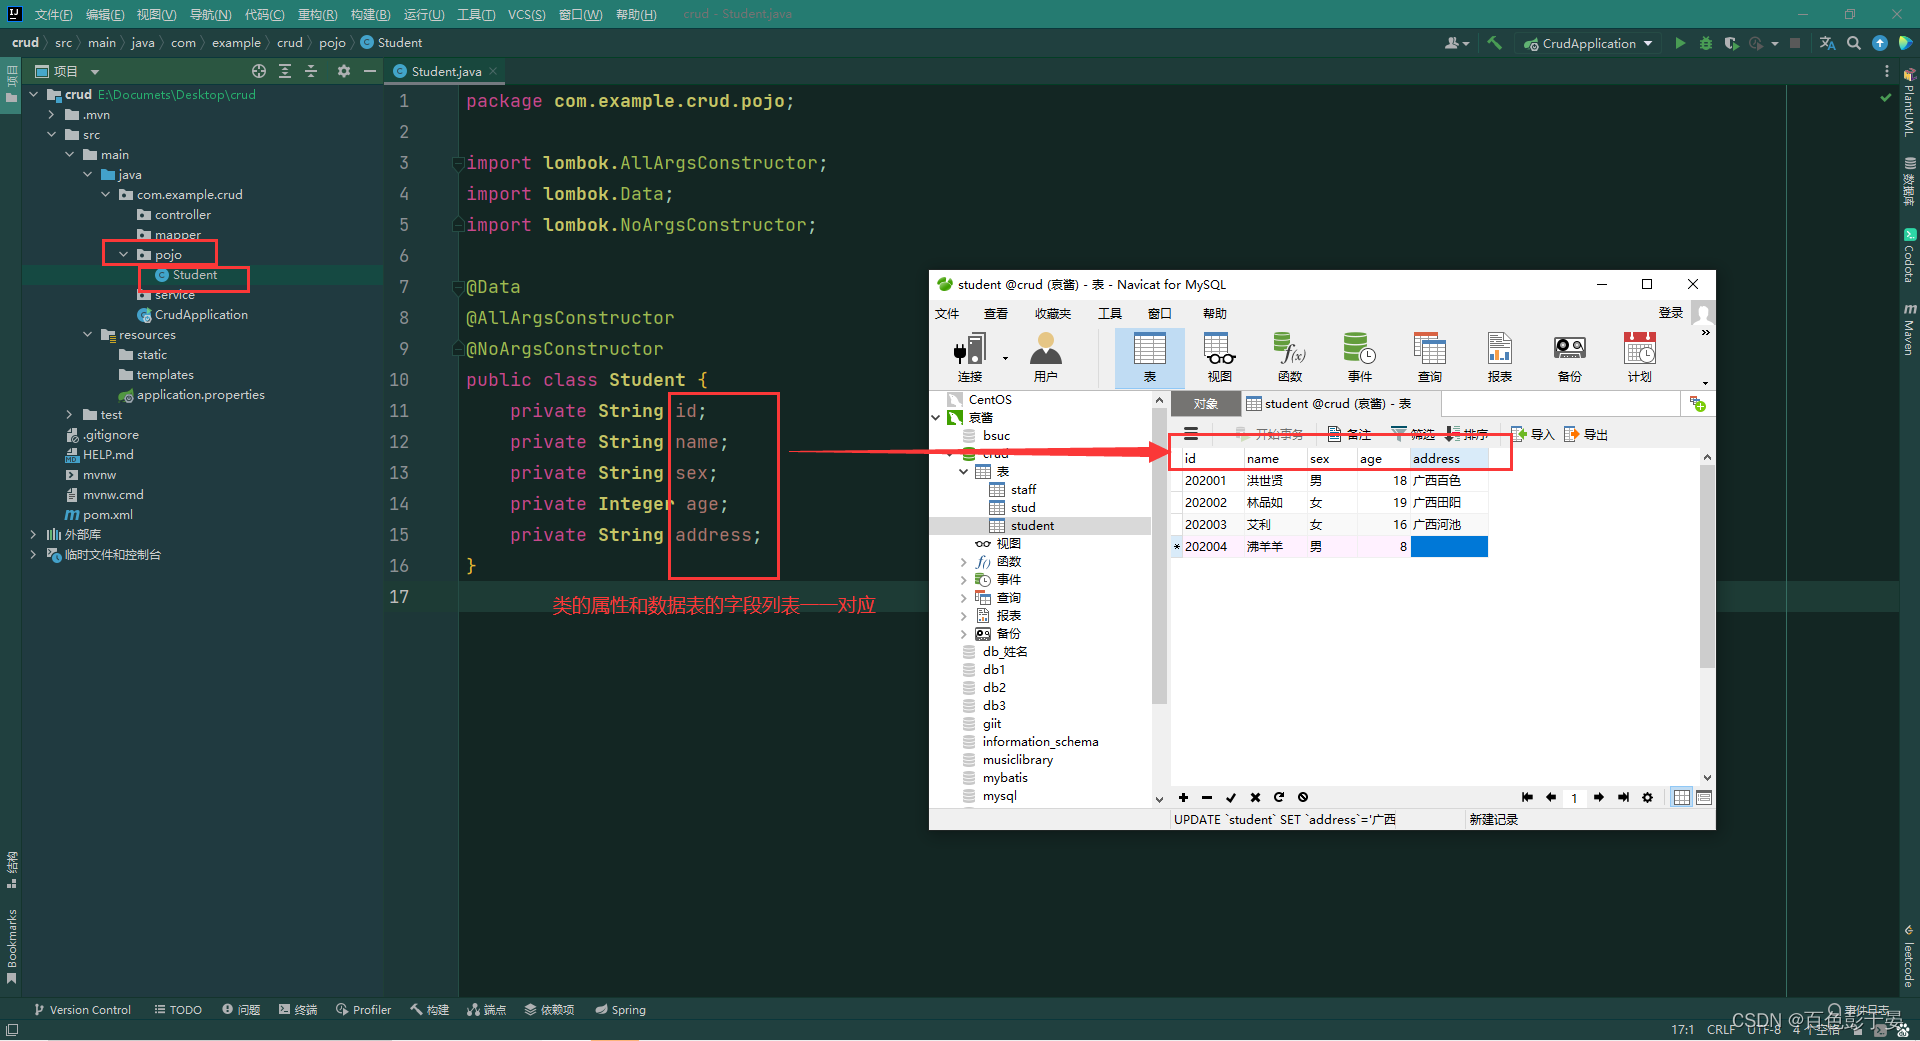
4.在pojo下建立实体类,类的属性要和数据表的字段对应
在pojo下创建一个 Student类,类上面添加三个注解,这三个注解的作用分别是
添加:get set方法、有参构造方法、无参构造方法
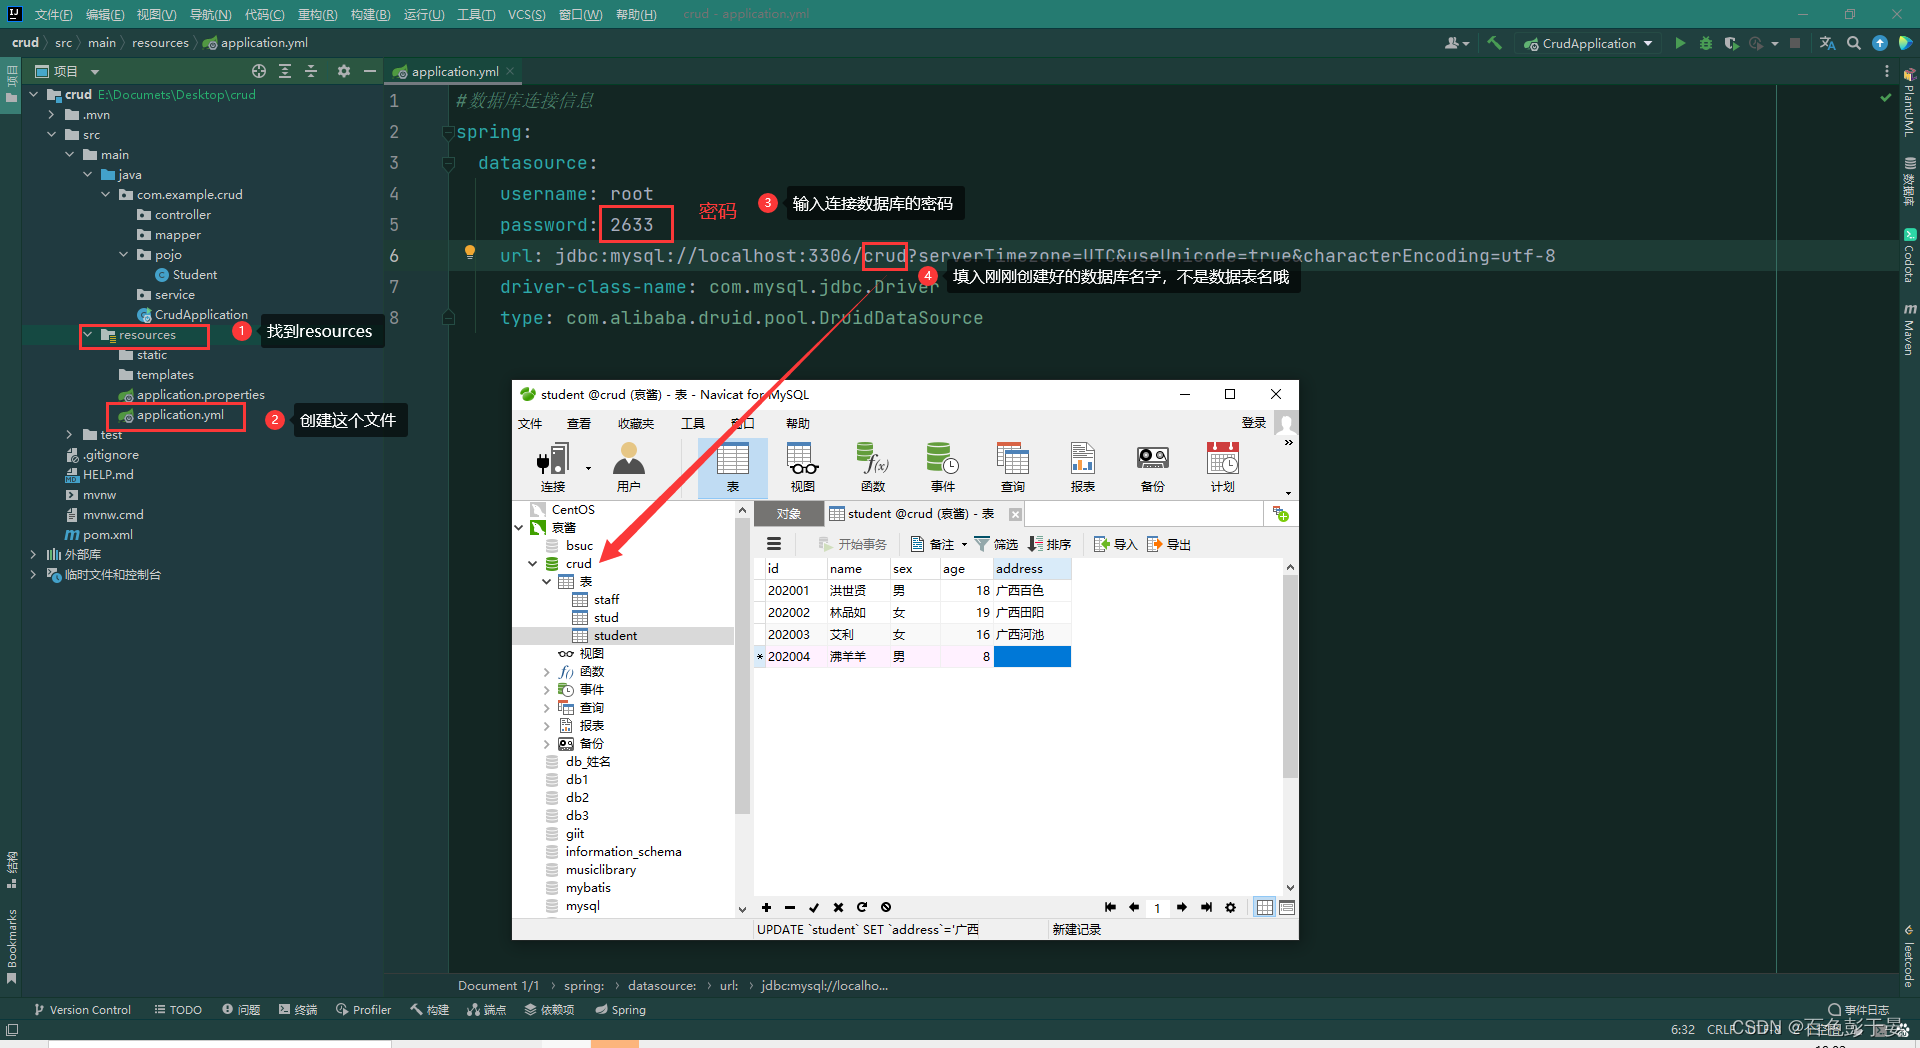
5. 配置数据库连接信息,通过yml文件(里面的缩进要格外注意,缩进一定要和我写的一样)
#数据库连接信息
spring:datasource:username: rootpassword: 2633url: jdbc:mysql://localhost:3306/crud?serverTimezone=UTC&useUnicode=true&characterEncoding=utf-8driver-class-name: com.mysql.jdbc.Drivertype: com.alibaba.druid.pool.DruidDataSource
结果:
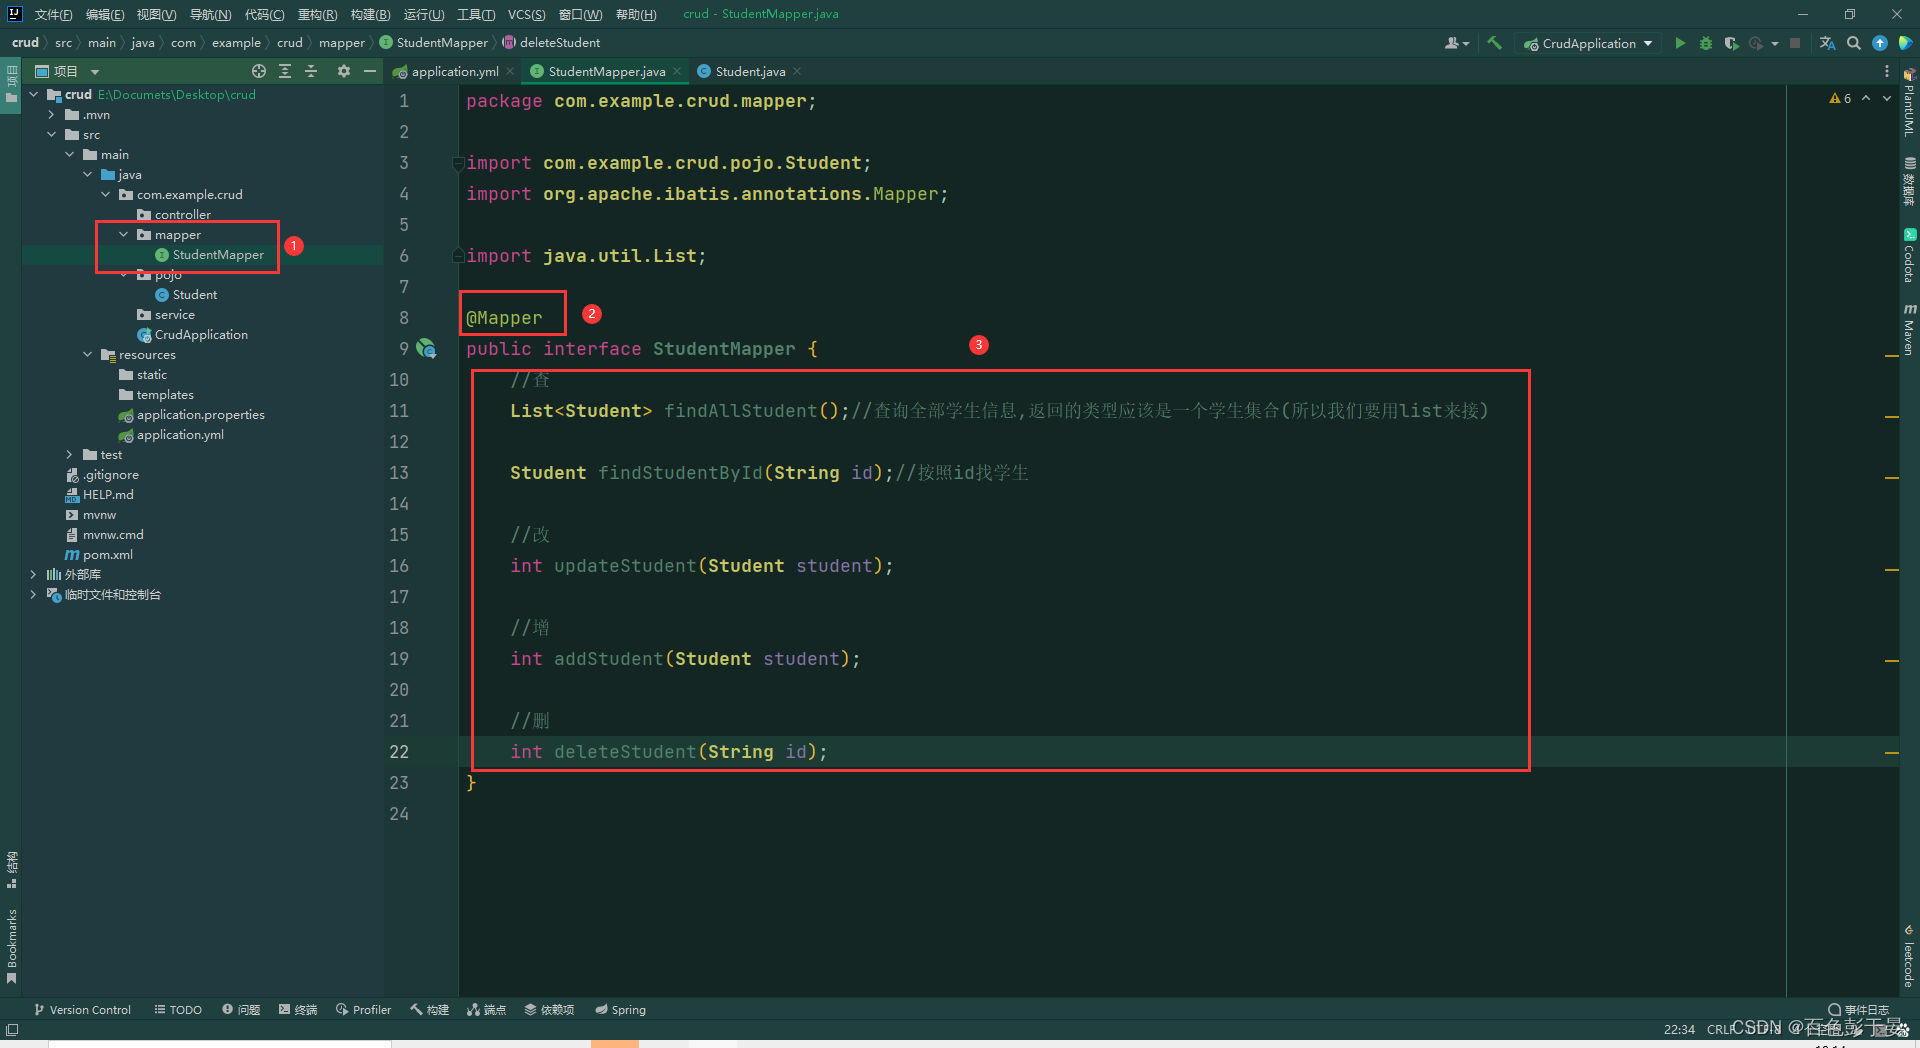
5. 编写mapper层
(1)在mapper中创建接口 名字为StudetMapper
(2)在接口中添加注解 @Mapper
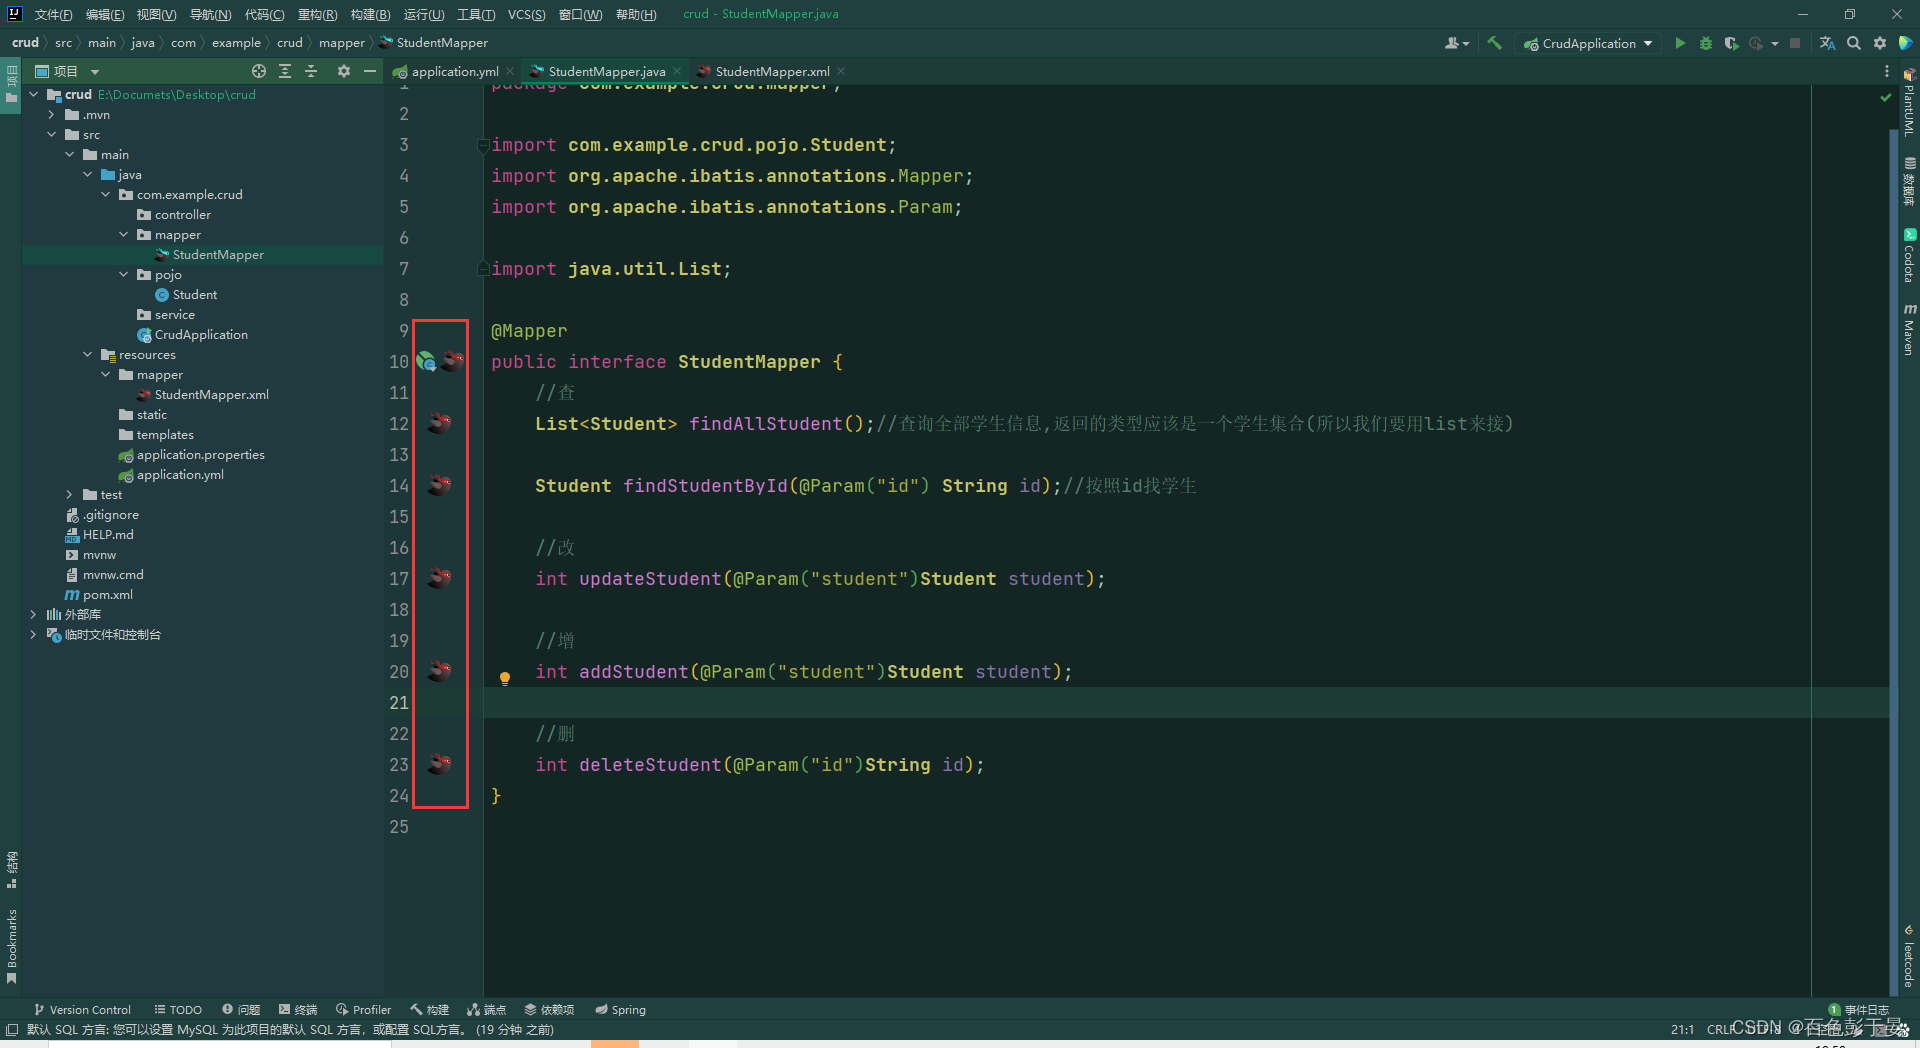
(3) 在接口中编写增删改查的方法
6.编写SQL
(1)先装一个 mybatis的插件
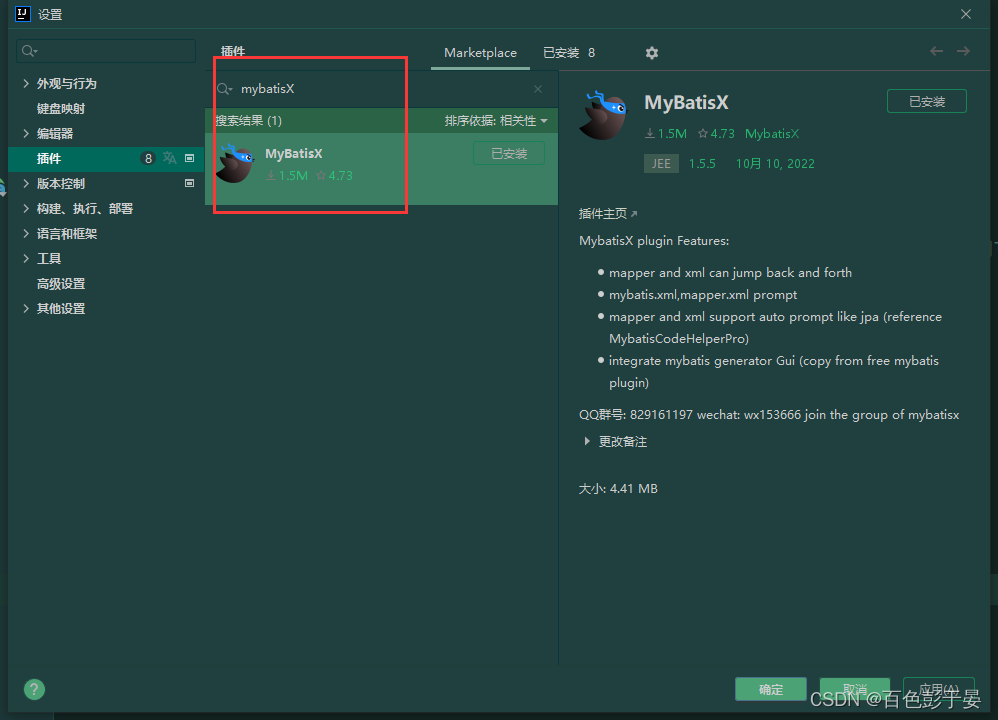
(2)在下面这个路径中先建立一个mapper目录,再创建一个StudentMapper.xml文件
<?xml version="1.0" encoding="UTF-8" ?>
<!DOCTYPE mapperPUBLIC "-//mybatis.org//DTD Mapper 3.0//EN""http://mybatis.org/dtd/mybatis-3-mapper.dtd"><mapper namespace="com.example.crud.mapper.StudentMapper"></mapper>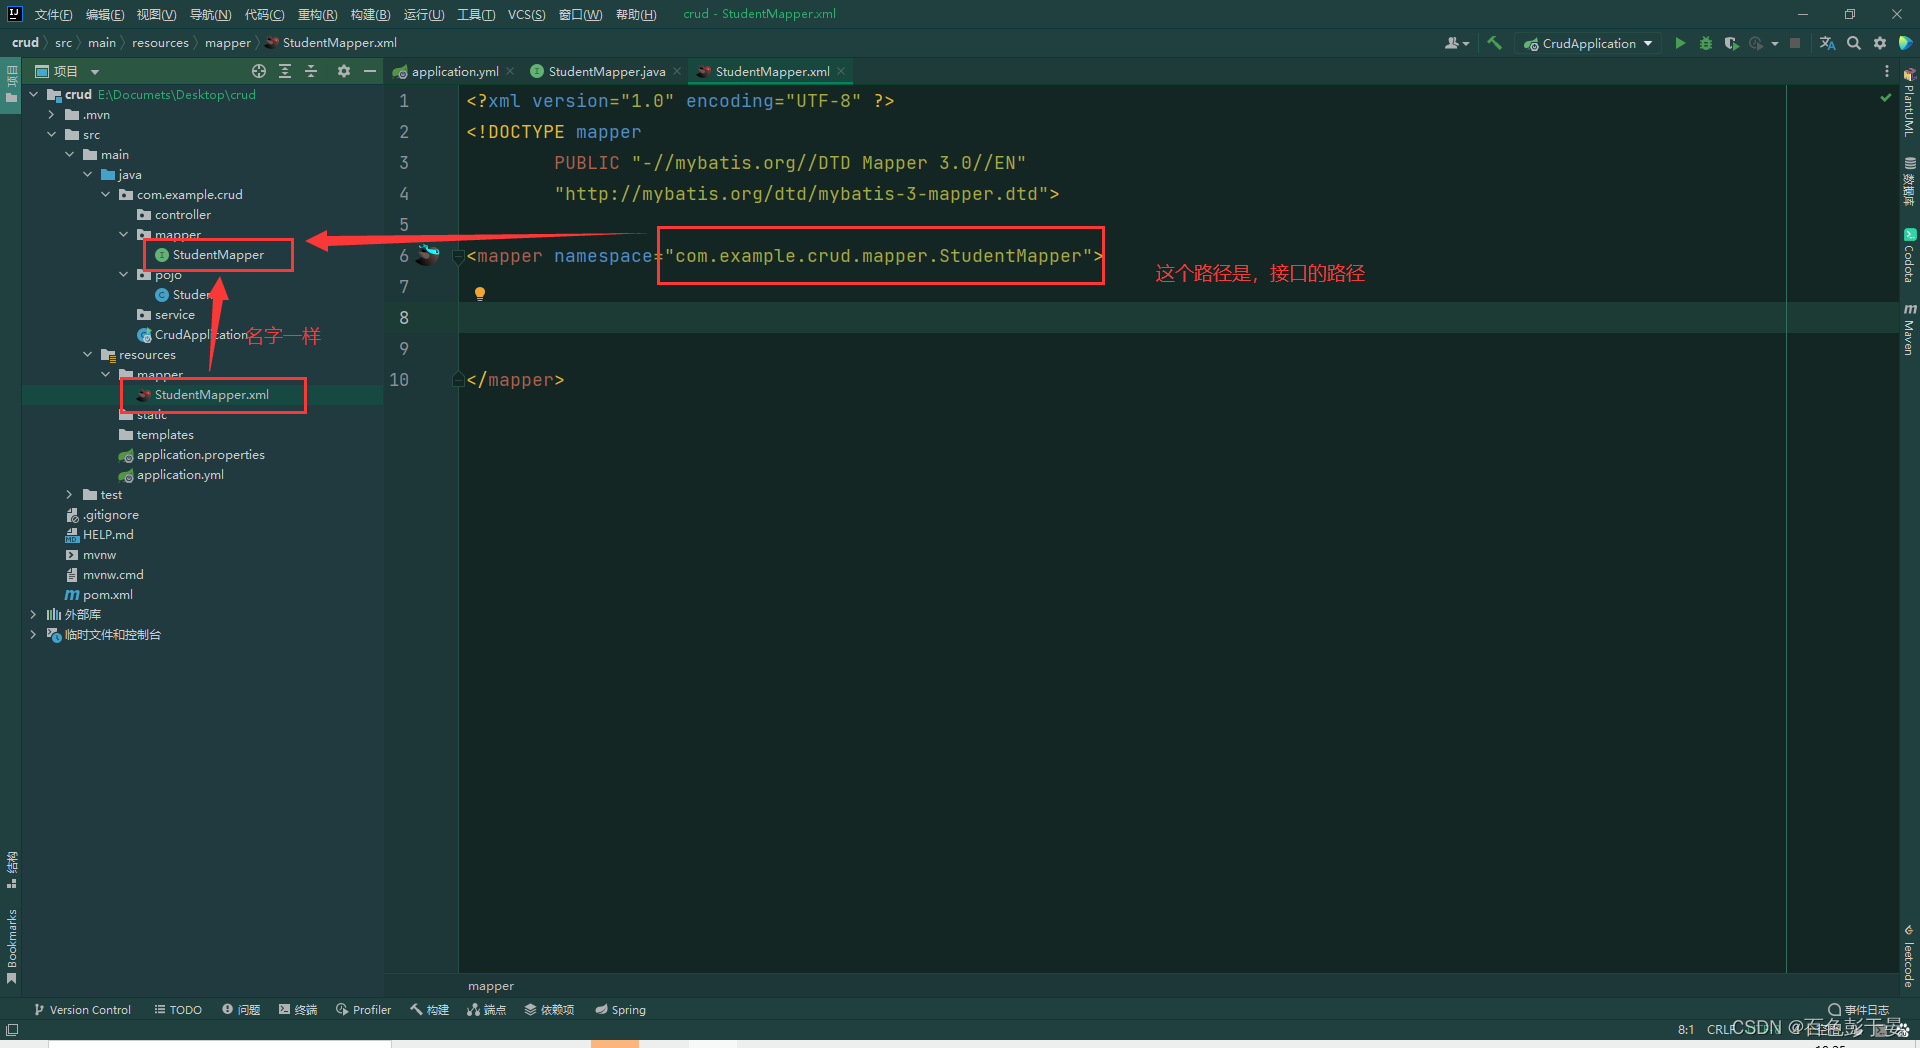
好了之后屏幕会有蓝色头绳的小鸟![]()
点击小鸟,就会跳转到StudentMapper接口,这时我们可以看到接口方法报错了
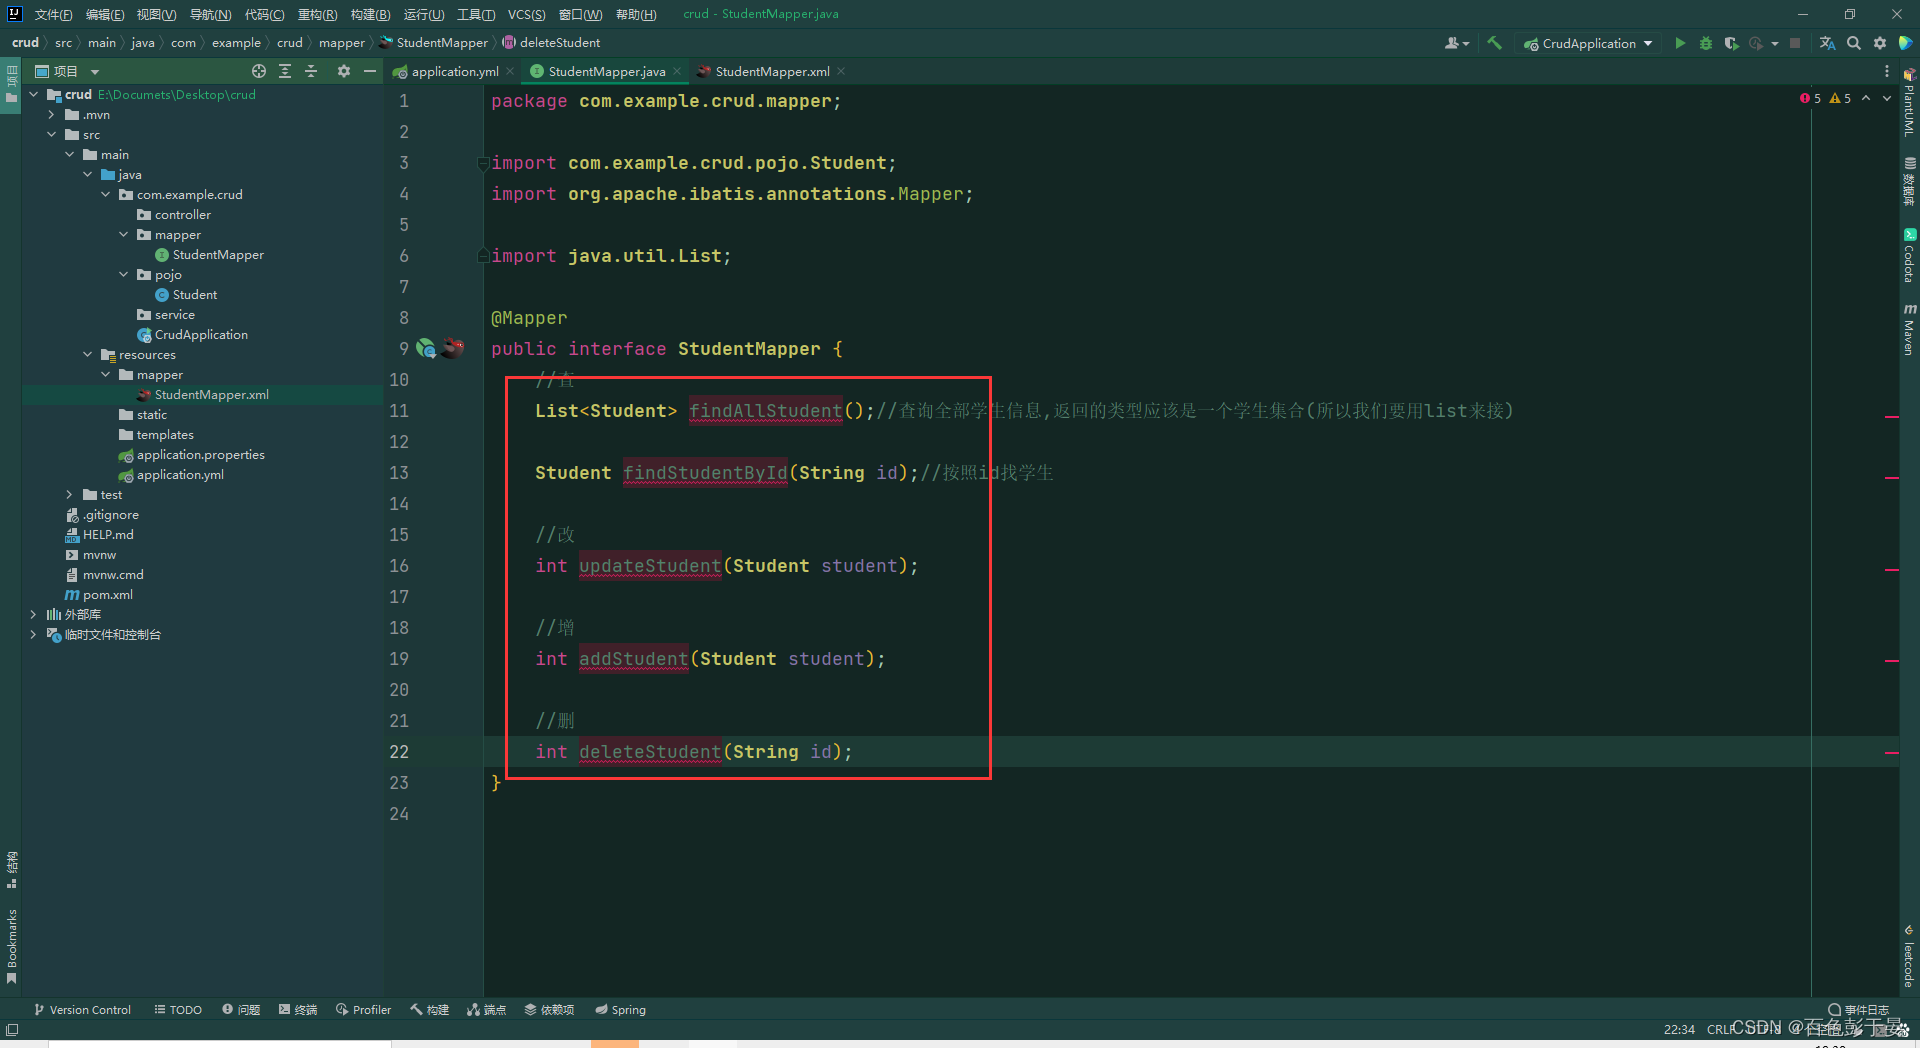
(3)在mapper标签中编写sql语句
把鼠标光标放到红色的地方,按快捷键 alt + 回车 就可以创建写sql的地方了,然后再标签里边编写sql
(4)连接数据库
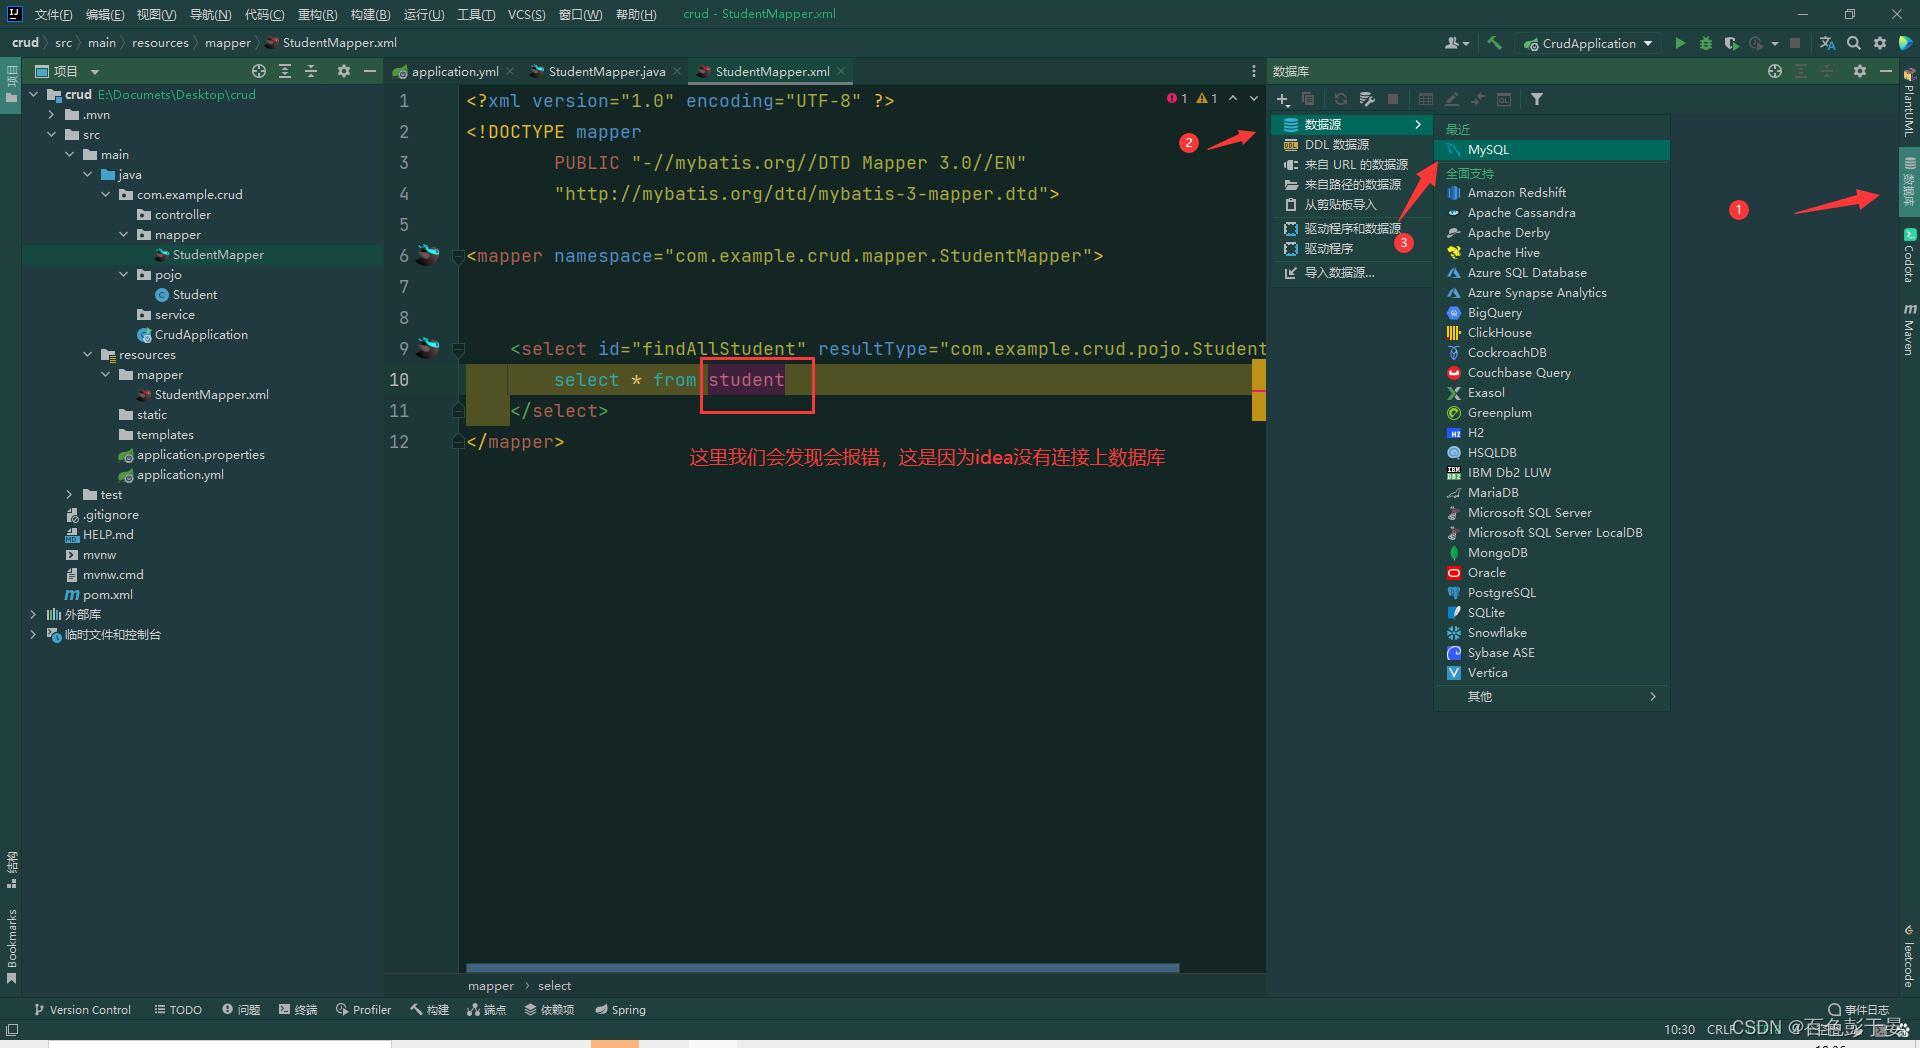
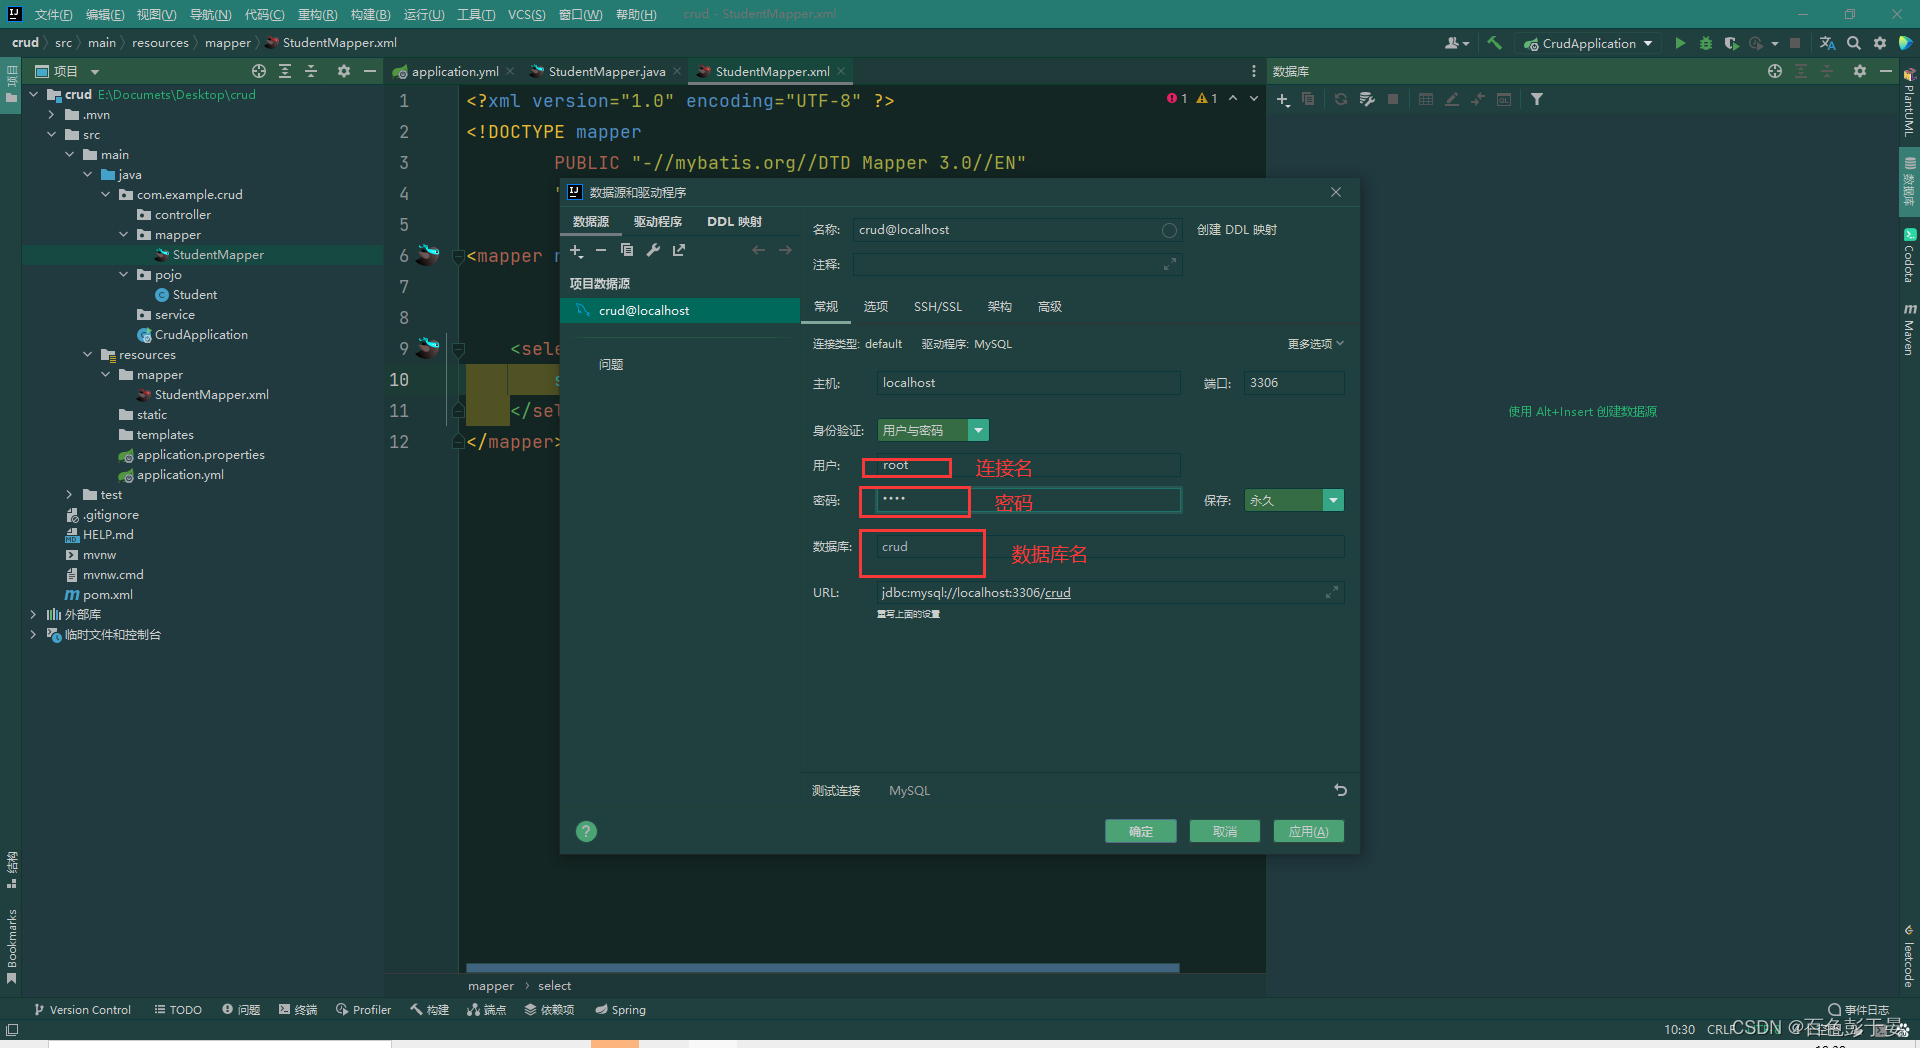
之后就不会报错了。
继续编写SQL语言,重复返回接口按ALT+回车+回车编写全部的SQL
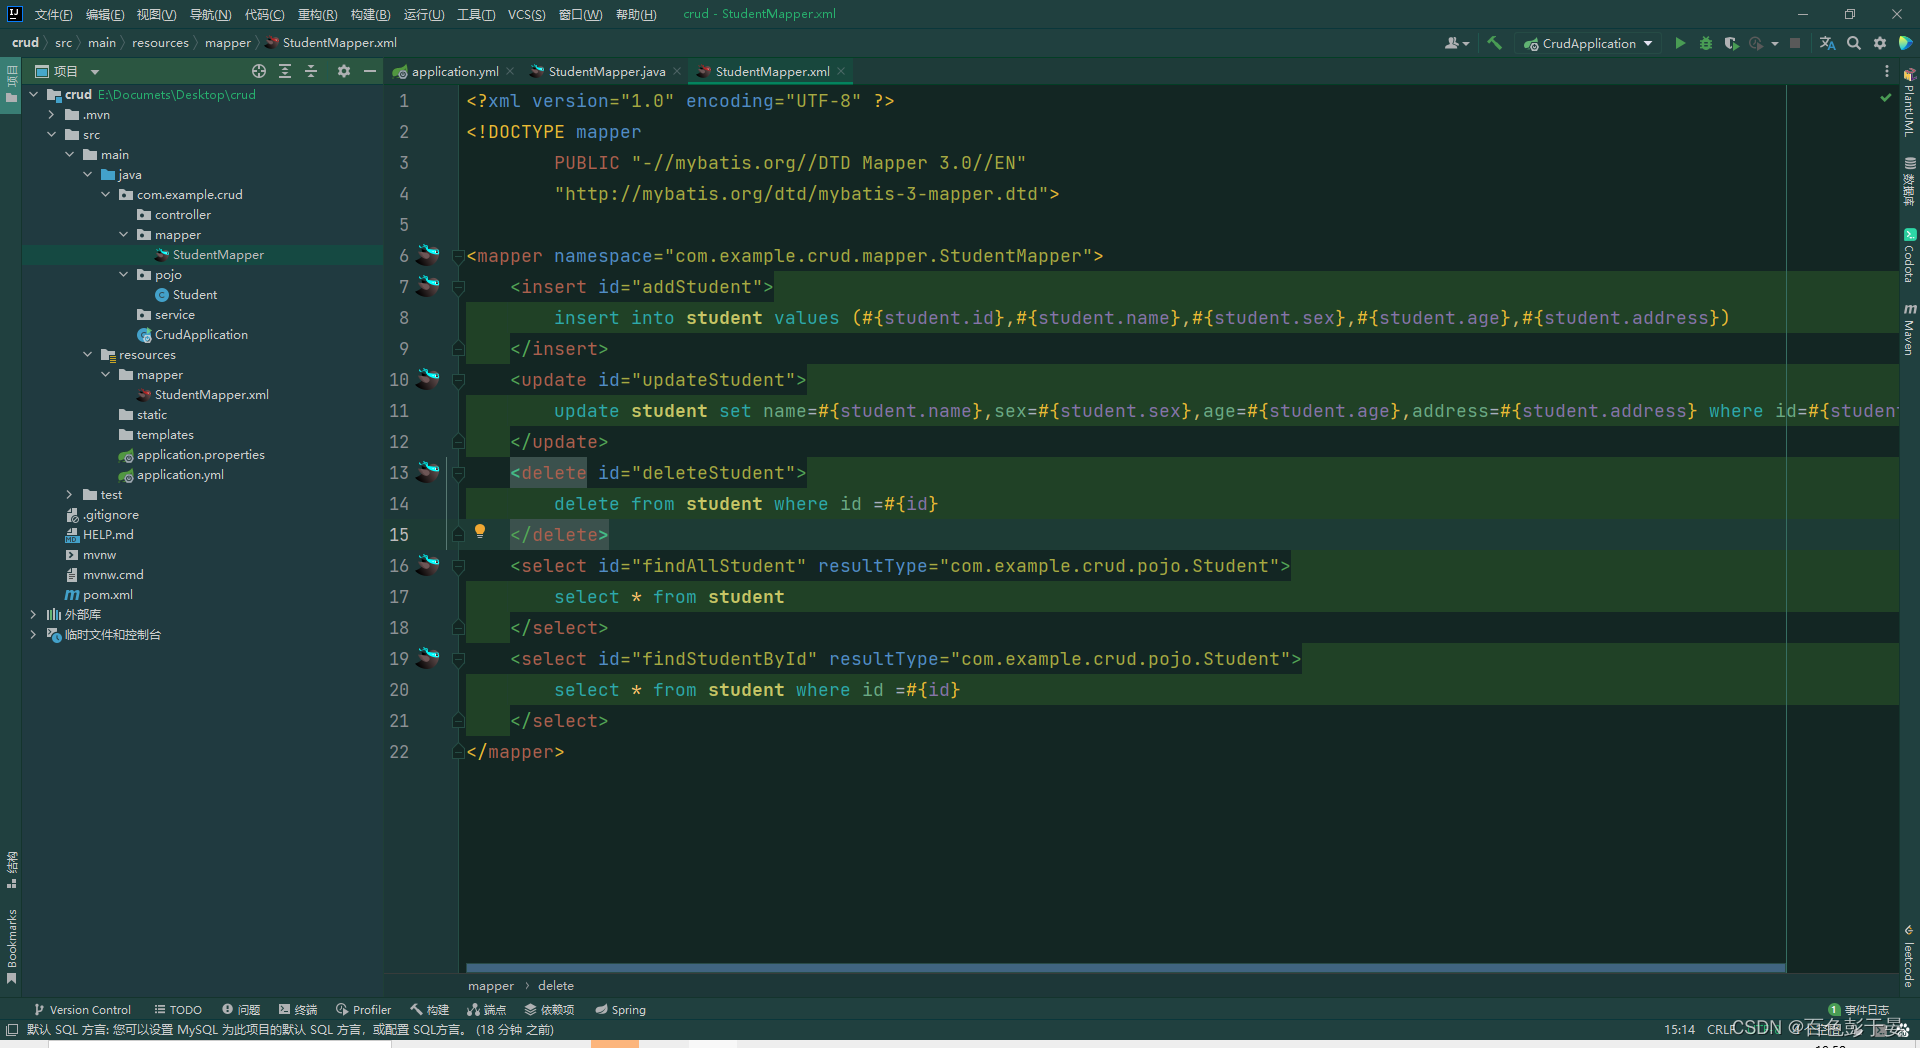
直到这里没有报错,并且有红色头绳小鸟
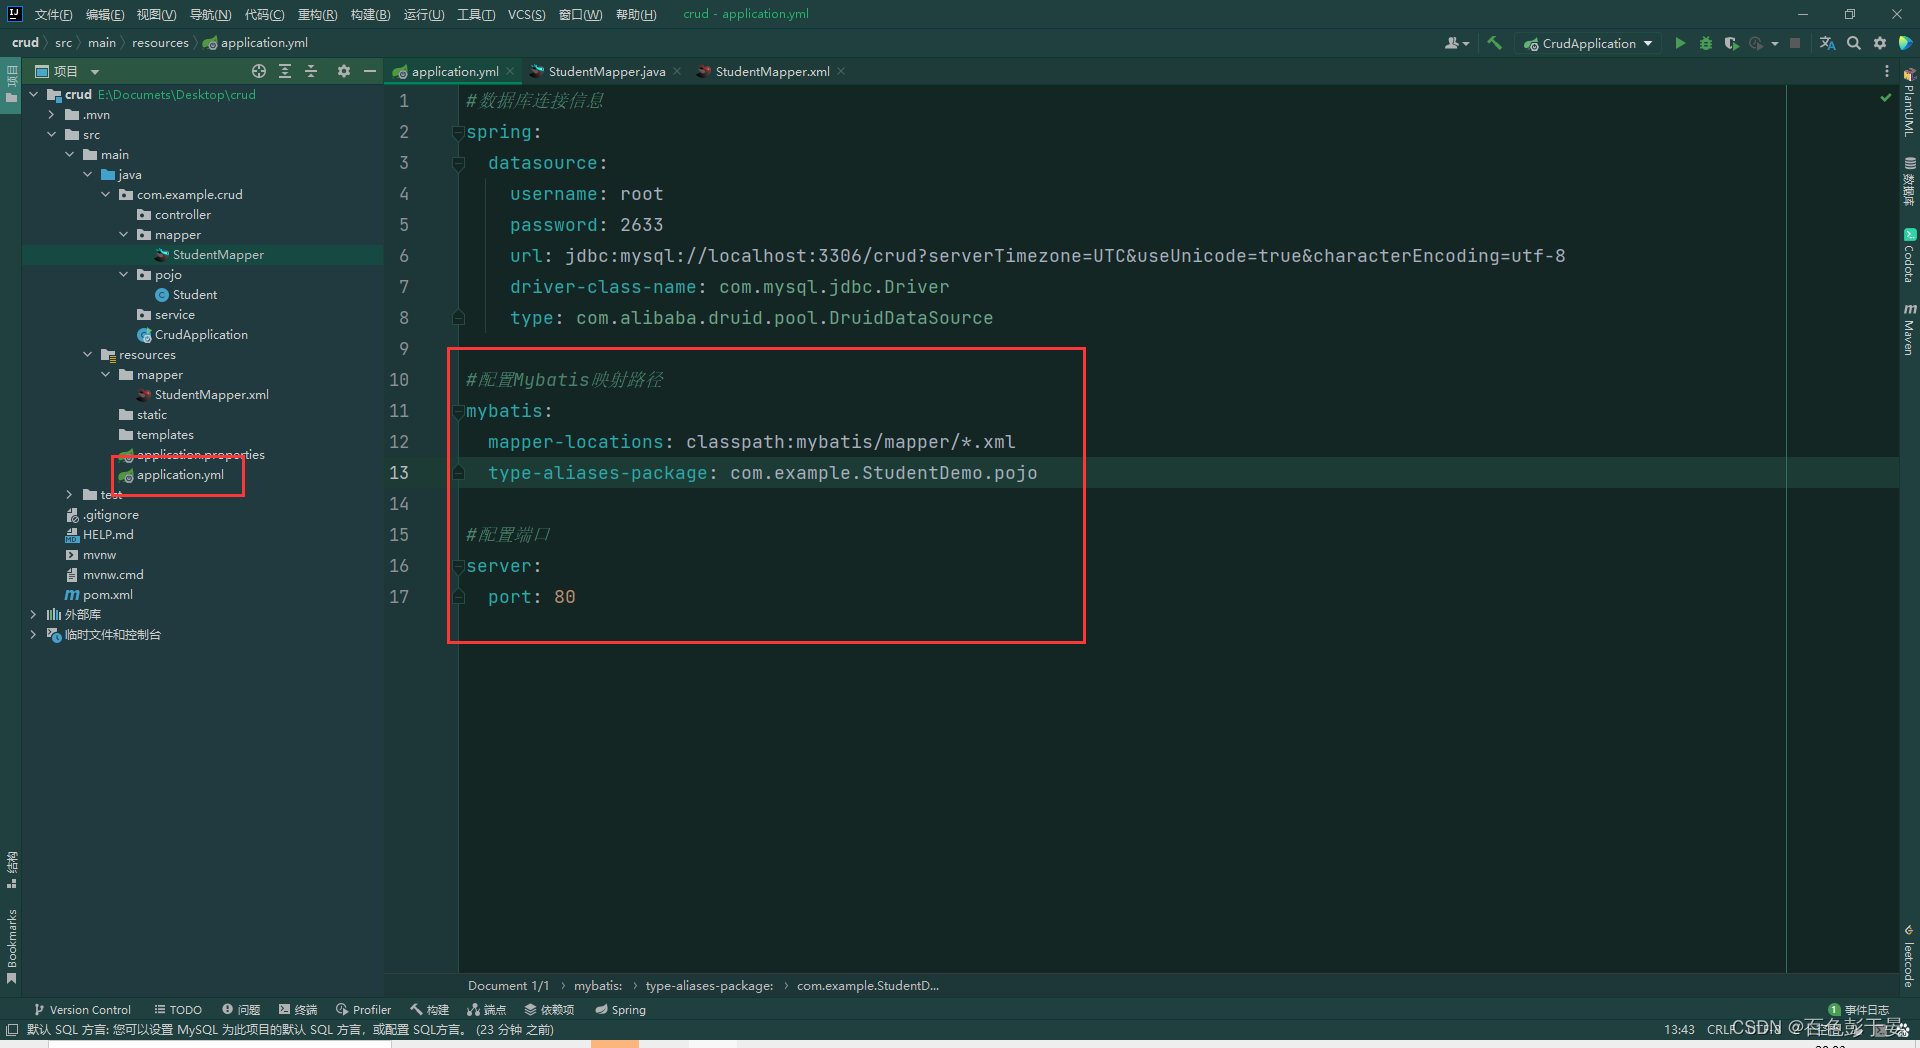
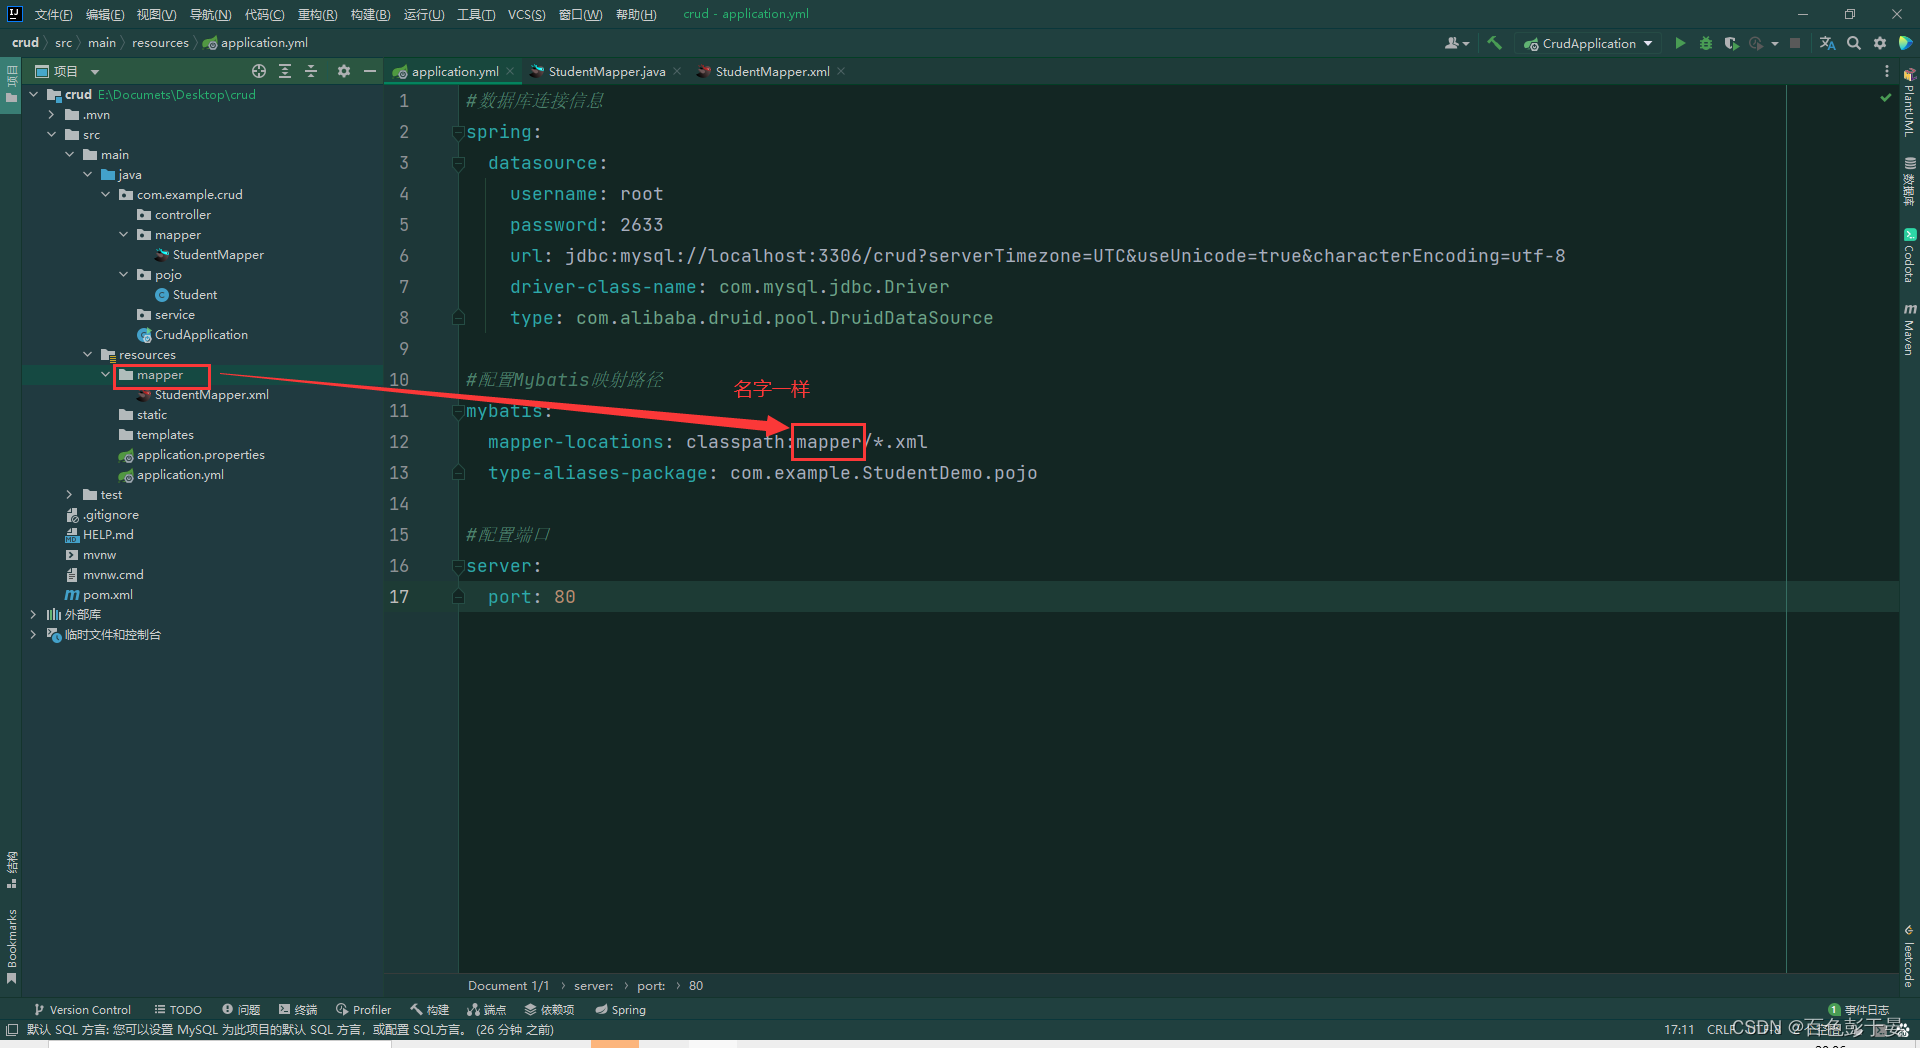
7.在application.yml文件中添加mybatis信息
#配置Mybatis映射路径
mybatis:mapper-locations: classpath:mapper/*.xmltype-aliases-package: com.example.StudentDemo.pojo
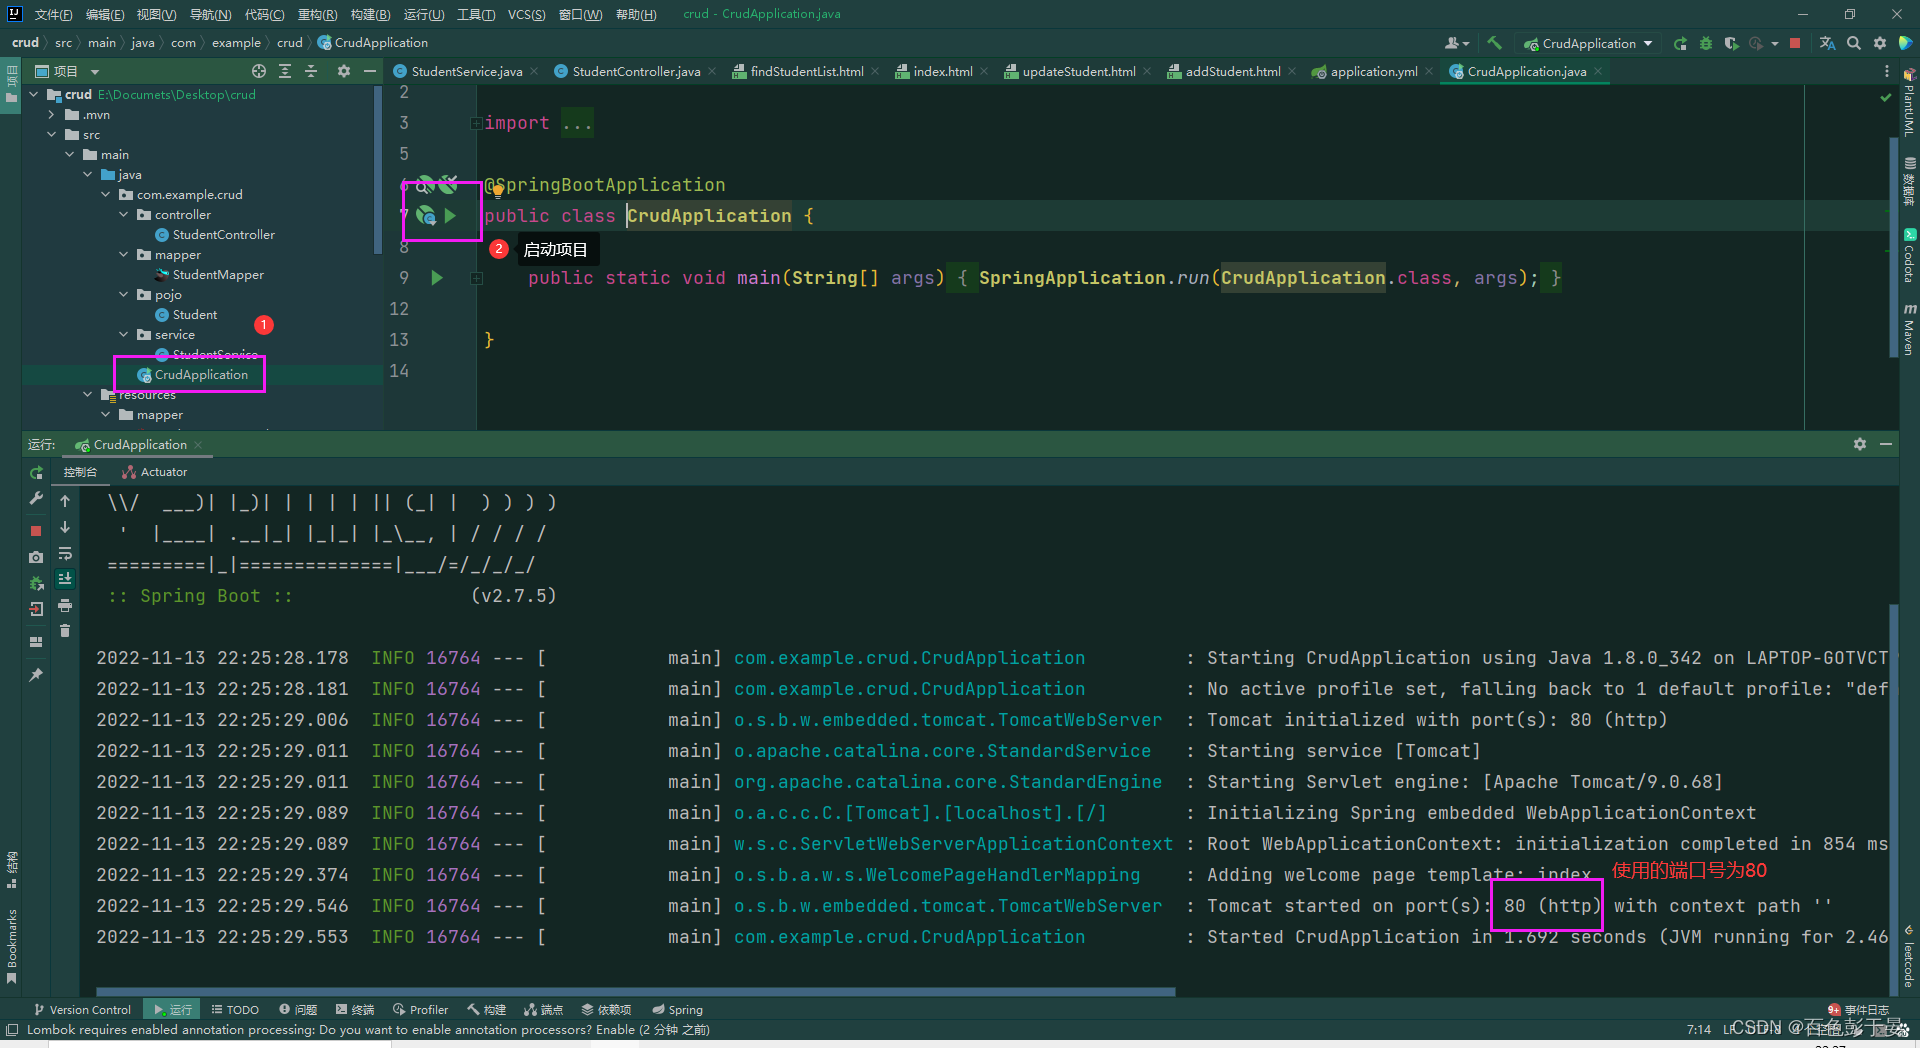
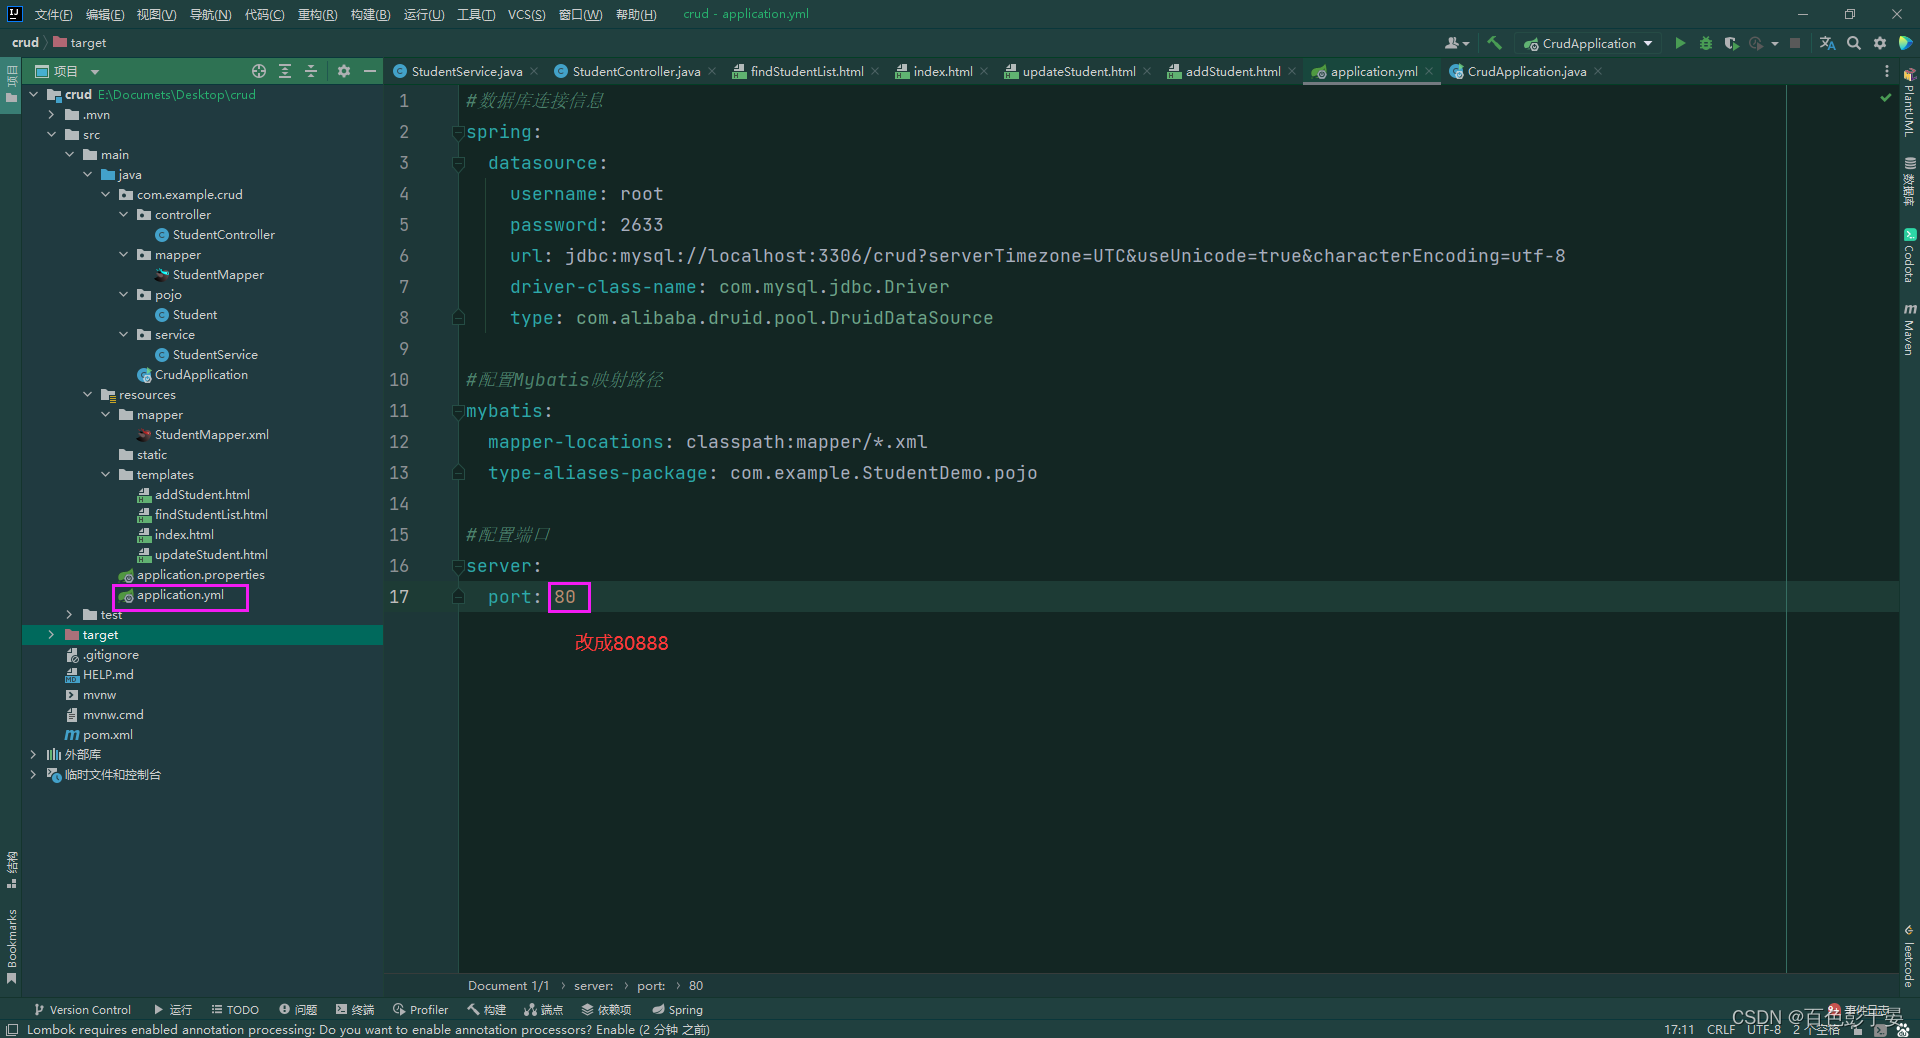
配置端口为80
#配置端口
server:port: 80
结果
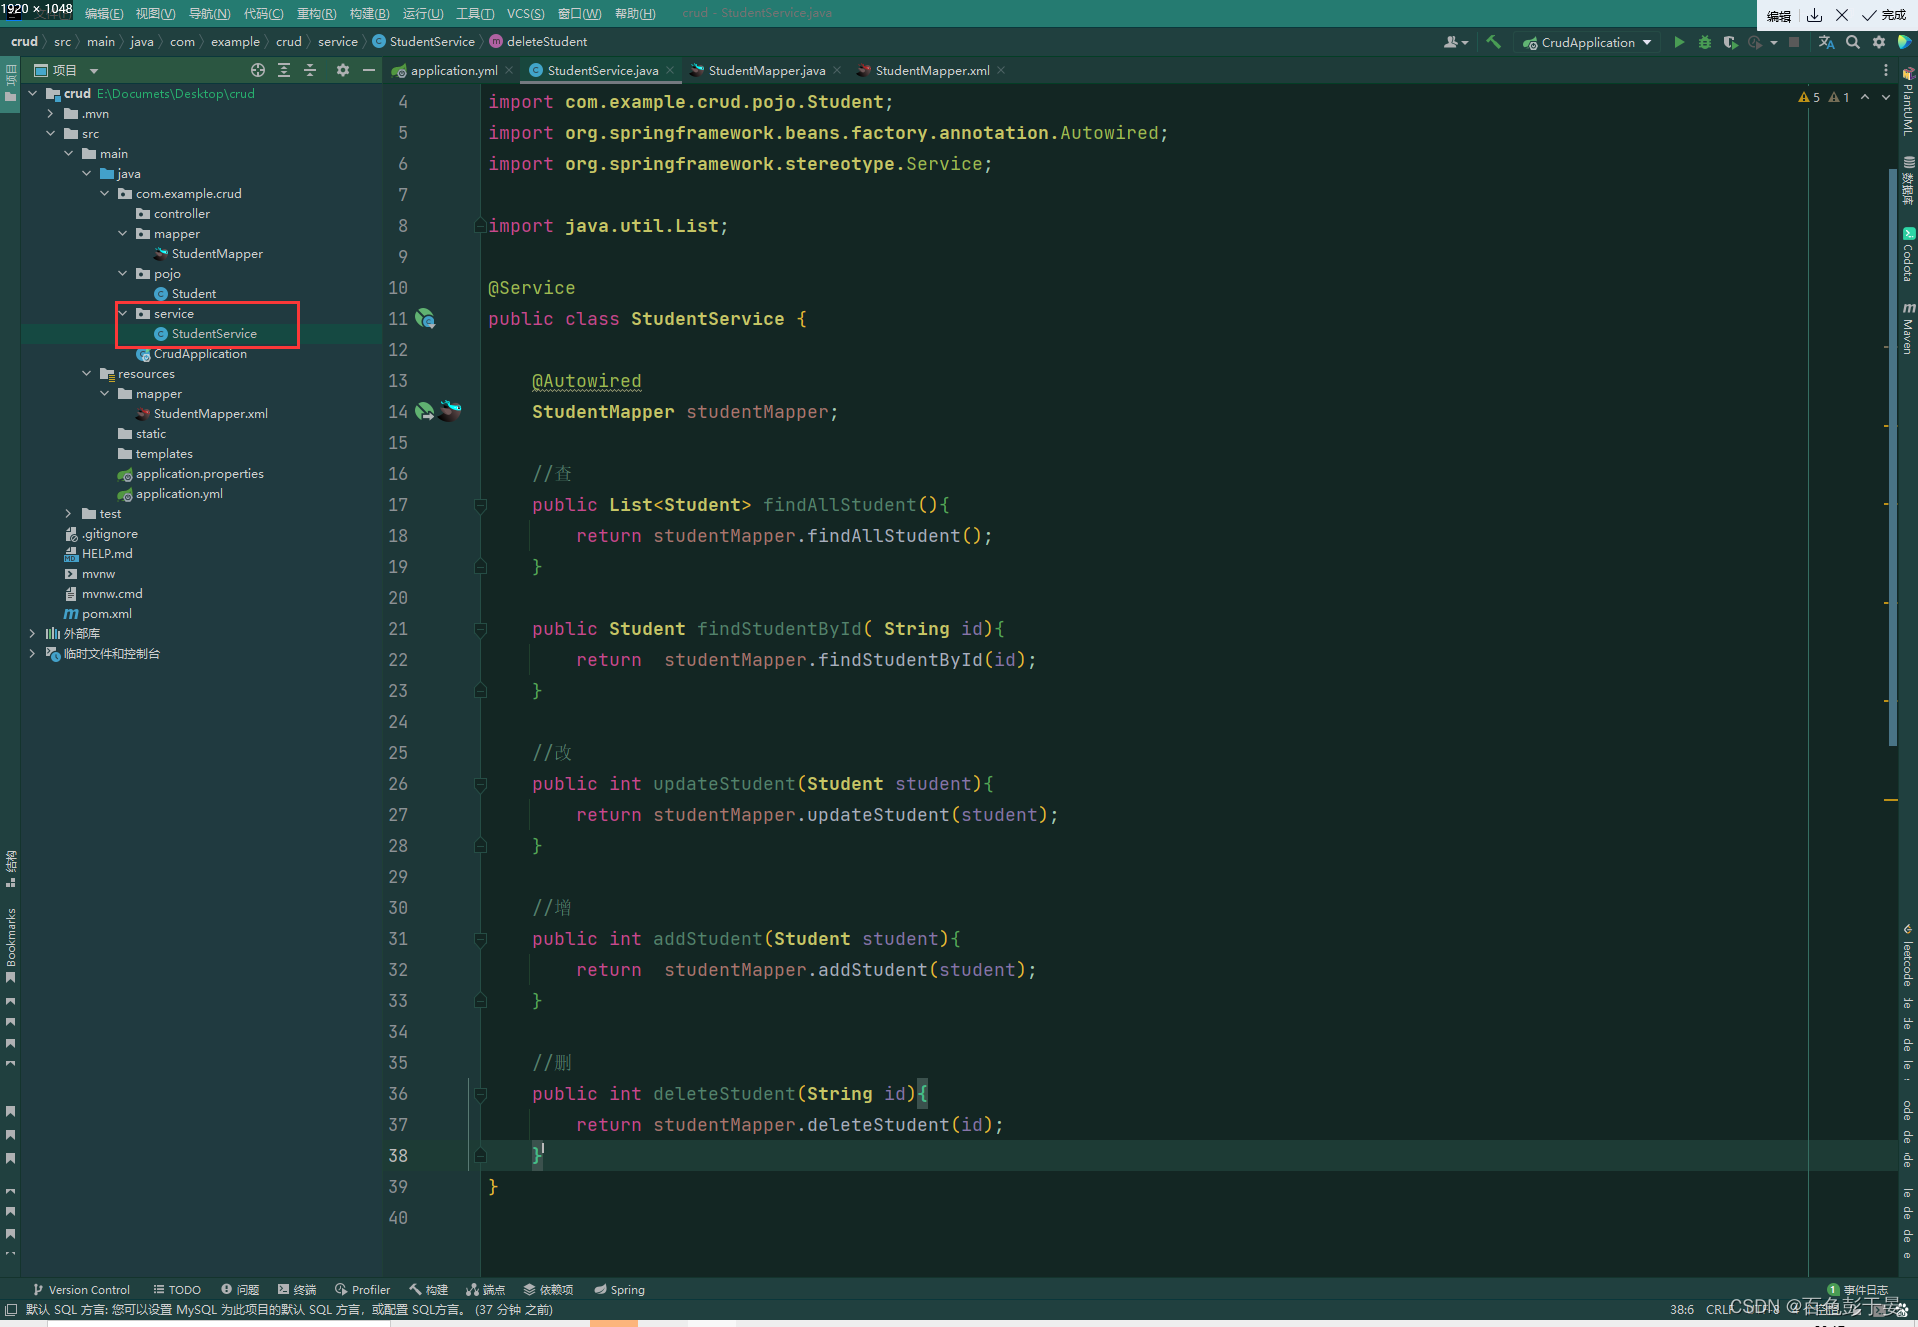
8. 编写service层
(1)在类外面添加@Service注解
(2)在类中添加
@AutowiredStudentMapper studentMapper;(3)调用studentMapper的接口方法
结果截图:
9.编写controller层和前端页面
注:到这里是我认为最难的部分,如果前面没有做单元测试的话 会有可能报错,所以单元测试很重要
(1)在controller中创建StudentController类 ,在类外面注解为@Controller
(2)在类中添加注解@Autowired 调用StudentService
StudentController代码
package com.example.crud.controller;import com.example.crud.pojo.Student;
import com.example.crud.service.StudentService;
import org.springframework.beans.factory.annotation.Autowired;
import org.springframework.stereotype.Controller;
import org.springframework.ui.Model;
import org.springframework.web.bind.annotation.GetMapping;
import org.springframework.web.bind.annotation.PathVariable;
import org.springframework.web.bind.annotation.PostMapping;import java.util.List;@Controller
public class StudentController {@AutowiredStudentService studentService;@GetMapping("/toindex")public String toindex(){return "index";}//查询所有页面@GetMapping("/findStudentList")public String findStudentList(Model model){List<Student> studentList=studentService.findAllStudent();//传进去的是一个键值对model.addAttribute("studentList",studentList);//传进前端的东西//返回值==html文件名return "findStudentList";}//跳转到添加页面@GetMapping("/toaddStudent")public String toaddStudent(){//返回值为文件名return "addStudent";}//真正执行添加@PostMapping("/addStudent")public String addStudent(Student student){studentService.addStudent(student);//跳转到哪里(文件名)return "redirect:/findStudentList";}@GetMapping("/toupdateStudent/{id}")public String toupdateStudent(@PathVariable("id")String id, Model model){//先找到被修改的对象Student student=studentService.findStudentById(id);//将对象保存到model中model.addAttribute("student",student);//html文件名return "updateStudent";}@PostMapping("/updateStudent")public String updateStudent(Student student){//获取当前页面学生信息,传入按照id修改学生信息的Service,进行信息修改studentService.updateStudent(student);return "redirect:/findStudentList";}@GetMapping("/deleteStudent/{id}")public String deleteStudent(@PathVariable("id")String id){studentService.deleteStudent(id);return "redirect:/findStudentList";}
}
结果截图

(3)编写首页index.html
<!DOCTYPE html>
<html lang="zh-CN" xmlns:th="http://www.thymeleaf.org">
<head><meta charset="UTF-8"><title>Title</title>
</head>
<body>
<a th:href="@{/findStudentList}">查询信息</a>
</body>
</html>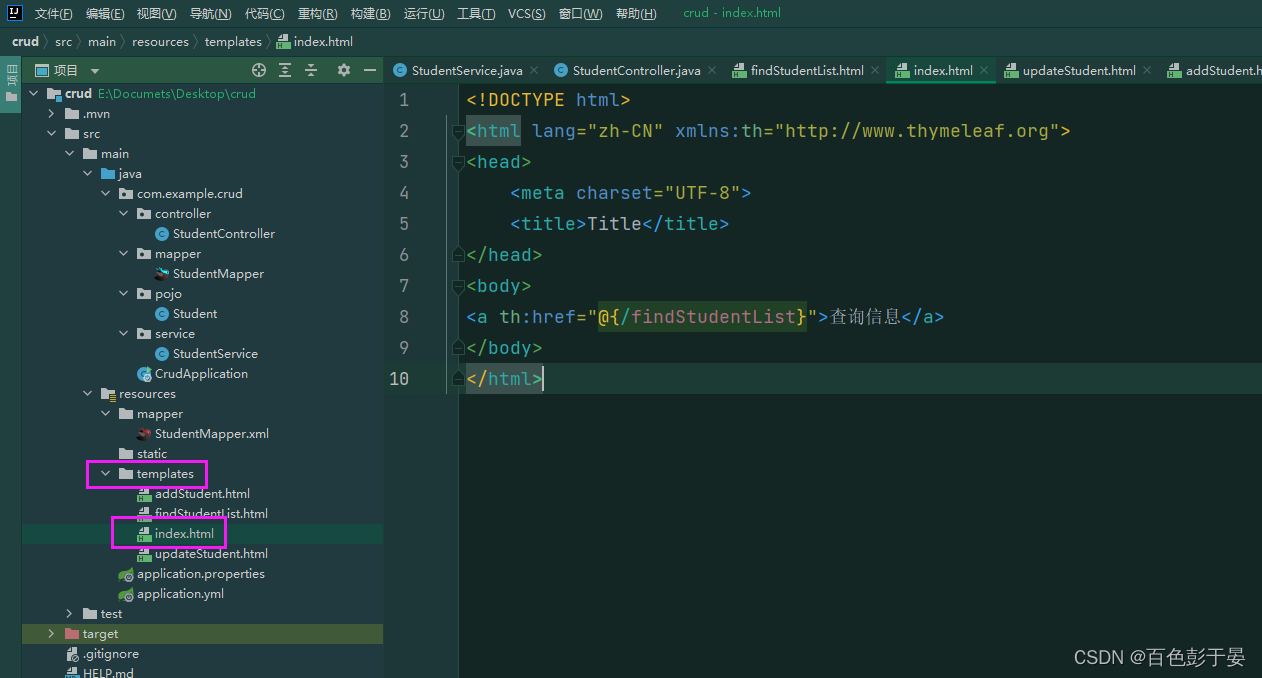
(4)编写查询所有页面 findStudentList.html
<!DOCTYPE html>
<html lang="zh-CN" xmlns:th="http://www.thymeleaf.org">
<!--/*@thymesVar id="student" type="com.example.crud.pojo.Student"*/-->
<!--/*@thymesVar id="studentList" type="com.example.crud.controller"*/-->
<head><meta charset="UTF-8"><title>查询所有</title>
</head>
<body>
<table border="1"><tr><!--列--><th>学号</th><th>名字</th><th>性别</th><th>年龄</th><th>籍贯</th><th>操作</th></tr><tr th:each="student:${studentList}"><td th:text="${student.getId}"></td><td th:text="${student.getName()}"></td><td th:text="${student.getSex()}"></td><td th:text="${student.getAge()}"></td><td th:text="${student.getAddress()}"></td><td><a  role="button" th:href="@{/toupdateStudent/${student.getId()}}">修改</a><a  role="button" th:href="@{/deleteStudent/${student.getId()}}">删除</a></td></tr>
</table>
<div ><a  role="button" th:href="@{/toaddStudent}">添加员工</a><a  role="button" th:href="@{/toindex}">返回首页</a>
</div>
</body>
</html> 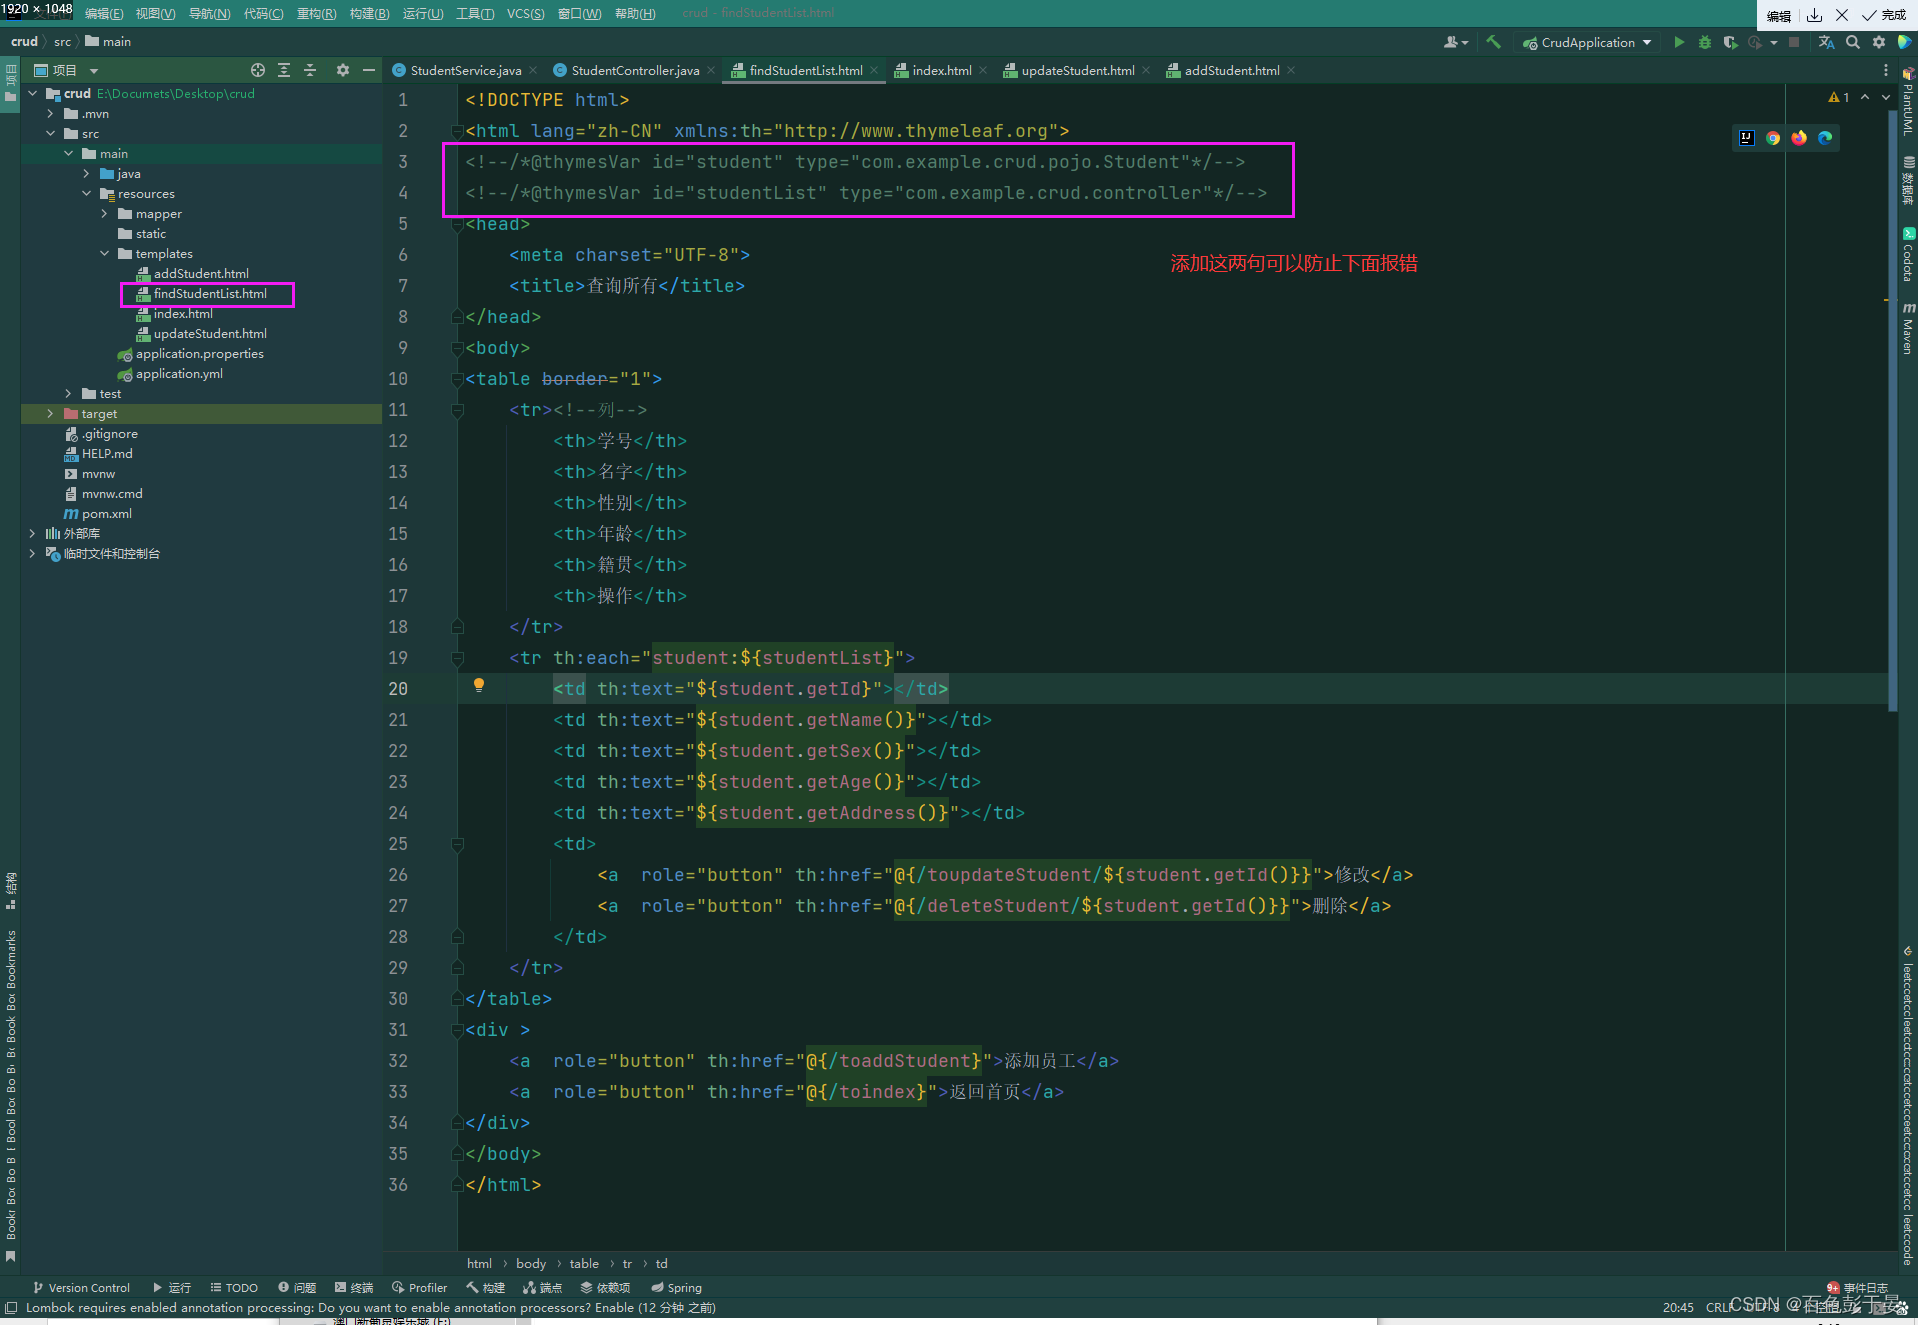
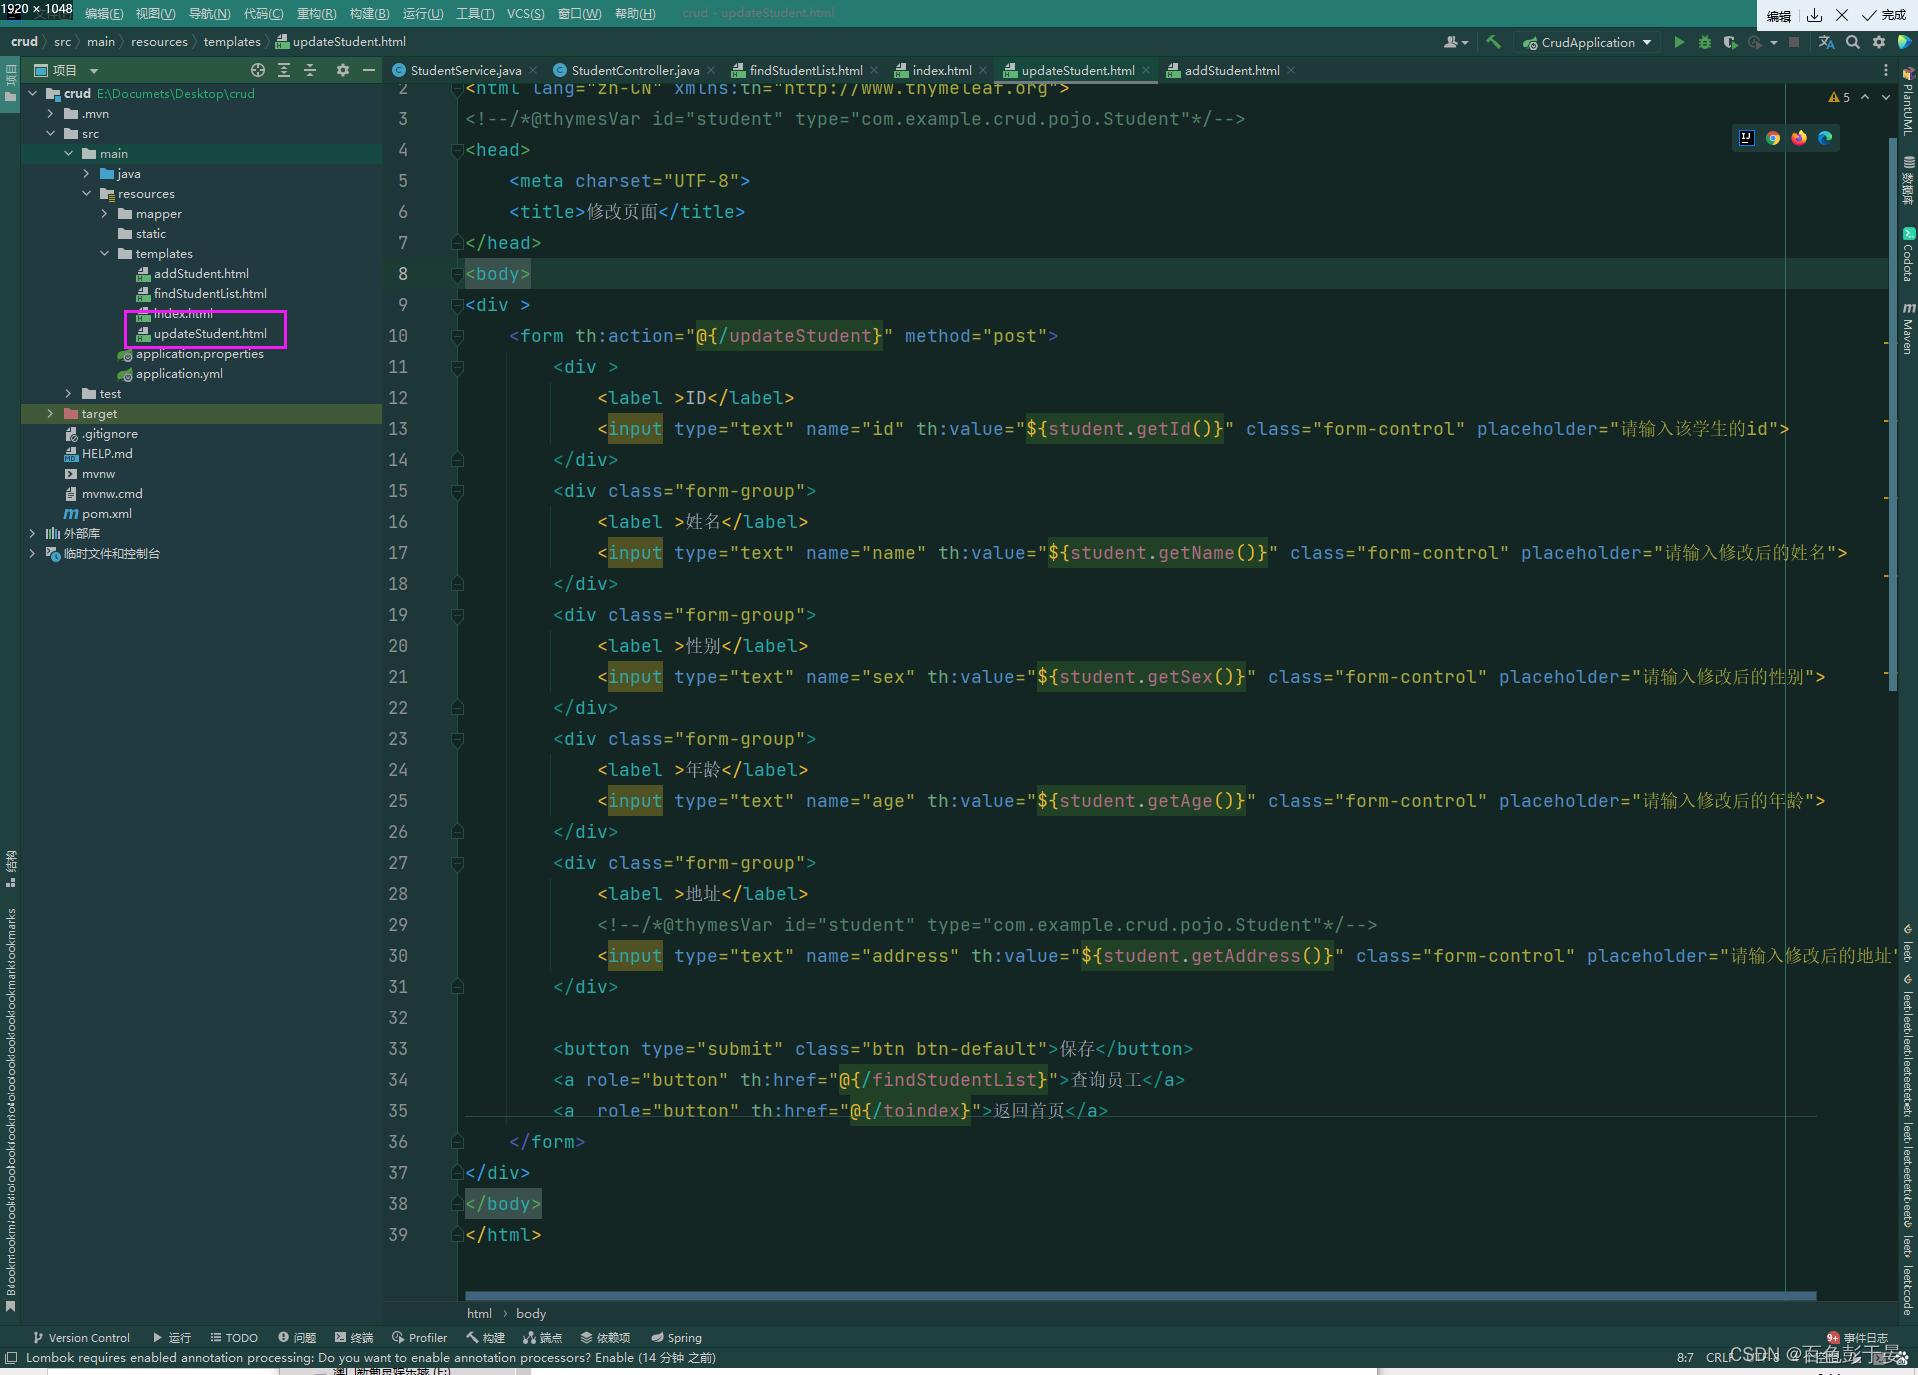
(5)编写修改页面
<!DOCTYPE html>
<html lang="zh-CN" xmlns:th="http://www.thymeleaf.org">
<!--/*@thymesVar id="student" type="com.example.crud.pojo.Student"*/-->
<head><meta charset="UTF-8"><title>修改页面</title>
</head>
<body>
<div ><form th:action="@{/updateStudent}" method="post"><div ><label >ID</label><input type="text" name="id" th:value="${student.getId()}" class="form-control" placeholder="请输入该学生的id"></div><div class="form-group"><label >姓名</label><input type="text" name="name" th:value="${student.getName()}" class="form-control" placeholder="请输入修改后的姓名"></div><div class="form-group"><label >性别</label><input type="text" name="sex" th:value="${student.getSex()}" class="form-control" placeholder="请输入修改后的性别"></div><div class="form-group"><label >年龄</label><input type="text" name="age" th:value="${student.getAge()}" class="form-control" placeholder="请输入修改后的年龄"></div><div class="form-group"><label >地址</label><!--/*@thymesVar id="student" type="com.example.crud.pojo.Student"*/--><input type="text" name="address" th:value="${student.getAddress()}" class="form-control" placeholder="请输入修改后的地址"></div><button type="submit" class="btn btn-default">保存</button><a role="button" th:href="@{/findStudentList}">查询员工</a><a  role="button" th:href="@{/toindex}">返回首页</a></form>
</div>
</body>
</html>
截图
(6) 编写添加学生信息页面
<!DOCTYPE html>
<html lang="zh-CN" xmlns:th="http://www.thymeleaf.org">
<head><meta charset="UTF-8"><title>添加页面</title></head>
<body>
<div  ><form th:action="@{/addStudent}" method="post"><div><br><label >ID</label><input  type="text" name="id"  placeholder="请输入该员工的id"></div><div><label >姓名</label><input type="text" name="name"  placeholder=""></div><div><label >性别</label><select name="sex"><option value ="">null</option><option value ="男">男</option><option value ="女">女</option></select></div><div><label >年龄</label><input type="text" name="age"  placeholder=""></div><div><label >地址</label><input  type="text" name="address"  placeholder=""></div><br><button type="submit">点击添加</button><a class="myButton" th:href="@{/findStudentList}">查询员工</a><a class="myButton" th:href="@{/toindex}">返回首页</a></form></div></body>
</html>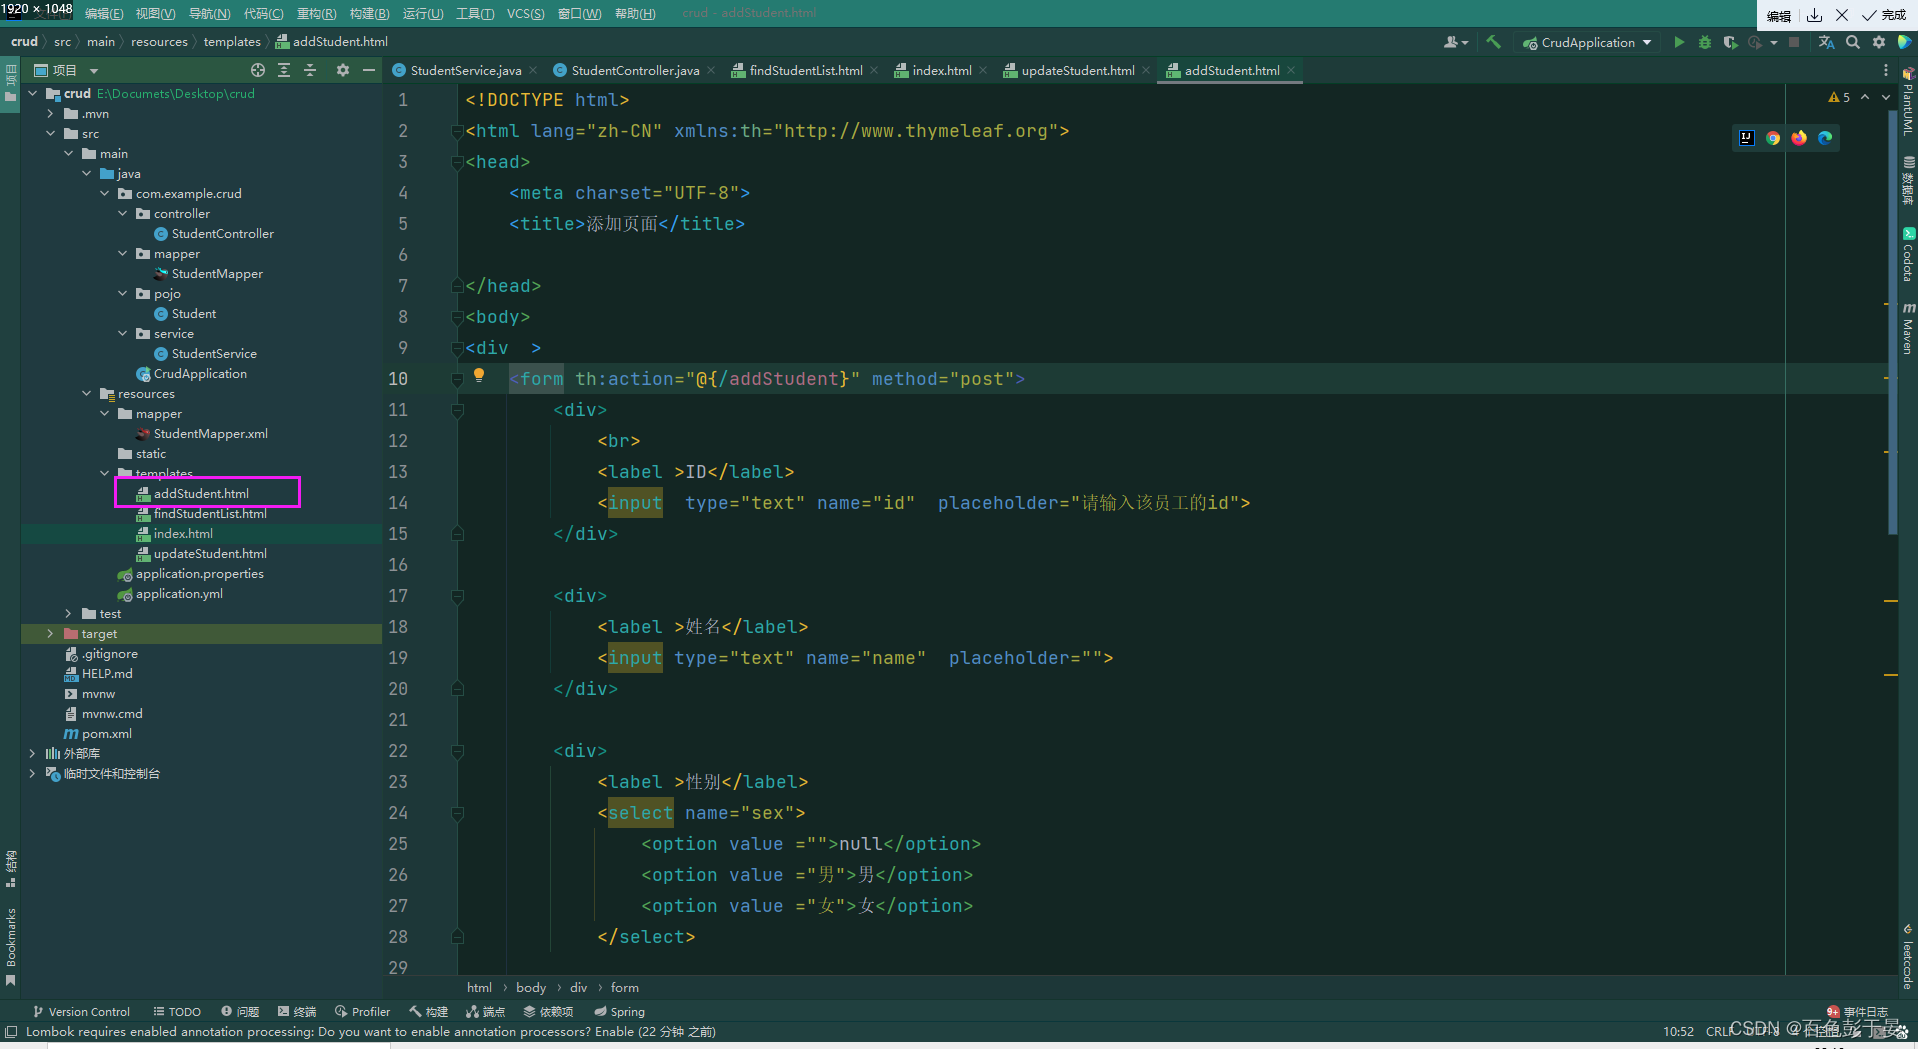
这样 整个项目就写完了
三、测试运行
成功开启服务截图:
开启服务失败截图:
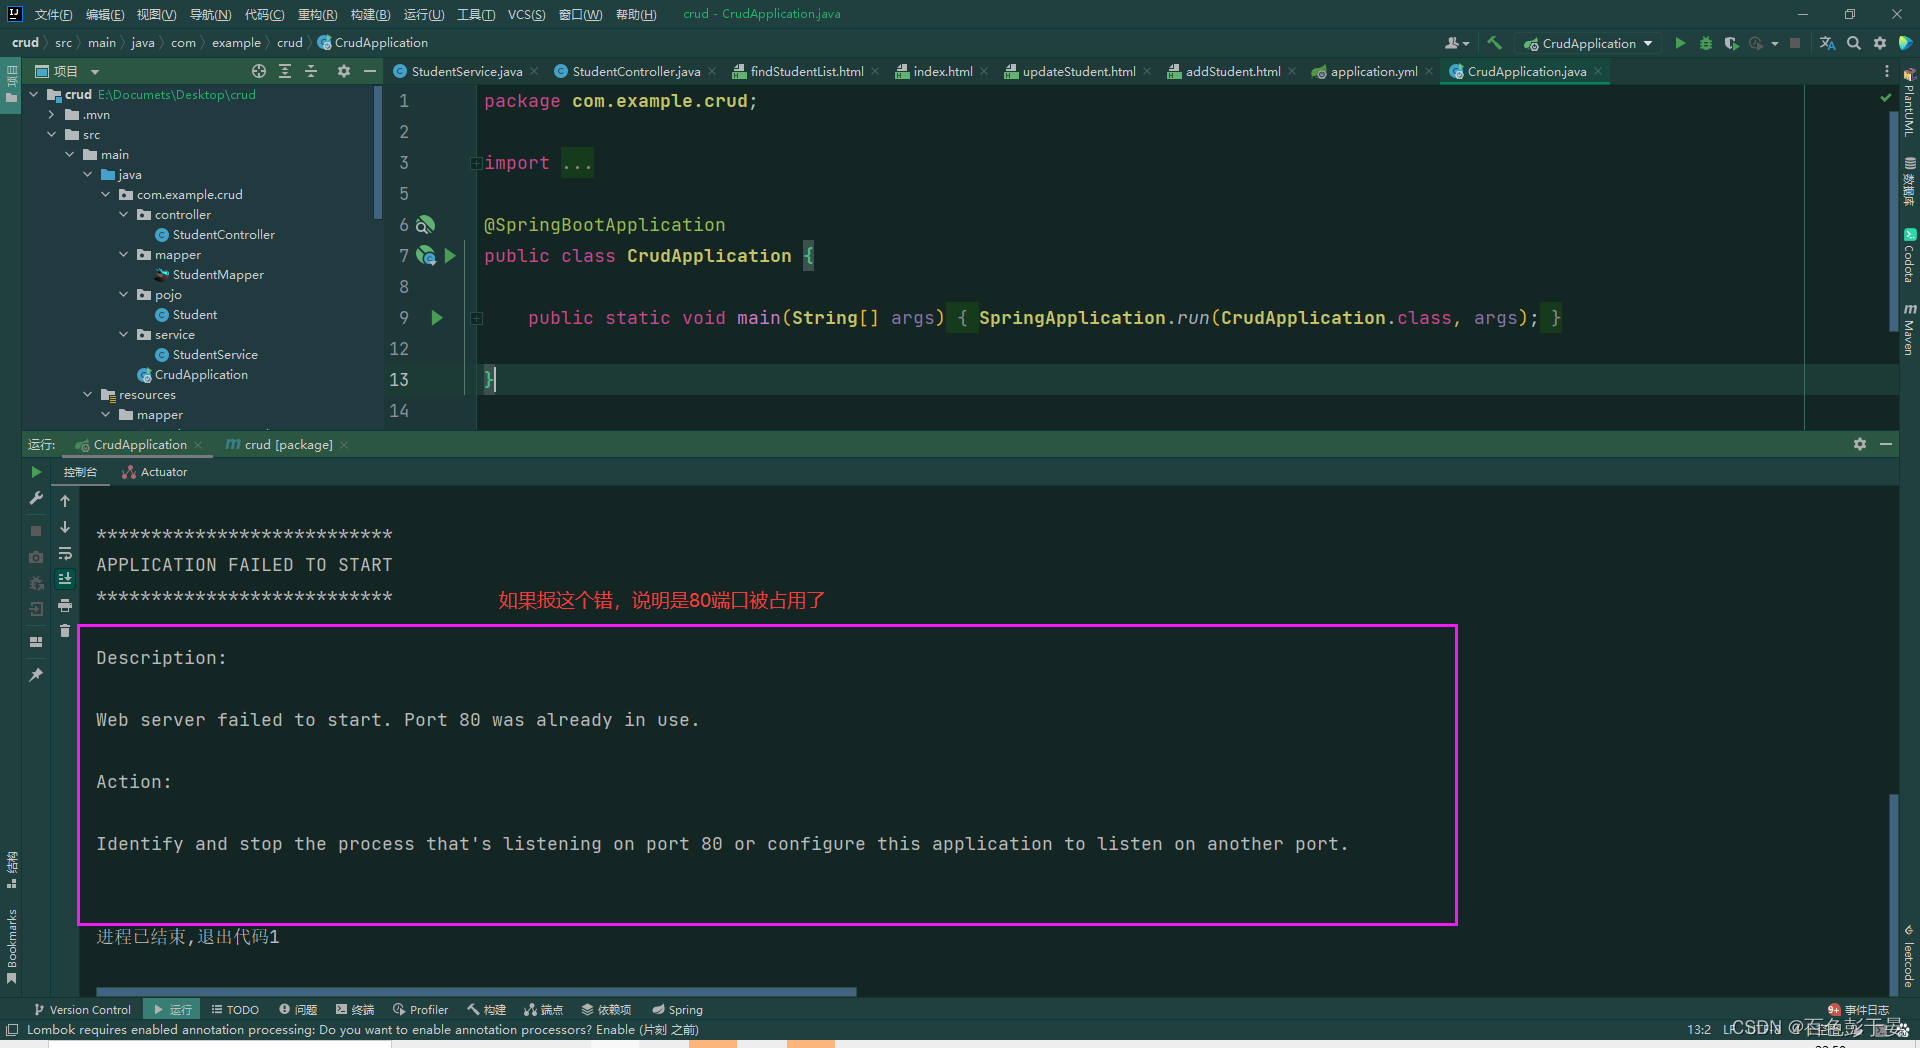
解决办法有两个:
1.修改端口号 ,在yml文件中
2. 杀死当前80端口的进程
win+r 进入命令行 输入
netstat -ano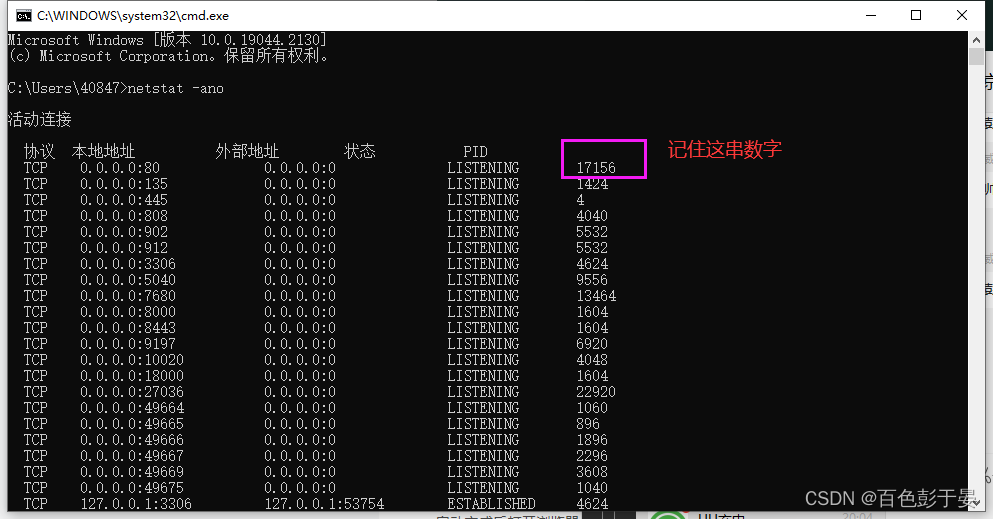
输入
taskkill /pid 17156 -f 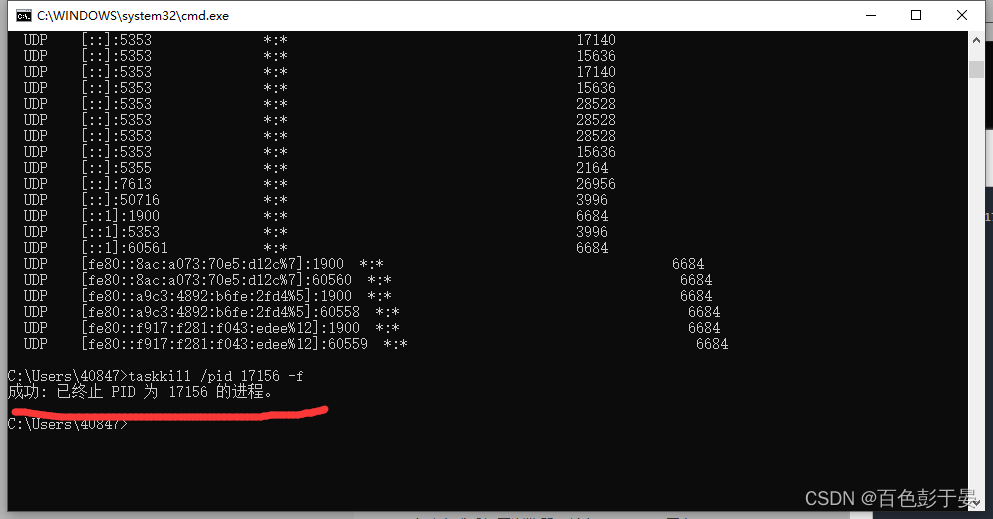
这样就可以继续启动服务了
启动完成后打开浏览器,输入 127.0.0.1 回车
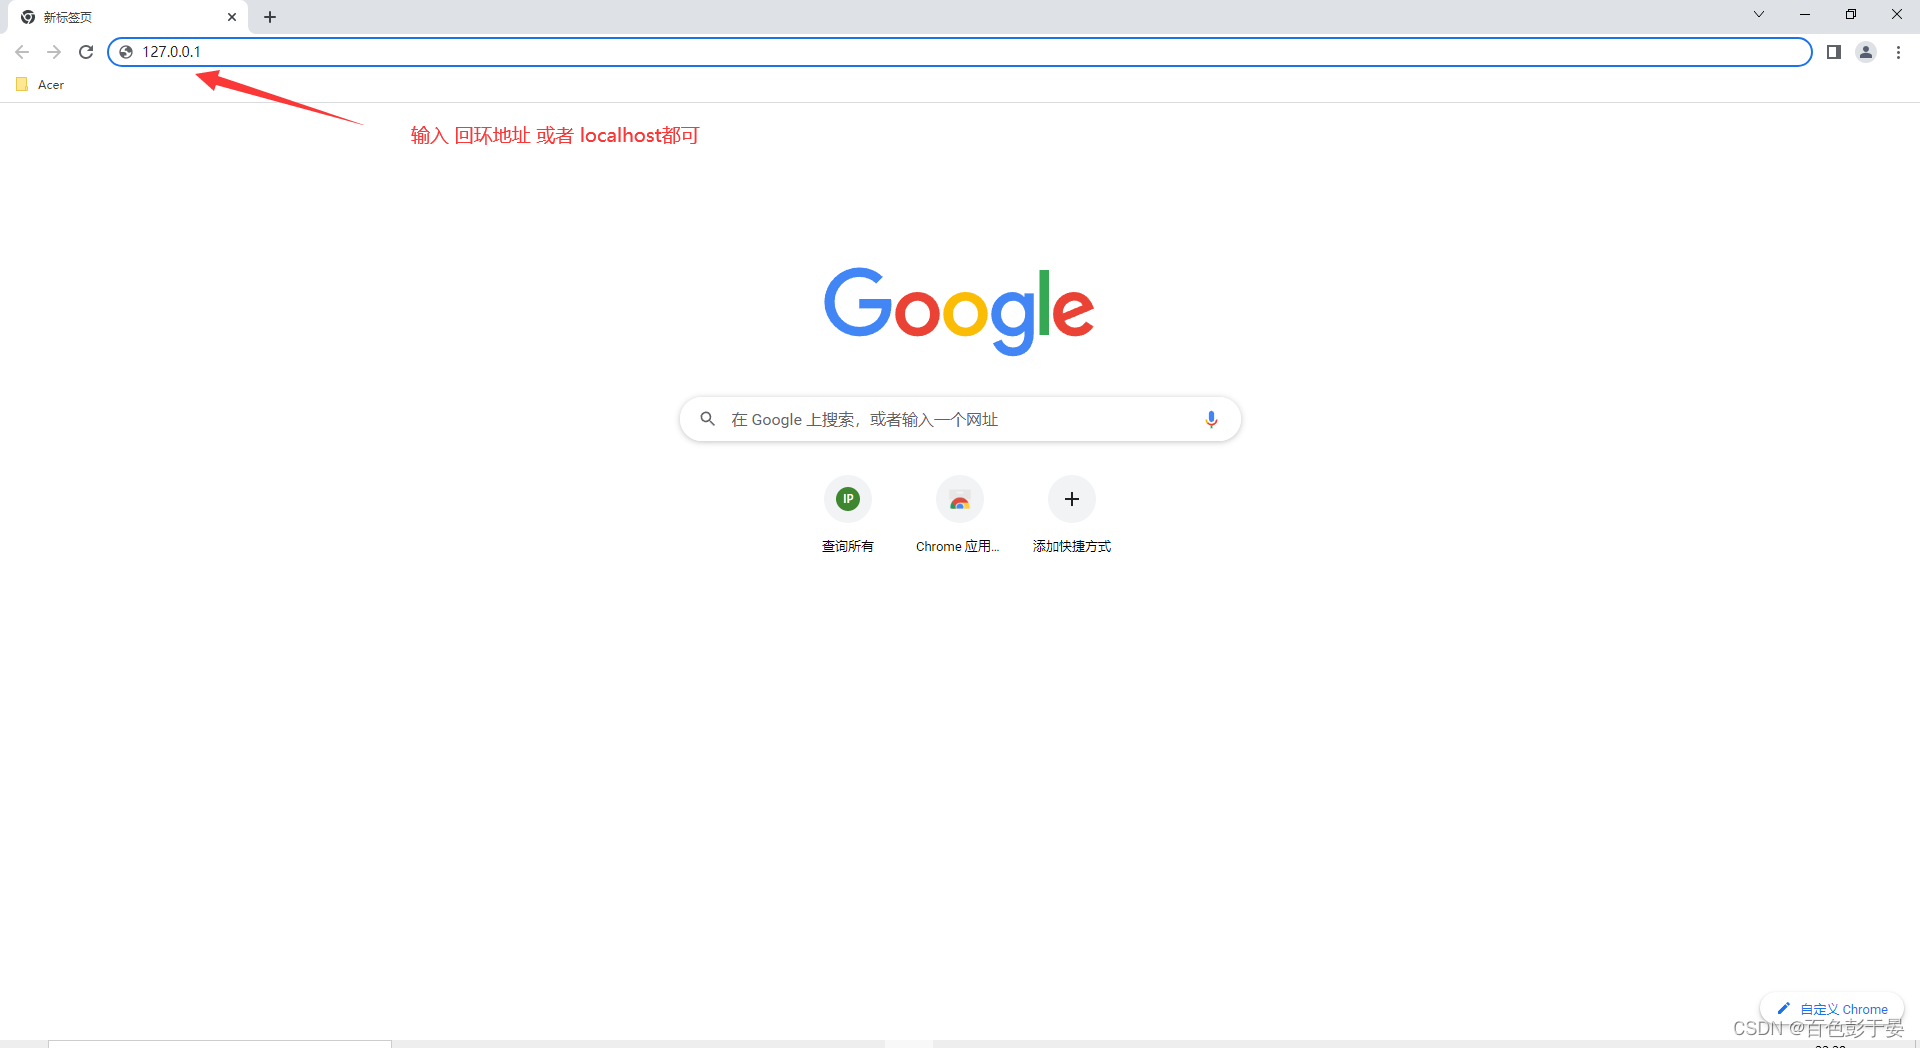
这样就访问到了 index.html页面
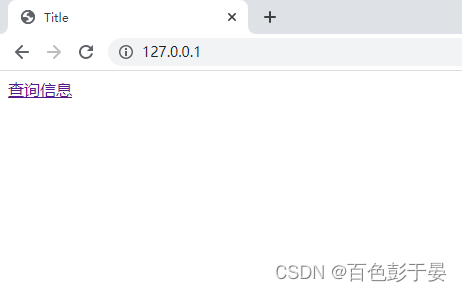
点击查询信息,就访问到了 findStudentList.html页面的内容,在页面上展示了数据库中的记录

点击修改 跳转到修改页面 updateStudent.html

点击删除 直接删除数据库中的内容
点击 添加 跳转到添加页面 addStudent.html

这样就完成了CRUD实例的编写,重点在Controller 和 交互前端交互的部分 有很多值得深究的地方,时间精力有限,不能一一解释,而且存在诸多BUG,有很多值得优化的地方,mybatis可以写的更好
1.并发控制的问题(一个线程把数据删除了,另一个线程点击了修改,这样就会报错)
2.添加一个空记录,然后把这个空记录进行删除(可以再前端页面用一个正则表达式解决)
3.添加一条重复的记录
仅记录学习。。。。。不足之处还需要大哥批评指正
项目源代码![]() http://链接:https://pan.baidu.com/s/1oXVY-eD0ypziKzPcaKGAmg?pwd=1234 提取码:1234
http://链接:https://pan.baidu.com/s/1oXVY-eD0ypziKzPcaKGAmg?pwd=1234 提取码:1234


如何取消listview的越界效果)


:Cache结构 命中与缺失 多级Cache结构 直接映射缓存)


